EZee Life Triton CH4130 User manual

Triton/Europa Lift Chair
User Manual
Triton: CH4130 – Dark Brown
CH4131 – Grey
CH4132 – Blue
Europa: CH4040 – Sandstone Bronzing
CH4041 – Blue Bronzing
EZee Life™ Products
34 Futurity Gate, Unit 15, Concord, ON L4K 1S6
…...............................................

2
INTRODUCTION:
Please read the operation manual thoroughly for the correct
usage of the chair, especially the notes on safety. Please keep this
manual available for future reference after you have read it
through.
CONTENTS:
Limited Warranty:
EZee Life™, through its authorized distributor/service
organization, warrants our Planet lift chair line to the original
consumer only, to be free from material and workmanship
problems as follows:
•Lifetime warranty on lift chair steel lift mechanism.
•Year 1 & 2 warranty on other parts and labour.
•Third year parts only warranty.
Warranty Exemptions:
•Any alterations, misuse, or abuse
•Exceeding the weight capacity (352 lb / 160 kg)
•Accidental damage
•Commercial use
•Battery leakage or spillage damage
•Improper storage or contamination damage
•Upholstery damage, other than manufacturing defect.
Warranty Information
2
Safety Information
3
Specifications
5
Assembly Instructions
6
Chair Placement
7
Product Care and Storage
8
Battery Back Up System
9
Remote Position Controller
9

3
EZee Life™, at its sole discretion, reserves the right to replace or repair
any part that has become defective.
The warranty does not extend to consequential costs resulting from the
fault or defect of the product: freight and travel costs, loss of earnings,
or other expenses that one may incur.
Warranty is valid for the original purchaser only and the original receipt
must be presented before any warranty options are considered. Please
also be prepared to provide the date of purchase and serial number.
SAFETY:
•Warning - The chair must be assembled correctly according to
the assembly instruction enclosed. The manufacturers of the
chair, their agents and distributors are not liable for any damages
caused by improper assembly of the chair.
•The chair must be placed on a flat, level floor.
•Do not use your chair in an excessively humid or dusty
environment, as it may cause electrical shock or
mechanical problems. The chair must be in a dry room.
•Do not use your chair in room temperatures higher than
40 degrees.
•Do not expose your chair to heaters, stoves or direct
sunlight to protect the upholstery.
•Do not use the chair outdoors.
•When the chair is not in use for long periods of time,
disconnect the power cord from the main supply to avoid
overheating.
•Do not rest or place any heavy object on the armrest,
footrest or back of the chair.
•Do not jump or play on the chair.
•Children must be supervised by an adult when using the
lift chair. This chair is not intended for children.
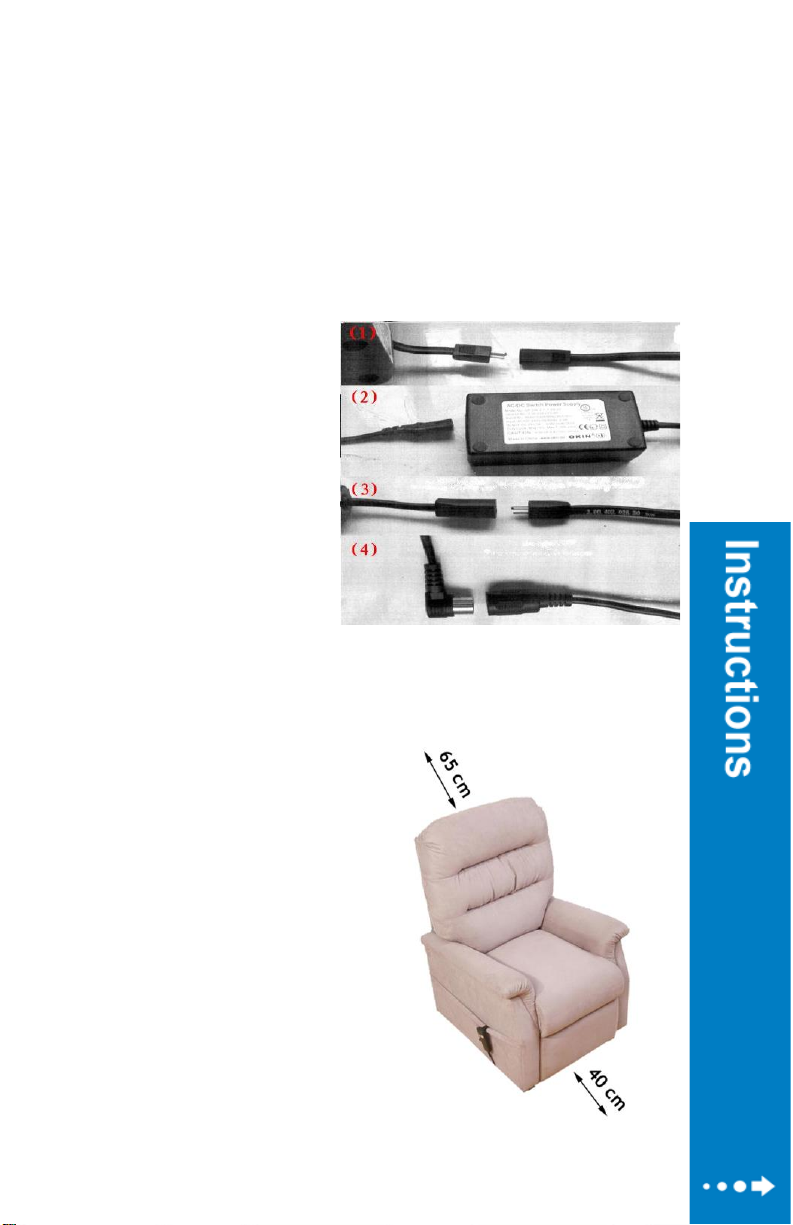
•Check that the voltage corresponds with the
specifications indicated for the chair.

4
•Electrical connection must be made in accordance with
Local regulation.
•Do not disconnect the plug from the electrical outlet roughly
or unplug by pulling on the cord.
•Do not connect or disconnect the plug from the electrical
outlet with wet hands. It may result in electrical shock or
mechanical breakdown.
•Do not place the AC/DC adaptor cord under the Chair as it
may damage the cord and result in fire or electrical shock.
•Do not let the AC/DC cord hang down from the chair.
•Do not use the Chair if the AC/DC cord or plug is damaged,
or if the electrical outlet is excessively loose. Contact a
professional for inspection.
•If necessary, the power cable may be replaced with an
identical one, but it must only be replaced by a qualified
technician.
•Do not touch the surface of the plug immediately after use,
As it can be hot.
•Do not operate the remote control with wet hands, sharp or
heavy objects.
•Avoid dropping the remote control.
•Do not step on or place heavy objects on the remote-control
wire.
•Do not put your fingers and hands in between the seat and
the footrest when the chair is reclining or when the chair is
returning back from the recline position to sitting position.
•This Chair is not for commercial or professional use.
•The manufacturers of this chair, their agents and distributors
are not liable for any damages to person(s) or property(s)
resulting from improper use of the chair.
Note: All repairs must be done by qualified technicians.
Caution: A sudden change in temperature from cold to warm can cause
condensation on electrical and mechanical parts. It is recommended
that the chair be allowed to warm up for a minimum of an hour before
using to ensure proper operation and reduce the chances of mechanical

5
breakdown.
Do not use the lift chair if any of the following events occur:
•Water is accidentally spilled on the chair. This may result in
electrical shock.
•The upholstery is torn, and the inside mechanism is exposed.
•You detect any malfunction or another abnormal condition during
operation.
Use Caution if there is a power failure. Injury may occur when power is
restored unexpectedly if the operation buttons are depressed.
Avoid using the chair during severe lightning storms.
Please switch the power OFF immediately and disconnect the AC power
cord from the electrical outlet in the event of accidental damage or
malfunction. Contact a professional for servicing.
Specifications:
Weight - The weight of the chair is 60 kgs (132 lb)
- The maximum weight capacity of the chair is 160 kgs
(352 lb)
Power Requirements - 100~240 V 50 Hz 70 W
Note motor operation: 2 minutes is available for continual use,
allow 15 to 30 seconds between cycling the motors.
Casters:
Your lift chair is supplied with four casters for easy movement of
chair and transporting of the user. Ensure the rear casters are
locked before using any of the positioning functions to prevent
movement and possible injury or damage.

6
Assembly:
The chair is packed in two pieces consisting of the back and the
base to make transport and delivery easier. Assemble the chair as
per the assembly Instructions below.
Directions:
1) Remove seat and back form packing bags.
2) Hold back and upholstery flap with both hands and line up
brackets.
3) Apply downward pressure and ensure both sides snap into
locked position.
Note: Both back receivers need to be lowered onto the to flat bars at

7
the same time and evenly to prevent binding.
Note: Do not assemble the chair if the upholstery or any of the parts
of the chairs are damaged.
Check all parts carefully before assembling the chair. If any problem
is apparent contact the vendor.
Electrical Connections:
Note: Make sure all the wires are properly connected to ensure proper
function.
(1). Connector for the motor
and wiring
(2). Connector for wiring
and adaptor
(3). Connector for adaptor
wiring and plug wiring
(4) Hand control connection
Chair Placement:
•To allow for unimpeded
Reclining, make sure there is
a minimum of 65 cm
behind the chair.
•Ensure there is at least
40cm in front of the chair
To allow the footrest to
rise.
•Place the chair on a flat
surface/floor in a dry

8
room.
Caution:
Make sure there is no obstruction behind or in front of the chair
for a safe recline and lift during operation.
The area between the seat and the footrest should be kept clear
to avoid pinching hazard while the chair is operating.
Product Care & Storage:
1. Storage
a. Wipe the dust and dirt off. Keep the chair clean and away
from places of high humidity
b. If the chair is not in use for a long period of time, cover it
with a piece of clean cloth to protect it from dust and store
in a dry room.
c. Do not store the chair under direct sunlight or in places of
high temperatures. This may result in the fading of fabric
colour.
2. Maintenance
a. Before cleaning, ensure that the Main Power Switch is turned
off and AC plug is removed for the electrical outlet.
b. Do Not use wet towels to clean chairs with leatherette
upholstery (PU) unless it is our incontinent leatherette.
Leather cleaning agents are allowed.
3. Main Body
•Very mild soap can be used to clean the plastic, piping and
upholstery of the chairs. Carefully wipe away all traces of the
soap with dry cloth.
•To spot clean the upholstery, dip a piece of soft cloth into some

9
warm soapy water, wring the cloth to remove excess water and
apply it to the spot.
•Do not use cleaning agents like benzene or thinner, or any
other cleaners which may result in fading of fabric color and
scratching of upholstery.
•Do not remove the upholstery for washing. Ironing of
upholstery is strictly prohibited
4. Remote Position Control:
•Use only a dry cloth for cleaning of the unit. Excess
moisture may damage the controller.
Battery Back Up System:
These chairs are supplied with a battery back-up system to allow
exiting the chair during a power failure.
Two 9-volt batteries are required and not supplied with the chair.
In the event of a power failure the chair will automatically switch
over to battery power but only run for one cycle before the
batteries are discharged. It is recommended that the batteries
are replaced after each emergency use.

10
Lift Chair Operation
The Europa and Triton lift chairs feature adjustable lumbar
support, adjustable headrest, lift, recline, and tilt features
controlled by two controller hand pendants.
Lift & Tilt Controller
Lumbar & Headrest Controller

11
Cautions:
•If the chair doesn’t work properly, please contact the supplier.
•Only trained technicians should attempt repairs.
•There are no user serviceable parts inside.
Date of Purchase: ___________________________________
Dealer Name: _______________________________________
Dealer Location: _____________________________________
Chair Serial Number: _________________________________
Imported & Distributed by:
HPU Medical Wholesale
34 Futurity Gate, Unit 15
Vaughan, Ontario
L4K 1S6
This manual suits for next models
4
Table of contents
Other EZee Life Indoor Furnishing manuals
Popular Indoor Furnishing manuals by other brands

KMART
KMART 42987574 Assembly instruction

LumiSource
LumiSource Home Safety Product owner's manual

USP
USP DURAMAX 68062 Assembly instructions

Kaboodle
Kaboodle W-51603 Assembly instructions

deVRIES
deVRIES TRENDY Milage Set 40480 Assembly instructions

Salamander Designs
Salamander Designs SDAV2 7224 Assembly instructions