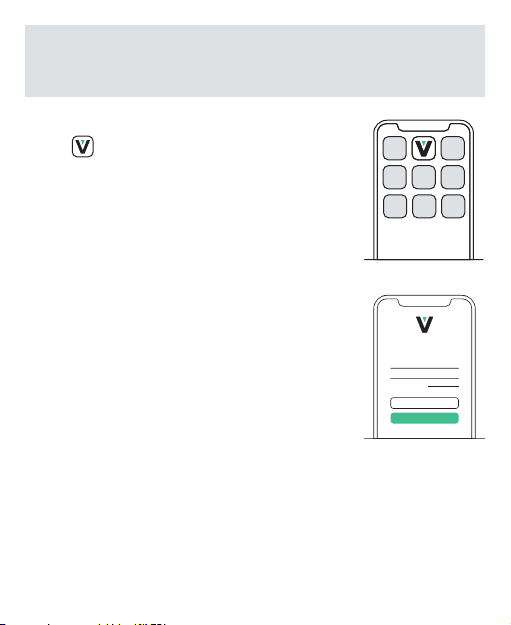
eZLO VistaCam 1203 User manual

VistaCam 1203
Video Doorbell
Quick Start Guide


Congratulations on
choosing the VistaCam 1203
You’ve taken the next step toward mak-
ing your home safer and your
life easier.
It’s easy to set up your camera.
Here’s what you need to do.

If you haven’t already set up your Vera or Ezlo controller, please
do that first. There are instructions on how to do so accompany-
ing the controller.

Install your app
VistaCam 1203 runs on Ezlo’s Vera app. Just look
for the in the iOS App Store or on Google
Play. If you already have the Vera app, just log in.
Open the Ezlo’s Vera app and please sign up for a
Vera account, or sign in if you have one already.
The app will take you step by step through the
process, giving you the option to choose between
Wired Set Up and Wireless Set Up.
Forgot password
Password
Username
Login
Newt oV era?

What’s in the Box
1 x Video
Doorbell
1 x 5° Vertical
angle bracket
1 x Thick
mounting
bracket
2 x Wire
Extenders
2 x Wire Nuts
1 x 15° Horizontal
angle bracket
3 Sets - Expansion
Screws
Option A, E 22mm (0.87’’)
Option B, C 35mm (1.38’’)
Option D 45mm(1.77’’)
1 x Type-c cable
1 x Drill Hole
Position
Template
1 x Silicone Plug Quick Start
Guide
1 x Mounting
bracket
1 x Dual-purpose screwdriver
1 x Power Kit

Physical Description
Camera
Type-C Port
Reset
Mounting slots
Micro SD Card Slot
Power Input Port
Front Panel
Boom Panel
Rear Panel
Light sensor
Microphone
Doorbell buon
Speaker
Security screw
hole
Type-C Port

Note: The output of any
newly installed wiring
should be between 8-24
VAC .
Before doing anything else, shut o the breaker that controls the
doorbell’s circuit.
If you have a mechanical chime installed in your home, install the
power kit and doorbell.
If you have an electronic chime installed in your home, refer to its
own manual to install the power kit, and install the doorbell.
If your home does not currently have chimes, please consult a
local installer or contractor for assistance.

Install the power kit
1 Insert one end of the wire har-
ness into the power kit
2 Remove the cover from your
mechanical chime.
3 Remove the existing chime
wires in the terminals named
TRANS and FRONT.

Install the power kit
4 Connect the wire harness to
the chime’s terminals named
TRANS and FRONT.
5 Insert the existing chime wire
and the other end of the wire
harness into the wire connector
and twist it tightly. Repeat this
step with the other chime wire.
Wiring overview
Wire
Connector
Chime Wire
Chime Wire
Chime Wire
Wire Harness

Install the power kit
6 Mount the power kit to the side
of the chime.
7 Put back the chime cover.

Install the doorbell
1 Ensure the electricity at the
breaker that controls the door-
bell’s circuit is still o.
2 Place the mounting bracket
where you want to mount the
doorbell. A good location is at
least 59 inches (1.5m) high from
the ground. Then, holding the
bracket in place, drill holes in the
two designated areas on the
bracket (at top and boom).
Mounting bracket
3 Drill holes according to drill
points and insert anchors.

Install the doorbell
4 Fix the mounting plate to the wall.
Option A
Option D Option E
Option B Option C
Mounting Screws
22mm (0.87’’)
Mounting Screws
45mm(1.77’’)
Mounting Screws
22mm(0.87’’)
Mounting Screws
35mm (1.38’’)
Mounting Screws
35mm (1.38’’)

Install the doorbell
5 Connect the doorbell with your existing doorbell wires.
Please note that it is forbidden to connect the doorbell to AC
and Type-C power supply at the same time.
Type-C Port

Install the doorbell
6 Hook the doorbell on top of the
mounting bracket and then snap
the doorbell boom to the
bracket. You may hear a “click”
sound.
8 Restore the electricity at the
breaker.
7 Use the included screwdriver to
tighten the anti-theft screw.
Type-C Port

Doorbell Setup
9 In the Vera app, navigate to the Devices screen and tap + in the top
right corner.
Select doorbells and look for the VistaCam 1203.
Follow the prompts to finalize the setup.
If you want to change your doorbell’s Wi-Fi, press and hold the reset
buon for 5s and repeat the device adding process.
Reset
Type-C Port

Camera model VistaCam 1203 is designed for indoor use.
FCC Information
This device complies with Part 15 of the FCC Rules. Operation is subject to the
following two conditions:
(1) This device may not cause harmful interference, and
(2) This device must accept any interference received, including interference that
may cause undesired operation.
Note: This product has been tested and found to comply with the limits for a Class
B digital device, pursuant to Part 15 of the FCC Rules. These limits are designed to
provide reasonable protection against harmful interference in a residential instal-
lation. This product generates, uses, and can radiate radio frequency energy and,
if not installed and used in accordance with the instructions, may cause harmful
interference to radio communications. However, there is no guarantee that inter-
ference will not occur in a particular installation. If this product does cause harmful
interference to radio or television reception, which can be determined by turning
the equipment o and on, the user is encouraged to try to correct the interference
by one or more of the following measures:
—Reorient or relocate the receiving antenna.
—Increase the separation between the equipment and receiver.
—Connect the equipment into an outlet on a circuit dierent from that to which
the receiver is connected.
—Consult the dealer or an experienced radio/TV technician for help. Please take
aention that changes or modification not expressly approved by the party re-
sponsible for compliance could void the user’s authority to operate the equipment.
This equipment should be installed and operated with a minimum distance 20cm
between the radiator and your body.
CAUTION: RISK OF EXPLOSION IF BATTERY IS REPLACED BY AN INCORRECT
TYPE. DISPOSE OF USED BATTERIES ACCORDING TO THE INSTRUCTIONS.
BATTERY IS NOT USER REPLACEABLE.

Your doorbell is now set up!
You can now talk to people at your door
through the Vera app and ensure greater
security for your home.


You’re now ready to enjoy
smarter home control.
© Ezlo Innovation 2021
Table of contents
Other eZLO Accessories manuals