manuals.online logo
Brands
  1. Home
  2. •
  3. Brands
  4. •
  5. EZM
  6. •
  7. Test Equipment
  8. •
  9. EZM MK-328 TR/LCR/ESR User manual

EZM MK-328 TR/LCR/ESR User manual

1
MK-328 TR\LCR\ESR
Transistor \LCR\ESR Tester User Guide
EZM ELECTRONICS STUDIO
2
1.troduction
This meter is an intelligent semiconductor device analyzer, it can measure most of the diodes, bipolar
transistors, Junction/MOS FETs and low power thyristors. It automatically identifies the type of devices and
pinouts, measures the current gain HFE, gate theshhold and FET junction capacitance, a typical application is to
pair two transistors or identify an unknown SMD device. The test clips can be connected any way round, the
pinout can be identified and displayed on screen vs. test clip numbers. Beside the semiconductor device analyzer,
this meter can also work as a RLC/ESR meter, the RLC/ESR accuracy may not be able to compete with the
professional one, but it definitely meets the needs for most of the applications. A 9V battery (part number 6F22) is
used for this meter, the typical working current is about 20mA, standby current is about 20nA. Dimension:
83x152x34mm, weight 175 gram (no exclude battery).
Special caution: Discharge the capacitors completely before you measure it, otherwise, it could damage
your meter!
2.Panel features, test clips and test jig
2.1 Panel features (refer to Figure 1)
Figure 1: Panel features
①:LCD screen, to display measured data
②: Test/power-on button. When this button is first pushed, it turns on the meter power and
excuses a measurement. After that, every push, it will excuses a measurement. The meter will turn
3
off the power automatically if you don’t use it within 20 seconds
③: Test terminal 1, Yellow, will display as pin 1 on LCD.
④: Test terminal 2, Green, will display as pin 2 on LCD.
⑤: Test terminal 3, Red, will display as pin 3 on LCD.
2.2 Test clips and test jig
For those big size DUTs (device under test), you may connect them directly to the test terminals,
otherwise, you need the test clips and test jig as shown in Figure 2 and Figure 3. With clips and jig
you can measure all most all the devices.
Figure 2: Test clips (standard)
Figure 3: Multi-function Test Jig(option)
3.Basic Meter operation
3.1 Clips: Three clips can be used for any non-SMD devices, you can hook up the clips any way
round, the meter will identify and display the pinout vs. the clip numbers on the screen. Figure 4
shows an example for a medium-power NPN transistor test.
4
Figure 4: Test Transistor with Test Clips
3.2 Test Jig: It is used for small pin pitch and thin pin lead device, such as low power transistor,
resistor and capacitors,.This jig has a test area for SMD devices. Figure 5 shows an example of
capacitor test .
5
Figure 5: Test Capacitor with Test Jig
4.Test examples
4.1
It shows that no device is connected on test terminals or an unknown part. It may also be that the devise was
damaged
-----------------------------------------------------------------------------------------------------------------------------------------
6
4.2 Test a NPN transistor
It shows that the DUT is NPN transistor, test terminal 1,2,and 3 are connected to E,C and B pins, Gain is 248, and
forward voltage on junction B and E is 619Mv, leakage current ICE0=0,ICES=0.
4.3 Test a PNPtransistor
It shows that the DUT is a PNP transistor, the test terminals 1, 2 and 3 are connected to transistor pin E, C and B,
Gain is 356, the forward voltage on B and E junction is 662mV, leakage current ICE0=0,ICES=0.
4.4 Test a Junction FET
It shows that the DUT is a N junction FET, the test terminals 1, 2 and 3 are connected to pin D, G and S. When the
voltage between G and S is 0.75V, the measured drain current is 1.1mA
4.5 Test a MOS FET
It shows that the DUT is NMOS FET, test terminals 1, 2 and 3 are connected to pin S, G and D. There is a protect
diode between S and D, the anode of the diode is connected to S, and the cathode of the diode is connected to
D.Junction capacitance is 92pF, the gate threshold voltage is 1.9V and the forward voltage is 708mV.
4.6 Test a thyristor
7
It shows that DUT is a thyristor, test terminals 1, 2 and 3 are connected to pin C (cathode), G (control gate) and A
(anode), the forward voltage is 0.78V.
4.7 Test a triac
It shows that the DUT is a triac, test terminals 1, 2 and 3 are connected to first anode 1, control gate G, second
anode2, and the forward voltage is 0.99V
-----------------------------------------------------------------------------------------------------------------------------------------
4.8 Test a diode
It shows that the DUT is a diode, test terminal 1 is connected to anode, and test terminal 3 is connected to cathode.
The forward voltage is 666mV. Junction capacitance is 11pF.
4.9 Test a resistor
It show the DUT is a 82.57k resistor, between terminal 1 and 3.
-----------------------------------------------------------------------------------------------------------------------------------------
4.10 Test two resistors
It shows that the DUT are two resistors, 12.34k ohm between terminal 1 and 2, and 8889 ohm between terminal 2
and 3.
8
4.11 Test an inductor
It shows that the DUT between terminal 1 and 3 is an inductor, L=0.09mH, and DC resistance is 1.4ohm
4.12 Test a capacitor
It shows that the DUT between terminal 1 and 3 is a capacitor. Capacitance =1168uF, ESR=0.06 ohm and Voltage
loss is 1.7%.
5. Inseting battery
5.1 Remove the battery compartment cover.
5.2 insert a 9V 6F22 battery.
5.3 Replace the compartment cover.
Figure 6: Battery compartment
9
6.Features
6.1 Operates withATmega328 microcontrollers.
6.2 Displaying the results to a 128x64 graphic LCD-Display.
6.3 One key operation with automatic power shutdown.
6.4 Shutdown current is only about 20nA.
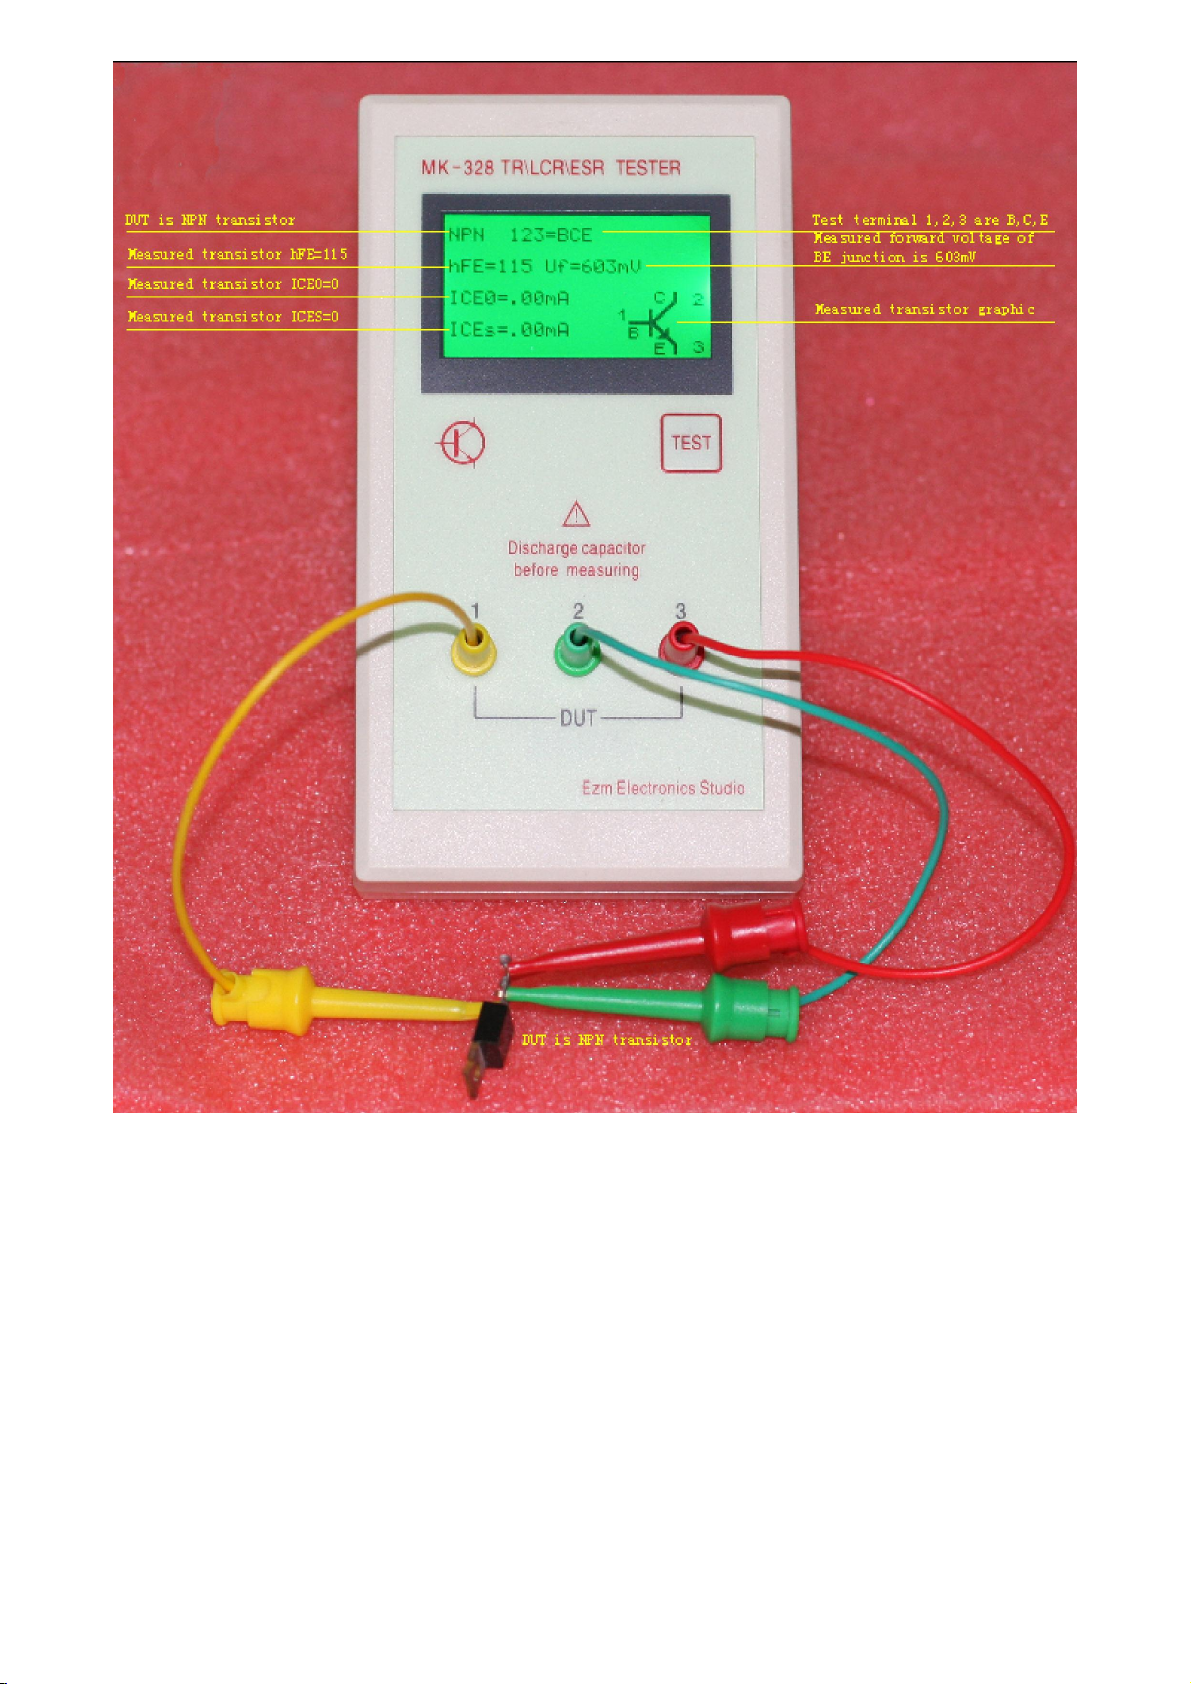
6.5 Automatic detection of NPN and PNP bipolar transistors, N- and P-Channel MOSFETs, JFETs, diodes, double
diodes, Thyristors and Triacs.
6.6 Automatic detection of pin layout of the detected part.
6.7 Measuring of current amplification factor and Base-Emitter threshold voltage of bipolar transistors.
6.8 Darlington transistors can be identified by the threshold voltage and high current amplification factor.
6.9 Detection of the protection diode of bipolar transistors and MOSFETs.
6.10 Measuring of the Gate threshold voltage and Gate capacity value of MOSFETs.
6.11 Up to two Resistors are measured and shown with symbols and values with up to four decimal digits in the
right dimension. All symbols are surrounded by the probe numbers of the Tester (1-3). So Potentiometer can
also be measured. If the Potentiometer is adjusted to one of its ends, the Tester cannot differ the middle pin
and the end pin.
6.12 Resolution of resistor measurement is now up to 0.01Ω, values up to 50MΩare detected.
6.13 One capacitor can be detected and measured. It is shown with symbol and value with up to four decimal
digits in the right dimension. The value can be from 25pF to 100mF. The resolution can be up to 1pF .
6.14 For capacitors with a capacity value above 0.18µF the Equivalent Serial Resistance (ESR) is measured with a
resolution of 0.01Ωand is shown with two significant decimal digits.
6.15 For capacitors with a capacity value above 5000pF the voltage loss after a load pulse can be determined. The
voltage loss give a hint for the quality factor of the capacitor.
6.16 Up to two diodes are shown with symbol or symbol in correct order. Additionally the flux voltages are
shown.
6.17 LED is detected as diode, the flux voltage is much higher than normal. Two-in-one LEDs are also detected as
two diodes.
6.18 Zener-Diodes can be detected, if reverse break down Voltage is below 4.5V. These are shown as two diodes,
you can identify this part only by the voltages. The outer probe numbers, which surround the diode symbols,
are identical in this case. You can identify the real Anode of the diode only by the one with break down
(threshold) Voltage nearby 700mV!
6.19 If more than 3 diode type parts are detected, the number of founded diodes is shown additionally to the fail
message. This can only happen, if Diodes are attached to all three probes and at least one is a Z-Diode. In this
case you should only connect two probes and start measurement again, one after the other.
6.20 Measurement of the capacity value of a single diode in reverse direction. Bipolar Transistors can also be
analysed, if you connect the Base and only one of Collector or Emitter.
6.21 Only one measurement is needed to find out the connections of a bridge rectifier.
6.22 Capacitors with value below 25pF are usually not detectet, but can be measured together with a parallel diode
or a parallel capacitor with at least 25pF. In this case you must subtract the capacity value of the parallel
connected part.
6.23 For resistors below 2100Ωalso the measurement of inductance will be done, if your ATmega has at least 16K
flash memory. The range will be from about 0.01mH to more than 20H, but the accuracy is not good. The
measurement result is only shown with a single component connected.
6.24 Testing time is about two seconds, only capacity or inductance measurement can cause longer period.
6.25 Software can be configured to enable series of measurements before power will be shut down.
6.26 Selectable facility to calibrate the internal port resistance of port output and the zero offset of capacity
measurement with the selftest . A external capacitor with a value between 100nF and 20µF connected to pin 1
and pin 3 is necessary to compensate the offset voltage of the analog comparator. This can reduce
measurement errors of capacitors of up to 40µF. With the same capacitor a correction voltage to the internal
reference voltage is found to adjust the gain for ADC measuring with the internal reference.
10
6.27 Display the Collector cutoffcurrent ICE0 with currentless base (10µA units) and Collector residual current
ICES with base hold to emitter level . This values are only shown, if they are not zero (especially for
Germanium transistors).
6.28 Thyristors and Triacs can only be detected, if the test current is above the holding current. Some Thyristors
and Triacs need as higher gate trigger current, than this Tester can deliver. The available testing current is only
about 6mA!
Attention: Allways be shure to discharge capacitors before connecting them to the Tester! The Tester may be
damaged before you have switched it on. There is only a little protection at theATmega ports.
Extra causion is required if you try to test components mounted in a circuit. In either case the equipment should be
disconnected from power source and you should be shure, that no residual voltage remains in the equipment.
7. Product configuration
7.1 standard configuration (As show in figure)
7.2 Option (As show in figure)

Popular Test Equipment manuals by other brands

VeEX FL41 Getting started guide

VeEX

VeEX FL41 Getting started guide

Aqua-Tronics EG 3000 instruction manual

Aqua-Tronics

Aqua-Tronics EG 3000 instruction manual

SBS 8400 user manual

SBS

SBS 8400 user manual

BK TECHNOLOGIES KAA0608 user manual

BK TECHNOLOGIES

BK TECHNOLOGIES KAA0608 user manual

Iwatsu SS-7821/11 Operation manual

Iwatsu

Iwatsu SS-7821/11 Operation manual

VOP LC-CAST 60A user manual

VOP

VOP LC-CAST 60A user manual

Tintometer Lovibond Floc-Tester instruction manual

Tintometer

Tintometer Lovibond Floc-Tester instruction manual

HVTest HTFZ-III manual

HVTest

HVTest HTFZ-III manual

Tektronix 2235 instruction manual

Tektronix

Tektronix 2235 instruction manual

Anritsu Precision AutoCal 36585 Series Reference manual

Anritsu

Anritsu Precision AutoCal 36585 Series Reference manual

Stardex 0602 manual

Stardex

Stardex 0602 manual

TMI Products TQC Sheen 32-76e Series manual

TMI Products

TMI Products TQC Sheen 32-76e Series manual

Tektronix Keithley 8020-STC manual

Tektronix

Tektronix Keithley 8020-STC manual

Fluke 714 instruction sheet

Fluke

Fluke 714 instruction sheet

AZUNO ATG200A01 quick start guide

AZUNO

AZUNO ATG200A01 quick start guide

Bosch EPS 205 Original instructions

Bosch

Bosch EPS 205 Original instructions

OWL 7V Series Operation guide

OWL

OWL 7V Series Operation guide

Cleerline SSF-TKITE-300 manual

Cleerline

Cleerline SSF-TKITE-300 manual

manuals.online logo
manuals.online logoBrands
  • About & Mission
  • Contact us
  • Privacy Policy
  • Terms and Conditions

Copyright 2025 Manuals.Online. All Rights Reserved.