Ezmax EZMP-4200 User manual

Copyright ©2005 EZMAX. All rights reserved.
Advance permission of EZMAX is required to use User’s Guide, photos,
the related documents and software of the product. Any violation may
follow the legal measures.
The contents of the User’s Guide are subject to change without prior
notice for further improvement of the product.
EZMAX
http://www.ezmax.co.kr
1
Table of Contents
Before Use
Product & Accessories ............................. 2
PC System Requirements ....................... 3
Safety Precautions .................................. 4
Features .................................. ................ 5
Designation of Parts
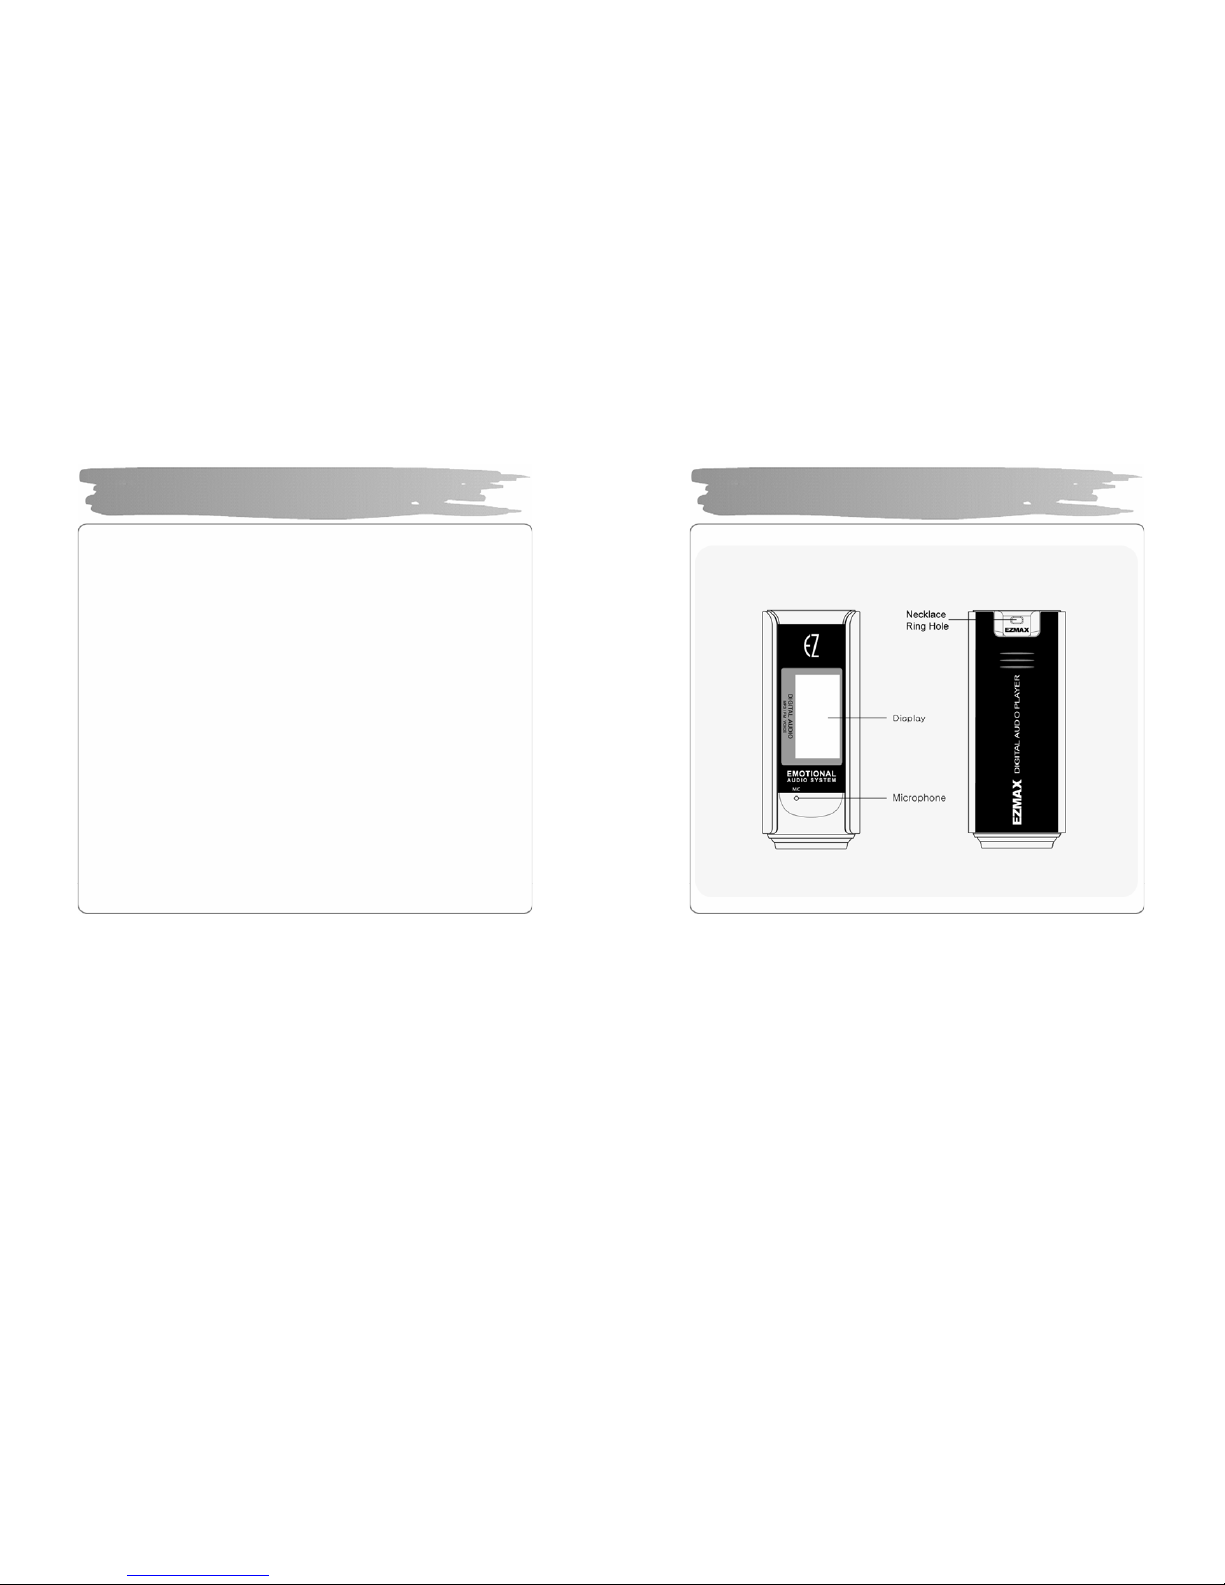
Front/Rear View of the Product ................ 7
Side View of the Product ......................... 8
Function Icons in Display .......................... 9
Preparation
Installing USB Driver ................................10
Connecting Player to PC ........................12
Manually Installing USB Driver .................13
Using Removable Disk.............................16
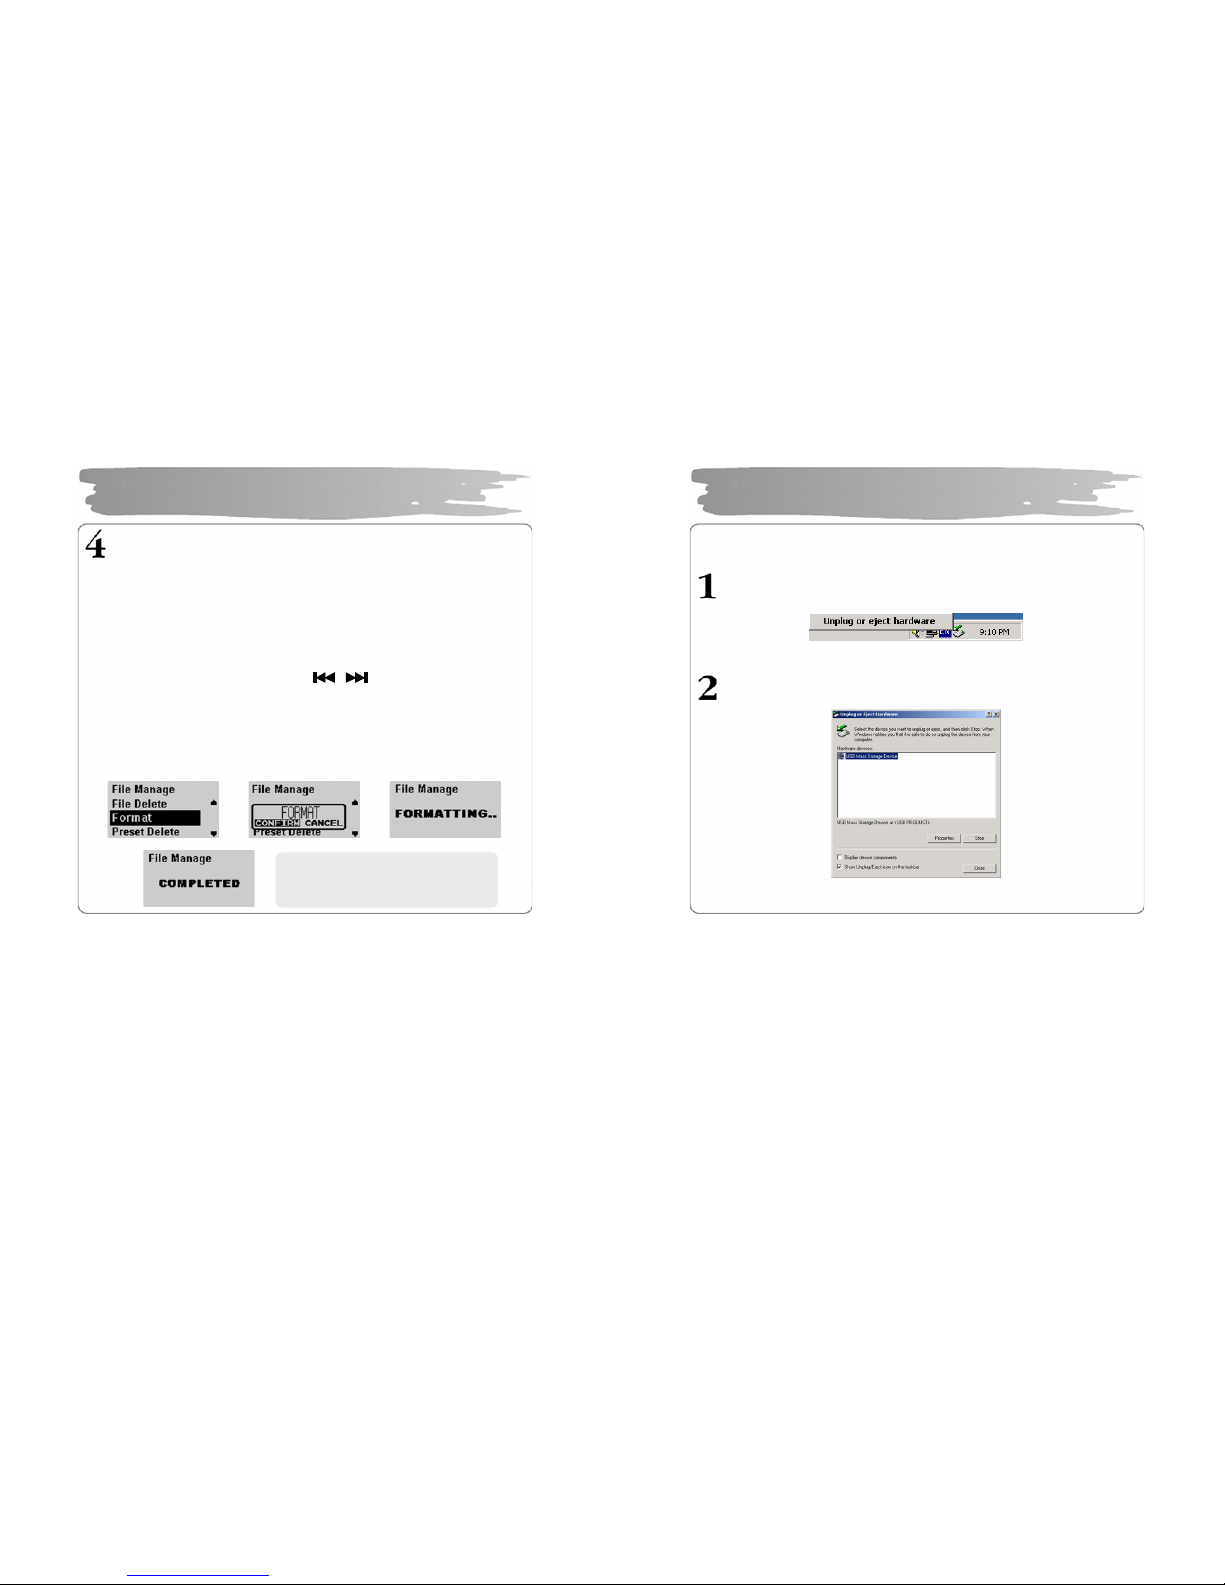
Disconnecting USB Cable ..................... ...19
Upgrading Firmware.................................21
Installing LDB Manager ..........................23
Using LDB Manager ...............................24
Basic Functions
Basic Operation ......................................29
Power On/Off .........................................32
Playback Music File ................................33
Using Navigation .................................. 36
Voice Recording/Listening .................... 37
MP3 Encoding/Listening ................... 38
Listening to FM Radio .......................... 41
Recording/Playback FM Radio ............. 45
Function Menu
Menu Setting ........................................ 46
Music File Playback ............................. 47
Managing File .................................... 48
Detailed Menu Setting .......................... 51
Playback Mode Setting ........................ 52
Sound Setting ...................................... 53
Display Setting ..................................... 55
Timer Setting ....................................... 57
Encoding Setting .................................. 59
Setting ................................................. 60
Others
About Battery ....................................... 63
HOLD Setting Method .......................... 64
Troubleshooting ................................... 65
Specifications ....................................... 67
Service (A/S) ........................................ 68
Warranty .............................................. 69

2
!NOTE: Accessories are subject to change without a prior notice for further
improvements in of this product.
Products & Accessories
3
Basic requirements should be satisfied to use this player on yo ur PC.
Make sure to check the following recommendatio ns before its use:
Pentium 200MHZ or above
Windows 98SE / ME / 2000 / XP
(Windows 98SE - Install Drive r)
Mac OS 9.0 / 10.0
USB Port (2.0 s upported)
(Requires PC with a capacity of more than
PentiumⅢ1GHZ. Couldn’t be supported
depending on a mainboard. Is n’t supported
without S ervice Pack 1 under Windo ws XP.)
CD-ROM Drive
Hard Disc Space 20MB or above
(an additional capacity may be required to save the music files.)
64MB RAM or above
!NOTE: Memory spaces available may be less than those indicated above since
the firmware uses some po rtions of the memory availa ble to your PC for
the operation by its system.
PC System Requirements

4
Listening Cautions…
The output of the product guarantees the best sounds at its proper volume. As
listening with a volume set at a high position for a long time may damage your
sense of hearing, make sure to listen to the music at a proper volume.
Avoid Strong Impact or Vibration
Be careful in handling the product and its accessories since their falling on the floor
or givi ng an impact on them may result in their se rious damages.
Storage
Avoid the places exposed to heat, humidity or magnetic field
Cleaning
Wiping the pla yer with chemicals may result i n discolorations or damages on its
surface.
Wipe out the player with a soft cloth.
Using the Battery…
If you do not use the P layer for a lo ng time, do not insert a battery in the Player.
!NOTE: Never try to dissemb le, rep air or remode l it.
Safety Precautions
5
Multi-Codec Player
Multi-codec p la yer supporting MP3, WMA, ASF(a udio), OGG, WAV format.
FM Transmitter Function(My FM Station)
If you select the embedded FM Transmitter mode, you can e njoy a high se nsitivity
of music wireless through de vice with FM radio(ex. Car audio, home audio, ordinar y
FM radio).
High Quality 3D Sound, MEX (Magic EXpander)
Experience a profound sound due to an introduction of MEX which allows you to
feel 3D expansion effects with richness while keeping the original and stable sound
of the player. 3D Sound MEX is a new 3D effect that does not make you feel tired
even if you liste n to it for a lo ng time .
EL Display
With its introduction of Blue/Yellow 2 Color EL Screen Graphic Display, the player
can command more luxurious and fancy images.
Firmware Upgrade
Upgrade Firmware to add/change/improve functions and performance of the Playe r.
Always enjoy t he music with its latest version of performance.
Voice Recording
A function of high quality voice recording allows a clear recording for conferences
and lectures.
Features

6
FM Radio
Conveniently enjoy the FM radio with a variety of functions such as the
manual/automatic frequency search, automatic tune to the radio station, and the
station p reset.
Easy Navigation
Tree structure allows you to manage and search a specific song more conve niently.
Lyric Display(LDB)
You can easily edit, save a nd display the lyrics of a song in 3 lines on the large
display.
6 Preset Equalizer
You ca n produce your own sound quality with the 5-band User EQ and 5
recommend EQs i ncludi ng Normal, Classi c, Pop, Rock a nd Ja zz.
Removable Disk Device
You can freely upload and download files without a separate ma nager program
since the player is recognized as a removable disk when it is connected to the PC.
Direct Encoding
You can record an external sound you hear through L INE-IN port of the player, as
from FM radio broadcasting.
Features
7
Front/Rear View of the Product

8
Side View of the Product
9
Function Icons in Display

10
Make sure to install the USB driver before connecting it to the PC.
When t here appears “Add New Hardware Wizard”, press the “Cancel” button and
install Upgrade Manager.
If you install Upgrade Manager, the USB driver will be a utomatically installed.
►The driver is recogni zed without installation of a separate program under
Windows ME, 2000, XP, but make sure to install it if Firmware Upgrade is
required.
►If Upgrade Manager is not installed under Windows 98 SE, the player ca nnot be
recognized as a removable disk. Make sure to install Upgrade Ma nager.
Insert Installatio n CD into CD -ROM Dri ve a nd the n click setup.e xe in t he
folder of Upgrade Manager.
.
The installation will start.
Installing USB Driver
11
Click “Ne xt”.
Click ‘Next’ or ‘Yes” in subsequent windows.
Installing USB Driver
When the installation has bee n done,
connect it to the PC as show n in the next
p
a
g
e.

12
To download music files (MP3/WMA/A SF/OGG) from the PC, use USB cable
to connect the MP3 Player to the USB port of the PC.
(Make sure to use only USB cable supplied with the MP3 Player.)
Connect ‘A’ of the cable to the USB port on the part of the PC.
Open the cover of the USB port on the part of the player and connect
‘B’(a smaller part) of the cable to the USB port.
Connecting Player to PC
13
Install the USB driver in the following way when it is not recognized as a
removable disk.
If there doesn’t appear “EZMAX EZMP-4200 USB Device" in “Disk Drive” of Device
Manager or “USB Mass Storage Device”(Except Window 98SE) in Universal Serial
Bus Controller, or if there does a ye llow exclamation mark or “Unknown Device”, the
driver has not been p roperly installed. In this case, manually install the driver.
If an error has occurred while installing USB driver
Check Device Manager.
▪Windows 98SE/ME
Control Panel→System →Device Manager
▪Windows 2000 (Professiona l )
Control Panel→System →Har dw are
→Devic e Mana ger
▪Windows XP (Professional )
Control Panel→Performance and
Mainten anc e→System
→Har dw are →Device Manager
Check whether there are any device with a exclamation mark or question
mark(unknown device or USB device) i n Device Manager.
Manually Installing USB

14
Do uble c lick the device with a
exclamation or question mark.
Press “Install Driver Again”..
Click ‘Ne xt’ in the subsequent windo ws . Whe n sea rchi ng driver files as s hown
below, click the “Browse” to select C:\Wi nnt\Inf or C:\Windows\Inf and press
“OK”.
Press “Next”: in the s ubsequent windows to complete the installation of the
USB driver.
Manually Installing USB
15
For Windows 98SE
Click ‘Next’ in the subsequent wi ndows.
Designate the path for searchi ng the driver file to \Upgrade Manager\Drivers of
CD Drive.
Make sure to restart your system after installation is completed.
Manually Installing USB (Win 98SE)

16
Since the player is detected as a removable disk on the part of PC, you can easily
upload, download, or delete music files or folders in Windows Explorer without a
separate manager program.
Copying files to Player(Download)
1) When you connect the p layer to the USB cable, it is recognized as a
removable disk in Windows Explorer.
2) Click the removable disk to enter into a memory area o f the player.
3) Run one more Windows explorer.
4) Select the file to save,
①Drag and drop it to the removable disk.
②Or, right-click to select Copy. Designate the removable disk and right-
click to select Paste.
5) Then, there will appear a file tra nsfers window, indicating that the file is
being copied to the removable disk.
Using Removable Disk
17
Export File(Upload)
1) Connecting the USB cable to the Player allows the Player to be
recognized as a removable disk in the Windows Explorer.
2) Select the removable disk to have access to the memory area of
the Player.
3) Run one more Windows Explorer.
4) Select a file you want to export from the removable disk, and
then:
①Drag & drop to the diskto which you want to export.
②Or right-click the mouse to select Copy, and select a folder
to which you want to export, and then right-click the mouse
to select Paste.
You can add or delete a folder in the Windows Explorer.
When you download a music file to the player, wait until there appears Ready
on the display as shown below. If you disconnect the USB cable during
DOWNLOAD or UPLOAD, the file may not be properly downloaded. Check
the display(READ Y) and then disconnect the cable.
READYStatus DOWNLOAD UPLOAD
Using Removable Disk

18
Format Player
1) Formatting in the Windows
①Select the removable disk, and then right-click the mouse to
select Format(Select “FAT” as a file system).
②Click Start. (If you remove the USB cable while formatting, the
player could be damaged. Be sure to remove it after the
formatting has been done.)
2) Formatting in the Player
①Press the ME NU button to e nter into t he men u mode.
②Select the File Manager with button and then press the
MEMU button to enter into File Ma nage menu.
③Select Format menu with VOL +/- button and then press the MENU
button.
④After selecting “Confirm”, press the MENU button one more to start
formatting .
Using Removable Disk
ÎÎ
Î
※
Be careful si nce formatti ng will
delete all contents permanently.
19
After completing file transfer, disconnect the USB cable in the following way.
Right-click the removable hardware icon on the taskbar of the desktop ,
and then select “Remo ve Hardware Safely”.
After selecting the devi ce to disconnect, click “Stop” .
Disconnecting USB Cable

20
Click “OK” to confirm the device to stop.
Click “OK” to remove USB cable.
Disconnecting USB Cable
※Abnormally disconnecting the USB cable may result in damages or a
failure to the player.
The order of music files that appears when you select a removable
disk in Windows Explorer has nothing to do with the actual
sequence in accordance with the playback.
21
Download the lates t versio n of firmware at o ur website (w ww.ezmax.co.kr)
and unzip it (unzipped to 4 files.)
Co py t he unzipp ed la te st firm ware fi les i nto
C:\Program Files\EZMAX\EZMP-4200 folder.
Connect the USB port in the status of Power-off so that the PC can recognize
the player.
Execute Firmware Upgrade manager program.
Wait for the device to search. Connect USB cable.
Upgrading Firmware

22
Click ”Start” to proceed Firmware Upgrade. Select “Data Area Formatti ng”
to delete all the files in the system.
Disconnecting the USB cable during Firmware Upgrade may result in mal-
functions of the player or the PC.
When the firmware upgrade has been completed, click “Close” and remove
the USB cable(Refer to Disconnecting USB Cable).
Upgrading Firmware
23
Insert the Instal lation C D into CD-ROM Drive and click setup.e xe in the folde r
of LDB Manager.
Select a language to use.
Click “Ne xt’ or ‘ Yes” in the subseque nt wi ndows.
Installing LDB Manager

24
LDB Manager is a program that automatically e nters the lyrics in MP3 music files
and can be used without connecting the p layer to PC.
Using LDB Manager
▪The Internet should be available so that it can get information about a
lyric from the lyric server.
▪Lyrics are not marked for the VBR file since time information does not
match.
25
Enter Lyrics(Auto Search)
①Select the MP 3 file to e nter the lyrics in the file list window, and press
“Enter Lyri cs” on the top menu.
②The lyric server searches for informa tion about the lyrics according to
information about the relevant files to automatically enter the lyrics.
③After the lyrics ha ve been entered in, you can check the lyric marking
information i s displa yed in the file list windo w.
④Play back in the preview window to check information about the lyrics.
Using LDB Manager

26
Enter Lyrics (Manual Search)
①Select the file to enter the lyrics and click the button on the top menu.
②Enter the name of singer or title of song to search for in Enter & Search
Lyric window and press the Search button.
③The songs matching the time information, singer information and title wi ll
be displayed.
Click the MP3 file to check the lyrics to e nter i n the rig ht window.
④Press the Lyrics Marking button on the right bottom of the LDB search
windo w to comple te enteri ng the lyrics.
Using LDB Manager
27
Delete Lyrics
Select the MP3 file to delete lyrics and press the button to delete their
information.
Manually Enter Lyrics
①Selec t the file to e nter the lyrics a nd pre ss the button on the top menu.
②Press Text Editor, enter the lyrics you want and then click OK.
Using LDB Manager

28
③Press Playback in the preview wi ndow and press the S YNC setting button at
the point where there s hould appear one line of lyrics editing wi ndow.
④When SYNC setting has been completed, press the Lyrics Marking window.
Modify Lyrics
①Select the MP3 file to modify lyrics and then press the button.
②Double click the area to modify lyrics so that you can modify the lyrics or
time.
Using LDB Manager
29
Display
- Displays the operating status of the product..
PLAY
- Press short to turn the power ON.
- When listening to the music or the recorded file, press short to
pause the music, and then do so again to resume the music.
- When listening to the FM radio broadcasting, press short to save
the current station to the PRESET.
- In any mode, press and hold to turn the power OFF.
Basic Operation

30
VOL+
- Each press on the button will increase the volume step by step.
(can be adjusted in 0-30 levels..)
VOL–
- Each press on the button will decrease the volume step by step.
MENU
- Press s hort to enter into the me nu screen.
- Press and hold to enter into the na vigation screen.
- Press short to select the relevant item on the menu screen.
- When listening to a music or a recorded file, press short to move to the next
music while keep pressing to fast move withi n the current played file.
- Press it short to move to the next menu screen.
- Pres it short in FM radio mode to increase the radio frequency step by step,
and press and hold to automatically search for the next broadcasting station.
- Press it to move to the next PRESET number in the FM PRESET mode.
- When listening to a music or a recorded file, press short to move to the
previous music while keep pressing to fast move within the current played
file.
- On the MENU screen, press short to move to the previo us me nu item.
Basic Operation
31
- When listening to the FM radio, press short to move to the
previous frequency while keep pressing to automatically search for
the previous station.
- In the PRESET mode, press short to move to the next PRESET
number.
REC/A-B
- During the playback, press short to specify the section ‘A’ and do
so again to specify the section ‘B’ for the Repeat Section. And
then another pressing short will cancel the Repeat Section.
- When listening to the FM radio, press and hold to record the radio
station.
- Press and hold in the FM Radio mode to start FM broadcasting recording,
and press and hold it again to complete recording.
HOLD
- In the HOLD status, operation of a ll buttons are locked down.
- If you press any button while it is in the HOLD status and the player is being
played , it displays the message “HOLD”, sticking to its previous status.
- If you press any butto n while it is in the HOLD status and the player is turned
off, it d isplays the message “HOLD ”, s tic king to its power-off status.
EQ
- You can orderly search for the effect of each EQ including tha t of 3D.
- Press in FM Radio mode to execute AUTO PRESET and to search for a
radio frequency automatically.
Basic Operation

32
Power ON
Press PLAY short to turn the power ON, and there will appear the logo on
the display, followed by which there appears a version of firmware, a
total memory and the memory available to the Player.
!NOTE: A total of memory an initial booting shows may be less than its
default memory since some part of it is used to drive the system by
the firmware.
Power Off
Press and hold PLAY to turn the power OFF while the logo GOODBYE is displayed .
If you press PLAY during the playback, it will enter into its pause. It will be
automatically released in the time you set in advance if you do not press anybutton.
ÎÎ
Power ON/OF
Î
33
◎You can p lay back a music file or files recorded in the player in the PLAY menu.
Press MENU short to move to the menu mode. Select the PLAY me nu and
press MENU again to move to the me nu.
You can se lect TOTAL P LAY, NAVIGATION P LAY, B OOKMARK
PLAY, VOICE PLAY, FM PLAY, LINE-IN PLAY using VOL+/- button.
Press MENU to enter into a rele vant playback mood.
(1) TOTAL PLAY
- TOTAL PLAY plays back all music files in the memory.
(2) NAVIGATION PLAY)
- Press MENU to e nter into NAVIGATION PLAY where you can see all the folde rs
and music files in the memory.
- Select the folder or file yo u wa nt to pla y back using the butto n.
- Press PLAY to pla y back the folder or file you ha ve selecte d.
Playback Music File

34
(3) BOOKMARK PLAY
- Press MENU to enter into BOOKMARK PLAY where you can see the bookmark
files.
- Press PLAY to play back BOOKMARK files alone.
▪How to Set BOOKMARK
- While listening to music or in t he pause status, press and hold MENU to enter
into the NAVIGATION mode.
- Select the file for BOOKMARK and press MENU short to bookmark it. Another
pressing it short to release the bookmark.
(4) VOICE PLAY
- Plays back voice-recording files.
(5) FM PLAY
- Plays back files in which FM radio broadcasting is recorded.
(6) LINE-IN PLAY
- Plays back all files with L INE-IN encoded.
Playback Music File
35
Searching For File
During the pla yback, press the button to play back the previous/next
file.
In the pause status, press the button to mo ve to the previo us/ne xt file.
( If a function o f Study is set, it moves in accordance wit h the time you have set.)
Searching for Part
During the playback, press and hold button to quickly move to the area
you want. Release it to play back normally.
Setting Repetition Section
During the playback of music/recorded files, press REC/A-B on the beginning of the
section you want to listen to repeatedly.
Press REC/A-B again on the ending of the sectio n.
The section will be repeatedly played back.
Press REC/A-B again to release the sectional repetition.
Adjusting Volume
Press the VOL +/- button short to adjust by 1 level, and press and hold it to adjust
continuously. The volume can be adjusted from 0 to 30 levels.
Playback Music File
Î

36
Use the functio n of Na vigation to easily search for the fi le you want.
Press and hold MENU to move to the Navigation mode.
Se lect the folde r or file you wa nt to p lay bac k.
▪button : move to a upper folder
▪button : move to a lower folder
▪VOL+/- button : move to a file or a folder in the same folder
▪MENU button : move to a lower folder in the case of folder
setBOOKMARK in the case of file
Press PLAY to play back a se lected file.
Using Navigation
Î
※ Press and ho ld MENU in the Navigation mode to release.
( c lick MEN U button )
37
Recording Voice
During the playback or in the pause status , press and hold REC to re cord voice.
Press it again to stop recording.
Press PLAY to listen to the voice file you have just recorded.
▪It will be recorded in an order of V001, V002, … and saved in the VOICE
folder as WAV file after its recording.
▪Voice recording will not work if it is in the FM RADIO mode or if the line-In
cable is not connected.
▪Voice recording will automatically stop if the memory is full.
Listening to Voice Recording File
In the PLAY menu, select the VOICE PLAY using the VOL+/- button and press
PLAYto play back the voice recording file.
Voice Recording/Listening
Î
ÎÎ

38
One jack of the line-i n shall be connected to the output port of an external acoustic
unit, and the other jack(USB port) to the USB line-in port of the
player.
▪Do not listen to FM during the recording from an external device since it
may cause a noise.
▪If you want to record from a home audio device, our line-in cable may not
work, and you need to separately purchase a line-in cable.
▪Encoding may not be performed if the line-In cable has not been
connected.
▪Encoding after setting the volume of an external audio device properly.
Too high or low volume may deteriorate the encoding sound quality.
MP3 Encoding/Listening
39
Bit Rate Setting
In the MENU mode, use the MENU button and button to select
SETTINGS →ENCODING →BITRATE and se lect one of 96 /112/128kbps.
Auto Sync. Setting
In the MENU mode, use the MENU button and button to select
SETTINGS →ENCODING →AUTOSYNC TIME and select one of OFF/2/3/4/5
SEC.
MP3 Encoding/Listening
Î
ÎÎ
Î
ÎÎ
Table of contents
Other Ezmax MP3 Player manuals