manuals.online logo
Brands
  1. Home
  2. •
  3. Brands
  4. •
  5. FAAC
  6. •
  7. Motherboard
  8. •
  9. FAAC 868 User manual

FAAC 868 User manual

4
PROGRAMMER FOR SLHP DECODER
Connections
Make the connections as shown in the drawing.
ÂWhen the programmer is connected to the
external power supply, it powers the Decoder
but not the receiver Plus868 (if present)
connected to the Decoder.
ÂWhen the Decoder is powered (e.g. inserted in
the rapid connector or connected by means of
a terminal board to a powered equipment), it
powers the programmer and receiver Plus868
connected (if present).
Switch on/Stand-by
When switched on, the display shows, in rapid
succession,FAAC and Vx.x (S/W version) after which
a sliding luminous point appears to indicate the
“stand-by”status.
In this status:
- if the programmer is connected to a decoder in
operation, it shows the Tx No. activated (if, apart
from the Tx No., four points appear,it means the Tx
is disabled);
- connection to the PC is possible.
Programming
Press PROG: ---- (request for password) is displayed;
Press 6: 0000 is displayed;
If no password has been inserted in the decoder,
press OK; or press 6to select each digit, make
the settings using keys 8and 2and press OK;
P 1 is displayed: use keys 8and 2to select the
required function;
Press OK and follow the explanation of the function
selected.
To quit the program at any moment, press PROG
till you return to stand-by status.
ÂFunctions P6,P9,P12 are not protected by
password: this means that they are operative
even without knowing the password, if any, set
on the Decoder.
ÂFunctions P6,P9 do not require the Decoder to
be connected: this means they are operative
also without the Decoder.
Data entry
When,within a function,you are requested to enter
a value (e.g.code or a Tx No.),press 6 to select
each digit,make the settings using keys 8and 2
and press OK.
ÂSome values may be in alphanumeric form: this
means, for each digit, apart from numbers 0to
9, letters from Ato F can also be set.
ÂSome values may be composed of more than 4
digits (display limit) and are “split”into two
successive displays: after the first part has been
set,press OK to set the second part.
J3
J2 J1
NC NO
COM
J4
LED
PROG
OK
12

24 V
dc
RS232
햲
햳
RADIOCODER SLHP DECODER
Tx SLH
MEX
1
MEX
2
 2.1mm
+ internal
PC
ENGLISH ENGLISH
5
P 1 ENABLE TX
Enables a serial code present in the Decoder
memory that was disabled earlier.
•Enter the Tx No.to be enabled
(in decimal from 0000 to 1999);
•Press OK.
P 2 DISABLE TX
Disables a serial code present in the Decoder
memory (a disabled code is not acknowledged
by the Decoder).
•Enter the Tx No.to be disabled
(in decimal from 0000 to 1999);
•Press OK.
P 3 DELETE TX
Deletes a serial code from the Decoder memory.
•Enter the Tx No.to be deleted
(in decimal from 0000 to 1999);
•Press OK.
P 4 ENTER PLANT CODE (FROM KEYBOARD)
Stores the plant code keyed in (8 alphanumeric
digits) in the Decoder and transmits it to the
Radiocoder for coding Tx, if necessary.
Â
the plant code is stored in each memory bank
present (by overwriting the plant code,if any,
already set).
•Enter the first four digits of the plant code
(alphanumeric values from 0000 to FFFF);
•Press OK.
•Enter the second set of four digits of the plant
code
(alphanumeric values from 0000 to FFFF);
•Press OK: the plant code is stored in the Decoder
and simultaneously transmitted by the
Radiocoder (the display shows four steady light
points and the Radiocoder LED lights up);
•Move the Tx closer to make contact with the
Radiocoder and press the channel on which the
plant code is to be stored,checking the double
flashing of the Tx LED (learning occurred);
•When the operations are complete,press OK.
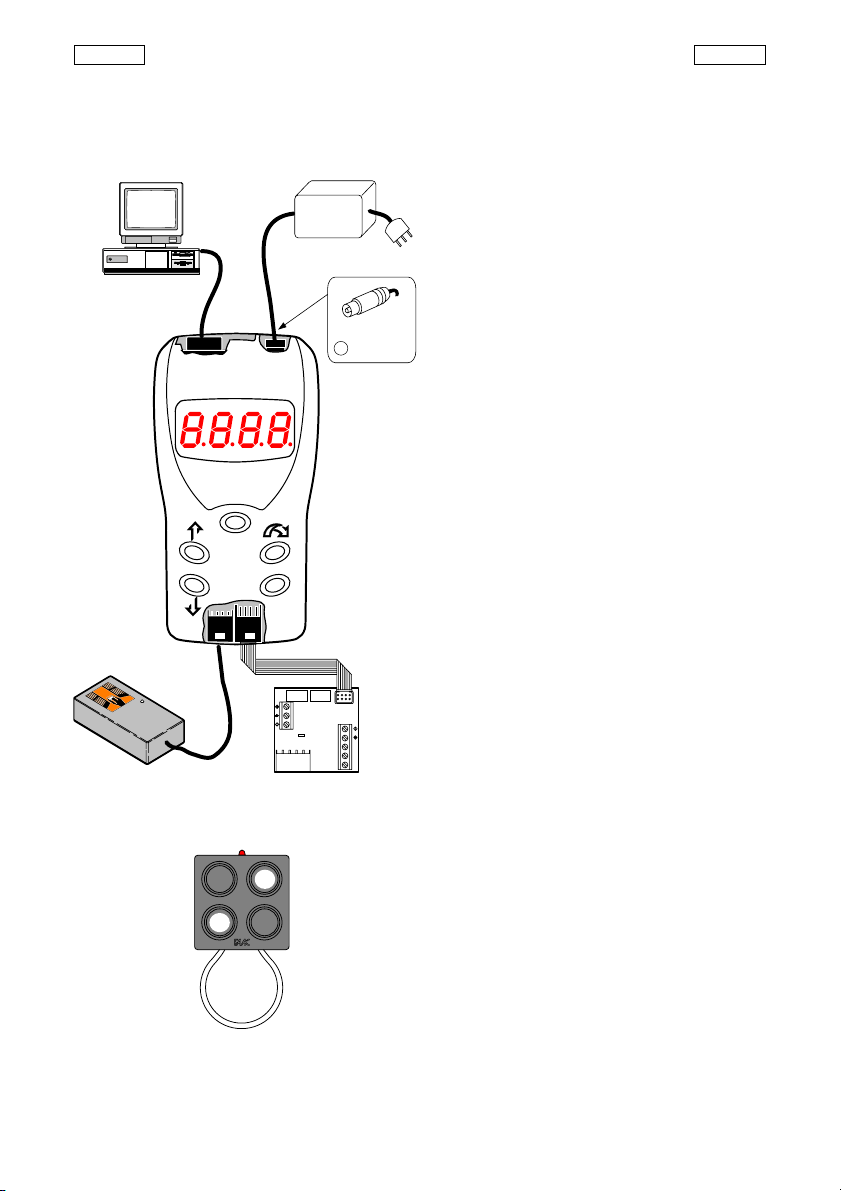
P 5 ENTER PLANT CODE (FROM RADIOCODER)
Stores the plant code in the Decoder by reading it
from a master Tx.
Â
the plant code is stored in each memory bank
present (by overwriting the plant code,if any,
already set).
•When the function is confirmed,the programmer
waits for the Radiocoder to read the plant code
within 15 sec. (the display shows four steady
lighted points but the Radiocoder LED does not
light up);
•Press buttons 1 and 2 of master Tx simultaneously
and release them when the LED flashes (after
about one second);
•Press the channel for which the plant code is to
be acquired and move the Tx closer to make
contact with the Radiocoder (if the reading is
not done within about 15 sec. an Err: message
is displayed; in such cases,press OK);
•If the reading has been done correctly,
P1appears on the display,then release the Tx key.
P 6 TEACH PLANT CODE TO TX
Transmits the plant code keyed in (8 alphanumeric
digits) to the Radiocoder for coding Tx.
•Enter the first four digits of the plant code
(alphanumeric values from 0000 to FFFF);
•Press OK.
•Enter the second set of four digits of the plant
code
(alphanumeric values from 0000 to FFFF);
•Press OK: the plant code is transmitted by the
Radiocoder (the display shows four steady light
points and the Radiocoder LED lights up);
•Move the Tx closer to make contact with the
Radiocoder and press the channel on which the
plant code is to be stored,checking the double
flashing of the Tx LED (learning occurred);
•When operations are complete,press OK.
P 7 ENTER NEW TX (FROM KEYBOARD)
Stores the serial code keyed in (6 alphanumeric
digits) in Decoder and transmits it to the
Radiocoder for coding Tx,if necessary.
Âthe positions available for storing (“Tx No.”) the
serial code, are:
from 0000 to 0999 --> MEX1 memory bank
from 1000 to 1999 --> MEX2 memory bank
Â
there is no checking if the code is already stored
or if the Tx No.is already occupied (in this case,
it is overwritten).
•Enter Tx No.(in decimal from 0000 to 1999);
•Press OK;
•Enter the first two digits of the serial code
(alphanumeric values from 00 to FF);
•Press OK;
•Enter the second set of four digits of the serial
code
(alphanumeric values from 0000 to FFFF);
•Press OK: the serial code is stored in the Decoder
and simultaneously transmitted by the
Radiocoder (the display shows four steady light
points and the Radiocoder LED lights up);
•Move the Tx closer to make contact with the
Radiocoder and press the channel in which the
serial code is to be stored,checking the double
flashing of the Tx LED (learning occurred);
•Press OK; the next Tx No.is proposed (when OK is
pressed again,the next serial code is proposed);
•Press PROG to exit the function.
P 8 ENTER NEW TX (FROM RADIOCODER)
Stores the serial code in the Decoder by reading it
from a Tx (master or slave).
Â
the positions available for storing (
“
Tx No.”) the
serial code, are:
from 0000 to 0999 --> MEX1 memory bank
from 1000 to 1999 --> MEX2 memory bank
Â
there is no checking if the code is already stored
or if the Tx No.is already occupied (in this case,
it is overwritten).
•Enter Tx No.(in decimal from 0000 to 1999);
•Press OK; the programmer waits for the
Radiocoder to read the serial code within 15 sec.
(the display shows four steady light points but the
ENGLISH ENGLISH
6
Radiocoder LED does not light up);
•Move Tx closer to make contact with the
Radiocoder and press the channel for which the
serial code is to be acquired (if the reading is
not done within about 15 sec.an Err: message is
displayed; in such cases, press OK);
•If the reading has been done correctly, P8
appears on the display, then release the Tx key;
•Press OK, the procedure restarts proposing the
next Tx No.
P 9 TEACH SERIAL CODE TO TX
Transmits the serial code keyed in (6 alphanumeric
digits) to the Radiocoder for coding Tx.
•Enter the first two digits of the serial code
(alphanumeric values from 00 to FF);
•Press OK;
•Enter the second set of four digits of the serial
code
(alphanumeric values from 0000 to FFFF);
•Press OK: the serial code is transmitted by the
Radiocoder (the display shows four steady light
points and the Radiocoder LED lights up);
•Move the Tx closer to make contact with the
Radiocoder and press the channel on which the
serial code is to be stored,checking the double
flashing of the Tx LED (learning occurred);
•When operations are complete,press OK.
P 10 COPY MEMORY MODULE
Copy the MEX1 memory on MEX2 memory.
Â
the operation overwrites the MEX2 memory
contents.
Â
the copy includes the plant code, serial codes
and the password.
•When the function is confirmed,the contents of
MEX1 memory bank are copied on MEX2.
P 11 ENTER/CHANGE PASSWORD
Sets the password (4 alphanumeric digits).
Â
the password is stored in each memory bank
present.
•Enter the four digits of the new password
(alphanumeric values from 0000 to FFFF);
•Press OK.
P 12 DELETE DECODER
Completely deletes the memory banks present
(plant code, serial codes and password).
Â
the delete function is always possible, even
without knowing the password set,if any.
•When the function is confirmed, P12 flashes;
•Press OK again to delete the Decoder: the
display shows four steady light points;
•at the same time, check to ensure that the
Decoder LED lights up for a few seconds;
•When the deletion is complete,the programmer
returns to stand-by.
SUGGESTIONS
•In the same plant, do not duplicate the Tx with
the same serial code;
•Do not store the same serial code in different
positions in the Decoder;
•The memory banks inserted in the Decoder must
have the same plant code and the same
password;
•If the functions protected by password are
accessed by initially keying in a password that is
different from that stored in the Decoder,an Err:
message is displayed;
•For each plant,file the data relative to codes,Tx
No.and password.
P1 ENABLE Tx Enter Tx No.(4 decimal digits from 0000 to 1999) + OK
P2 DISABLE Tx Enter Tx No.(4 decimal digits from 0000 to 1999) + OK
P3 DELETE Tx Enter Tx No.(4 decimal digits from 0000 to 1999) + OK
P4 ENTER PLANT CODE Enter plant code (4+4 alphanumeric digits) + OK-->
(FROM KEYBOARD) --> stores and transmits to Radiocoder
P5 ENTER PLANT CODE Waiting reading of master Tx by Radiocoder
(FROM RADIOCODER)
P6 TEACH PLANT CODE Enter plant code (4+4 alphanumeric digits) + OK-->
TO Tx --> transmits to Radiocoder
P7 ENTER NEW Tx Enter Tx No.(4 decimal digits from 0000 to 1999) + OK;
(FROM KEYBOARD) Enter serial code (2+4 alphanumeric digits) + OK-->
--> stores and transmits to Radiocoder
P8 ENTER NEW TX Enter Tx No.(4 decimal numbers from 0000 to 1999) + OK-->
(FROM RADIOCODER) --> waiting reading of Tx by Radiocoder
P9 TEACH SERIAL CODE Enter serial code (2+4 alphanumeric digits) + OK-->
TO Tx --> transmits to Radiocoder
P10 COPY MEMORY MEX1 is copied on MEX2
MODULE
P11 ENTER/CHANGE Enter new password (4 alphanumeric digits) + OK
PASSWORD
P12 DELETE DECODER P12 flashes: press OK to delete decoder
QUICK REFERENCE GUIDE
ENGLISH ENGLISH
16
DICHIARAZIONE CE DI CONFORMITÀ
Fabbricante: FAAC S.p.A.
Indirizzo: Via Benini, 1
40069 - Zola Predosa
BOLOGNA - ITALIA
Dichiara che:
Il Decoder SLHP e il Programmatore sono conformi ai requisiti
essenziali di sicurezza delle seguenti direttive:
73/23/CEE e successiva modifica 93/68/CEE;
89/336/CEE e successiva modifica 92/31/CEE e 93/68/CEE.
Nota aggiuntiva:
Questi prodotti sono stati sottoposti a test in una configurazione
tipica omogenea (tutti prodotti di costruzione FAAC S.p.A.).
Bologna, 01, gennaio, 2001
L’Amministratore delegato
A. Bassi
CE DECLARATION OF CONFORMITY
Manufacturer: FAAC S.p.A.
Address: Via Benini, 1
40069 - Zola Predosa
BOLOGNA-ITALY
Declares that:
The Decoder SLHP and the Programmer conform to the essential
safety requirements of the following directives:
73/23/EEC and subsequent amendment 93/68/EEC;
89/336/EEC and subsequent amendment 92/31/EEC and
93/68/EEC.
Additional information:
These products underwent tests in a typical, uniform
configuration (all products manufactured by FAAC S.p.A.).
Bologna, 01, January, 2001
The Managing Director
A. Bassi
DECLARACIÓN CE DE CONFORMIDAD
Fabricante: FAAC S.p.A.
Dirección: Via Benini, 1
40069 - Zola Predosa
BOLOGNA - ITALY
Declara que:
el Decoder SLHP y el Programador y cumplen con los requisitos
esenciales de seguridad de las siguientes directivas:
73/23/CEE y sucesiva modificación 93/68/CEE;
89/336/CEE y sucesiva modificación 92/31/CEE y 93/68/CEE.
Nota :
Estos productos han sido sometidos a test en una configura-
ción típica homogénea (todos los productos de fabricación
FAAC S.p.A.)
Bolonia, 01 de enero del 2001
El Administrador Delegado
A. Bassi
CE - KONFORMITÄTSERKLÄRUNG
Hersteller: FAAC S.p.A.
Adresse: Via Benini, 1
40069 - Zola Predosa
BOLOGNA-ITALY
erklärt, dass:
Die Decodereinheit SLHP and das Programmiergerät den
wesentlichen Sicherheitsanforderungen der folgenden
Richtlinien entsprechen:
73/23/EWG und nachfolgende Änderung 93/68/EWG;
89/336/EWG und nachfolgende Änderungen 92/31/EWG und
93/68/EWG.
Zusätzliche Anmerkung:
Diese Geräte wurden in einer typischen und homogenen
Konfiguration geprüft (alle Produkte aus der Fertigung FAAC
S.p.A.).
Bologna, den 01. Januar 2001
Der Geschäftsführer
A. Bassi
DECLARATION CE DE CONFORMITE
Fabricant: FAAC S.p.A.
Adresse: Via Benini, 1
40069 - Zola Predosa
BOLOGNA - ITALIE
Déclare que:
le Decoder SLHP et le Programmateur sont conformes aux
conditions essentielles de securitérequises par les directives
suivantes:
73/23/CEE et modification 93/68/CEE successive;
89/336/CEE et modifications 92/31/CEE et 93/68/CEE
successives.
Note supplémentaire:
Ces produits ont étésoumis àdes essais dans une configuration
typique homogène (tous les produits sont fabriqués par FAAC
S.p.A.)
Bologne, 01 janvier 2001
L’Administrateur Délégué
A. Bassi
FAAC S.p.A.
Via Benini,1•40069 Zola Predosa, Bologna
℡051-61724
051-758518
www.faacgroup.com
732447 Rev.A

Other FAAC Motherboard manuals

FAAC Digiprogam User manual

FAAC

FAAC Digiprogam User manual

FAAC TM XTT 433 R User manual

FAAC

FAAC TM XTT 433 R User manual

FAAC 724D User manual

FAAC

FAAC 724D User manual

Popular Motherboard manuals by other brands

Elitegroup Computer Systems P6EX-A+ user manual

Elitegroup Computer Systems

Elitegroup Computer Systems P6EX-A+ user manual

Supermicro X11DSF-E user manual

Supermicro

Supermicro X11DSF-E user manual

Asus GRYPHON Z87 user manual

Asus

Asus GRYPHON Z87 user manual

Nuvoton NuMaker-M031GTD user manual

Nuvoton

Nuvoton NuMaker-M031GTD user manual

ASROCK FM2A58M-HD+ R2.0 Quick installation guide

ASROCK

ASROCK FM2A58M-HD+ R2.0 Quick installation guide

ASROCK Fatal1ty Z370 Gaming K6 Series user manual

ASROCK

ASROCK Fatal1ty Z370 Gaming K6 Series user manual

Hanasis TEB-J1900A/P user manual

Hanasis

Hanasis TEB-J1900A/P user manual

Silicon Laboratories CP2130 user guide

Silicon Laboratories

Silicon Laboratories CP2130 user guide

Realtek RTL8762D user manual

Realtek

Realtek RTL8762D user manual

Texas Instruments ADS8881EVM-PDK user guide

Texas Instruments

Texas Instruments ADS8881EVM-PDK user guide

ST STM32303C-EVAL user manual

ST

ST STM32303C-EVAL user manual

Atmel Xplained Pro SAM4L user guide

Atmel

Atmel Xplained Pro SAM4L user guide

Texas Instruments INA4180-INA4181 user guide

Texas Instruments

Texas Instruments INA4180-INA4181 user guide

Advantech AIMB-275 A2 user manual

Advantech

Advantech AIMB-275 A2 user manual

Advantech PCM-3341 Series user manual

Advantech

Advantech PCM-3341 Series user manual

Lattice Semiconductor LatticeXP2 user guide

Lattice Semiconductor

Lattice Semiconductor LatticeXP2 user guide

Gigabyte GA-MA780G-UD3H user manual

Gigabyte

Gigabyte GA-MA780G-UD3H user manual

ASRock Industrial NUC-1360P/D5 user manual

ASRock Industrial

ASRock Industrial NUC-1360P/D5 user manual

manuals.online logo
manuals.online logoBrands
  • About & Mission
  • Contact us
  • Privacy Policy
  • Terms and Conditions

Copyright 2025 Manuals.Online. All Rights Reserved.