Faber FCH 84 GR User manual

EN
USER MANUAL
FR
MANUEL D’UTILISATION
IT
LIBRETTO DI USO
RU
РУКОВОДСТВО ПО ЭКСПЛУАТАЦИИ
ES
MANUAL DE USO
DE
GEBRAUCHSANLEITUNG
NL
GEBRUIKSAANWIJZING
AL
UDHËZUES PËR PËRDORIMIN
MK
УПАТСТВО ЗА КОРИСНИК
SR
КОРИСНИЧКО УПУТСТВО
FCH 84 GR KL
FBH 84 BK KL
FCH 64 GR KL
FBH 64 BK KL

EN
.................................................................................................................................. 3
FR
.................................................................................................................................. 19
IT
.................................................................................................................................. 37
RU
.................................................................................................................................. 53
ES
.................................................................................................................................. 71
DE
.................................................................................................................................. 88
NL
..................................................................................................................................105
AL
..................................................................................................................................122
MK
..................................................................................................................................139
SR
..................................................................................................................................157

EN
1. SAFETY INFORMA-
TION
For your own safety and
correct operation of the
appliance, please read
this manual carefully be-
fore installation and oper-
ation. Always keep these
instructions together with
the appliance, even if it is
sold or transferred to third
parties. It is important that
users know all the appli-
ance's operating and
safety characteristics.
These hobs have induc-
tion systems that comply
with the requirements of
EMC standards and with
the EMF directive, and
they should not interfere
with other electronic
devices. Pacemaker
wearers and those using
other electronic implants
must consult their doctor
or the manufacturer of the
implanted device to as-
sess whether or not it is
sufficiently resistant to in-
terference.
Electrical connections
must be performed by a
trained technician. Before
making the electrical con-
nection, please read the
section on ELECTRICAL
CONNECTION.
For appliances with a power
supply cable, the terminals or
section of wire between the
cable anchor point and the ter-
minals must be laid out that they
allow the live wire to be extrac-
ted before the earth wire, if it
comes loose.
• The manufacturer cannot be
held responsible for any dam-
age resulting from incorrect or
inadequate installation.
• Check that the mains power
supply corresponds to the
one indicated on the rating
plate affixed to the inside of
the product.
• The cut-out devices must be
installed in the fixed system
according to wiring system
regulations.
• For Class I appliances, check
that the domestic power sup-
ply has a suitable earthing
connection.
• Connect the product to the
mains using an omnipolar
switch.
• If the power cable is dam-
aged, it must be replaced by
the manufacturer, an author-
ised service centre or a quali-
fied technician, to avoid any
risk of danger.
WARNING: Remove the
protective films before in-
stalling the appliance.
• Only use the screws and
other hardware elements
supplied with the appliance.
WARNING: Failure to in-
stall the screws or fixing
devices as described in
these instructions may
lead to a risk of electric
shocks.
3

• Cleaning and maintenance
must not be carried out by
children, unless they are su-
pervised by an adult.
• Children must be supervised
to ensure that they do not play
with the appliance.
• This appliance must not be
used by persons (including
children) with limited phys-
ical, sensory or mental abilit-
ies, or by inexperienced or un-
trained persons, unless
closely supervised and in-
structed in the safe use of the
appliance by a person re-
sponsible for their safety.
• This appliance may be used
by children over the age of
eight and by persons with lim-
ited physical, sensory or men-
tal abilities or with insufficient
experience and knowledge,
provided they are closely su-
pervised and instructed on
the safe use of the appliance
and on the dangers that it in-
volves. Do not allow children
to play with the appliance.
WARNING: The appli-
ance and its accessible
parts become extremely
hot during use.
Take great care not to touch the
heating elements.
Keep children under 8 years of
age well away from the appli-
ance, unless they are under
constant supervision.
WARNING: If the surface
shows any signs of cracking,
turn the appliance off to prevent
any risk of electric shock.
• Do not touch the appliance if
your hands or body are wet.
• Do not use steam appliances
to clean the product.
• Do not rest metal objects such
as knives, forks, spoons and
pan lids on the surface of the
hob, as they might overheat.
• Use the relevant control to
turn the hob off after use; do
not rely on the pan sensors.
WARNING: Unsupervised
cooking on a hob using oil and
grease may be dangerous and
could cause a fire. NEVER at-
tempt to put flames out with wa-
ter. Turn the appliance off and
suffocate the flames by cover-
ing them with a pan lid or a fire
blanket, for example.
CAUTION: The cooking pro-
cess must be supervised. A
short cooking process must be
constantly monitored.
• The appliance is not designed
to be started using an external
timer or a separate remote
controlled system.
WARNING: Danger of fire: do
not place objects on the cooking
surfaces.
• The appliance must be in-
stalled to allow it to be cut off
from the electrical power sup-
ply with a contact opening (3
mm) that ensures complete
disconnection under over-
voltage category III condi-
tions.
• The appliance must never be
exposed to the elements
(rain, sun).
4

• Keep the packaging away
from children and animals.
• Make sure the device is con-
nected directly to the power
outlet.
• Do not use adapters, multiple
sockets or extension cables
to connect the device.
• Never use the appliance for
purposes other than those for
which it has been designed.
• Fryers must be monitored at
all times during cooking; over-
heated oil could catch fire.
• Do not operate the appliance
using an external timer or
separate remote-controlled
system.
• The appliance must never be
installed behind a decorative
door, to prevent it from over-
heating.
• Do not stand on the appli-
ance, as this may damage it.
• Do not rest hot pots and pans
on the edge, as this may dam-
age the silicone seals.
2. INSTALLATION
The installation process must comply
with the laws, ordinances, directives and
standards (electrical safety rules and
regulations, proper recycling in accord-
ance with the regulations, etc.) in force in
the country of use!
• For further information on the installa-
tion, please refer to the Assembly In-
structions.
• Do not use silicon sealant between the
appliance and the worktop.
• Make sure that there is a sufficient gap
underneath the hob for air circulation.
Please refer to the Assembly Instruc-
tions.
• The underside of the appliance can
get hot. If the appliance is installed
over drawers, install a non-combust-
ible separation panel under the appli-
ance to prevent access to the under-
side. Please refer to the Assembly In-
structions.
• Ventilation of the appliance must com-
ply with the manufacturer’s instruc-
tions.
• Create a front opening of at least 28
cm² in the kitchen unit which houses
the hob to allow correct air circulation.
Requirements for kitchen units
• If the appliance is mounted on flam-
mable materials, the guidelines and
regulations relating to low voltage in-
stallations and fire prevention must be
strictly observed.
• For built-in units, the components (in
plastic and veneered wood) must be
applied with heat-resistant adhesives
(85°C min.): the use of unsuitable ma-
terials and adhesives may cause the
components to deform or detach.
• The use of decorative hardwood bor-
ders around the worktop behind the
appliance is permitted, provided the
minimum distance always complies
with the indications indicated in the in-
stallation drawings.
Min.
28 mm
max.
R 5 mm
min.
100 mm
55 mm
560+2
mm
490+2
mm
520 mm
580 mm min.
500 mm
FCH 64 BK KL – FCH 64 GR KL
5

Min.
28 mm
min.
100 mm
55 mm
max.
R 5 mm
520 mm
780 mm
min.
500 mm
490+2
mm mm
750+2
FCH 84 BK KL – FCH 84 GR KL
• For further information on the installa-
tion, please refer to the Assembly In-
structions.
• If there is no oven beneath the hob, in-
stall a separation panel under the ap-
pliance according to the Assembly In-
structions.
3. ELECTRICAL
CONNECTIONS
WARNING: All electrical connec-
tions must be carried out by an au-
thorised installer.
• Before making the connections, check
that the rated voltage of the appliance
indicated on the relevant rating plate
corresponds to the power supply
voltage. The rating plate is affixed to
the underside of the hob.
• Follow the connection diagram (loc-
ated on the underside of the hob).
• Only use original components sup-
plied by the spare parts service.
• The appliance is supplied with a
power cable.
• If damaged, replace the power supply
cables with original spare cables.
Contact the After Sales Service.
Caution! Do not weld any of the
cables!
Electrical connection
• The wire connection must be per-
formed by a specialised technician.
• This device has a Y-shaped connec-
tion with an H05V2V2-F cable. Min.
wire section: 5x2.5 mm².
• Connection terminals can be ac-
cessed by removing junction box
cover.
• Make sure the specifications of the
household electrical system (voltage,
maximum power and current) are
compatible with those of the appli-
ance.
• Connect the appliance as shown in
the diagram (in accordance with the
mains voltage and country standard
reference).
Connection diagram
220V - 240V 1N
NL
L Black
L Brown
N Blue
N Grey
Yellow / Green
6

380V - 415V 2N
L1 L2 L3 N
L1 Brown
L2 Black
N Blue
N Grey
Yellow / Green
L1 L2 N2N1
220V - 240V 2N
L1 Brown
L2 Black
N Blue
N Grey
Yellow / Green
L1 L2 L3 N1 N2
Place shunts between the terminals
as shown
220V
-240V
1N
~
L N PE
123456
220V
-240V
380V - 415V
2N
~
1 2 3 4 5 6
L1 L2 N PE
220V-240V
220V-240V
220V -240V
2N
~
L1 L2 N1 PE
1 2 3 4 5 6
220V-240V
220V-240V
N2
4. CLEANING AND
MAINTENANCE
• Never use abrasive sponges, wire
wool, hydrochloric acid or other
products that might scratch or mark
the surface.
• Do not consume any food that falls ac-
cidentally or builds up on the surface
and the functional or aesthetic ele-
ments of the hob.
• Switch off or unplug the appliance
from the mains supply before carrying
out any maintenance work.
7

• Clean the appliance after every use to
prevent any residual food from burn-
ing on to it. It is much harder work to
remove encrusted and burned-on dirt.
• For everyday dirt, use a soft cloth or
sponge and a suitable detergent. Fol-
low the manufacturer’s recommenda-
tions regarding detergents to be used.
The use of neutral detergents is re-
commended.
• Remove all traces of encrusted dirt ,
e.g. milk that has boiled over, using a
scraper suitable for ceramic glass,
while the hob is still hot. Follow the
manufacturer’s recommendations re-
garding the type of scraper to be used.
• Remove food containing sugar, e.g.
jam that has spilled during cooking,
using a scraper suitable for ceramic
glass, while the hob is still hot. If this
residue is not removed, it may dam-
age the ceramic glass surface.
• Remove any melted plastic using a
scraper suitable for ceramic glass
while the hob is still hot. If this residue
is not removed, it may damage the
ceramic glass surface.
• Remove limescale using a small
amount of descaler, e.g. vinegar or
lemon juice, once the hob has cooled
down. Then, clean again with a damp
cloth.
• Do not cut or prepare foodstuffs on the
surface and do not drop hard objects
onto it. Do not drag pans or plates over
the surface.
• Do not use steam cleaning equip-
ment.
Maintenance and repairs
• Make sure that any maintenance on
the electrical components is only car-
ried out by the manufacturer or by the
service technicians.
• Make sure that damaged cables are
only replaced by the manufacturer or
by the service technicians.
In there is a fault, try to resolve it by fol-
lowing the troubleshooting guidelines. If
the problem cannot be resolved, contact
the After Sales Service.
When contacting the After Sales Ser-
vice, please provide the following inform-
ation:
- type of fault
- appliance model (Art./Code)
- serial number (S.N.)
This information can be found on the rat-
ing plate. The rating plate is affixed to the
underside of the appliance.
If the event of incorrect use of the appli-
ance or if the installation has not been
performed by an authorised installer, the
intervention by the After Sales Service
technician or dealer may not be free of
charge, even during the warranty period.
5. PRODUCT
DESCRIPTION
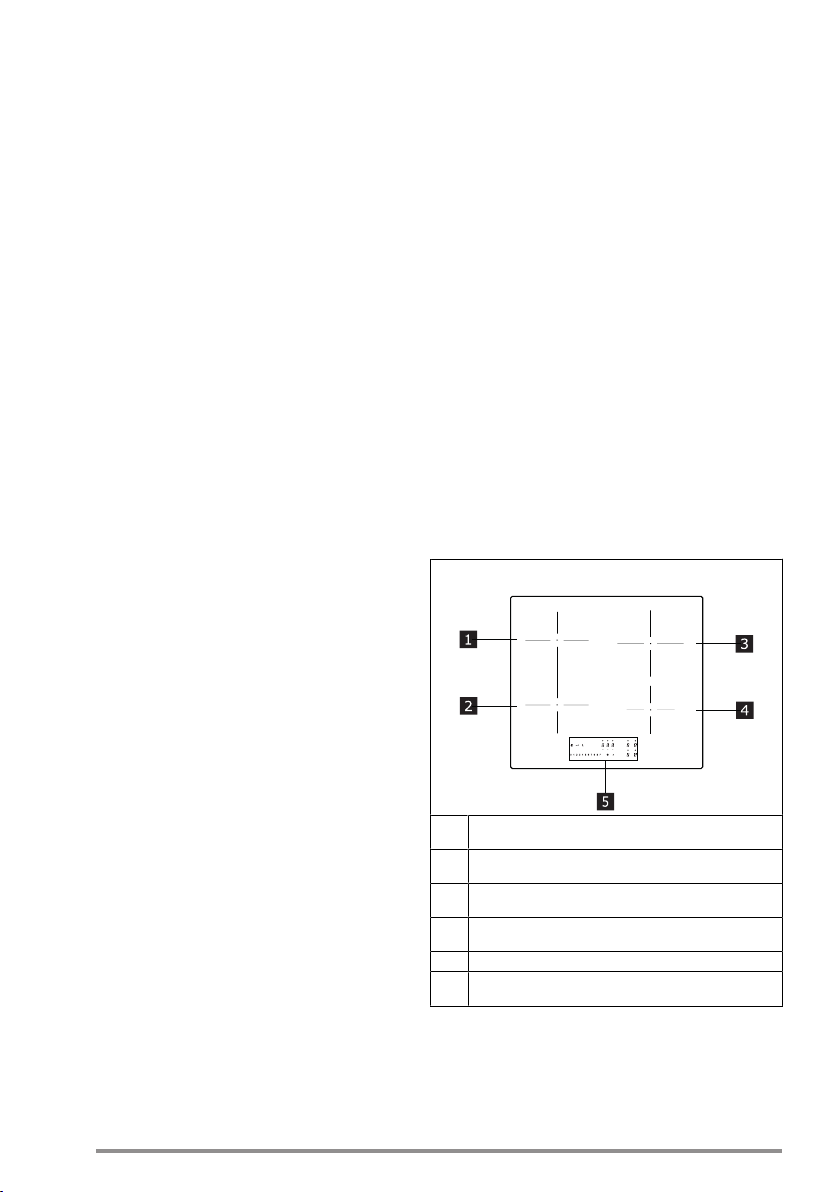
Cooking surface layout
FCH 64 BK KL - FCH 64 GR KL
1Single cooking area (220 x 197 mm) 2100 W, with
3000 W Booster function
2Single cooking area (220 x 197 mm) 2100 W, with
3000 W Booster function
3Single cooking area (200 mm) 2300 W, with 3000 W
Booster
4Single cooking area (145 mm) 1400W, with 1850 W
Booster
5Control panel
1 + 2 Combinable cooking area (220 x 395 mm) 3000 W,
with 3700 W Booster function
8

FCH 84 BK KL - FCH 84 GR KL
1Single cooking area (220 x 197 mm) 2100 W, with
3000 W Booster function
2Single cooking area (220 x 197 mm) 2100 W, with
3000 W Booster function
3Single cooking area (200 mm) 2300 W, with 3000 W
Booster
4Single cooking area (160 mm) 1400W, with 2100 W
Booster
5Control panel
1 + 2 Combinable cooking area (220 x 395 mm) 3000 W,
with 3700 W Booster function
INDICATORS
Pan detection
Each of the cooking areas is fitted with a
system to detect the presence of a pan.
The pan presence detection system re-
cognises pans with a magnetic base,
suitable for use with induction hobs.
If the pan is removed during cooking or if
an unsuitable pan is used, the symbol
appears on the display.
Residual heat indicator
The residual heat indicator is a safety
feature, indicating that the surface of the
cooking area is still at a temperature of
50 °C or above, which may cause burns if
touched by a bare hand. The digit for the
corresponding cooking area indicates
.
6. CONTROL PANEL
1
5
4
2
8
67
3
A
1On/Off
2Power level indicator
3Timer symbol
4Timer control and cooking time indicator
5Defrost key
6Lock key
7Pause key
8Swipe keyboard
AAuto key
9

The cooking areas can be activated by
pressing the reference digit . The digit
becomes brighter to confirm the opera-
tion.
When a pan is placed on one of the 4
cooking areas, the hob automatically de-
tects its presence and lights up the cor-
responding digit to activate it.
If there are no pans or other objects on
the hob, the digits are not visible.
The functions which can be selected are
always visible on the control panel, but
with a dimmed light. Select the functions
by touching the corresponding symbol.
7. POWER LIMITATION
When connecting to the domestic power
supply for the first time, the installer must
set the power of the cooking areas based
on the actual capacity of the domestic
power supply.
If this is not necessary, the hob can be
turned on directly using , otherwise,
follow the operations below to access the
menu.
Before carrying out the procedure it is
advisable to read the entire paragraph.
Connect the hob to the domestic mains
power.
1. All the digits light up for a few
seconds, then switch off and only
keeps flashing.
2. Press and hold : the digits in the
cooking area indicate .
3. Keep pressing and start press-
ing the digits in the areas in anti-
clockwise order starting from the
front right one.
1
2
4
3
The rear left digit indicates and a num-
ber indicating the type of menu. The front
left digit indicates a number which de-
pends on the parameters indicated in the
selection.
Select the digit with and press “8” in the
power bar.
Select the front left digit and select the
correct setting.
See the following table for the specifica-
tions:
Value on the
power bar KW Notes
0 7.4 Standard initial setting
1 6
2 5
3 4
4 3.5
5 3
6 2.5
Once the correct value has been
entered, confirm by touching and holding
.
10

8. FUNCTIONS
Child lock This function prevents accidental use of the appliance
To enable: if a pan is on the hob, press and hold the corresponding digit for 3 seconds. If there is
no pan on the hob, press and hold for 3 seconds one of the 4 digits (not visible) next to point on
the left side. Release and slide your finger from 0 to 9 along the power bar which displays the oper-
ating sequence. All the digits indicate .
The operations described must be completed within 10 seconds.
To disable: press and hold for 3 seconds one of the 4 digits in the cooking areas. Release and slide
your finger from 9 to 0 along the power bar which displays the operating sequence.
The operations described must be completed within 10 seconds.
Lock It is possible to lock the hob functions during use, e.g. to clean the hob. The function is enabled
even if the hob is switched off and on again.
If the electricity supply is cut, the function is disabled.
To enable: press and hold for 1 second.
To disable: press .
Boost function Every cooking area can be set to an additional power level for a maximum of 5 minutes.
To enable: select one of the 4 cooking areas and select “P” on the power bar. The corresponding
digit indicates .
To disable: select one of the other possible values on the power bar.
Cooking zone
timer The timer allows a specific cooking area to be switched off when the set time expires.
The cooking areas can be programmed individually because each one has its own timer.
To enable: With the cooking area switched on, press the corresponding symbol to access the
timer controls for that area.
The 3 digits indicate “0 0 0”. Press “+” or “-” to set the timer countdown.
Hours - Tenths - Minutes
To confirm the set time, do not touch anything for 10 seconds.
When the countdown has finished, the digits are reset and an audible signal is emitted. The func-
tion can be interrupted by pressing any key.
If the timer is enabled for more than one cooking area, the 3 digits will always show whichever timer
is about to finish first.
To disable: with the cooking area switched on, press the corresponding symbol to access the
timer controls for that area.
Set the three digits to “0 0 0” using “+” or “-”.
11

Timer (generic) Timer with alarm for generic use.
To enable: switch on the hob making sure there are no pans or active cooking areas.
The 3 digits to control the timer show “- - -”.
Press the digit to access the timer menu and display “0 0 0”.
Press “+” or “-” to set the timer countdown.
Hours - Tenths - Minutes
To confirm the set time, do not touch anything for 10 seconds.
When the countdown has finished, the digits are reset and an audible signal is emitted. The func-
tion can be interrupted by pressing any key.
Repeat the steps described to change the countdown value.
To disable: switch on the hob making sure there are no pans or active cooking areas.
Press the digit to access the timer menu and use “+” and “-” to set the display to “0 0 0”.
Defrost function To enable: select one of the 4 cooking areas and press .
The digit of the selected area shows .
To disable: press or press .
Heating function This function is used to heat a pan to the maximum power before continuing to cook at a selected
level. The time interval for which the cooking area is held at maximum power depends on the final
cooking level that has been set. See the table:
Power level Timer (seconds)
1 48
2 144
3 230
4 312
5 408
6 120
7 168
8 216
9 Not available
P Not available
To enable, with a pan on the bob and the cooking area selected, press and hold the selected value
(from 1 to 8) on the power bar for 3 seconds. The display of the corresponding cooking area indic-
ates “A”.
The cooking level can be increased, but the function is disabled if it is decreased.
It can also be disabled by touching and holding the cooking area in question for 3 seconds.
Pause function This function allows you to pause/restart any active function on the hob, by reducing the power
available in the cooking area and resetting all the functions. If the Pause function is not disabled
with 10 minutes, the hob automatically switches off.
To enable: With a pan on the hob and the cooking area selected, press and hold the Pause func-
tion key for at least 1 second. All the displays show .
To disable: press and hold for 1 second until it starts flashing. Press any other key within 10
seconds. The function is disabled and the hob continues with the previous settings.
Recall function This function is used to recall the function settings of the hob if it is switched off by mistake or the
electricity is unexpectedly cut off.
When the hob is switched off, if it is switched on again with 6 seconds by touching , the
key flashes for 6 seconds. Press the key to recall the functions set previously. A beep is emit-
ted to confirm the operation.
12

Combo mode (“bridge”
function) This function allows 2 cooking areas to be combined to use and control them as if they were one
and have a bigger cooking area at your disposal. This function allows you to use pans with a wider
base.
Only the cooking areas on the left can be selected for use with this function.
To enable/disable: press the digits of the left-hand cooking area at the same time to select the 2
areas be combined until the digit appears to show that the function has been enabled. The other
digit is used to set the power level.
AUTO function This function allows you to enable AUTO mode so that operation of the hob and hood are coordin-
ated. When the hob is switched on, the lights are also switched on. The hood speed is automatic-
ally set using the highest power level present on the hob.
Hob-Hood Coupling
Please refer to the “USER MENU CUSTOMISATION” section, menu code “U9”, to start the connec-
tion procedure and follow all the instructions.
9. COOKING TABLE
Power level Cooking method To be used for
1Melting, heating gently Butter, chocolate, gelatine, sauces
2Melting, heating gently Butter, chocolate, gelatine, sauces
3Warming up Rice
4Prolonged cooking, thickening, stewing Vegetables, potatoes, sauces, fruit, fish
5Prolonged cooking, thickening, stewing Vegetables, potatoes, sauces, fruit, fish
6Prolonged cooking, braising Pasta, soups, braised meat
7Light frying Rösti (potato fry-ups), omelettes, breaded and fried
foods, sausages
8Frying, deep fat frying Meat, chips
9Quick frying at high temperature Steak
PQuick heating Boiling water
13

10. USER MENU CUSTOMISATION
Before carrying out the procedure, it is advisable to read the entire paragraph.
– Press .
– Press and hold again for 3 seconds.
– The key starts flashing.
– Press and hold : the digits in the cooking area indicate .
– Hold and start pressing the digit of the cooking areas in clockwise order starting from the left front one.
4
3
1
2
The rear left digit alternately indicates and a number from 2 to 9 indicating the menu code.
The front left digit indicates a number which depends on the parameters indicated in the selection.
– Press the left rear digit.
– Select a number on the power bar to access the menu code.
– Press the left front digit.
– Select a number on the power bar to select a value.
– Once the correct value has been entered, confirm by touching and holding for 2 seconds.
– To exit the menu without saving, press .
If no operation is carried out the user menu will close after 1 minute.
See the following table for the specifications:
Menu code Description Value
U2 Key sound volume control menu. 0 - Sound disabled
1 - Min.
3 - Max.
U3 Countdown beeper volume control
menu. 0 - Sound disabled
1 - Min.
3 - Max.
U4 Display brightness level control
menu. 0 - Max.
9 - Min.
U5 Countdown display control menu. 0 - Countdown display disabled
1 - Countdown display enabled
U6 Pan detection menu. 0 - Enabled
1 - Disabled
U7 Countdown end management
menu. 0 - Continuous flashing and shut-down
1 - Ten flashes and shut-down
2 - One flash and shut-down
U9 Menu to activate Hob-Hood
Coupling.0 - Hob-Hood Coupling disabled
1 - Activate Hob-Hood Coupling procedure. The display shows an anima-
tion.
WARNING: once the procedure has been activated, refer to the hood
manual and check that the K-Link Coupling procedure has been activated.
The coupling procedure takes 2 minutes.
14

11. POWER MANAGEMENT
FCH 64 BK KL - FCH 64 GR KL
1
2
3
4
FCH 84 BK KL - FCH 84 GR KL
1
2
3
4
“This product is equipped with electron-
ically controlled power management.
See the illustration.
This function monitors the electricity in-
put and limits the maximum power output
to 3700 W for cooking areas 1 and 2, op-
timising the power distribution and pre-
venting the system from overloading.
Hob in full power setting - the function di-
vides the power between cooking areas
and automatically decreases the power
of the other cooking area, if necessary
(the last command has highest priority).
Hob in power limitation setting - the func-
tion divides the power between cooking
areas and does not allow you to set the
power for the other cooking area above
the limit (to increase the power of a par-
ticular cooking area, the power setting
for the other one must be decreased
manually).
Example:
If boost level (P) is selected for hob 1,
hob 2 cannot exceed level 9 at the same
time and will be automatically limited.”
12. GUIDE TO PAN USE
What pans to use
Only use pots and pans with the bottom
made from ferromagnetic material which
are suitable for use with inductions hobs:
• cast iron
• enamelled steel
• carbon steel
• stainless steel (including partial)
• aluminium with ferromagnetic coating
or ferromagnetic plate
To determine if a pot or pan is suitable,
check for the symbol (usually
stamped on the bottom). You can also
hold a magnet to the bottom. If it clings to
the underside, the pan can be used on an
induction hob.
To ensure optimum efficiency, always
use pots and pans with a flat bottom that
distributes the heat evenly. If the bottom
is not perfectly flat, this will affect power
and heat conduction.
How to use
Minimum diameter of pot/pan base for
the different cooking areas.
To ensure that the hob functions prop-
erly, the pan must cover one or more of
the reference points indicated on the sur-
face of the hob, and must be of a suitable
minimum diameter.
Always use the hob that best corres-
ponds to the diameter of the bottom of
the pan.
Cooking areas Pan base diameter
Ø min.(recommen-
ded) Ø max (recommen-
ded)
Right rear 110 mm 200 mm
Right front 110 mm 145 mm
Left rear 110 mm 190 mm
Left front 110 mm 190 mm
Empty or thin-based pots/pans
Do not use empty or thin-based pots/
pans on the hob as it will be unable to de-
tect the temperature or turn off automat-
15

ically if the temperature is too high, thus
damaging the pan or the hob surface.
If this occurs, do not touch anything and
wait for all components to cool down.
If an error message appears, refer to
“Troubleshooting”.
Hint/tips
Noise during cooking
When a cooking area is active, it may
hum briefly. This is a characteristic of all
ceramic glass hobs and does not impair
the function or life of the appliance. The
noise depends on the pan used. If it
causes considerable disturbance, it may
help to change the pan.
13. TROUBLESHOOTING
Error code Description Possible causes of the error Solution
ER03 Hob switches off after 10
sec. Continuous key activation detected.
Water or pan placed on the control
panel.
Remove water or pan from the ceramic
glass surface and control panel.
ER21 Hob switches off. The internal temperature of electronic
parts is too high. Let the hob cool down.
Please check if the hob has sufficient
ventilation.
If the error persists, please contact
After Sales Service.
E2 Corresponding cooking
area switches off. Empty or unsuitable pan.
Pan or ceramic glass surface temper-
ature too high.
Electronic component temperature too
high.
Let the hob cool down.
Use a suitable pan.
Do not heat empty pans.
E3 Corresponding cooking
area switches off. Unsuitable pan.
The pan is losing its magnetic proper-
ties and may damage the induction
hob.
Use a suitable pan.
The error is automatically cancelled
after 8 seconds and the cooking area
can be used again.
If any other errors occur, the pan must
be changed.
If the error persists, please contact
After Sales Service.
E6 Hob does not switch on. Power supply voltage and/or frequency
is out of range. Check mains voltage and/or fre-
quency.
If necessary, contact After Sales Ser-
vice.
E8 Cooking areas are turned
off. Fan fault.
Fan blocked by dust or fibres. Clean and remove foreign bodies from
the fan.
If the error persists, please contact
After Sales Service.
EH Corresponding cooking
area switches off. Temperature sensor blocked for cook-
ing area.
Insufficient temperature variation de-
tected after switching on the hob.
Switch off the hob and switch it on
again after cooling down.
If the error persists, please contact
After Sales Service.
E4
E5
E7
E9
ER20
ER22
ER31
ER36
ER42
ER47
EA
Disconnect the hob from the power supply.
Wait a few seconds, then reconnect the hob to the power supply.
If the problem persists, call the After Sales Service and specify the error code that appears on the display.
16

14. TECHNICAL DATA
FCH 64 BK KL - FCH 64 GR KL
Unit Value
Type of product Built-in Hob
Dimensions Width mm 580
Depth mm 520
Min./max height mm 54
Total power W 7400
Parameter Value
Power supply voltage/frequency 220-240 V, 50 Hz; 220 V; 60 Hz;
2N~ 380-415 V, 50 Hz; 2N~ 380 V, 60 Hz;
Weight of the appliance 8.8 kg
FCH 84 BK KL - FCH 84 GR KL
Unit Value
Type of product Built-in Hob
Dimensions Width mm 780
Depth mm 520
Min./max height mm 54
Total power W 7400
Parameter Value
Power supply voltage/frequency 220-240 V, 50 Hz; 220 V; 60 Hz;
2N~ 380-415 V, 50 Hz; 2N~ 380 V, 60 Hz;
Weight of the appliance 10.4 kg
15. ENERGY EFFICIENCY OF HOB
Number of cooking areas 4
Number of combo cooking areas 1- Left
Cooking technology Induction
Combo cooking area dimensions Left 220 x 395 mm
Dimensions of cooking areas Front left 220 x 197 mm
Rear left 220 x 197 mm
Rear right Ø 200 mm
Front right Ø 145 mm – (FCH 64)
Front right Ø 160 mm – (FCH 84)
Energy consumption per combo cooking area 192 Wh/kg
Energy consumption per cooking area Rear right 185 Wh/kg
Front right 181 Wh/kg – (FCH 64)
Front right 187 Wh/kg – (FCH 84)
Energy consumption of the hob (electric cooking) 186 Wh/kg – (FCH 64)
188 Wh/kg – (FCH 84)
17

16. ENVIRONMENTAL
ASPECTS
Disposal of household appliances
The symbol on the product or pack-
aging indicates that the product must not
be disposed of with normal domestic
waste. The product must be disposed of
at a specialist recycling centre for elec-
trical and electronic components. By en-
suring that this product is disposed of
correctly, you will help prevent possible
negative consequences for the environ-
ment and health that might result from its
improper disposal. For more detailed in-
formation on how to recycle this product,
please contact your local municipal of-
fices, local waste disposal service or the
shop from which the product was pur-
chased.
Disposal of packaging materials
Materials with the symbol can be re-
cycled. Dispose of the packaging in spe-
cial recycling collection bins.
Energy saving
You can save energy during everyday
cooking if you follow hints outlined be-
low.
• When you heat water, only use the
quantity you require.
• If possible, always put the lids on the
pans.
• Place the pan on the hob before you
switch it on.
• Put smaller pans on the smaller cook-
ing areas.
• Put the pans directly in the centre of
the cooking area.
• Use residual heat to keep the food
warm or melt it.
17. CONFORMITY
Information on the product pursuant
to EU regulation no. 66/2014
Reference standards:
EN/IEC 60350-2
EN/IEC 50564
This appliance has been designed, man-
ufactured and sold in compliance with
EEC Directives.
“The technical data is provided on the
rating plate affixed to the underside of
the product.”
18

FR
1. INFORMATIONS SUR
LA SÉCURITÉ
Pour la sécurité person-
nelle et pour le fonctionne-
ment correct de l’appareil,
prière de lire attentive-
ment ce manuel avant
l’installation et la mise en
marche. Toujours garder
ces instructions avec l’ap-
pareil, même en cas de
cession ou de transfert à
des tiers. Il est important
que les utilisateurs
connaissent toutes les ca-
ractéristiques de fonction-
nement et de sécurité de
l’appareil. Ces tables de
cuisson disposent de sys-
tèmes d’induction
conformes aux exigences
des directives EMC et
EMF et ne devraient pas
interférer avec d’autres
appareils électroniques.
Les porteurs de pacema-
kers ou d’autres implants
électroniques doivent
consulter leur médecin ou
le fabricant de ces im-
plants pour évaluer leur
degré de sensibilité aux in-
terférences.
Faire effectuer les raccor-
dements électriques par
un technicien spécialisé.
Avant de procéder au rac-
cordement électrique, lire
la section RACCORDE-
MENT ÉLECTRIQUE.
Pour les appareils munis d’un
cordon d’alimentation, les
bornes ou la section des fils
entre le point d’ancrage du cor-
don et les bornes doivent être
disposées de manière à per-
mettre d’extraire le conducteur
sous tension en amont du câble
de mise à la terre au cas où le
cordon sortirait de son ancrage.
• Le fabricant ne pourra être te-
nu responsable des dom-
mages découlant d'une mau-
vaise installation ou d'un
mauvais usage.
• Vérifier que la tension élec-
trique indiquée sur la plaque
signalétique fixée à l’intérieur
de l’appareil correspond à la
tension du secteur.
• Les dispositifs de sectionne-
ment doivent être installés
dans l’équipement fixe,
conformément aux normes
sur les systèmes de câblage.
• Pour les appareils de Classe
I, contrôler que le réseau d’ali-
mentation domestique dis-
pose d’un branchement adé-
quat à la masse.
• Raccorder l’appareil au sec-
teur avec un interrupteur om-
nipolaire.
• Si le cordon d’alimentation
est endommagé, le faire rem-
placer par le fabricant, par un
service après-vente agréé ou
par un technicien spécialisé,
afin d’éviter tout risque ou si-
tuation de danger.
19

AVERTISSEMENT :
Avant d’installer l’appareil,
retirer les films de protec-
tion.
• Utiliser uniquement les vis et
les petites pièces fournies
avec l’appareil.
AVERTISSEMENT :
Toute installation de vis ou
de dispositifs de fixation
non conformes à ces ins-
tructions peut entraîner
des risques de décharges
électriques.
• Les opérations de nettoyage
et d’entretien ne doivent pas
être effectuées par des en-
fants, à moins qu’ils ne soient
surveillés par un adulte.
• Surveiller les enfants. S’as-
surer qu’ils ne jouent pas
avec cet appareil.
• Cet appareil ne doit pas être
utilisé par des personnes (en-
fants compris) ayant des ca-
pacités psychophysiques et
sensorielles réduites ou ne
disposant pas de l’expé-
rience et des connaissances
nécessaires, à moins qu’elles
ne soient attentivement sur-
veillées et instruites sur l’utili-
sation sûre de l’appareil par
une personne responsable
de leur sécurité.
• Cet appareil peut être utilisé
par des enfants âgés de plus
de 8 ans et par des personnes
ayant des capacités psycho-
physiques et sensorielles ré-
duites ou ayant une expé-
rience et des connaissances
insuffisantes à condition
qu’elles soient attentivement
surveillées et instruites sur
l’utilisation sûre de l’appareil
et sur les dangers qu’elle
comporte. S’assurer que les
enfants ne jouent pas avec
cet appareil.
AVERTISSEMENT : L’ap-
pareil et ses parties acces-
sibles peuvent atteindre
de très hautes tempéra-
tures durant l’utilisation.
Prendre garde de ne pas tou-
cher les résistances.
Les enfants de moins de 8ans
doivent être tenus à l’écart de
l’appareil, à moins qu’ils ne
soient surveillés en perma-
nence.
AVERTISSEMENT : Si la sur-
face présente des fissures,
éteindre l’appareil pour éviter
tout risque de décharge élec-
trique.
• Ne pas toucher l’appareil
avec les mains ou des parties
du corps mouillées.
• Ne pas utiliser des appareils à
vapeur pour nettoyer le pro-
duit.
• Ne pas poser d’objets métal-
liques tels que couteaux,
fourchettes, cuillères, et cou-
vercles sur la surface de la
table de cuisson, car ils pour-
raient atteindre des tempéra-
tures très élevées.
• Utiliser la commande prévue
pour éteindre la table de cuis-
son après son utilisation, ne
pas s’en remettre aux cap-
teurs des casseroles.
20
This manual suits for next models
3
Table of contents
Languages:
Other Faber Cooktop manuals
Popular Cooktop manuals by other brands

Dometic
Dometic CVH1350GOG Installation and operating manual

Samsung
Samsung NZ30K6330R SERIES user manual

Frigidaire
Frigidaire FEC30S6AB - on 30" Smoothtop Electric... Wiring diagram

KitchenAid
KitchenAid KECD806RBL01 parts list

KitchenAid
KitchenAid KCGD500GSS Use and care guide

Frigidaire
Frigidaire FEC30S6ABC Factory parts catalog

Monogram
Monogram 36 Ceramic Cooktop installation instructions

Omega
Omega OI64MZ Installation, operation and maintenance instructions

Euromaid
Euromaid BCS 4 user manual

Fisher & Paykel
Fisher & Paykel GC912 user guide

Mellerware
Mellerware CAPRI user manual

ROBINHOOD
ROBINHOOD HEF302TCOM Installation and operating instructions