Face Dipstick 2277 User manual

Dipstick2277 Road Profiler
Operator's Manual
with
RoadFaceData Collection Program 6.7x
And RoadFace 6.1x
April 2017
Face Construction Technologies
427 West 35th Street
Norfolk, Virginia 23508
(757) 624-2121
1-800-FNUMBER

This page is intentionally blank.

i
OVERVIEW OF THE DIPSTICK®2277
Operation
The Dipstick2277 is the latest in the 2200 series of Dipsticks. It has all the benefits of the earlier 2000, 2200 and
2272, plus some important new features.
The Dipstick2277 Road Profiler stands on two support legs. The operator simply "walks" the Dipstickalong a survey
line alternately pivoting the instrument about each leg. Two digital displays show the elevation difference between the
Dipstick'stwo support legs. Audible and visual signals alert the operator when each elevation difference reading is
measured and automatically recorded.
Advantages
The Dipstick2277 Auto-Read Road Profiler is a totally integrated data collection instrument that provides a fast and
accurate method of measuring roads, bridges, and runways.
Extraordinarily bright tablet screen –brighter and easier to read in sunlight than a smart phone. (NEW)
Uses an embedded virtual keyboard so there is no chance of getting water or sweat into the keyboard (NEW)
Instantly calculates IRI on-site
Instantly produces graphs on-site
"Drag & Drop" downloading to desktop or laptop computer
Automatic electronic zeroing
Print reports to any network or direct printer using the RoadFace analysis program
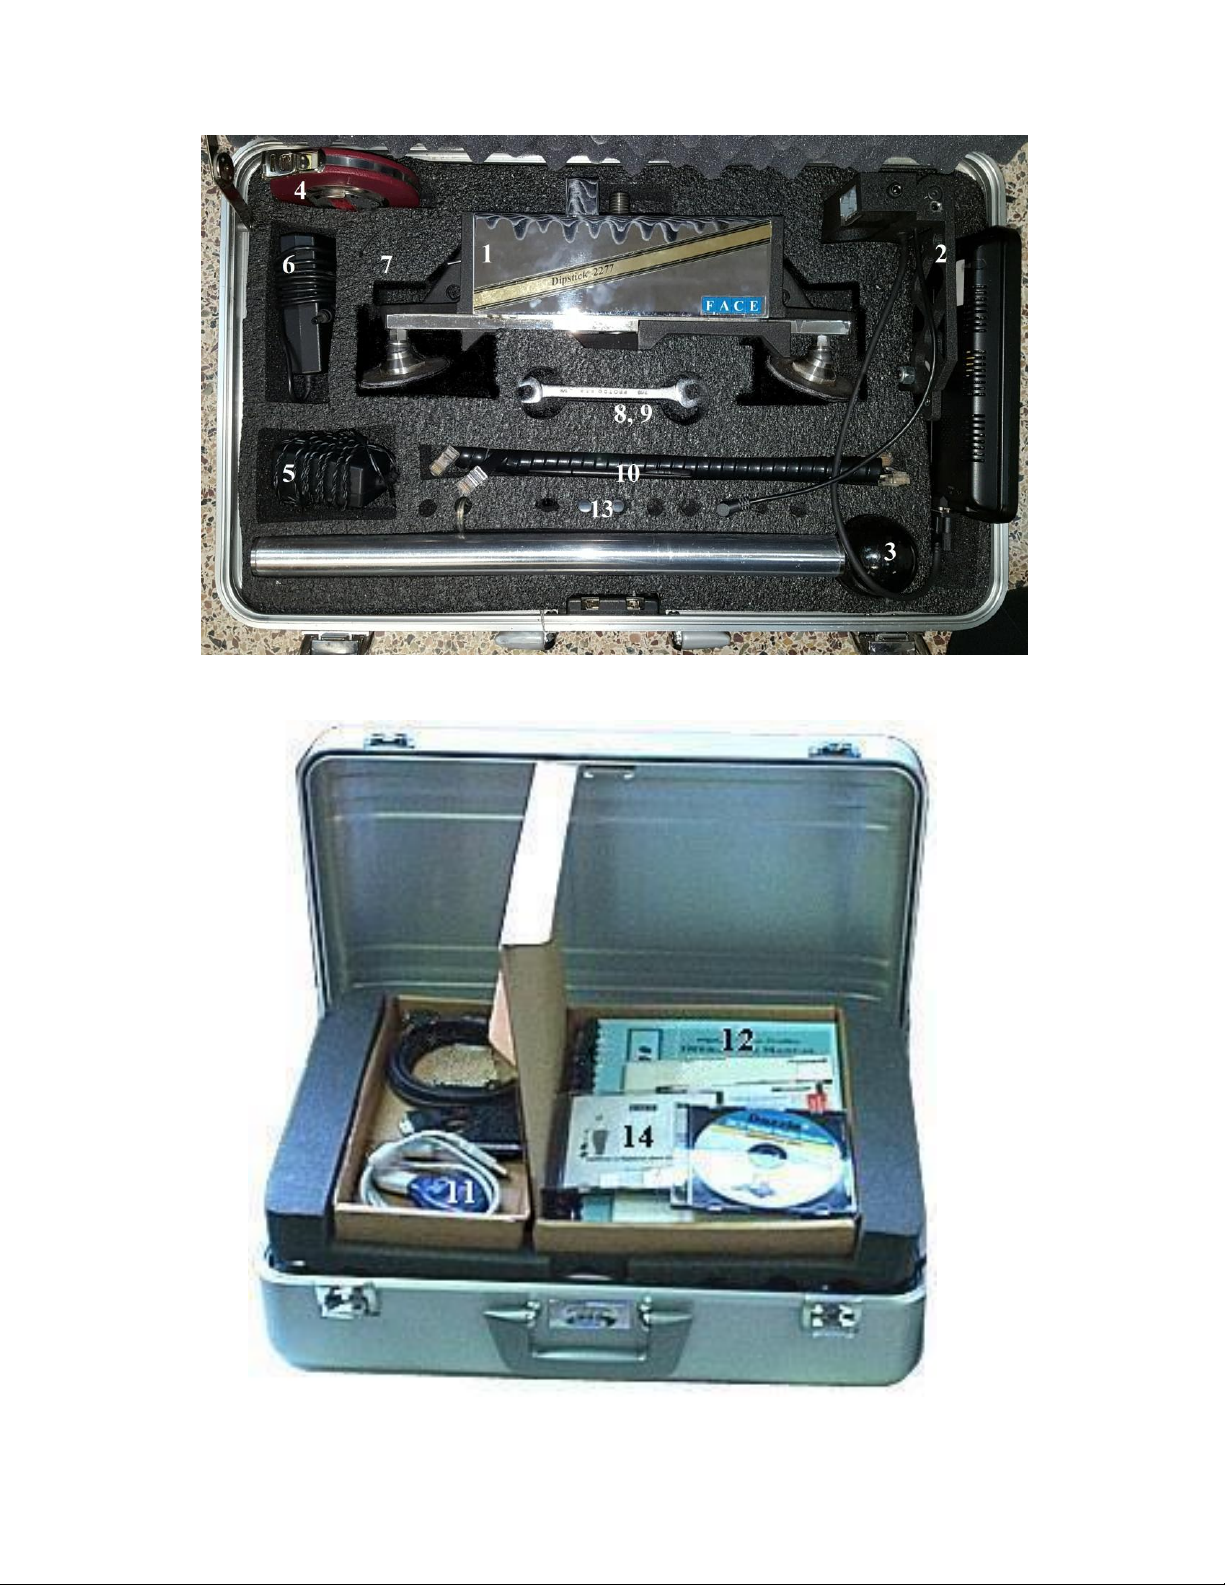
Is delivered as a complete kit in a custom Zero Haliburton case –everything you need.
Fast, Easy and Compact
Measure, analyze and report up to 1200 ft per hour
Instant on-slab IRI analysis
Complete kit is sized as carry-on luggage
Is extremely fast, efficient and accurate
—this is the fastest Dipstick®ever
Accurate
IRI and elevation data proven over millions of measurements
Class I instrument approved by state, federal and foreign governments
This instrument is used to calibrate other profiling instruments
The most accurate floor measuring instrument made
Comes with QC Test data and instructions on how to self-test, so you never need to send it to us for
calibration.
Versatile Road Instrument
Only Dipstickcan be stepped over cords, rebar and debris
Only Dipstickcan be used to set forms
Only Dipstickcan be used to check beams and girders
Everything Included
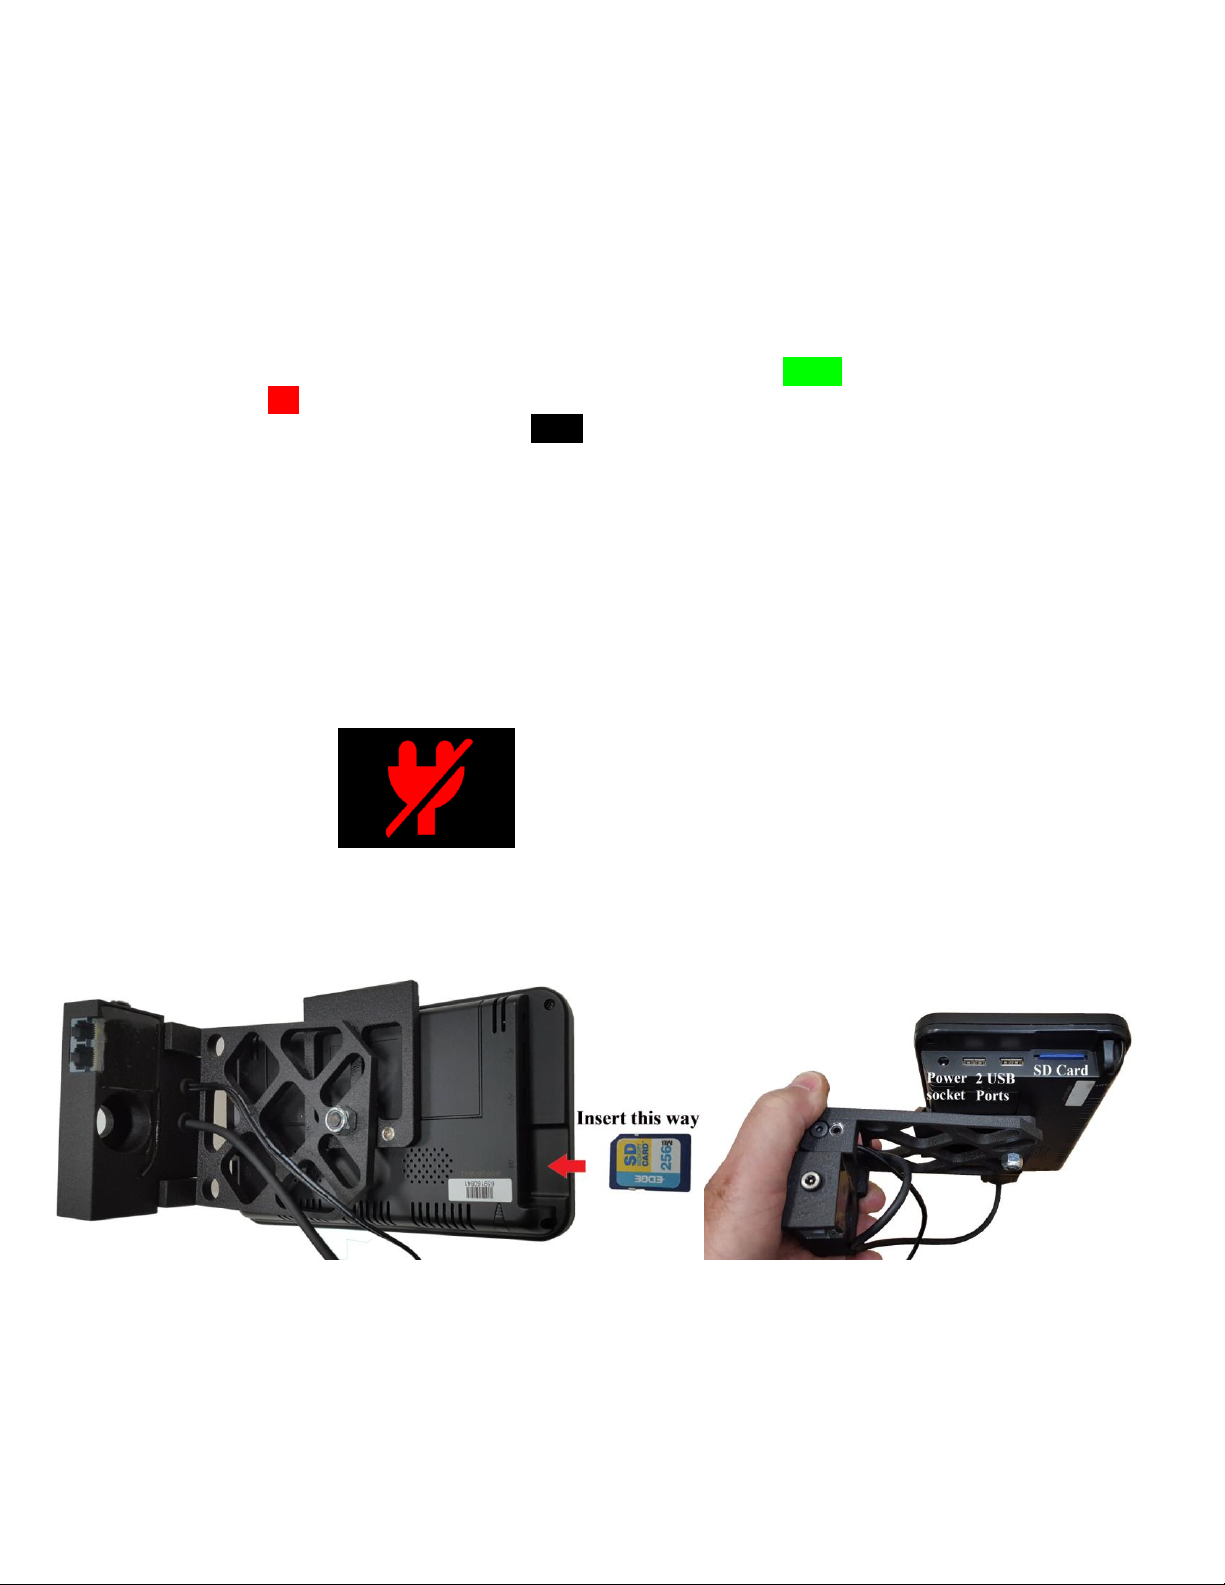
LED Voltmeter for measuring Battery Handle voltage is built into the Handle Mount (NEW)
Much larger and much brighter tablet viewing screen (NEW)
Windows®CE 6 tablet and Windowscompatible software for your PC included (NEW)
Rechargeable on-board power system
Comes equipped with a Windows CE version 6 touch screen tablet computer
Works with all Windows®operating systems including Windows®10
Blazing fast "Drag and Drop" data transfer to your PC
Print from your PC to any printer - network or local, B & W or color
Many Reports created for you which can be edited in your favorite word processing software
Touch screen & virtual keyboard interface
Includes the latest RoadFace™analysis program and the 2277 RFCollect™ program

ii
HOW TO USE THIS MANUAL
This manual shows you how to collect data with the Dipstick®2277, as well as how to process
and report the data. It will show you how to manipulate the data on either the 2277 Windows
CE 6 touch-screen 2277 Tablet that mounts on the Dipstick®, or on the RoadFace analysis
software that resides on your desktop or laptop PC.
The Dipstick's Windows CE tablet runs the RFCollect program (RFCollect) which allows you
to collect, edit, and report your data. Because the editing portions of the menu on the Windows
CE tablet is virtually identical with the RoadFace analysis program on your desktop PC, the
menus and commands are nearly identical. Chapter 5 of this manual will identify any
differences and explain how to operate in either the RFCollect program (RFCollect_2277) or
the RoadFace desktop analysis program.
This manual is laid out in the order that you will probably use the program - first collect some
data, then process and report it.
If you want to collect some new data, and if you have never done this before, you should read
Chapters 1, 2, and 3 in this manual. These are quite short –Chapters 1 & 2 are only 4 pages
each, with lots of photos & diagrams.
If you just want to process/edit/report some existing data, you can skip to Chapter 5,
Processing Data.

iii
TABLE OF CONTENTS
OVERVIEW OF THE DIPSTICK®2277 . . . . . . . . . . . . . . . . . . . . . . . i
HOW TO USE THIS MANUAL . . . . . . . . . . . . . . . . . . . . . . . . . . . . . . ii
THE DS2277 KIT PARTS LIST . . . . . . . . . . . . . . . . . . . . . . . . . . . . . . . iv
ASSEMBLING THE DIPSTICK®2277 . . . . . . . . . . . . . . . . . . . . . . . . . 1-1
ZEROING THE DIPSTICK®2277 . . . . . . . . . . . . . . . . . . . . . . . . . . . . 2-1
QUICK START DATA COLLECTION . . . . . . . . . . . . . . . . . . . . . . . 3-1
DATA COLLECTION (Expanded Details) . . . . . . . . . . . . . . . . . . . . . 4-1
PROCESSING DATA . . . . . . . . . . . . . . . . . . . . . . . . . . . . . . . . . . . . . . . 5-1
Selecting and Deselecting Runs . . . . . . . . . . . . . . . . . . . . 5-2
Edit . . . . . . . . . . . . . . . . . . . . . . . . . . . . . . . . . . . . . . . . . . . 5-10
Reports . . . . . . . . . . . . . . . . . . . . . . . . . . . . . . . . . . . . . . . . 5-4 thru 5-9
THE 2277 TABLET COMPUTER. . . . . . . . . . . . . . . . . . . . . . . . . . . . . 6-1
Transferring Data to Your Desktop PC . . . . . . . . . . . . . . . . . . . 6-3
DIPSTICK®CARE AND OPERATION . . . . . . . . . . . . . . . . . . . . . . . . 7-1
TROUBLESHOOTING . . . . . . . . . . . . . . . . . . . . . . . . . . . . . . . . . . . . . 8-1
DATA COLLECTION BIAS . . . . . . . . . . . . . . . . . . . . . . . . . . . . . . . . . 9-1
Collecting Data in Wheelpaths. . . . . . . . . . . . . . . . . . . . . . . . . . . .Appendix A
Dipstick®Capabilities. . . . . . . . . . . . . . . . . . . . . . . . . . . . . . . . . . .Appendix B
Elevation Studies & 3-D Topo Maps. . . . . . . . . . . . . . . . . . . . . . . Appendix C
Dipstick®Hints & Tips. . . . . . . . . . . . . . . . . . . . . . . . . . . . . . . . . . .Appendix D
Checking Calibration and using your Test Track. . . . . . . . . . . . .Appendix E

DIPSTICK®2277PARTS LIST
iv
It’s important that you learn to identify each part of the DS2277 Kit.
Please inspect each part carefully. If any parts are missing or appear damaged, call The Face Companies at
1-800-FNUMBER or (757-624-2121) immediately.
Cables, Software, Manuals and the Warranty are all found under the top foam lid of the Dipstick®case.
Item Description Units per Kit
1. Dipstick®unit with Moon Feet attached……………..………………………….. 1
2. 2277 Tablet and Clamp Assembly with beeper and LED Voltmeter…………… 1
3. Handle Assembly (2 Pcs) ………..……………………..…………………………. 1
4. Tape Measure…………………………………………………....…………………. 1
5. AC Adapter for Dipstick®…………………………………….…………………. 1
6. AC Adapter for 2277 Tablet……………………………..……….…….…..……… 1
7. Allen Wrenches, 7/64”, 1/8”, 5/32”& 1/16”…………………………..………….. 4
8. Open End Wrench, 7/16” x 3/8” ………………………….………………………. 1
9. Marking Crayon………………………………...…………………………………… 1
10. Dipstick®Connector Cable ("Coily Cord")…….………….……………………... 1
11. SD Card Reader ………………………………...…..………………………………… 1
12. Dipstick®Operator’s Manual………..………..……………..………………………. 1
13. Leg Extensions…………………………….........………..…………………..………. 1 pr
14. Software CD (RoadFace, RFCollect_2277).………………………………..……….... 1

DIPSTICK®2277 PARTS LIST
v
The Dipstick2277 Case
Behind the Top Foam Lid

Introduction to the 2277 Tablet Computer
READ THIS NOW
The 2277 tablet computer used on the Dipstick®is different from anything you have used before.
Read these two pages before doing anything else, and read Chapter 6 (all about the 2277 Tablet)
as soon as you can. Here’s what you need to know right now:
1. When you turn off the computer,
press and hold the On/Off button until you see this icon.
This is very important. Remember this and do this.
If you simply press and release the ON/Off button, the tablet will close the screen but will keep
running and will burn up power while it does this. The next time you try to turn it on, it will be
dead. If you try to turn it on but it does not come on when you press the On/Off button, almost
certainly you have not actually turned it off, but you have only turned off the screen.
Press and hold the On/Off button until you see this icon.
AC Power Socket
(on side)
(on side)
Stylus
RFDC startup Icon
Power
Properties
Brightness control
Calibrate Stylus
Power Indicator
(green/red/black)
Reset Button
Rubber
Port Cover
Face Co. SD Card
(on side)
On/Off Button
Touch Screen
“Get Desktop” Icon
“Get Keyboard” Icon

Introduction to the 2277 Tablet Computer
2. The 2277 Tablet is brighter than anything you have ever used before. You can read it easily
in bright sunlight. It takes power to keep the screen this bright, so you’ll need to keep track of
the power in the computer battery and the Handle Battery. You can check the computer’s
power by double-tapping the Power Properties icon, and you can see the power in the
Handle Battery by watching the LED voltmeter. You can get a quick check on the computer
power by looking at the Red/Green/Black power indicator. Green means the tablet is fully
charged, red means that the computer is being recharged from an outside source, (the AC
Adaptor or the Handle Battery) and black means that the tablet is running on its own power.
(no external power available) The Power Properties and the LED voltmeter provide the
details. The Red/Green/Black power indicator is only a rough quick check.
3. You should adjust the brightness by double-tapping the Backlight Control. Turn it all the
way up for use outside in bright sunlight, and turn it down for use indoors. Turning it down
will greatly extend the life of the computer battery and Handle Battery.
4. The most important thing to remember is to press and hold the On/Off button until you
see this icon.
5. Any time you remove and replace the Face Company SD card, be sure to put the card in as
shown in the photos below, with the face of the SD card towards the ground.

This page is intentionally blank.

CHAPTER 1ASSEMBLY
1-1
ASSEMBLING THE DIPSTICK2277
BEFORE YOU START:
Ensure that the Face Company’s Data Collection program SD card is in the slot on
the right side of the 2277 computer. Be sure the Dipstick®and the 2277 Tablet are
both fully charged. (See Chapter 7, Maintenance)
SET UP THE DIPSTICK®
Extend the kickstand from underneath the Dipstick®unit and let the Dipstick®rest on
the kickstand.
TURN ON THE DIPSTICK®
Flip the on/off switch at the start end of the Dipstick®up to turn on the Dipstick®.
As the Dipstick is coming on, you will notice the L.C.D. screens blink. The L.C.D. screens
will then display readings. If the computer connector cable (“coily” cord) is connected to
the Dipstick before turning the Dipstick on, the beeper will sound 3 beeps to let you know
that the connections are good from the Dipstick to the handle mount.
The Dipstick should be warmed
up for at least 5 minutes before
zeroing (Chapter 2) or collecting data. (Chapter 4) Turning the Dipstick on now will
ensure that it is fully warmed up by the time the Dipstick is completely assembled and is
ready to collect data.

CHAPTER 1ASSEMBLY
1-2
ASSEMBLE THE HANDLE, THE 2277 TABLET COMPUTER, AND CLAMP
The handle section with the black ball is the top section. The other section is the lower
section or Battery Handle. It contains a set of rechargeable batteries to provide power
for the 2277 Tablet computer.
Screw the lower section onto the Dipstick body stud and snug it down.
Place the computer clamp assembly over the threaded stud on the bottom handle
section. Be sure the beeper and LED Voltmeter on the computer clamp are facing up.
Align the Tablet so that it is over the “Start” end of the Dipstick.
Screw the top handle section onto the threaded stud on the bottom handle section
sticking through the computer clamp assembly and snug it down.
ADJUST THE COMPUTER CLAMP ASSEMBLY
The computer clamp assembly functions as a rotary desktop as well as a clamp that holds
the computer to the Dipstick®. The two 1/8" set screws on the side of the Handle Mount
provide the friction that holds the desired angle for the desktop. Once the desired position
is obtained, tighten up the set screws enough to provide adequate friction, but do not
overtighten.

CHAPTER 1ASSEMBLY
1-3
Coily Cord
goes here
VERIFY THAT THE 2277 TABLET IS CONNECTED TO THE SERIAL CABLE
The serial cable underneath the handle mount needs to be connected to the left side of the
Tablet. You can leave it connected, even when it is in the case.
CONNECT THE POWER CABLE TO THE TABLET
Connect the clear power cord from the lower handle section to the side of the Handle
Mount and connect the black power cord from underneath the Handle Mount to the right
side of the Tablet as shown in the photo on the previous page. The Handle Battery
provides power to the Tablet computer. If the Tablet and the Handle Battery are both fully
recharged, you can run it for more than 8 hours on a single charge. Note that the LED
Voltmeter measures the available voltage in the Handle Battery (not the voltage in the
Dipstick) There is a menu item on the Tablet’s data collection program that allows you to
monitor the voltage in the Dipstick.
PLUG IN THE DIPSTICK®COMPUTER CONNECTOR CABLE
Plug one end of the Dipstick®computer connector
cable (the black "coily" cord) into the phone jack
connector on the Dipstick®, and the other end into
the large phone jack on the Handle Mount.
PLUG IN THE TRIGGER CONNECTOR
(All Road Dipstick Profilers come with a "Trigger" handle)
Plug the phone cord "pig tail" cable from the top handle section into the small phone jack
connector on the Handle Mount. It will only fit in one of the two sockets.

CHAPTER 1ASSEMBLY
1-4
TURN ON THE 2277 TABLET
Press the <On/Off> key at the lower right corner of the Tablet. The Tablet’s screen will
show a “Windows Smart” picture with a green bar below it, then a white line will cross the
screen from left to right, and the Data Collection program will start automatically.
Starting from the Windows CE Desktop
If the Tablet is on but the Data Collection program is not
running, you may start the program from the Windows
CE Desktop by double-tapping the red and blue “Face”
icon for the RFDC program. (near the left side of the
screen)
Starting from the Executable
You may start the program by double-tapping the "My
Device" icon, then double-tapping the "NandFlash"
Folder, then double-tapping the "RFDC2277" folder,
then Doubletapping the RFCollect.exe icon.
At this point, the Dipstick 2277 is assembled and ready.
Zeroing and elementary data collection are covered in
the next two chapters.

CHAPTER 2-ZEROING
2-1
ZEROING THE DIPSTICK®
WHAT IS ZEROING?
Zeroing is the process that insures that a Dipstick®reads accurately by making it read the
same when it is turned “end-for-end.” It is similar to the zeroing process done with
precision “bubble” type levels.
WHEN TO ZERO THE DIPSTICK®
The Dipstick®should be either checked for zeroing or zeroed before each data gathering
session –every time you turn it on. If you shut your Dipstick®off for more than a couple
of hours, you should rezero. You do not need to rezero between Runs.
MANUAL OR COMPUTERIZED ZEROING
Your Dipstick®can be zeroed from within the Data Collection Program by using the
zeroing routine. It can also be zeroed without the computer attached by using the
electronic zeroing button. There is no difference in accuracy between the two methods.
We'll show you both ways.
PREPARE THE DIPSTICK®AND THE SURFACE
Be sure that the Dipstick®unit is fully charged and has warmed up for at least 5 minutes.
Turn the Dipstick®on as soon as you open the case. This way, it will be fully warmed up
when you are finished assembling it and are ready to zero it.
Assemble the Dipstick®as described earlier.
Place the Dipstick®on a firm, flat, smooth, solid surface and extend the kickstand.
Use a felt tip marker or “keel” (provided) to draw one long straight line (longer than the
Dipstick®) and a shorter line perpendicular to the long line at one end. You may also use
an intersection of sawcut joints or the joints between ceramic tiles.
One of the “Moon Feet” will be placed tangent to both lines, and the other moon foot will
be placed tangent to the long line. In this way, you will be able to relocate the Dipstick®to
the exact same position during the zeroing process.
Lines made with
marker or “keel”or
two intersecting
sawcut joints
Place
Moon Feet
here

CHAPTER 2-ZEROING
2-2
A “Moon Foot”
Place the Dipstick®Moon Feet Tangent to the Two Lines as shown below.
ZEROING USING THE 2277 COMPUTER
Turn On the 2277 Tablet Computer and
start the RFDC program. Tap the
"Collect" header, then hold the Dipstick®
still with the handle straight up and down
and tap the menu item “Zero”.
The L.C.D. screens on the Dipstick®will
flash “CAL - CAL - CAL” as shown here.
Once the reading is taken and stored in the
Dipstick®, the L.C.D. screens will turn
back on and the computer will show this
statement:
Please Rotate the Dipstick and click OK
Lift and rotate the Dipstick®180 degrees (end for end) placing the Moon Feet tangent
to the two lines again, and press <Enter>. The Dipstick®will flash “CAL - CAL - CAL”
again. Once the second reading is taken and stored,the Dipstick®is zeroed.

CHAPTER 2-ZEROING
2-3
You may check the Zero if you like:
Set the Dipstick®on two fixed points and note the L.C.D. readings. (You may use the
two lines you already have drawn.) Then pick up the Dipstick®and reverse it end for
end, taking care to place the feet down on the exact same spots where they were
before. Now check the L.C.D. reading values again. If the L.C.D. readings are the same
with the Dipstick®in either position, then the Dipstick®is zeroed. If the zeroing is not
within .003” (0.1mm) it should be rezeroed before data is collected.
If zeroing is not within +/- .003” (0.1mm):
Check for loose feet or a loose jam nut.
Also check for dirt or other debris on the bottom of the feet or the surface,
Ensure that you are placing the Dipstick®in exactly the same location.
Repeat the zeroing process until both L.C.D. screens measure the same reading (within +/-
.003” or 0.1mm) with the Dipstick®in either position.
ZEROING WITH THE BUTTON
The Dipstick®unit may be zeroed using the black zeroing button located on the switch end
of the unit. This method can be used even if the 2277 Tablet is not attached or is not
turned on.
Place one Moon foot tangent to both
lines, and place the other Moon foot
tangent to the other line. Press the
zeroing button.
The L.C.D. screens will flash
“CAL - CAL - CAL” Once the reading
is taken, the L.C.D. screens will turn back
on and the Dipstick®may be rotated. Lift
and rotate the Dipstick®180 degrees
(end for end) placing the “Moon Feet”
tangent to the two lines again. It is very
important to get the Dipstick®aligned
exactly as it was before.
Press the zeroing button again.
The Dipstick®will flash “CAL - CAL - CAL”again. Once the Dipstick®has finished
zeroing itself, the L.C.D. screens will turn back on.
Something to Remember: After zeroing by using the zeroing button, you cannot re-zero
until you turn the Dipstick®off and then back on. Turning the Dipstick®off momentarily
and then back on resets the zeroing algorithm stored on a microchip inside the Dipstick®.
This enables you to re-zero with the button.

CHAPTER 2-ZEROING
2-4
Important:
You should understand that the "Zeroing" process does not result in the Dipstick®showing
"0.000" or "Zero" as a reading.
The Dipstick will always show the difference in elevation between the two feet, no matter
where they are placed on the floor. It is almost impossible to find a location where two
points that are 12 inches (300mm) apart are at exactly the same elevation. It just doesn’t
happen. On a real floor, one end will always be a few thousandths of an inch (a few tenths
of a mm) higher than the other.
The zeroing process simply ensures that the Dipstick®will give the same reading at a
particular location, regardless of which end of the Dipstick®is "forward". When you think
about it, this makes sense.
Note that after the Dipstick is Zeroed, it will read the same after you turn it 180° and put it
back in the same place on the floor.

CHAPTER 3QUICK START
3-1
QUICK START
This “QUICKSTART” section of the manual will tell you how to do basic data collection and
elementary analysis and reporting from the Dipstick®and its Tablet. After you have practiced and
are comfortable with this, you will want to learn about the advanced features that are built into the
Dipstick®and will make data collection and analysis easier and more informative. These advanced
techniques are covered in Chapter 4 "Collect" and Chapter 5 "Process" of this manual.
By following along with the instructions in this section you will be able to collect and process data.
If this is the first time you have used a Dipstick®, we suggest that you collect and process some data
for practice in your office, hallway, driveway, or parking lot before going to a job site.
Before you collect data, you must first:
Assemble the Dipstick, (Chapter 1) Zero the Dipstick, (Chapter 2) turn on the 2277 Tablet, and
start the Data Collection Program (RFCOLLECT2277).
There are just a few things you need to know about using the RoadFace Data Collection Program on
the Dipstick 2277. If you read this section carefully, you won't have any problems using the
Dipstick®.
TO START THE DATA COLLECTION PROGRAM:
Turn on the 2277 Tablet and start the RFCOLLECT program. There are three methods to start
the program: Please be sure that the Face Company's SD Card is in the slot on the right side of
the computer before you start.
Auto Startup Any time you reboot the computer, the program will start automatically.
You don’t need to do anything but reboot.
Starting from the Windows CE Desktop You may start the program from the
Windows CE Desktop by double-tapping the icon for the RFCollect program.
Starting from the Executable You may start the program by double-tapping the
"My Device" icon, then double-tapping the "NandFlash" folder, then double-tapping the
"RFCOLLECT2277" folder, then double-tapping the "RFCollect.EXE" icon.
When the Data Collection program starts, it will automatically open the last Job you had open.
You may continue to collect data in this Job if it is appropriate, or you may wish to open a
different Job or make a New Job before collecting data.
USING THE TOUCH SCREEN:
If you touch (lightly tap) the screen with the stylus provided, the cursor will snap to that point. If
you double-tap, you'll get the same response you normally get when you double-click. We have
provided you with a spare stylus in the foam in the case next to the Dipstick®unit, in case you
should lose a stylus. You may use your fingernail or other similar object, but be careful not to
scratch the screen. Obviously, you won't want to touch the screen with a pencil or pen. This
manual will not describe where to tap for each menu item, because it works exactly like using a
mouse on your desktop PC.

CHAPTER 3QUICK START
3-2
WITHIN THE MENUS:
Using the stylus, just tap the menu item you want to use, then tap a command on the drop-down
menu, just as if you were using a mouse on a desktop PC. If you fail to fill out some required
information, the window will not close until you enter the required information.
OPENING AN EXISTING JOB AND MAKING A NEW JOB:
The program will automatically open your last job. If you want to open a different Job, this is
similar to opening a file in any other program. Tapping FILE/OPEN will open a selection
window, showing all folders on the storage card where data are stored. Folders that contain
RoadFace data are shown with a blue folder icon instead of the normal tan color. This makes it
easy to find data, because the program has "X-Ray Vision" that allows it to know which folders
have RoadFace Data in them. You can open any Job by double-tapping it or by single-tapping,
then tap OPEN JOB on the dialog box.
Sometimes you'll want to start a new Job, rather than collect data in an old Job. (Be sure to start
a new Job every time you go to a different Job site.) To do this, just tap FILE/NEW, then type in
the name of the new Job. Let the program choose where to store the data - on the SD (storage)
Card.
CHECKING THE DIPSTICK®VOLTAGE:
After the Dipstick is assembled fully, you should check the Dipstick's voltage before you start
collecting data. Tap COLLECT/VOLTAGE to check voltage in the Dipstick®itself.
If you get a “Dipstick Not Responding” message, you do not have the Dipstick connected
to the Handle Mount or there is a bad connection.
When fully charged, the Dipstick voltage will be over 13V. Anything over 11V is OK.
The Dipstick will operate properly and collect data until the voltage drops to about 10.5V.
Whenever the Dipstick®voltage drops below about 10.7 Volts, you'll see a "LOW BAT"
warning in each of the Dipstick's two LCD screens. This means that you have a short time left to
collect data before recharging the Dipstick. You’ll be able to collect one or two more Runs when
you get the "LOW BAT" warning, but don’t expect to be able to collect all day long after you get
a "LOW BAT" warning. If the voltage drops below 10.5 Volts, the Dipstick will beep 3 times
and display "OFF." At this point, the Dipstick will no longer collect data, and you must recharge
it or exchange batteries. Please note that if the Dipstick allows you to collect data, it will be good
data. The Dipstick will shut itself down before the voltage gets too low to collect good data.
CHECKING HANDLE BATTERY VOLTAGE:
It is important to keep the Dipstick®Handle Battery fully charged and to always use the Handle
Battery to power the 2277 Tablet. Otherwise, you'll only be using the 2277 Tablet’s battery, and
you run the risk of losing power to the 2277 Tablet while collecting data. This is particularly
important if you have the screen brightness turned up on the 2277 Tablet. Charging the Handle
Battery is covered in Chapter 7, Maintenance. If you charge the Handle Battery and the 2277
Tablet properly, it will give you more than a full day’s service. If you charge the Handle Battery
every night before using it the next day, you will not run out of battery power. Do NOT risk
having the 2277 Tablet shut down during data collection because it has no power. The green
LED on the Handle Mount shows the voltage in the Dipstick's Handle Battery. Remember, this
is the Handle Battery voltage, and it supplies extra power to the Tablet. When the Handle
This manual suits for next models
1
Table of contents