Facina VKPCCTV User manual

SECURITY CAMERA
INSTRUCTION MANUAL
Model: VKPCCTV

Facina_VKPCCTV_Instructions_Rev01
2
TABLE OF CONTENTS
Camera Kit Contents……………………………….. 3
Camera Overview…………….……………………… 3
General Information……………………………….. 5
Definitions………….…………………………………… 6
Quick Start Guide……………………………………. 0
Battery and Memory Installation…………….. 2
Camera Setup and Program…………………….. 4
Setting up the Camera in Field……….….……. 25
Using the Camera in PIR Detection Mode…28
Using the Camera in Time Lapse Mode……. 30
Viewing and Deleting Files………………………. 3
Technical Specifications………………………….. 34

Facina_VKPCCTV_Instructions_Rev01
3
Camera Kit Contents
•Security Camera
•Instruction Manual
•USB Cable
•Mounting Strap, Wall Mounting Bracket,
.
Camera Overview
Front View

Facina_VKPCCTV_Instructions_Rev01
4
Bottom View
Side View

Facina_VKPCCTV_Instructions_Rev01
5
General Information
Storing conditions
•Operating Environment: - 5 to 40c˚ - 20-85% relative
humidity, non-condensing.
Special care instructions!!
•The camera is designed to be weather resistant. Never
attempt to immerse the unit in water or any other liquid.
This will damage the unit and void the warranty
•Use a soft lens cloth for cleaning lens. Avoid touching lens
with fingers. And remove dirt or stains with a soft cloth
dampened with water or neutral detergent. Keep your
camera in a dry and cool dust-free environment or
container when it is NOT used
•Take the batteries out, when camera is NOT in use over an
extended period of time
•Avoid dropping your camera
•Do not disassemble your camera
•Do not mix new and old batteries
•Do not open the camera for unauthorized service. This
could cause serious damage to the unit and WILL void the
warranty.
NOTE: This camera is a precision electronic evice. Do
not attempt to service this camera yourself, as opening
or removing covers may expose you to angerous
voltage points or other risks.

Facina_VKPCCTV_Instructions_Rev01
6
Definitions
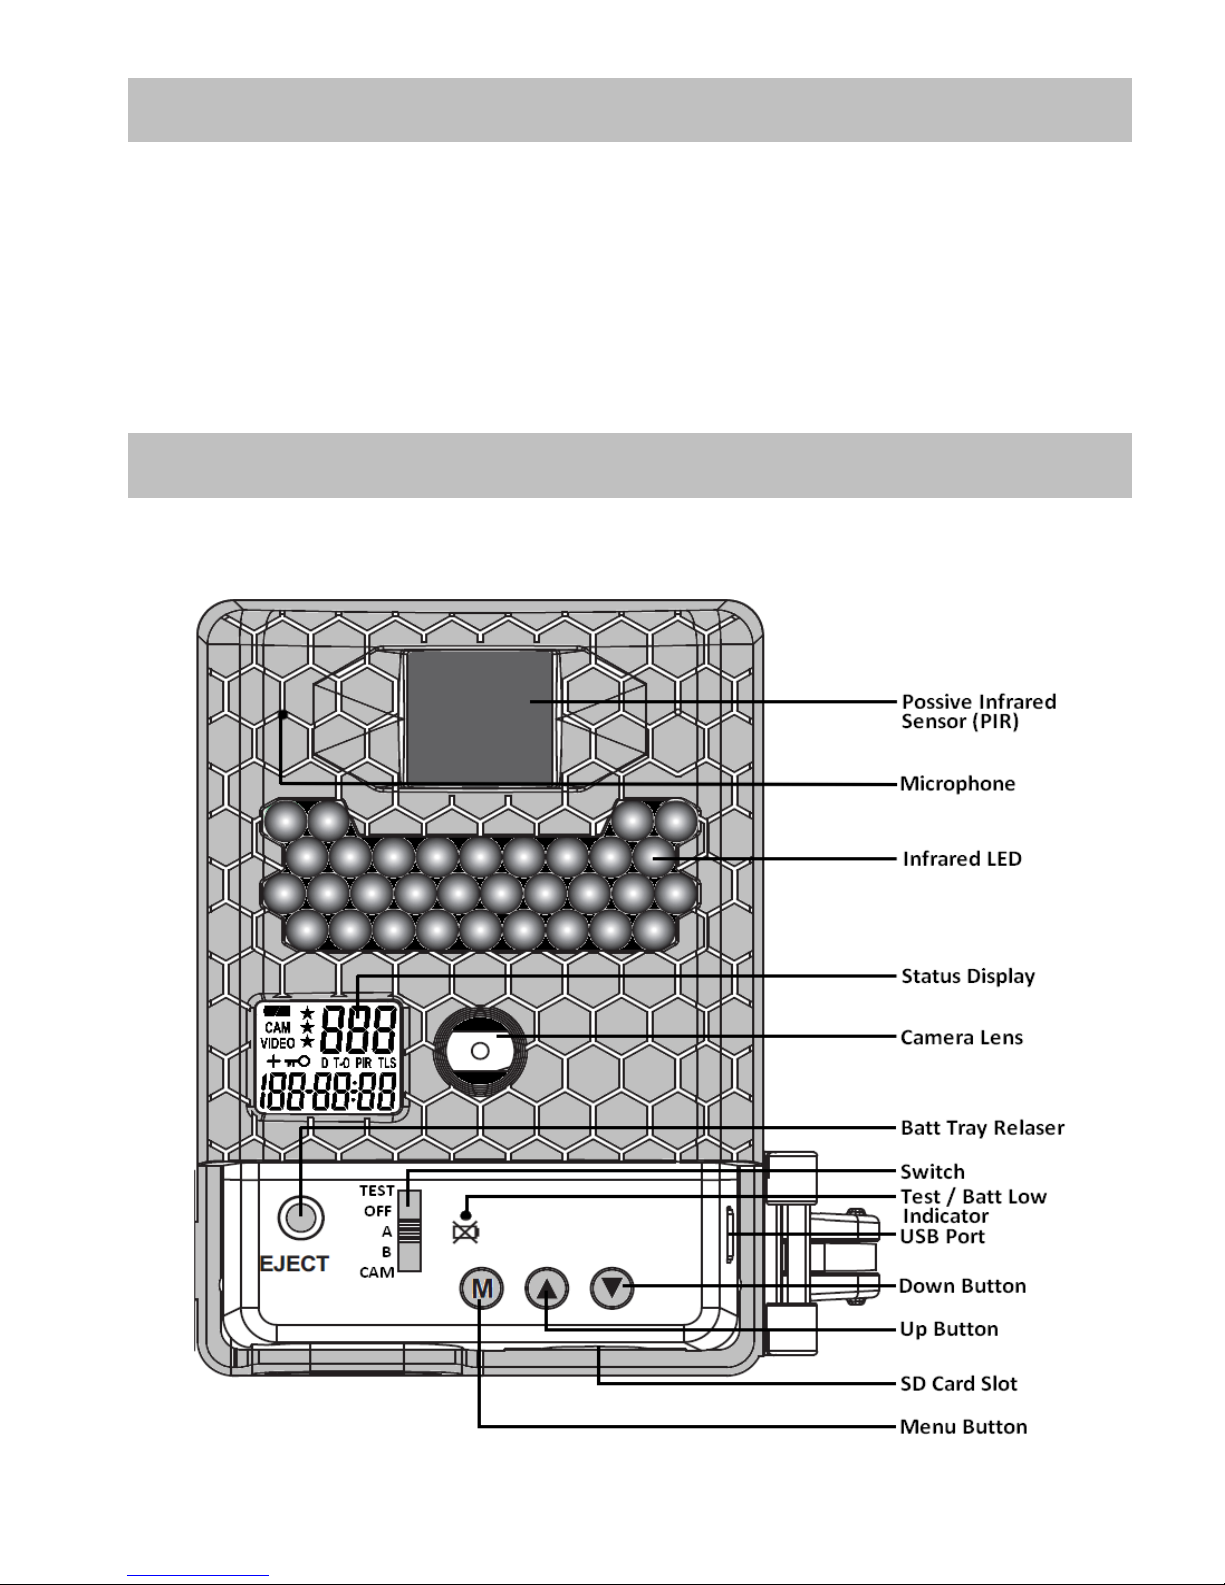
Definitions of Front View parts
•Passive Infrared Sensor: Used to detect the moving infra-
red heat. i.e. people
•Microphone: Can record sound while video recording
•Infrared L D: Invisible light for night time capture
•Status display: Displays the settings and camera status
•Camera Lens: Used to capture the image/video
•J CT Button: Pressing this button releases the battery
tray to gain access to the batteries to install or replace
(Batteries Not Supplied)
•Slide Switch: To select the different camera modes,
changing the camera status, TEST, OFF, Preset A, B or CAM
•Test / Batt Low Indicator: Indicates the PIR detection
coverage when camera is switched to TEST or indicate the
battery is low
•USB Port: Used to connect the camera to PC by the
provided USB cable for captured image/video download
•[▲]Up and [▼] Down Button: To change the mode and
adjust the setting value when camera is switched to TEST
•SD Card Slot: Used to install the SD memory card, the
camera supports SD memory card up to 32GB
•[M] Menu Button: Used for entering the camera’s menus
or press and hold 2 seconds for exit

Facina_VKPCCTV_Instructions_Rev01
7
Definitions of Bottom and Side View parts
•Front Cover: To prevent the water ingress, can also be
locked (not supplied) after settings adjustments
•xternal Power Port Cover: 2V DC external PSU can be
connected (sold separately). Please ensure this seal is
closed tightly if the external power is not used.
•Battery Tray: Container to install 6 AA alkaline battery
•Lock Hole: Attaching a lock to prevent unauthorized
access to settings or theft of SD card
•Tripod Mount: Used to attach the wall mount bracket or
tripod (tripod not supplied)
•Strap Holes: Used to attach the camera to pillar or tree
by the provided mounting strap
•Python Cable Holes: Used to lock the camera to pillar or
tree by Python cable (sold separately)
•Locker: Used to lock the cover in right location
NOTE: Make sure the installe batteries or the external
power is the correct polarity.

Facina_VKPCCTV_Instructions_Rev01
8
Definitions of Status Display
•CAM: Indicates the camera mode, still image capture
•VIDEO: Indicates the camera mode, video capture
• : Indicates the number of burst capture, and video
recording time
• : It indicates the battery status.
Full (Icon on) Half Low (Icon off)
When batteries are low, the status isplay will show “Lo
bAtt” an Batt Low (RED, LED) In icator lights up. Please
replace with new batteries.

Facina_VKPCCTV_Instructions_Rev01
9
• : Indicates the still image/video resolutions
Image resolution is 8MP
Image resolution is 5MP or video resol
ution is
HD 720P
Image resolution is 2MP
•D : Indicates the camera in date setting
•T : Indicates the camera in time setting
•T-O : Indicates the camera in time out setting
•PIR : Indicates the camera in PIR detection Mode
•TLS : Indicates the camera in Time Lapse Mode
• : Indicates the GPS coordinate data as + for East
longitude or North latitude, - for West longitude or South
latitude
• : Indicates value of date/time, time out, video
recording time and the GPS coordinate data during
setting or quality of captured image/video. The date and
time will be stamped onto the still image and video
•: Indicates camera is the security version

Facina_VKPCCTV_Instructions_Rev01
10
Quick Start Gui e
This guide is designed to show how to setup the unit in a short
period. To get the most out of this S URITY CAM RA, please
read the manual thoroughly before operation. If you would like
to modify any of the Factory Default Settings, except for the
Time & Date, please read manual for instructions.
Factory Default Settings:
Time Out: 30 seconds Burst Mode: 1P
Resolution: 8MP Operation Mode: PIR
Video Capture: 10 seconds (Resolution 720P)
Time Lapse Mode setting: 19:00-7:00 (Next day), ime out 60
seconds, Resolution 8MP, 1P Still image.
•A (Preset A) - This bypasses all
user defined settings and uses
the following settings:
(PIR mode / Still image /
Resolution: 5MP / Burst: 3P /
Time out: 30 seconds).
•B (Preset B) - This bypasses all
user defined settings and uses
the following settings:
(PIR mode / Video: 0 seconds
/ Resolution: 720P / Time out:
30 seconds).
•CAM – A programmable mode for user to program the
setting you wanted.

Facina_VKPCCTV_Instructions_Rev01
11
Initial Camera Set-up:
. Open the front cover
2. Insert SD card into the camera SD card slot until secured, ensure
card inserted the correct way round
3. Pressing the “EJECT” button and slide out the battery tray out,
install 6 “AA” batteries (Not Supplied) into the tray ensuring the
correct polarity (+/-) as indicated in battery tray, then push the
battery tray back into camera
4. Sliding the switch from OFF to T ST to adjust the Time and Date
5. The status display shows “T” flashing, if “Test” is displayed then
please refer to “Time & Date Setting” on page 6
6. Press the [UP] or [DN] button to adjust the first digit of Hour
then press [M] to confirm, and go to next digit of Hour then [M]
and move to the Minute setting.
7. Press the [UP] or [DN] then [M] button repeats to set the
Minutes in digit by digit until Minute setting is completed then
move to Date
8. Adjust the Year, Month and Day by using [UP] or [DN] and then
[M] button in digit by digit to complete the setting. Each time
you finish an adjustment, you MUST press the [M] button to
confirm and move to the next digit for adjustment.
9. Once it is done, the word GPS will be blinking, this stands for
GPS coordinate data setting and will allow you to set your
camera’s coordinate data. Press and hold the [M] button 2
seconds to exit.
NOTE: The Time an Date will be stampe onto the
image or vi eo.

Facina_VKPCCTV_Instructions_Rev01
12
Special Requirement when Using Batteries.
WARNING: Do not use ifferent Voltage lea aci
battery other than the one specifie in this section.
Doing so will amage the camera an will voi the
warranty.
Do not mix ol an new batteries, an Do not mix
alkaline, stan ar , or rechargeable batteries.
WARNING: ALWAYS have the camera in the OFF
position when installing or removing batteries an
memory car . Removing batteries or memory car
while the camera is ON may amage the camera.
Battery an Memory Installation
The
camera
is designed to operate with two different types of
supply, either 6xAA alkaline batts or remote 2v DC
NOTE: Make sure camera is in the OFF position
whenever a ing or removing memory.
“AA” Battery (not supplied)
The internal battery tray accepts 6 pieces of “AA” battery. Be
sure to use high quality branded alkaline batteries. Install
batteries with correct polarity (+/-) as noted inside the battery
tray.
12V DC external power (not supplied)
The camera is equipped with an external power socket designed
to accept a 2. mm jack plug 2V DC adaptor or battery pack
(sold separately).

Facina_VKPCCTV_Instructions_Rev01
13
•Make sure camera is in the OFF position
•Insert the jack plug of external AC/DC power adaptor or
battery pack into the DC 2V port at the bottom of
camera housing
•Sliding the switch to T ST or A or B or CAM from OFF
Memory Options
The camera is also equipped with an expandable media card slot
capable of accepting from 2GB up to 32GB SD card with Class 0
or below speed rating (sold separately). The status display will
show the number of images stored on the SD card. If no SD card
is inserted the status display will show “NOSd”.
And once the memory is full, the camera will overwrite the
memory to keep the last image and delete the first image from
the memory.
Inserting SD memory card
•Note: Please ensure the camera is switched off while
inserting or removing the SD card. Open the cover, and
insert SD memory card in to the SD card slot completely
and in the correct direction as shown on the top of SD
card slot.
•To remove the SD memory card, depress the SD card and
pull out the card gently (ensure the switch is in the off
position)
•SD cards must be empty (i.e. blank). If you are using the
SD card from other cameras, please make sure to format
the SD card in your computer prior to use in this camera.

Facina_VKPCCTV_Instructions_Rev01
14
New SD cards can be used straight from the packaging
SD Car FORMAT – Definition: When you format a SD memory
card, the operating system erases all information and files on
the card. hen it creates an internal address tables that it later
uses to locate information and files. Formatting also removes all
Hidden System files as well. Basically it cleans your SD memory
card just like if it was brand new. DO NOT USE File System type:
“NTFS” or “exFAT”, these formats are not supported.
Camera Setup an Program
When the camera switch is first turned in the A or B or CAM
position from OFF, the status display shows the camera status.
The following information is on this status display.
This camera is equipped with 2 preset and programmable
operation modes.
The camera will power off within 5 minutes if there isn’t any
operation when switch is slid to TEST position.
Setting the Operation Mode:
NOTE: If you choose one of the Preset settings, your
camera will only function in PIR Detection Mo e (not
Time Lapse Mo e).

Facina_VKPCCTV_Instructions_Rev01
15
•A (Preset A) - This bypasses all
user defined settings and uses
the following settings:
(PIR mode / Still image /
Resolution: 5MP / Burst: 3P /
Time out: 30 seconds).
•B (Preset B) - This bypasses all
user defined settings and uses
the following settings:
(PIR mode / Video: 0 seconds
/ Resolution: 720P / Time out:
30 seconds).
•CAM – This is a programmable mode for user to program
the setting you wanted.
Setting the Time and Date:
Your camera uses the 24hr military time format.
•Slide the switch to the T ST position and the status
display will show the camera’s current status.
•Press [M] button once to call out the program menu.
•The word PIR or TLS will be blinking, press [DN] button
until display shows S T in blinking, then press [M] to
confirm camera into setting.
•The word – d L – will in blinking,
press [DN] button once to get the T
(Time) in blinking, then press [M] to
confirm.

Facina_VKPCCTV_Instructions_Rev01
16
•
Press [UP] or [DN] button to adjust the first digit of Hour then
press [M] to confirm, and go to next digit of hour then [M] and
move to the Minute setting.
•
Press [UP] or [DN] then [M] button
repeatedly to set the Minutes in digit by
digit until minute setting is completed
then move to set Date, the D (Date) will
show at display.
•
Adjust the Year, Month and Day by pressing [UP] or [DN] and
then [M] button in digit by digit to complete the setting. Each
time you finish an adjustment, you MUST press [M] button to
confirm and move to the next digit for adjustment.
•
Once done, the word GPS will be blinking, this stands for GPS
coordinate value setting. To exit by pressing and hold the [M]
button 2 seconds.
Setting the Programmable Mode:
Your camera can be programmed to operate either in PIR
Detection mode or Time Lapse / PIR mode when programmed at
the T ST and switched back to CAM.
Select the Switch to CAM - This allows the user to define what
setting the camera will use.
Passive Infrare Mo e Time-Lapse / PIR Mo e

Facina_VKPCCTV_Instructions_Rev01
17
Setting the camera in PIR Mode:
•Slide the switch to the T ST position from OFF.
•The status display will show the camera’s current status.
•Press [M] button once to call out the program menu and
the word PIR or TLS will be blinking.
•Press [UP] or [DN] button to select PIR mode.
•Press [M] to save your selection, the display shows PIR,
and CAM A S or VID O T in blinking.
•Press and hold the [M] button 2 seconds to exit, and
display will show the camera status with word PIR.
•
Now, camera will operate at PIR Detection Mode if you
slide the switch to CAM position.

Facina_VKPCCTV_Instructions_Rev01
18
Setting the Image Resolution in PIR mode:
Your camera can be programmed to 3 different image
resolutions: “3 Stars” is 8MP, “2 Stars” is 5MP and “ Star” is
2MP.
•Slide the switch to the T ST position from OFF and the
status display will show the camera’s current status.
•Press [M] button once to call out the program menu and
the word PIR will be blinking.
•Press [M] to confirm the camera’s operation is PIR
detection.
•Press [UP] or [DN] button until the word CAM and A S
(Resolution) are blinking.
•Press [M] button ONCE to confirm the camera into still
image resolution setting.
•Press [UP] or [DN] button to select the desired resolution.
•Press [M] to save your selection, then burSt (Burst shoot)
will blink. Press [M] to enter the burst shoot setting or
press and hold the [M] button 2 seconds to exit.
Setting the Burst Shoot in PIR mode:
Your camera can be programmed to shoot - 0 pictures per
trigger.
•Slide the switch to the T ST position from OFF and the
status display will show the camera’s current status.
•Press [M] button once to call out the program menu and
the word PIR will be blinking.

Facina_VKPCCTV_Instructions_Rev01
19
•Press [M] to confirm the camera’s operation is PIR
detection.
•Press [UP] or [DN] button until the word CAM and burSt
are blinking.
•Press [M] button ONCE to confirm the camera into still
image burst setting.
•Press [UP] or [DN] button to select the desired burst
setting (number of pictures per trigger).
•Press [M] to save your selection, then the CAM and T-O
(time out) will blink. Press [M] button to enter time out
setting or pressing and hold the [M] button 2 seconds to
exit.
Setting the Time of Video length in PIR mode:
Your camera can be programmed to record 5 ~ 600 seconds
(00:05- 0:00 minutes) of video per trigger. The Video capture is
only workable under PIR mode.
•After set camera operated at PIR detection, press [M] to
confirm.
•Press [UP] or [DN] button until the word VID O and T are
blinking.
•Press [M] button ONCE to confirm the camera into video
recording time setting.
•Press [UP] or [DN] button to select the desired time
5~600 seconds (video recording time per trigger).
•Press [M] to save your selection, then the VID O and T-O
(time out) will blink. Press [M] button to enter time out

Facina_VKPCCTV_Instructions_Rev01
20
setting or pressing and hold [M] button 2 seconds to exit.
Setting the Time Out in PIR mode:
Your camera can set the amount of time in seconds or minutes
the camera will sleep between two PIR triggers.
•In order to complete the Burst Shoot or Time of Video
Length settings, press [M] button.
•The status display will show out CAM T-O or VID O T-O in
blinking
•Press [M] button to into the Time Out setting.
•Press [UP] or [DN] button to increase or decrease the first
digit of minutes, then [M] to confirm and go to next digit
of minutes, repeat by pressing [UP] or [DN] then [M] to
complete minutes and seconds value, and then save the
time out setting.
•You’ll then see the word PIR blinking. Press [DN] button
twice to S T menu or press and hold [M] button 2
seconds to exit and camera stays at PIR detection mode.
Setting the Time Lapse Mode (TLS):
The Time Lapse default setting value is from 9:00 to 07:00 next
day. When the camera is set to use the Time Lapse Mode (TLS),
the program settings will follow the Time Lapse settings, and if
PIR is active during the TLS, the time out of TLS will resume.
Outside of the Time Lapse time frame; the camera will follow
the user defined PIR settings.
Your camera can be set operative for a pre-determined time
period [such as 9:00 to 07:00]. And then sets the frequency of
Table of contents
Other Facina Security Camera manuals