Fagerstrom Technopipes Mk.II User manual

Technopipes Mk.Ⅱoperation manual
(Galician closed / Galician open / Asturian / Great Highland version)
Use a pair of ordinary stereo earphones. (Typically 16 Ohm impedance and ∅3.5mm stereo plug.)
The chanter is switched on by connecting the earphones to the upper end of the chanter
and
switched off by disconnecting the earphones.
All settings are controlled by the +control
button and the -control
together with a specific
fingering combination for each setting.
Setting
fingering combination +control
-control
both
Chanter &
drones
on/off
the drones and chanter are started when the thumb is
placed on the contact and stopped when the thumb is
removed
Sensitivity
(option 1)
increase decrease -
Sensitivity
(option 2)
increase decrease (N.B. Factory
reset.)
Pitch
increase decrease
key
A
>
Bb
>
C
>
D
>
(La
>
Si bemol
>
Do
>
Re
>)
Metronome
increase tempo decrease tempo /
add sub-beat
turn on /
turn off
Drones
increase volume decrease volume
tuning
C
>
C+F
>
C+G
>
D
>
(
Do
>
Do+Sol
>
Do+Fa
>
Re
>)
Fingering
GHB Ast. Gal. open Gal. closed
in Bb < in C < in C < in C
(Si B) (Do) (Do) (Do)
-
Recording
increase playback
speed
decrease playback
speed
recording mode /
normal mode
Factory
reset
- -
Restore factory
settings. Marked in
bold
in this chart.
Volume
increase decrease start volume
EARPHONES
SWITCHING ON/OFF
!
REMEMBER TO DISCONNECT THE EARPHONES TO SAVE THE BATTERY WHEN THE
CHANTER IS NOT B
EING PLAYE
D.
SETTINGS
!
DO NOT USE MONO EARPHONES AS THIS MIGHT DAMAGE THE CIRCUITRY.

The output volume depends to some extent on the type of earphone plugged in.
The contacts of the chanter are electrical and not mechanical, meaning they do not have to be
pressed down to become activated. The grip does not have to be any firmer than that on the pipe
chanter. To start the drones and chanter, put the lower hand thumb on the contact
on the back.
To stop playing, remove the thumb from the contact
.
(Fingering charts can be found on the product webpage www.technopipes.com)
A sligh reverb effect is on by default to give a bit of depth to the sound.
It could happen, from time to time, that your fingers are very dry, causing them to become poor
conductors. The chanter, being dependent on electrical conductivity, may then have some trouble
playing the note your fingers indicate, instead producing a squeaky sound, or the wrong note. You
then need to increase the sensitivity. Sometimes, on the other hand, your fingers may be very warm
and short-circuit the chanter through a very thin film of sweat, so that the chanter fails to detect that a
finger no longer is on a contact. You then need to decrease the sensitivity. The sensitivity can be set
to five different levels.
The chanter starts in the key of C (Do) (523Hz) when set to Asturian or Galician mode. The low C
goes from 200Hz up to 594Hz. The chanter starts in the key of Bb (Si bemol) (466Hz) when set to
Great Highland mode. The key of the chanter can easily be set to A (La), Bb (Si bemol), C (Do), or D
(Re). The pitch of the drones will follow the chanter.
MIDI (Musical Instrument Digital Interface) is an electronic communications protocol that enables
electronic musical instruments, computers, and synthesizers etc. to communicate with each other.
MIDI does not transmit an audio signal - it transmits digital data messages defining parameters such
as pitch and volume of the musical notes to play. See http://www.midi.org for further reading.
MIDI mode is entered when MIDI combination is fingered at the time the MIDI cable is connected.
The chanter is initially set to channel 1, but can be set between 1 and 14. The bass is fixed on
channel 15 and the tenor fixed on channel 16. The default Low A is MIDI note number 69 (A5).
(In MIDI mode metronome and recording are not available.)
Setting
(cont.) fingering combination +control
-control
both
Reverb
increase decrease switch
on / off
MIDI
increase chanter
channel no.
decrease chanter
channel no. enter MIDI mode
VOLUME
PLAYING
SENSITIVITY
PITCH
!
PLAYING AT HIGH VOLUME MIGHT DAMAGE YOUR HEARING.
M
IDI

Set the tempo like this:
1) Hold the Metronome fingering combination.
2) Beat the tempo once on the +/-controls (both contacts at the same time).
3) (OPTIONAL) Add sub-beats by touching the -control.
4) Beat the tempo again on the +/-controls to set the main beat.
5) The metronome continues in that tempo.
6) Touch + or - control again holding the Metronome fingering combination to adjust tempo.
To start the metronome in a given tempo, start like this:
1) Hold the Metronome fingering combination.
2) Touch +/-controls once (both contacts at the same time.)
3) The metronome starts at a 100 bpm tempo.
4) Touch + or - control again holding the Metronome fingering combination: the metronome
increases or decreases tempo in 4 bpm steps.
The chanter can record more than 2500 notes. You can play along with the recorded notes to
practice phrases, seconds, etc. When recording, the first note and the last note preceding the Sound
off note are not stored for simplifying the creation of loops. The recorded track is played back on the
right channel, and you play along on the left channel. The playback speed can be set between ¼ and
2 times the recorded speed. The recording is erased when recording mode is exited, or when the
earphones are disconnected.
Typical recording sequence:
1) Start drones and chanter.
2) Play the Recording fingering combination.
3) Put your lower hand thumb on both the +control and -control. A high-pitched beep indicates
recording mode.
4) Record as long as you like, or until the memory is full (indicated by a low-pitched beep).
5) Stop playing.
6) Start playback by turning drones and chanter on.
7) Play along.
8) Exit recording mode by 2) and 3) above. A low-pitched beep indicates normal mode.
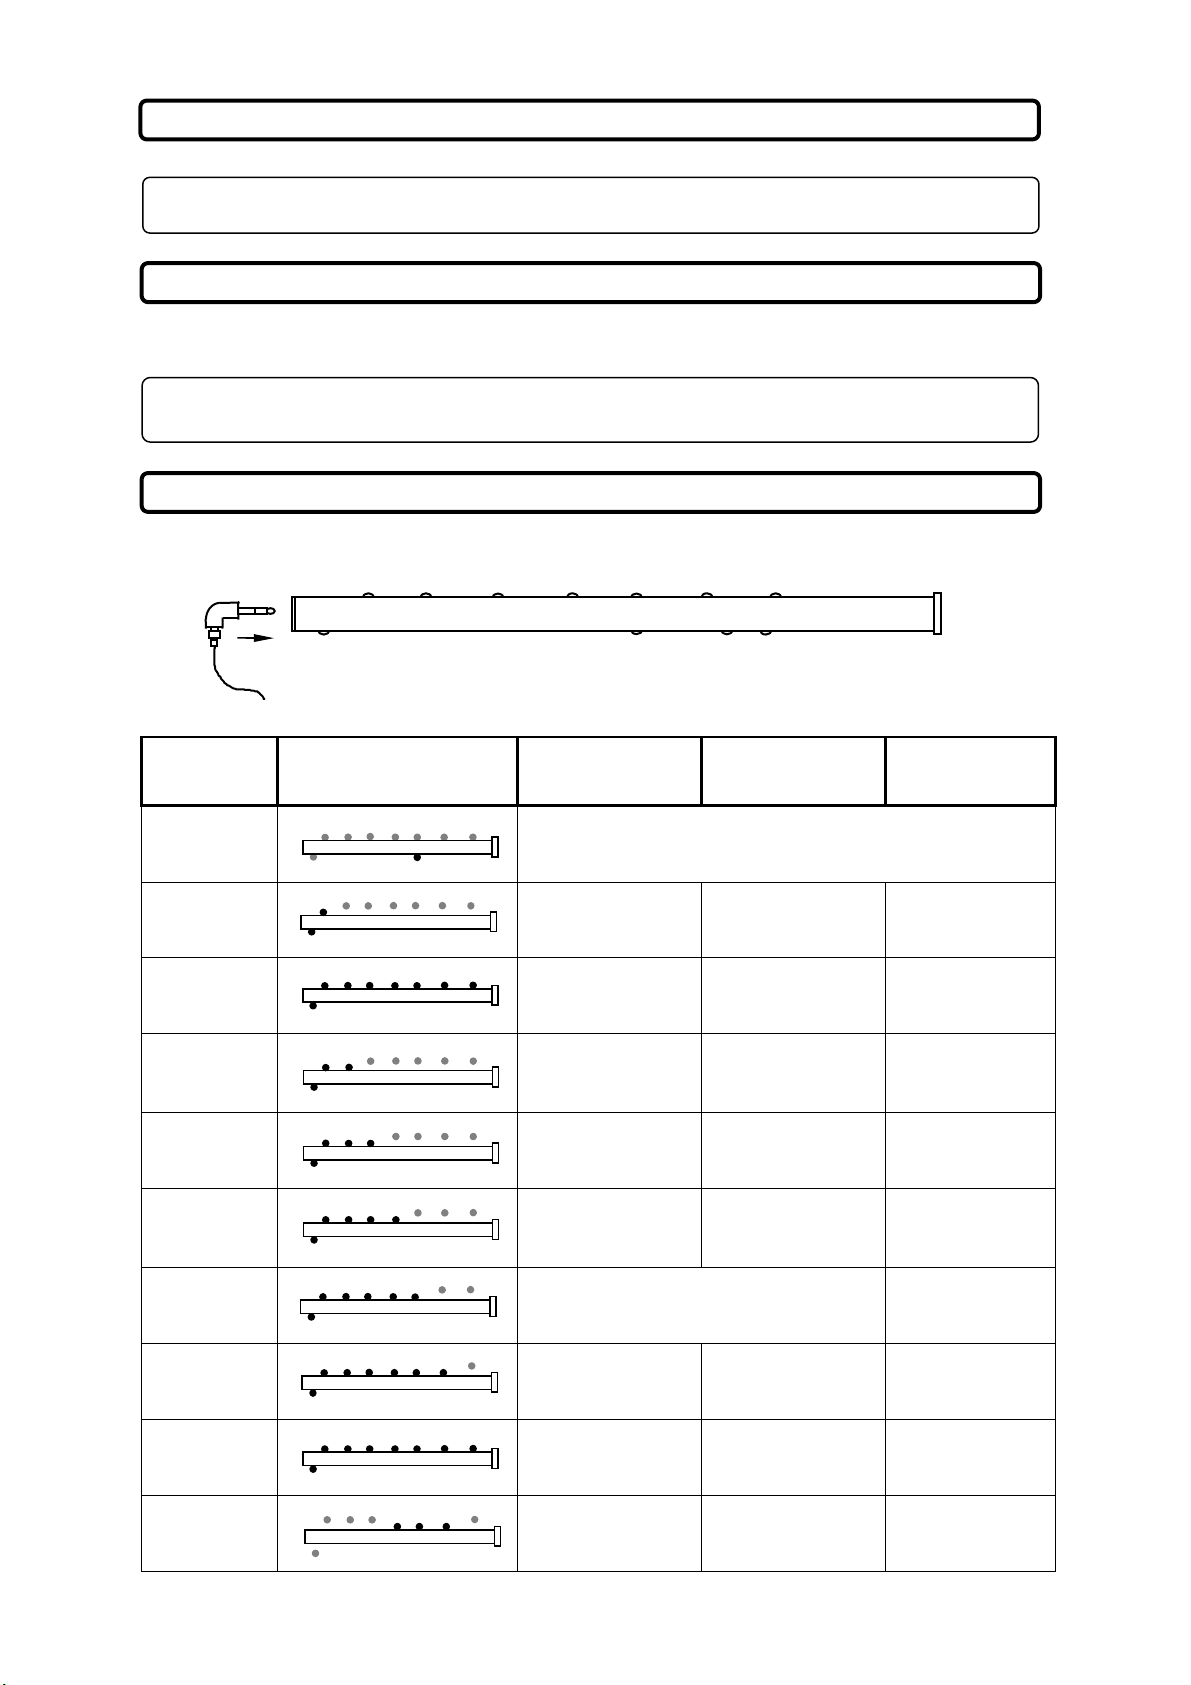
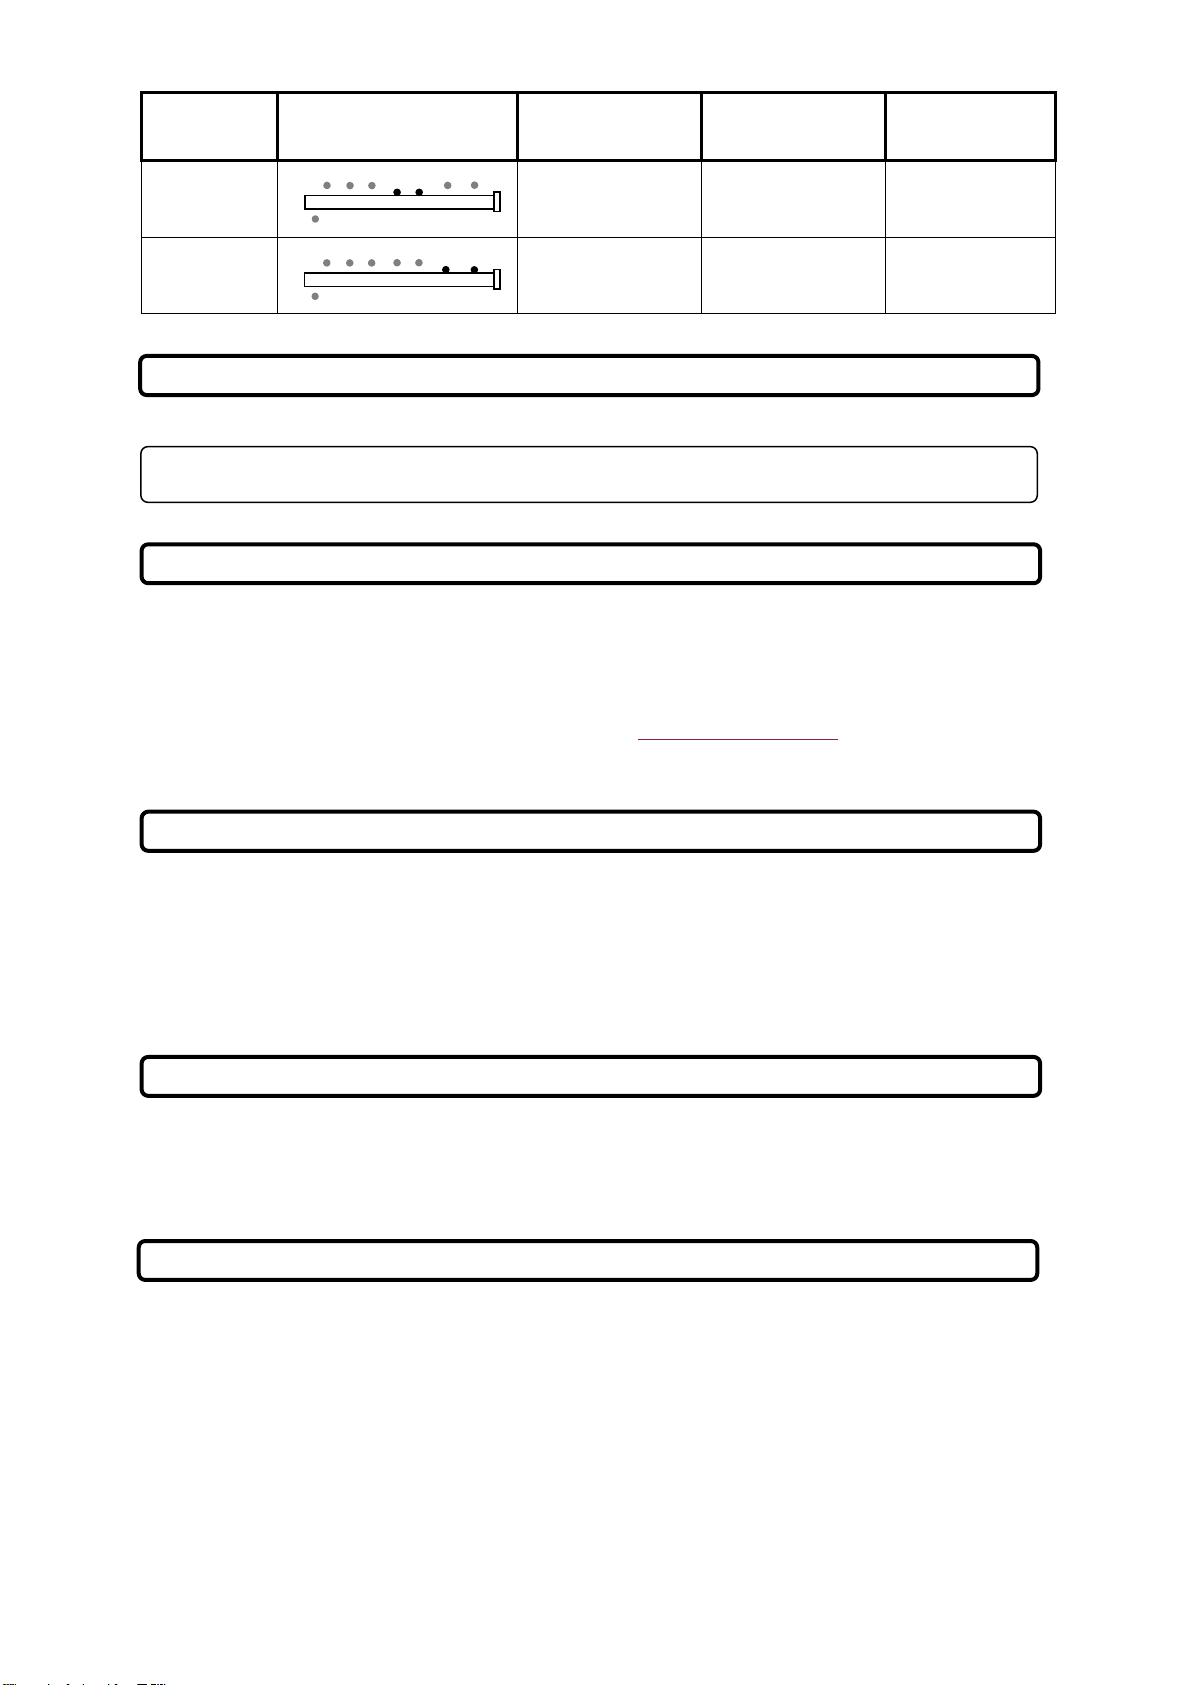
The chanter can play four different fingerings:
1) Galician closed fingering.
2) Galician open fingering.
3) Asturian fingering.
4) Great Highland fingering.
(See separate fingering document.)
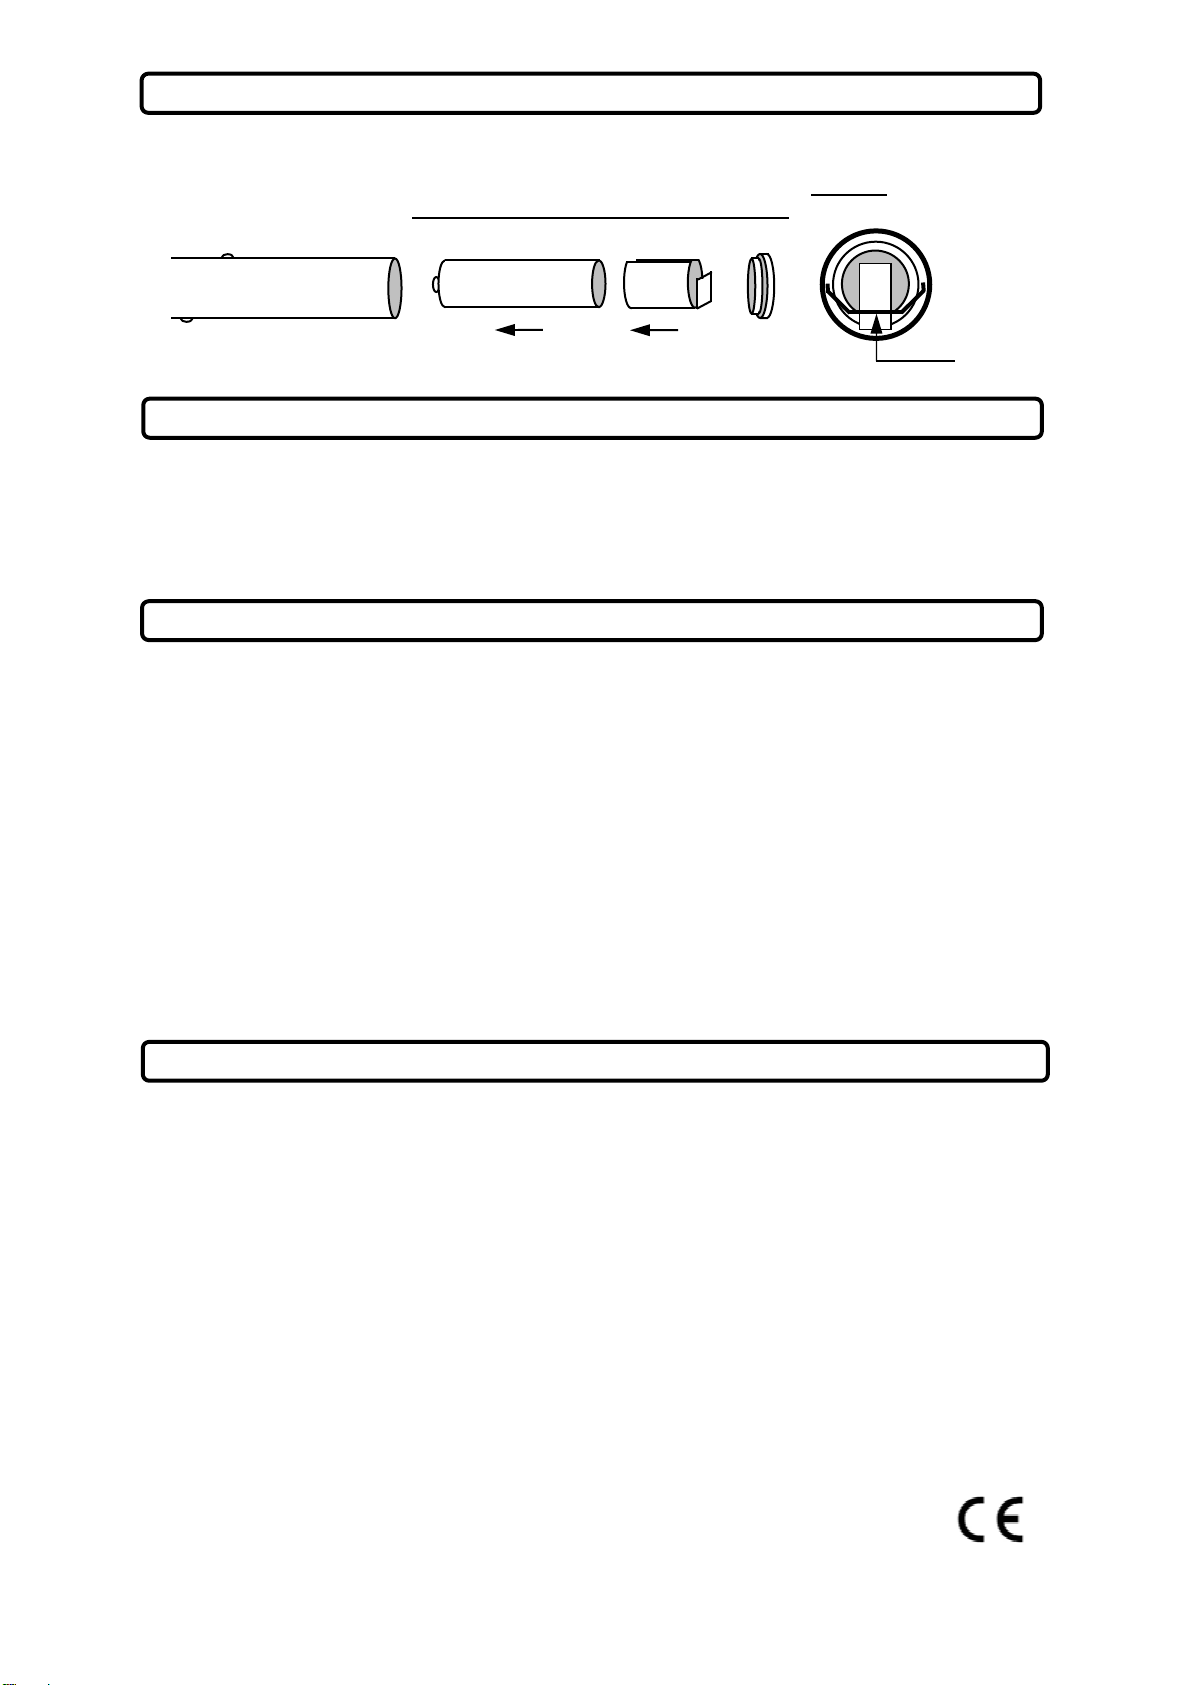
The chanter uses one 1.5Volt AAA/LR03 alkaline battery, or one 1.2Volt AAA/HR03 NiMH
rechargeable battery. The chanter will run +30 hours on a 1000mAh NiMH rechargeable battery. A
rechargeable battery is recommended.
When the red LED at the upper end of the chanter
is blinking slowly, the battery soon needs
replacing. When the red LED is on constantly, the battery is near flat.
BATTER
Y
METRONOME
RECORDING
FINGE
RING
!
REMOVE BATTERY IF CHANTER IS BEING STORED FOR A LONGER PERIOD.

Remove the end cap
from the chanter by firmly pulling it outwards. Move the battery holder to the
side to allow the battery to slide out slightly. Tap the battery end of the chanter against the palm of
your hand in order to get the battery out. Insert the new battery with the positive pole first. Make
sure the battery holder makes electrical contact with the negative pole. Put the end cap back on.
Do not expose the chanter to high temperatures (e.g. in a car during daytime). High temperatures
can damage the battery and distort plastic parts.
Handle the chanter carefully. Dropping it can damage the circuit board and housing, and can
cause the chanter to malfunction.
Keep out of reach of small children. Product contains small parts.
Symptom: Chanter does not start at all.
Solution: Make sure the battery is ok. Make sure the battery holder makes electrical contact
with the battery pole.
Symptom: Chanter does not start correctly, or runs only for a few minutes before shutting off.
Solution: Change/charge the battery.
Symptom: Chanter makes a loud clicking noise on one headphone channel.
Solution: Chanter is in MIDI mode. Disconnect and reconnect the earphones without fingering
the combination for MIDI mode.
Symptom: Chanter gets hot by the bottom end.
Solution: Battery is inserted the wrong way. Insert the battery the correct way and use the clip.
Symptom: The wrong note is played, or response is slow.
Solution: Adjust the sensitivity setting.
Anders Fagerström Electronics AB
Anundsgatan 8
S-753 34 Uppsala
Sweden
e-mail: anders@fagerstrom.com
Web page: www.fagerstrom.com
Telephone: +46 70 523 55 98
VAT No: SE556835323801
Technopipes Mk.Ⅱmanual (Galician closed/Galician open/Asturian/Great Highland version) 1.0
(R
ef
er to the web page for further
support.)
+
-
AAA
2 1
MAKER
PRECAUTIONS
TROUBLESHOOTING
CHANGING THE BATTERY
Push holder
over end of
battery clip!
Other Fagerstrom Musical Instrument manuals