Fagron FagronLab RVC1 User manual

FagronLab™ RVC1
Laboratory Robot Vacuum Cleaner
User Manual


Table of contents
1. Introduction................................................................................................................................................................................................................. 4
2. Service................................................................................................................................................................................................................................ 4
3. Warranty......................................................................................................................................................................................................................... 4
4. Safety instructions................................................................................................................................................................................................ 5
5. Product features...................................................................................................................................................................................................... 5
Powerful suction ....................................................................................................................................................................................................... 5
Intelligent suction adjustment........................................................................................................................................................................... 5
User friendly design................................................................................................................................................................................................. 5
Washable dust bin .................................................................................................................................................................................................. 6
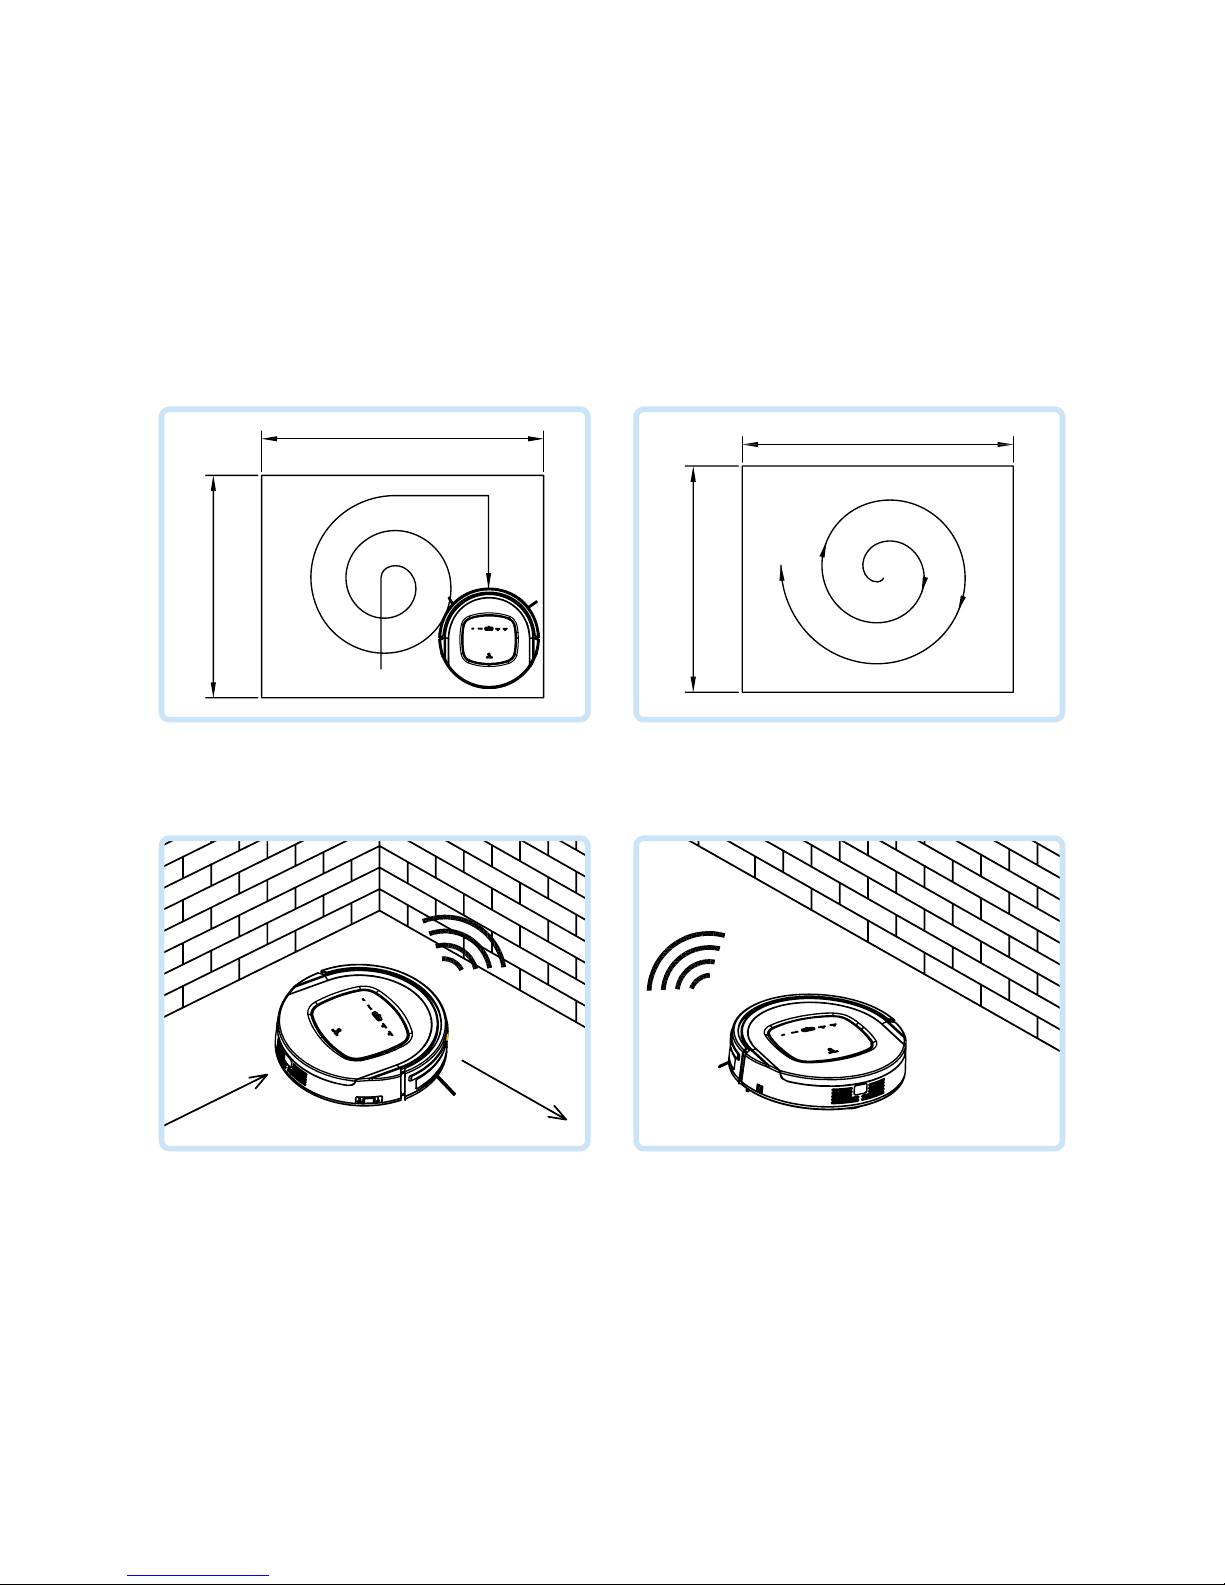
Various cleaning modes........................................................................................................................................................................................ 6
6. Product components........................................................................................................................................................................................... 7
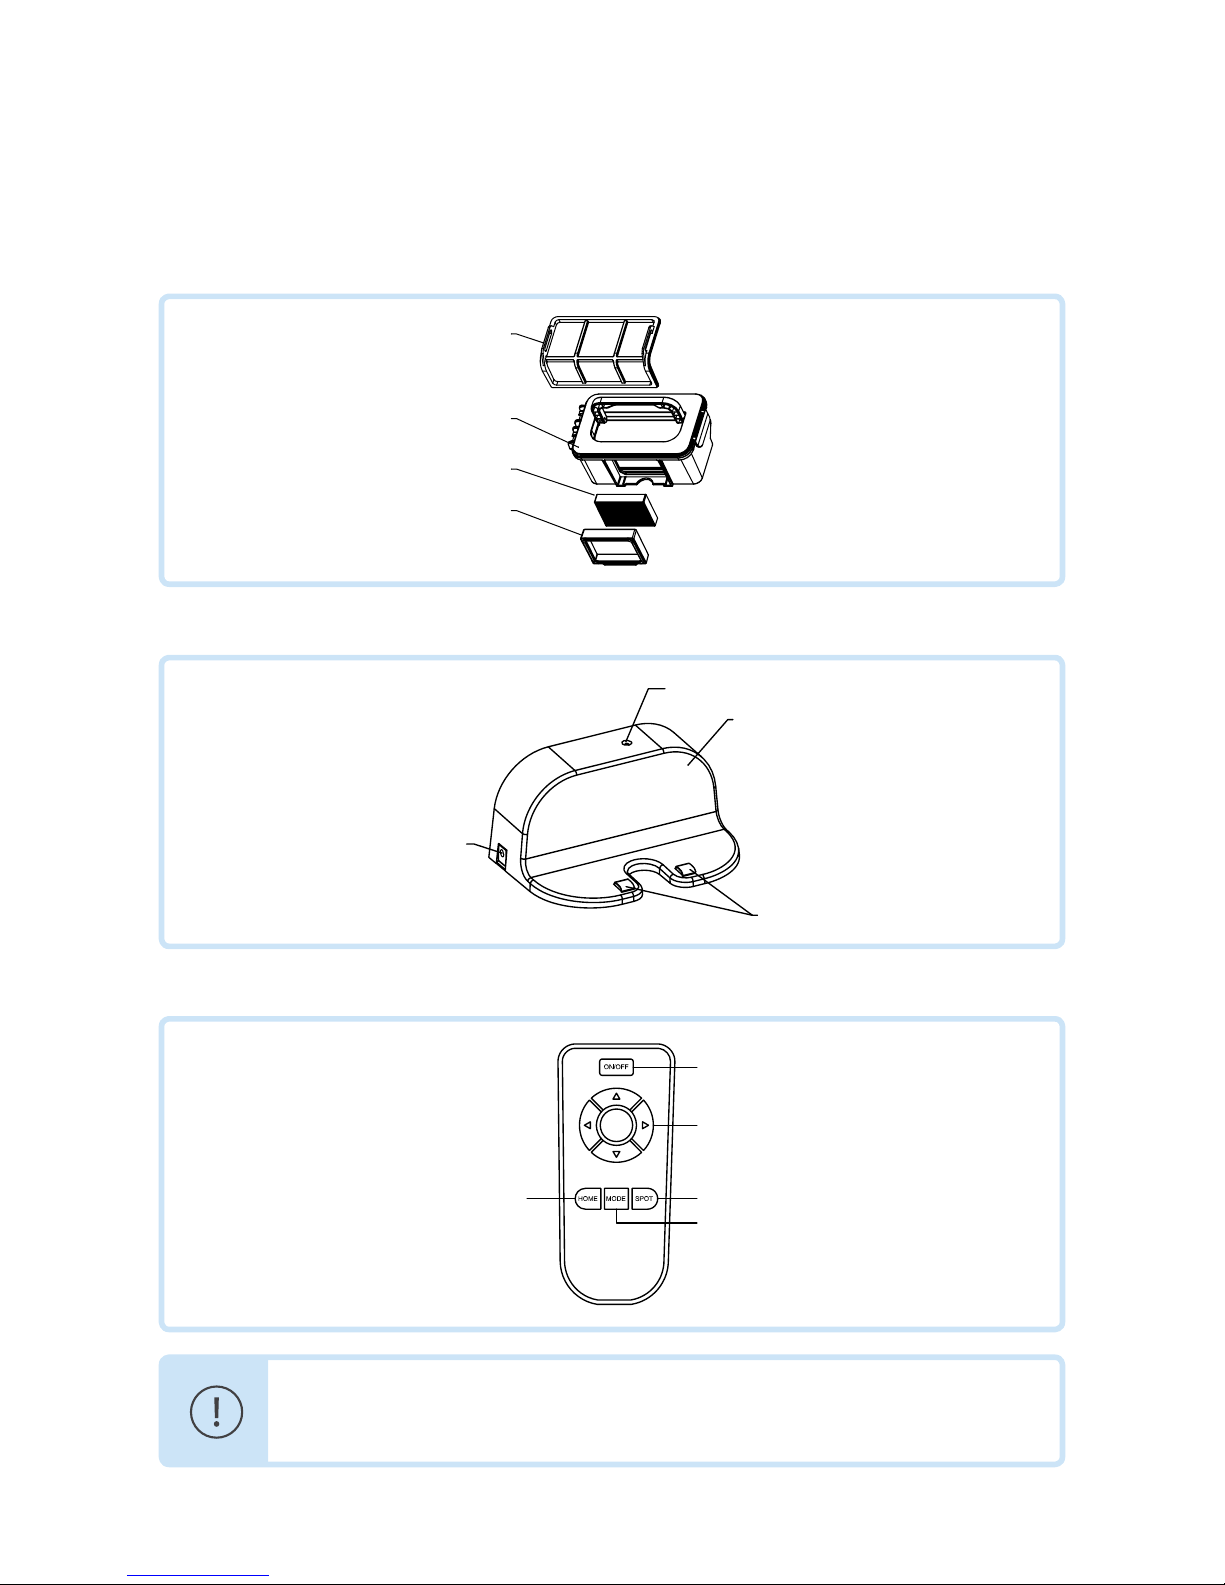
Main body and accessories................................................................................................................................................................................... 7
Main body diagram................................................................................................................................................................................................. 8
Dust bin........................................................................................................................................................................................................................ 9
Charging station....................................................................................................................................................................................................... 9
Remote control ......................................................................................................................................................................................................... 9
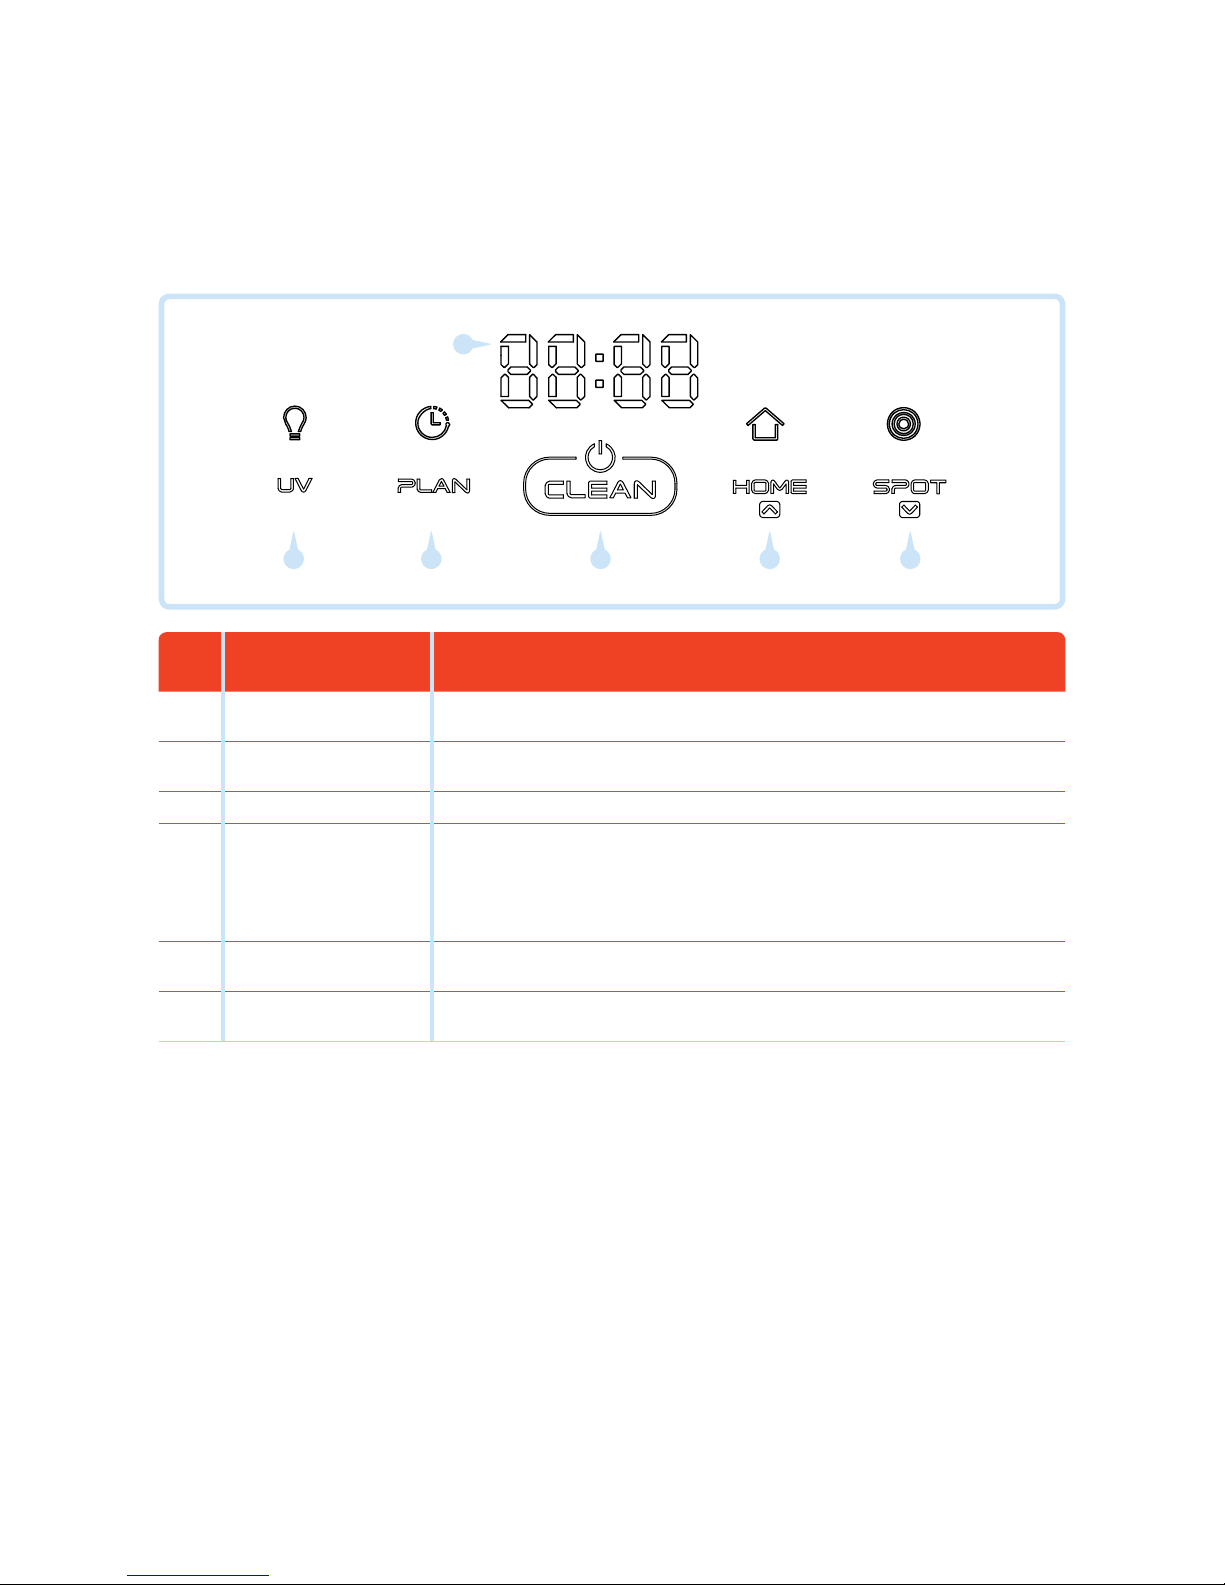
Display panel ........................................................................................................................................................................................................... 10
7. Product operation................................................................................................................................................................................................. 11
Battery charging....................................................................................................................................................................................................... 11
Starting up.................................................................................................................................................................................................................. 11
Standby ....................................................................................................................................................................................................................... 12
Sleeping....................................................................................................................................................................................................................... 12
Scheduling ................................................................................................................................................................................................................. 12
Cleaning modes....................................................................................................................................................................................................... 13
Water tank and mop ............................................................................................................................................................................................. 14
8. Product maintenance........................................................................................................................................................................................14
Cleaning side brushes........................................................................................................................................................................................... 14
Cleaning dust bin and filters.............................................................................................................................................................................. 15
Cleaning sensors and wheels ............................................................................................................................................................................ 16
Cleaning charging poles....................................................................................................................................................................................... 16
Cleaning suction passage and dust sensor.................................................................................................................................................. 16
9. Troubleshooting..................................................................................................................................................................................................... 17
Error code for sensors............................................................................................................................................................................................ 17
Troubleshooting for motors.............................................................................................................................................................................. 19
10. Battery removal..................................................................................................................................................................................................... 20
11. Product specification........................................................................................................................................................................................ 21

FagronLab™ RVC1
FagronLab™ RVC1 – User Manual | 4
1. Introduction
Thank you for purchasing the FagronLab™ Laboratory UV Vacuum Cleaner RVC1. This robot vacuum cleaner is specially
designed for laboratories of compounding pharmacies and it is a very useful assisting device on everyday cleaning activities
according to the cleaning standard operational procedures of the facility. Its UV sterilisation function, mopping feature and
cleaning pattern can guarantee a sustainable and repeatable cleaning process. This device cannot be used for home cleaning
but can be used for health facilities' spaces. You must carefully read and understand the contents of this manual prior to
operating this device. After reading this manual, please put it in an appropriate position for easy access.
2. Service
3. Warranty
In case of any problem, you can always contact the Service Department for technical support AFTER FIRST consulting the
troubleshooting pages of this manual. Please provide the customer care representative with the following information:
•Description of problem.
•Methods and procedures adopted to resolve the problems.
•Your contact information.
This device is under warranty and free from defects in materials and workmanship, under normal use and service, for
a period of 12 months from the date of invoice (excluding consumable accessories such as UV lamp, fuse, filters, brushes,
mopping cloths and breakable parts). The warranty is extended only to the original purchaser. Warranty is not valid on
device which has been damaged on account of improper installation, improper connections, misuse, accident or abnormal
conditions of operation. If the warranty has been expired, Fagron would still responsible for repair with relative charges.
For claims under the warranty please contact your local supplier.

FagronLab™ RVC1
FagronLab™ RVC1 – User Manual | 5
Before using this product, please read the safety instructions and follow all those regular safety precautions.
•Only authorized technicians can disassemble the product. Users are not allowed to disassemble or repair the product.
•Only use the original battery and power adapter of the product for charging. Using an unmatched adapter may cause
electric shock, fire or product damage.
•Do not touch the power cord, plug or adapter with wet hands.
•Do not use this product in wet or moist environment (any environment with liquid), e.g. bathroom or laundry.
•Do not have any kind of wrapping material or part of user’s body wound in the drive wheels.
•Before use, clean floor environment (remove all fragile objects and cords, clothing, paper, loose cables, as well as make
sure to lift drapes o the floor to avoid any possible accidents. In case a loose cable is tangled with the product, the
cable might move around with the product as it works and topple down equipment or cabinet and might cause hurt or
property damage.).
•Make sure this product is not close to cigarette ends, lighters, matches or any flammables.
•Never use the product to clean combustible or highly volatile liquids, such as gasoline.
•Only use the product indoors; do not use it outdoors.
•If the product needs cleaning, clean it after it is fully charged.
•Do not over-bend or press the flexible cord with heavy or sharp objects.
•Do not sit on top of this product or attach an abject on the top of it. Beware of children or pets while the product is in
operation in case it is used in public health spaces.
•Do not place this product where it is easy to drop o (workbenches).
•Turn o the power switch during product transportation or when you don’t need to use this product for a long time.
•Before charging, check whether the adapter and outlet are properly connected.
•To avoid tripping, inform all the people in the facility when this product is working.
•When dust bin is full, empty it before use.
•Use this product in temperature from 0°C to 40°C.
•Do not use this product in high-temperature environment or under baking sunlight for a long time.
•The battery must be removed from the product before it is disposed of.
4. Safety instructions
5. Product features
Warning:
• This is a professional device and should not be used by children. For persons with reduced physical,
sensory or mental capabilities or lack of experience and knowledge, proper supervision or instruction
should be given concerning use of the appliance in a safe way to help them understand the hazards
involved. Children should not play with the appliance. Cleaning and user maintenance should not be
made by children.
Powerful suction
Suction power of this product is strong enough to ensure that even tiny dust on the floor will be cleaned thoroughly!
Intelligent suction adjustment
This product is able to automatically adjust its suction power when different floor environments are detected. Not only does
it make cleaning more efficient, but it also helps to save more power (up to 30%).
User friendly design
Operation is greatly simplified, touch the "CLEAN" button, you could start the robot!

FagronLab™ RVC1
FagronLab™ RVC1 – User Manual | 6
1Auto cleaning mode
The robot will clean a room automatically and adjust
its cleaning according to situation.
3Edge cleaning mode
In this mode the robot will clean along the wall or
obstacles.
2Spot cleaning mode
The robot will clean intensively in a spiral way when it
detects a very dirty area.
4Scheduling mode
After scheduled, the robot will leave charging station
and start working at scheduled time.
Washable dust bin
Wash dust bin and filters with water.
Wash dust bin after every empty.
Various cleaning modes
Four cleaning modes are provided to meet your needs.

FagronLab™ RVC1
FagronLab™ RVC1 – User Manual | 7
6. Product components
No Description Quantity
1 Main Body 1
2 Charging Station 1
3 Adapter 1
4 Remote Control (battery not included) 1
5 Water Tank 1 pc and Mopping clothes 2 pcs 3
6 HEPA Filter 1
7 Cleaning Brush 1
8 Side Brushes *2 and Spare Brushes *2 4
9 User Manual 1
1
4
7
2
5
8
3
6
9
Main body and accessories

FagronLab™ RVC1
FagronLab™ RVC1 – User Manual | 8
Main body diagram
Body
Right wheel
Cover
Dust bin
Right side brush
Suction package
Battery cover
Universal wheel
Auto charge pole
Left side brush
LED Display
Touch key
Cover
Power switch
Button battery cover
Bottom cover
UV light
Left wheel
Charging socket

FagronLab™ RVC1
FagronLab™ RVC1 – User Manual | 9
Dust bin
Charging station
Remote control
Primary filter
Dust bin
HEPA filter
Charging socket
Auto charging
HEPA filter holder
Power light
Top cover
Charging poles
ON/OFF
Direction button
Spot cleaning
Cleaning mode
Note:
• Install two AAA type batteries into the remote before use.
• Remove the batteries if the remote will be left unused for a long period.
• If you use the remote near charging home base, the robot may not recognize command and may not work.

FagronLab™ RVC1
FagronLab™ RVC1 – User Manual | 10
Display panel
No Description Action
1 LED Panel • LED panel shows the time setting, charging status, and error codes by using
numbers, letters or graph
2 UV light button • In standby mode, press this button to preset the UV light status (on/o)
• When robot starts cleaning, the UV light will turn on/o as preset
3 Schedule button • In standby mode, press this button to enter/quit scheduling mode
4 Clean button
• Press this button to change from sleeping mode to standby mode
• In standby mode, keep pressing this button for more than 3 seconds to go into
sleep mode
• Confirm scheduling setting in scheduling mode
• Start cleaning in standby mode
5Auto homing/Number
increment button
• Press this button to increase number in scheduling mode
• In other mode, press this button to start auto-homing and charging mode
6Spot cleaning/Number
decrement button
• Press this button to decrease number in scheduling mode
• In other mode, press this button to start spot cleaning
1
2 3 54 6

FagronLab™ RVC1
FagronLab™ RVC1 – User Manual | 11
7. Product operation
•Positioning the charging station: Place the charging station against the wall and remove obstacles 1 meter on either side
and about 2 meters front of the charging station, as shown in the image.
•To charge, make sure the “ON/OFF” switch on the side of the robot is switched to “ON”.
•Charge the robot in one of the two ways as shown below:
1. Plug the adapter into the robot and the other end to the power socket as shown in Figure 1.
2. Press ”HOME” on robot or “HOME” on remote control to operate the robot to go charging station for recharging as
shown in Figure 2.
Figure 1 Figure 2
Note:
• When robot is charging, LED panel will gradually show “11:11”, from left to right.
• Once charging is completed, LED panel will show “11:11”.
• In the standby status, the robot will broadcast voice “please charge” when battery power is low.
• In the working status, the robot will return to charging station automatically when battery power is low.
•Before first use, charge the robot for 12 hours.
•Charge the robot as soon as battery power is low.
•The robot will return to charging station automatically when it has finished cleaning or if battery power is low.
•If the robot is not to be used for a long time, fully charge the battery, turn the power switch o, remove and store it in a
cool, dry place.
•If the robot is not to be used for more than 3 months, charge the robot for 12 hours, turn the power switch o, remove and
store it in a cool, dry place.
To ensure optimum battery performance:
Starting up
Battery charging
•Press the “ON/OFF” switch on the side of the robot to “ON”.
•Press "CLEAN" on main body or ON/OFF on remote control to start cleaning.
Note:
• If robot is in sleeping mode, press "CLEAN" on main body or ON/OFF on remote control to wake up the
robot from sleeping mode, then press "CLEAN" again, the robot will start cleaning automatically.

FagronLab™ RVC1
FagronLab™ RVC1 – User Manual | 12
Standby
Sleeping
Scheduling
•Standby means the robot’s main power is “ON”, and the robot is ready to use. It can be changed to standby mode by
below methods:
1. During robot cleaning, press "CLEAN" on main body to enter standby mode.
2. During robot cleaning, press ON/OFF button on remote control to power o the robot.
•In sleeping mode, the robot can only be waken up from "CLEAN" button on main body or ON/OFF on remote control in
order to save power. To turn robot into sleeping mode from standby mode:
1. Keep pressing "CLEAN" on main body for 3 seconds.
2. Robot will automatically enter sleeping mode if there is no command received for more than 60 seconds.
You can schedule the robot to make it start cleaning automatically at a certain time every day.
Scheduling by keys on the main body
Schedule by the LED panel on robot
Setting Robot Clock
•In standby or charging status, press "PLAN" to start the clock-setting. The LED panel will show the current system time.
•Press "CLEAN" to enter the hour-setting mode, the left two numbers on LED panel will flash. Press "HOME" to increase hour
or "SPOT" to decrease it.
•Press "CLEAN" again to enter the minute-setting mode, the right two numbers on LED panel will flash. Press "HOME" to
increase it or "SPOT" to decrease it.
•Press "CLEAN" again to confirm the setting.
Setting the scheduling time
•In standby or charging status, press "PLAN" for two times to start scheduling, LED panel will show previous scheduled time
or “00:00” if there is no schedule settled before.
•Press "CLEAN" to enter hour-setting mode, the left two numbers on LED panel will flash. Press "HOME" to increase hour or
"SPOT" to decrease it.
•Press "CLEAN" again to enter the minute-setting mode and the right two numbers on LED panel will flash. Press "HOME" to
increase minute or "SPOT" to decrease it.
•Press "CLEAN" again to confirm the scheduling.
Cancel the scheduling
•Set the scheduling interval to 00:00.
Note:
• The robot can only be set when it’s in Standby or Charging mode. If the robot is in sleep mode, press
"CLEAN" on main body or ON/OFF button on remote control to wake up the robot. If the robot is in
Cleaning mode, stop it before scheduling.
Note:
• Before scheduling, please set the robot time to be the same with real time.
• The robot will start cleaning at the schedule time of Robot Clock every day.

FagronLab™ RVC1
FagronLab™ RVC1 – User Manual | 13
Cleaning modes
Auto cleaning mode
Spot cleaning mode
Edge cleaning mode
Zig-Zag cleaning mode
Please touch the "CLEAN" button to start cleaning. You can only select the cleaning mode when the robot is cleaning, press
the MODE button on remote control to select the cleaning mode, the mode type will appear on the robot’s 4 Digits LED
Display as follow:
•1111: Spot Cleaning Mode
•2222: Auto Cleaning Mode
•3333: Edge Cleaning Mode
•4444: Zig-Zag Cleaning Mode
•The robot will activate spot cleaning mode under the following condition:
1. When it detects a dirty area in the lab.
2. Press SPOT on remote control or "SPOT" on robot.
•In this mode, the robot will clean the area automatically and adjust its cleaning
mode according to the environment.
Note: Press ON/OFF on remote control or "CLEAN" on robot.
•In cleaning mode, press MODE button to select edge cleaning. The robot will
clean along the walls and obstacles.
•Robot will goes into Zig-Zag cleaning mode when it detected an open area or
environment with less obstacles. This is the recommended cleaning mode for
laboratories and when you want to apply the UV or mopping function.

FagronLab™ RVC1
FagronLab™ RVC1 – User Manual | 14
Water tank and mop
Cleaning side brushes
Usage of water tank and the fiber mopping cloth:
Clean the side brush when it gets dirty and replace it if it's damaged. Max life span for side brush is 12 months.
•Attach the fiber mopping cloth to the bottom of water tank.
•Fill up the water tank with water. Open the rubber plug, fill it with water, and
your cleaning agent. Close the rubber plug tightly to avoid leakage.
•Attach the water tank to the robot. Turnover the robot, attach the water tank to
the robot, the bolts must enters tightly into the slots available underneath the
robot. Please note that the UV function can not be used simultaneously with
mopping accessory.
MOP
Water tank
Rubber plug
8. Product maintenance
Note:
• Before replacing side brushes, check and make sure the 'L'/'R' mark on side brush match with the
'L'/'R' mark on the bottom base of the robot.

FagronLab™ RVC1
FagronLab™ RVC1 – User Manual | 15
Cleaning dust bin and filters
Empty and clean dust bin after each use following the steps as shown in the figures below:
1Press "PUSH" to open the cover.
3Take out the HEPA.
5Empty the dust bin.
7Install the primary filter and HEPA back into the dust
bin.
2Take out the dust bin.
4Open dust bin cover, take out primary filter.
6Open the dust bin and filter, clean the HEPA with brush.
Do not wet HEPA filters every time you clean the dust bin.
Press

FagronLab™ RVC1
FagronLab™ RVC1 – User Manual | 16
Note:
• Wash HEPA filter after 15~30 days of use. Max life span for HEPA and filter is 24 months.
• Reinstall the HEPA and primary filter after they are fully dry.
• HEPA and primary filter could be replaced if needed.
• Do not dry the filters under baking sunshine.
Cleaning charging poles
Cleaning sensors and wheels
Cleaning suction passage and dust sensor
•Slightly wipe all the sensors and wheels, as marked in figure below, with soft
cleaning cloth or tool.
•Clean the charging poles, as marked in figure below, with soft cleaning cloth or
tool.
•Take out the suction kit from robot, and then clean the suction passage and
dust sensor, as marked in figure below, with soft cleaning cloth or tool.
Note:
• Please don't let the sensors get wet by water, thinner e.t.c.

FagronLab™ RVC1
FagronLab™ RVC1 – User Manual | 17
Error code Cause Solution
AUBF Suction passage blocked Clean suction passage
AUBN Dust bin not placed in position or robot without
dust bin Put back dust bin and place it in position
E1XX Left collision switch fault
Check sensitivity of the front bumperE2XX Right collision switch fault
E3XX Left and right collision switches fault
E4XX Left wheel o the ground Put robot on solid ground
E5XX Left wheel o the ground, left collision switch
fault
Put robot on solid ground and check sensitivity
of the front bumper
E6XX Left wheel o the ground, right collision switch
fault
E7XX Left wheel o the ground, left and right
collision switches fault
E8XX Right wheel o the ground Put robot on solid ground
E9XX Right wheel o the ground, left collision switch
fault
Put robot on solid ground and check sensitivity
of the front bumper
EAXX Right wheel o the ground, right collision
switch fault
EBXX Right wheel o the ground, left and right
collision switches fault
ECXX Left and right wheel o the ground Put robot on solid ground
EDXX Left and right wheel o the ground, left
collision switch fault
Put robot on solid ground and check sensitivity
of the front bumper
EEXX Left and right wheel o the ground, right
collision switch fault
EFXX Left and right wheel o the ground, left and
right collision switch fault
EXX1 Left anti-drop sensor detects cli Clean bottom anti-drop sensor
EXX2 Front anti-drop sensor detects cli
EXX3 Left and front anti-drop sensors detect cli Clean front sensor lens and bottom anti-drop
sensor lens
EXX4 Right anti-drop sensor detects cli Clean bottom anti-drop sensor
EXX5 Left and right anti-drop sensors detect cli
E XX6 Front and right anti-drop sensors detect cli Clean front sensor lens and bottom anti-drop
sensor lens
EXX7 Front, left and right anti-drop sensors detect
cli
EXX8 Front bumper right infrared sensors detect
obstacle Clean front bumper sensor lens
EXX9 Left anti-drop sensor detects cli, front bumper
right infrared sensor detects obstacle
Clean front sensor lens and bottom anti-drop
sensor lens
Error code for sensors
9. Troubleshooting

FagronLab™ RVC1
FagronLab™ RVC1 – User Manual | 18
Error code Cause Solution
EXXA Front anti-drop sensor detects cli, front
bumper right infrared sensor detects obstacle
Clean front sensor lens and bottom anti-drop
sensor lens
EXXB
Left and front anti-drop sensors detect cli,
front bumper right infrared sensor detects
obstacle
EXXC Right anti-drop sensor detects cli, front
bumper right infrared sensor detects obstacle
EXXD
Left and right anti-drop sensors detect cli,
front bumper right infrared sensor detects
obstacle
EXXE
Right and front anti-drop sensors detect cli,
front bumper right infrared sensors detect
obstacle
EXXF
Front, left and right anti-drop sensors detect
cli, front bumper right infrared sensors detects
obstacle
EX1X Front bumper left infrared sensor detects
obstacle
Clean front bumper sensor lens
EX2X Front bumper middle infrared sensor detects
obstacle
EX3X Front bumper left and middle infrared sensors
detect obstacle
EX4X Front bumper right infrared sensor detects
obstacle
EX5X Front bumper left and right infrared sensors
detect obstacle
EX6X Front bumper middle and right infrared sensors
detect obstacle
EX7X Front bumper left, middle and right infrared
sensors detect obstacle
EX8X Front bumper wall detection infrared sensor
detects obstacle
EX9X Front bumper wall detection sensor and left
infrared sensor detect obstacle
EXAX Front bumper wall detection sensor and middle
infrared sensor detect obstacle
EXBX Front bumper wall detection sensor, left and
middle infrared sensor detect obstacle
EXCX Front bumper wall detection sensors, right
infrared sensor detect obstacle
EXDX Front bumper wall detection sensors, left and
right infrared sensor detect obstacle
EXEX Front bumper wall detection sensors, right and
middle infrared sensors detect obstacle
EXFX Front bumper wall detection sensors, left, right
and middle infrared sensors detect obstacle

FagronLab™ RVC1
FagronLab™ RVC1 – User Manual | 19
Troubleshooting for motors
Error code Cause Solution
L01X Fan overloaded Check if fan is pressed, and clean dust bin
L0X1 Left wheel overloaded
Check if it’s stuck or wired by obstacles
L0X2 Right wheel overloaded
L0X3 Left and right wheels overloaded
L0X4 Left side brush overloaded
L0X5 Left wheel and left side brush overloaded
L0X6 Right wheel and left side brush overloaded
L0X7 Left and right wheels, left side brush overloaded
L0X8 Right side brush overloaded
L0X9 Left wheel and right side brush overloaded
L0XA Right wheel and right side brush overloaded
L0XB Left and right wheels, right side brush
overloaded
L0XC Left and right side brushes overloaded
L0XD Left wheel, left and right side brushes
overloaded
L0XE Right wheel, left and right side brushes
overloaded
L0XF Left and right wheels, left and right side
brushes overloaded
L02X Roller brush overloaded
Note:
• There is no problem for the robot when it displays L000.
• "X" is the number or letter might appear on display for different fault.
• If robot displays E001 or E004, please directly find the relative solution referred in troubleshooting.
• If robot displays EC07, please find ECXX and EXXX for relative solution referred in troubleshooting.
• Like wise, if robot displays EE91, please find EXX1, EEXX and EX9X for relative solution referred in
troubleshooting.
• If above solution does not work, please try below:
1. Reset the robot by switching off the unit and then turn it on, and check again.
2. If it still does not work after reset, contact the after sales.
• UV light might hurt your eyes, so please do not stare directly at the light when turned on.

FagronLab™ RVC1
FagronLab™ RVC1 – User Manual | 20
10. Battery removal
Note:
• Only use the original battery of the product, otherwise it may cause product damage.
Warning:
•You must remove (or attempt to remove) the battery incorporated in this product on your own. To
replace the battery, you must contact your service provider or an independent qualified professional.
These instructions have been prepared for the exclusive use of your service provider or independent
qualified professional.
FOR YOUR OWN SAFETY, DO NOT ATTEMP TO REMOVE THE BATTERY ON YOUR OWN OR
DISPOSE OF IT IN FIRE. DO NOT DISASSEMBLE, CRUSH OR PUNCTURE THE BATTERY.
•Remove the screws on battery cover with a screw driver.
•Remove the battery cover.
•Grasp the insulating tape at two sides of the battery and lift the battery.
•Unplug the wire connector that links the battery and robot.
Applicable in countries with battery return systems
The marking on the battery, manual or packaging indicates that the battery in this
product should not be disposed of with other household waste. Where marked, the
chemical symbols Hg, Cd or Pb indicate that the battery contains mercury, cadmium or
lead above the reference levels in EC Directive 2006/66.
The battery incorporated in this product is not user replaceable. For information on its
replacement, please contact your service provider. Do not attempt to remove the battery
or dispose it in a fire. Do not disassemble, crush, or puncture the battery. If you intend to
discard the product, the waste collection site will take the appropriate measures for the
recycling and treatment of the product, including the battery.
Table of contents