FAIR S7 User guide

Maintenance
And Use Manual
Pellets Stove
Pellets StovePellets Stove
Pellets Stove
- -

Pellets Stove
2
22
2
Dear client,
We thank you for having chosen one of our products. Our products are designed and made in accordance
with the safety standards in force with high quality materials and a great experience about transformation
processes. We recommend you to read carefully the instructions of this manual to obtain the best
performance of your appliance.
This manual is an important part of the product: make sure you keep it always with the appliance, even if you
give the appliance away to another person. Whether you lose it, ask for as copy to the nearest service centre.
•INDEX
INDEXINDEX
INDEX
•WARNINGS AND SAFETY ........................................................................................................................ 2
•PACKING.................................................................................................................................................... 3
•CHIMNEY FLUE ......................................................................................................................................... 3
•FUEL........................................................................................................................................................... 8
•INSTALLATION .......................................................................................................................................... 9
•USE........................................................................................................................................................... 10
•SAFETY DEVICES ................................................................................................................................... 14
•MAINTENANCE........................................................................................................................................ 15
•TECHNICAL DATA................................................................................................................................... 17
•IF THERE IS A PROBLEM ....................................................................................................................... 20
•GUARANTEE............................................................................................................................................ 23
•WARNINGS AND SAFETY
WARNINGS AND SAFETYWARNINGS AND SAFETY
WARNINGS AND SAFETY
The stoves built in our factory are made with great care, also for individual components, in order to protect
both the user and the installer from the possibility of accident. We therefore strongly advise skilled personnel,
after any operation carried out on the product, to take special care with the electrical connections, especially
the bare part of the conductors, which should not come out of the terminal board in any way, so as to prevent
possible contact with the live parts of the conductor. When installing the appliance, comply with all local
regulations and byelaws, including those referring to national and European legislation.
Installation should be carried out by skilled personnel, who will take complete responsibility for final
installation and for consequent correct operation of the installed product. Fair will not be liable in the event of
failure to respect these instructions.
This stove should be used for the purposes for which it was designed and made. The manufacturer is
excluded from any contractual or extra-contractual liability for damage caused to persons, animals or objects,
by errors in installation, adjustment or maintenance and by improper use. After removing the packing make
sure the contents are complete and intact. If not, contact the retailer where the apparatus was purchased.
The stove should be serviced at least once a year, by making an appointment in good time with the technical
assistance services.
For safety reasons, always bear in mind:
This appliance should not be used by people (including children) with physical, sensory or mental limitations
or by people with little experience or knowledge, unless they are supervised or receive instruction on how to
use the appliance by the person who is responsible for their safety. Do not touch the stove if barefoot or if
parts of the body are wet or damp. Never change the safety devices or adjustment devices without prior
authorisation and instruction from the manufacturer.
Do not pull, detach or twist the electric cables coming out of the stove, even if it is disconnected from the
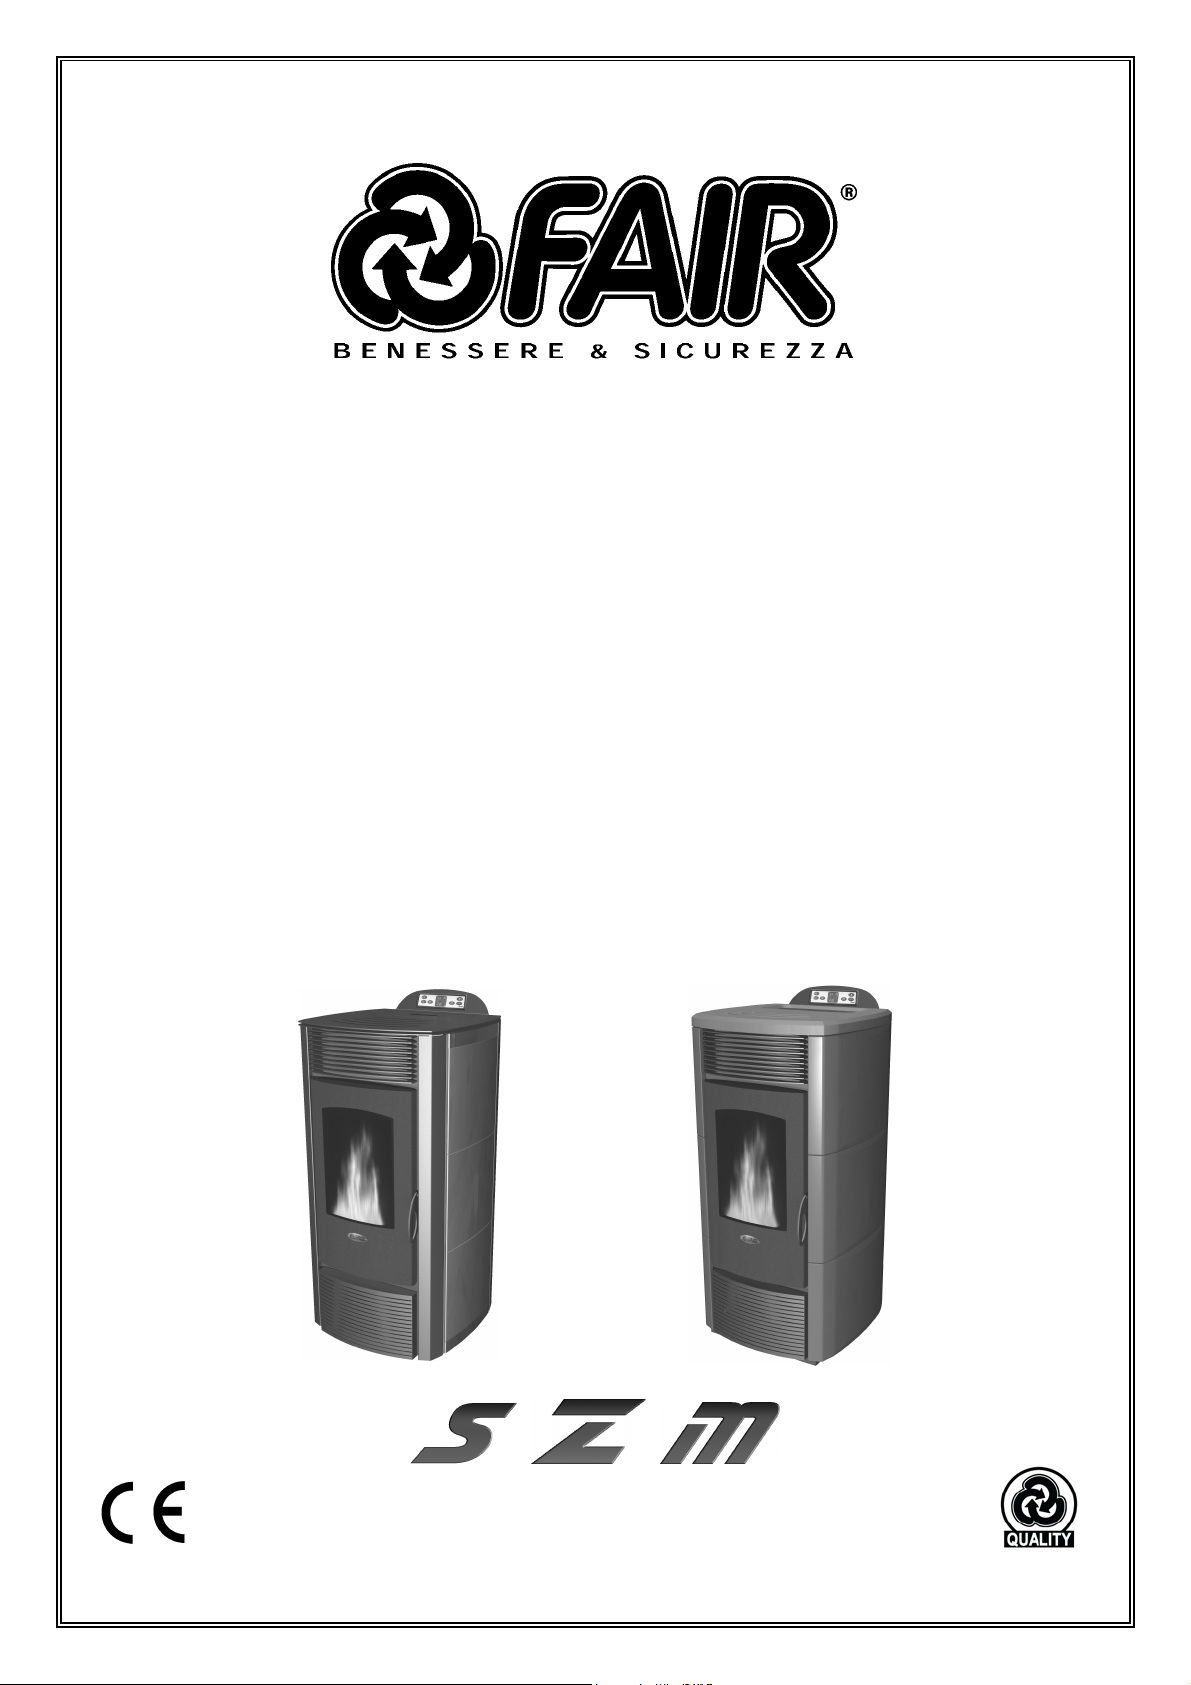
power supply. Do not block or reduce the size of the openings for ventilation on the premises where the stove
is installed. The ventilation openings are essential for correct combustion.
Keep the packaging out of reach of children and unassisted incapable people. Do not use the appliance as
an incinerator or in any other way than that for which it has been designed. When the appliance is running its
exterior, in particular, will reach high contact temperatures; handle with care to burns.
Do not make any unauthorised changes to the appliance. Use only original spare parts as recommended by
the manufacturer.

Pellets Stove
3
33
3
•PACKING
PACKINGPACKING
PACKING
Packing
PackingPacking
Packing
The packing includes a cardboard box, which is recyclable in accordance with RESY guidelines, some
recyclable inserts made of expanded EPS and wooden pallet. All package materials can be used again for
similar use or taken away as solid urban waste in accordance with the regulation in force.
After you have taken the package away make sure the appliance is in perfect conditions.
Important: we recommend you move the appliance with adequate means paying attention to the safety
regulation. Don’t turn the package upside down and handle the majolica details with care.
•CHIMNEY FLUE
CHIMNEY FLUECHIMNEY FLUE
CHIMNEY FLUE
Introduction
IntroductionIntroduction
Introduction
This chapter gives you some directions for a good and correct fulfilment of the chimney flue but it doesn’t
replace the regulations in force that a qualified chimney setter should know.
The company declines any responsibility for the bad functioning of the stove if that is caused by a bad
dimensioned chimney flue that is not in accordance with the regulation in force UNI10683.
Chimney flue
Chimney flueChimney flue
Chimney flue
The chimney flue or chimney has a great importance for a heating appliance which uses solid combustible
materials of b type with forced draft; as modern heating appliances are high efficient with colder fumes and a
consequent lower draft it is really important that the chimney flue is properly built and always maintained
perfectly efficient. The chimney flue must be single (regulation UNI7129/92) or going outside (regulation
UNI7129/92) (see picture 1 a and b) which is not allowed in building with several floors and flats. It is not
possible to connect more than one pellets appliance to the same chimney flue.
Pic. 1
Technical characteristics
Technical characteristicsTechnical characteristics
Technical characteristics
The chimney flue must be fume tight (a seepage of air through cracks or an inspection door which isn’t fume
tight will highly reduce the draught of the chimney). It must be vertical without obstructions, made of materials
that are impermeable to fumes and condensate, thermal insulated and adequate to be resistant against
normal mechanical stress on a long term (we recommend chimneys made of a/316 or refractory material with
double insulated chamber of round section). It must be insulated from the outside to avoid phenomenon of
condensate and to decrease the effect of fumes cooling. It must be separated from materials that are
combustible or easily inflammable by means of air space or insulating materials. The chimney fireplace throat
must be located in the same room where the appliance is installed or at least in the next room and

Pellets Stove
4
44
4
underneath it there must be a chamber to collect solid residuals and condensate with a height not inferior to
50 cm and accessible through an airtight metal door. An expert stove setter should verify the chimney flue
efficiency and if it is necessary the chimney flue must be ducted with materials in accordance to the
standards in force. Auxiliary extractor fans can’t be installed along the chimney or on the chimney pot.
Height
HeightHeight
Height –
––
– chimney draught
chimney draughtchimney draught
chimney draught
The chimney flue draught depends also on its height. The draught, which is necessary for the different
models of pellets stoves, is: 15p/20p (0,15/0,20 mbar).
Dimensions
DimensionsDimensions
Dimensions
The section can be round (which is the best shape), square or rectangular (the ratio between the inner sides
must be <=1,5) and the linked sides must have a minimum radius of 20 mm. The section dimensions must be
equal to or bigger than the diameter of the fumes waste pipe (8cm). Hereunder you can see the dimensions
table (see picture 2).
Type of system Pipe Diameter 8 cm Pipe Diameter 10 cm
Minimum length 1.5 2
Maximum vertical length (with 1 pipe tee) 6.5 10
Maximum length (with 3 pipe tees) 4.5 8
Maximum number of bends or pipe tees 3 4
Horizontal stretches (minimum gradient 5%) 2 2
Installation at altitudes over 1200 m above sea level NO Compulsory
Pic. 2
Chimney pot
Chimney potChimney pot
Chimney pot
The chimney pot is really important for a good functioning of a heating appliance, we recommend a chimney
pot, which is wind resistant with wing profiles (see picture 3).
Pic. 3
It must present an outlet section not inferior to a double of the chimney section and it must be shaped to
assure the outlet of fumes in case of wind coming from all directions and inclinations. It must stop rain, snow

Pellets Stove
5
55
5
and animals from going inside. The height of the fumes outlet in the atmosphere must be far away from the
reflux area caused by the roof shape or by the presence of nearby obstacles (see picture 4).
Maintenance
MaintenanceMaintenance
Maintenance
The chimney flue must be kept always clean: deposits of soot or incombustible oils reduce its section in size
obstructing its draught, compromising the good functioning of the stove and if the residuals are big they can
catch fire. The chimney flue and pot must be cleaned and checked by an expert at least once a year. Safety
can be compromised by the non-cleaning.
Pic. 4
External air intake
External air intakeExternal air intake
External air intake
We recommend to set an air intake from the outside to have a healthy inner environment. The air flow
between the outside and the room can be vented directly from a duct on the external wall of the room (best
solution, see picture 5A pag.6) or indirectly from adjacent rooms (see picture 5B pag.6) as long as these
rooms are not bedrooms, garages, store rooms, rooms that present the risk of fire or with an opposite draft
due to a suction system without air intake. The air intake duct must have an inner cross section of at least
100cm2but this parameter must be increased if there is an electric ventilation system to air the room (ex.
Kitchen hood) (see picture 7 pag.7). The air intake duct must be located near the floor and safe from any
accidental obstruction.

Pellets Stove
6
66
6
Pic. 5
Maximum capacity of electric ventilation(m3/h) Net additional section (cm2)
Up to 50 140
Over 50 and up to 100 280
Over 100 and up to 150 420
Pic. 6
Air necessary for combustion
Air necessary for combustionAir necessary for combustion
Air necessary for combustion
All types of combustion need air (oxygen). Hence, every stove extracts air from the room in which it is
installed and then the air has to be returned. Bad combustion may be caused by poor air circulation inside
the house and this often occurs in modern homes, which have hermetically sealed doors and windows. The
situation can also be problematical when, on the other hand, there are drafts inside the room (generated by
fans in the kitchen or bathroom for example).
To avoid this type of problem we recommend installing a permanent ventilation grid in a window or near the
stove. Air intake directly from the outside is compulsory.
WARNING!
Use only steel pipes. Pipes in synthetic material are aluminium must never be used.
Comburent air duct
Comburent air ductComburent air duct
Comburent air duct
We recommend to vent the flow of air for combustion purposes directly from the outside through a pipe with
diameter 40 mm, located behind the stove (see page 17) that allows a better combustion with no risk against
safety. When the installation takes place it is necessary to verify the minimum distances of the comburent air
duct taken directly from the outside as (for example) a window or an open door can take off the comburent air
necessary to the stove (see hereunder table). The duct outlet must be covered with a grid strainer against
birds. If extractor fans are used in the same room or place where the appliance is installed this may create
problems.

Pellets Stove
7
77
7
Pic. 7
The air intake must be at a
distance of:
1.5 m Below Doors, windows, fume exhaust, air
spaces etc.
1.5 m Level with Doors, windows, fume exhaust, air
spaces etc.
0.3 m Above Doors, windows, fume exhaust, air
spaces etc.
1.5 m Far away Smoke outlet
Pic. 8
Connection to the chimney flue
Connection to the chimney flueConnection to the chimney flue
Connection to the chimney flue
A pellets stove works with a fumes draft forced by a ventilator, therefore you must be sure that all piping is
properly made as explained in this chapter by specialised staff. The pipes fitting between the stove and the
chimney flue must be short in order to support the draft and avoid the formation of condensate inside the
pipes. The diameter of the fumes pipe must be equal to or bigger than the diameter of the waste fumes pipe
(diameter 80mm). For the fumes pipe fitting you should use pipe made of plate for stove-setting, type B22
with silicone strips, pipes of painted aluminates steel (minimum thickness 1,5mm) or made of stainless steel
A316 or porcelain zed (minimum thickness 0,5mm) with a diameter of 80 mm or 100mm depending on the
type of plant (see picture 2 pag.4), you can not use pipes made of asbestos cement or flexible metal. The
pipes must be sealed with high temperature silicone (min. 250°) and fixed together with a self-threading
screw with diameter 3.9. You must always use a T pipe fitting (see picture 8) with inspection plug, which
allows an easy periodic cleaning of the pipes without having to disassemble them. Make sure that after the
cleaning the inspection plugs are closed hermetically with good strip. For changes of direction you can only
use 3 T pipefitting and the fumes pipe length must not exceed 2 meters of horizontal projection with a
minimum gradient of 5% (see picture 2 pag.4). You can’t link more than one appliance to the same fumes
pipe, you can’t direct the waste fumes coming from above hoods into the same fumes pipe, you can’t
discharge the combustion products through the wall directly to the outside or to close spaces in open air. You
can’t connect any other type of appliances (wood stoves, hoods, boilers etc.). You can’t fit butterfly valves or
anything that can block the fumes passage anyway.

Pellets Stove
8
88
8
Examples of correct installation
Examples of correct installationExamples of correct installation
Examples of correct installation
1) Installation with hole on the roof for the passage of the pipe using an adequate mineral insulator (rock
wool, ceramic fibre with a density bigger than 80 kg/m3). The hole diameter varies from 300 mm, if the hole is
in contact with flammable materials (wood etc.), to 200 mm if in contact with non-flammable materials
(cement, bricks, etc.). This rule is valid also for holes on the wall.
2) Old chimney flue, ducted with an external door for the cleaning.
3) External chimney flue made of insulated stainless steel pipes with double wall, diameter 8-10 cm, well
fixed on the wall.
4) Ducts system of T pipe fittings for easy cleaning without the disassemble of the pipes.
Pic. 9
•FUEL
FUELFUEL
FUEL
Combustible material
Combustible materialCombustible material
Combustible material
Do not use inflammable liquids. Pellets are the only combustible material you can use. You can find different
kind of pellets with different characteristics and quality on sale. We recommend to use pellets of good quality
as that has great influence on the heating capacity and on the residuals of ash. Pellets characteristics are:
diameter of 6-7 mm, maximum length 30 mm, they must be well pressed and little friable, without any
residuals of glue, resin or additive. Not adequate pellets can cause bad combustion, frequent blockage of the
brazier, obstruction of waste pipes, increase of consumption and decrease of heating power, dirtiness of the
glass, increase of ash quantity or unburned granules. Any wet pellets causes bad combustion and bad
functioning of the appliance, therefore make sure you store the pellets in dry rooms but at least 1 meter far
from the stove or any other heating appliance. We suggest you to try different pellets on sale and then
choose those with the best performance. The use of low quality pellets can damage the stove making the
guarantee not granted and the manufacturer not responsible for the damage.

Pellets Stove
9
99
9
•INSTALLATION
INSTALLATIONINSTALLATION
INSTALLATION
Introduction
IntroductionIntroduction
Introduction
The stove position must be chosen in accordance with the environment, the waste pipe and the chimney flue.
Verify with the local authority if there are restrictive rules about the air intake for combustion purposes and
ventilation of domestic environment and about the waste fumes pipes plant with chimney flue and chimney
pot. The manufacturer declines any responsibility in case of installation not in accordance with the standards
in force, with a not correct ventilation system, an electrical connection not in accordance with the standards in
force, or in case of bad use of the appliance. The installation must be carried out by a qualified technician
who will sign a declaration of conformity of the system and take all responsibility for the installation and good
functioning of the appliance. A booklet of testing and periodic maintenance to be carried out by the installer is
issued to the client together with the stove.
Installation
InstallationInstallation
Installation
The appliance should be installed on a floor with adequate load bearing capacity. If the existing structure
does not satisfy this requirement it is essential to take appropriate precautions (e.g. install a load distribution
plate). When the appliance is installed it should be placed so as to allow easy access for cleaning the stove
itself, the exhaust gas ducts and the chimney flue.
The pellets stove must be installed in isolation, with a minimum air space of 15 cm to allow an adequate
cooling of the appliance and a good distribution of heat in the domestic environment. In compliance with fire-
prevention methods there must be a minimum distance of at least 20 cm from flammable objects (sofas,
furniture, wooden covering) to the back and side of the stove and of 80 cm to the front where the fire door is.
If the floor is made of flammable material you must prepare a coverage made of non-flammable material
(plate of steel, marble, refractory material), which sticks out 50 cm from the front of the stove where the fire
door is and 20 cm from the other sides (see picture 10). You can’t install the stove in bedrooms or
bathrooms.
Pic. 10
Electrical connection
Electrical connectionElectrical connection
Electrical connection
Important: the appliance must be installed by specialised staff. The electrical connection must be carried out
using the supplied cable, adding an adequate plug on a socket which can take the load factor and voltage
specific of each model as indicated on the technical data table (see page 17), the plug must be accessible
when the appliance is installed. It is necessary that the fixed power grid is protected with a single pole switch
to assure a complete disconnection with a minimum opening between the contacts of 3 mm. Make sure there
is an efficient grounding, if there isn’t one or it is inefficient you should provide to have a grounding installed
in compliance with the standards in force.
N.B. The stove heating system is protected by two fuses located inside the main switch behind the stove.
Always remember to disconnect the power supply before carrying out any maintenance and/or checks!

Pellets Stove
10
1010
10
External thermostat connection
External thermostat connectionExternal thermostat connection
External thermostat connection
The stove starts thanks to a thermostat placed on its back, make sure you verify its position and don’t place it
near any kind of heating source. If you wish you can connect the stove to any kind of external environment
thermostat. In that case you must use a cable of 2x0,5 mm2, make it go through the pre-set hole under the
tank and connect it to the electronic card (see wiring diagram pag.18). These operations must be carried out
by a specialised technician.
Digi
DigiDigi
Digital or mechanical thermostat
tal or mechanical thermostattal or mechanical thermostat
tal or mechanical thermostat
It is possible for the apparatus to control the ambient temperature by means of a digital thermostat that
serves to reduce the heating power to minimum when a preset temperature is reached.
When the stove has been started off and it is in normal operation mode display A will show a number (21 C
for example); this value is the ambient temperature.
Buttons P1 or P2 are used to enter thermostat setting mode and the display will show a message that will
alternate with the word “set” and the temperature setting; pressing P2 will decrease this value while pressing
P1 will increase it.
After adjusting to the desired temperature wait until the message “set” disappears from the display.
Use buttons P4 and P5 to adjust the desired heating power.
When the apparatus reaches the temperature setting it will automatically pass to operation at the lowest
heating power and LED 4 will go off.
If you wish to disable digital thermostat operation, using P3 take the temperature to maximum so that the
message “Hot” appears on display A. The remote control can also be used to perform the same operations.
Ventilation
VentilationVentilation
Ventilation
The stove is provided with a ventilation system with dust filter. The air vented by the moto-ventilators keeps
the stove temperature low preventing the materials the stove is made of from excessive stress and heating
the domestic environment more homogeneously. Make sure you periodically test if the ventilator works
properly. After removing the humidifying glass you can connect a pipe (diameter 8 cm) to vent some of the
heated air to an other room. It is recommended that the pipe length doesn’t exceed 3 meters not to loose the
efficacy of the heated air.
•USE
USEUSE
USE
Basic instructions
Basic instructionsBasic instructions
Basic instructions
The stove that you have bought uses fuel in pellets. This type of material is made of natural wood chips from
the wood processing industry. A special process that requires neither binders nor additives is used to
compress the chips in industrial machinery at high pressure so that they become solid wood pellets. Use of
raw materials that have not been made into pellets is ABSOLUTELY PROHIBITED in our stove.
Failure to respect this instruction will invalidate all guarantees and may have a negative affect on the safety
of the apparatus.
For the first two or three times when you light the stove, bear in mind the following advice:
- Children should not be present, because the vapours emitted by the stove may be harmful to health. Adults
should also avoid staying for long near the stove.
- Do not touch the surfaces as they may still be unstable.
- Air the room well several times.
-The surfaces will be fully hardened after several heating processes.
- Operate the stove at medium Power for 2-3 days (display A will show the number 3) so that the mechanical
parts are able to settle into smooth running.
Important
Continuous operation of the stove at maximum power may shorten the expected life of the electrical
components, we therefore advise against it. We suggest using the stove at maximum power only at the start,
in order to bring the room quickly to the desired temperature (for an hour and a half for example).
The stove is designed for using pellets with a diameter of 6-7 mm. If you need to use pellets of different
diameters, an authorised servicing engineer must first take it away for adjustment.

Pellets Stove
11
1111
11
Introduction
IntroductionIntroduction
Introduction
It is recommended to follow the hereunder guidelines for the best functioning and least consumption. If the
installation is well carried out and the fumes pipe is efficient the lightning of the pellets will be very easy. The
procedure is as following: empty and clean the brazier, verify there are enough pellets in the tank. If you start
the stove for the first time you should wait for the cochlea to be filled with pellets and that requires at least
three attempts at starting, as the brazier is empty. Make sure the door is well close.
Important: don’t use any kind of inflammable liquid during the lightning (alcohol, petrol, gasoline, etc.).
Important: at the first starting you should keep the fire lightning slowly for at least 24 hours to allow the
materials the stove and the furnace are made of to settle the inner elastic stress avoiding permanent
damages. Some greasy working residuals and paints can produce smell and smoke during the first hours of
functioning, we recommend to air the room as they can be harmful to people and pets.
Important: the programming parameters from 1 to 5 are set by the company and can be changed only by an
authorised technician.
Pic. 11
Control panel
Control panelControl panel
Control panel
Key P1 and P2: when you are setting the temperature they increase or decrease the thermostat parameter
from minimum 06°C to maximum 41°C. If you keep P1 pressed you can see the waste fumes temperature
displayed. They both have programming function.
Key P3: to go to temperature and menu of parameters of the user and technician.
Key P4: (ON-OFF) to turn on and off, to unlock from alarms and go out from programming
Key P5 and P6: to increase or decrease the heating power from 1 to 5:
Led 1: active time programming
Led 2: if it is on the cochlea is activated
Led 3: to receive input from the remote control
Led 4: to turn on the thermostat
Led 5: it flashes when you are setting temperature or you are inside menu
Display A: during starting it shows the card state, during functioning it shows the heating power, when setting
input it shows the parameter label you are changing.
Display B: during starting it shows the card state, during functioning it shows the temperature chosen by the
user, during setting of inputs it shows the parameter you are changing.
Starting
StartingStarting
Starting
To start the stove, keep key P4 pressed for few seconds, then the gear case will set the stove in a pre-
ventilation state, displaying “Fan Cand”, starting the extractor fan at minimum rate and the pre-heating of the
starting resistance. After this phase which lasts 2 minutes, it will be displayed “Load Wood”, the cochlea will

Pellets Stove
12
1212
12
stoke pellets and the resistance will keep warming up. When the temperature is high enough, thanks to the
fume gas feeler, the electronic gear case (after 7-10 minutes) will consider the starting phase ended and start
the next phase of flame stabilisation displaying “FirE on” and starting the tangential ventilator (heat
exchanger). When the “FirE on” phase ends, the gear case will set the work state, displaying the chosen
heating power (you can change it with keys P6 and P5) and the environment temperature. During this phase
keys P5 and P6 can regulate the stove power from 1 to 5. If the environment temperature exceed the limit
parameter fixed on key-board during the temperature setting the heating power will decrease to minimum
rate until the parameter is back to its prefixed limit and the display will show “RiS”.
Non
NonNon
Non-
--
-starting
startingstarting
starting
If pellets don’t light up, the non-starting will be indicated by an alarm “AlAr no FirE”. The stove starting takes
about 7/10 minutes with good quality pellets and an environment temperature of about 10°C. If the
environment temperature is lower, the starting plug is not able to start the stove; in this case you can help
putting a lighted igniter on the brazier.
Energy failure
Energy failureEnergy failure
Energy failure
After an energy blackout, when the stove is restored it will display “AlAr no rEtE”. The fumes gas extractor
will discharge the fumes residuals for 20 minutes starting the switching off phase. When the cooling phase is
completed, empty the brazier from excessive pellets and start the stove again.
To bypass the start stage (e.g. the fire goes out unintentionally): just press key (6) for about 2 sec. and the
stove will immediately go into the ON operating phase; it is only possible to jump the startup phase if the
smoke temperature (detected by the probe) is over 55°-60°C. Below these values, after several seconds the
stove will return to the “Fan Cand” startup stage.
Temperature setting
Temperature settingTemperature setting
Temperature setting
To modify the environment temperature you can press any time key P3 together with P1 or P2 to regulate it.
The chosen temperature and the environment temperature will be displayed on display b.
Fumes gas temperature
Fumes gas temperatureFumes gas temperature
Fumes gas temperature
To verify the fumes gas temperature at the outlet keep key P1 pressed for few seconds.
Switching off
Switching offSwitching off
Switching off
To switch off the stove keep P4 pressed, “OFF” will be displayed on display a. During this phase the stoking
of pellets is stopped, the tangential fan is switched off and after 20 minutes the fumes extractor is turned off
too (that occurs anyway if the stove is hot or cold).
To put off the fire
To put off the fireTo put off the fire
To put off the fire
If it happens you suddenly have to put off the fire burst out from the stove or chimney flue, use carbon dioxide
extinguisher (CO2) or ask for the fire-brigade intervention. Do not use water to put off the fire in the brazier.
Pellets stoking
Pellets stokingPellets stoking
Pellets stoking
If you have to stoke the stove with pellets while it is working, make sure the pellets bag doesn’t get in contact
with any hot surface. Make sure the pellets tank is always closed with its lid. Don’t put any residuals of
combustible material (unburned embers) of the brazier into the pellets tank.
Clock setting
Clock settingClock setting
Clock setting
To set the clock press key P3 some times until the green led with the clock lights up and “UT02” is displayed,
then you can regulate time with keys P1 and P2.

Pellets Stove
13
1313
13
Weekly programming
Weekly programmingWeekly programming
Weekly programming
You can plan the daily starting and switching off of the stove for 7 Days with 4 different programs. Remember
pressing P4 you can exit from any program at any time you wish. The parameters of the clock-thermostat are:
UT01 to set the current date and the use modality (OFF means the exclusion of programming).
UT02 to set the current hour.
UT03 to set minutes.
UT04 to set technical parameters (reserved to technicians).
UT05 to set starting time program 1, with step of 10 min.
UT06 to set switching off time program 1, with step of 10 min.
UT07 to choose the weekdays with program 1 starting.
UT08 to set starting time program 2, with step of 10 min.
UT09 to set switching off time program 2, with step of 10 min.
UT010 to choose the weekdays with program 2 starting.
UT011 to set starting time program 3, with step of 10 min.
UT012 to set switching off time program 3, with step of 10 min.
UT013 to choose the weekdays with program 3 starting.
UT014 to set starting time program 4, with step of 10 min.
UT015 to set switching off time program 4, with step of 10 min.
UT016 to choose the weekdays with program 4 starting.
To verify if the clock-thermostat is working, go to UT01, the indication “Day” means it is activated, “OFF”
means it isn’t.
We explain you now some parameters meaning.
UT01 to set the weekly program on “Day” or deactivate it on “OFF”. Select the weekday from “Day 1”=
monday to “Day 7”= sunday. If UT01 is set on the current day (ex: Day 2 is tuesday) you can then select the
weekday when you want to start program 1, 2, 3 or 4. Pressing P1 and P2 you can choose the wanted
parameter.
UT05-UT06 indicates starting and ending time of the functioning of the stove in program 1. They are
activated when UT01 is on weekly modality.
UT07 this parameter is activated when UT01 is on weekly modality. When program 1 is activated, with P1
you can choose the weekday and with P2 you activate or deactivate the starting of the stove and so on for all
programs.
Example:
Starting Switching off
Mon.
(Day1)
Tue.
(Day2)
Wed.
(Day3)
Thu.
(Day4)
Fri.
(Day5)
Sat.
(Day6)
Sun.
(Day7)
Progr. 1 UT05
UT05UT05
UT05
h 07.00 UT06
UT06UT06
UT06
h 09.00 ON
ONON
ON
ON
ONON
ON
ON
ONON
ON
ON
ONON
ON
ON
ONON
ON
OFF OFF
Progr. 2 UT08
UT08UT08
UT08
h 11.00 UT09
UT09UT09
UT09
h 13.00 ON
ONON
ON
ON
ONON
ON
ON
ONON
ON
ON
ONON
ON
ON
ONON
ON
OFF OFF
Progr. 3 UT011
UT011UT011
UT011
h 17.00 UT012
UT012UT012
UT012
h 21.00 ON
ONON
ON
ON
ONON
ON
ON
ONON
ON
ON
ONON
ON
ON
ONON
ON
OFF OFF
Progr. 4 UT014
UT014UT014
UT014
h 10.00 UT015
UT015UT015
UT015
h 20.00
OFF OFF OFF OFF OFF
ON
ONON
ON
ON
ONON
ON
Optional remote control
Optional remote controlOptional remote control
Optional remote control
With the remote control it is possible to adjust the heating power, the desired ambient temperature and
switch the apparatus on/off automatically.
To switch on the stove press buttons P1 and P6 simultaneously for 3 seconds; the apparatus will
automatically enter the ignition stage. After the ignition stage it will enter normal operation mode and buttons
P6 and P5 can be used to adjust the heating power. Pressing P1 or P2 will adjust the desired ambient
temperature. To switch off the stove keep buttons P1 and P6 pressed simultaneously for 3 seconds, display
A will show the message “Off”.

Pellets Stove
14
1414
14
The remote control operates with a 12 Volt MN21 type battery.
The batteries should be removed from the device before it is disposed of and must
themselves be disposed of safely.
Carry out the following operations to change the batteries:
- use a screwdriver to loosen the screw on the back of the remote control;
- slide out the cover and replace the batteries, taking care to orient the polarities
correctly;
- close the cover and tighten the screw.
•SAFETY DEVICES
SAFETY DEVICESSAFETY DEVICES
SAFETY DEVICES
Introduction
IntroductionIntroduction
Introduction
Pic. 12
Safety devices are useful to prevent and avoid risks of damages to people, pets or property. You should
avoid to tamper with them or cal non-authorised staff to have them repair, making the guarantee not valid and
the manufacturer not responsible for them.
Pressure switch alarm
Pressure switch alarmPressure switch alarm
Pressure switch alarm
A pressure switch is connected to the boiler pipeline to check the depression. If “AlAr dEP” appears on
display the pressure switch stops the electric input to the cochlea blocking the pellets stoking to the brazier
and starting the switching off phase. The electronic card makes the fumes extractor work at maximum speed
and then turns it off within 20 minutes. Switch the stove off with ON/OFF key. Verify the occurring fault on
page 20. After detecting the cause of the fault, clean up the brazier and restart the stove with ON/OFF.
Ther
TherTher
Thermocouple fumes feeler alarm
mocouple fumes feeler alarmmocouple fumes feeler alarm
mocouple fumes feeler alarm
A feeler, which controls constantly the temperature, is connected to the fumes waste duct. When the feeler is
damaged or disconnected “AlAr Sond” will appear on display. The electronic card stops the electric input to
the cochlea blocking the pellets stoking to the brazier and starting the switching off phase. The electronic
card keeps the fumes extractor working for 20 minutes to cool the stove down. Let the stove cool down, and
then switch it off with ON/OFF. Verify the occurring problem on page 20. After solving the problem clean up
the brazier and start the stove with ON/OFF.
Alarm of non
Alarm of nonAlarm of non
Alarm of non-
--
-starting
startingstarting
starting
The fumes thermocouple takes control of the stove in case of non-starting when the temperature is not high
enough to allow the starting. When “AlAr no FirE” appears on display the feeler through the electronic card
starts the turning off phase after 20 minutes. Verify the occurring problem on page 20. After solving the
problem clean up the brazier and start the stove with ON/OFF.
Over
OverOver
Over-
--
-heating alarm
heating alarmheating alarm
heating alarm
If the fumes feeler detects a temperature higher than 200°C at the fumes waste duct, “RiS” will appear on
display, the pellets stoking is decreased and the card makes the fumes extractor work at its maximum speed
to take the temperature back to the set limits. If temperature shouldn’t decrease but increase up to 215°C the
stave starts the switching off phase. Verify the occurring problem on page 20. After solving the problem clean
up the brazier and start the stove with ON/OFF.
Switchi
SwitchiSwitchi
Switching off alarm
ng off alarmng off alarm
ng off alarm
If the fumes feeler detects a temperature lower than the minimum limit, “AlAr no FirE” will appear on display.
That means the fire went out and the electronic card starts the switching off phase. Verify the occurring
problem on page 20. After solving the problem clean up the brazier and start the stove with ON/OFF.

Pellets Stove
15
1515
15
Energy black out alarm
Energy black out alarmEnergy black out alarm
Energy black out alarm
After an energy black out “AlAr no rEtE” will appear on display. The fumes extractor will clear up the fumes
residuals for 20 minutes starting the switching off phase. When cooled down, verify the occurring problem on
page 20. After solving the problem clean up the brazier and start the stove with ON/OFF.
Tank safety alarm
Tank safety alarmTank safety alarm
Tank safety alarm
There is a manual winding thermostat near the tank, which controls if the temperature exceeds the allowed
limits preventing in this way the pellets from catching fire because of the over-heating. “AlAr Sic” will appear
on display and the thermostat stops the electrical input to the cochlea blocking the pellets stoking of the
brazier and starting the switching off phase. Let the stove cool down and then switch it off with ON/OFF.
Verify the occurring problem on page 20. After solving the problem wind the thermostat: unscrew the black
cap, press the black button and screw the cap back. Clean up the brazier and restart the stove with ON/OFF.
•MAINTENANCE
MAINTENANCEMAINTENANCE
MAINTENANCE
Introduction
IntroductionIntroduction
Introduction
To extend the life of your stove it is important to clean it periodically as indicated hereafter. It is also
necessary to have an extraordinary maintenance intervention done on the stove and chimney once a year
calling the assistance service on time. Do not use steel-wool, muriatic acid or corrosive and scratching
products to clean its inner and exterior parts. In case of damages always use original spare parts asking to
authorised shops or to the manufacturer.
Important: before cleaning or performing maintenance let the fire go out completely and the stove cool down
and disconnect it from electrical power supply.
Filter cleaning
Filter cleaningFilter cleaning
Filter cleaning
The stove is equipped with a filter against dust, which is placed on the air ventilation duct on the stove back
and must be cleaned once a month. Take the filter out and wash it without water.
Majolica parts cleaning
Majolica parts cleaningMajolica parts cleaning
Majolica parts cleaning
We would like to remind you that the majolica parts are craft-made and therefore they can have little flaws
(flaws interlacing due to thermal dilation between the biscuit and the paint), marking by tricks (very little holes
due to microscopic gas blisters that appear on surface during the cooking) shadings (shades of paint due to
concentration of colour in particular areas of majolica). To clean the majolica parts you should use a dry and
soft cloth. If you use any kind of detergent that will filter through the flaws showing them up.
Painted metal parts cleaning
Painted metal parts cleaningPainted metal parts cleaning
Painted metal parts cleaning
Use a wet soft cloth to clean the painted metal parts. Do not use degreasing substances, alcohol, diluent,
acetone, petrol that can damage irreparably the paint.
Glass cleaning
Glass cleaningGlass cleaning
Glass cleaning
The fire-door pyroceram resists to 700°C but not to sudden changes of temperature. Therefore you can clean
the glass with normal glass products but you have to wait for the glass to cool down to avoid its explosion. If
you break the glass you must replace it before using the stove.
Fumes ducts cleaning
Fumes ducts cleaningFumes ducts cleaning
Fumes ducts cleaning
Using brushes clean the soot from: the fume duct, the chimney flue and the chimney pot. A specialised
technician should carry out this cleaning and verify its effectiveness.
Fumes chamber cleaning
Fumes chamber cleaningFumes chamber cleaning
Fumes chamber cleaning
Every two weeks it is recommended to clean the fumes chamber.

Pellets Stove
16
1616
16
Open the door only when the stove is off. Clean it sucking the ash left inside. After cleaning repeat the opposite
operation to make sure of the good conditions and efficiency of the strip and when necessary replace it.
Firebox cleaning
Firebox cleaningFirebox cleaning
Firebox cleaning
Every two weeks you should clean the firebox (see picture 13). Open the door only when the stove is off.
Remove the fire pot. Clean it sucking the ash left inside the firebox. After cleaning repeat the opposite
operation.
Brazier cleaning
Brazier cleaningBrazier cleaning
Brazier cleaning
It is recommended to clean the brazier every two days (see picture 13). Open th
It is recommended to clean the brazier every two days (see picture 13). Open thIt is recommended to clean the brazier every two days (see picture 13). Open th
It is recommended to clean the brazier every two days (see picture 13). Open the door only when the stove is
e door only when the stove ise door only when the stove is
e door only when the stove is
off. Remove the brazier from its seat lifting it up, empty it from the ash and if necessary use a pointed tool to
off. Remove the brazier from its seat lifting it up, empty it from the ash and if necessary use a pointed tool tooff. Remove the brazier from its seat lifting it up, empty it from the ash and if necessary use a pointed tool to
off. Remove the brazier from its seat lifting it up, empty it from the ash and if necessary use a pointed tool to
clean the obstructed holes. Clean also the brazier room from ash left inside. The frequency of the cleaning
clean the obstructed holes. Clean also the brazier room from ash left inside. The frequency of the cleaningclean the obstructed holes. Clean also the brazier room from ash left inside. The frequency of the cleaning
clean the obstructed holes. Clean also the brazier room from ash left inside. The frequency of the cleaning
depe
depedepe
depends on the type of pellets. Pay attention to the flame colour, if it is red that means it is weak, if there is
nds on the type of pellets. Pay attention to the flame colour, if it is red that means it is weak, if there isnds on the type of pellets. Pay attention to the flame colour, if it is red that means it is weak, if there is
nds on the type of pellets. Pay attention to the flame colour, if it is red that means it is weak, if there is
black smoke that means the brazier is dirty and it must be cleaned.
black smoke that means the brazier is dirty and it must be cleaned.black smoke that means the brazier is dirty and it must be cleaned.
black smoke that means the brazier is dirty and it must be cleaned.
Pic. 13
Ash draw cleaning
Ash draw cleaningAsh draw cleaning
Ash draw cleaning
You must empty the ash draw when full. The ash should be put in a metal container with airtight lid and it
shouldn’t get in contact with combustible material (ex: left on a wooden floor) as the ash keeps the live coal
lighted for long time. Clean also the draw room from eventual residuals (see picture 13).
Fumes duct cleaning
Fumes duct cleaningFumes duct cleaning
Fumes duct cleaning
It is recommended to clean the waste fumes pipes once a month (see picture 9 pag.8).
Remove the inspection plug of the T pipe-fitting (when the stove is off). Clean it from the ash left inside. After
cleaning repeat the opposite operation verifying the good conditions and the efficiency of the strip and if
necessary replace it.
Important: close hermetically the plug otherwise the toxic fumes gas will spread in the room.
Strip replacement
Strip replacementStrip replacement
Strip replacement
When the strip of the fire door or fumes chamber door is damaged it is necessary to replace it to make the
stove work properly. Take the strip off and replace it with original spare parts. Call a specialised technician to
replace it.

Pellets Stove
17
1717
17
•TECHNICAL DATA
TECHNICAL DATATECHNICAL DATA
TECHNICAL DATA
Characteristics
CharacteristicsCharacteristics
Characteristics
Descrizione
DescrizioneDescrizione
Descrizione
S7
S7S7
S7
S6
S6S6
S6
ZC12
ZC12ZC12
ZC12
Z12
Z12Z12
Z12
M
MM
MC10
C10C10
C10
M10
M10M10
M10
Width 50,2cm 50,2cm 50,3cm 47,4cm 50,3cm 47,4cm
Depth 50,6cm 50,6cm 50,6cm 50,6cm 50,6cm 50,6cm
Height 103,5cm 100cm 100cm 100cm 92cm 92cm
Weight 115kg 113kg 104kg 95kg 99kg 90kg
Global Rated thermal power 12kw 12kw 12kw 12kw 10kw 10kw
Rated thermal power (min-
max) 3-10,5kw 3-10,5kw 3-10,5kw 3-10,5kw 3-8,5kw 3-8,5kw
Hour consumption (min-max) 0,6-2,4kg/h 0,6-2,4kg/h 0,6-2,4kg/h 0,6-2,4kg/h 0,6-2kg/h 0,6-2kg/h
Efficiency >89% >89% >89% >89% >91% >91%
Chimney depression 7-11pa 7-11pa 7-11pa 7-11pa 7-12pa 7-12pa
Emissions CO at 13% of O20,01-0,06% 0,01-0,06% 0,01-0,06% 0,01-0,06% 0,01-0,06% 0,01-0,06%
Emissions CO25,5-12% 5,5-12% 5,5-12% 5,5-12% 5,5-11% 5,5-11%
Average temperature fumes 78-206 °C 78-206 °C 78-206 °C 78-206 °C 78-167 °C 78-167 °C
Mass flow fumes 3,3-5,6 g/s 3,3-5,6 g/s 3,3-5,6 g/s 3,3-5,6 g/s 3,3-5,0 g/s 3,3-5,0 g/s
Tank capacity 25kg 25kg 25kg 25kg 20kg 20kg
Fumes waste outlet diameter 80mm 80mm 80mm 80mm 80mm 80mm
Comburent air duct diameter 50mm 50mm 50mm 50mm 50mm 50mm
Volume to heat (min-max) 150-315 m3150-315 m3150-315 m3150-315 m3150-255 m3150-255 m3
Autonomy (min-max) 10-42h 10-42h 10-42h 10-42h 10-33h 10-33h
Electrical input 230v-50hz 230v-50hz 230v-50hz 230v-50hz 230v-50hz 230v-50hz
Maximum power intake 250w 250w 250w 250w 250w 250w
Max rated elec. power cons. 40w 40w 40w 40w 40w 40w
Heated air capacity (max) 260m3/h 260m3/h 260m3/h 260m3/h 260m3/h 260m3/h
Pipes fitting dimensions
Pipes fitting dimensionsPipes fitting dimensions
Pipes fitting dimensions
M Z/S
Fig. 14
The above indicated data can be changed. The manufacturing company can modify any of them if necessary
to improve the products characteristics. The efficiency rating refers to premises with insulation conforming to
local standards.

Pellets Stove
18
1818
18
Wiring diagram
Wiring diagramWiring diagram
Wiring diagram

Pellets Stove
19
1919
19

Pellets Stove
20
2020
20
•IF THERE IS A PROBLEM
IF THERE IS A PROBLEMIF THERE IS A PROBLEM
IF THERE IS A PROBLEM
Problem
ProblemProblem
Problem
Cause
CauseCause
Cause
Solution
SolutionSolution
Solution
•The control panel
doesn’t start
•The stove hasn’t got electrical input
•Card protection fuse is burned
•Control panel is faulty
•Flat cable is faulty
•Electronic card is faulty
•Verify if the plug is connected
•Replace the fuse. Call a specialised
technician
•Replace the control panel
cod.Com0241. Call a specialised
technician
•Replace the flat cable
cod.Com0240. Call a specialised
technician
•Replace the electronic card
cod.Com0231. Call a specialised
technician
•The stove doesn’t start.
Alarm displayed: “AlAr
no FirE”
•The tank is empty
•The brazier isn’t cleaned
•The feeler hasn’t detected the
minimum threshold to start
•Starting plug is faulty
•Outside temperature is too cold
•Pellets are wet
•Thermal feeler is blocked
•Electronic card is faulty
•Fill the tank
•Clean the brazier (see Maintenance)
•Empty the brazier and start again, if
the problem continues call a
specialised technician
•Replace the plug, cod Com0234.
Call a specialised technician
•Restart the stove
•Pellets must be stored in a dry room.
Verify
•Replace the feeler, cod Com0139.
Call a specialised technician
•Replace the card, cod Com0231.
Call a specialised technician
•Pellets don’t get to the
fire box
•The tank is empty
•Cochlea is blocked by a strange object
(ex. Nails)
•Cochlea gear motor is damaged
•Verify if there is an alarm activated on
display (ex. AlAr dEP., AlAr Sic…..)
•Fill the tank
•Unplug the plug, move the inside
hand protection of the tank, empty
the tank, clean the cochlea e start
again
•Replace the gear motor, cod
Com0232. Call a specialised
technician
•Call a specialised technician to
check the stove and detect the
problem
•The fire goes out and
the stove stops
•The tank is empty
•Cochlea is blocked by a strange object
(ex. Nails)
•Pellets aren’t of good quality
•The phase 1 parameter set in the
electronic card is too low
•Verify if there is an alarm activated on
display (ex. AlAr dEP, AlAr Sic…..)
•Fill the tank
•Unplug the plug, move the inside
hand protection of the tank, empty
the tank, clean the cochlea e start
again
•Try different types of pellets
•The pellets supply must be regulated
by a specialised technician
•Call a specialised technician to
check the stove and detect the
problem
•The fire has a weak
and orange flame,
pellets don’t burn
correctly and the glass
gets black
•The air for combustion isn’t enough
•The waste pipe is blocked
•The stove is obstructed
•Fumes extractor is damaged
•Check the following: possible
obstructions of the air inlet on the
back of the stove: brazier grid holes
obstructed and/or brazier box with
too much hash: exchanger pipes too
dirty; clean the extractor blades and
its scroll (see Maintenance)
•Exhaust chimney is partially or
totall
y
obstructed
(
call an ex
p
ert
This manual suits for next models
5
Table of contents
Popular Pellet Stove manuals by other brands

Wood Heating Solutions
Wood Heating Solutions NC-30 Installation and operation manual

Enviro
Enviro Milan owner's manual

Warmland
Warmland PS45 series A Nstallation and operating instructions

Dansons Group
Dansons Group CAN/CSA B365 Operation guide

Palazzetti
Palazzetti ECOFIRE LOLA PRODUCT TECHNICAL DETAILS

Enviro
Enviro WINDSOR owner's manual

Harman
Harman XXV Installation & operating manual

RIKA
RIKA PREMIO instruction manual

Piazzetta
Piazzetta IP 78 Instructions for installation, use and maintenance

Buffalo
Buffalo B100 Owner's installation and operation manual

ZANTIA
ZANTIA HEBE Operating and maintenance handbook

Breckwell
Breckwell Cardinal P24I owner's manual