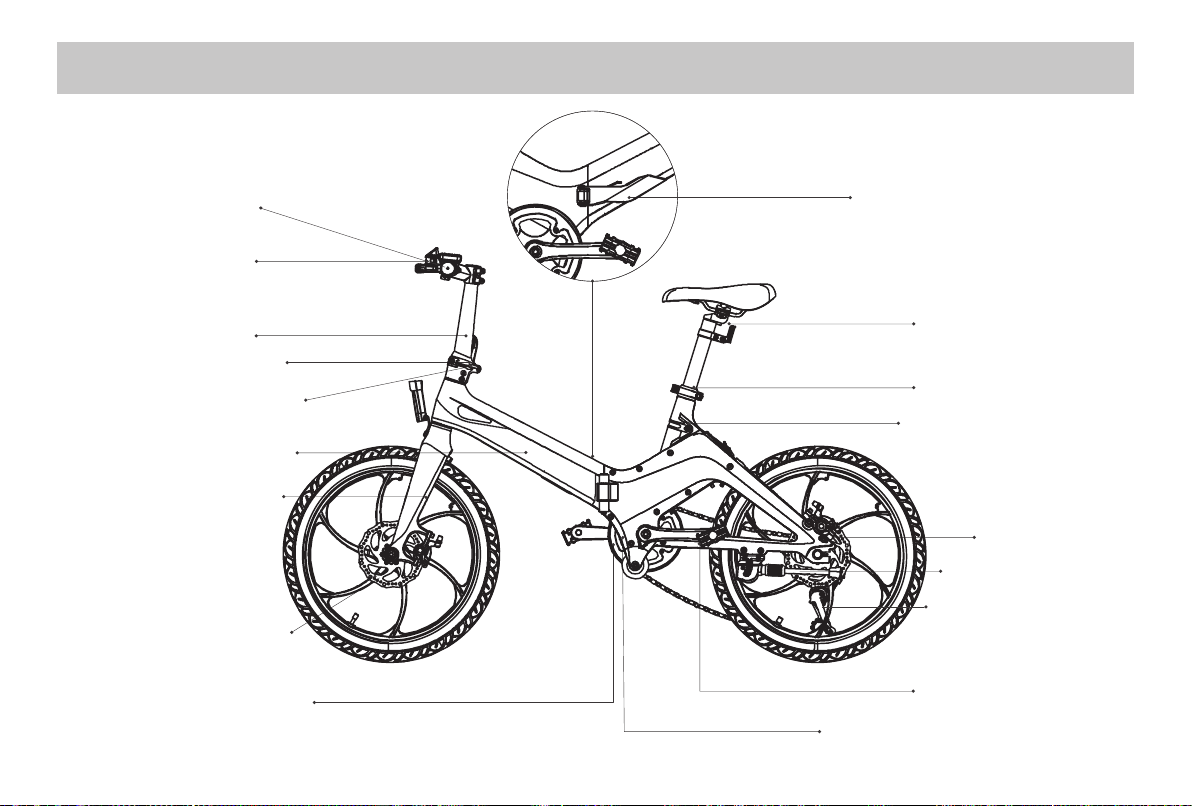
Falcon FLO User manual

ELECTRIC BIKE
OWNER’S MANUAL

Page 2
• About this manual
1. Why you should read this manual
2. Warning, Important safety information
• Diagrams
1. Parts diagram with part names
2. Wiring diagram
• Operating instructions
1. Important notices
2. Riding mode
3. Riding safely
4. Battery charging
5.Checkthebatterypackbeforeusingforthersttime
6. Inserting, removing, locking the battery
7. PAS (pedal assist system)
8. Fitting pedals
9. Folding instructions
10. Shifter
11. Derailleur system
12. Unfolding the bike
13. Saddle position
4
5-6
7
8
9
10
11
12
13
14
15-16
17
18
19
20
21
22-23
TABLE OF CONTENTS

Page 3
• Maintenance and cleaning
• FAQ
• Service & maintenance schedule
• Troubleshooting
• About seller and information card
24-26
27
28-32
33-37
38
Please note, this is a basic overview of your new bike and its service requirements.
TABLE OF CONTENTS

Page 4
WHY YOU SHOULD READ THIS MANUAL
This manual is written to help you to get the best performance, comfort, enjoyment and safety when riding your new
E-bike.Themanualdescribesspeciccareandmaintenanceproceduresthathelpprotectyourwarrantyandensure
years of trouble free use. Please pay particular attention to the section on battery charging and maintenance.
It is important for you to understand the features and operation of your new E-bike so that you can get maximum
enjoymentwithmaximumsafety.Byreadingthismanualbeforeyougoonyourrstride,you’llknowhowtogetthemost
from your new E-bike.
ItisalsoimportantthatyourrstrideonanewE-bikebetakenunderacontrolledenvironment,awayfromcars,obstacles
and other cyclists.
ABOUT THIS MANUAL
Cycling can be a hazardous activity even under the best circumstances, Giving Proper maintenance
to your E-bike is your responsibility as it helps to reduce the risk of injury. This manual contains many
“Warnings” and “Cautions” concerning the consequences of failure to maintain or inspect you E-bike.
Many of the Warnings and Cautions say “you may lose control and fall” Because any fall can result in
serious injury or even death, we do not repeat the warning of possible injury or death whenever the
risk of falling is mentioned.

Page 5
IMPORTANT SAFETY INFORMATION
YourE-Bikecanprovidemanyyearsofservice,funandtness-ifyoutakegoodcareofit.
Understand the features of your E-Bike and become aware of the challenges that you will meet on the road. There are
manythingsyoucandotoprotectyourselfwhileriding.Wewilloermanyrecommendationsandsafetytipsthroughout
this manual. The following are those we believe the most important.
Always Wear A Helmet!
Helmetssignicantlyreducethepossibilityandseverityofheadinjuries.Alwayswearahelmetthatcomplieswith
BS EN 1078:1997. Do not wear loose clothing that can become tangled in the moving parts of the E-Bike. Wear sturdy
shoes and eye protection.
Know your E-Bike!
Your new E-Bike incorporates many features and functions that have never been built into a bicycle before. Read this
manual thoroughly to understand how those features enhance your riding pleasure and safety.
Ride Defensively!
Oneofthemostcommoncyclingaccidentsisthatwhenthedriverofaparkedcaropenshisdoorintoarider’spath.
Another common occurrence is when a car or another cyclist moves suddenly into your path. Always be aware of other
vehicles around you. Do not assume that the driver or the other cyclist see you. Get prepared to take evasive action or
stop suddenly.
Make Yourself Easy To See!
Makeyourselfmorevisiblebywearingbrightreectiveclothing.Keepyourreectorscleanandproperlyaligned.Signal
your intentions so that drivers and other cyclists can notice your actions.
ABOUT THIS MANUAL

Page 6
Ride Within Your Limits!
Take it slow until you are familiar with conditions that you encounter. Be especially careful in wet conditions as traction
canbegreatlyreducedandbrakeslesseective.Neverridefasterthanconditionswarrantorbeyondyourridingabilities.
Rememberthatalcohol,drugs,fatigueandinattentioncansignicantlyreduceyourabilitytomakegoodjudgmentsand
ride safely.
Keep Your E-Bike In Safe Condition
Follow the inspection and maintenance guidelines beginning on page 25. Check critical safety equipment before each and
every ride.
Know The Law
Cyclistsarerequiredtofollowthetracrules.Additionally,somecommunitiesregulatetheuseofmotorizedbicycles
regardingminimumagerequirementsandnecessaryequipment.Checkwithyourlocalpolicedepartmentforspecic
details.
Max Rider Weight
This E-Bike has a maximum rider weight of 110kg. If exceeded, this could compromise the performance and safety of the
rider.
Frame Clearance
For safe and comfortable riding there should be clearance of no less than 1-2 inches between the groin area of the
intendedriderandthetoptubeofthebicycleframe,whiletheriderstraddlesthebicyclewithbothfeetatontheground.
ABOUT THIS MANUAL

Page 7
Handlebar Bike frame folder
Saddle
Seat post
Seat post clamp
Motor
Kickstand
Rear Derailleur
Pedal
Chain wheel protection wheel
Brake lever
Stem
Safe lock
Stem folder
Bike frame
Front fork
Disc brake rotor
Chain wheel
FOLDING E-BIKE DIAGRAM

Page 8
PACKING LIST
Initial Use
Seat Post
Charger
Owners
Manual
Always wear a helmet!
This E-Bike is designed for urban use and should not be
usedforanyseriouso-roading

Page 9
OPERATING INSTRUCTIONS
Please read and understand these instructions completely before operating your E-bike to prvent serious injury to yourself
and others, and to prevent damage to the bike also.
IMPORTANT NOTICES
• Always recharge the battery immediately after each use. Failure to do so may damage the battery.
• For storage periods over 1 month, the battery should be regularly checked and charged/topped up.
Helmets
Alwayswearaproperlyttedhelmetwhichcoverstheforeheadwhenridingabicycle.
It’sstronglyadvisedthataproperlytting.
Bicycle safety helmet be worn at all times when riding your bicycle.
The correct helmet should be comfortable, lightweight, have good ventilation, t correctly and cover forehead.
Reectors
Reectorsareimportantsafetydeviceswhicharedesignedasanintergralpartofyourbicycle.UKregulationsrequire
everybicycletobeequippedwithfront,rearwheelsandpedalreectors.Thesereectoraredesignedtopickupand
reectstreetlightsandcarlightsinawaythathelpsyoutobeseenandrecognizedasamovingbicyclist.Checking
reectorsandtheirmountingbracketsregularlytomakesuretheyareclean,straight,unbrokenandsecurelymounted.
Replacedamagedreectorsandstraightenortightenanythatarebentorloose.
Yourbicycleissuppliedwithonefront,onerearwheelreectors,andfourpedalsreectors.Theseareimportantsafety
andlegalrequirements,andshouldremainsecurelyttedandingood,cleanconditionatalltimes.Periodicallyinspect
allreectors,bracketsandmountinghardwareforsignsofwearordamage.Replaceimmediatelyifdamangeisfound.
Somebicycleswillrequireyoutoinstallyourreectorsontoyourbicycle.

Page 10
Riding method
Be familiar with all the component parts of the e-bike and test all the electric functions before riding. Make sure all the
componentsofthebicycleareingoodcondition,thebatteryischargedandthetyresarecorrectlyinated.Thedetail
operation as following:
START UP:
Your bike is supplied with a set of keys which are to lock your battery in place. They are not ignition keys. Once the
battery is in place, turn the key to lock and remove when in use to avoid them falling out/being lost. To turn your electric
motor on, press the power button on your handlebar display (Fig.1). Ensure the battery cover is positioned correctly
before use (Fig.2).
RIDING METHOD
Fig.1 Fig.2
Charge the battery before your
rstride.
Note: When charging is
completed, please cover the plug
to avoid the water intake of the
charging port.
Press M button
for 3 seconds to
power up

Page 11
General Rules
When riding, please follow the road laws as all other road vehicles, including giving way to pedestrains, stopping at rea
lightsandstopsigns.Forfurtherinformation,contacttheroadtracauthority,policedepartmentordepartmentofmotor
vehiclesinyourstate.Ridepredicatablyandinastraightline.Neverrideagainsttraclaws.Usecorrecthandsignalsto
indicate turning or stopping. Ride defensively. To other use users, you may be hard to see.
Concentrate on the path ahead. Avoid pot holes, gravel, wet road markings, oil, curbs, speed bumps, drain grates and
other obstacles.
Cross train tracks at 90 degree angle or walk your bicycle across.
Except the unexpected such as opening car doors or cars backing out of concealed driveways.
Be extra careful about intersections and when preparing to pass other vehicles.
Familiarizeyourselfwithallthebicycle’sfetures.Practicegearshifts,brakingandtheuseoftoeclipsandstraps,iftted.
If you are wearing loose pants, use leg clips or elastic bands to prevent them from being caught in the chain or gears.
Wear proper riding attire and avoid wearing open toe shoes.
Don’tcarrypackagesorpassengersthatwillinterferewithyourvisibilityorcontrolofthebicycle.
Don’tuseitemsthatmayrestrictyourhearing.
Donotlockupthebrakes.Whenbraking,alwaysapplytherearbrakerst,thenthefront.Thefrontbrakeismorepower-
ful and if it is not correctly applied, you may lose control and all.
Maintain a comfortable stopping distance from all other riders, vehicles and objects. Safe braking distance and fores are
subject to the prevailing weather conditions.
Use designed bicycle paths if possible.
This bicycle is designed for on-road use only. It is not imtended to be used for stunt riding, jumping, carrying passengers,
orridingo-road.
If used incorrectly, the rider risks damage to components, injury or death.
RIDING SAFELY

Page 12
BATTERY CHARGING
Battery charging
Whentherideisoverorthebatteryisrunningout,chargebatteryimmediately.Thiswillhelpmaximiseit’suseablelife.
Charging methods can be divided into two kinds:
1. Takeothebatterytocharge(Fig.1)
2. Charge the E-bike directly (Fig.2)
• AttachthechargerconnectortothebikeandtheACconnectortoa230VpowersourcewiththesuppliedUKplug.
• There is an LED indicator on the battery charger unit.
• The LED is red when the power is connected and the battery is charging.
• When the LED turns green, it means the battery is full.
Li-LON recommended charge time: 5-6 hours
Do not charge continuously for more than 18 hours at any one time.
Aftercharging,unplugtheinputsocketrst(fromtheoutlet),thenunplugtheoutputsocket(fromthebike).
Thebatterychargermusthaveconstantvoltage.Fluctuatingvoltageoructuatingpowersupplyofanykindmaydamage
thebatterystoragecellssoavoidchargingfromageneratororogridsolar/windsource.
Fig.1 Fig.2

Page 13
Check the battery Pack before using for the rst time
• The battery pack is applied partially charged.To ensure fully battery pack capacity,completely charge the battery pack
overnightbeforeusingforthersttime.
• The distributor should charge the batteries as soon as receiving the e bike from supplier.
Battery Care
Even with proper care,rechargeable batteries do not last forever.Every time the battery is discharged and subsequently
recharged.Itsrelativecapacitydecreasesbyasmallpercentage.Youcanmaximizethelifeofyourbatterybyfollowingthe
instructions in this guide.Battery should be fully charged immediately when ther are received for the full recommended
charge times
Li-ION recommended charge time:5-6 hours
• For a complete,100% charge, leaving the battery on the charger for one full hour after the charger indicator light turn
green.
• Never charge batteries for longer than 24 hours. Or damage will occur.
• Li-ionbatteriesdonothavea‘’memory.’’Partialdischarge/chargecycleswillnotharmthebatteries”capacityorperfor-
mance.
• Theratedoutputcapacityofabatteryismeasuredat77”F(25”C).Anyvariationinthistemperaturewillaltertheperfor-
mance of the battery,and shorten its expected life.High temperatures especially reduce overall battery life&run time.
• Alwaysbesuretoturnthebikepowerswitchto“OFF”aftereachuse.Ifyouleavethepowerswitchinthe“ON”posi-
tion,or your product has not been charged for a long period of time,the battery may reach a stage at which they will no
longer hold a charge
BATTERY CHARGING

Page 14
Inserting, unlocking and removing the battery:
•Totthebatterysimplypressintoplaceuntilyouhearaclick.Removethekeyfromthekeyholeforsafekeeping(Fig.1)
• To remove the battery, insert key into keyhole and turn anti-clockwise into unlock position, the battery can now be
removed (Fig.2)
Please note: your keys are simply to lock your battery into place for security. They do not switch the power on and o.
Fig.1
1.Powerothevehicle,unlockthebattery,thenpull
out the battery box by lifting handle as picture shows.
When installing battery, lock the battery with key and
takethekeyaway,pressbatteryhandletobeat,and
unfold the bike frame.
Fig.2
BATTERY CHARGING

Page 15
Thebikeshaveanelectricpedalassisteddrivingsystem.InEUcountries,itisknownlegallyas“PAS”cycleorPedal
Assisted System.
The driving assisted system consists of a driving unit, a battery, a controller, and various electronic components (harness
wires, sensors and switches). It is important to know that when the assistant system is turned on, the driving unit engages
to provide power only while you are pedaling. The amount of power provided by the drive unit depends on your pedaling
force and the assistance speed/level you set with handlebar control unit at any time, if you stop pedaling, the drive
assistantwilldisengage.Inallspeeds/levels,thedrivingassistedsystempowerreducesprogressivelyandcutsoas
the bike reaches a speed of 25km/h,(15.5mph), or sooner if you stop pedaling. The drive assist re-engages when speed
drops below 25km/h, (15.5mph) as long as the pedals are turning.
• Yourelectricbikeoers3dierentlevelsofpowerassistancewhichyoucanswitchbetweenusingthehandlebar
controller (Fig.1)
• Afterpressingthe“M”buttontoswitchthebikeon,simplypressthe“+/-”button1,2or3timestoswitchbetween
Low,MediumandHighpowerassistance.Pressingita4thtimeswitchestheassistanceoforthebiketobeped-
alled without assistance, and starts the cycle between modes again.
• Ifyourbikeisttedwitha“6km/h”button,thisistoactivatethe“WalkAssist”mode.Whilstdismountedandpushing
the bike, press and hold this button for the bike to push itself – useful uphills!
Please note: Walk Assist should never be used whilst you are sitting on the bike. This will cause undue wear on the motor
andpotentiallycausedamage.FollowingUKlegislation,allofourelectricbikesarepowerassistonly,nonearettedwith
a throttle and all motors will activate ONLY when you are pedalling.

Page 16
Speed mode 0 : no assistance , pure pedaling mode Indicates the front light is on
Indicates the brake is working
Indicates the throttle is not working or not working properly
Indicates the motor is not working or not working properly
Indicates the controller is not working or not working properly
Switch among single trip mileage , total mileage and running time
The figures of single trip mileage , total mileage and running time
Speed mode 1 : low assistance , top speed 12km/h
Speed mode 2 : mid assistance , top speed 18km/h
Speed mode 3 : high assistance , top speed 25km/h
Battery percentage
Button functions: Icons’ meaning:Speed modes:
+button
M button
- button
Battery level
Speed
Speed mode
Fig.1
PEDAL ASSIST SYSTEM
M: The multifunctional button, long
press for 3 seconds to switch on/
o;shortpresstoswitchthedisplay
of single trip mileage, total mileage
and running time.
+:Longpressfor3secondstoturn
on/othefrontlight,shortpressto
switch gear.
-: Short press to switch gear

Page 17
FITTING PEDALS
Pedal installation
Pedalsareapairwith“R”&“L”(Fig.1),“R”forright,“L”forleft.
Tighten the pedals with the directive turnings (Fig.2).
NON-DRIVE SIDE
ANTI-CLOCKWISE
DRIVE SIDE
CLOCKWISE
Fig.1 Fig.2

Page 18
How to fold the bike (Only for folding bike)
1. Unlock the handlebar quick release lever
(Fig.1(A)) and push down down the handlebar
to the lowest position, then lock the handlebar
quick release lever.
2. Unlock the handlebar quick release lever
(Fig.2(A)) and rollover The handle bar.
3. Rotate the pedal upward so it is perpendicular to
the ground (Fig.3(A)).
4. Release the lock lever from its clasp on the right
side of the E-Bike (Fig.4(A)).
5. Rotate the lock lever (Fig.4(A)) clockwise until it
points backward pull the lock nut and rotate the
lock nut (Fig.4(A)) out away from the E-Bike until
the nut clears the lock plate (Fig.4(A)).
6. Grasp the seat and the handlebar. Pivot the front
half of the frame rearward around the hinge until
the front wheel is beside the rear wheel (Fig.5).
FOLDING INSTRUCTIONS
Fig.1 Fig.2
Fig.3 Fig.4
Fig.5

Page 19
SHIFTER
Your E-Bike is equipped with a Shimano drivetrain, with multiple gears.
This consists of:
• A rear sprocket called a freewheel
• A rear derailleur
• Handlebarshifter(RevoshiftorThumbshift;Fig.2)
Therearemanydierenttypesofshiftermechanisms,eachpreferredfor
specicapplicationsbecauseofitsergonomic,performanceandprice
characteristics.
A downshift is a shift to a lower or lower gear, one which is easier to pedal. An
upshift is a shift to a higher or faster gear, one which is harder to pedal. For
example, you can downshift to a lower gear to make pedaling easier on a hill.
On the other hand, you may upshift to a higher gear when you wish to go
faster.
Whether upshifting or downshifting, the derailleur system requires that the drive
Chain be moving forward and be under at least some tension. A derailleur will
Shift only if you are pedaling forward.
Caution:
Never move the shifter while pedaling backward. Also do not pedal backwards
after moving the shifter. Either of these actions could jam chain and cause
serious damage to the E-Bike.
Fig.1
Fig.2

Page 20
DERAILEUR SYSTEM
Derailleur System
The derailleur system includes a rear derailleur, the shift levers, and the
derailleur control cables, all of which must function properly for smooth
gear shifting to occur.
Rear Derailleur
Begin by shifting the rear shifter to largest number indicated, loosen the
cable from the rear derailleur cable anchor bolt, and place the chain on
the smallest sprocket.
Adjust the high limit screw so that the guide pulley and the smallest
sprocket are lined up vertically. Re-tighten the cable, pull out any slack,
and re-tighten the anchor bolt securely. Shifting through the gears, making
sure that each gear is achieved quietly and without hesitation. If
necessary,usethebarreladjustertonetunethecabletensionbyturning
it the direction you want the chain to go. For example, turning clockwise
will loose the cable tension and move the chain away from the wheel,
while turning counter-clockwise will tighten cable tension and direct the
chain to the wheel.
Fig.1
Fig.2
Table of contents
Other Falcon Scooter manuals