Mobility Works Shopper 3 User manual

- - 1 - -
Shopper 3 & 4 Scooter
O
Stopper 3 & 4 Scooter
NE Shopper OWNER'S MANUAL
Mobility
Works…….
®

- - 2 - -
TABLE OF CONTENTS
1. PREFACE ……………………………………………………………………………………
2. SAFETY NOTICE ………………………………………………………………………….
2.1 Before Driving
2.2 Whilst Driving
2.3 Label
2.4 Electromagnetic Interference
3. PARTS INTRODUCTION…………………………………………………………………..
4. OPERATION …………………………………………………………………………………
4.1 Control Panel
4.2 How to Operate Your Scooter
5. DRIVING ON THE ROAD………………………………………………………………….
6. BATTERY CHARGING AND CARE …………………..…………………………………
6.1 Charging the Battery
6.2 Charger
6.3 Battery
7. INSPECTION AND MAINTENANCE………..……………………………………………
7.1 Daily Checking
7.2 Regular Checking Record
7.3 Battery, Fuse and Tire
7.4 Maintenance
7.5 Storage
7.6 Moving About
7.7 Disassembling the Scooter for Transportation
7.8 Assembling the Scooter
8. TROUBLESHOOTING…………………………………………………………………….
9. SPECIFICATION……………………………………………………………………………
10.WARRANTY…………. ……………………………………………………………………
11. ABOUT MEDICARE TECHNOLOGY……………….…………………………………
12. APPENDIX: SHROUD INSTALLATION………………………………………………

- - 3 - -
PREFACE AND INTRODUCTION
Please carefully read this owner’s manual before using the vehicle. Improper use of the vehicle could
result in harm, injury or traffic accidents. To ensure that you get the most from your scooter, please read
this owner’s manual before using.
This owner’s manual includes operation instructions for every aspect of the vehicle, assembly
instructions, as well as instructions for how to deal with possible incidents.
The symbols used in this manual are explained overleaf:
Warning
Improper use could result in serious injury. Not Designed for Road Use.
Attention
Improper use could lead to injury and/or damage to your scooter
Suggestion
Follow these instructions to keep your vehicle in good working order
This manual includes a repair and maintenance record chart and warranty information. Please keep
it in a safe place or with the scooter.
If someone else uses the scooter make sure that you provide him or her with this owner’s handbook
for his or her consideration.
As designs change some illustrations and pictures in the manual may not correspond to the vehicle
that you purchased. We reserve the right to make design modifications.
The Shopper range of scooters are part of the Mobility Works range, and have been designed and
manufactured to provide a comfortable and secure yet affordable solution for some mobility
requirements. They are manoeuravble and are suitable for indoor and some limited outdoor applications.
There is a 3-wheel and 4-wheel model available in Red or Blue. Both models can be folded and disabled,
and feature a rotating seat.

- - 4 - -
2. SAFETY NOTICE
IC MOBILITY SCOOTE
2.1 BEFORE DRIVING
The user needs to be familiar with the use and operation of this vehicle before driving. Therefore, please
follow the recommendations in this safety notice.
The same traffic rules apply to the user of this vehicle as apply to pedestrians.
For your safety, please follow and adhere to the same traffic laws as pedestrians.
Ride on the pavement and pedestrian areas only. Never ride on roadways, motorways or dual
carriageways. Only use roads to cross to the other side of the pavement.
Be aware of traffic when crossing or using roads.
Be extremely cautious when driving your scooter in busy areas or in shopping malls.
Please do not drive your scooter after consuming alcohol or when you are tired.
Please be careful when driving your scooter in low light. It has not been designed for use at night.
Practice operating your vehicle
Before using the scooter in busy or potentially dangerous areas, familiarize yourself with the operation
of your scooter. Practice in a wide and open area like a park. In order to avoid accidents with your
scooter whilst driving, please bear in mind driving motions such as accelerating, stopping, turning,
reversing, and gradients.
Please turn the speed dial to the minimum value for your initial practice.
Be sure someone accompanies you for safety when driving for the first time.
Only use higher speed settings when you are confident that you can easily operate & control your
scooter.
■The scooter is only to be used by one person at a time
Do not carry passengers on your scooter (including children)
■Do not use this vehicle to carry or haul goods
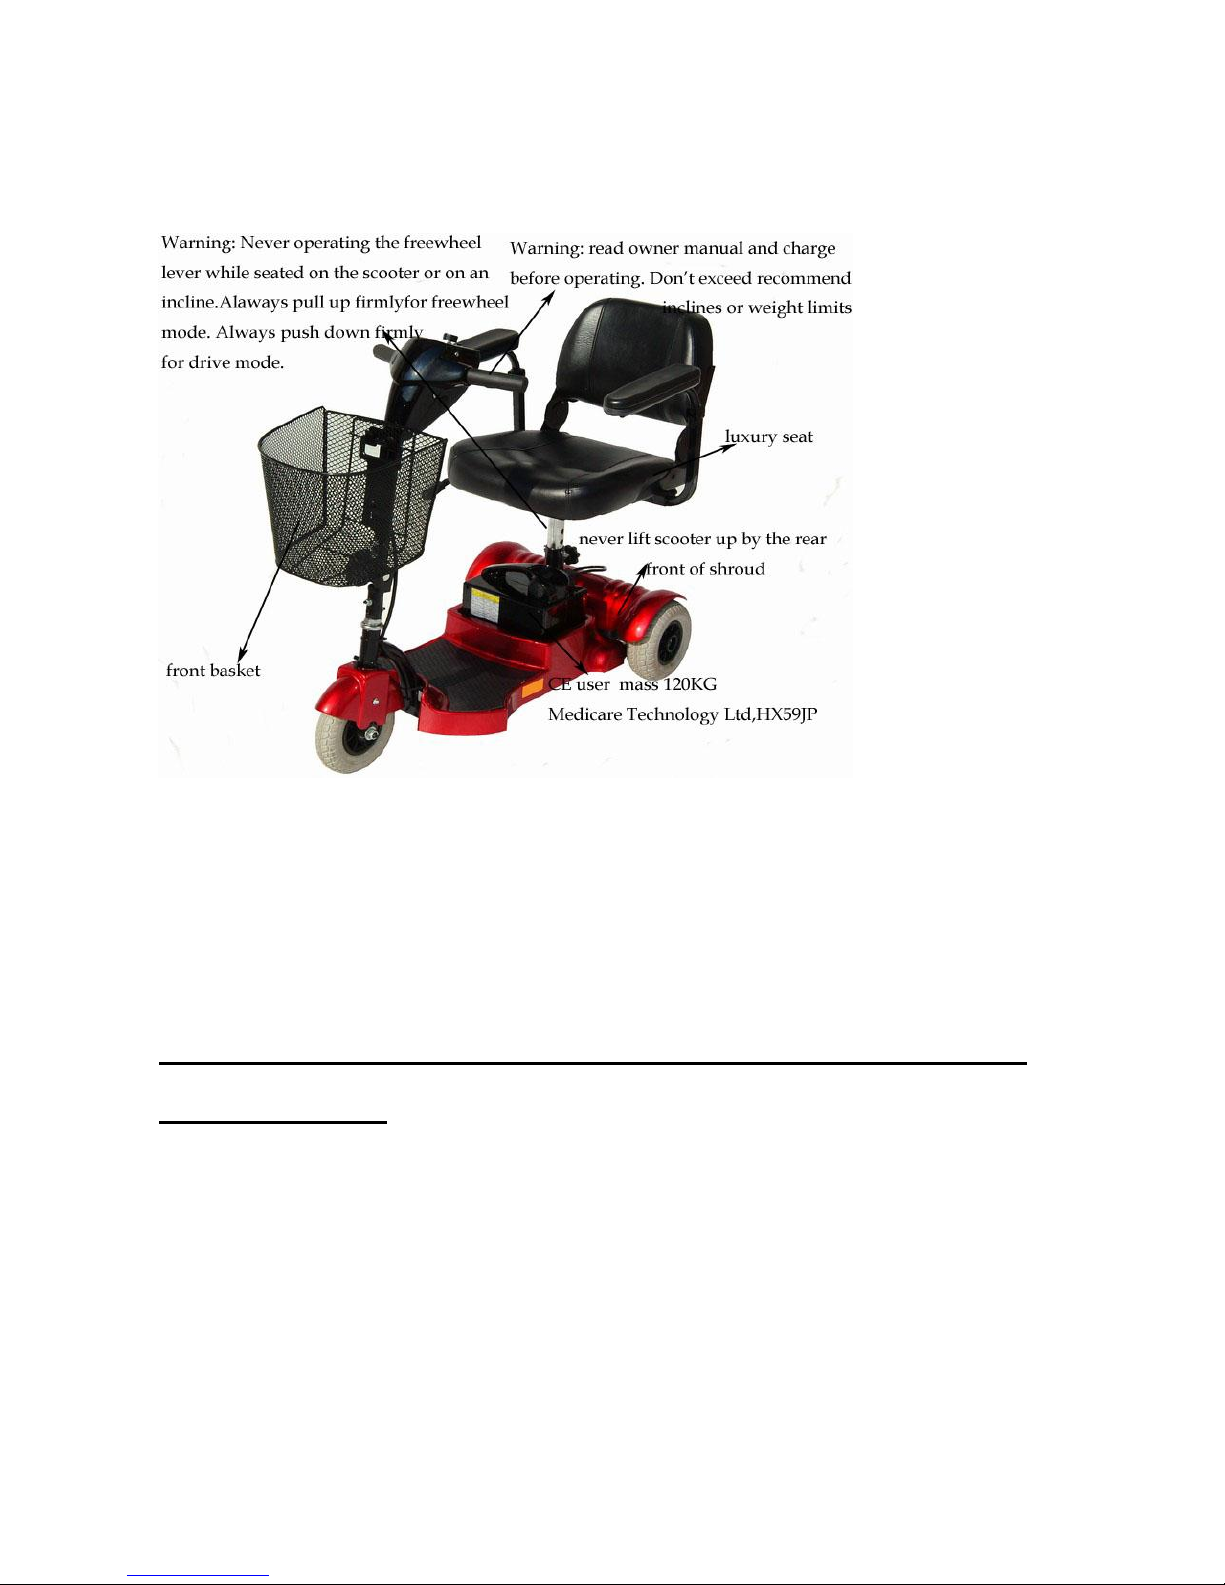
■The maximum weight that can be carried is 110kg (including occupant and any goods). Refer to
“MAX LOAD WEIGHT” in “9. SPECIFICATION”
Maximum loading weight for basket is 3kg (7lb).
2.2 WHILST DRIVING
■Do not use your vehicle under the circumstances below.
On surfaces that are muddy, gravelly, bumpy, narrow, snowed over, icy, or towpaths very near to canals
which not guarded by any fence or hedge. Keep away from places where you might get the wheels
stuck.
Do not drive at night or when it is raining, snowing, misty, or windy.
Do not drive your vehicle in an “S” pattern or make erratic turnings.
Do not take the scooter onto escalators.
UNDER NO CIRCUMSTANCES SHOULD THE SCOOTER BE USED AS A SEAT IN
A MOTOR VEHICLE (E.G. CARS, BUSES, TRAINS, ETC).

- - 5 - -
■About Mobile Phones and other electrical equipment
■Do not use a mobile phone or other wireless communication devices whilst driving.
■Always switch off the scooter and remove the ignition key before using a mobile phone.
■Do not charge the mobile phone or any other electrical devices from your scooter’s battery.
■Automatic Power Shut Down
■In order to avoid accidental battery run down, your scooter is equipped with an automatic power
shut down facility. If the scooter is switched on, but remains undisturbed for a period of thirty
minutes it will automatically turn off. Should this occur, simply switch your scooter off and back on
and it will be ready to use once again.
■Ramps, gradients and drops
Always use a low speed setting when ascending or descending a gradient.
Do not drive on roads with large drops or potholes. The ground clearance of the scooter is
44mm (1¾”).
Do not cross water gutters where the width is too big and where there is a risk of getting the
wheels stuck.
Please slow down when driving on roads with gradients.
Do not make sudden turns when driving on gravel roads or gradients.
Always lean forward when climbing a steep gradient.
Do not travel on gradients exceeding those stated on the diagram below:
WARNING
Do not set in freewheel mode when driving on a gradient.。
Always re-engage the freewheel device into drive mode before use. Failure to do so may result in
injury.
To protect your safety, the power will automatically cut off and electromagnetic brake system will
activate while you are driving down a steep gradient (over 10°). This will limit the speed to a safe
level. Turn the power on again to re-start your scooter.
The Maximum User Weight Limit is 110kg
Overloading past the weight limit may lead to damage of your scooter or cause it to malfunction
and will endanger your safety. The warranty does not cover this type of damage.

- - 6 - -
2.3 LABELLING
Please carefully read all labels on the scooter before driving it. For future reference, do not remove
them.
Mercury Prism Electric Scooter Page 6 of 28 Owner’s Handbook (Part Code: Z40949)
This section of the manual will provide the user with basic information that describes the problems with
EMI, known sources of EMI, protective measures either to lessen the possibility or exposure or to
minimize the degree of exposure, and suggested action should unexpected or erratic movement occur.
Attention: It is very important that you read this information regarding the possible effects of
electromagnetic interference on your Shopper scooter.
2.4.1 ELECTROMAGNETIC INTERFERENCE (EMI) FROM RADIO
WAVE SOURCES
Powered scooters may be susceptible to electromagnetic interference (EMI), which is interfering
electromagnetic energy (EM) emitted from sources such as radio stations, TV stations, amateur radio
(HAM) transmitters, two-way radios, and mobile phones. The interference (from radio wave sources)
can cause the powered scooter to release its brakes, move by itself, or move in unintended directions. It
can also permanently damage the powered scooter’s control system. The intensity of the interfering EM
energy can be measured in volts per metre (V/m). Each powered scooter can resist EMI up to a certain
intensity. This is called its “immunity level”. The higher the immunity level, the greater the protection.
At this time, current technology is capable of achieving at least a 20 V/m immunity level, which would
provide useful protection from the more common sources of radiated EMI. This powered scooter model
as shipped, with no further modification, has an immunity level of 20 V/m without any accessories.
There are a number of sources of relatively intense electromagnetic fields in the everyday environment.
Some of these sources are obvious and easy to avoid. Others are not apparent and exposure is

- - 7 - -
unavoidable.
However, we believe that by following the warning listed below, your risk to EMI will be minimized.
The sources of radiated EMI can be broadly classified into three types:
1. Hand-held portable transceivers (transmitter-receivers with the antenna mounted directly on the
transmitting unit). Examples include: citizens band (CB) radios, “walkie talkies”, security, fire, and
police transceivers, mobile telephones and other personal communication devices.
Attention:
Some mobile telephones and similar devices transmit signals while they are ON, even when not being
used.
2. Medium-range mobile transceivers, such as those used in police cars, fire trucks, ambulances and
taxis. These usually have the antenna mounted on the outside of the vehicle
3. Long-range transmitters and transceivers, such as commercial broadcast transmitters (radio and TV
broadcast antenna towers) and amateur (HAM) radios.
Attention: Other types of hand-held devices, such as cordless phones, laptop computers, AM/FM
radios, TV sets, CD player, and cassette players, and small appliances, such as electric shavers and
hair dryers, so far as we know, are not likely to cause EMI problems to your scooter.
Mercury Prism Electric Scooter Page 7 of 28 Owner’s Handbook (Part Code: Z40949)
2.4.2 POWERED SCOOTER ELECTROMAGNETIC INTERFERENCE
(EMI)
Because EM energy rapidly becomes more intense as one moves closer to the transmitting antenna
(source), the EM fields from hand-held radio wave sources (transceivers) are of special concern. It is
possible to unintentionally bring high levels of EM energy very close to the control system of the
scooter while using these devices. This can affect powered scooter movement and braking. Therefore,
the warnings listed below are recommended to prevent possible interference with the control system of
the powered scooter.
2.4.3 WARNINGS
Electromagnetic interference (EMI) from sources such as radio and TV stations, amateur radio (HAM)
transmitters, two-way radios, and mobile phones can affect powered scooters. Following the warnings
listed below should reduce the chance of unintended brake release or powered scooter movement which
could result in serious injury.
1. Do not operate hand-held transceivers-receivers, such as citizens band (CB) radios, or turn ON
personal communication devices, such as mobile phones, while the powered scooter is turned ON;
2. Be aware of nearby transmitters, such as radio or TV stations, and try to avoid coming close to them;

- - 8 - -
3. If unintended movement or brake release occurs, turn the powered scooter OFF as soon as it is safe;
4. Be aware that adding accessories or components, or modifying the powered scooter , may make it
more susceptible to EMI ( Note: There is no easy way to evaluate their effect on the overall immunity
of the powered scooter ).
5. Report all incidents of unintended movement or brake release to the powered scooter manufacturer,
and note whether there is a source of EMI nearby.
2.4.4 IMPORTANT FORMATION
1. 20 Volts per Metre (V/m) is a generally achievable and useful immunity level against EMI (the
higher the level, the greater the protection);
2. This product has an immunity level of 20 V/m without any accessories connected to it.

- - 9 - -
3. PARTS INTRODUCTION
Parts Description :
1. Control panel
2. Charger socket
3. Tiller adjustment knob
4. Drag handle
5. Front wheel lock
6. Arm rest
7. Seat
8. Seat post
9. Seat rotation lever
10. Battery pack
11. Ignition
Please note that the detachable body shrouds not identified on this parts description.
For more information about the body shrouds
please refer to the installation instructions supplied with the body shroud packs.
A copy of these instructions is also contained
at the back of this manual.
4. O

- - 10 - -
4.SCOOTER OPERATION
4.1 CONTROL PANEL
Please see the diagram on the right.
1. Speed adjuster knob
2. battery indicator
3. power light
4.key ignition
5.horn button
4.2 HOW TO OPERATE YOUR SCOOTER
Key Ignition
The key ignition acts as the power switch for the scooter. To switch the power on, turn the key
clockwise in the ignition. The power eye should illuminate.
To switch the power off, turn the key anticlockwise. The power eye should switch off and the key
can be removed if required.
Speed Adjuster Knob
Turn the speed dial to determine the maximum speed of the scooter. Turn the dial clockwise to
increase the speed setting and turn the dial anticlockwise to decrease the speed setting.
Horn Button
Press the horn button to sound the horn. Release the button to stop the horn
Braking
Electromagnetic brake

- - 11 - -
Warning
When on a gradient NEVER set the vehicle to the freewheel mode. The electromagnetic brakes will not
be applied. This may result in injury.
Seat
The seat can be rotated and locked in position at 45intervals.
Push the seat adjustment lever forward and swivel the seat.
Release the lever, and then continue swivelling the seat until it locks in position.
Attention
Return the seat to the forward position before driving.
Adjusting the Seat Height
1. Remove the seat from your scooter
2. Remove the locking pin (arrowed).
3. Move the chrome seat post to the desired height.
4. Adjust the seat post height so that there is a predrilled hole to
Reinert the locking pin.
5. Insert the locking pin and lock.
Battery Indicator
The battery indicator on the tiller console uses a colour code to indicate the approximate remaining
power of your batteries. Green indicates (40-100%) capacity, yellow a draining charge (10-30%),
and red indicates that an immediate recharge is necessary.
The remaining power indicated by the battery indicator will vary by the actual driving time incurred
and how you drive. Repeated starting, stopping, climbing will consume the power more quickly.
Suggestion
1. You should recharge the batteries after each time the vehicle is used to ensure maximum
range. The batteries should be charged up at least once a week even if the scooter is not used.
2. After charging or replacing a new battery, drive the vehicle for 2-3 minutes to make sure the

- - 12 - -
battery capacity is sufficient.
3. In wintertime or in cold conditions, the battery may respond more slowly and the battery
range may be reduced.
4. When driving on a gradient, the battery indicator gauge might move up and down. This is a
normal phenomenon so please do not worry.
5. Even if the battery is used properly, it is natural for the battery’s capacity to reduce with time,
which results in reduced battery range compared to a brand new battery. Therefore, when you
find the battery’s range is about only 50% of the range when the batteries were new, it is time
to replace the batteries. Please see your dealer about replacement batteries. If you continue to
use the old battery when it should be replaced, it could lead to a rapid decline in performance.。
6. The battery range will be reduced when driving frequently on a gradient or rough terrain, as
this leads to greater consumption of power.
7. The batteries have a twelve-month warranty covering manufacturing defects. This warranty
does not cover faults due to incorrect battery recharging.
Warning
Never operate the freewheel lever while seated on the scooter or on an incline.
Tiller Adjustment
The tiller can be adjusted in to many different
positions to suit each driver
The tiller can be adjusted by following the steps
below.
Step 1:
Loosen the knob (as being performed in the photo by
the lower hand) so the tiller can move.
Step 2:
Using the other hand, reposition the tiller as required.
Then retighten the knob to secure.

- - 13 - -
5. DRIVING ON THE FOOTPATH
VING ON THE ROAD
Starting and Driving
1. Make sure the seat is installed properly.
2. Make sure the tiller has been secured properly.
3. Fold down the armrests so you can rest your arms on them.
4 Check battery indicator to see whether there is enough power for your journey.
If you have any doubt about the remaining power, recharge the batteries before departure.
6. Set the speed dial to a position you feel safe and comfortable with.
7. Check the wigwag paddle works correctly.
8. Make sure the electromagnetic brake works correctly.
9. Before driving, ensure it is safe to do so in the environment around you.
Attention
1. Do not push both RH & LH sides of the wigwag paddle simultaneously. This might leave you
unable to control your scooter.
2. Do not turn the power switch to OFF whilst driving as this will lead to an emergency stop and
possible risk of accident and injury.
3. Do not set to the highest speeds whilst driving indoors.
4. Do not adjust the speed dial whilst driving, a sudden change in speed may cause danger to you
and others, and may cause damage to your scooter
5. Do not place magnetic devices near the scooter controller as this could affect the safe operation
of your scooter. The scooter controller is located under the footwell.
6. Do be careful while driving in heavy traffic or crowded areas.
7. Whilst reversing the vehicle, beware of people or objects behind you.。
Stopping
Turn the scooter off at the key ignition. Then pull out the key.
Attention
The stopping distance will vary with your forward / reverse speed. Therefore please begin
braking as early as you can.
When parking your scooter, be sure to park on flat ground and then turn the power to “OFF”
before you dismount.
Main Circuit Breaker (Reset Button)
When the voltage in your scooter’s batteries becomes low or the
scooter is heavily strained because of excessive loads or steep
inclines, the main circuit breaker may trip to protect the motor
and electronics from damage.
The arrow shows the location of the circuit breaker on the
photograph (left).
Under normal operating conditions the circuit breaker button will
be protruding 2mm –3mm. If the circuit breaker has tripped, the
button will be protruding by 7mm. To reset the circuit breaker,
push the button in and the scooter should function as normal.

- - 14 - -
6. BATTERY CHARGING AND CARE
6.1 CHARGING THE BATTERY
There are two methods which can be used to charge the battery pack on the Prism:
Method 1: On-board Charging (see photograph
overleaf)
Follow the procedure below step by step:
1. Turn the power switch to (OFF)
2. Plug the charger’s power cord into the mains.
3. Open the charging socket cap on the scooter’s tiller head. Then connect the charger’s round
plug to the charging socket
4. Switch on the plug socket.
5. The chargers LED will illuminate orange to
indicate the batteries are charging. The
charging duration is about 8 hours. To ensure
optimum performance a 12-hour charge is
recommended.
6. The orange LED will turn green when charging
is complete.
7. Turn off the charger, disconnect the power
cord and the round plug from charger socket on
the scooter.
Method 2: Off-Board Charging (see photograph over leaf)
Follow the procedure below step by step:
1. Turn the power switch to (OFF)
2. Lift out the battery pack from the scooter usingthe handle on the pack.
3. Plug the charger’s power cord into the mains.
4. Plug the charger’s round plug into the charging
socket of the battery pack
5. Switch on the plug socket.
6. The charger’s LED will illuminate orange to
indicate the batteries are charging. The charging
duration is about 8 hours. To ensure optimum
performance a 12-hour charge is recommended.
7. The orange LED will turn green when charging
is complete.
8. Turn off the charger, disconnect the power cord
and the round plug from charger socket on the
scooter.
Above: On Board Charging Above: Off Board Charging

- - 15 - -
Suggestion
1. Do not disconnect the charger cord if charging is not completed. The battery life will be
seriously shortened or decayed if the battery is repeatedly used without being fully charged.
Therefore be sure to charge the battery fully every time.
2. Always complete the charging until the LED light turns green. NEVER stop charging
before it is complete
3. When fully charged, the battery charger will still trickle charge the battery to ensure
optimum range.
4. If you do not use your scooter for a long time, it should be charged at least every week to
keep the battery in a fully usable condition.
5. The ambient temperature will affect charging time. Charging time will be longer in the
winter.
6. After charging, do not leave the charger socket plugged in to the scooter, as this will cause a
power drain on the scooter and temporarily reduce its range.
7. The batteries carry a twelve-month manufacturer's warranty. This warranty only covers
issues relating to manufacturing faults, and not faults relating to failure to recharge the
batteries as instructed above.
Attention: Please follow the rules below to avoid accidents while charging.
1. Please use the Mercury charger only, and recharge the battery to its full capacity every
time. You may damage the battery and scooter if you use a charger which is not to the
correct specification.
2. Never disassemble or modify the charger.
3. Please charge in a well-ventilated space where there is no direct exposure to the sunlight.
Do not charge in surroundings where it is humid or under rainfall and morning dews.
4. Do not charge in temperatures less than -10°C or higher than +50°C as the charger may
not work well and the batteries may become damaged.
Warning
1. Keep away from flammable objects while charging as this may lead to fire or battery
explosion.
2. Do not smoke while charging as the battery may release hydrogen gas. Always charge
your battery in a well-ventilated space.
3. Never connect or disconnect the plug or cord with wet hands whilst charging. Do not
connect or disconnect the plug or cord when they are wet, it may lead to electric shock.

- - 16 - -
6.2 CHARGER
The charger supplied with the Prism has an LED which changes colour depending on its status:
If the LED is lit ORANGE then the charger is switched on and charging
If the LED is lit GREEN then the charger is switched on and has finished the bulk of its charging
and the batteries can be used. However, we recommend that you leave the charger charging for a
couple of hours after the green LED has lit. This will maintain and probably increase the capacity
of your batteries.
The LED will also illuminate GREEN if the charger is switched on but not connected to the
batteries.
Warning
If the charger LED does not illuminate then the charger is faulty.
In this event please contact your dealer.
6.3 BATTERY
Do not expose the battery to temperatures below - 10C or above 50C when charging or storing the
vehicle. Being out of the above temperature range can cause the battery either to freeze or over heat.
This will damage the batteries and shorten their life.
These batteries are maintenance free and there is no need to inspect the battery liquid or refill with
water.
You are required to recharge the batteries on a regular basis. Even if the scooter is stood idle, you
should charge the batteries at least once a week.
Warning
Do not open the battery-sealed cap at any time.
Batteries
The Prism is powered by 12V 12ah batteries.
They are sealed lead acid type, and are maintenance free and non-spillable.
They are supplied with spade terminals.
The batteries supplied as standard with Prism are classified as safe to transport under IATA special
provision A67.
Warning
Do not remove the battery pack whilst the scooter is switched (ON). This will cause the scooter
to stop and may damage the scooter. If, whilst the scooter is switched on, the battery pack is
accidentally removed or loses contact as the result of jolt, switch the scooter (OFF). Then reinsert
the battery pack and switch the scooter (ON).
Charging the Batteries
Using the charger supplied with the scooter, the charging duration is about 8 hours.
However, to ensure optimum performance we recommend a 12-hour charge.
We also recommend that the batteries are not charged for more than 24 hours.

- - 17 - -
7. INSPECTION AND MAINTENANCE AND M
7.1 DAILY CHECKING
Check the following items before driving. If you find anything abnormal, contact your Medicare
Technology dealer for further inspection or advice before using the scooter.
Item
Inspection
Tiller
Is there any looseness?
Can it turn left and right smoothly ?
Speed Control Dial
Can it be adjusted freely and does it function well?
Speed Control Lever
Does the scooter move when the lever pressed
down?
Does the scooter stop when the lever is
released completely?
Motor
Is there an abnormal noise from the motor?
Do the electromagnetic brakes work properly?
Freewheel Mode
Does the freewheel mode lever work
properly?
Battery Indicator
Is the light on when the power is switched on?
Is the remaining power enough for your trip?
Horn
Does the horn work?
Seat
Can the seat swivel smoothly?
Tyres
Are there any cracks or other damage to the
tyres?
Check the tyre tread depth.
Other
Are there any abnormal noises?
Is there oil leakage from the transmission
box?
Attention
Go to your dealer for inspection and maintenance if you find anything wrong
7.2 REGULAR CHECKING RECORD
To make sure your scooter is correctly serviced, take it to your Mobility Works dealer for regular
maintenance checks. This should be at six monthly intervals after an initial inspection after one month.
Your dealer may charge a fee for this. The checking record is shown overleaf.
Suggestion
Even if you do not use the vehicle for a long time it should still be serviced regularly.

- - 18 - -
7.3 BATTERY, FUSE AND TYRE
Battery
Refer to the section entitled “6.3 BATTERY” in “6. BATTERY CHARGING AND CARE”.
Fuse
If the battery charger is turned on and the LED is not lit, check the fuse.
Suggestion
Ask for help from your dealer to inspect or replace the fuse, since the tiller shroud has to be
removed first before you can replace the fuse.
Tyres
The condition of the tyres depends on how you drive and use your scooter.
Please check the tread depth regularly.
Replace the tyres when the tread depth is less than 0.5mm
Attention
1. When tread depth is below 0.5mm it can easily lead to vehicle slippage, making braking
distances longer. Therefore replace the tyres as early as possible when they are found to have
insufficient tread depth.
2. The Prism scooter comes with solid tyres so there is no need to check tyre pressure. Prism
7.4 MAINTENANCE
You must maintain the scooter frequently if you tend to drive on grass, sand, and gravel or in other

- - 19 - -
adverse environments.
Do not use, water, oil or other chemical solutions to clean your scooter. Be sure NOT to spray the
scooter with a hose or tap as this may cause damage to electronic componentry and the scooter
controller.
Please take the scooter to authorised dealers for repairs and adjustments. Improper adjustments could
lead to an accident or scooter malfunction.
Please use a soft, wrung dry cloth to keep your scooter tidy and dust-free. Use natural or mild detergent
to clean the scooter.
Attention
When conducting maintenance of your vehicle, turn the power switch to OFF and remove the
charger cords
Suggestions
Do not splash water directly to wash your scooter as this could lead to malfunction of the system
electrics.
Do not use petrol, solvents or vaporizing solution as these may deform or damage the shrouds. Do
not use wax.
7.5 STORAGE
Ensure the scooter is stored under the following conditions:
Ensure the seat is set in the ‘forward’ position
Ensure the scooter is switched off
Ensure the charger is disconnected when not in use
Suggestion
Please store the scooter in an environment where it is out of direct sunlight or damp. When
storing for a long time, charge the battery to full power and then disconnect the battery terminal.
For more details contact to your dealer.
7.6 MOVING ABOUT
Switch off the power with the ignition key before moving. Always dismount from the scooter before
moving.
Lift the scooter by the chassis, and not by the bumpers. Lifting the scooters by the bumper could cause
damage or injury.
For your safety, always ask for help if required. You will need two people when moving or lifting
the scooter whole. If you are on your own, please disassemble the scooter before lifting. Refer to
the section below.
7.7 DISASSEMBLING THE SCOOTER
Both the models of scooter can be disassembled in to four pieces. These are the seat (weight 6kg), the
front section (Prism 3-wheel front section weight 14.6kg, Prism 4-wheel front section weight 19.1kg),
the rear section (weight 10.6kg), and battery pack (weight 9.8kg) without any tools
The procedure for disassembly is the same for both scooters. Please follow the steps and photographs
below:

- - 20 - -
1. Push the Seat Rotate Lever whilst pulling up on the seat to remove.
2. Lift out the battery pack from the main body of the scooter.
3. Loosen the tiller adjustment knob and fold down the tiller and retighten knob.
4. Lock the front wheel and tiller by pulling the wheel lock catch down.
5. Pull up the scooter using the seat post, whilst pulling the red handle behind the seat post.
6. Lift the front section up until the lower pegs are longer in contact with the curved locking brackets on
the rear section.
7.8 ASSEMBLING THE SCOOTER
Suggestion
The assembly process is essentially the disassembly process in reverse. First study the text and
photographs in the disassembly procedure before re-assembling the scooter
This manual suits for next models
1
Table of contents
Other Mobility Works Scooter manuals