F&U CD-3590BT User manual

INSTRUCTIONS MANUAL
DIGITAL CAR AUDIO SYSTEM WITH BLUETOOTH
CD-3590BT
BLUETOOTH

IMPORTANT NOTICE & PRECAUTIONS
Thank you for using our company multi-media player! To operate the unit correctly,
please read the operation manual carefully before using.
The unit is designed only for DC12V negative ground operation system. Make sure
your vehicle is connected to DC 12V negative ground electrical system. Be sure to
connect the speaker (-) leads to the speaker (-) terminal. Never connect the left and
right channel speaker wires together or to the vehicle body.
The normal temperature for operation is between -20 and +60 degree Celsius. Do
not work in extreme high or low temperature and block vents or radiator panels of
the unit, blocking them will cause heat to build up inside the unit and may cause
damage or fire.
This unit can play the following discs (12 cm) and media files: CD-R/RW / MP3 /
WMA.
SPECIFICATION
GENERAL
Power Requirement DC 12Volts, negative ground
Load Impedance: 4 Ohms
Maximum Power Output: 40 watts x 4 channels
FM RADIO SECTION
Frequency Range: 87.5 – 108MHz (Europe)
DISC SECTION
Disc Play: CD / MP3 / WMA
Mounting Angle: ±30 degree
AUDIO SECTION
Maximum Output Level: 2 Vrms (+/-3 dB)
Frequency Response: 20 Hz to 20 KHz
Signal to Noise Ratio: 85 dB
Channel Separation: 80 dB
Note: Specification and design; functions and features; unit illumination; color and display
segment are subject to change without prior notice. Photos and drawings on gift box or operation manual
might be varied from the exact unit. Depends the input device, operation might be varied from the
operation manual described.
110
Declaration of Conformity
This product complies with the requirement of below directives:
EMC Directive: 2004 / 108 / EC
Restriction of Hazardous Substance (RoHS) Directive: 2002/95/EC
EXCLUSIVE IMPORTER IN GREECE:
Amiridis – Savidis S.A.
87A 17th November street – P.C. 55535 – EMO Zone
Pylaia, Thessaloniki, Greece.
Tel: +302310944944, Fax: +302310944940
www.fandu.gr
Notice about recycling
Your product is designed and manufactured with high quality materials and components which can
be recycled and reused.
This symbol means that electrical and electronic equipment, at their end-of-life, should be disposed
of separately from your household waste.
Please dispose of this equipment at your local community waste collection/recycling centre. In the
European Union there are separate collection systems for used electrical and electronic products.
Please help us to conserve the environment we live in!

INSTALLATION
Accessories included in the package for installation
Mounting Method A
1. Put the mounting sleeve
(1) into the dashboard.
2. Band the tabs of the
mounting sleeve (1)
outward into the
dashboard for a secure
mounting.
3. If necessary, use the strap (6) to secure the back of the unit in
place.The strap (6) can be bent by band to the desired angle.
To remove the unit,
insert the release keys
(2) on both sides of
the unit and then pull
the unit out from the
dashboard.
Mounting Method B
This mounting method is used for most Japanese cars. The actual mounting method should depend on
the type of cars and the supplied parts.
Note:
- Store small articles in places not accessible to children
- Install only with the supplied screws
- Installation varies on type of cars and supplied parts.
You should have the unit installed by qualified technician
MODE SELECTION
During unit operation, press MOD (1) repeatedly to select the Bluetooth operation mode.
MICROPHONE
During installation of unit, connect the microphone to the microphone jack at the back of the main unit.
LINK UP WITH MOBILE PHONE
To link up the Bluetooth connection with the mobile phone, take your phone and follow these
steps:
-turn on the Bluetooth operation of your mobile phone
-start to search new device on your mobile phone
-after searched, new device “CAR KIT” searched out, confirm the search
-input the default code “0000” in your mobile phone and confirm the setting
-“BT ON” will appear shortly on LCD DISPLAY(4) when the linked-up succeed
CONNECT / DISCONNECT WITH MOBILE PHONE
When Bluetooth has been connected with mobile phone, once a call is received or dial, the unit will be
responded automatically and switched to Bluetooth operation. The unit will be resumed to its original mode
when the phone hanged-up.
CALL PICK UP
When a call is received, the caller ID (if available on the incoming call) will be appeared on the LCD
DISPLAY(4). Press (11) to pick up the call.
DIAL OUT
When a phone number is dial out, "CALLING" will be appeared on LCD DISPLAY(4).
HANG UP / REFUSE CALL
Press (1) to hang up or refuse an incoming call. The unit will resume to its original playing mode.
MUSIC PLAYBACK
At Bluetooth operation mode and when mobile phone is connected, music playback from the mobile phone
will be transmitted to the unit for broadcasting.
NOTE
Bluetooth operation on the main unit is confined to call pick up, call hang up, refuse call and music
playback only.
MAIN UNIT – BLUETOOTH OPERATION
9 2

Before detaching the front panel, be sure to turn
off the unit. Press the release button and pull off
the front panel.
First, insert the right hand side of the front panel
into the main unit. Then push the left hand side of
the front panel into the main unit until it locks firmly.
(Only for mdels with detachable panel) (Only for mdels with
detachable panel)
To Detach the Front Panel To Replace the Front Panel
WIRING CONNECTION
A B
( ) ( )
( ) ( )
( ) ( )
( ) ( )
-
-
-
-
MEMORY
BACKUP +12V
POWER
ANTENNA
GROUND
ILGNITION
SWITH
REAH RIGHT SPEAKER
FRONT RIGHT SPEAKER
FRONT LEFT SPEAKER
REAH LEFT SPEAKER
1
2
3
4
5
6
78
78
5
4
ISO Wire
connection
15. / TA At Radio Mode, press to turn on or off AF.
At Bluetooth Mode, press to is the key.
16. # / PTY At Audio Mode, press to turn on or off PTY function.
At Bluetooth Mode, press to is the # key.
17. 0 / DISP Press to show the status of current operation of the unit.
At Bluetooth Mode, press to is the 0 number key.
18. VOL+ / VOL- Press to adjust sound output level.
19. APS / TITLE Radio Mode
Press shortly to scan all the preset stations on selected radio band and stop
several seconds for broadcasting. Press and hold for 2 seconds to start
search & storing the strongest signal stations into the PRESET MEMORY
STATIONS 1-6.
Disc / USB / SD Input Mode
Press repeatedly to activate different searching modes that may include
directory, file, track & time search. Under this mode, rotate & press
FUNCTION CONTROL to select track for playback.
20. PRESET At radio mode, press any one of the preset number to select a station that
MEMORY had been stored in the memory. Press and hold for 2 seconds of any one of
STATION the preset number can store the current broadcasting station in the memory.
NO.(1– 6)
Note: Depends on different type of disc and media files that recorded, not all operation as described in the
above operation manual can be functioned.
3 8
**

7 4
MAIN UNIT OPERATION
NO / Symbol / Control Operation & Controls
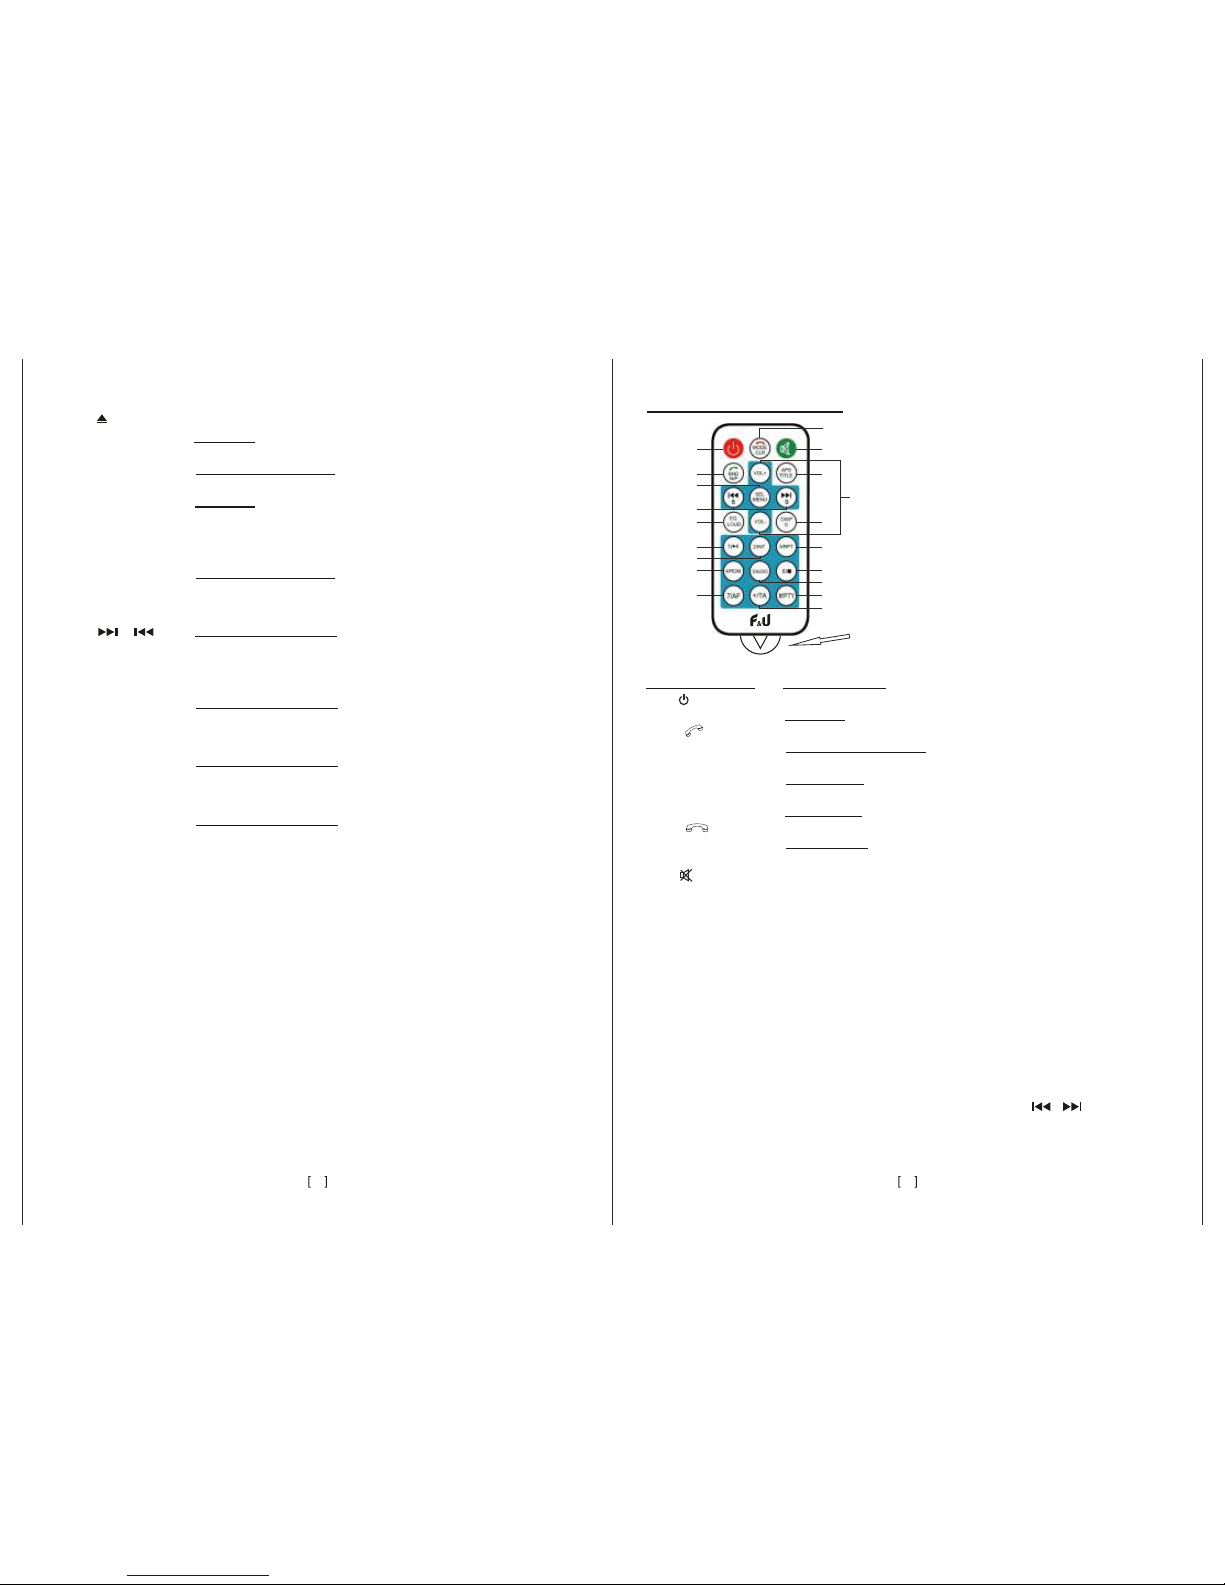
1. PWR Press to turn on or off of the unit.
1. / MOD When the unit is turned off, press to turn on the unit. When the unit is turned
on, press & hold it for 2 seconds to turn off the unit. When the unit is turned
on, press repeatedly to select desired mode for operation.
2. IR Remote control sensor(for signal reception from remote handset).
3. Press to detach the removable front panel from the main unit.
4. LCD DISPLAY It shows the status of current operation of the unit.
5. FUNCTION Volume Control
CONTROL Rotate to adjust sound output level.
Audio Control
Press repeatedly to activate following control modes and when the desired
mode reached, rotate to set or adjust: Bass (BAS) / Treble (TRE) / Balance
(BAL) / Fader (FAD) / Loudness (LOUD ON / LOUD OFF) / Preset EQ
(CLASSIC / POP / ROCK / DSP OFF) / Local & Distant (LOCAL / DX) /
Stereo & Mono (STEREO / MONO) / Volume (VOL)
(Note: Local / distant and stereo / mono operate under FM radio mode only)
Function Control
Press & hold for 2 seconds to activate various function controls. At this mode,
press & rotate to have the following settings and controls:
- On-volume level selection (VOL LAST / VOL ADJ): to select volume level
when the unit turned on again after power off.
- Radio band selection & frequency setting (BAND --- / BAND ADJ): to select
numbers of AM/FM radio band and range of frequency that suite your
country or area.
- Radio seel & tuning control (SEEK 1/ SEEK 2/ SEEK3): to select different
seeking and tuning modes when using + / - control.
- Beep sound control (BEEP ON / BEEP OFF): to select on or off of beep
sound when control key / knob is pressed / rotated. (Note: only available on
the versions come with this function)
- Count up & down (COUNT UP / COUNT DOWN): to select the counting up
or down of the playing track time.
- ESP Control (ESP ON / ESP OFF): to turn on or off of ESP (electronic
shock protection) control under disc input operation mode.
DVD / USB / SD Input Mode
At file/track/time selection mode, rotate for selection and press to enter/
confirm the selection.
6. Press to turn on or off of sound muting control.
7. DSP Press repeatedly to select your desired preset equalization mode.
8. LOUD Press to select on or off of loudness control.
9. CLK Press to recall time display. Press & hold for 2 seconds to activate clock
setting mode and hour digit start blinking. At this mode, rotate & press
FUNCTION CONTROL to adjust hour and minute. After setting, press to
confirm the setting.
10. MODE Press to select desired mode for operation.
11. USB Insert USB device to this slot for digital files playback.
12. SD Insert SD / MMC card to this port for digital files playback.
13. AUX Insert an external device to this jack in order to have output of the external
device through the unit.
- Count up & down (COUNT UP/ COUNT DOWN): to select the
counting up or down of the playing track time.
- ESP Control(ESP ON/ESP OFF): to turn on or off of ESP
(electronic shock protection) control under disc input operation
mode.
DVD / USB / SD Input Mode
At file / track / time selection mode, press to enter / confirm the
selection.
6. / 8 Radio Mode (SEEK 1 Mode)
/ 9 Press to start automatic seeking frequency upward or downward to
the next strong station received. Press & hold for 2 seconds to
activate manual tuning mode. At this mode, press repeatedly to tune
the radio frequency upward or downward.
Radio Mode (SEEK 2 Mode)
Press repeatedly to turn radio frequency upward or downward. Press
& hold for 2 seconds to start automatic seeking frequency upward or
downward to the next strong station received.
Radio Mode (SEEK 3 Mode)
Press repeatedly to turn radio frequency upward or downward. Press
& hold to turn the frequency upward or downward and release when
your desired frequency is reached.
Disc / USB / SD Input Mode:
Press to shift track upward or downward for playback. Press & hold
to start fast forward or fast rewind of the track.
At Bluetooth Mode, press to is the 8 / 9 number key.
7. EQ Press repeatedly to select the desired preset equalization mode.
LOUD Press to select on or off of loudness control.
8. 1 / At disc / USB / SD input mode, press to start or pause playback.
At Bluetooth Mode, press to is the 1 number key.
9. 2 / INT At disc / USB / SD input mode, press to start intro playback of each
track for 10 seconds.
At Bluetooth Mode, press to is the 2 number key.
10. 3 / RPT At disc / USB / SD input mode, press to select repeat playback
mode.
At Bluetooth Mode, press to is the 3 number key.
11. 4 / RDM At disc / USB / SD input mode, press to select start random playback
of the device.
At Bluetooth Mode, press to is the 4 number key.
12. 5 / AUDIO At video / music playback mode, each time press & hold shortly to
select different audio output channels.
At Bluetooth Mode, press to is the 5 number key.
13. 6 / At disc / USB / SD input playback mode, press to stop playback.
At Bluetooth Mode, press to is the 6 number key.
14. 7 / AF At Radio Mode, press to turn on or off AF.
At Bluetooth Mode, press to is the 7 number key.

REMOTE HANDSET OPERATION
BATTERY REPLACEMENT
Refer to the back of remote handset for
details on how to replace the batteries.
NO / Symbol / Control Operation & Controls
1. Press to turn on or off of the unit.
2. BND / N/P Radio Mode
/ Press to select the desired radio band for broadcasting.
Disc / USB / SD Input Mode
Press to display ID3 contains of the MP3 files that recorded in the device.
Bluetooth Mode
Press to dial out a phone or pick up a call.
3. MODE / CLK Bluetooth Mode
/ Press to hang up or refuse an incoming call.
The Other Mode
Press to select desired mode for operation.
4. Press to turn on or off of sound muting control.
5. SEL / MENU Audio Control
Press repeatedly to activate following control modes & when the desired
mode reached, press VOL+ / VOL- (18) to set or adjust: Bass (BAS) / Treble
(TRE) / Balance (BAL) / EQ (CLASSIC / POP / ROCK / DSP OFF) / Volume
(VOL)
Function Control
Press & hold for 2 seconds to activate various function control. At this mode,
press SEL / MENU (5) & VOL+ / VOL- (18) to have the following settings and
controls:
- On-volume level selection (VOL LAST/ VOL ADJ): to select volume level
when the unit turned on again after power off.
- Radio band selection & frequency setting (BAND --- / BAND ADJ): to select
numbers of AM/FM radio band and range of frequency that suite your
country or area.
- Radio seek & tuning control (SEEK 1 / SEEK 2 / SEEK 3): to select
different seeking and tuning modes when using / (6) control.
- Beep sound control (BEEP ON / BEEP OFF): to select on or off of beep
sound when control key / knob is pressed / rotated. (Note: only available on
the versions come with this function)
Remote this tab before using remote control
1
2
5
6
7
8
11
14
3
4
19
18
17
10
9
13
12
16
15
14. DISC SLOT Insert or remove disc from the disc slot.
15. Press to eject disc from the disc slot.
16. BAND Radio Mode
Press to select the desired radio band for broadcasting.
Disc / USB / SD Input Mode
Press to display ID3 contains of the MP3 files that recorded in the device.
17. APS Radio Mode
Press shortly to scan all the preset stations on selected radio band and stop
several seconds for broadcasting. Press and hold for 2 seconds to start
search & storing the strongest signal stations into the PRESET MEMORY
STATIONS 1-6.
Disc / USB / SD Input Mode
Press repeatedly to activate different searching modes that may include
directory, file, track & time search. Under this mode, rotate & press
FUNCTION CONTROL to select track for playback.
18. + / - Radio Mode (SEEK 1 Mode)
Press to start automatic seeking frequency upward or downward to the next
strong station received. Press & hold for 2 seconds to activate manual tuning
mode. At this mode, press repeatedly to tune the radio frequency upward or
downward.
Radio Mode (SEEK 2 Mode)
Press repeatedly to turn radio frequency upward or downward. Press & hold
for 2 seconds to start automatic seeking frequency upward or downward to
the next strong station received.
Radio Mode (SEEK 3 Mode)
Press repeatedly to turn radio frequency upward or downward. Press & hold
to turn the frequency upward or downward and release when your desired
frequency is reached.
Disc / USB / SD Input Mode:
Press to shift track upward or downward for playback. Press & hold to start
fast forward or fast rewind of the track.
19. PRESET At radio mode, press any one of the preset number to select a station
MEMORY that had been stored in the memory. Press and hold for 2 seconds of any
STATION one of the preset number can store the current broadcasting station in the
(NO.1- 6) memory.
20. PAU At disc / USB / SD input mode, press to start or pause playback.
21. INT At disc / USB / SD input mode, press to start intro playback of each track for
10 seconds.
22. RPT At disc / USB / SD input mode, press to select repeat playback mode.
23. RDM At disc / USB / SD input mode, press to select start random playback of the
device.
24. -10 At disc / USB / SD input mode, press each time to select every 10 tracks
downward for playback.
25. +10 At disc / USB / SD input mode, press each time to select every 10 tracks
upward for playback.
Note: Depends on different type of discs and media files that recorded, not all operations as described in
the above operation manual can be functioned.
5 6
Table of contents
Other F&U Car Receiver manuals
Popular Car Receiver manuals by other brands

EMPHASER
EMPHASER EM-MBF2 Installation & operating manual

PowerAcoustik
PowerAcoustik PTID-8200 operating instructions

Silvercrest
Silvercrest SAR 28 A1 operating instructions

IMG STAGE LINE
IMG STAGE LINE CD-112RDS/BT instruction manual

CarShow
CarShow CS-PRIS12 Toyota Prius installation guide

PowerAcoustik
PowerAcoustik PTID-8001NT operating manual