FARMER FRIEND QUONSET User guide

Caterpillar Tunnel
Watch the video!
Scan the code or visit: c.us/tunnel/s

Well-designed, quality tools and equipment |farmersfriendllc.com
I just want to say a personal “Thank You” for doing business
with us. Our team has worked hard to develop the best
caterpillar tunnel on the market, and I’m excited to share it
with you!
I grew up on a small farm so I know firsthand how hard each
of you works at what you do; market gardening is not for
the faint of heart. I also know how important it is to have the
right tools for the job. My goal at Farmers Friend is to make
well-designed, high-quality tools to improve your eciency,
profitability and quality of life.
I see us all on the same team. You are growing the food and
flowers to make our world a healthier, happier place, and we
are developing the tools to make your work more productive
and enjoyable. Your success is our success.
From the whole team here at Farmers Friend, I want to wish
you a happy and extended growing season. May your days
be filled with more veggies and flowers and less stress! Thank
you again for your trust in us.
Jonathan Dysinger,
Owner & Chief Innovator
P.S. Don’t hesitate to contact us with ideas on how we can make
your work more enjoyable.
Rev.
Contents
Anchoring.......................................................................... 2
Rebar ............................................................... 2
Ground Posts .................................................................... 3
Bow Assembly.................................................................... 6
Quonset & Gothic ................................................. 6
Cross Bracing ................................................................... 8
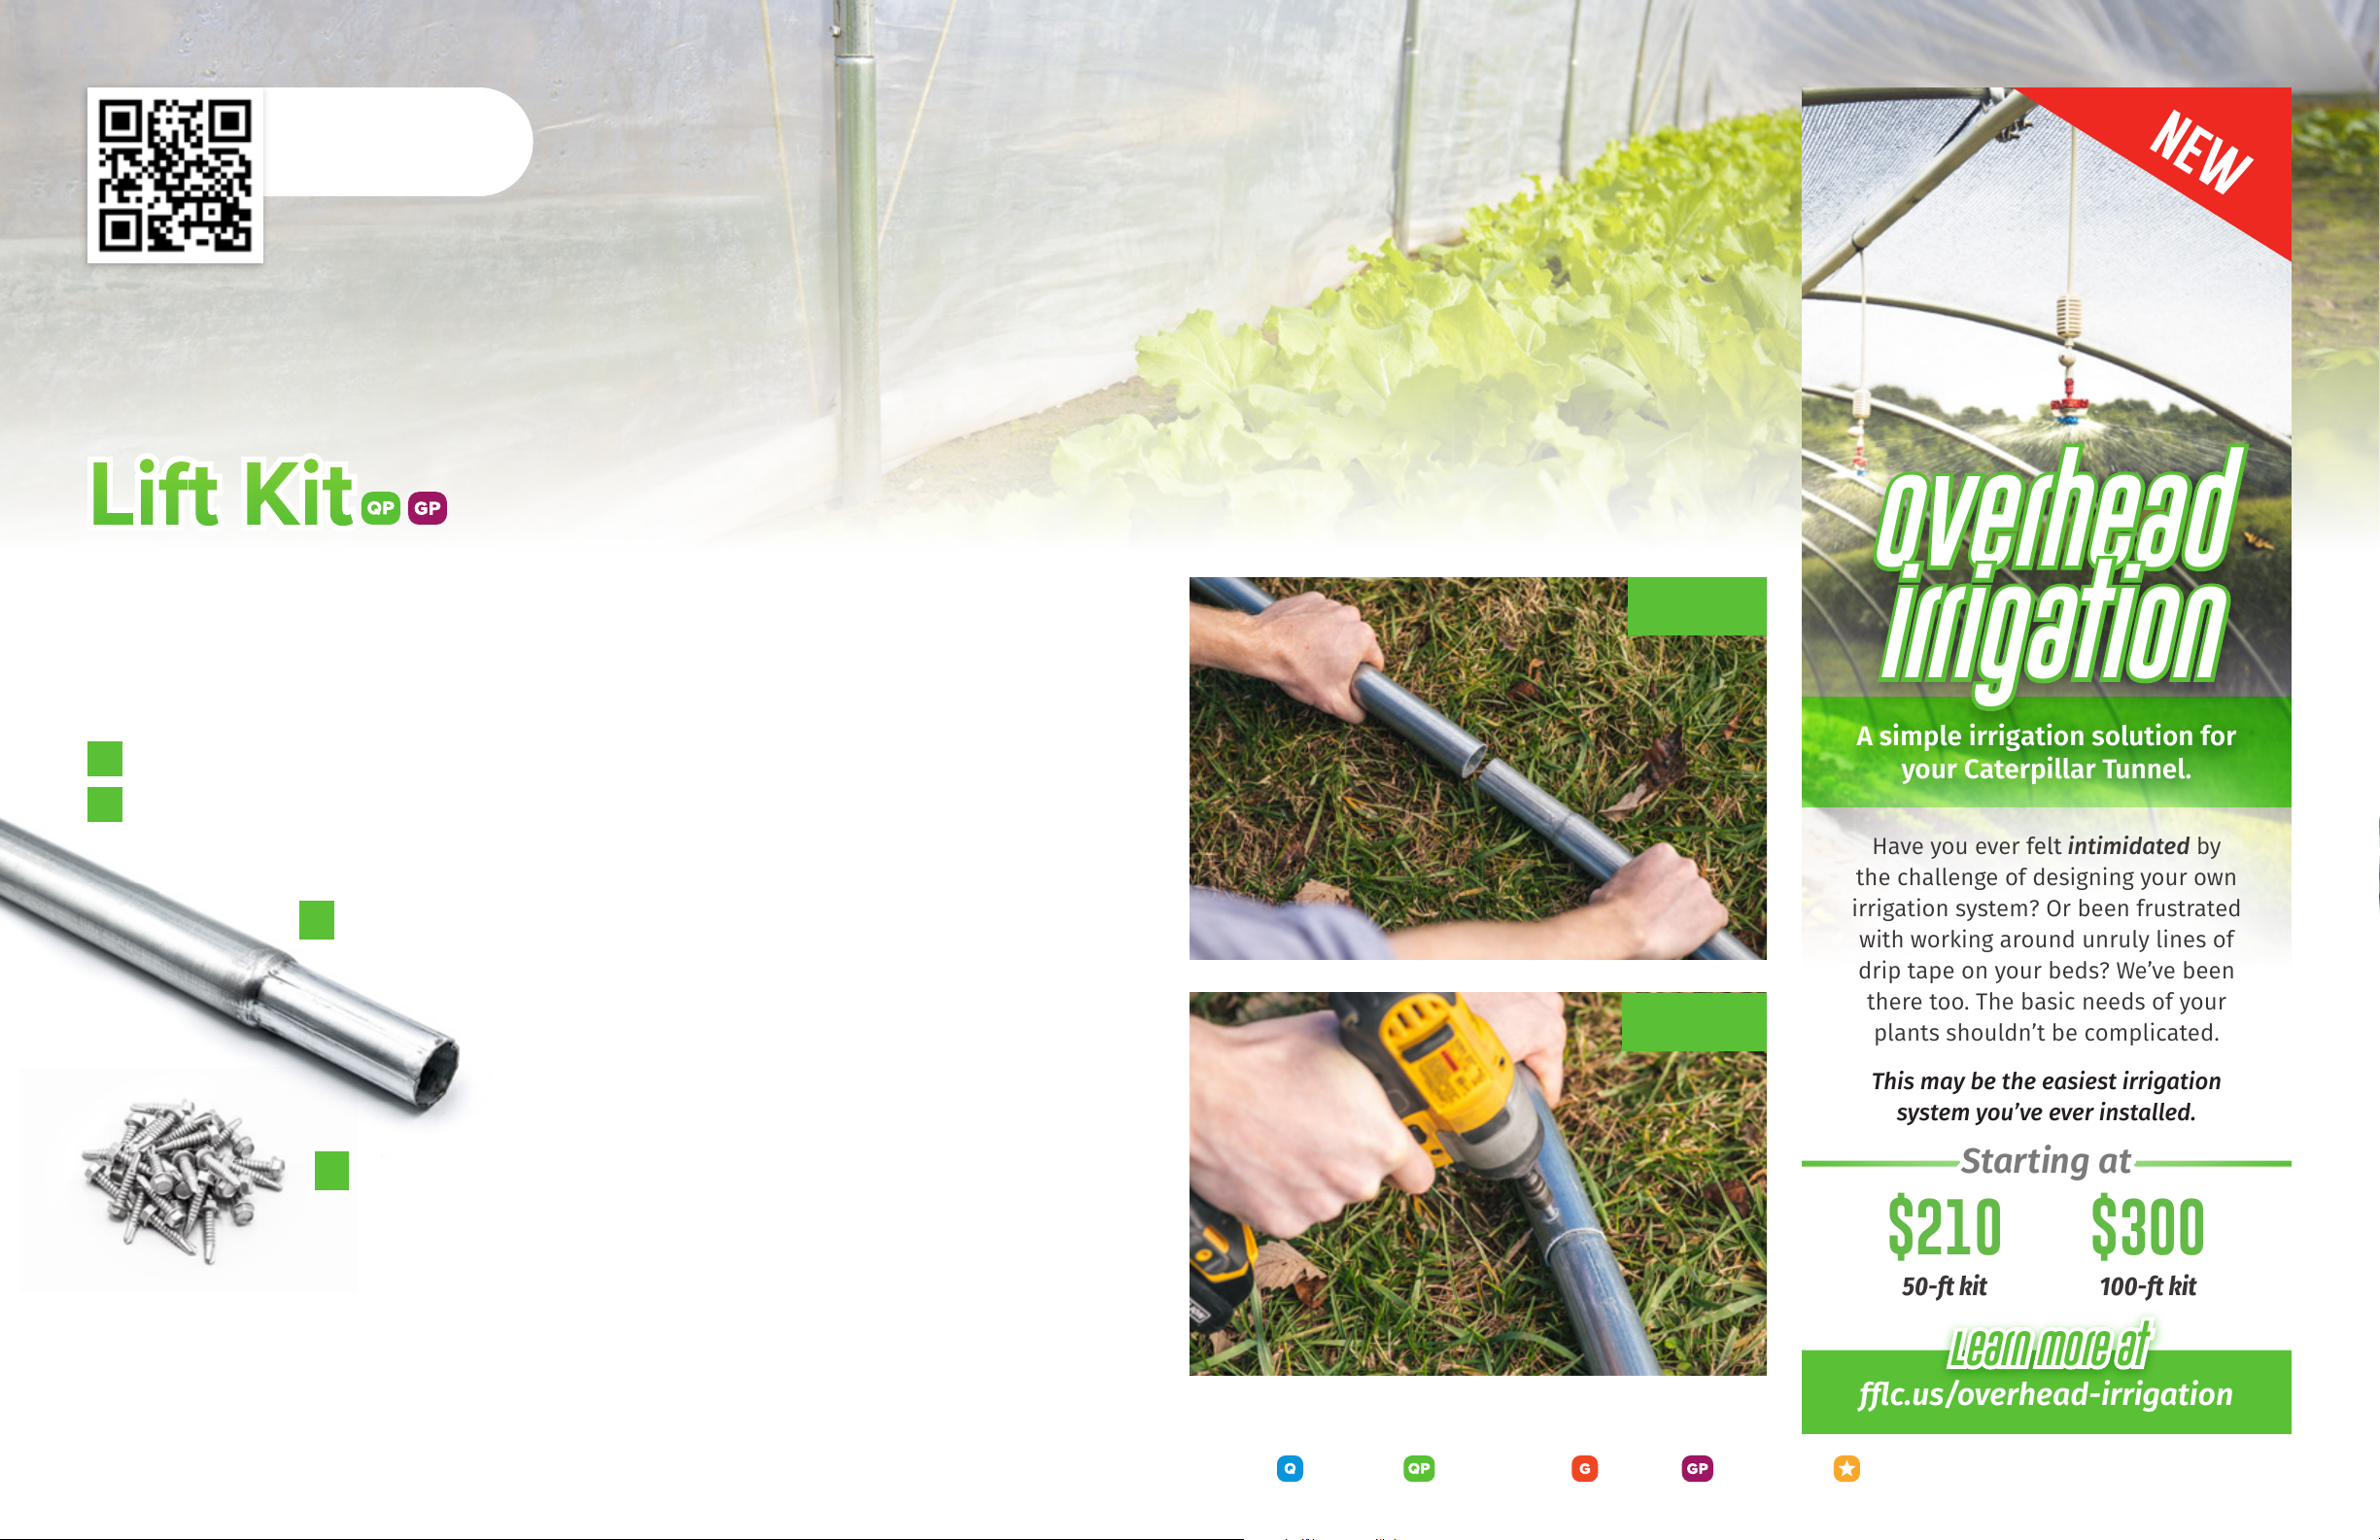
Lift Kit ...................................................................... 10
Structure & Support ........................................................... 12
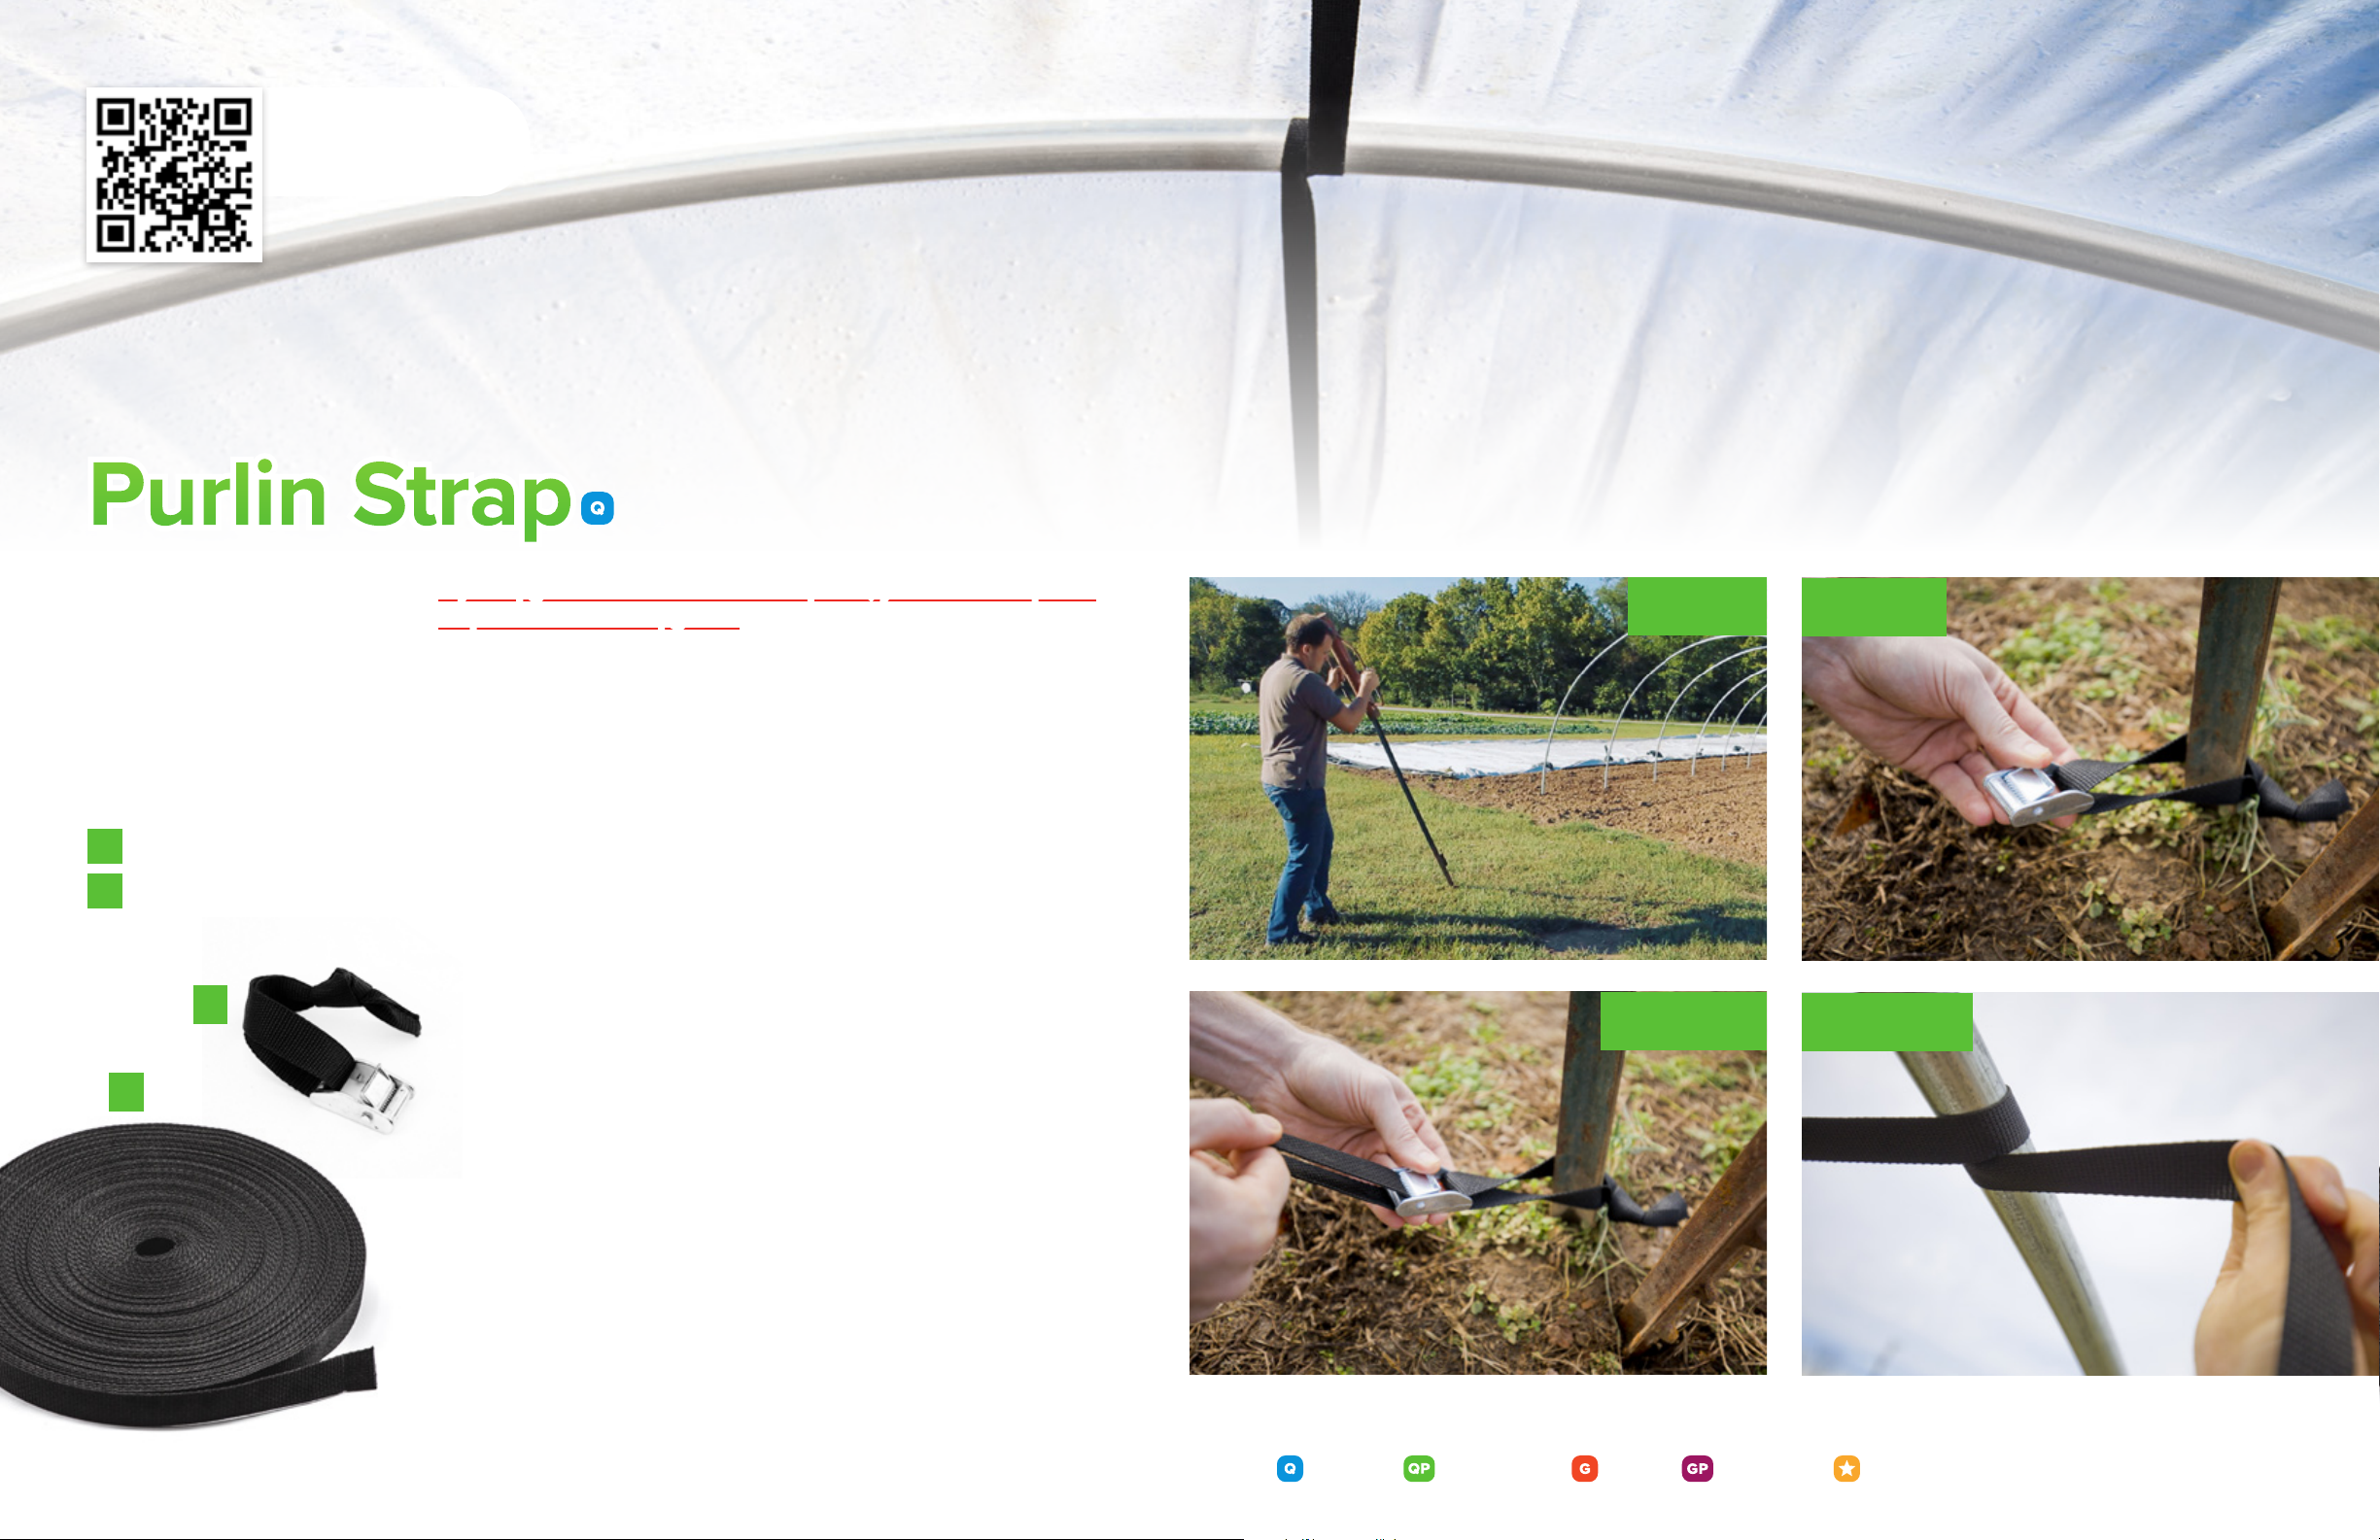
Purlin Strap ..................................................................... 12
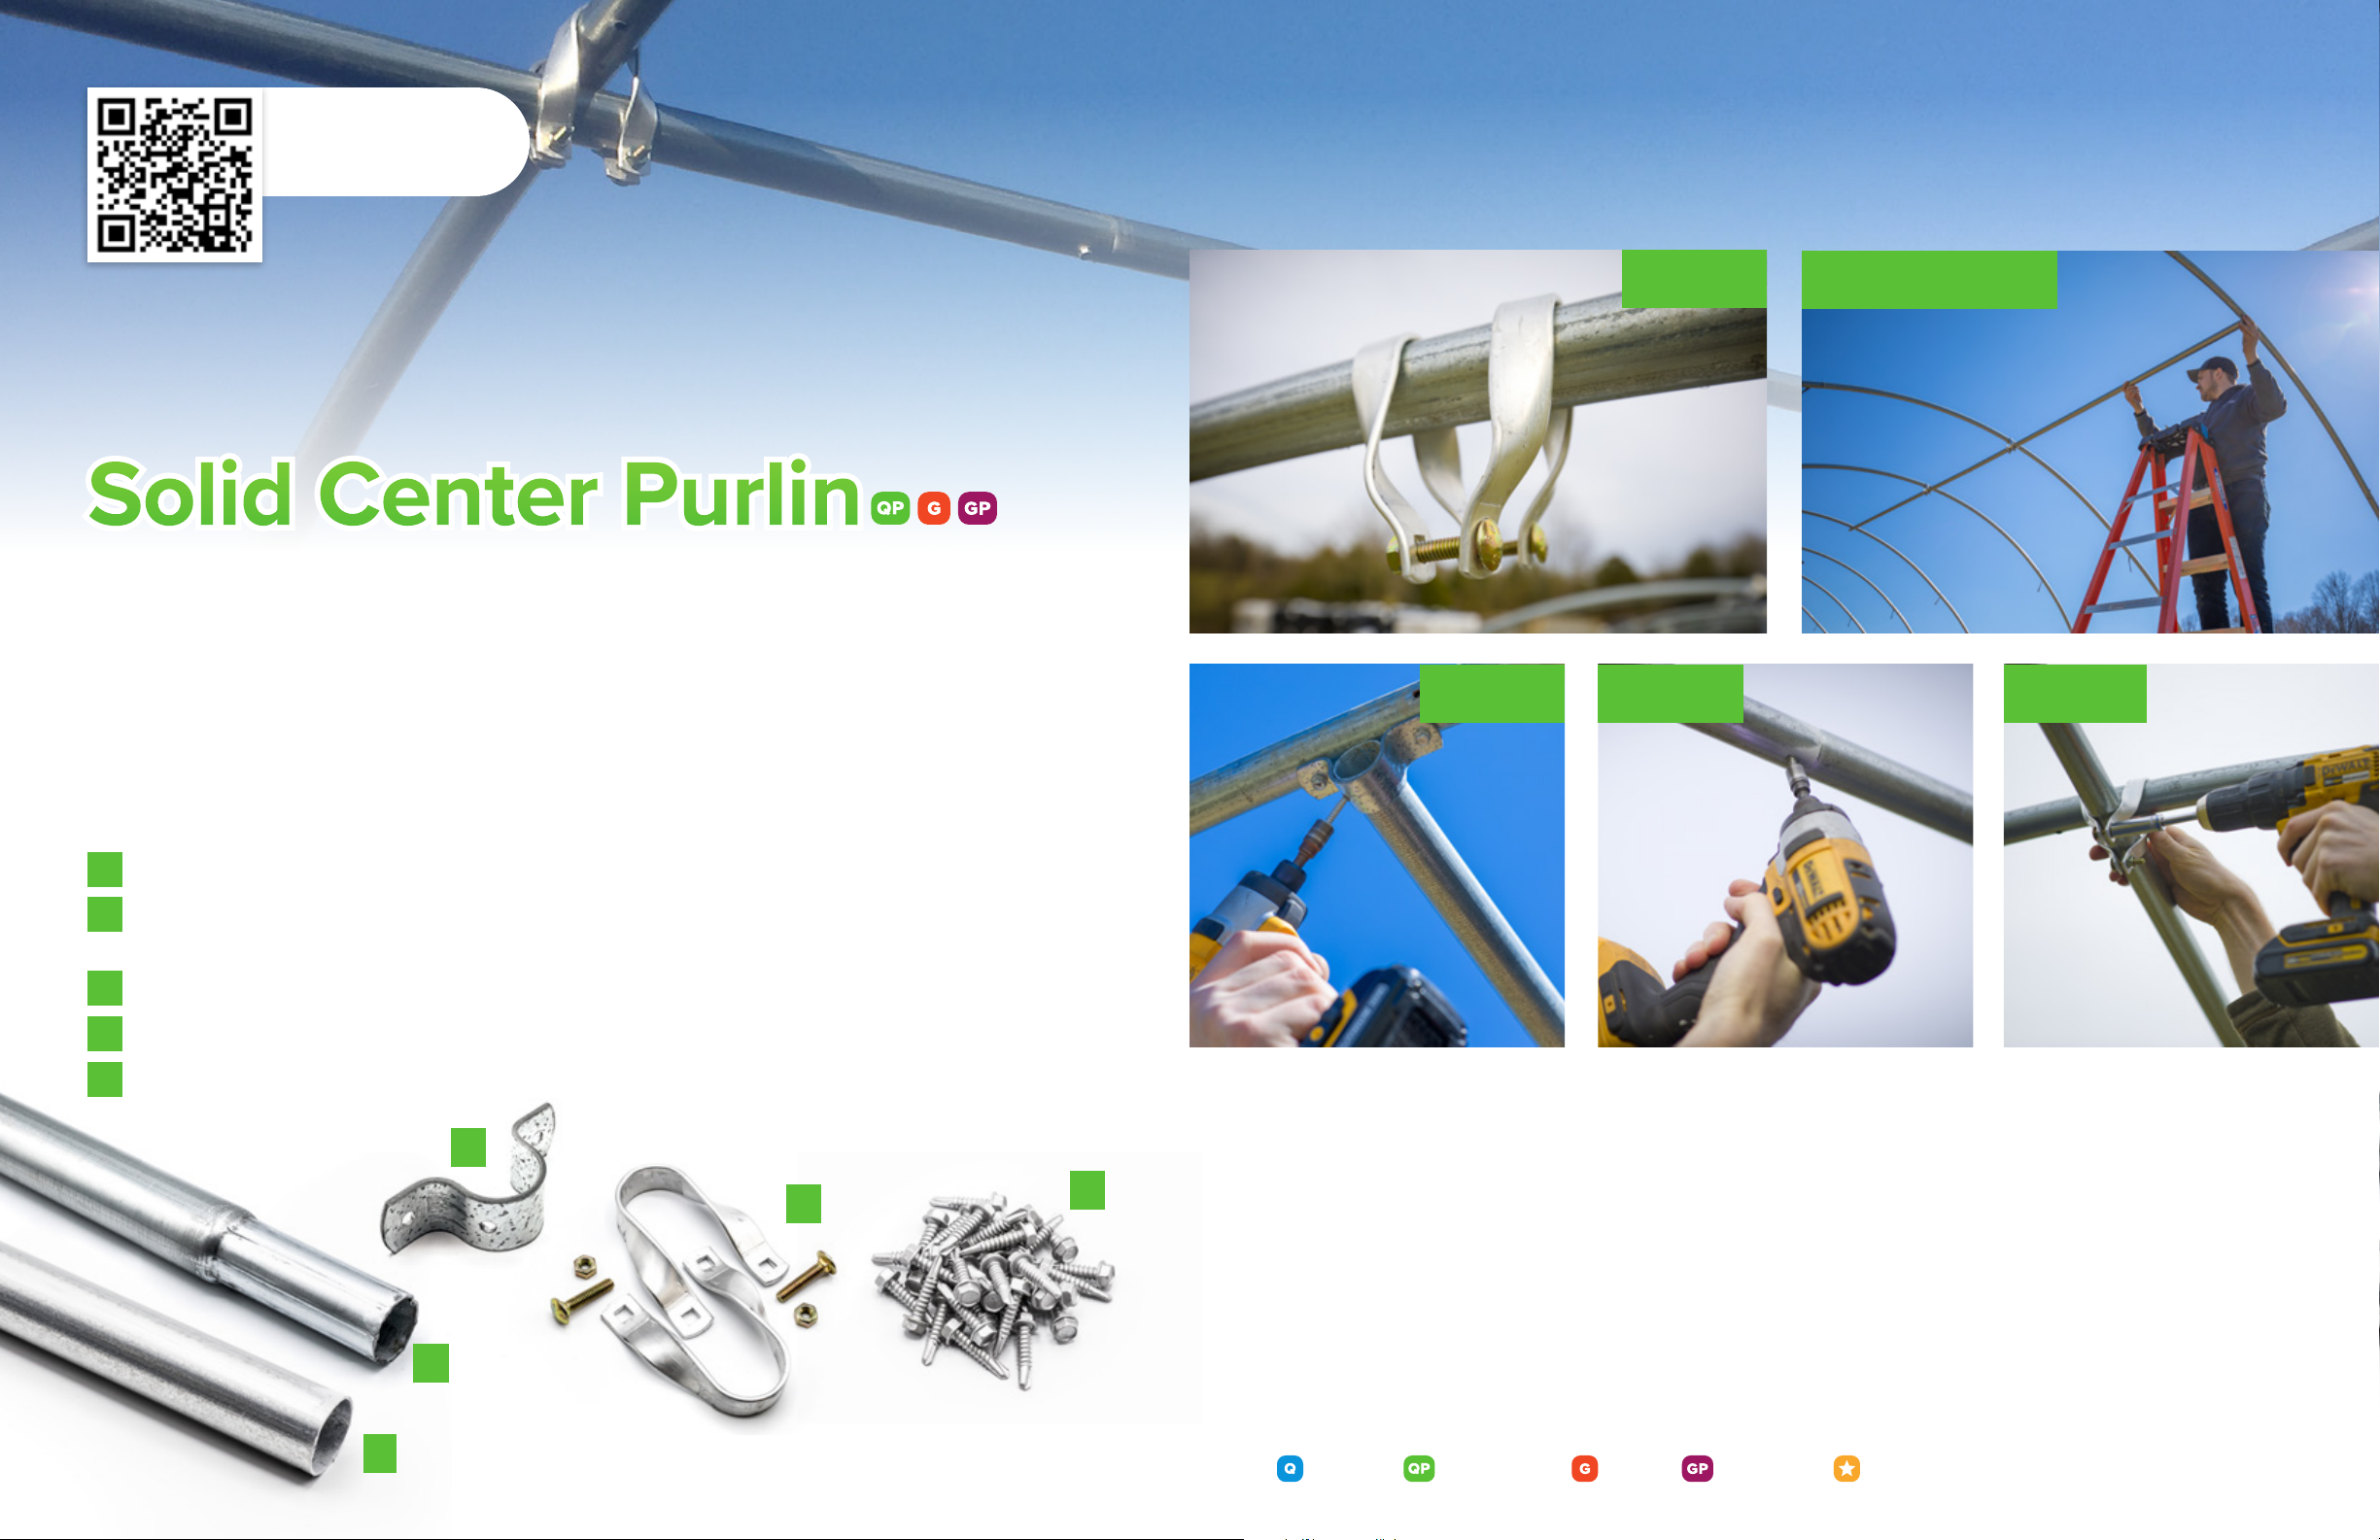
Solid Center Purlin . . . . . . . . . . . . . . . . . . . . . . . . . . . . . . . . . . . . . . . . . . . . . . . . . . . . . 14
Trellising Kit ....................................................................... 16
Wind Bracing .......................................................... 18
Wiggle Wire .......................................................20
Covering........................................................................... 22
Plastic ............................................................. 22
Shade Cloth ..................................................................... 24
QUONSET QUONSET PRO GOTHIC GOTHIC PRO UPGRADE
We’re here to help. Contact us.
() -|support@farmersfriendllc.com

D
C
A
A
B
C
E
B
Well-designed, quality tools and equipment |farmersfriendllc.com QUONSET QUONSET PRO GOTHIC GOTHIC PRO UPGRADE
1. Slide anchor plate with carabiner attached over
rebar. (Rebar may mushroom after pounding them into
the ground, making it dicult to install anchor plates
afterwards.)
2. Drive rebar in ground at distances specified in TABLE .
Pick a corner point on one side and drive rebar 1. On the
same side measure the tunnel length (-ft or -ft) and
drive rebar 2. String from 1to 2for a straight line. Drive
rebar every four or five feet depending on bow spacing
purchased. See Figure 1
3. Measure feet from each corner. Then measure distance
of 3to 4(-ft or -ft). Repeat step above. For most
precise placement, make measurements from 1to 4and
3to 2and adjust stakes 3and 4until both diagonal
measurements match.
• Tape Measure
• Sledge Hammer
• String
A Carabiners
B Anchor Plates
C Rebar Stakes
ANCHORING
Rebar
• Permanent Marker
• Saw
• Drill
• Tape Measure
• Sledge Hammer
• String
• Post Hole Digger
• Level
• ⁄" Wrench
• Ground Post Driver*
• 6 - 2" × 4" × 8' Boards
• 1⁄" Wood Screws
• Concrete
A Self-Tapping Screws
B Nuts and Bolts
C Brace Bands
D Carabiners
E Ground Posts
1. Mark greenhouse corners. With a rock or some other
object, mark general position of greenhouse corners.
2. Make batter boards for a string grid. Cut batter boards
at inches each from six " × " × ' boards. Screw three
batten boards together. See Figure 2 on pg. 4
3. Install batter boards. Drive batter board frame into the
ground making sure the top is twelves inches above the
ground and level. Repeat for all four corners. See Figure 3
on pg. 4
4. String batter boards to create rectangle grid, then
square. Connect parallel boards with string held in place
by a weight on each end. See Figure 4 on pg. 5
ANCHORING
Ground Posts
Watch the video!
:
c.us/rebar/v
Watch the video!
:
c.us/ground-posts/v
Continued on next page →
*Ground post driver
sold separately
1
3 4
2
Distance Between Rebar
Bow
Spacing
50-ft
Tunnel
100-ft
Tunnel
4-foot 50" 48"
5-foot 60" 60"

Well-designed, quality tools and equipment |farmersfriendllc.com QUONSET QUONSET PRO GOTHIC GOTHIC PRO UPGRADE
9. Mix concrete, pour into hole, and insert post. Concrete
should be loose but not soupy and about four inches
below soil surface. Push post into concrete until the mark
on the post is level with the string line. Plumb with level.
10. Drive remaining posts into ground. Place ground post
driver in top of post. Drive post a few inches, then check
for plumb. Continue until line on post is level with string
line.
11. Add fill dirt. Fill in around cemented posts after concrete
has set.
12. Install brace bands. Slide brace bands over the posts with
bolting side facing out. Installation may be easier if you
spread the brace bands apart with pliers. Push brace band
down to ground level.
13. Bolt carabiner to brace band. With carabiner and bolt in
hand, place the carabiner small end inside the brace band,
then insert bolt through holes of brace band and carabiner
with clasp facing away from tunnel. Tighten bolt.
* Depending on if your tunnel has four- or five-foot bow spacing.
** The depth will be determined by your specifications, but ex-
posed post above soil line should not exceed 2 feet. Plastic will
not go to ground if post exceeds these specifications.
Post
Above Soil
Post
Below Soil
Hole
Depth
12" 36" 40"
14" 34" 38"
16" 32" 36"
18" 30" 34"
Post
Above Soil
Mark from
Top of Post
12" 0"
14" 2"
16" 4"
18" 6"
( )
'
'
'
Post Depth Line
(If string is 12" above soil)
Hole Depth Requirement
"
5. Check your angles with the -- rule. Measure three
feet from the string intersection on one line, and four feet
on the other and mark both points. Adjust strings so the
measure from mark to mark is five feet. Repeat for each
corner. All diagonal measurements should match. See
Figure 4
6. Secure strings on batter board by marking position with
nail and wrapping.
7. Mark string every four or five feet.*Dig holes where you
plan to add concrete for posts. We recommend concreting
at least every other post, starting from the corners. You
may choose more or less concrete depending on soil
structure and wind exposure. See Table 3and Figure 4
8. Mark posts for depth line. Mark each post according to
Table 4.** One side of your tunnel must have the swaged
ends of the posts facing up and the other side must face
down. Mark posts accordingly. See compariSon on leFT
Swaged
Non-swaged
= Recommended
= Recommended
Distance Between Ground Posts
Bow
Spacing
50-ft
Tunnel
100-ft
Tunnel
4-foot 50" 48"
5-foot 60" 60"

A
B
C
D
Well-designed, quality tools and equipment |farmersfriendllc.com QUONSET QUONSET PRO GOTHIC GOTHIC PRO UPGRADE
1. Find level surface to assemble bows.*Note: If you are
assembling a Gothic Pro Tunnel with cross bracing, it is
easiest to attach the bracing at this point. See page
for instructions.
2. Connect each bow section with one self-tapping screw
in the side of each bow joint. Three sections form one
complete bow.
3. Slide side curtain hooks onto bottom of bow with eyelets
facing down.
* All bow sections are swaged on one end. This allows for univer-
sal interchangeability. See Figure 5
• Drill or Impact Driver
•⁄" Driver Bit
A Side Curtain Hooks
B Self-Tapping Screws
C Quonset Bow Section
D Gothic Bow Section
BOW ASSEMBLY
Quonset & Gothic
Watch the video!
:
c.us/bow-assembly/v
.
.
:
Swaged ends
Non-swaged ends
Quonset Bow
Gothic Bow
( )
( )
( )
Grey lines represent bows. Colored circles indicate placement of side curtain hook.
Illustration applies to both 50- and 100-ft tunnels.
Some Side Curtain Hook Placement Options

A
B
C
Well-designed, quality tools and equipment |farmersfriendllc.com QUONSET QUONSET PRO GOTHIC GOTHIC PRO UPGRADE
BOW ASSEMBLY
Cross Bracing
Attaching cross bracing to bows is easiest when done during
bow assembly on a level surface.
1. Pry brace bands open enough to slide over bows. Use
two pairs of pliers for leverage.
2. Slide two brace bands onto each Gothic bow and position
" from peak of bow in both directions. See Figure 6
3. Squeeze flanges back together with pliers, leaving some
slack.
4. Attach cross brace to brace bands with bolt. Finger
tighten nut.
5. Center cross brace in the peak, then tighten nuts.
6. Repeat process for correct number of bows. See Table 3
• 2 Pairs of Pliers
• ⁄" Socket or Wrench
A Nuts and Bolts
B Brace Bands
C Cross Braces
Watch the video!
:
c.us/cross-bracing/v
" "
- -
- -
- -
- -
Number of Bows
with Cross Braces
Bow
Spacing
50-ft
Tunnel
100-ft
Tunnel
4-foot 6 bows 12 bows
5-foot 5 bows 10 bows
:
Grey lines represent bows. Colored circles indicate bows with cross braces.

overhead
irrigation
new
A simple irrigation solution for
your Caterpillar Tunnel.
Have you ever felt intimidated by
the challenge of designing your own
irrigation system? Or been frustrated
with working around unruly lines of
drip tape on your beds? We’ve been
there too. The basic needs of your
plants shouldn’t be complicated.
This may be the easiest irrigation
system you’ve ever installed.
Starting at
Learn more at
$210 $300
50-ft kit 100-ft kit
fflc.us/overhead-irrigation
A
B
Well-designed, quality tools and equipment |farmersfriendllc.com QUONSET QUONSET PRO GOTHIC GOTHIC PRO UPGRADE
1. Insert a Lift Kit post into bottom of each bow.*
2. Connect posts with one self-tapping screw on the side of
each joint. Make sure screw head is not facing out or it can
cause damage to the plastic.
3. Slide the completed bows over the rebar or ground posts.
* All bows sections are swaged on one end. This means that on
one side of the bow, the swaged end of the lift kit will be facing
down.
• Drill or Impact Driver
•⁄" Driver Bit
A " Swaged Pipe
B Self-Tapping Screws
BOW ASSEMBLY
Lift Kit
Watch the video!
:
c.us/lift-kit/v

A
B
Well-designed, quality tools and equipment |farmersfriendllc.com QUONSET QUONSET PRO GOTHIC GOTHIC PRO UPGRADE
If you upgraded to the solid center purlin, you should skip this
step and install the upgrade.
1. Drive two T-posts at each end of the tunnel. Pace out
– feet from the center of each end. Drive two posts as
close as possible together leaning away from the tunnel.
2. Slide a purlin strap clasp over one T-post at each end.
3. Insert purlin strap into clasp at one end, then wrap strap-
ping around each bow. Using a step ladder wrap purlin
strap around the top center of each bow. Ensure bows are
standing up straight and strap is in a straight line down the
center.
4. Insert purlin strap into clasp at the opposite end of the
tunnel.
5. Pull purlin strap as tight as possible from each end.
• T-Post Driver
• Ladder
• 4 T-posts
A Purlin Strap Clasps
B Roll Purlin Strapping
STRUCTURE & SUPPORT
Purlin Strap
Watch the video!
:
c.us/purlin-strap/v
.
.

D
A
E
BC
Well-designed, quality tools and equipment |farmersfriendllc.com QUONSET QUONSET PRO GOTHIC GOTHIC PRO UPGRADE
1. Assemble cross connectors. Make sure nuts are loosely
threaded on bolts.
2. Place cross connectors on center of bows. Position your-
self between the second and third bows and place a cross
connector on each bow.
3. Slide a " swaged purlin tube through both connectors
with swaged end facing down the tunnel.
4. Now position yourself under the first bow and slide
another " swaged tube into the tube you just placed
between the second and third bow. Slide the two sections
of tube down the length of the tunnel until the purlin tube
is flush with end bow.
5. Install tube strap. Use one tube strap and three self-
tapping screws to attach the purlin tube to the first bow.
• Ladder
• Drill or Impact Driver
•⁄" Driver Bit
•⁄" Socket or Wrench
• Level (Optional)
A Tube Strap
B Cross Connectors with
Hardware
C Self-Tapping Screws
D " Swaged Purlin Tubes
E " Non-Swaged Purlin
Tube
STRUCTURE & SUPPORT
Solid Center Purlin
Watch the video!
:
c.us/solid-purlin/v
6. Install a self-tapping screw in each purlin tube joint.
Make sure screw is facing down to avoid damage to plastic.
Ensure bows are visually plumb, then tighten the cross
connector.
7. Continue adding purlin tubes and cross connectors
down the length of the tunnel. Adjust for center alignment
as you go and add one self-tapping screw to each purlin
joint. The purlin will terminate with the " non-swaged
tube and the last tube strap on the end bow.

D
G
B
F
C
A
E
Well-designed, quality tools and equipment |farmersfriendllc.com QUONSET QUONSET PRO GOTHIC GOTHIC PRO UPGRADE
The trellising wire will be easiest to install before you attach
any wiggle wire channel to end bows.
1. Slide brace bands over end bows. Using two pairs of
pliers, pry brace bands open enough to slide over both
end bows.
2. Attach trellis wire hangers on sides of bows. Ensure that
hangers are centered over the bed to be trellised, then
use self-tapping screws to attach to the side of each bow
(except the two ends).*
3. Thread cable through hangers. Pull cable o of spool and
thread the end through each trellis wire hanger.
4. Attach cable loop to brace band. Locate brace band over
the center of bed and attach cable loop to brace band with
supplied bolt and nut. Make sure bolt is facing down to
avoid snagging plastic.
• 2 Pairs of Pliers
• Ladder
• Drill or Impact Driver
•⁄" Driver Bit
• ⁄" Socket or Wrench
•⁄" Socket or Wrench
A Stainless Steel Cable
B Cable Clamps
C Brace Bands
D Nuts and Bolts
E Self-Tapping Screws
F Thimble
G Trellis Wire Hangers
STRUCTURE & SUPPORT
Trellising Kit
Watch the video!
:
c.us/trellising-kit/v
5. Attach thimble to brace band at opposite end of tunnel.
Make sure brace band is centered over bed then attach
thimble to brace band with supplied bolt and nut. Leave
room for thimble to move freely on bolt.
6. Attach cable to thimble on brace band. Insert cable end
around thimble and pull tight. Secure cable using two
cable clamps. The U-Bolt of all clamps should saddle
dead end of cable. See Figure 7
7. Repeat above steps for any additional trellis lines.
* Install middle trellising wire hangers next to either side of
centerpurlin.
Dead (Short) End
U-Bolt
Saddle
Nuts
Live (Long) End

A
B
C
Well-designed, quality tools and equipment |farmersfriendllc.com QUONSET QUONSET PRO GOTHIC GOTHIC PRO UPGRADE
• 2 Pairs of Pliers
• ⁄" Socket or Wrench
• Level (Optional)
A Nuts and Bolts
B Brace Bands
C Wind Braces
STRUCTURE & SUPPORT
Wind Bracing
1. Using two pairs of pliers, pry brace band open enough to
slide over the base of .
2. Squeeze flange back together with pliers.
3. Attach wind brace to brace band. With wind brace lying
on the ground, attach to brace band with supplied bolt.
Finger tighten nut. Make sure bolts face to the inside of
the tunnel to avoid puncturing the plastic.
4. Slide a brace band onto .
5. Attach other end of wind brace to brace band on
. At its natural connecting height, attach wind brace from
bow three to brace band on bow two. Finger tighten nut.
6. Ensure both bows are visually plumb, then tighten nuts
with /" socket or wrench. A level can help with this.
7. Repeat previous steps. Begin above the connection point
on and go up with the wind bracing to .
8. Repeat process for remaining three corners.
Watch the video!
:
c.us/wind-bracing/v

B
C
A
Well-designed, quality tools and equipment |farmersfriendllc.com QUONSET QUONSET PRO GOTHIC GOTHIC PRO UPGRADE
1. Attach wiggle wire channel to the top of your tunnel.
For Quonset tunnels, start your top wiggle wire channel
approximately ⁄" below the bow joint and work your way
over the top of the tunnel. For Gothic tunnels, start channel
approximately " above bow joint. (Clamps can help to
hold channel in place)
2. Fasten channel every - inches with self-tapping
screw. Be careful not to over-torque the screws or you
will strip out the bows.
3. Repeat until desired amount of channel is used. We
recommend using at least one channel per end. Side
ventilation will be incrementally restricted when using two
or more channels. Wiggle wire can be removed to increase
ventilation, however, repeated installing and removing
of wire will wear out plastic. End walls can assist with
ventilation.
4. Install wiggle wire into the channel after plastic is pulled
over the tunnel. First insert the end and then wiggle the
wire back and forth while seating into the channel.
• Ladder
• Marker
• Tape Measure
• Clamps (Optional)
• Drill or Impact Driver
•⁄" Driver Bit
A Self-Tapping Screws
B Wiggle Wire Channel
C Wiggle Wire
STRUCTURE & SUPPORT
Wiggle Wire
Watch the video!
:
c.us/wiggle-wire/v
.
.

A
B
Well-designed, quality tools and equipment |farmersfriendllc.com QUONSET QUONSET PRO GOTHIC GOTHIC PRO UPGRADE
1. Roll out plastic. Unroll plastic down one side of tunnel leaving
about the same amount of extra on each end.
2. Pull plastic over tunnel. Avoid this step on a windy day.
Ensure words on plastic can be read on the inside of the tunnel.
This side is treated with anti-drip additives. If you have only one
wiggle wire base channel on the end bow, it is recommended
to hammer down the corners to prevent tearing plastic.
3. Secure plastic on one end between T-posts. Tie T-posts to-
gether with a few feet of rope from provided spool. Pull plastic
tight from the opposite end. Repeat.
4. Install anti-billowing rope. Tie to carabiner on spot 1and pull
spool to other end of tunnel. Clip into carabiner on spot 3. Pull
out enough rope between spot 1and 3to throw over tunnel.
Clip into spot 2. Repeat to the end. See Figure 8
5. Tighten Rope. Have one person at spot 2and one person at
spot 3. Person at spot 2will pull rope down with left hand while
person at spot 3will pull rope down with right hand. While spot
3is holding tension, person at spot 2will proceed to spot 4
and repeat process all the way to end. Tie rope at end of tunnel.
For -ft tunnels, pull out an extra ' of rope and cut. The extra
will be helpful if tunnel is moved.
6. Rope tension should be firm. If slack, plastic will billow.
7. Repeat on the other side with remaining rope or spool.
• None
A -ft wide Greenhouse
Plastic
B Spool of Rope
COVERING
Plastic
Watch the video!
:
c.us/greenhouse-plastic/v
11
10
8
9
6
7
4
5
2
31
: -

B
A
Well-designed, quality tools and equipment |farmersfriendllc.com QUONSET QUONSET PRO GOTHIC GOTHIC PRO UPGRADE
1. Install corner shade cloth clips. Attach clips at four
corners.
2. Pull shade cloth over tunnel and tie to corners. On
corners 1and 2, tie rope between clip and carabiner
(-ft rope with no lift and -ft rope with lift kit). Tie long rope
to clips on corners 3and 4and pull shade cloth across
bows or plastic. Tie rope between clip and carabiner on
corners C and D. See Figure 9
3. Install remaining clips on shade cloth and secure.
Method : Attach clips to cloth between bows. Tie rope
to corner 1carabiner and run through clips to corner 2
carabiner. Starting at corner 1pull rope down to carabin-
ers between clips. Pull rope tight and tie o corner 2.
Repeat on other side.
Method : Attach clips to cloth at each bow. Tie rope from
each clip to carabiner below.
4. Wiggle wire shade cloth to end bows (Optional). Keep
existing wiggle wire, used to secure plastic, in channel.
Additional wiggle wires can be used on top of existing
wiggle wires to secure shade cloth for high wind.
5. Secure shade cloth to T-posts (Optional). Attach – clips
to shade cloth ends. Pull tight and tie rope from clips to
T-posts.
• Ladder
• Rope
A Shade Cloth
B Shade Cloth Clips
COVERING
Shade Cloth
Watch the video!
:
c.us/shade-cloth/v
, ,
1 2
43

Dry Prong Rd., Williamsport, TN | support@farmersfriendllc.com | () -
This manual suits for next models
3
Table of contents
Popular Lawn And Garden Equipment manuals by other brands

Snapper
Snapper 2-9693 Setup instructions

Toro
Toro Lynx SmartHub Installation and user guide

Simplicity
Simplicity 2438 Illustrated parts list

Makita
Makita DUM604Z instruction manual

Pastore & Lombardi
Pastore & Lombardi 12-V 0834 26156A operating instructions

Fieldmann
Fieldmann FZF 4010-E operating instructions

Metabo
Metabo 628714000 Original instructions

HORNEET
HORNEET CK2A Instruction for operation and maintenance

LI-COR
LI-COR 6400-18 Installation and operational instructions

Autopot
Autopot AQUAvalve Simple care guidelines

Winsome house
Winsome house WH078 instruction manual

Garden Oasis
Garden Oasis NEW CASTLE FIREBOWL owner's manual