FAST CLEAN ZL1 WSC14 User manual

OWNER’S MANUAL
FAST
CLEAN
ZL1 WSC14
Battery Powered Automatic
Walk-behind Scrubber
FAST CLEAN, INC.
210 Southwest Ave. Tallmadge OH 44278
(833) 801-2358
ZL1 WSC14
2
NOTICE: Descriptions, features and specifications of the
machine in this publication are not binding, and are subject
to change without notice. The manufacturer reserves the
right to make necessary changes and modifications as
conditions warrant. Reproduction of the text and diagrams
contained in the present manual, without manufacturer
consent, is illegal.
IMPORTANT: Before operation or use of this machine,
please carefully read this manual.
When ordering the replacement parts, please refer to the
spare and accessory parts manual attached to the
machine. Before matching parts or accessories, please
first determine your machine model and serial number.
You may order parts and accessories from any authorized
service center or dealer. Please follow the instructions in
the manual.
Follow manufacturer’s instructions for operating the
machine.
Perform maintenance according to the maintenance
instructions provided in the operation manual.
Use the OE or same-grade parts for maintenance.
Please dispose of old machine components
such as packaging material, battery, etc.
and toxic liquid such as antifreeze and oil
according to your local regulations on waste
disposal and on environmental safety.
Machine Information (Please fill in for future reference.)
Model number-
Machine number-
Machine option-
Sales representative-
Tel. of sales representative-
Customer ID-
Installation date-
Table of Contents
General Operating Instructions.........................................2
User Responsibility ...........................................................3
Unpacking the Machine ....................................................3
Battery Instructions ..........................................................3
Recharging the Batteries...................................................3
Battery Power Gauge .......................................................3
Machine Diagram .............................................................4
Control Panel ...................................................................4
Machine Unpackaging ......................................................4
Battery Installation ............................................................4
Preparing the Machine for Use .........................................4
Filling the Solution Tank....................................................5
Operating the Machine ....................................................5
Routine Maintenance and Cleaning of Machine ..............5
Brush/Pad Recommendations .........................................5
Specifications
Troubleshooting ...............................................................5
Warranty Card ..................................................................6
General Operating Instructions
Scrubber should only be operated in designated areas by
trained personnel.
Scrubber should not be left unattended while running. Turn
off the machine before walking away.
Always be aware of your surroundings before and during
operation of the scrubber. Be careful operating around
obstacles, stairs, drop-offs, and steep inclines. Also

ZL1 WSC14
3
operate carefully around other workers in the area. Keep
children away from the machine.
Use only manufacturer-recommended low foam cleaning
detergents in the machine. Follow chemical manufacturer
directions for mixing and dilution ratios.
Warning: Do not use in an area where explosive or
corrosive vapors, such as gasoline fumes or paint thinner,
are present.
Warning: Do not use acetone or other harsh solvents in or
around the scrubber, as this may cause corrosion to
sensitive machine parts.
Warning: Do not operate scrubber on floor surface where
the slope exceeds 5%.
Maintenance and repairs should be done only by factory-
trained personnel. Contact manufacturer or local dealer for
more information.
When cleaning, servicing, transporting, or performing
maintenance on the machine, be sure to turn off
machine, and disconnect the power.
Warning: Do not use steam or pressure washer to clean
the scrubber as this may allow water into electrical
components, and damage the machine.
Be sure that brush, squeegee, hoses, solution and
recovery tanks are properly fitted before using.
Do not attempt to operate or perform maintenance on the
machine in a manner other than recommended by manu-
facturer.
User Responsibility
ZL1 WSC14 is designed for scrubbing and vacuuming
indoor hard floor surfaces. (It is not intended for parking
lots, sidewalks, or other outdoor areas). Please follow the
manufacturer’s instructions for operation, maintenance,
and transportation of machine as given in this manual. If
the machine is operated outside manufacturer’s guidelines
and recommendations, the manufacturer will not be held
liable for the consequences.
Machine should be operated, maintained, and repaired by
trained personnel. Operators must comply with accident
prevention, safety, and health regulations.
Do not make changes or modifications to the machine
without manufacturer’s consent. Manufacturer will not be held
responsible for damages resulting from such changes.
Unpacking the Machine
Please carefully inspect whether there is damage to the
packing crate of the machine. If there is, please imme-
diately notify your carrier.
The machine should arrive in a cardboard box of the
approximate dimensions as shown in the following
diagram. If you are transporting or shipping multiple
machines, we recommend stacking no higher than four
packages.
A: 20” B : 18 ¼” C: 37 ½”
1. Open the top of the cardboard box.
2. Carefully remove the machine from the packaging, and
cut straps, cords, and fastenings.
3. Remove machine from pallet.
4. Take out the recovery tank, charger, and scrub pads.
Battery Instructions
ZL1 WSC14 comes standard with two 12 volt lead acid
(wet) rechargeable batteries, and 24V/15A battery charger.
Optional no-maintenance gel
batteries are available. Consult
your local dealer for details.
Battery dimensions should not
exceed (L/W/H): 10 ¾”, x 3 ½”, x 7
¾”. The battery weight should not
exceed 26.5 lb. per battery.

ZL1 WSC14
4
In order to achieve a capacity of 24V, the batteries must
be connected in series, and the connection process should
carried out by trained personnel. Consult your local dealer
or service center if you have questions.
ATTENTION: If you are using optional gel
batteries, the PCB board must be reset by a
trained professional. Consult your local dealer or
service station before installing gel batteries!
Battery Installation
The batteries are housed in the battery compartment
under the solution tank. To install the batteries you must:
1. Remove the solution tank
2. Open the two rear latches that
fasten the battery compartment.
3. Rotate the handlebar by lifting the
handlebar control lever.
4. Place the batteries in the
compartment (as shown on left).
5. Connect the battery cables.
ATTENTION: We recommend using factory
sealed batteries to avoid acid leakage.
Please wear appropriate protective gear: safety
glasses, apron and gloves when performing
battery maintenance. Avoid contact with battery
acid as it is highly corrosive.
Recharging the Batteries
Check the battery power level. If anything less than 4 (full
charge) is indicated, please charge batteries before using
the machine.
Note: Make sure that the battery charger matches the
installed batteries, both in capacity and in type. Never use
a charger that is not intended for your batteries.
To charge the batteries, follow these instructions:
1. Be sure machine is turned off.
2. Take machine to recharging area.
3. Plug DC cable into charging port
as shown in the photo.
4. Plug AC cord into outlet/power
source.
Warning! Never charge a GEL battery with an
unsuitable battery charger. Strictly follow the
instructions provided by the battery and battery
charger manufacturer.
IMPORTANT! In order to avoid permanent damage to the
batteries, they should not be allowed to run completely
down. Batteries should be recharged within a few minutes
after the low battery warning light starts to flash. Do not
leave batteries for long periods of time without recharging
routinely, as they will slowly lose their charge even when
not in use.
We recommend proper ventilation in the area where
batteries are being charged.
Warning! Fire or explosion hazard. The batteries may release
hydrogen. Please keep away from spark or open flame. The
battery compartment must be kept open when charging.
The machine will not operate while it is charging. While
charging, please do not pull the DC cord out of the port at
the back of the machine. If charging must be halted before
it is complete, please unplug the AC power cord from
power source first.
Battery Power Gauge
The batteries’ power gauge is digital with 5 power level
indicators as follows:
4 = Maximum charge (near 100%)
3 = 75% charge
2 = 50% charge
1 = 25% charge
0 = near 0% charge (blinking)
Warning! 8 seconds after the “0” blinks, the brush motor
automatically switches off. Recharge the batteries before
reusing or storing the machine. It may shorten the life of the
batteries if they are allowed to run completely out of charge.
Operation Controls for ZL1 WSC14
*Note: the control panel arrangement on your
machine may not be exactly like the above
photo, but it will use the same icons.

ZL1 WSC14
5
Turn Power On/Off
Turn Solution Flow On/Off
Turn Brushes On/Off
Turn Vac On/Off
Battery Power Level (0 –4)
Machine Diagram
1.
Steering, Control Panel, Main Power, Battery Power Gauge
2. (On front) Vac Hose to Recovery Tank and Waste Water
Intake Hose (On back) Squeegee Raise/Lower & Center
Pole Height Levers
3. Recovery Tank
(Detachable)
4. Solution Tank
Fill Port
5. Solution Tank
(Detachable)
6. Battery Compartment
7. Wheel
8. Scrub Deck &
Squeegee Assembly
9. Recovery Tank Lid
& Hose Fittings
10. Handlebar
11. Solution Tank Flow
Adjustment Valve, Drainage
Plug & Quick Disconnect
Preparing the Machine for Use
In order make it more compact for shipping and trans-
porting, the scrubber is packaged with the handlebar
folded, and recovery tank detached. Follow these
instructions in order to prepare the machine for use:
1. Adjust the handlebar by
pulling up on the lever on the
back right. (See top photo and
#2 in machine diagram). Adjust
to comfortable working height.
2. Mount the recovery tank on
handlebar using the two
hooks.
3. Put the lid onto the recovery
tank. Insert the connecting
hoses into the fittings on the lid
of the recovery tank as shown
in photo at right and in the
machine diagram at left (note
hoses at #2)..
4. Be sure connecting hose from solution tank is properly
fitted into the port in recovery tank as shown in machine
diagram (behind #4 Solution Tank Fill Port).
5. Check that the solution tank flow adjustment plug is
properly inserted and the quick disconnect is closed. (See
#11 in machine diagram at left.)
6. Check to see that brushes and squeegee are properly
installed and tightened. (See “Cleaning the Squeegee” and
“Removing the Scrub Brush” later on for details about
installing/changing squeegee and brushes/scrub pads.)
7. Turn on machine and check power gauge. If it is less
than “4”, we advise charging the batteries (see instructions
on previous page regarding batteries).
Filling the Solution Tank
1. Open the solution fill port by twisting off the plug (see #4
in machine diagram at left). Make sure solution tank is
securely fitted into place. (It is detachable).
2. Check that the drainage plug is securely in place and
connection is tight. See that the solution flow valve is
open. Check for kinks, blockages or loose connection in
the tube. (See #11 in machine diagram).
3. Pour in clean water through the fill port at a temperature
that does not exceed 140°F (50°C). Add low foam cleaning
chemical, and use mixtures recommended by the chemical
manufacturer. Do not overfill.
1
3
9
10
5
6
7
4
2
8
11
ZL1 WSC14
6
Warning: Do not use a high foaming agent, or too high a
concentration of cleaning chemical as this could cause
excessive foam buildup in the machine, which could
damage the vac motor.
Warning: Do not use harsh solvents or other strongly
corrosive chemical agents, as this may damage the
machine. Consult your local dealer or service center if you
have questions.
Warning! Do not exceed maximum temperature
recommendation (50°C or 140°F) forcontent of
solution & recoverytanks.
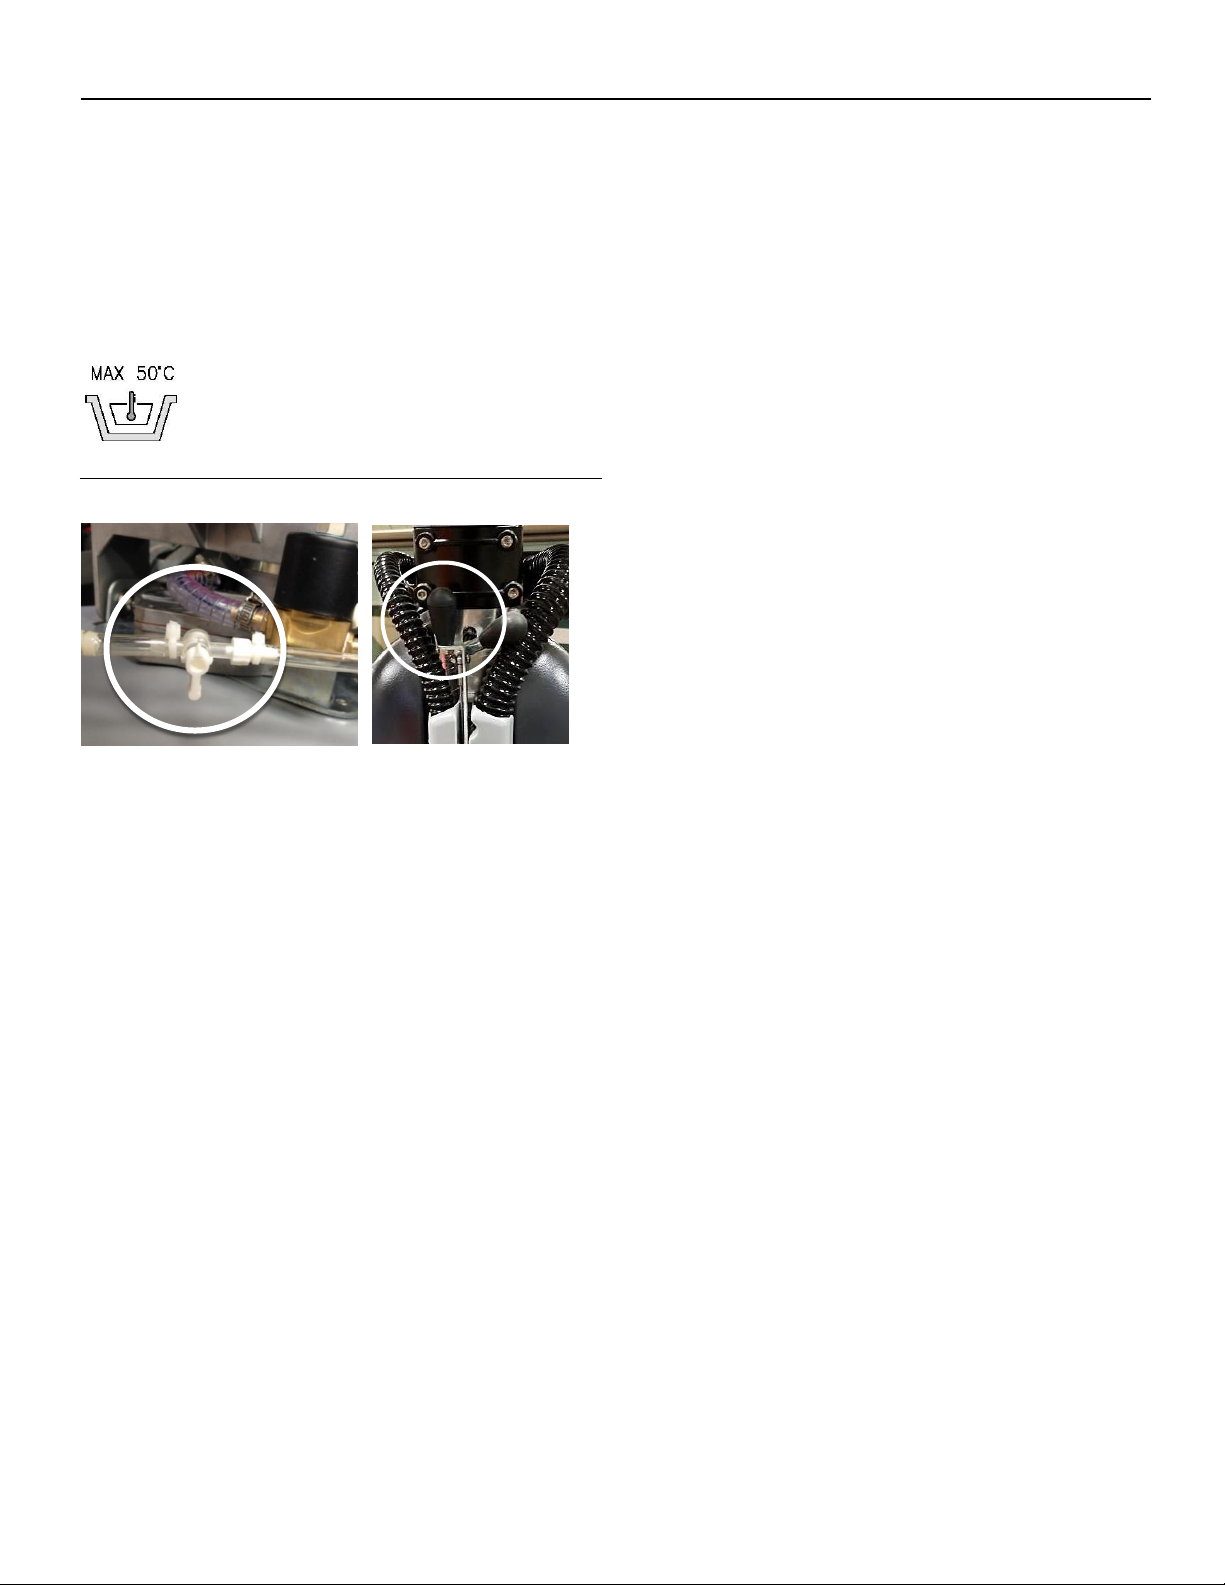
Operating the Machine
1. Turn the flow adjustment valve on. (See above left
photo and #11 in Machine Diagram.)
2. Pull the lever to lower the squeegee and brush head.
(See above right photo and #2 in Machine Diagram).
3. Press the power button and make sure that gauge
reads “4” (fully charged). If it is less than 4, we
recommend turning off the machine and charging the
batteries before proceeding.
4. Turn brushes on.
5. Turn solution flow on.
6. Turn vac motor on.
7. Allow machine to move forward. (Motion of the scrub
brush or pad will naturally pull the machine forward).
Warning! Do not attempt to back machine up without first
raising the squeegee. (Lift lever on back).
Warning: Fire or explosion hazard. Do not attempt to vac
up flammable or corrosive liquids, dust, vapor, or reactive
metals.
For Best Scrubbing Performance:
If floors are especially dirty, we recommend a two-pass
system. On the first pass, turn off vac and dispense clean-
ing solution. Allow the detergent to work on floor for 3-5
minutes (follow recommendations of the chemical manu-
facturer). On the second pass, turn on the vac and allow
the machine to vacuum up the solution from the floor.
Routine Maintenance Instructions
Cleaning the Machine After Use:
1. Turn off the brushes, solution flow and vac.
2. Turn off power.
3. Raise squeegee by lifting the lever in back.
4. Move the machine to cleaning/draining area.
5. Drain the solution tank by pulling the drainage plug at
the front of the machine (To the left of the valve in the
photo on the left).
6. Remove the hoses from the recovery tank and allow it
to drain. Take recovery tank off handlebar and flush
with water until it is clean, then allow it to drain and air
dry.
7. Dismantle the scrub brush or scrub pad and rinse with
water. Inspect condition of brush or pad and flip over
or replace with new one if necessary.
8. Clean the squeegee. Inspect condition of squeegee
and reposition or replace squeegee if necessary.
Important: We do not recommend using steam
cleaning or pressure washer to clean the scrubber.
ATTENTION! Always wear gloves during maintenance
procedures to avoid any contact with potentially
harmful substances. Follow maintenance procedures
and allow machine to air dry thoroughly before storing
in order to avoid buildup of unpleasant odors,
residues, or harmful bacteria inside machine or on
brushes.
Recovery Tank Cleaning:
1. Remove the hoses from the ports on top of tank. Clean
hoses according to directions under “Weekly Mainten-
ance Instructions”.
2. Open the recovery tank cover by turning it
counterclockwise.
3. Drain recovery tank.
4. Take out the filter and rinse with water. Inspect for
corrosion or damage, and replace if necessary
5. Rinse the recovery tank with water and clean with mild
detergent if necessary. Do not use steam or pressure
washer to clean the machine.
6. Leave recovery tank open and allow to air dry.
Cleaning the Squeegee
The squeegee must be in perfect working condition in
order to dry the floor properly. If the scrubber is leaving
dirty streaks behind, you will need to clean, reposition, or
replace the squeegee:
1. Raise the squeegee assembly bypushing the left lever
on back.

ZL1 WSC14
7
2. Lift the machine (see photo 1)
3. Remove the hose from the squeegee assembly (see
photo 2).
4. Loosen the 2 screws as shown in the picture to
remove the squeegee (see photo 3).
5. Carefully clean the squeegee and squeegee holders.
6. Reassemble everything.
Note: Each squeegee has four working edges. If you flip
over the squeegee and put it back into the assembly, you
can reuse it until all the edges are worn down. (Working
edge of squeegee should be square and meet the ground
properly).
Showing all parts of squeegee assembly:
Removing the Scrub Brush
1. Raise the squeegee assembly. (See photo 5).
2. Lift the machine by pushing down on the handlebar.
3. When the base is lifted, turn the brush control
clockwise. The brush releases automatically.
Weekly Maintenance Instructions
Clean the Vac Hose
Weekly or whenever the vacuum
loses suction, it is necessary to
flush out the vac hose as follows:
1. 1. Remove the hose from the
squeegee assembly.
2. 2. Unplug the other end from the
recovery tank.
3. 3. Wash the inside of the pipe with
a jet of water, from the side that
plugs into the tank as shown.
4. Reassemble the hose.
ATTENTION! DO NOT WASH THE PIPE THAT
CONNECTS THE VACUUM MOTOR AND RECOVERY
TANK! DOING SO MAY DAMAGE VAC MOTOR!
Clean the Solution Tank
1. Unscrew the plug on the solution tank.
2. Flush the inside of the solution tank with clean water.
3. Remove tank and dump.

ZL1 WSC14
8
4. Allow tank to drain and air dry.
5. Reinstall the plug.
Brush Recommendations:
Polypropylene Brush(PPL)
This general purpose scrub brush is recommended for all
floor types and offers good resistance to wear and to hot
water (not over 60°C / 140°F). PPL is not hygroscopic (it
does not absorb moisture), and is ideal for working on wet
floors.
Nylon Brush
This brush is used on all floor types and offers excellent
resistance to wear and to hot water (not over 60°C /
140°F). Nylon is hygroscopic (it absorbs moisture) and
tends, over a period of time, to lose its character when
working on wet floors.
Pad Driver
Scrubbing pads are recommended for cleaning polished
surfaces, there are two types of pad holders:
1. Traditional pad holders with set of anchor stubs that
hold and turn the scrub pad during operation.
2. Center lock pad holders that have anchor stubs and a
plastic snap-in center lock system. This allows perfect
centering of the scrub pad and ensures it is kept
anchored without slipping during the operation of the
machine.
Consult your local dealer or service center for more details
about scrub brush and scrub pad/driver types & uses.
Machine Specifications
Specifications
Unit
ZL1 WSC14
Voltage
V
24V (2 x 12V)
Amps
AH
35
Run Time
hrs
2 (approx.)
Cleaning Efficiency
ft2/hr
9,000 (approx.)
Drive Speed
mph
2.2
Max Surface Gradient
%
2
Scrubbing Path
in
14
Vacuuming Path
in
17
Vac Lifting Power
bar
.1
Brush Speed
rpm
180
Brush Motor
hp
54
Vac Motor
hp
50
Solution Tank Capacity
hp
50
RecoveryTank Capacity
gal
3
Solution Tank Capacity
gal
3.5
Weight (w/Batteries)
lb
154
Machine Dimensions
in
28 x 36x 17
Troubleshooting
Problem
Cause
Solution
Insufficient water and detergent
on the scrub brush/pad.
Solution tank is empty.
Refill solution tank.
Solenoid valve switch is off.
Turn on solenoid valve switch.
Flow control valve is off.
Open flow control valve.
Quick-fit connection is loose or
disconnected on solution hose.
Fix quick fit connection.
Machine is not cleaning well.
Brush or scrub pad is worn down.
Check condition of brush or pad and
replace with new one if necessary.

ZL1 WSC14
9
Detergent in machine is not aggressive
enough to remove soil from floor.
Try using a different detergent, or use a
two-pass cleaning system and allow
detergent to sit on floor surface for 3-5
minutes before second pass. (Consult
cleaning chemical manufacturer or local
dealer if you have questions).
Brush or pad is not aggressive enough
for your application.
Consult your local dealer for advice for
appropriate brush/pad for your
particular application.
Squeegee is not drying the
floor, or is leaving drag marks.
Squeegee is dirty or worn down.
Clean squeegee. Reposition or replace
worn squeegee with new one.
Vac motor is not turned on.
Turn on vac motor.
There is a blockage in the hose
between vac pipe and recovery tank.
Drain recovery tank, check the hose
and clean it.
Vac unit is dirty or malfunctioning.
Try cleaning vac unit. If it is still not
working, contact local service center.
Too much foam is forming in
recovery tank.
Too high a concentration of detergent
is in solution tank, or wrong detergent
has been used.
Try adding an anti-foam liquid to the
solution in machine. Use lower
concentration of detergent in the
solution tank or try a different
detergent. (Consult chemical
manufacturer or local dealer).
The machine cannot be
operated.
Batteries have no power.
Charge batteries.
Batteries will not charge.
Replace batteries
Battery wiring is not connected.
Check battery wiring. Connection may
be loose.
Fuse has blown.
Replace the fuse.
Run time has shortened.
Batteries have worn out.
Replace batteries.
Battery charger has failed.
Replace charger or contact service
center.
Warranty Card
(please fill out and return to dealer)
Name Phone #
Address
City State Zip
Purchase Date Invoice #
Model # Serial #
Local Dealer Local Dealer City/State
Warranty provided with purchase invoice.
Table of contents
Other FAST CLEAN Scrubber manuals


