Fastec IL3 User manual

IL3TM High-Speed Camera
Operator’s Manual
2013-9
110S-3002B

IL3 User’s Guide
11S-3002B page i
Copyrights and Disclaimer
© 2012, Fastec Imaging Corporaon. All Rights Reserved
This documentaon is copyrighted material. Making unauthorized copies is prohibited by law. No
part of this documentaon may be reproduced, transmied, transcribed, stored in a retrieval system
or translated into any human or computer language without the prior wrien permission of Fastec
Imaging Corporaon.
Informaon in this document is provided in connecon with Fastec Imaging products. Fastec Imaging
believes the printed maer contained herein to be accurate from date of publicaon and reserves the
right to make changes as necessary without noce. Fastec Imaging makes no commitment to update
the informaon and shall have no responsibility whatsoever for conicts or incompabilies arising
from future changes to the soware or documentaon.
No license, express or implied, or otherwise, to any intellectual property rights is granted by this
document. Except as provided in Fastec Imaging’s Terms and Condions of Sale for such products,
Fastec Imaging assumes no liability whatsoever.
THIS MANUAL IS PROVIDED “AS IS” WITHOUT WARRANTY OF ANY KIND, EITHER EXPRESSED OR
IMPLIED, RELATING TO SALE AND/OR USE OF FASTEC IMAGING PRODUCTS INCLUDING LIABILITY OR
WARRANTIES RELATING TO FITNESS FOR A PARTICULAR PURPOSE, CONSEQUENTIAL OR INCIDENTAL
DAMAGES, MERCHANTABILITY, OR INFRINGEMENT OF ANY PATENT COPYRIGHT OR OTHER
INTELLECTUAL PROPERTY RIGHT. FASTEC IMAGING FURTHER DOES NOT WARRANT THE ACCURACY
OR COMPLETENESS OF THE INFORMATION, TEXT, GRAPHICS OR OTHER ITEMS CONTAINED WITHIN
THIS MANUAL. FASTEC IMAGING SHALL NOT BE LIABLE FOR ANY SPECIAL, INDIRECT, INCIDENTAL, OR
CONSEQUENTIAL DAMAGES, INCLUDING WITHOUT LIMITATION, LOST REVENUES OR LOST PROFITS,
WHICH MAY RESULT FROM THE USE OF THIS DOCUMENT.
Fastec Imaging products are not intended for use in medical, lifesaving or life sustaining applicaons.
Fastec Imaging customers using or selling Fastec Imaging products for use in such applicaons do so
at their own risk and agree to fully indemnify Fastec Imaging for any damages resulng from such
improper use or sale.
Trademarks
Windows™ is a registered trademark of Microso Corporaon. Other brand or product names are
trademarks of their respecve holders.
Product names or services listed in this publicaon are for idencaon purposes only, and may
be trademarks of third pares. Third-party brands and names are the property of their respecve
owners.
Reader Response
Fastec Imaging strives to produce quality documentaon and welcomes your feedback. Please send
comments and suggesons to Fastec Imaging. For technical quesons, contact your local Fastec
Imaging sales oce.
Contact
Fastec Imaging Corporation
17150 Via Del Campo
Ste. 301
San Diego, CA 92127
+1-858-592-2342
support@fastecimaging.com

IL3 User’s Guide
page ii 11S-3002B
Chapter Summary
(Where to nd things in this manual)
Chapter 1, IL3 Product Overview
The rst chapter contains general informaon regarding the IL3 product family, common applicaons
for which the camera is used, and the basic guide to the component parts of the camera. Look here
for the names and locaons of all camera controls and indicators.
Chapter 2, Geng Started
This chapter guides the user through the camera setup process from unpacking the camera to
aaching, connecng, or installing the pieces necessary to begin using the camera: i.e. the power
supply and/or baery, lenses, mass memory devices, etc., as well as oponal devices such as triggers,
monitors, PCs, etc.
Chapter 3, Camera Setup
This chapter is about learning to use the IL3 user interface and seng the camera up for use,
including naming the camera and seng up the me. It also covers controls for the built-in LCD
display, connecng with an external display, and connecng the IL3 to a computer network.
Chapter 4, Recording with the IL3
Chapter 4 covers the recording process from seng up the recording parameters to Arming and
Triggering the camera. It also covers bit selecon, image processing and saving the imagery in its
dierent formats.
Chapter 5, Synchronizing Cameras
Cameras may be synchronized to external ming devices as well as to other cameras. This chapter
tells you how to do it on the IL3.
Chapter 6, IL3 Web-Applicaon
IL3 camera’s Web-Applicaon makes it easy to control the camera from virtually any device that can
aach to a network and run a standard internet browser. No need to load any soware! Chapter 6
walks you through the Web-App and how to control the camera, and capture and manage imagery
with it.
Appendices
Technical details are to be found in the appendices. These include a glossary of terms, camera and
sensor specicaons, lens FOV vs. resoluons tables, an index, connector schemacs, and back focus
adjustment procedures.

IL3 User’s Guide
11S-3002B page iii
Contents
Copyrights and Disclaimer .................................................................................................... i
Trademarks ............................................................................................................................................... i
Reader Response ...................................................................................................................................... i
Contact...................................................................................................................................................... i
Chapter Summary ................................................................................................................ ii
Chapter 1, IL3 Product Overview .............................................................................................................. ii
Chapter 2, Geng Started ........................................................................................................................ ii
Chapter 3, Camera Setup.......................................................................................................................... ii
Chapter 4, Recording with the IL3............................................................................................................. ii
Chapter 5, Synchronizing Cameras............................................................................................................ ii
Chapter 6, IL3 Web-Applicaon ................................................................................................................ ii
Appendices .............................................................................................................................................. ii
1 IL3 Product Overview......................................................................................................... 1
1-1 IL3 Product Descripon....................................................................................................................... 1
1-2 IL3 Product Dierenaon.................................................................................................................. 2
1-3 IL3 Controls, Indicators, and Connectors ............................................................................................. 3
2 IL3 Geng Started ............................................................................................................ 7
2-1 Unpacking the Camera ....................................................................................................................... 7
2-2 Installing the Lens............................................................................................................................... 7
2-3 Power................................................................................................................................................. 8
2-4 IL3 Memory and Mass Storage Opons............................................................................................... 8
3 IL3 Camera Setup............................................................................................................. 11
3-1 Install FasMoon Camera Control Soware ...................................................................................... 11
3-2 Connect the IL3 to a Wired Network ................................................................................................. 13
3-3 WiFi Setup........................................................................................................................................ 14
3-4 FasMoon Applicaon Window........................................................................................................ 15
3-5 Controlling the Image Displays.......................................................................................................... 16
3-6 Name the Camera............................................................................................................................. 18
3-7 Camera Time and Date ..................................................................................................................... 18
3-8 Connect to the IL3 Outside FasMoon .............................................................................................. 19
3-9 Storage Setup ................................................................................................................................... 21
3-10 Conguraons ................................................................................................................................ 22
3-11 Reboot and Power Down ................................................................................................................ 22
3-12 Camera Informaon........................................................................................................................ 23
4 Recording with the IL3 ..................................................................................................... 24
4-1 Seng Frame Rate and Resoluon ................................................................................................... 24
4-2 Seng Shuer Speed ....................................................................................................................... 26
4-3 Seng Bit Depth .............................................................................................................................. 27
4-4 Conguring the Trigger .................................................................................................................... 27
4-5 Conguring Sync and Arm I/O........................................................................................................... 28
4-6 Black Level Calibraon...................................................................................................................... 29
4-7 Record: Arm and Trigger ................................................................................................................... 29
4-8 Autosave .......................................................................................................................................... 31

IL3 User’s Guide
page iv 11S-3002B
4-9 FasFire .............................................................................................................................................. 32
4-10 Reviewing Captured Imagery: Playback........................................................................................... 34
4-11 Image Processing ............................................................................................................................ 37
4-12 Custom Color Correcon................................................................................................................. 38
4-13 Saving Images to Mass Storage ....................................................................................................... 40
4-14: Transfers, Batch Transfers and Conversions.................................................................................... 42
5 Synchronizing Cameras ................................................................................................... 44
5-1 Sync In.............................................................................................................................................. 44
5-2 Sync Out........................................................................................................................................... 46
5-3 Master/Slave Setup .......................................................................................................................... 47
5-5 IL3 Timestamps and Markers ............................................................................................................ 50
6 Using the Web App .......................................................................................................... 52
6-1 Web App Overview........................................................................................................................... 52
6-2 Camera Tab....................................................................................................................................... 53
6-3 Storage Sengs Tab.......................................................................................................................... 54
6-4 Record Sengs................................................................................................................................. 55
6-5 Record Controls ................................................................................................................................ 56
6-6 Display Sengs Tab .......................................................................................................................... 57
6-7 Arm, Trigger, Live, and Review Buons ............................................................................................. 57
6-8 Review Tab ....................................................................................................................................... 58
Applicaon Notes............................................................................................................... 60
Applicaon Note 1: Histograms .............................................................................................................. 60
Applicaon Note 2: Understanding Bit Depth ......................................................................................... 62
Applicaon Note 3: Trigger Posion and the Circular Buer.................................................................... 64
Applicaon Note 4: Frame Rate, Resoluon, and Exposure..................................................................... 68
Applicaon Note 5: Opmizing System for Image Transfers .................................................................... 69
Applicaon Note 6: Choosing an Image File Format ................................................................................ 76
Appendices ........................................................................................................................ 78
Appendix A: Denion of terms ............................................................................................................. 78
Appendix B: IL3 Specicaons ................................................................................................................ 81
Appendix C: IL3 Record / Resoluon Tables ............................................................................................ 82
Appendix D: Power and I/O Connecons................................................................................................ 85
Appendix E: Adjusng Back Focus........................................................................................................... 87
Appendix F: Camera Status LEDs............................................................................................................. 89
Appendix G: Contents of Frame.txt le ................................................................................................... 90
Appendix H: Contents of <Capture>.XML File.......................................................................................... 91
Appendix I: IL3 Updates.......................................................................................................................... 92
Appendix J: Physical Measurements ....................................................................................................... 94
Appendix K: Crop Factor ......................................................................................................................... 95
Appendix L: Paron Capture (CAP) File Format ..................................................................................... 96
Appendix M: Day Number Calendar Conversion ..................................................................................... 98
Table of Contents Connued

IL3 User’s Guide
11S-3002B page v
Table of Figures
Figure 1-1: IL3 Back View ......................................................................................................................... 3
Figure 1-2: IL3 Front View ....................................................................................................................... 4
Figure 1-3: IL3 Top View........................................................................................................................... 4
Figure 1-4: IL3 Side Views ...................................................................................................................... 5
Figure 1-5: IL3 Boom View..................................................................................................................... 5
Figure 2-1: IL3 Connecons...................................................................................................................... 9
Figure 3-1: FasMoon Installaon.......................................................................................................... 11
Figure 3-2: FasMoon Install Locaon.................................................................................................... 11
Figure 3-3: FasMoon Start Folder......................................................................................................... 12
Figure 3-4: FasMoon Install Progress.................................................................................................... 12
Figure 3-5: FasMoon Installaon Complete.......................................................................................... 12
Figure 3-6: FasMoon “Find Camera” Icon ............................................................................................. 13
Figure 3-7: FasMoon “Find Cameras” Dialog ........................................................................................ 13
Figure 3-8: Conguraon Menu with WiFi.............................................................................................. 14
Figure 3-9: WiFi Conguraon Dialog..................................................................................................... 14
Figure 3-10: WiFi Access Point Scan Dialog............................................................................................. 14
Figure 3-11: FasMoon Applicaon Window ......................................................................................... 15
Figure 3-12: Video Control Pane............................................................................................................. 16
Figure 3-14: User Preferences ................................................................................................................ 16
Figure 3-13: View Menu......................................................................................................................... 16
Figure 3-15: Gamma Comparison........................................................................................................... 17
Figure 3-17: Time and Date Conguraon.............................................................................................. 18
Figure 3-16: HDMI Sengs .................................................................................................................... 18
Figure 3-18: Web-Applicaon ................................................................................................................ 19
Figure 3-19: Open IL3 Media in Windows Explorer................................................................................. 20
Figure 3-20: FasMoon Storage Sengs Tab .......................................................................................... 21
Figure 3-21: FasMoon Camera Explorer................................................................................................ 21
Figure 3-22: FasMoon Camera Menu ................................................................................................... 22
Figure 3-23: Camera Informaon ........................................................................................................... 23
Figure 4-1: Record Sengs Tab .............................................................................................................. 25
Figure 4-2: Shuer Sengs.................................................................................................................... 26
Figure 4-3: Trigger Conguraon............................................................................................................ 27
Figure 4-4: I/O Dialog in Record Controls ............................................................................................... 28
Figure 4-5: Conguraon menu: Black Level Calibraon......................................................................... 29
Figure 4-6: Record Progress Bar: Armed ................................................................................................. 30
Figure 4-7: Record Progress Bar: Triggered............................................................................................. 30
Figure 4-8: Video Review tab and Video Controls................................................................................... 31
Figure 4-9: Autosave Setup Dialog ......................................................................................................... 32
Figure 4-10: FasFire Gas Gauges............................................................................................................. 33
Figure 4-11: FasFire with one Paron Le ............................................................................................ 33
Figure 4-12: Video Review with Mulple Parons................................................................................ 33
Figure 4-13: FasMoon Playback Window.............................................................................................. 34
Figure 4-14: Playback Bug Selected ........................................................................................................ 34
Figure 4-15: Video Controls (Playback)................................................................................................... 35
Figure 4-16: Select Per Frame Metadata in View Menu .......................................................................... 36
Figure 4-17: Per Frame Metadata in FasMoon...................................................................................... 36
Figure 4-18: Image Pipeline.................................................................................................................... 37
Figure 4-19: Display Sengs .................................................................................................................. 38

IL3 User’s Guide
page vi 11S-3002B
Figure 4-20: Custom White Balance ....................................................................................................... 39
Figure 4-21: Save Dialog......................................................................................................................... 41
Figure 4-22: FasMoon Explore Menu ................................................................................................... 42
Figure 4-23: Copy: Choose Desnaon................................................................................................... 42
Figure 4-24: Batch Copy Convert: JPEG or BMP to AVI ............................................................................ 42
Figure 4-25: Batch Copy Convert: CAP les............................................................................................. 43
Figure 5-1: Sync In Sengs Dialog.......................................................................................................... 44
Figure 5-2: Sync: Per Frame Timing ........................................................................................................ 45
Figure 5-3: Sync In Per Second ............................................................................................................... 45
Figure 5-4: Sync: Per Second Timing....................................................................................................... 46
Figure 5-5: Sync Out Per Frame .............................................................................................................. 46
Figure 5-6: Sync Pass Thru...................................................................................................................... 47
Figure 5-7: Master and Slave Cameras ................................................................................................... 47
Figure 5-8: External Sync: Local Grouping............................................................................................... 48
Figure 5-9: External Sync: Distributed Grouping ..................................................................................... 49
Figure 5-10: Image with Timestamp....................................................................................................... 50
Figure 5-11: Per Frame Metadata from XML File .................................................................................... 51
Figure 6-1: Address bar (Chrome) .......................................................................................................... 52
Figure 6-2: Applicaon Window Camera Tab.......................................................................................... 52
Figure 6-3: Camera Tab .......................................................................................................................... 53
Figure 6-4: Network Conguraon Dialog .............................................................................................. 53
Figure 6-5: Storage Sengs Tab ............................................................................................................. 54
Figure 6-6: Explore Window................................................................................................................... 54
Figure 6-7: Record Sengs Tab .............................................................................................................. 55
Figure 6-8: Record Sengs Tab--Advanced Sengs ............................................................................... 56
Figure 6-9: Record Controls Tab ............................................................................................................. 56
Figure 6-10: Display Sengs Tab............................................................................................................ 57
Figure 6-11: Arm, Trigger, Live and Review Buons ................................................................................ 57
Figure 6-12: Web-App Review and Save ................................................................................................. 58
Figure 6-13: Video Review Tab ............................................................................................................... 59
Figure 6-14: Download Informaon Box................................................................................................. 59
Figure 7-1: Histogram: Linear Gradient................................................................................................... 60
Figure 7-2: Histogram: Mono-tonal ........................................................................................................ 60
Figure 7-3: Histogram: Linear Gradient................................................................................................... 61
Figure 7-4: High...Mid...and Low 8 Bits of the same Image ..................................................................... 63
Figure 7-5: Circular Buer Fills and Images Shi Posion ....................................................................... 64
Figure 7-6: Circular Buer Fills and Images Shi Posion ....................................................................... 65
Figure 7-7: Circular Buer Overowing ................................................................................................. 65
Figure 7-8: Circular Buer End Trigger .................................................................................................... 66
Figure 7-9: Packet Delay Spinner............................................................................................................ 70
Figure 7-10: FasMoon Shortcut............................................................................................................ 71
Figure 7-11: FasMoon Shortcut Properes .......................................................................................... 71
Figure 7-12: Memory Usage in Task Manager......................................................................................... 74
Figure 8-1: Sync I/O Cable Drawing ........................................................................................................ 86
Figure 8-2: Sync I/O Camera Interface Schemac ................................................................................... 86
Figure 8-3: Focus Chart .......................................................................................................................... 87
Table of Figures Connued

IL3 User’s Guide
11S-3002B page vii
Table of Figures Connued
Figure 8-4: C-Mount............................................................................................................................... 87
Figure 8-5: Navitar 50mm f/95 Lens ....................................................................................................... 88
Figure 8-6: Camera Informaon ............................................................................................................. 92
Figure 8-7: Camera Update Screens........................................................................................................ 92
Figure 8-8: Contents of Update SD Card ................................................................................................. 93
Figure 8-9: SD Card Restorer Messages .................................................................................................. 93
Figure 8-10: Physical Measurements...................................................................................................... 94
Figure 8-11: Crop Factor 1280 x 1024 ..................................................................................................... 95
Figure 8-12: Crop Factor 1280 x 720 ....................................................................................................... 95
Figure 8-13: Crop Factor 800 x 600 ......................................................................................................... 95
Figure 8-14: CAP File Diagram ................................................................................................................ 96

IL3 User’s Guide
page viii 11S-3002B
Table of Tables
Table 1-1: IL3100-L and IL3100-S Models.................................................................................................. 2
Table 1-2: Part Number Legend................................................................................................................ 2
Table 1-3: Camera Part Locaons ............................................................................................................. 3
Table 2-1: Package Contents: ................................................................................................................... 7
Table 2-2: Lens Selecon.......................................................................................................................... 8
Table 2-3: IL3 Mass Storage Funconality............................................................................................... 10
Table 3-1: IL3 Network LEDs................................................................................................................... 13
Table 4-1: Sample Frame Rates and Resoluons..................................................................................... 24
Table 4-2: Camera Control Buons......................................................................................................... 29
Table 4-3: Playback Control.................................................................................................................... 35
Table 4-4: Image File Save Opons......................................................................................................... 40
Table 5-1: I/O Pins to Markers................................................................................................................ 51
Table 7-1: Table Stats.txt High-Performance System............................................................................... 72
Table 7-2: Table Stats.txt Moderate-Performance System ...................................................................... 72
Table 7-3: Missing Frames on a Busy System .......................................................................................... 74
Table 7-4: Benet from Jumbo Packets .................................................................................................. 74
Table 7-5: Finding the Correct Packet Delay Value .................................................................................. 75
Table 7-6: File Format Features .............................................................................................................. 77
Table 7-7: Save to SSD Benchmarks........................................................................................................ 77
Table 8-1: Denions............................................................................................................................. 78
Table 8-2: Specicaons ........................................................................................................................ 81
Table 8-3: Resoluons, Rates, and Times................................................................................................ 82
Table 8-4: Power Pin Out ....................................................................................................................... 85
Table 8-5: I/O Connector Pin Out ........................................................................................................... 85
Table 8-6: Camera Status LEDs ............................................................................................................... 89
Table 8-7: Crop Factor ............................................................................................................................ 95
Table 8-8: CAP File Format ..................................................................................................................... 97
Table 8-9: Dates and Day Numbers (non leap-years) ............................................................................. 98
Table 8-10: Dates and Day Numbers (leap-years) ................................................................................... 99

IL3 User’s Guide
11S-3002B page 1
1 IL3 Product Overview
1-1 IL3 Product Descripon
The Fastec IL3 is a high-speed digital camera line with models capable of capturing high resoluon
1280 x 1024 pixel images at 500 frames per second and smaller-resoluon images at much higher
frame rates. Recording image data at high frame rates makes it possible to play back high quality
video sequences in slow moon, enabling the user a greatly enhanced ability to analyze events that
occur much too quickly for human vision to perceive.
The IL3, with its many modes of operaon, including its unique stand alone capabilies, and its high-
speed imaging performance, resoluon and sensivity, make it an excellent choice for many dierent
applicaons. For ad hoc tesng and troubleshoong, when setup me is precious, the IL3 comes
through as a point and shoot camera. For mul-camera use or where the camera might be set up and
le in more remote applicaons, its networking and master/slave capabilies come into play.
Fastec Imaging high-speed cameras are
used in hundreds of dierent industrial
manufacturing sites to analyze moon in
machinery and producon line processes.
Reduce jams, speed up line setup and
changeovers, lower scrap and rejected
material costs, and reduce downme and
maintenance expenses.
Hundreds of universies worldwide use
Fastec cameras for a variety of research
studies. Animal locomoon, mechanical
engineering, ow visualizaon, combuson
studies, biomechanics & kinesiology,
physics, chemistry, tensile tesng, and
more.
High-speed cameras are used to determine
the eects of blasts on structures or
vehicles or determine the actual ring
mes of blast holes and the nature of the
rock movement. Delay detonators provide
the ming blasts needed under specic
blasng condions. Blast holes ring at
incorrect mes reduce rock fragmentaon,
eect blast movement, and can increase
blast vibraons.
Military customers worldwide use high-speed video to design and test weapons, counter measure
and defensive systems and components. High-speed cameras are key for tesng projecles for
determining balliscs, detonics and fragmentaon characteriscs; in airborne stores separaon; and
in vehicle armor design tesng materials and survivability.

IL3 User’s Guide
page 2 11S-3002B
Camera Max Resoluon / Frame Rate Standard
Memory
Sensor
Size
Oponal
Memory
Oponal Solid-State Drive
IL3-100-L 800 x 600 @1250 fps 4GB 14mm 8GB 64GB / 128GB / 256GB
IL3-100-LS 1280 x 1024 @ 500 fps* 4GB 22.9mm 8GB 64GB / 128GB / 256GB
IL3-100-S 1280 x 1024 @ 500 fps** 4GB 22.9mm 8GB 64GB / 128GB / 256GB
Component Opons Examples
Drive (GB SSD) None/ 64 / 128 / 256
Memory (GB) 4 / 8 IL3100LC4 = 800 x 600, Color, 4GB (no SSD)
Sensor Color or Mono IL3100SM4 = 1280 x 1024, Mono, 4GB (no SSD)
Model L / S / LS IL3100LSM8064 = 1280 x 1024, Mono, 8GB, 64GB SSD
IL3100XXXxxx
1-2 IL3 Product Dierenaon
Fastec Imaging sells a number of dierent IL3 high-speed digital camera models. These cameras are
oered in either monochrome or color with various high-speed digital image recording capability
using a wide range of recording rates, sensor resoluons, and on-board memory opons. The cameras
boast 10-bit (mono) or 24-bit (color) resoluons. All cameras are equipped with a standard C-mount
lens mount, and 1/4-20 tripod mount. Addional lens mount opons are available.
IL3 cameras support the following modes of operaon:
• Local or remote operaon via a wired GigE connecon, using the Fastec Camera Control
Soware or the Fastec Web Applicaon via GigE, wired or WiFi (with WiFi opon). With the Web
Applicaon, any host device (PC, tablet, smartphone) with a common Web browser may be used
to control the camera.
• Unaended operaon: The camera is set up using the camera control or web applicaon, set for
AutoSave and Armed, then le waing only for a trigger input.
The IL3 camera housing is made of 100% machined aluminum with a black anodized nish. It is both
aracve and extremely durable. LEMO connectors are used for crical power and Sync/Trigger
connecons. It has side-mounted USB-OTG, HDMI, Gig-E, Sync/Trigger, and Power connectors as
well as a SD-Card slot. Power is supplied by an AC power adapter or a any 10-26v DC source.
Table 1-1: IL3100-L and IL3100-S Models
Table 1-2: Part Number Legend
* Maximum frame rate at any resoluon
** Higher frame rates at reduced resoluons

IL3 User’s Guide
11S-3002B page 3
1-3 IL3 Controls, Indicators, and Connectors
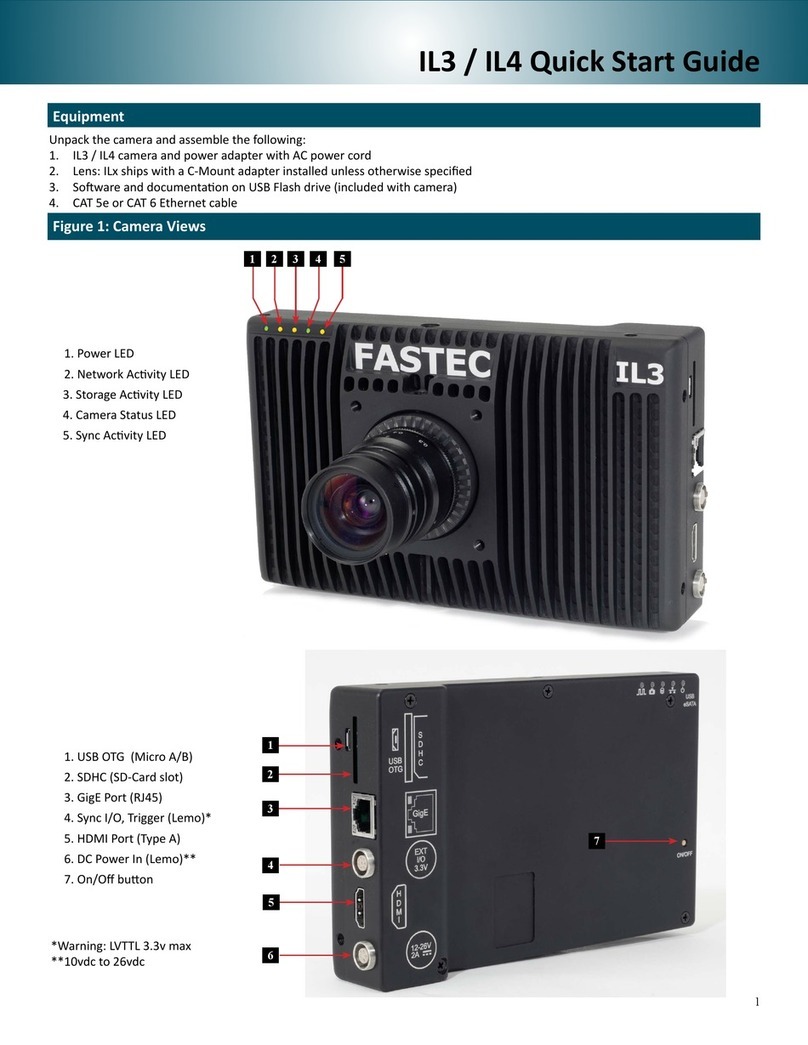
Figure 1-1: IL3 Back View
Camera Part Link to View
LED Indicators “Figure 1-1: IL3 Back View” / “Figure 1-2: IL3 Front View”
C-Mount “Figure 1-2: IL3 Front View”
C-Mount Lock Screws “Figure 1-3: IL3 Top View” / “Figure 1-5: IL3 Boom View”
Lens Mount Holes “Figure 1-3: IL3 Top View”
1/4-20 Tripod Mounts “Figure 1-3: IL3 Top View” / “Figure 1-5: IL3 Boom View”
USB Port “Figure 1-3: IL3 Top View”
USB OTG Port “Figure 1-4: IL3 Side Views”
SD-Card Slot “Figure 1-4: IL3 Side Views”
Gig-E Connector “Figure 1-4: IL3 Side Views”
Sync I/O Connector “Figure 1-4: IL3 Side Views”
HDMI Connector “Figure 1-4: IL3 Side Views”
Power Connector “Figure 1-4: IL3 Side Views”
Table 1-3: Camera Part Locaons
Note: See “Appendix J: Physical Measurements” on page 94 for dimensions.
Sync LED
Camera LED
Storage LED
Network LED
Power LED
ON/OFF buon

IL3 User’s Guide
page 4 11S-3002B
Figure 1-2: IL3 Front View
Figure 1-3: IL3 Top View
C-Mount
Lens Mount Holes
Sync LED
Camera LED
Storage LED
Network LED
Power LED
8-32 Bracket
Mount Holes
C-Mount Lock
Screw
1/4-20 Tripod
Mount Hole

IL3 User’s Guide
11S-3002B page 5
Figure 1-4: IL3 Side Views
Figure 1-5: IL3 Boom View
1/4-20 Tripod
Mount Hole
C-Mount Lock
Screw
8-32 Bracket
Mount Holes

IL3 User’s Guide
11S-3002B page 7
2 IL3 Geng Started
2-1 Unpacking the Camera
Part STD OPT Part #
IL3 Camera X IL3100XXX
C-Mount (factory installed and adjusted on the camera) X 1105-0026
F-Mount (factory installed and adjusted on the camera) X 1105-0200
PL-Mount (factory installed and adjusted on the camera) X 1105-0115
DC Power Supply-- 110/220VAC, 50/60Hz, 12V @ 4.17A, with IEC 13 socket and 5-pin
LEMO connector (no power cord included)
X 1105-0250
8 GB SDHC Card X 1105-0260
16 GB SDHC Card X 1105-0261
32 GB SDHC Card X 1105-0262
I/O Cable--1.3 meter with 8-pin LEMO camera connector and BNC connectors for Sync-In,
Sync-Out, and Trigger-In
X 1105-0401
I/O Cable--1.3 meter with 8-pin LEMO camera connector and BNC connectors for Sync-In,
Sync-Out, and Trigger-In
X 1105-0405
Wireless Dongle X 1105-0275
Documentaon and Soware (on USB thumb drive) X
Fastec Imaging retails its cameras through independent distributors. Fastec or its distributors can
provide the accessory items required for camera operaon according to each customer’s parcular
applicaon needs.
2-2 Installing the Lens
The camera is shipped with a C-mount lens adaptor installed and adjusted at the factory. To install a
C-mount lens, follow these steps:
1. Select a C-mount lens for use with the camera.
NOTE: There are many C-mount lens formats and focal lengths available. The 22.9mm diagonal sensor
of the IL3100S is larger than the light circle produced by many C-mount lenses. This is especially true
for wide angle lenses, but it is dependent on lens design and format. Vigneng (darkening at the
corners or edges of the image), will occur when the image on the sensor, the size and locaon of
which is dependent on resoluon and image oset, is not covered by the image circle of the lens. (See
“Table 2-2: Lens Selecon”.)
2. Remove the lens receptacle cover from the camera’s C-mount. This is a cover that is installed at
the factory to protect the camera opcs and sensor from dust contaminaon.
NOTE: Whenever threading lenses on or o the camera, face the camera lens down so that any
contaminaon on the threads will tend to fall away from the camera rather than into it.
3. Thread the C-mount lens into the lens mount located in the front of the camera. DO NOT over-
ghten the lens! The lens should be “nger ght” only--just ght enough that you can adjust
focus and aperture without unscrewing the lens.
NOTE: Limit the me between removal of the receptacle cover and installaon of the lens. Dust could
sele on the face of the sensor cover glass and degrade the image quality.
Table 2-1: Package Contents:

IL3 User’s Guide
page 8 11S-3002B
*The 17.5mm diagonal @ 1024 x 1024 is slightly larger than the 16mm specicaon for 1” C-mount
lenses. Many, but not all 1” format lenses will sasfactorily cover this resoluon.
This table assumes that the images are centered (no custom oset applied). (See “Appendix C: IL3
Record / Resoluon Tables” on page 82.)
Note: All F-mount and PL-mount lenses will easily cover the full 22.9m full resoluon image plane.
2-3 Power
Aaching the External DC Power Supply
The 12V DC Power Supply operates on 100-240VAC, 50-60Hz. The socket is a standard IEC 13, used
worldwide for all types of electronic equipment. The power supply is shipped without power cord so
that the user may use one appropriate for local power outlets.
1. Aach a power cord to the power supply and connect it to an AC power outlet.
2. Aach the power supply output cord to the camera via the LEMO connector. Note that the LEMO
connector is keyed: the red dot on the connector will face the back of the camera.
3. The camera will automacally begin to boot as soon as power is applied. While powering on, the
green camera LED will light up for a 15 seconds and go o, then the green power LED will light up.
Aer about 45 seconds, when both power and camera LEDs are lit, the camera is fully booted. If
aached to a network, the amber network LED will blink occasionally.
Note: There is also an ON/OFF buon located on the backside of the camera. This can be used to turn
the camera on and o while power is applied. It is also used to manually update the camera.
2-4 IL3 Memory and Mass Storage Opons
The IL3 camera is equipped with 4GB or 8GB of internal high-speed internal memory that can be
paroned for one or more image sequences. Images stored in this memory may be reviewed on the
camera, external monitor via HDMI, or PC, then saved to any of four types of mass storage devices:
1. Solid State Hard (oponal) drive installed in the IL3 at the factory.
2. SD-Cards (SDHC) inserted by the operator into the SDHC slot on the side of the IL3.
3. USB devices such as thumb drives or USB external hard drives connected via the USB port.
4. Memory devices on a networked PC using Fastec Camera Control (not Web Browser).
Resoluon Sensor Diagonal Required Lens Format
to avoid noceable
Vigneng
Field of View From 10M with
50mm Lens
1280 x 1024 22.9mm 1.3” 3.6 x 2.9M
1024 x 1024 17.5mm 1.3”* 2.9 x 2.9M
800 x 600 14mm 1” 2.2 x 1.7M
640 x 480 11.2mm 2/3” 1.8 x 1.3M
256 x 200 4.5mm 1/3” .72 x .56M
Table 2-2: Lens Selecon

IL3 User’s Guide
11S-3002B page 9
IL3 Solid State Hard Drives (Internal SSD)
Solid state hard drives (SSDs) are available as an opon on the L and S series. (See “Table 1-1: IL3100-L
and IL3100-S Models” on page 2.) These drives serve as mass storage devices for the camera and
are installed in the camera at the factory. Image data from the IL3’s high-speed internal memory may
be downloaded to the SSD, thus making room for the next high-speed image capture. While the SSD
does not add to the recording me of the camera (the number of images it can record in one session),
it does allow the user to download large quanes of image data without ever connecng the IL3 to a
PC or other external device.
SD-Card
The IL3 is shipped with a 16GB high performance SD-Card. This card has two funcons:
• It can be used as a mass storage device for downloading and distribung images. SD-Cards and
card readers are very commonly used storage devices among PC users and photographers.
• Any eld soware updates for the IL3 from Fastec will be installed via the SD-Card.
Note: An SD-Card when used for a soware update must be reformaed before it can be reused as a
mass storage device. See “Appendix I: IL3 Updates” on page 92.
In
ternal SDD
64/128/256GB
USB Port
USB Thumb Drive
Figure 2-1: IL3 Connecons

IL3 User’s Guide
page 10 11S-3002B
USB Port
The IL3 will act as a Host to any USB mass storage device connected at the USB port. (See “IL3 Side
Views” on page 5.) Image data may be saved to these devices.
USB-On The Go!
The USB-OTG port allows the camera to be connected as a slave to any PC using a USB-A to USB-
Micro-B cable. Once connected via the IL3’s OTG port, any mass storage device on the camera can be
accessed by the PC. This includes an SD-Card, Solid State Drive, or thumb drive in the USB port. To use
this opon:
1. Power up the camera.
2. Install thumb drive and/or SD-Card in the camera.
3. Aach the camera to the PC via the camera’s USB-OTG port, which is next to the SD-Card slot
on the side of the camera. (See ) As each device is located by the PC an Autoplay window on the
PC will open. This is a very simple way to transfer image data to a PC. This is for le access only--
there is no way to control the camera via USB-OTG.
When you are nished, you need to eject the media from the PC. Click on the “Safely Remove
Hardware and eject Media” icon on your computer’s task bar and select “Eject Fastec Camera.”
Note: Any device that is connected to the camera aer the camera and PC are connected will not be
seen by the PC.
Target Drive(s) Funcons
FasMoon Ulies:
Storage/Explore PC Drives+SSD/USB/SDHC Move, Copy, Delete, Batch, Convert to AVI, Load CAP, review metadata
Storage/Format SSD/USB/SDHC Format drive
Review/Save PC Drives+SSD/USB/SDHC Save image Data from Internal High-Speed Memory, Load CAP le
Record Sll PC Drives+SSD/USB/SDHC Save a single sll Image
Autosave PC Drives+SSD/USB/SDHC Autosave image Data from Internal High-Speed Memory
PC via Gig-E Connecon:
Explore SSD/USB/SDHC Open, Copy les, mulple les, directories From IL3 to PC only
Web Applicaon:
Storage/Browse SSD/USB/SDHC Move, Copy, Delete (1 le at a me), review metadata of Image les
Storage/Format SSD/USB/SDHC Format drive
Review/Save SSD/USB/SDHC Save image Data from Internal High-Speed Memory
Record Sll PC Drives+SSD/USB/SDHC Save a single sll Image
Autosave PC Drives+SSD/USB/SDHC Autosave image Data from Internal High-Speed Memory
PC via USB-OTG:
Explore SSD/USB/SDHC Copy les and directories to and from IL3
Table 2-3: IL3 Mass Storage Funconality

IL3 User’s Guide
11S-3002B page 11
3 IL3 Camera Setup
3-1 Install FasMoon Camera Control Soware
Before we can begin seng up the IL3, you must rst install the Fastec FasMoon Controller soware.
The FasMoon soware install program is available on the Fastec website, hp://www.fastecimaging.
com and is also copied onto the USB thumb drive that shipped with your IL3 camera.
This soware may be used to set up and control IL3 and TS3 cameras. With it you may congure all
recording parameters including Session Length, Resoluon, Frame Rate, Exposure, Color Balance,
Autosave, Trigger point, and Sync opons.
To install FasMoon on a Windows PC:
Note: At the me of this wring a MAC version of FasMoon is not yet available. Its release is
ancipated shortly aer the inial release of the product and the install le be posted at the Fastec
website.
1. Run the FasMoon executable on
your PC. The le will have the format:
FasMoon<version><date>.exe. For example,
FasMoon_1.1.0_2013_0109.exe would be
version 1.1.0, dated January 9, 2013. It is
recommended that you copy the install le
to the hard drive of your PC for safekeeping.
2. The Windows Account Control will display
a message asking if you want to allow the
installer to make changes to your computer.
Answer “Yes.”
3. The Installer Setup window will appear as
shown informing you that the install process
has begun. Click on “Next.”
4. The next window allows you to choose a
locaon for the program. Select a locaon
and click on “Next.”
Figure 3-1: FasMoon Installaon
Figure 3-2: FasMoon Install Locaon

IL3 User’s Guide
page 12 11S-3002B
5. The next window gives you the opon on
creang a shortcut for FasMoon in the
directory of your choice. Select a directory
for a shortcut or click the “Do not create
shortcuts” check box. Click on “Install” to
connue.
6. FasMoon will now be installed on the PC. A
window with a progress bar will appear and
inform you when the install is complete.
7. The nal install window gives you the opon
to run FasMoon soware and a link to the
Fastec web page. Click on “Finish” when done
to exit the install program.
Figure 3-3: FasMoon Start Folder
Figure 3-4: FasMoon Install Progress
Figure 3-5: FasMoon Installaon Complete
Other manuals for IL3
1
Table of contents
Other Fastec Digital Camera manuals
