Fastec IL3 User manual

IL3 / IL4 Quick Start Guide
Equipment
1
2
3
4
5
6
1. USB OTG (Micro A/B)
2. SDHC (SD-Card slot)
3. GigE Port (RJ45)
4. Sync I/O, Trigger (Lemo)*
5. HDMI Port (Type A)
6. DC Power In (Lemo)**
7. On/O buon
1. Power LED
2. Network Acvity LED
3. Storage Acvity LED
4. Camera Status LED
5. Sync Acvity LED
Figure 1: Camera Views
Unpack the camera and assemble the following:
1. IL3 / IL4 camera and power adapter with AC power cord
2. Lens: ILx ships with a C-Mount adapter installed unless otherwise specied
3. Soware and documentaon on USB Flash drive (included with camera)
4. CAT 5e or CAT 6 Ethernet cable
2 3 4 51
1
7
*Warning: LVTTL 3.3v max
**10vdc to 26vdc

FasMoon Camera Control Applicaon
Before you can begin seng up the ILx, you must rst install the Fastec FasMoon Controller soware on a Windows PC or Mac.
The FasMoon soware install program is available on the Fastec website, hp://www.fastecimaging.com and is also copied onto the
USB thumb drive that shipped with your ILx camera.
This soware may be used to set up and control ILx and TSx cameras. With it you may congure all recording parameters including
Session Length, Resoluon, Frame Rate, Exposure, Color Balance, Autosave, Trigger point, and Sync opons.
To install the Windows version onto a PC:
1. Run the FasMoon install le, FasMoon_1.7.17.exe (or some other version), on your PC. You may wish to copy the install le to
a secure locaon on your PC for storage.
2. Follow the prompts to install and run FasMoon.
To install the Mac version:
1. Copy the FasMoon_1.7.17.dmg (or some other version), to your Mac.
2. Double click on the .dmg le to install.
3. Move the FasMoon icon to the Applicaons folder. Once installed, FasMoon will look and behave the same on a PC and Mac.
All instrucons below, as well as those found in the IL3 / IL4 Users Manual are applicable
to either version.
2
Power Up the ILx
Connect the ILx to a Computer
Power on the camera:
• The IL3 will begin to boot up as soon as power is applied. During the power-up cycle, rst
the Camera LED will go green for a about 15 seconds, then the Power LED will go green
and stay on. Within about 45 seconds both the Camera LED and the Power LED will be
green. At this point the camera is booted up.
• The On/O buon on the camera may be used to turn the camera o and on while con-
nected to power.
Once connected to FasMoon, the camera may be powered down via the soware.
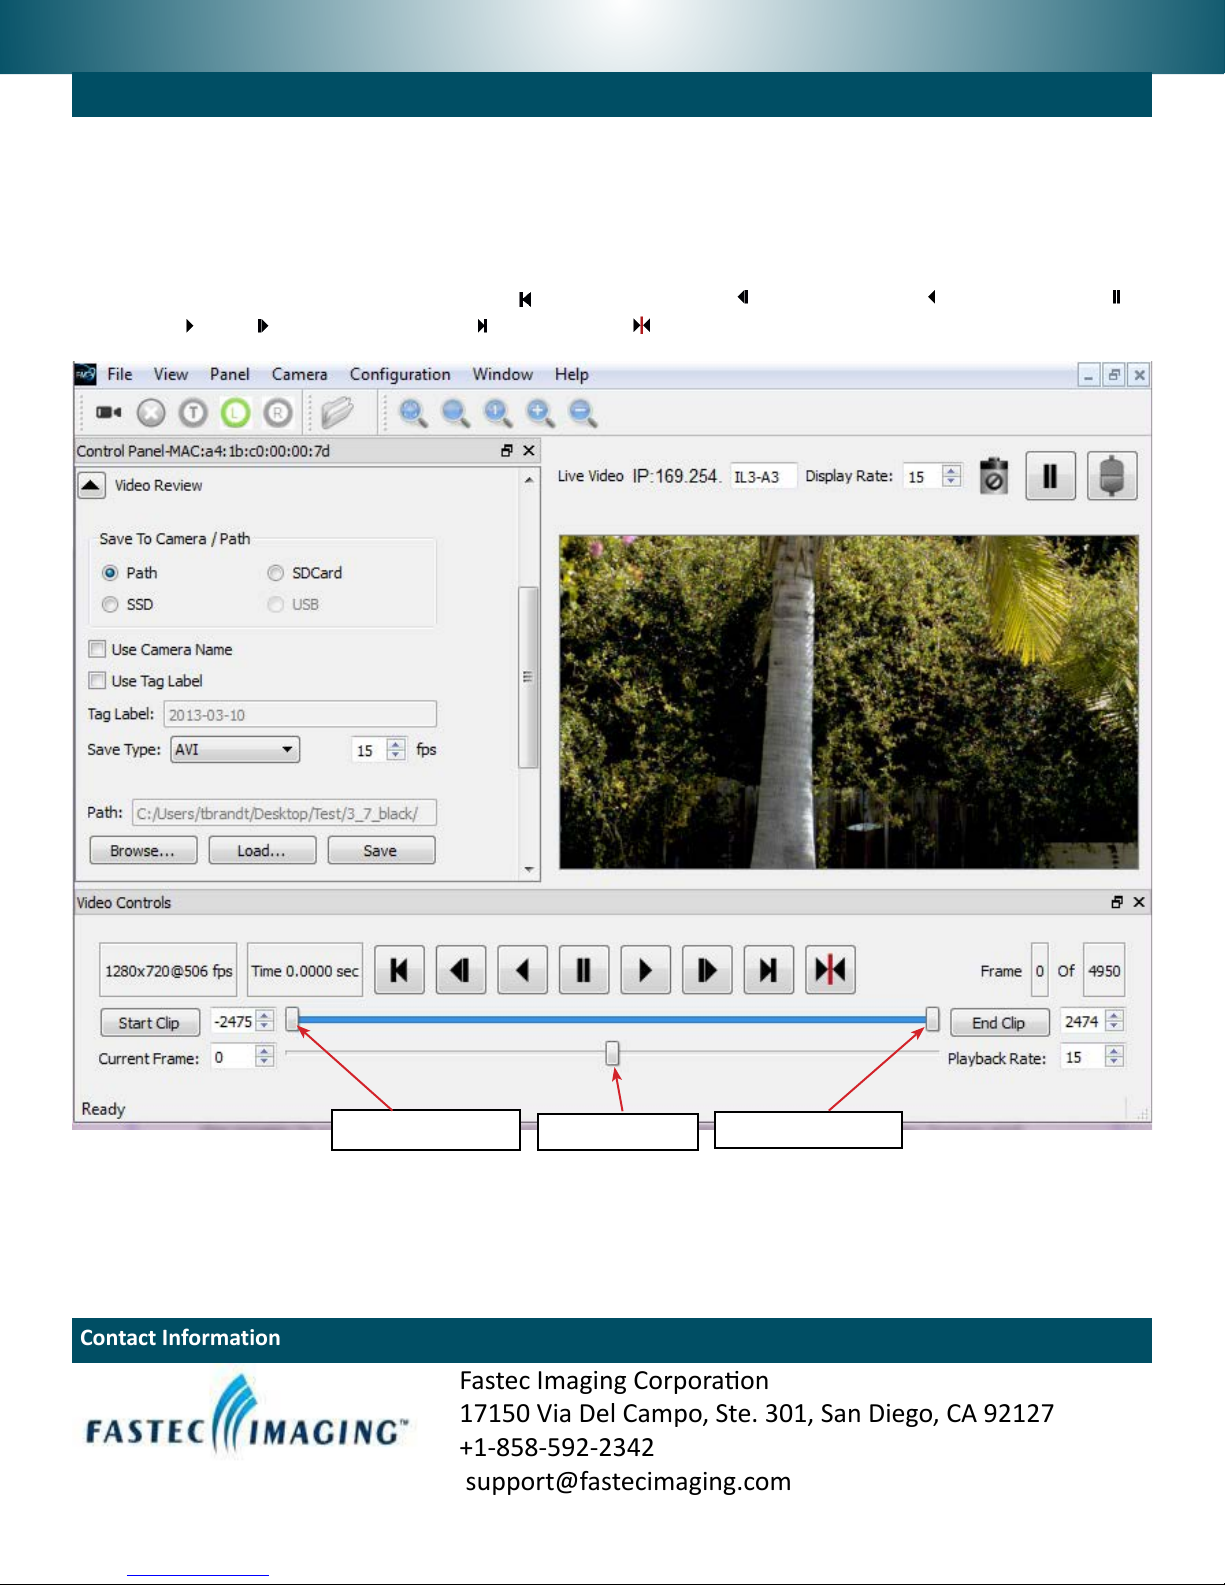
Camera Control Buons
Set the Language in FasMoon
To Set the Language for FasMoon:
1. Select “Language” from the View menu in FasMoon.
2. Select the language of your choice.
To Connect the ILx to a Computer:
1. Connect one end of the Ethernet cable to the computer’s Ethernet port, and the other to the GigE port of the camera. It is best
to start with a direct connecon (no other networking infrastructure involved). The computer’s network connecon should be
set for DHCP.
2. Launch the FasMoon applicaon.
3. Click on the Camera buon from the camera control buons on the upper le of
the FasMoon applicaon window to open the Find Camera Dialog box.
4. Click on the Scan buon. Select the camera
from the list on the le (if you have one
camera connected there will only be one in
the list, as in the image shown here). The
cameras are listed by MAC address and IP
address. Once a camera is selected, its de-
tails will be listed in the Camera Informaon
box to the right.
5. Click on the Connect buon to connect the
selected camera.
The Camera Control Panel and a Live Video
window will now open. If you have a lens on the
camera, you should be able to adjust and focus
it using the live image. If you are unable to get a
live image, open the Find Cameras dialog again
and adjust the Packet delay to a higher number
and click on Update.

Record Setup: Resoluon, Frame Rate, and Exposure
Open the Record Sengs Tab on the Control Panel to set
up the Resoluon, Frame Rate and Exposure:
• Use the Frame Aspect Rao pull-down to select the
shape of your Region of Interest (ROI)
• Adjust the Width and Height sliders or for the re-
quired resoluon.
• Select the Frame Rate for your recording using the
Frame Rate slider or edit box.
• Adjust the Shuer Speed to get the proper exposure
for your recording.
Note: the Low Light seng is for setup in dark environ-
ments where full illuminaon is only available during
recording. The camera will revert to its normal shuer
speed as soon as the camera is Armed.
• Click on the Green Arm buon to begin recording.
• Click on the Red Trigger buon to end the
recording.
Note: The default seng for the trigger point is an “end”
trigger. Trigger posion can be changed in the Record
Controls tab, explained below.
Set Preferences: Long Recording Mode for IL4
The User Preferences dialog in FasMoon is used
to set important camera funcons: JPEG Quality,
Default Gamma, Long Recording Mode, and Auto-
download Metadata.
To open User Preferences:
1. Connect to the ILx. (See instrucons above.)
2. Select User Preferences from the FasMoon
Conguraon menu.
Set JPEG Quality:
• JPEG quality controls the relave size and quality
of JPEG and AVI les saved from the ILx. The
range goes from 1 to 100. 80, the default seng
is a good compromise between quality and size.
Set Default Gamma:
• Set the Gamma to the seng in which the
displayed image (on the computer display or
HDMI monitor) best matches the scene. Most
LCD and LED monitors will look best at 2.2. Use 1.0, the default, if in doubt to preserve image quality, then adjust as a post-
process via the Display tab.
Set Long Recording Mode and Autodownload Metadata:
• IL4 cameras may be used in either “Basic” mode, or “Long Recording” mode. When this selecon is changed, the camera will
reboot into the selected mode. When going from “Long Recording” to “Basic” mode, the SSD will have to be reformaed before
it can be accessed. Select “Autodownload Metadata” if features such as Markers and Search for me will be used in Review.
Record Controls: Triggering
Open the Record Control Tab to Set the Trigger Posion:
• With the trigger slider all the way to the le (0%), the (Armed) ILx will begin recording
images when a trigger is received. It will stop as soon as the session buer is full.
• With the trigger slider all the way to the right (100%), the (Armed) ILx will begin recording
images into a circular buer and will stop recording when it receives a trigger.
• With the trigger slider at 50%, the (Armed ) ILx will record into 1/2 the session length into
a circular buer, then record the last 1/2 of the session aer it receives a trigger.

Fastec Imaging Corporaon
17150 Via Del Campo, Ste. 301, San Diego, CA 92127
+1-858-592-2342
support@fastecimaging.com
Contact Information
3
Review and Save
Whenever there is a recording in camera memory, the Review tab and acve Video Controls will become
available.
• The Playback Bug (see gure, below) can slide to any frame of the video. The Start and End Clip Bumpers
can be moved to limit the playback to any poron you choose. The bumpers may be moved with the
mouse or by clicking on the Start Clip or End Clip buons, which move the chosen bumper to the present
frame. Start and End Clip locaons are also used to choose the poron of the recording to be saved.
• The playback buons funcon as follows: move to beginning, one frame back, play backwards,
pause, play, one frame forward, move to end, move to trigger frame.
Start Clip Bumper End Clip BumperPlayback Bug
To Save captured video:
1. Set the Start and End Clip bumpers to where you would like the clip to begin and end.
2. Set the target locaon from the radio buons: Path (to a PC drive), SSD (to the camera’s internal hard
drive), SD Card (to an SD Card in the camera), or USB (to a USB device connected to the camera).
3. Select the “Save Type”--this would be AVI, DNG, BMP, JPEG, TIFF, or CAP le.
4. Click on “Save” to begin the transfer.
Other manuals for IL3
1
This manual suits for next models
1
Table of contents
Other Fastec Digital Camera manuals