Faster KS-20 CITY User manual

E
EL
LE
EC
CT
TR
RI
IC
C
K
KI
IC
CK
K
S
SC
CO
OO
OT
TE
ER
R
F
FA
AS
ST
TE
ER
R
K
KS
S-
-2
20
0
C
CI
IT
TY
Y
U
US
SE
ER
R
'
'
S
S
M
MA
AN
NU
UA
AL
L
(Version française disponible à partir de la page 15)
It is important to read the manual carefully
and the warranty before using the device
______________________________
TABLE OF CONTENTS
:
1. Presentation of the kick scooter
2. Safety instructions
3. Procedure for folding/unfolding the device
4. Instructions for use
5. Instructions for adjusting the braking system
6. Driving instructions
7. Battery and charger
. Maintenance and service
9. Specifications

P
PR
RE
ES
SE
EN
NT
TA
AT
TI
IO
ON
N
O
OF
F
T
TH
HE
E
K
KI
IC
CK
K
S
SC
CO
OO
OT
TE
ER
R
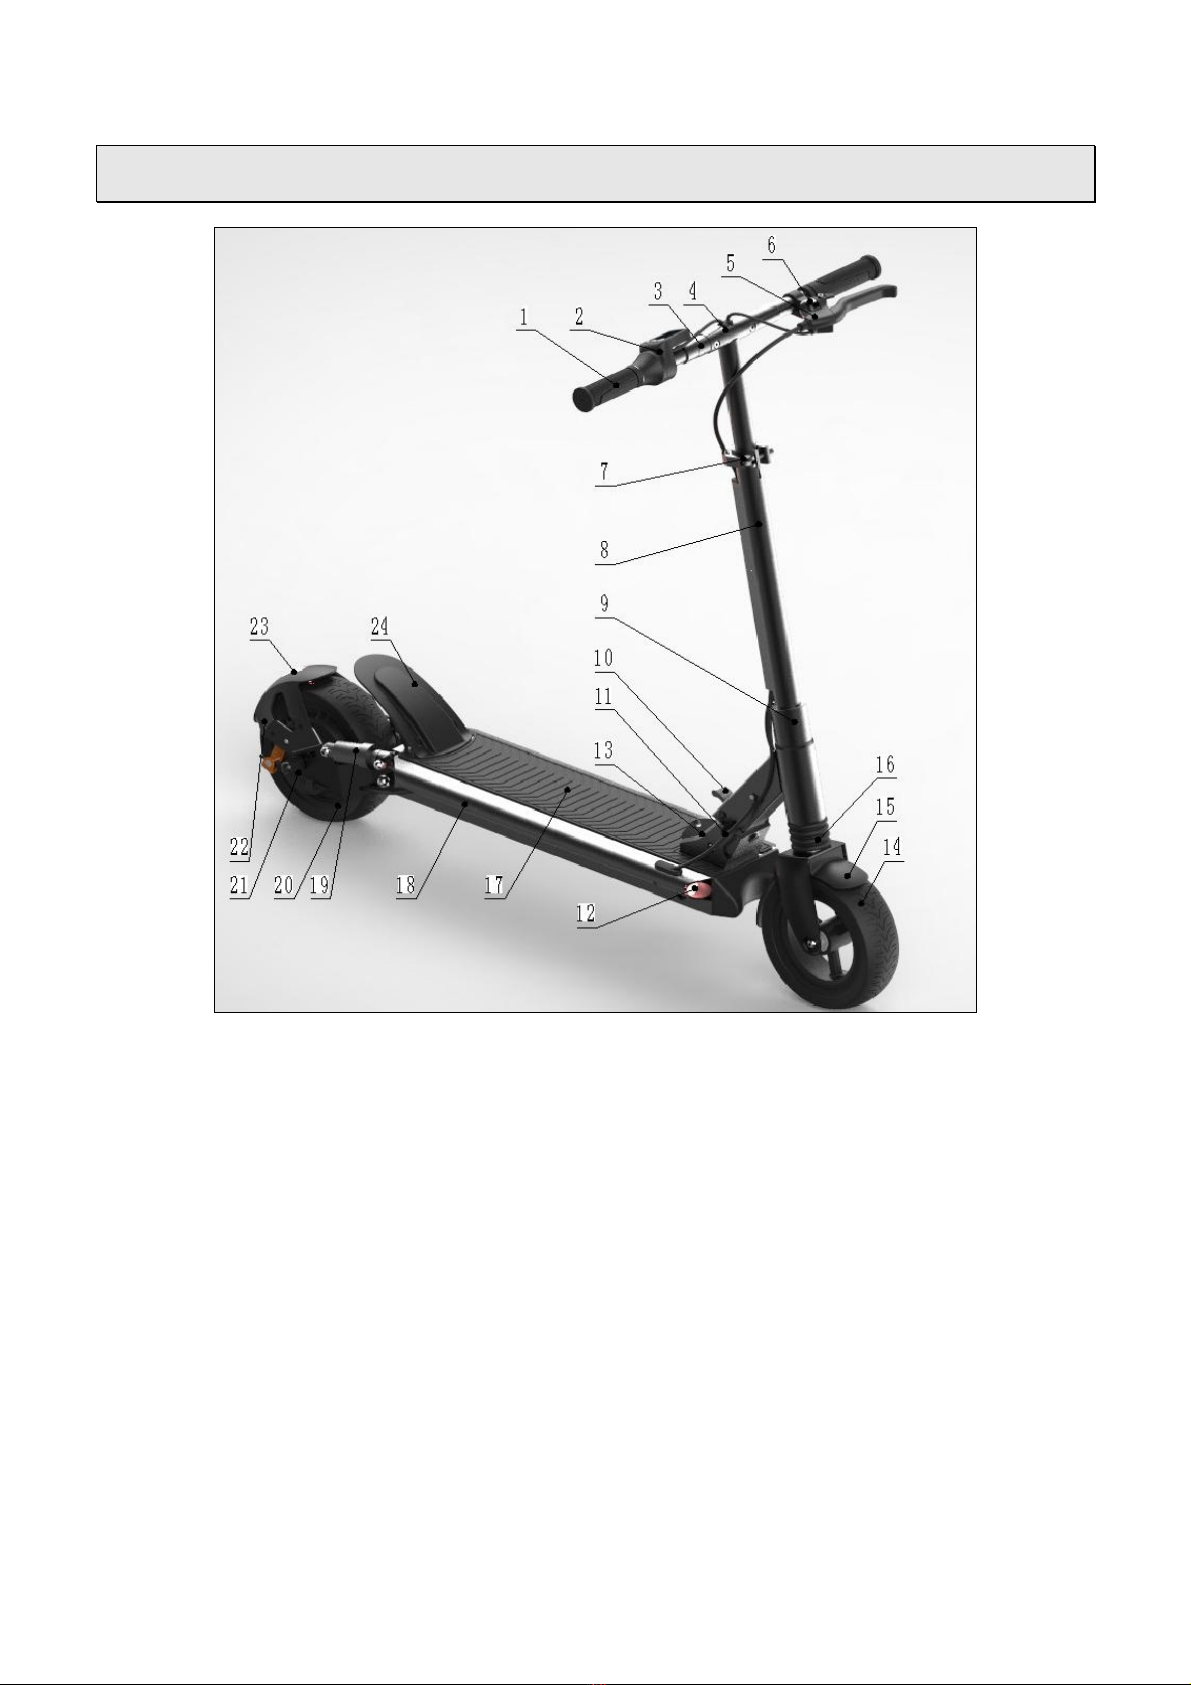
1. Handle 2. Digital dashboard 3. Folding lever
4. Handlebar 5. Handbrake 6. Horn
7. Handlebar adjustment clamp 8. Vertical bar 9. Bottom handlebar clamp
10. Folding loop 11. Folding pin 12. Headlight
13. Folding joint 14. Front wheel 15. Front mudguard
16. Front suspension 17. Non-slip deck 18. Battery compartment
19. Rear suspension 20. otor 21. Drum brake protector
22. Brake adjustment nut 23. Brake light 24. Rear mudguard

3
S
SA
AF
FE
ET
TY
Y
I
IN
NS
ST
TR
RU
UC
CT
TI
IO
ON
NS
S
1. This is an adult electric kick scooter and should only be used by one person at a time.
For the safety of others, please do not entrust your kick scooter to anyone who is not
qualified to use it.
2. Please wear a helmet and other protective equipment when operating this device. Also,
please observe the laws and regulations of the place where the vehicle is used.
3. Never drive the kick scooter in dangerous or illegal areas.
4. Please practice in an open area and avoid driving on the road until you have acquired the
necessary skills.
5. Don't behave dangerously or drive one-handed while riding. Also, it is important to keep
your feet on the kick scooter.
6. Do not attempt to drive directly over changes in level greater than 3 cm in height, as this
may cause the vehicle to tip over and result in injury to the operator and/or damage to the
unit. In addition, it is also recommended that you avoid changes in height of less than 3 cm
whenever possible.
7. To ensure safe driving, please limit your speed to 5 km/h. It is recommended to avoid
using the kick scooter at night, but if necessary, please turn on the lights and limit your
speed below 15 km/h.
. Do not use the kick scooter when the temperature is below 5° Celsius. It is also important
not to use the vehicle during rain or snow showers, as this could cause damage to the
device that may not be covered by the warranty offered at the time of purchase.
9. When encountering rough or uneven road conditions, please slow down carefully or even
walk alongside the kick scooter until conditions become passable.
10. Avoid driving on oil or ice covered surfaces.
11. Adjust the height of the handlebar to the proper position for your height to ensure a safe
ride.
12. It is important not to let the vehicle be immersed in water deeper than 4 cm, as this
could damage its electrical components, which will not be covered by our warranty.
13. It is recommended that you avoid using the unit during inclement weather or snowfall,
as this may cause damage to the kick scooter.

4
P
PR
RO
OC
CE
ED
DU
UR
RE
E
F
FO
OR
R
F
FO
OL
LD
DI
IN
NG
G/
/D
DE
EF
FO
OL
LD
DI
IN
NG
G
T
TH
HE
E
D
DE
EV
VI
IC
CE
E
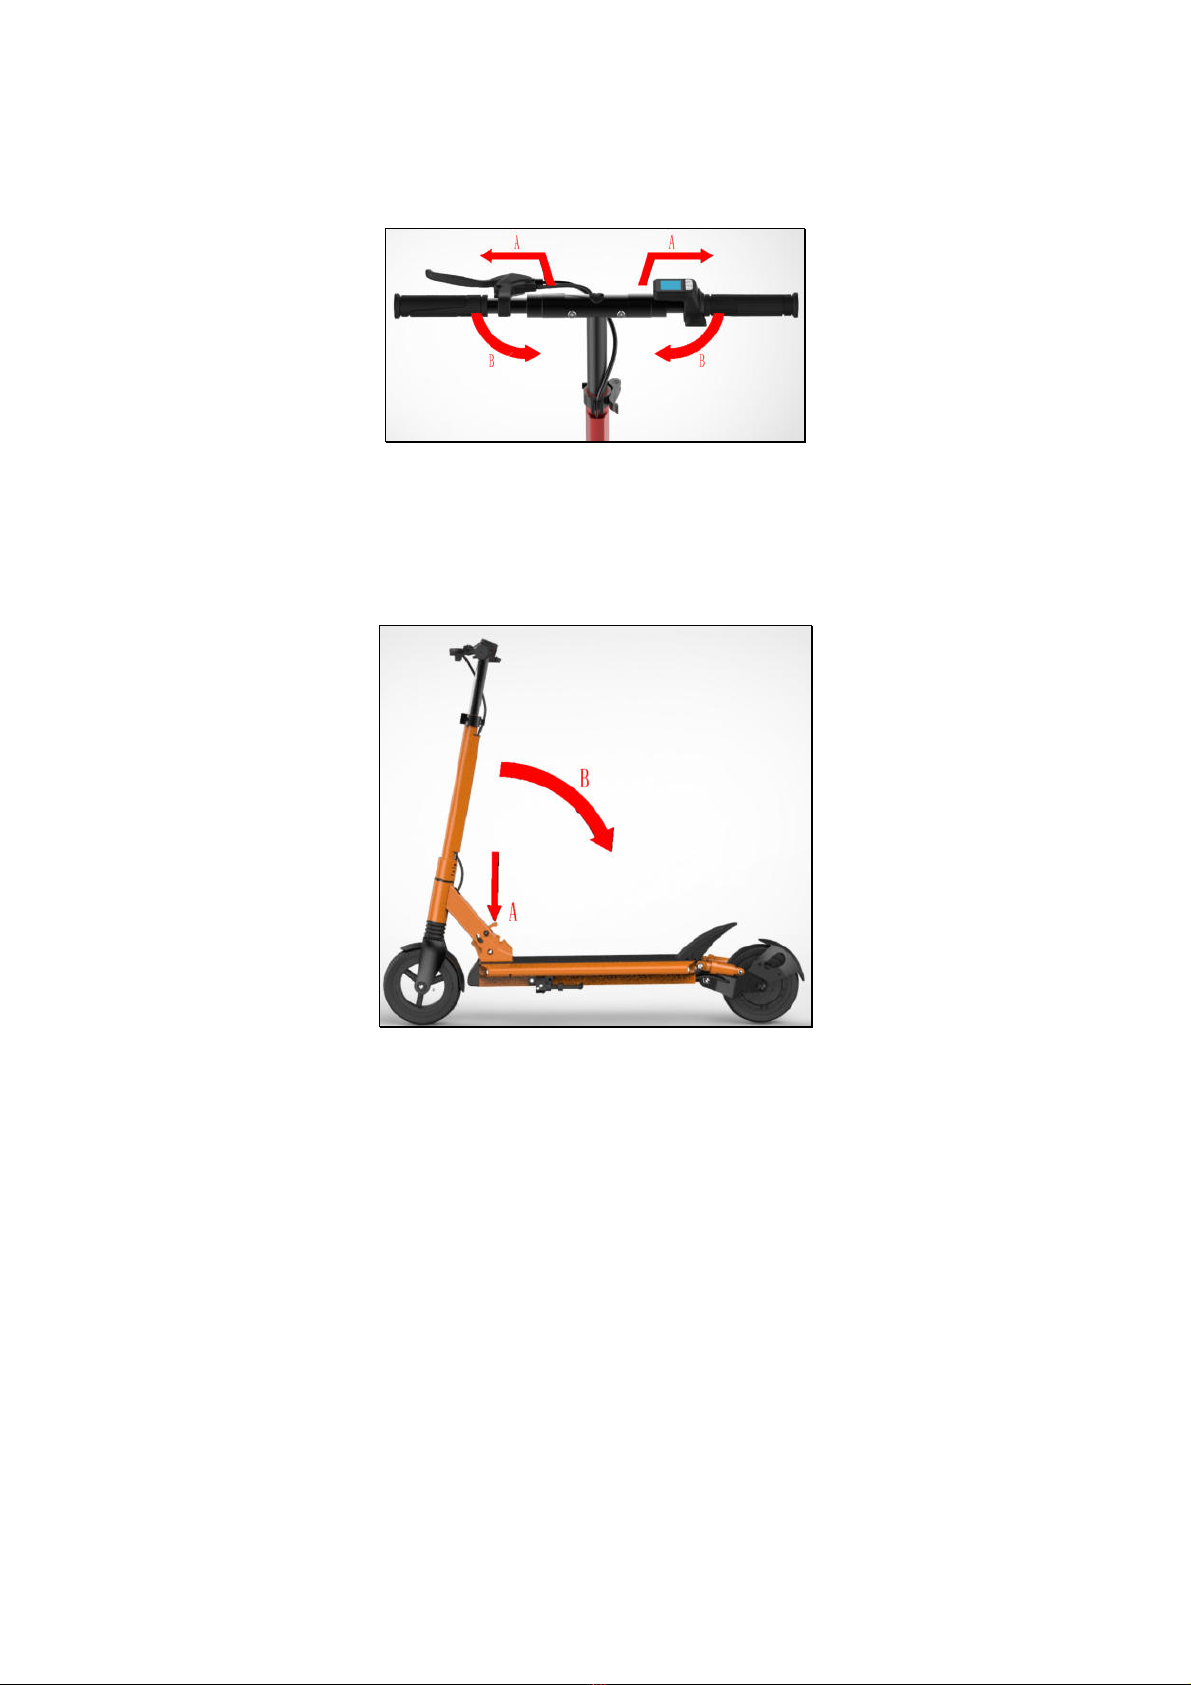
A. Unfolded vehicle B. Folding the handles
C. Complete folding of the vehicle
I
IN
NS
ST
TR
RU
UC
CT
TI
IO
ON
NS
S
F
FO
OR
R
F
FO
OL
LD
DI
IN
NG
G
1. As shown in the following pictures:
A. Loosen the handlebar adjustment bracket.
B. Press the handlebar down so that the handlebar is fully inserted into the vertical bar.
Figure 1
5
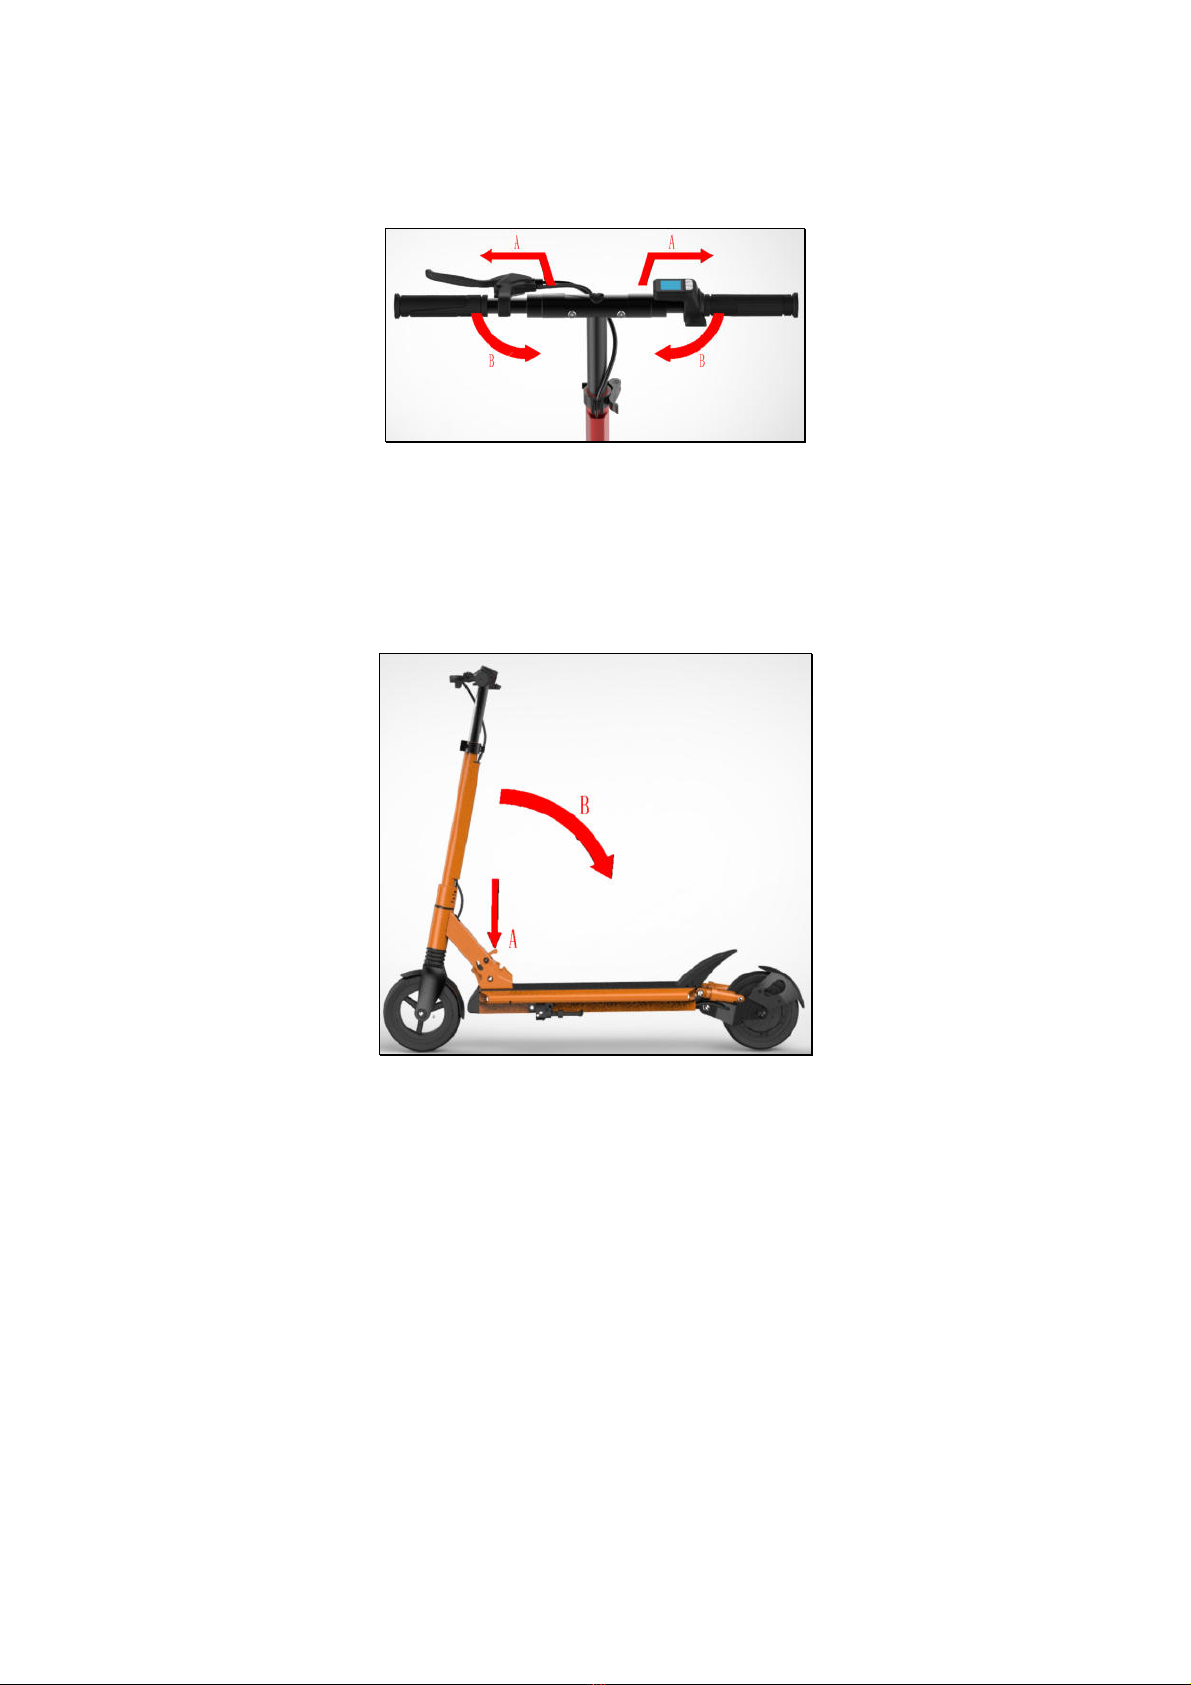
2. Release the folding lever on each side of the handlebar, then fold the handles
90 degrees to complete their folding.
Figure 2
3. Push the handlebar forward by pressing the folding loop (Part #10) to release the pin
(Part #11) from the folding joint (Part #13), and then fold the vertical bar of the handlebar
toward the rear of the vehicle to the point where the folding loop fits into the clip provided.
Figure 3
4. To unfold the vehicle, simply reverse the procedure described previously.
6
I
IN
NS
ST
TR
RU
UC
CT
TI
IO
ON
NS
S
F
FO
OR
R
U
US
SE
E
E
EL
LE
EC
CT
TR
RO
ON
NI
IC
C
B
BR
RA
AK
KE
E
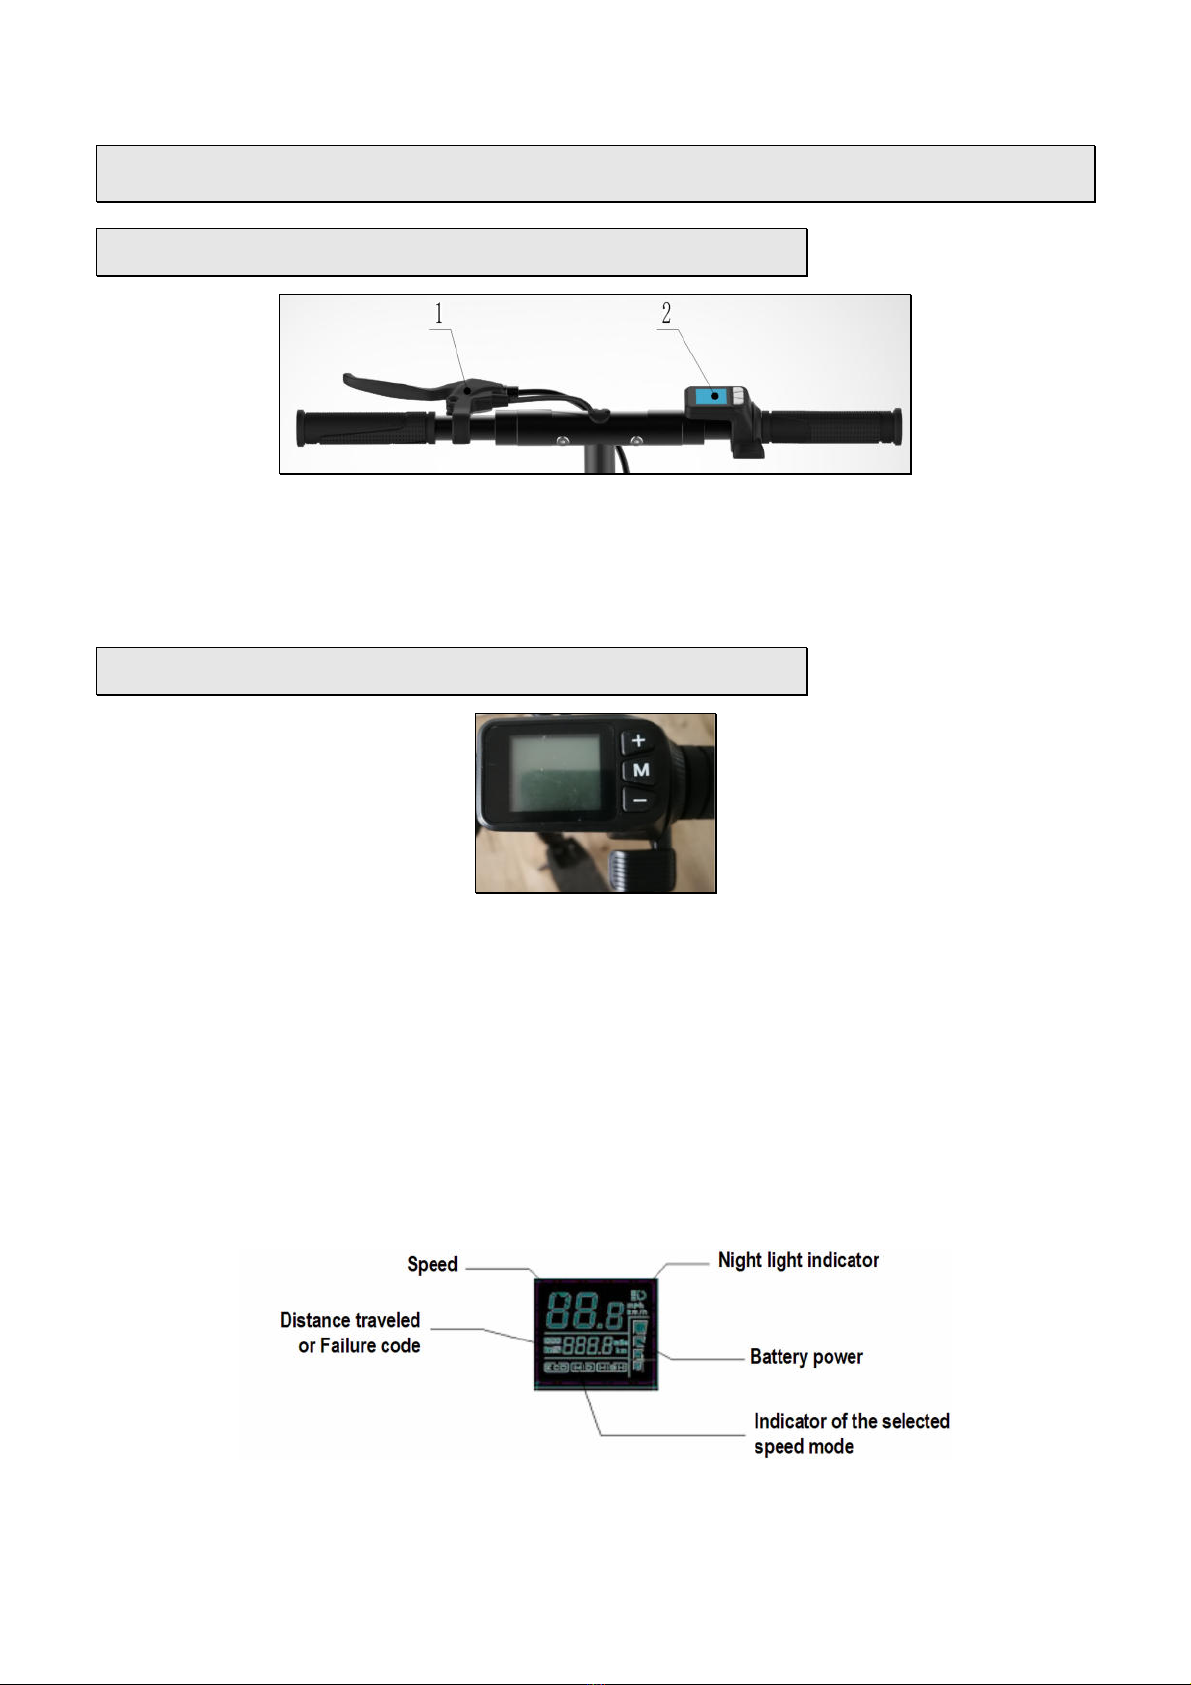
Figure 4
To brake, simply grasp the brake lever on the left handle and slowly apply the brake
(Indication 1 in Figure 4). The tighter the lever, the greater the braking force.
D
DI
IG
GI
IT
TA
AL
L
D
DA
AS
SH
HB
BO
OA
AR
RD
D
Figure 5
Buttons on the digital dashboard (Figure 5):
- Power button «M»
- Buttons to adjust the lighting and the speed mode «+» and «-». Concerning the speed
mode, three possibilities are proposed:
- ECO: Low speed
- MID: Medium speed
- HIGH: High speed
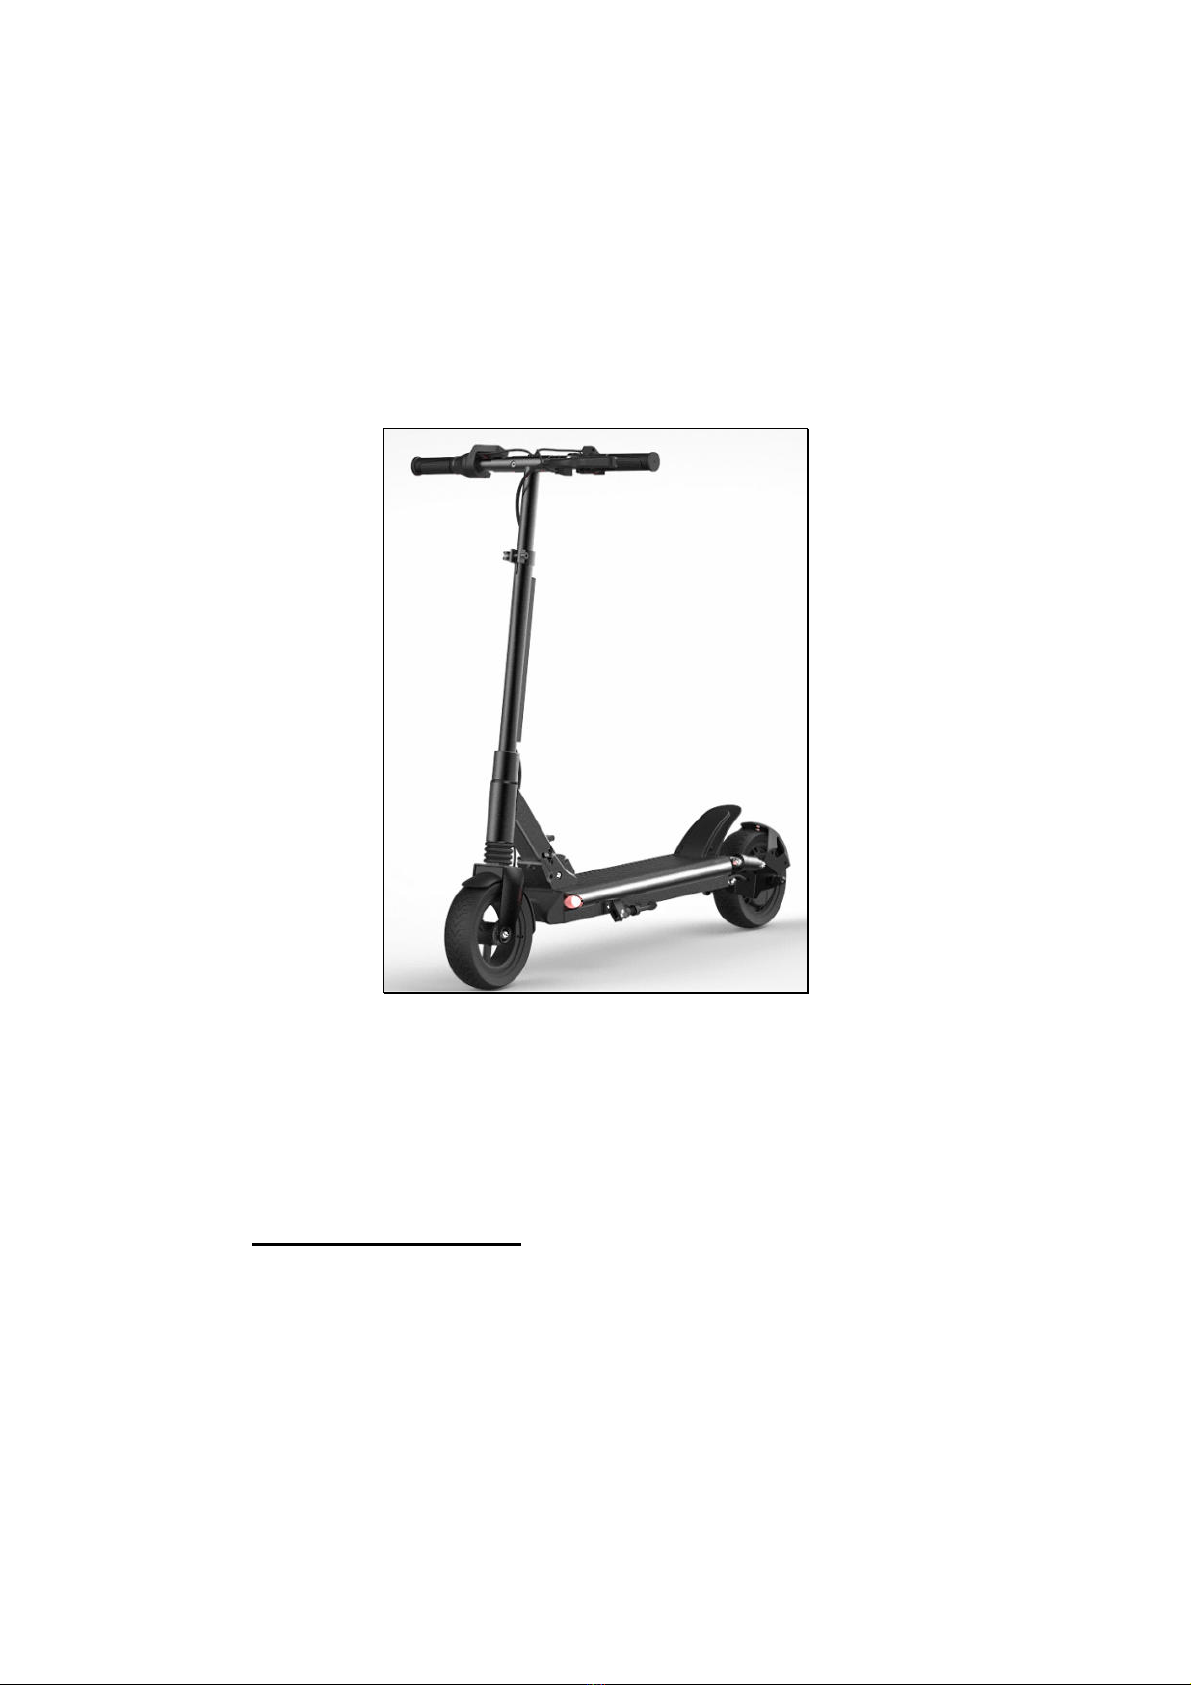
1. The indications on the screen
Display of speed, battery power, failure code, and distance traveled (Odometer).
Figure 6

7
2. The different functions offered by the buttons:
2.1 Turn On/Off the vehicle: Press the button «M» for more than one second, and the
electric kick scooter will turn on. If you want to turn it off, just press again the button «M»
for more than one second.
2.2 Changing the speed mode: To switch to the higher speed mode, briefly press the
button «+», and conversely to switch to the lower speed mode, briefly press the
button «-».
2.3 Turning On/Off the headlight: Press the button «+» for more than 3 seconds, and the
headlight will turn on. To turn off the headlight, simply press again the button «+» for
more than 3 seconds.
2.4 Changing the odometer function: Briefly press the button «M» to toggle between
cumulative travelled mileage (ODO), single trip mileage (TRIP), battery power, and failure
code (EXXX).
3. Adjustment of the parameters:
3.1 Instructions for setting the parameters: Press the buttons «+» and «-» simultaneously
to enter into the setting mode. Once in this mode, you will see a code next to the
speedometer that corresponds to a particular parameter.
Pressing the button «M» briefly will move to the next parameter. Briefly pressing the
button
«+»
or
the
button
«-»
will
increase
or decrease the value of the selected parameter.
When changing a parameter, it is automatically saved.
To exit the setting mode, press simultaneously the buttons «+» and «-». Note that if no
button is pressed for more than 10 seconds, you will automatically exit the setting mode.
List of parameters that can be configured in the setting mode:
P01 Screen backlighting. Three levels are offered (1, ,3), level «3» being the default and
offering the highest brightness.
P02 Choose the speed and odometer display mode. Two choices are offered (0 and 1),
and by default the kick scooter is configured to choice «0»:
- «0»: Kilometer - km/h
- «1»: Mile - mph
P03 Set the voltage. The default setting is 48 Volts.
The current model offers two choices (36,48), 36 and 48 Volts. However, this setting
cannot be changed by the user.
P04 Automatic shutdown time (in minutes). This parameter is set to «10» minutes by
default. You can change the time to between «1 and 60» minutes. This means that if no
operation is performed on the unit for the selected time, the vehicle will automatically shut
down. Note that if «0» is selected, it will disable this function.
P05 Set the number of speed modes. This parameter is set to «3» by default and cannot
be changed by the user.
P06 Set the diameter of the wheel (in inches). This parameter can be set between «1.0
and 50.0» inches.
P07 Set the number of magnets in the motor (These are used to evaluate the speed).
This parameter can be set between «1 and 100» magnets.

8
P0 Set the maximum vehicle speed. This parameter can be set between «0 and 100».
Note that if «100» is selected, this will remove the speed limit on the kick scooter.
P09 Startup method. Two choices are available (0 and 1):
- «0»: Starting with the speed control handle
- «1»: Starting during manual acceleration with the legs
P10 Enable/Disable cruise mode. Two choices are available (0 and 1):
- «0»: Cruise mode disabled
- «1»: Cruise mode activated
P16 Reset Odometer - Cumulative travelled mileage (ODO):
Press and hold the button «+» or «-» for more than 5 seconds to reset the odometer's
cumulative travelled mileage.
4. List of failure codes
If there is a problem with the operation of the vehicle, the odometer will display a failure
code when the kick scooter is turned on.
Failure code Description
E002 Brake problem
E006 Battery voltage too low
E007 Engine problem
E00 Speed control problem
E009 Controller problem
E010 Receiving communication problem from the controller
E011 Receiving communication problem from the display

9
I
IN
NS
ST
TR
RU
UC
CT
TI
IO
ON
NS
S
F
FO
OR
R
A
AD
DJ
JU
US
ST
TI
IN
NG
G
T
TH
HE
E
B
BR
RA
AK
KI
IN
NG
G
S
SY
YS
ST
TE
EM
M
The braking system of each kick scooter is adjusted at the factory to ensure optimal
braking.
Adjustment of the braking system:
After using the kick scooter for a while, the braking quality will be diminished due to wear of
the brake disc, which is a normal process. At this point, you can adjust the braking system
to improve its efficiency. Here are the steps to follow:
Step 1 :
Using Figure 7 below as a guide, adjust nut # by loosening it, and then tighten nut #1 to
secure the change and prevent loosening.
Figure 7
Step :
Access the adjustment nut corresponding to the one shown below in Figure 8. Then turn it
counterclockwise. Then rotate the wheel to see if you can hear the disc brake making a
grinding noise.
The goal is to turn the nut counterclockwise as much as possible without this rubbing noise
being heard. If there is a rubbing noise, please turn the nut slightly in the opposite direction,
and check again if the rubbing noise is still heard.
Figure 8
Note: If no adjustment is possible in step 1, go directly to step .

10
D
DR
RI
IV
VI
IN
NG
G
I
IN
NS
ST
TR
RU
UC
CT
TI
IO
ON
NS
S
1. Ready to use the kick scooter
1.1. For your safety, it is important to use a helmet and proper protective equipment;
1.2. Choose an appropriate place to use the kick scooter;
1.3. Unfold the vehicle following the instructions in this guide;
1.4. Adjust the height of the vertical bar of the handlebar to your height.
2. Start moving
2.1. After all preparations, press the battery switch to turn on the vehicle's power;
2.2. Press and hold the button «M» for more than one second to start the unit (See Figure 5);
2.3. Place one foot on the non-slip deck (Located above the battery), and the other foot at ground
level to gently push the kick scooter forward. As the vehicle begins to roll, also place your second
foot on the non-slip deck and slowly turn down the speed control handle to accelerate.
3. To turn off
3.1. Press the handbrake and hold it until you come to a stop.

11
B
BA
AT
TT
TE
ER
RY
Y
A
AN
ND
D
C
CH
HA
AR
RG
GE
ER
R
1. Every electric kick scooter that leaves our store is equipped with a lithium battery and a
smart charger, both of which are specifically designed for this type of vehicle. Therefore, it
is important not to use other chargers to charge your kick scooter, and similarly other
models of electric kick scooters should not be charged with the charger included with this
model. The seller is not responsible for any damage resulting from the battery or charger.
2. When you purchase your electric kick scooter, please fully charge the battery before
using it. Note that the battery can be recharged at any time. In addition, to optimize the
lifespan of the battery, it is not recommended to discharge the battery completely when
using the vehicle. Also in this same perspective, it is advisable to recharge the battery after
each use of the vehicle.
3. The lithium battery included with this electric kick scooter has a lifespan of approximately
400 to 800 recharges. However, if you find that the battery capacity remains low despite a
full charge, it is time to replace it with a new battery.
4. The special charger included with this model has a charge protection function. Therefore,
when the battery is fully charged to capacity, the green light is displayed and the charger
automatically stops charging. Also note that the charging time required depends on the
remaining energy capacity in the battery at the time of charging.
I
IN
NS
ST
TR
RU
UC
CT
TI
IO
ON
NS
S
F
FO
OR
R
R
RE
EC
CH
HA
AR
RG
GI
IN
NG
G
T
TH
HE
E
B
BA
AT
TT
TE
ER
RY
Y
Remove the protective cap blocking the charging port (See Figure 9), plug the charger
connector into the charging port and insert the other end of the charger into the electrical
outlet. When the red light on the charger is on, charging is in progress. When charging is
complete, the red light will turn off and the green light will turn on, indicating that you can
unplug the charger.
Figure 9

1
M
MA
AI
IN
NT
TE
EN
NA
AN
NC
CE
E
A
AN
ND
D
S
SE
ER
RV
VI
IC
CE
E
1. Please keep the kick scooter clean. It is not recommended to leave the device for a long
time under the hot sun or in very high humidity conditions.
2. Before each use of the kick scooter, first check that the braking system is working
properly.
3. Add a small amount of lubricant every 3 to 4 months to the parts that are used when
folding or unfolding the kick scooter.
IMPORTANTS:
If the electric kick scooter will not be used for a long period of time, the battery
should be charged to approximately 60% during storage. Failure to do so may
reduce the performance and longevity of the battery.
If you do not follow the above procedure, or if the kick scooter is involved in a
collision, or any other abnormal elements that would damage its battery, it will
not be covered by the warranty offered at the time of purchase.
S
SO
OL
LV
VI
IN
NG
G
D
DI
IF
FF
FI
IC
CU
UL
LT
T
P
PR
RO
OB
BL
LE
EM
MS
S
If the electric kick scooter breaks down and can no longer be used, please contact the
seller's customer service department so that their technicians can examine the vehicle and
proceed with its repair.

13
S
SP
PE
EC
CI
IF
FI
IC
CA
AT
TI
IO
ON
NS
S
Unfolded (L * W * H) 1080mm * 540mm * 1140mm
Folded (L * W * H) 1065mm * 232mm * 426mm
Dimensions and weight
of the vehicle
Net weight 17
kg / 38
lbs
aximum supported load 120
kg / 265
lbs
aximum speed 30
km/h
aximum climbable slope elevation 25 degrees
Pro erties of the vehicle
Distance per charge
45
km to 65
km ( ay vary
depending on road conditions,
speed and user weight)
Nominal voltage 48 Volts
Type Lithium-ion
Battery
Capacity 13
Ah
Type Brushless DC motor
Power rating 960 Watts
Nominal voltage 48 Volts
Motor
aximum torque 25
Nm
Input voltage 110 Volts - 220 Volts
Charger
Charging time Variable depending on the battery
and its condition

14
T
TR
RO
OT
TT
TI
IN
NE
ET
TT
TE
E
É
ÉL
LE
EC
CT
TR
RI
IQ
QU
UE
E
F
FA
AS
ST
TE
ER
R
K
KS
S-
-2
20
0
C
CI
IT
TY
Y
M
MA
AN
NU
UE
EL
L
D
D
'
'
U
UT
TI
IL
LI
IS
SA
AT
TE
EU
UR
R
Il est important de lire attentivement le manuel
et la garantie avant d'utiliser l'appareil
______________________________
TABLE DES MATI RES
:
1. Présentation de la trottinette
2. Consignes de sécurité
3. Les différents types de pliage de l'appareil
4. Instructions d'utilisation
5. Instructions pour ajuster le système de freinage
6. Instructions pour la conduite
7. Batterie et chargeur
. Maintenance et entretien
9. Spécifications
16
P
PR
RÉ
ÉS
SE
EN
NT
TA
AT
TI
IO
ON
N
D
DE
E
L
LA
A
T
TR
RO
OT
TT
TI
IN
NE
ET
TT
TE
E
1. Poignée 2. Panneau numérique 3. Levier de pliage
4. Guidon 5. Frein à main 6. Klaxon
7. Fixation d'ajustement du guidon 8. Barre verticale 9. Fixation au bas du guidon
10. Boucle de pliage 11. Goupille de pliage 12. Phare avant
13. Joint de pliage 14. Roue avant 15. Garde-boue avant
16. Suspension avant 17. Tablier antidérapant 18. Compartiment pour batterie
19. Suspension arrière 20. oteur 21. Protecteur du frein à tambour
22. Écrou d'ajustement du frein 23. Lumière à frein 24. Garde-boue arrière

17
C
CO
ON
NS
SI
IG
GN
NE
ES
S
D
DE
E
S
SÉ
ÉC
CU
UR
RI
IT
TÉ
É
1. Cet appareil est une trottinette électrique pour adultes qui doit être utilisée par une seule
personne à la fois. Pour la sécurité d'autrui, veuillez ne pas confier votre trottinette qui n'est
pas apte à utiliser celle-ci.
2. Veuillez porter un casque ainsi que d'autres équipements de protection lorsque vous
conduisez cet appareil. De même, veuillez respecter les lois et règlements en vigueur à
l'endroit où le véhicule est utilisé.
3. Ne conduisez jamais la trottinette dans des zones dangereuses ou illégales.
4. Veuillez vous entraîner dans un espace ouvert et éviter de conduire sur la route avant
d'avoir acquis les compétences nécessaires.
5. Ne vous comportez pas dangereusement et ne conduisez pas d'une seule main lorsque
vous roulez. De plus, il est important de conserver vos pieds sur la trottinette.
6. N'essayez pas de franchir directement les changements de niveau d'une hauteur
supérieure à 3 cm, puisque cela pourrait renverser la trottinette et causer des blessures au
conducteur et/ou des dommages à l'appareil. De plus, il est également recommandé
d'éviter autant que possible ceux d'une hauteur inférieure à 3 cm.
7. Pour assurer une conduite sécuritaire, veuillez limiter votre vitesse à 5 km/h. Il est
recommandé d'éviter d'utiliser la trottinette durant la nuit, mais advenant la nécessité,
veuillez allumer les lumières et limitez votre vitesse en dessous de 15 km/h.
. N'utilisez pas la trottinette lorsque la température est inférieure à 5° Celsius. De plus, il
est important de ne pas utiliser l'appareil lors d'averses de pluie ou de neige, puisque cela
pourrait occasionner des dommages à la trottinette qui advenant le cas ne pourront être
couverts par la garantie offerte lors de l'achat.
9. Lorsque vous rencontrez une route irrégulière ou en mauvais état, veuillez ralentir
prudemment, voire même marcher au côté de la trottinette, cela jusqu'à ce que les
conditions redeviennent praticables.
10. Évitez de rouler sur les surfaces recouvertes d'huile ou de glace.
11. Ajustez la hauteur du guidon à la position adéquate en fonction de votre taille pour vous
assurer une conduite sécuritaire.
12. Il est important de ne pas laisser le véhicule être immergé dans une profondeur d'eau
supérieure à 4 cm, puisque cela pourrait endommager ses composantes électriques,
lesquelles ne pourront plus être couvertes par notre garantie.
13. Il est recommandé d'éviter d'utiliser l'appareil lors d'intempéries ou de chute de neige,
puisque cela pourrait occasionner des dommages à la trottinette.

18
L
LE
ES
S
D
DI
IF
FF
FÉ
ÉR
RE
EN
NT
TS
S
T
TY
YP
PE
ES
S
D
DE
E
P
PL
LI
IA
AG
GE
E
D
DE
E
L
L
'
'
A
AP
PP
PA
AR
RE
EI
IL
L
A. Véhicule déplié B. Pliage des poignées
C. Pliage complet du véhicule
I
IN
NS
ST
TR
RU
UC
CT
TI
IO
ON
NS
S
P
PO
OU
UR
R
P
PR
RO
OC
CÉ
ÉD
DE
ER
R
A
AU
U
P
PL
LI
IA
AG
GE
E
1. Comme illustré sur les photos suivantes:
A. Desserrez la fixation d'ajustement du guidon.
B. Appuyez sur le guidon pour que celui soit entièrement inséré dans sa barre verticale.
Illustration 1
19
2. Déclenchez le levier de pliage sur chaque côté du guidon, puis rabattez les poignées à
90 degrés pour compléter leur pliage.
Illustration 2
3. Poussez le guidon vers l'avant en appuyant sur la boucle de pliage (Composante #10)
pour faire sortir la goupille (Composante #11) du joint de pliage (Composante #13), et
ensuite plier la barre verticale du guidon vers l'arrière du véhicule jusqu'au point où la
boucle de pliage s'insère dans l'attache prévue à cet effet.
Illustration 3
4. Pour procéder au dépliage du véhicule, vous n'avez qu'à inverser la procédure décrite
précédemment.

0
I
IN
NS
ST
TR
RU
UC
CT
TI
IO
ON
NS
S
D
D
'
'
U
UT
TI
IL
LI
IS
SA
AT
TI
IO
ON
N
F
FR
RE
EI
IN
N
É
ÉL
LE
EC
CT
TR
RO
ON
NI
IQ
QU
UE
E
Illustration 4
Pour effectuer un freinage, il suffit de saisir le levier de frein présent au niveau de la
poignée gauche et de serrer lentement celui-ci (Point 1 de l'Illustration 4). Ainsi, plus le
levier est serré, plus la force de freinage sera importante.
P
PA
AN
NN
NE
EA
AU
U
N
NU
UM
MÉ
ÉR
RI
IQ
QU
UE
E
Illustration 5
Boutons présent sur le panneau numérique (Illustration 5):
- Bouton d'alimentation «M»
- Boutons réglant l'éclairage ainsi que le mode de vitesse «+» et «-». Concernant le mode
de vitesse, trois possibilités sont proposées:
- ECO: Vitesse lente
- MID: Vitesse moyenne
- HIGH: Vitesse rapide
1. Les indications à l'écran
Affichage de la vitesse, la puissance de la batterie, le code de défaillance, et la distance
parcourue (Odomètre).
Illustration 6
Table of contents
Languages:


