Rungu Juggernaut1 User manual

V2.0 RUNGU Electric Juggernaut Owner Manual –2019 model year
Copyright 2019 Standard Bearer Machines, LLC 1
rungu®electric juggernaut
(mid-drive models)
owner manual
Congratulations on purchasing a Rungu Electric Juggernaut
1
! You own the latest generation of the
ultimate electric alternative to a Quad ATV for on-road and off-road fun. Before you ride and make new
tracks, please read the following instructions carefully.
Standard Bearer Machines, LLC (Standard Bearer Machines) thanks you for your purchase!
Electric Juggernaut uses the Bafang BBSHD mid-drive motor with a custom Rungu 52V (nominal voltage)
input that generates more than 1.4kW of mechanical power for off-road use. You access the power by
pedaling (“Pedelec”) or pressing the thumb throttle. As a “Pedelec,” the Electric Juggernaut senses
when you start to pedal and engages the motor to assist your pedaling - you don’t have to use the
throttle if you don’t want to. The amount of power assist varies based on the power level you select as
you ride. The Electric Juggernaut has five selectable power levels starting with barely any assist up to full
power, which is intended for use off-road only. The power settings are discussed below.
Note: US Federal Law mandates a 750W/20 MPH limit for riding an e-bike on public roads without a
license. Please check with your local government to ensure you follow all local laws and ordinances.
Standard Bearer Machines are not liable for those who choose not to follow their local laws.
CAUTION: STANDARD BEARER MACHINES WILL NOT BE HELD RESPONSIBLE FOR PEOPLE WHO CHOOSE
TO DISREGARD THE LAW!
WARNING: IMPORTANT- STANDARD BEARER MACHINES WILL NOT BE LIABLE FOR ANY DAMAGE OR
INJURY THAT MAY OCCUR DUE TO OPERATION OF YOUR ELECTRIC JUGGERNAUT. BY USING THE
ELECTRIC JUGGERNAUT, YOU ARE AGREEING TO STANDARD BEARER MACHINES TERMS AND
CONDITIONS AND THE WARNINGS AND CONDITIONS OF THE GENERIC BIKE MANUAL WHICH ARE
INCLUDED WITH OTHER FILES IN THE USB KEY ACCOMPANYING THE ELECTRIC JUGGERNAUT.
1
As the owner, you agree and are bound by all sales and transfer conditions as defined in “SBM Rungu Sales Terms
and Conditions US 2019.” Copies of these documents are available on the USB document drive that ships with the

V2.0 RUNGU Electric Juggernaut Owner Manual –2019 model year
Copyright 2019 Standard Bearer Machines, LLC 2
Contents
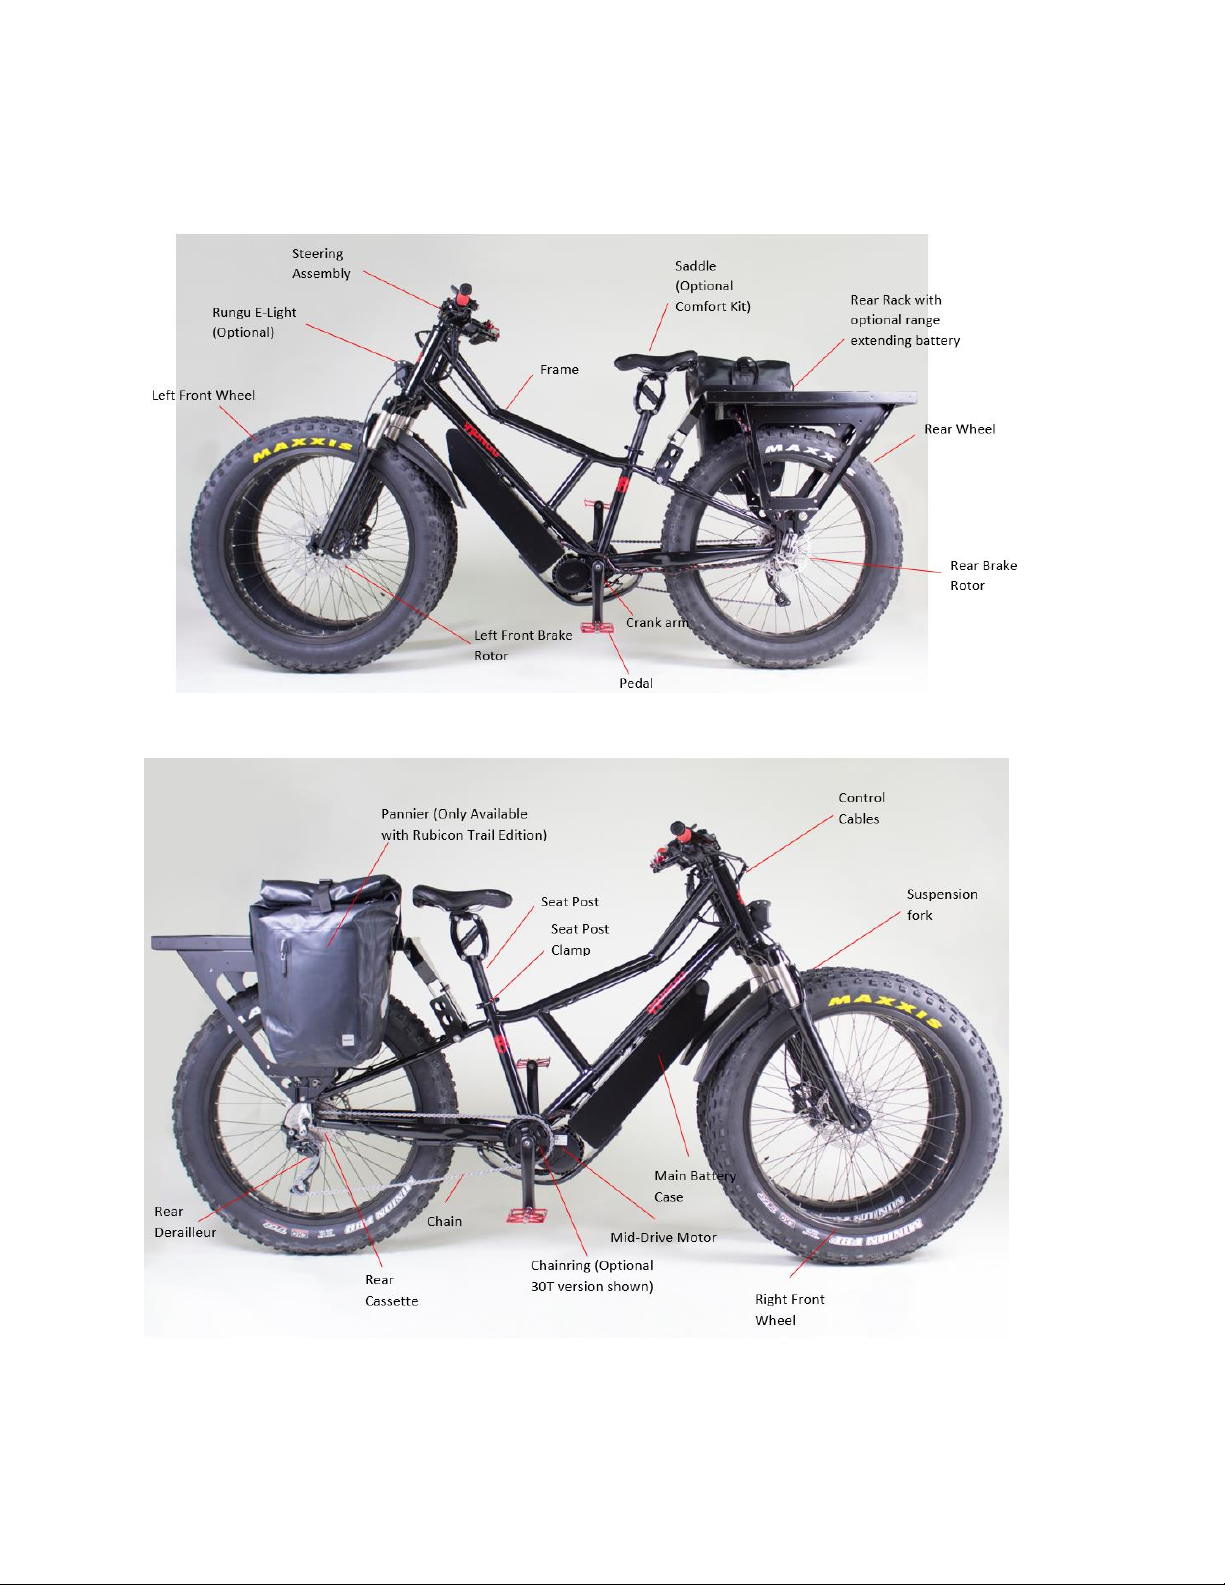
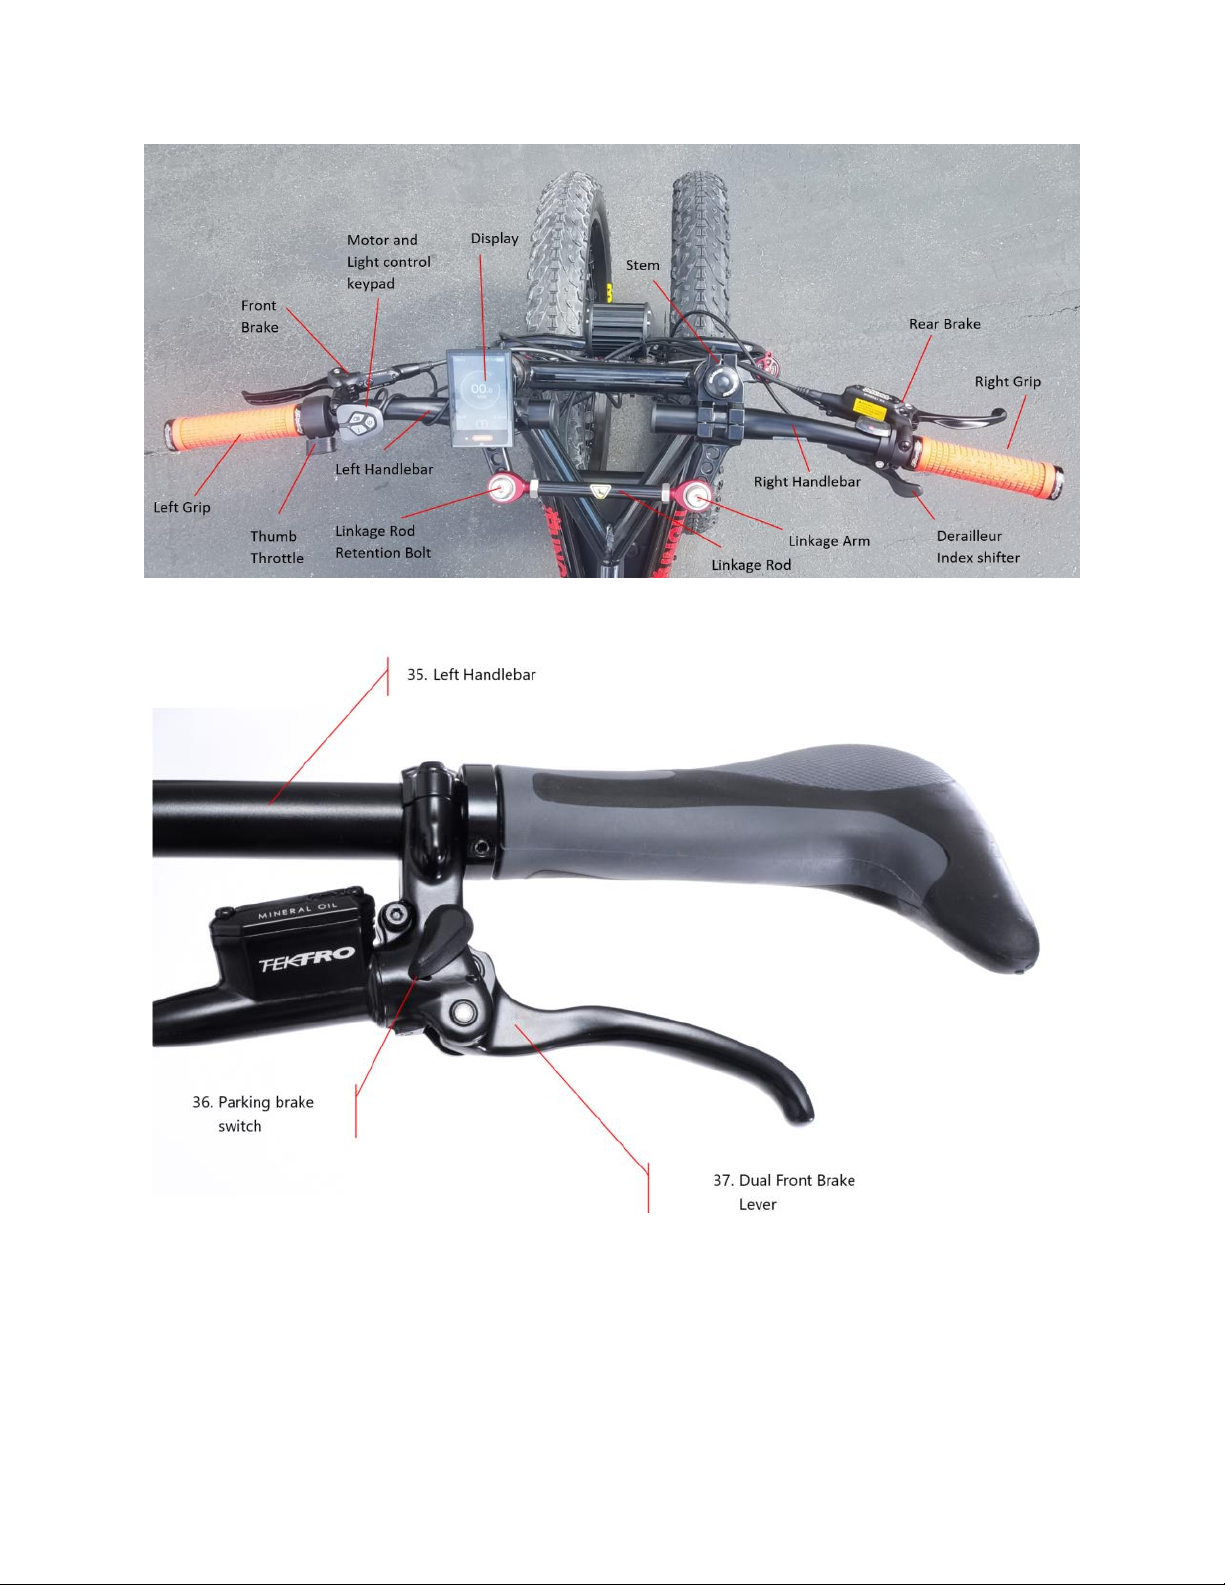
Electric Juggernaut parts identification ........................................................................................................4
Unpacking and Assembly Instructions..........................................................................................................6
Tools required...........................................................................................................................................6
Unpacking and Assembly Instructions......................................................................................................7
Additional Installation Instructions –mud flaps.....................................................................................28
Additional Installation Instructions –Rungu Cargo Rack with or without range-extending battery. ....32
Cautions and Safety ....................................................................................................................................40
General Cautions and Warnings .............................................................................................................40
Battery Safety..........................................................................................................................................41
Battery Safety Precautions..................................................................................................................42
Catastrophic Battery Failure ...............................................................................................................42
Battery Safety (In Depth) ....................................................................................................................43
Battery Failure Response Procedure ..................................................................................................44
Operating Electric Juggernaut.....................................................................................................................45
Charging Your Main Battery –Single battery units (Standard, HC+) ......................................................45
Charging Dual Batteries –Dual Battery Units (Overland, Rubicon)........................................................53
Before your first ride –Safety Check ......................................................................................................59
Using the control keypad and understanding the dashboard ................................................................62
Turning on Electric Juggernaut ...........................................................................................................62
Reading the dashboard.......................................................................................................................62
Accessing the display settings.............................................................................................................64
Toggling the (optional) Rungu E-Light on and off...............................................................................64
Turning off Electric Juggernaut...........................................................................................................64
Built-in USB charging port...................................................................................................................65
PIN Code..............................................................................................................................................65
Push assistance ...................................................................................................................................65
Riding Electric Juggernaut.......................................................................................................................66
Riding Electric Juggernaut, the first time............................................................................................66
Using Gear Shifters..............................................................................................................................66
Understanding and changing Electric Juggernaut Power Level..........................................................67
Power level and gear combination guidelines....................................................................................70

V2.0 RUNGU Electric Juggernaut Owner Manual –2019 model year
Copyright 2019 Standard Bearer Machines, LLC 3
Electric Juggernaut Operation Cautions .............................................................................................70
Riding Safety ...........................................................................................................................................71
Adjusting the Front Suspension..............................................................................................................72
Using the parking brake switch...............................................................................................................72
Using the optional 12VDC outlet ............................................................................................................73
Rungu Electric Juggernaut Maintenance and Care.....................................................................................74
Before Each Ride.....................................................................................................................................74
After Each Ride........................................................................................................................................74
Battery Care ............................................................................................................................................74
Storage When Not Using Electric Juggernaut for Periods of Two Weeks or Longer ..............................74
Prolonging the Life of your Battery –Best Practices ..............................................................................75
Maintenance –After strenuous rides, and every 500 miles or six months............................................75
Securing your Electric Juggernaut...........................................................................................................76
Technical Information.................................................................................................................................77
Default Display Settings ..........................................................................................................................77
Dimensions..............................................................................................................................................77
Performance ...........................................................................................................................................78
Electrical..................................................................................................................................................78
Troubleshooting..........................................................................................................................................79
Electrical..................................................................................................................................................79
Motor and System Performance.............................................................................................................80
Mechanical..............................................................................................................................................81
Getting more information...........................................................................................................................82

V2.0 RUNGU Electric Juggernaut Owner Manual –2019 model year
Copyright 2019 Standard Bearer Machines, LLC 4
Electric Juggernaut parts identification
The following images show the names of various components on the Electric Juggernaut
Figure 1 Left Side View
Figure 2 Right Side View

V2.0 RUNGU Electric Juggernaut Owner Manual –2019 model year
Copyright 2019 Standard Bearer Machines, LLC 5
Figure 3 Steering assembly view
Figure 4 Parking Brake View

V2.0 RUNGU Electric Juggernaut Owner Manual –2019 model year
Copyright 2019 Standard Bearer Machines, LLC 6
Unpacking and Assembly Instructions
WARNING: FAILURE TO FOLLOW INSTRUCTIONS MAY LEAD TO INCOMPLETE OR FAULTY ASSEMBLY
THAT CAN RESULT IN ACCIDENTAL RIDER INJURY OR DEATH.
Before you ride and make new tracks, please follow the assembly instructions carefully. The team at
Standard Bearer Machines recommends that you have the assembly performed by a qualified bike
mechanic.
Tools required
•5mm Hex wrench
•6mm Hex wrench
•Adjustable wrench
•Tire inflation pump (presta valve)
•Bicycle Tire pressure gauge –presta valve
•Wire cutters or scissors to remove packing material

V2.0 RUNGU Electric Juggernaut Owner Manual –2019 model year
Copyright 2019 Standard Bearer Machines, LLC 7
Unpacking and Assembly Instructions
WARNING: FAILURE TO FOLLOW THESE INSTRUCTIONS MAY LEAD TO INCOMPLETE OR FAULTY
ASSEMBLY THAT CAN RESULT IN ACCIDENTAL RIDER INJURY OR DEATH. IF YOU ARE NOT
COMFORTABLE PERFORMING THE STEPS BELOW, HAVE A PROFESSIONAL BICYCLE TECHNICIAN
ASSEMBLE YOUR ELECTRIC JUGGERNAUT.
1. Electric Juggernaut comes in a cardboard carton. After you have removed the binding straps,
remove the top cover. If you intend to ship or return your Rungu, please keep all packing
materials.
2. If you have purchased a model with a Rungu Cargo Rack (HC+, Overland, Rubicon Trail Edition)
or an optional Cargo Rack, remove the rack and place it to one side.
3. Remove the accessory box containing Quick Release Skewers, AC battery charger, tools, USB
document drive, keys and pedals.
Note: If you purchased an Electric Juggernaut with dual batteries or with the optional Cargo Rack,
remove the rack first and place it to the side.
4. Remove the two wheels from the carton and place them aside carefully to avoid damaging the
disc brake rotors.
Accessory Box. May be
located elsewhere
inside the carton

V2.0 RUNGU Electric Juggernaut Owner Manual –2019 model year
Copyright 2019 Standard Bearer Machines, LLC 8
5. Lift the frame and rear wheel from the carton and place the assembly on the floor gently so that
it stands upright as it was in the carton.
CAUTION: ELECTRIC JUGGERNAUT FRAME AND REAR WHEEL WEIGH 68 LBS (31 KG). USE TWO
(2) PEOPLE TO REMOVE THE ELECTRIC JUGGERNAUT FROM THE PACKAGING TO AVOID INJURY
6. Remove the packaging from the front forks steering assembly and handlebars.
7. Use the 5mm hex wrench to loosen the handlebar retention screws as shown below
8. Slide the right handlebar into the handle bar clamp.

V2.0 RUNGU Electric Juggernaut Owner Manual –2019 model year
Copyright 2019 Standard Bearer Machines, LLC 9
9. Insert the handlebar so that it extends at least 45 mm or 1 ¾” past the inside of the stem.

V2.0 RUNGU Electric Juggernaut Owner Manual –2019 model year
Copyright 2019 Standard Bearer Machines, LLC 10
10. Fasten, but do not tighten handlebar retention screws
11. Remove the left handlebar retention screws allowing the left-side linkage arm to move away
from the stem

V2.0 RUNGU Electric Juggernaut Owner Manual –2019 model year
Copyright 2019 Standard Bearer Machines, LLC 11
12. Place the left-side handle bar such that the display support bridges the stem. Take care to make
sure the display and control cables are behind the stem as shown below.

V2.0 RUNGU Electric Juggernaut Owner Manual –2019 model year
Copyright 2019 Standard Bearer Machines, LLC 12
13. Then replace the left-side linkage arm and the handlebar retention screws. Fasten but do not
tighten the handlebar retention screws.

V2.0 RUNGU Electric Juggernaut Owner Manual –2019 model year
Copyright 2019 Standard Bearer Machines, LLC 13
14. Ensure that the left handlebar extends at least 45 mm or 1 ¾” past the stem.
15. Tighten both sets of handlebar retention screws so that you can still rotate each handlebar and
slide the handlebar inside the stem.
16. Rotate the handlebars so that each side aligns, and they fit best for you.
Note: For additional adjustments after your first ride, loosen the handlebar retention screws and then
repeat steps 16 and 17.

V2.0 RUNGU Electric Juggernaut Owner Manual –2019 model year
Copyright 2019 Standard Bearer Machines, LLC 14
17. When you have aligned each handlebar, use a pattern of tightening the upper handlebar
retention screw and then bottom screw instead of tightening both top screws and then the
bottom screws.
WARNING: TIGHTENING HANDLEBAR HANDLEBAR RETENTION SCREWS BEYOND 6NM (53 IN
LBS.) OR FAILING TO ALIGN THE SCREWS WITH THE THREADS IN THE STEM MAY STRIP
THREADS IN STEM LEADING TO INSUFFICIENT TIGHTENING OF THE HANDLEBAR. FAILURE TO
TIGHTEN HANDLEBAR SUFFICIENTLY MAY RESULT IN UNEXPECTED HANDLEBAR ROTATION
THAT CAN RESULT IN ACCIDENTAL RIDER INJURY OR DEATH.
18. Open the accessory box to remove the two quick release skewers from the packaging.
19. Select which wheel will be the right-side wheel and the left-side wheel. Often, the wheels will
be labeled “L” or “R”. This means that the brakes have been adjusted differently for each wheel
–use the labels to guide which wheel mounts on which side.
Note: The left side is considered the side with the brake rotors. The right side has the chain and
gearing.
1
2
4
3

V2.0 RUNGU Electric Juggernaut Owner Manual –2019 model year
Copyright 2019 Standard Bearer Machines, LLC 15
20. Mount the left wheel to the left fork as shown in the two pictures below. Be careful to slide the
brake rotor between the disc caliper.

V2.0 RUNGU Electric Juggernaut Owner Manual –2019 model year
Copyright 2019 Standard Bearer Machines, LLC 16
21. Mount the right front wheel to the right fork. As with the left wheel, make sure that the brake
rotor slides between the brake calipers.

V2.0 RUNGU Electric Juggernaut Owner Manual –2019 model year
Copyright 2019 Standard Bearer Machines, LLC 17
22. Unscrew the retention nut from one of the quick-release skewers and remove the associated
conical spring.
23. Insert the skewer into the left wheel from the side of the brake disc as shown below.

V2.0 RUNGU Electric Juggernaut Owner Manual –2019 model year
Copyright 2019 Standard Bearer Machines, LLC 18
24. Replace the retention nut and conical spring as shown below.
25. Make sure that the quick release retention nut and lever are seated in the fork dropouts.

V2.0 RUNGU Electric Juggernaut Owner Manual –2019 model year
Copyright 2019 Standard Bearer Machines, LLC 19
26. Tighten the retention nut and close the quick-release lever once the wheel is mounted in the
fork. As a guideline the retention nut should begin to clamp when the lever points away from
the wheel at a right angle.
WARNING: MAKE SURE TO TIGHTEN THE QUICK-RELEASE IN THE FORK SO THAT IT CANNOT
FALL OUT OF THE FORK; FAILURE TO ADEQUATELY TIGHTEN THE QUICK-RELEASE CAN RESULT
IN ACCIDENTAL RIDER INJURY OR DEATH.
27. Unscrew the retention nut from the other of the quick-release skewers and remove the
associated conical spring.
28. Insert the skewer into the right wheel from the outside as shown.

V2.0 RUNGU Electric Juggernaut Owner Manual –2019 model year
Copyright 2019 Standard Bearer Machines, LLC 20
29. Replace the retention nut and conical spring as shown below.
30. Make sure that the quick release retention nut and lever are seated in the fork dropouts.
Table of contents
Other Rungu Scooter manuals