FCC Excecutive 6.2 Instructions for use

Sare u cookin!
FCC-G-20350-62SE / 611i-F2G-1
!
Instructions and maintenance
MANUAL
OUTDOORUSEONLY
READTHEOPERATINGINSTRUCTIONS
BEFOREUSINGTHEAPPLIANCE.
Contents
Warnings
Technical data
Parts list
Assembly
Regulator and hose
Check for leaks
Lighting instructions
Last check
Maintenance
Troubleshooting
Consumer contact
3
4
5
6
10
11
12
13
14
15
16

Warnings
• THIS PRODUCT IS DESIGNED AS A HOME APPLICANCE AND NOT SUITABLE
FOR PROFFESIONAL USE IN A RESTAURANT OR SIMILAR.
• FAILURE TO FOLLOW THE INSTRUCTIONS PROVIDED CAN IMPLY A RISK OF
SERIOUS INJURY TO PERSONNEL AND FIXED INSTALLATIONS.
• THE BBQ IS INTENDED FOR OUTDOOR USE ONLY IN WELL-VENTILATED
AREAS. NEVER BBQ IN ENCLOSED SPACES OR UNDER A ROOF, DUE TO THE
DANGER OF THE LACK OF OXYGEN.
• NEVER MOVE THE BBQ WHILE IN USE OR CONNECTED TO THE GAS BOTTLE.
• SHUT OFF THE GAS ON THE REGULATOR AFTER USE AND DISCONNECT FROM
THE GAS BOTTLE.
• MODIFICATION OF THE BBQ CAN CAUSE DANGER AND WILL INVALIDATE THE
WARRANTY.
• ALWAYS KEEP AN EYE ON THE BBQ WHEN IN USE. ACCESSIBLE PARTS OF THE
BBQ BECOME VERY HOT DURING USE. NEVER ALLOW CHILDREN OR OTHERS
WHO REQUIRE SUPERVISION NEAR THE BBQ WHEN IN USE.
• THIS BBQ IS ONLY INTENDED FOR OUTDOOR USE AND MUST NOT BE
USED UNDER A ROOF. DO NOT USE UNDER NORMAL GROUND LEVEL.
GAS CAN ACCUMULATE AND REPRESENT A DANGER OF EXPLOSION. GAS
ACCUMULATION CAN ALSO CAUSE OXYGEN DEFICIENCY.
• PERFORM THE LEAK TEST REGULARLY AND ALWAYS WHEN CHANGING THE
GAS BOTTLE AFTER A LONG TIME IN STORAGE. ALWAYS CHECK THE GAS
HOSE FOR DAMAGE AND CRACKS EACH TIME YOU USE THE BBQ.
• IF STORING THE BBQ IN A GARAGE OR BASEMENT BELOW GROUND LEVEL,
DO NOT STORE THE GAS BOTTLE THE SAME PLACE, AS IT MUST BE STORED
ABOVE NORMAL GROUND LEVEL.
• MAKE SURE THE BBQ IS COMPLETELY COOLED OFF BEFORE A COVER IS PUT
ON.
!
This appliance must not be disposed as unsorted municipal waste. It must be returned to a designated
collection point for recycling. By doing so, you will help to conserve resources and protect the environment.
Contact your local authorities for more information.
This appliance also use 1xAA battery. Used batteries must be disposed of properly.
Battery selling stores and municipal collection points offer special containers for battery disposal.
3
Tekniske data
Total Heat input: 27.7 kW
Gas consumption: 2016 gram/hour
Gasbottle (not included): Use standard bottle approved for use in the Nordic Region.
Even though butane and propane gas can be used, we recommend propane for use in the
Nordic Region. Approved hoses and regulators are available from most outlets selling gas
equipment.
NB! Gas hoses used for this product must not exceed 120 cm in length.
2531-19
This product is produced according to
EUROPEAN GAS APPLIANCE
STANDARD EN498 and is CE certified
Technical Data
ONLY THE GAS TYPE AND GAS CATEGORY LISTED IN THE RATING LABLE
SHOULD BE USED ON YOUR APPLIANCE.
BE, CY, DK, EE, FI, FR,
HU, IT, LT, NL, NO, SE, SI,
SK, RO, HR, TR, BG, IS,
LU, MT, CZ, GB,GR,LV
0.93 mm main burner
0.93 mm back burner
0.93 side bruner
G30 (butan), G31 (propan)
og blandinger av disse,
LPG 50 mbar
I3B/P(30)
!
DESTINATION OF
COUNTRIES TO USE GAS TYPEVALVE SIZE GAS CATEGORY
4
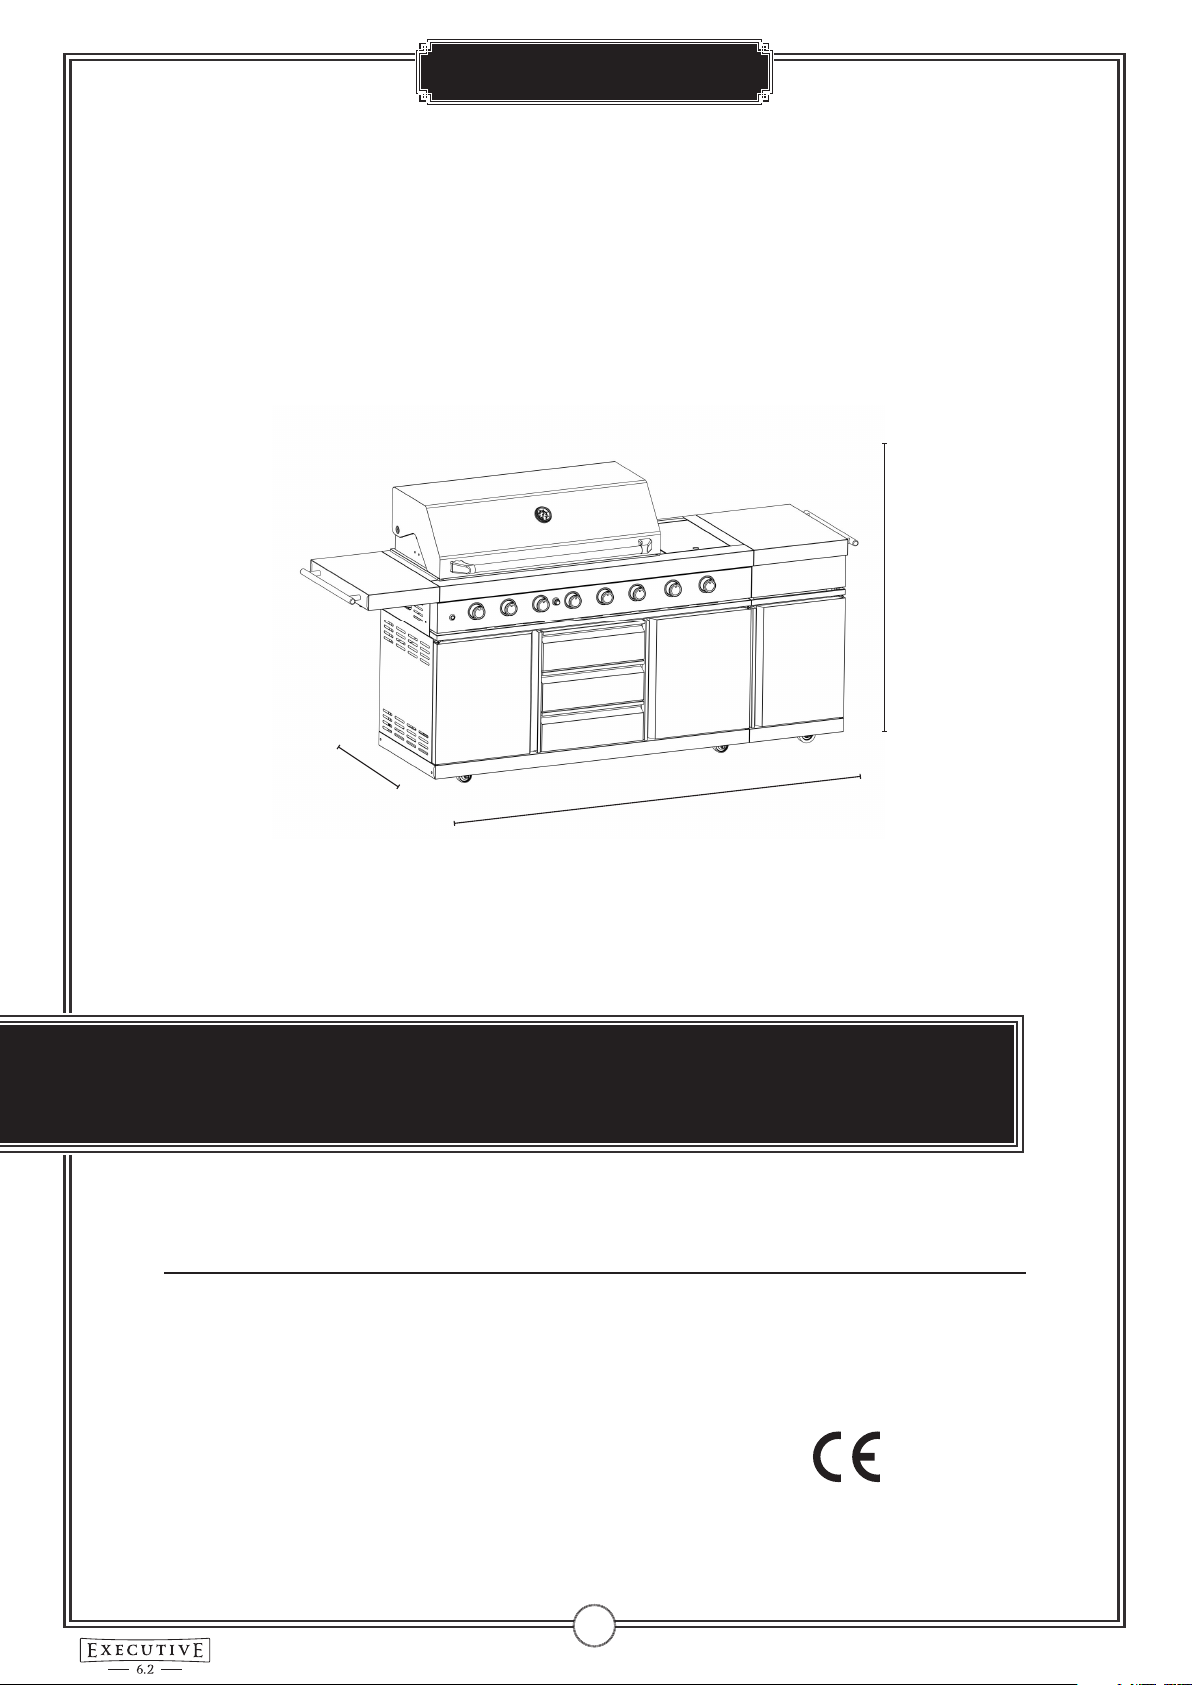
h: 119 cm
w: 214cm
d: 64cm

Parts list
DESCRIPTION
WARMING RACK
COOKING GRID
COOKING GRID
FLAME TAMER
FIREBOX ASSY
SIDE BURNER GRID
INFRARED SIDE BURNER
HANDLE
SIDE TABLE
DRIP TRAY
CABINET
CABINET FOR GAS TANK
ROTISSERIE
ROTISSERIE MOTOR
BRACKET FOR ROTISSERIE MOTOR
TRANSFORMER
COVER
M6x10 SCREW
QTY
1
1
2
6
1
4
1
2
1
1
1
1
1
1
1
1
1
9
CODE
1
2
3
4
5
6
7
8
9
10
11
12
13
14
15
16
17
18
5

1. Side /front handle assembly ( No. 8)
2. Side table assembly (No.9)
Assembly
Before beginning assembly of product make sure all parts are
present. Compare parts with package contents list. If any parts are
missing or damaged, do not attempt to assembly the product.
Remove all packing material from the grill.
6
Tools required:
Philips Screwdriver
Gloves (if necessary)

Assembly
3. Flame tamer assembly (No. 4) 4. Flame tamer assembly (No. 4)
5. Warming Rack Assembly (No. 1)
6. Side burner grid (No. 6)
7

Assembly
1XAA BATTERY NEEDED.
BATTERY NOT INCLUDED
8. Igntion7. Fat tray (No. 10)
10. Rotisserie kit
9. For gas tank
8

Assembly
Replacing the main
burner
Replacing the barbecue lights Replacing the LED light
1. Take off the light rear cover 1. Take off the control knob and
unscrew the knob bezel
2. Take off the unit and disconnect
the cable
3. Replace a new one and
reassemble
2. Take off the light
3. Disconnect the cable
4. Replace a new light and
reassemble
9

Regulator and hose
Follow these instructions carefully to avoid
serious damage your barbecue and causing injury
to yourself and to property.
HOSE
•Connect the gas hose to the gas rail inlet on the left hand side of the
barbecue. Do not overtighten.
•Fit the regulator and the hose. Follow the assembly instructions
supplied with the regulator set.
•Do not use any sealing tape, paste or liquid on the connection.
•Gas hoses used for this product must not exceed 120 cm in length
•Check the gas hose regularly for cracks, damage and decay. Never
use a damaged gas hose.
REGULATOR
•Confirm all barbecue control knobs are OFF
•We recommend propane gas for use in the Nordic Region, but butane
can also be used.Butane is not very suitable for low temperatures.
•Check that the gas bottle stands on a firm, flat surface and is lower
than the connector.
•Use an approved gas bottle that fits the regulator supplied. Bottles of
10 kg or above are recommended.
NEVER STORE THE GAS BOTTLE DIRECTLY UNDER THE BBQ WHEN IN USE.
IF THE GAS BOTTLE IS BEING STORED UNDER THE BBQ WHEN NOT IN USE,
DISCONNECT THE REGULATOR.
NEVER MOVE THE BBQ WHILE IT IS IN USE, OR CONNECTED TO THE GAS BOTTLE.
!
10
Check for leaks
Before use please check for leaks
Never check for leaks with a naked flame, always
use a soapy water solution
1. Make a mixed solution (water and liquid detergent / soap).
2. Ensure that there are no naked flames, heat sources and cigarettes in
the vicinity when performing a leak test.
3. Check that the control valve on the BBQ is ”OFF”.
4. Connect the regulator to the cylinder and ON/OFF valve to the
burner, ensure the connections are secure then turn ON the gas.
5. Brush the soapy solution on to the hose and all joints. If bubbles
appear you have a leak, which must be rectified before use.
6. Retest after fixing the fault. Turn OFF the gas at the cylinder after
testing.
7. IF BUBBLES APPEAR, SWITCH OFF THE GAS SUPPLY AND REPAIR
THE PROBLEM. PERFORM A NEW LEAK TEST. DO NOT USE THE
BBQ BEFORE YOU ARE SURE THAT THERE ARE NO LEAKS.
8. If detected leakage cannot be rectified, do not attempt to cure
leakage but consult your gas dealer.
ALL JOINTS AND CONNECTIONS MUST BE LEAK TESTED BEFORE
USING THE BBQ. LEAK TEST ANNUALLY, AND WHENEVER
THE GAS BOTTLE IS REMOVED OR REPLACED. !
11

Lighting Instructions
!IF THE BBQ STILL WILL NOT LIGHT USING NORMAL OR MANUAL LIGHTING, REFER
TO THE TIPS SECTION ON THE TROUBLESHOOTING PAGE, OR CONTACT YOUR
DEALER.
LIGHTING INSTRUCTIONS
1. The lid must be open when lighting the burner. Do not stand with your face
directly over the gas grill when lighting it. With all gas controls on the gas grill
in the “OFF” position, turn the gas cylinder valve to the ON position at the
regulator.
2. Push down the knob and turn the knob anticlockwise to HI position, then
press and hold the igniter button for 2-3 seconds ( a sound can be heard),
thus the burner should be lit. If the burner does not light, turn the knob
to OFF position and wait for 5 minutes for gas to dispel, then repeat this
process.
3. To light other burners, repeat the same process for the adjacent burner and
continue in sequence until all the burners are lit.
4. Preheat the BBQ for about 10 minutes on maximum temperature. After
completion of preheating, turn all burners to the low position for best
cooking results.
Adjust the heat by turning the knob to the HI /LO position.
Back burner is only set in HI position.
5. To turn the barbecue OFF, turn the cylinder valve or regulator switch to
the OFF position and then turn all of the control knobs on the barbecue
clockwise to the OFF position.
Manual lighting
1. Follow above instruction step 1-3 (except the pressing of the igniter button).
2. For main burner, place the match into match holder chain and fire the match, then
put the match into the lightinghole on the right side of the fire box. For side burner,
place the fired match on the holes of the side burner head.
3. Push down and turn the knob anticlockwise to HI position, then the burner should
be lit. If the burner does not light, turn off the gas tap and wait for 5 minutes then
repeat this step 2-3.
The side burner is designed for pot/pan with diameter 180-260mm. Side burner lid can not
be used as work table, do not put anything on the side burner lid while it is not working
Before cooking for the first time, light on all the main burners and keep burning for 15
minutes with the lid closed and knob at HI position . This will “heat clean” the internal parts
and dissipate odor from the painted finish.
The color of cooking area may get a change. It is normal and it is the nature of the material.
!
12

Last Check
PLACEMENT OF THE BBQ
GOOD ADVICE
FINAL CHECK
• Ensure that the BBQ is placed at least 150cm in all directions from house walls,
trees, plants and other flammable materials or liquids when in use.
• Do not place the BBQ under a roof or overhang.
• Ensure the BBQ is placed where there is plenty of ventilation.
• Do not BBQ below normal ground level.
• Check that the control knobs work
normally.
• Check that the gas hose is free of
cracks and damage (it should always
be done before using the BBQ)
• Check that the gas bottle and hose
do not come into contact with hot
objects.
• A CLEAN BBQ WORKS BETTER,
causes less smoke and will last
longer.
• PREHEAT THE BBQ for 5 minutes
at full power prior to placing food
on the BBQ. This gives a better
result, and cuts BBQing time.
13

Maintenance
CLEANING
All cleaning and maintenance should be
carried out when the appliance is cool and
with the fuel supply turned OFF at the gas
cylinder after each time use.
DO NOT mistake brown or black
accumulation of grease and smoke for paint.
Interiors of gas BBQs are not painted at
the factory (and should NEVER be painted).
Apply a strong solution of detergent and
water or use a BBQ cleaner with scrub brush
on insides of BBQ lid and bottom. Rinse and
allow to completely air dry.
DO NOT apply a caustic BBQ / oven cleaner
to painted surfaces.
DO NOT use abrasive or flammable cleaners,
as it will damage the parts of the product and
may start a fire.
PLASTIC PARTS
Wash with warm soapy water and wipe dry.
BBQ BODY
Lack of maintenance / cleaning, can lead
to the BBQ rust. To keep the barbecues
beautiful and long lasting, it is recommended
to use mild detergents and hot water. Wipe
the surface with a non-abrasive wash cloth.
Acid-free oil is recommended to avoid rust.
COOKING GRIDS and flame tamer
Use a mild soapy water solution. Non-abrasive
scouring powder can be used on stubborn
stains, then rinse with water. Make sure the
cooking grids are well dried before storage.
INSECTS AND VERMIN
•After long-term storage, insects and other
vermin can be found in the BBQ. If you
experience problems with lighting or
irregular flames, it can be due to unwanted
guests blocking the gas supply.
•Remove the burners and clean these on
suspicion of pests in the grill. Reassemble
the burners when completely dry.
•Check regularly that the gas hose is not
damaged.
Keep the barbecue body and the accessories clean to avoid grease fire.
IN CASE OF GREASE FIRE
In case of grease fire, close the gas supply and
disconnect the controller and wait until the fire
goes out by itself.
FIRES CAUSE BY FAT, WILL DAMAGE
THE METAL. DAMAGE TO THE BBQ
CAUSED BY GREASE FIRES ARE NOT
COVERED BY THE WARRANTY AS IT
IS DUE TO INCORRECT USE.
NEVER USE WATER TO EXTINGUISH
A GREASE FIRE! CLEAN THE BBQ
REGULARLY TO AVOID GREASE FIRE
!
!
MAINTENANCE
•Check that the burners are burning
correctly regularly.
•Remove the BBQ grate and flame guards.
•Light the BBQ normally.
•Turn the controls from low to high, check
there is a difference in flame strength and
that the flames are blue, not orange. If
the burners act abnormally, refer to the
troubleshooting chapter.
•Remove any fat or deposits from previous
use with a BBQ brush.
Maintenance of burners
1. Turn gas off at control knobs and LP Tank.
2. Remove cooking grates and grease tray.
3. Remove screw at end of burner using a
screwdriver.
4. Carefully lift each burner up and away from
valve openings.
5. Wire brush entire outer surface of burner
to remove food residue and dirt.
6. Clean any blocked ports with a stiff wire
such as an open paper clip.
7. Check burner for damage, due to normal
wear and corrosion some holes may
become enlarged. If any large cracks or
holes are found replace burner.
8. Carefully refit burners.
9. Replace flametamer and cooking grid.
14
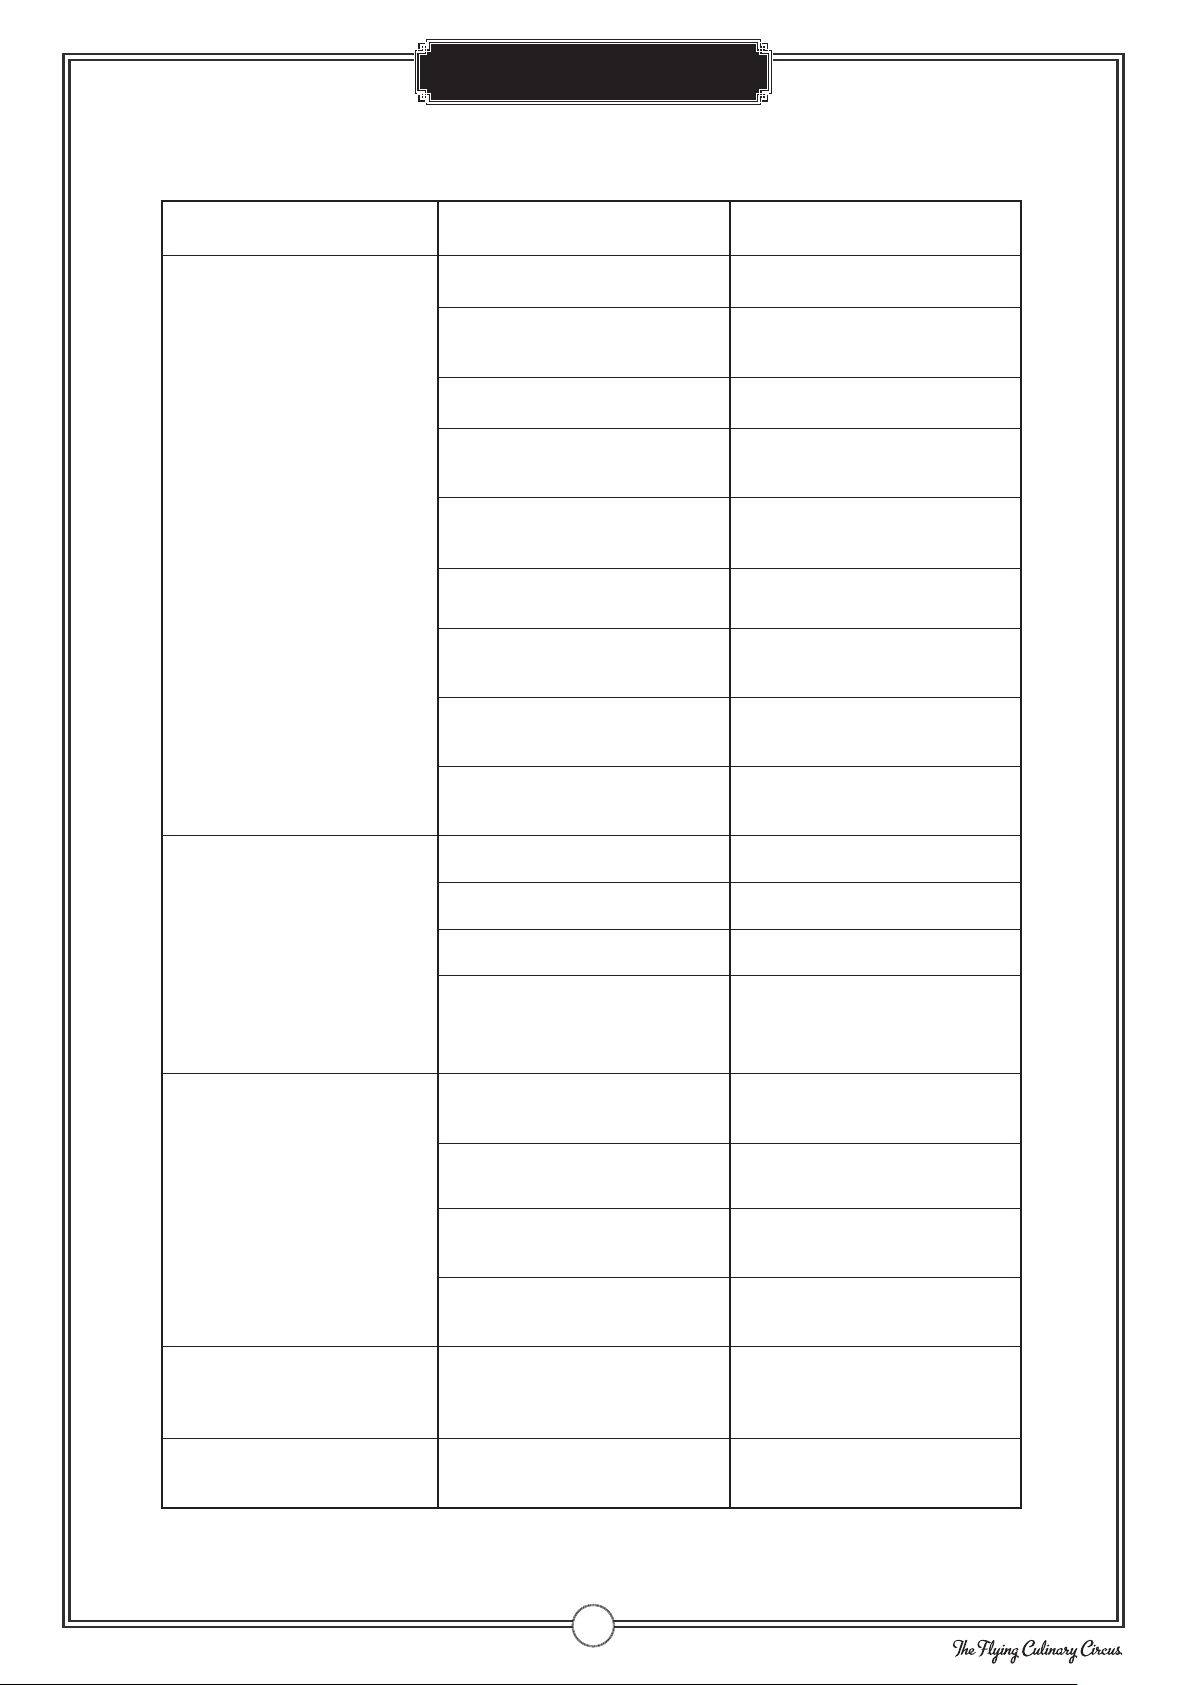
Troubleshooting
PROBLEM POSSIBLE CAUSE SOLUTION
BURNER WILL NOT
LIGHT
Gas bottle is empty Replace gas bottle
Damaged regulator Check/replace the regulator
Burner is blocked Clean the burner
Gas supply is blocked Clean gas ventury or hose
Electrode is broken or dirty Clean the electrode
Ignition knob is broken Contact your dealer
Windy conditions Place the BBQ in a less
exposed position
Ignition wire is damaged or
fitted incorrectly
Make sure wire is
mounted correct
Battery in ignitor box
is empty Change batteries
BURNER WILL
NOT LIGHT WHEN
PERFORMING MANUAL
LIGHTING
Empty gas bottle Replace gas bottle
Irregular gas supply Check/replace the regulator
The burner is blocked Clean the burner
Gas supply or hose
is blocked Clean gas ventury or hose
LOW FLAME OR
BACKFIRE
Gas bottle is too small 10 kg or larger bottle
is recommended
Burner is blocked Clean the burner
Gas supply or hose
is blocked Clean gas ventury or hose
Windy conditions Place the BBQ in a less
exposed position
TROUBLE TURNING THE
KNOBS Gas valve jammed
Replace gas valve.
NB! Knobs should be
pressed in and turned
HEAVY SMOKE Fatty foods on the BBQ Trim away excess fat from
meat. Clean the fat tray.
15

Consumer Contact
Always attach your receipt and product serial number when making a
warranty claim. Serial number is located on the side of the BBQ.
Produced in China for FCC Products AS
This product is covered by a warranty in accordance with consumer legislation. It has
undergone strict quality controls and testing at the factory. If there are any parts missing or
the product has been damaged, please contact your dealer or the consumer contact below for
help.
Faults due to misuse, lack of maintenance or modification of the product will invalidate the
warranty. Damaged parts not due to a fault with the product will be invoiced according to our
price list + carriage and administration fee.
If new parts are needed or in the event of a warranty claim, please contact your dealer or
consumer contact:
FCC PRODUCTS AS
KJELLER VEST 3, 2007 KJELLER, NORWAY
+47 924 78 600 / +46 031 189095
support@fccproducts.no
www.fccproducts.no
We are always looking for ways we can improve our products. Therefore, we reserve the right to change technical
specifications at any time. You will always find the latest manual on www.fccproducts.no.
16
Table of contents
Other FCC Grill manuals


Popular Grill manuals by other brands


Weber
Weber BABY Q 100 owner's guide

GrillBoss
GrillBoss GBC1449J owner's manual

Morphy Richards
Morphy Richards MRGP24SS instruction manual

DeLonghi
DeLonghi BQ 55 Instructions for use

Great Outdoors Grill Company
Great Outdoors Grill Company 7000 Series Owner's manual and assembly guide

Maxi-matic
Maxi-matic EliteGourment EGL-3450 instruction manual