FED BGM-II User manual
1
Foreword
Foreword
Foreword
Foreword
Dear
Dear
Dear
Dear FED
FED
FED
FED BGM-II
BGM-II
BGM-II
BGM-II Type
Type
Type
Type Blood
Blood
Blood
Blood Glucometer
Glucometer
Glucometer
Glucometer Owner
Owner
Owner
Owner :
:
:
:
Thank you for choosing FED BGM-II Type Blood Glucometer
(hereinafter referred to as Blood Glucometer). The Blood
Glucometer attaches importance to such features as convenience,
speediness, accuracy and humanization in the aspect of design
and is mainly used for clinical routine blood glucose test and
diabetes patients
’
self-blood glucose test.
This manual includes the detailed procedures and precautions
in your use of Blood Glucometer; please read all contents carefully
so as to master operating essentials of the Blood Glucometer and
get correct test results. Monitoring blood glucose can help
understand your blood glucose control status and guide a doctor
’
s
medication. Only when the blood glucose is controlled properly can
the occurrence of complications of diabetes be reduced and the
quality of life improved. If there is anything you don ’ t understand,
please call our guest service No.: 400-688-2098.
All manuals and user guides at all-guides.com

2
Table
Table
Table
Table of
of
of
of Contents
Contents
Contents
Contents
I.Detection p rinciple ...................................................... 3
II.Configuration, Composition & Schematic Diagram of Blood
Glucometer ................................................................ 4
III. LCD Symbols ........................................................... 6
IV.
Product Specification .................................................. 7
V.
Test
Performance of Blood Glucometer and Blood Glucose
Test
Strip ................................................................................ 8
VI.Operation Procedures ................................................... 9
VII. Precautions in Use ................................................... 16
VIII. Maintenance & Storage ........................................... 16
IX. Problems & Troubleshooting ........................................ 17
X. Ideal Blood Glucose Control Range .................................. 19
XI. Warranty .......................................................................... 19
All manuals and user guides at all-guides.com
3
I.
I.
I.
I. Detection
Detection
Detection
Detection Principle
Principle
Principle
Principle
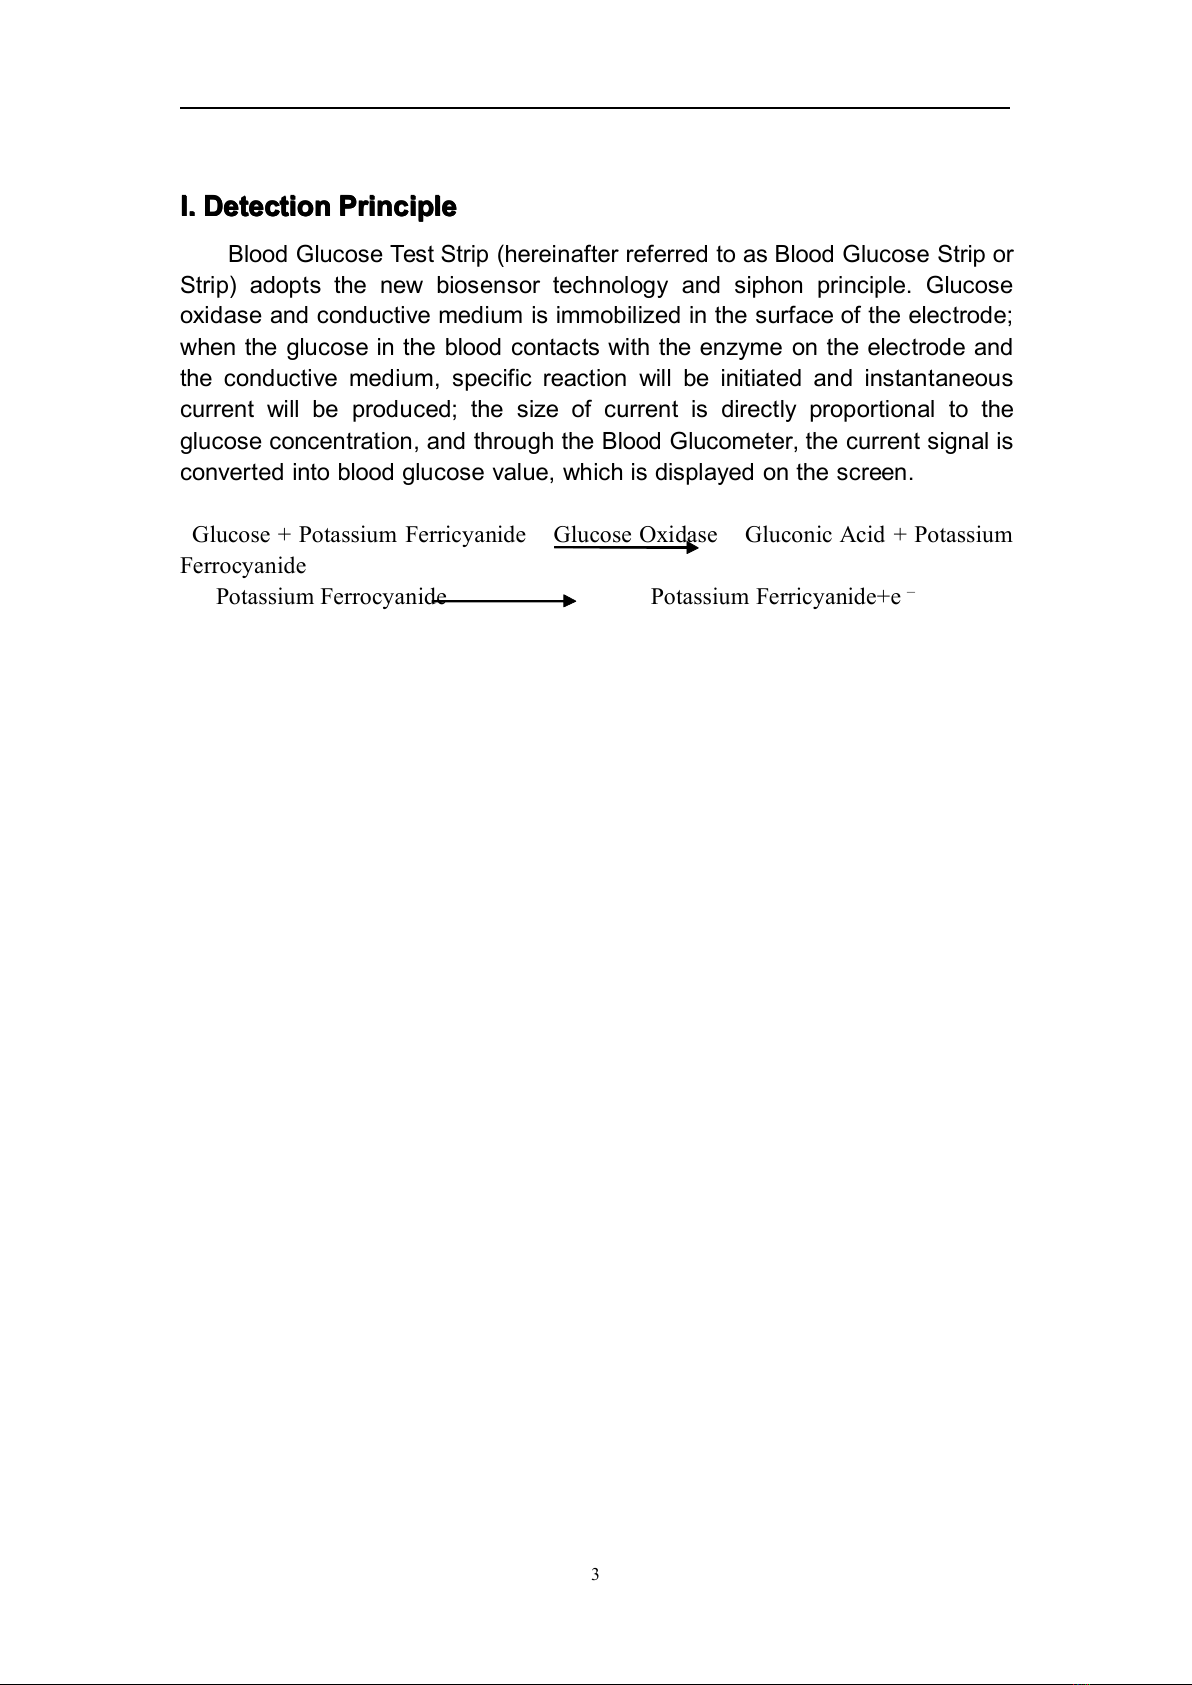
Blood Glucose Test Strip (hereinafter referred to as Blood Glucose Strip or
Strip) adopts the new biosensor technology and siphon principle. Glucose
oxidase and conductive medium is immobilized in the surface of the electrode;
when the glucose in the blood contacts with the enzyme on the electrode and
the conductive medium, specific reaction will be initiated and instantaneous
current will be produced; the size of current is directly proportional to the
glucose concentration, and through the Blood Glucometer, the current signal is
converted into blood glucose value, which is displayed on the screen.
Glucose + Potassium Ferricyanide Glucose Oxidase Gluconic Acid + Potassium
Ferrocyanide
Potassium Ferrocyanide Potassium Ferricyanide+e
–
All manuals and user guides at all-guides.com
4
II.
II.
II.
II. Composition
Composition
Composition
Composition &
&
&
& Schematic
Schematic
Schematic
Schematic Diagram
Diagram
Diagram
Diagram of
of
of
of Blood
Blood
Blood
Blood Glucometer
Glucometer
Glucometer
Glucometer
For the first purchase, please check whether all of the following
components are included in the package of your Blood Glucometer; if any
components are missing, please replace directly in the store where you
purchase or contact the agent.
1. Standard configuration:
a. FED BGM – II Type Blood Glucometer 1 set
b. Lancing pen 1 piece
c. Manual of FED BGM – II Type Blood Glucometer 1 copy
d. Warranty card: 1 copy
e. Battery (3V CR2032 lithium battery) 1
f. Pocket-case 1
2. Additional configuration:
(Not included in the standard configuration; contact the dealer or purchase in
a store when necessary)
a. Glucose test strip
b. Lancing needle (see instruction for use of lancing needle for details)
c. Test piece code (in the packing box of test piece)
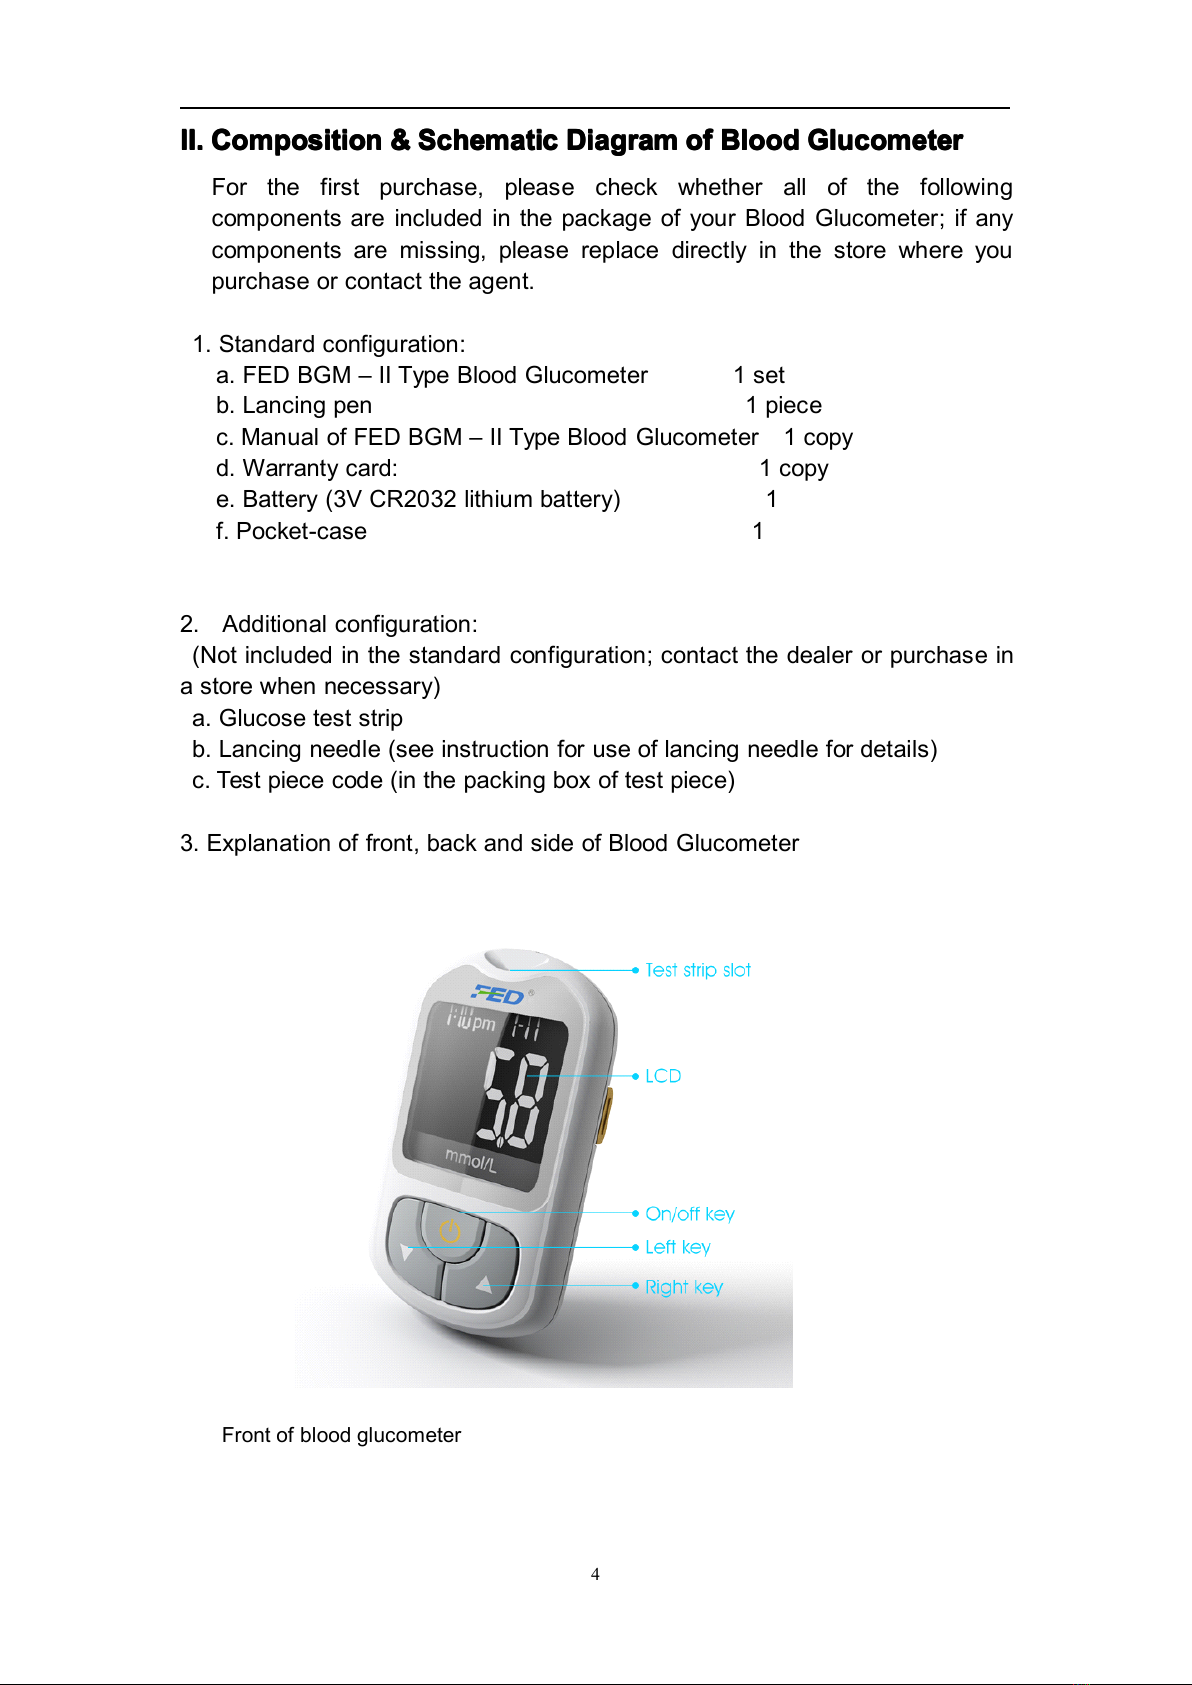
3. Explanation of front, back and side of Blood Glucometer
Front of blood glucometer
All manuals and user guides at all-guides.com

5
Back of Blood Glucometer
4. Blood glucose test strip (see manual of blood glucose test strip for details)
Front of test strip
5. Lancing pen (see the instruction for use of lancing pen for details)
All manuals and user guides at all-guides.com

6
III.
III.
III.
III. LCD
LCD
LCD
LCD Symbols
Symbols
Symbols
Symbols
a. Test piece code
b. Week
c. Display the average value of “ X ” weeks
d. Record
e. Display test piece code number, test result and error message
f. Temperature symbol
g. After meal
h. After sports
i. Before meal (symbol for after meal and after sports disappears)
j. Date
k. Average
l. Alarm symbol
m. Quality control test mode
n. Symbol for blood drop
o. Measurement unit: mmol/L and mg/dL
p. Low battery power
q. Time
All manuals and user guides at all-guides.com

7
IV.
IV.
IV.
IV.
Product
Product
Product
Product Specification
Specification
Specification
Specification
► Test sample: Fresh Capillary Whole Blood
► Type of sample used for calibration: Venous plasma
► Blood volume: about 3 microliters
► Measurement unit: mmol/L and mg/dL, switchable.
► Instrument calibration: automatic calibration with test piece code
► Memory capacity: 500 test results can be stored
► Calculation of average value: by 7 days, 14 days, 21 days and 28 days
► Display data and time: 12-hour system
► Working temperature: 5~42 ℃(41 ℉~107.6 ℉)
► w orking relative humidity: not higher than 80%
► Storage temperature: -20 ℃~55 ℃(-4 ℉~131 ℉)
► Storage relative temperature: not higher than 85%
► Instrument size: 85mm × 54mm × 19mm;
► Instrument weight: 50g or so
► Battery type: CR2032 (3V, lithium battery)
► Quality control solution: use key to isolate quality control value to
exclude it from calculation of average value
► Alarm setting: add alarm function
► Bloodsucking symbol display: display on the LCD screen
All manuals and user guides at all-guides.com
8
V.
V.
V.
V.
Test
Test
Test
Test Performance
Performance
Performance
Performance of
of
of
of Blood
Blood
Blood
Blood Glucometer
Glucometer
Glucometer
Glucometer and
and
and
and Blood
Blood
Blood
Blood Glucose
Glucose
Glucose
Glucose
Test
Test
Test
Test Strip
Strip
Strip
Strip
1. Test time
Test time of Blood Glucometer in each case is 10 seconds.
2. Test range
Test range of Blood Glucometer is 1.1mmol/L ~33.3mmol/L
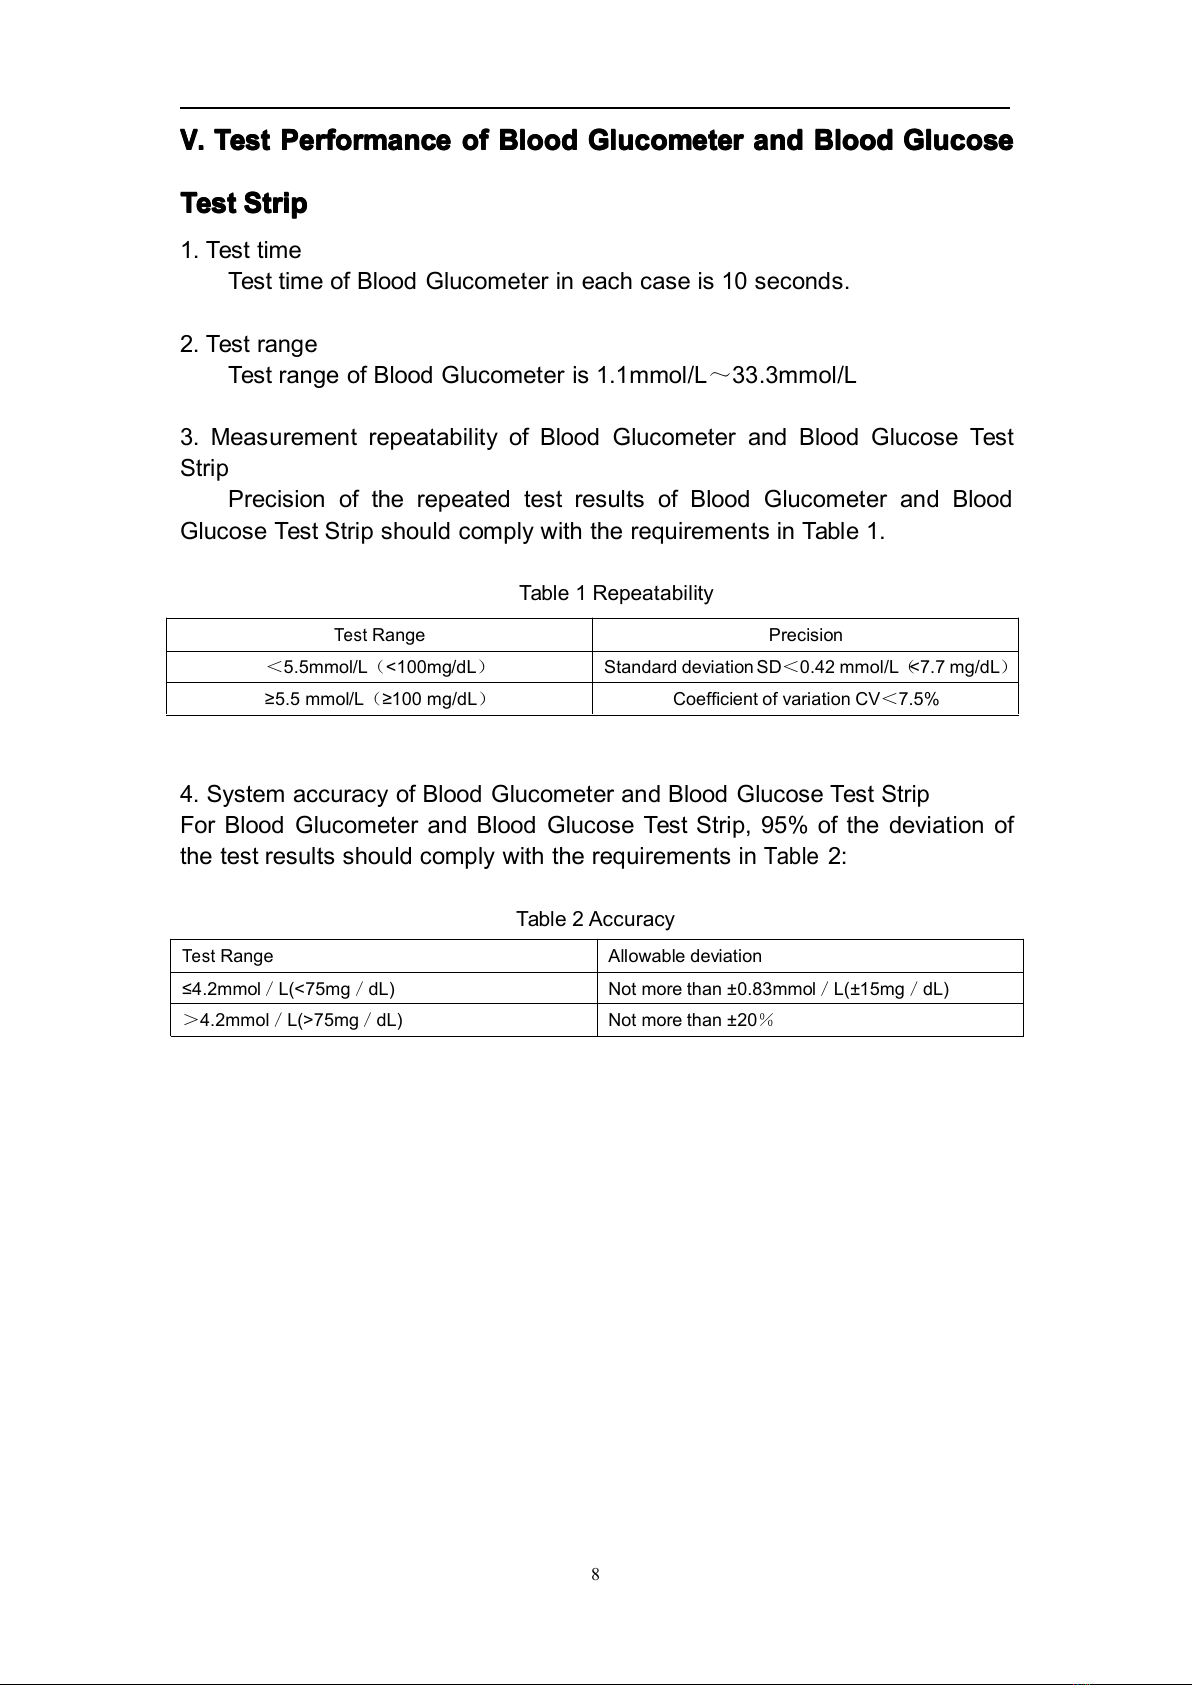
3. Measurement repeatability of Blood Glucometer and Blood Glucose Test
Strip
Precision of the repeated test results of Blood Glucometer and Blood
Glucose Test Strip should comply with the requirements in Table 1.
Table 1 Repeatability
4. System accuracy of Blood Glucometer and Blood Glucose Test Strip
For Blood Glucometer and Blood Glucose Test Strip, 95% of the deviation of
the test results should comply with the requirements in
Table
2:
Table 2 Accuracy
Test
Range Precision
<5.5mmol/L (<100mg/dL )Standard deviation SD <0.42 mmol/L (<7.7 mg/dL )
≥ 5.5 mmol/L (≥ 100 mg/dL )Coefficient of variation CV <7.5%
Test
Range Allowable deviation
≤ 4.2mmol /L(<75mg /dL) Not more than ± 0.83mmol /L( ± 15mg /dL)
>4.2mmol /L(>75mg /dL) Not more than ± 20 %
All manuals and user guides at all-guides.com

9
VI.
VI.
VI.
VI. Operation
Operation
Operation
Operation Procedure
Procedure
Procedure
Procedure
1. Install the battery
The Blood Glucometer needs one
3V,
CR2032 lithium battery; one battery
can test for 1000 times. This device has power saving function and will be
shut down automatically if no operation within 2 minutes.
Step 1. Open the battery cover.
Step 2. Put in a 3V CR2032 lithium battery; note the positive and negative
electrode.
Step 3. Cover the battery cover back.
Note:
Note:
Note:
Note: 1)
1)
1)
1) When
When
When
When the
the
the
the power
power
power
power is
is
is
is low,
low,
low,
low, a
a
a
a “
“
“
“ ”
”
”
” symbol
symbol
symbol
symbol will
will
will
will be
be
be
be displayed
displayed
displayed
displayed on
on
on
on the
the
the
the
screen,
screen,
screen,
screen, in
in
in
in which
which
which
which case
case
case
case please
please
please
please replace
replace
replace
replace with
with
with
with a
a
a
a new
new
new
new battery.
battery.
battery.
battery.
2)
2)
2)
2) After
After
After
After replacement
replacement
replacement
replacement of
of
of
of battery,
battery,
battery,
battery, the
the
the
the time
time
time
time and
and
and
and date
date
date
date should
should
should
should be
be
be
be reset,
reset,
reset,
reset, for
for
for
for
which,
which,
which,
which, please
please
please
please refer
refer
refer
refer to
to
to
to “
“
“
“ setting
setting
setting
setting of
of
of
of time
time
time
time and
and
and
and date
date
date
date ”
”
”
” .
.
.
.
2. Set the mode:
2.1 After installing the battery, turn to the setting of year, month, date, hour,
minute and test unit in succession.
Note:
Note:
Note:
Note: Setting
Setting
Setting
Setting of
of
of
of year,
year,
year,
year, month,
month,
month,
month, date,
date,
date,
date, hour
hour
hour
hour and
and
and
and minute
minute
minute
minute won
won
won
won ’
’
’
’ t
t
t
t influence
influence
influence
influence
the
the
the
the detection
detection
detection
detection results
results
results
results and
and
and
and only
only
only
only provides
provides
provides
provides convenience
convenience
convenience
convenience for
for
for
for reference.
reference.
reference.
reference.
2.1.1 Setting of year:
After installation of battery, year will be displayed on the lower left part of
the screen (as shown below, 2012 is displayed). Press left or right key to adjust
the year (the range of year setting is 2000~2099), then press on/off key to
confirm.
2.1.2 Setting of month, date, hour and minute:
Turn to setting of month, date, hour and minute (from left to right) after
year is set successfully and the method is the same with that of year setting.
The time follows 12-hour system. As shown below, the time is “ December 7
12:50 p.m. ”
2.1.3 Setting of test unit conversion:
All manuals and user guides at all-guides.com

10
Enter setting of unit conversion after setting of minute (as shown in the
following figure); press left or right key to choose the required unit (mg/dL or
mmol/L), then press on/off key to confirm and the screen displays “ OK ” ; the
setting is successfully finished and the tester is automatically shut down.
2.2 Alarm setting:
2.2.1 Turning-on of alarm:
When the alarm mode is “ OFF ” , press and hold on/off key and there will
be time flickering at the bottom of the screen including hour and minute where
you can set the time required to remind you, and the setting method is the
same with that of year setting. After proper setting, “ OFF ” flickers on the screen;
press left key or right key and the screen will display “ On ” (flicker) and “ ” (as
shown below: the alarm time is set as: 12:00 a.m. ); press on/off key again and
the screen display “ OK ” ; the setting is successfully finished and the tester is
automatically shut down;
When the alarm mode is “ On ” , press and hold on/off key and there will be
time flickering at the bottom of the screen including hour and minute where you
can set the time required to remind you, and the setting method is the same
with that of year setting. After proper setting, press on/off key again and the
screen display “ OK ” ; the setting is successfully finished and the tester is
automatically shut down;
2.2.2 Turning-off of alarm:
When the alarm reminds you, press the on/off key once and the screen
displays date and time
’
press the on/off key again and the Blood
Glucometer will be shut down.
When it is required to cancel the alarm, press and hold the on/off key under
shutdown state of the tester and there will be time flickering at the bottom of
the screen; then press the on/off key twice in a row, “ On ” will be displayed on
the screen and flickers; press left key or right key, “ OFF ” will be displayed on
the screen and flickers; then press the on/off button once again and the screen
displays “ OK ” ; the setting is successfully finished and the tester is
automatically shut down.
2.3 Use of test piece code
All manuals and user guides at all-guides.com

11
To
ensure the accuracy of the detection results, please use the test
piece code in the packing box or test strip bottom for calibration of
instrument when replacing with a new test strip, and the specific operation
procedures are as follows:
Step 1: Open the test strip package and take out the new test piece code.
Step 2: Insert the test piece code into the test piece code jack and push to
the end. (Please face the orbital plane of the test piece code towards the back
of the Blood Glucometer, as shown below)
Step 3: When you hear the sound of “ beep ” , the screen will display the test
piece code (as shown below and the number of the test piece code should be
consistent with the test piece code number on the test piece package).
Step 4: Press the on/off key and tester will be shut down; at this time, you
can start blood glucose test.
2.4 Start the blood glucose test
After calibrating the test piece code, start the blood glucose test (if the
storage temperature of Blood Glucometer has great differences with test
environment temperature, the tester and test strip are required to maintain
balance in the test environment for over 30min).
Step 1 : remove the cap of lancing pen.
Step 2 : insert a new lancing needle.
Step 3 : unscrew the protective cap of the needle.
Step 4 : cover the cap of lancing pen back.
Step 5 : adjust the lancing depth of the lancing pen according to the
thickness of skin; from 1 to 5, the pen is gradually inserted deeper and
generally 3 is chosen.
Step 6 : pull the lancing stopper back (don ’ t use excessive force in case of
All manuals and user guides at all-guides.com
12
damage to the lancing pen).
Step 7 : wash hands in warm soapy water, rinse with clear water and then
dry them. Afterwards, disinfect with 75%alcohol wipes, and dry
fingers in the air.
Note:
Note:
Note:
Note: washing
washing
washing
washing hands
hands
hands
hands with
with
with
with warm
warm
warm
warm water
water
water
water and
and
and
and massaging
massaging
massaging
massaging fingers,
fingers,
fingers,
fingers,
etc.
etc.
etc.
etc. can
can
can
can quicken
quicken
quicken
quicken the
the
the
the blood
blood
blood
blood flow
flow
flow
flow volume
volume
volume
volume of
of
of
of fingers
fingers
fingers
fingers and
and
and
and
make
make
make
make it
it
it
it easier
easier
easier
easier to
to
to
to get
get
get
get correct
correct
correct
correct drop
drop
drop
drop of
of
of
of blood.
blood.
blood.
blood.
Do
Do
Do
Do not
not
not
not use
use
use
use iodine-containing
iodine-containing
iodine-containing
iodine-containing disinfectant.
disinfectant.
disinfectant.
disinfectant.
Step 8 : take out the test strip.
Note:
Note:
Note:
Note: for
for
for
for packaging
packaging
packaging
packaging bottle,
bottle,
bottle,
bottle, cover
cover
cover
cover the
the
the
the cap
cap
cap
cap immediately
immediately
immediately
immediately after
after
after
after taking
taking
taking
taking out
out
out
out
the
the
the
the test
test
test
test strip
strip
strip
strip to
to
to
to prevent
prevent
prevent
prevent moisture.
moisture.
moisture.
moisture. If
If
If
If it
it
it
it is
is
is
is the
the
the
the first
first
first
first time
time
time
time to
to
to
to open
open
open
open the
the
the
the
packaging
packaging
packaging
packaging bottle,
bottle,
bottle,
bottle, please
please
please
please record
record
record
record the
the
the
the date
date
date
date on
on
on
on its
its
its
its label
label
label
label and
and
and
and discard
discard
discard
discard it
it
it
it after
after
after
after 3
3
3
3
months.
months.
months.
months.
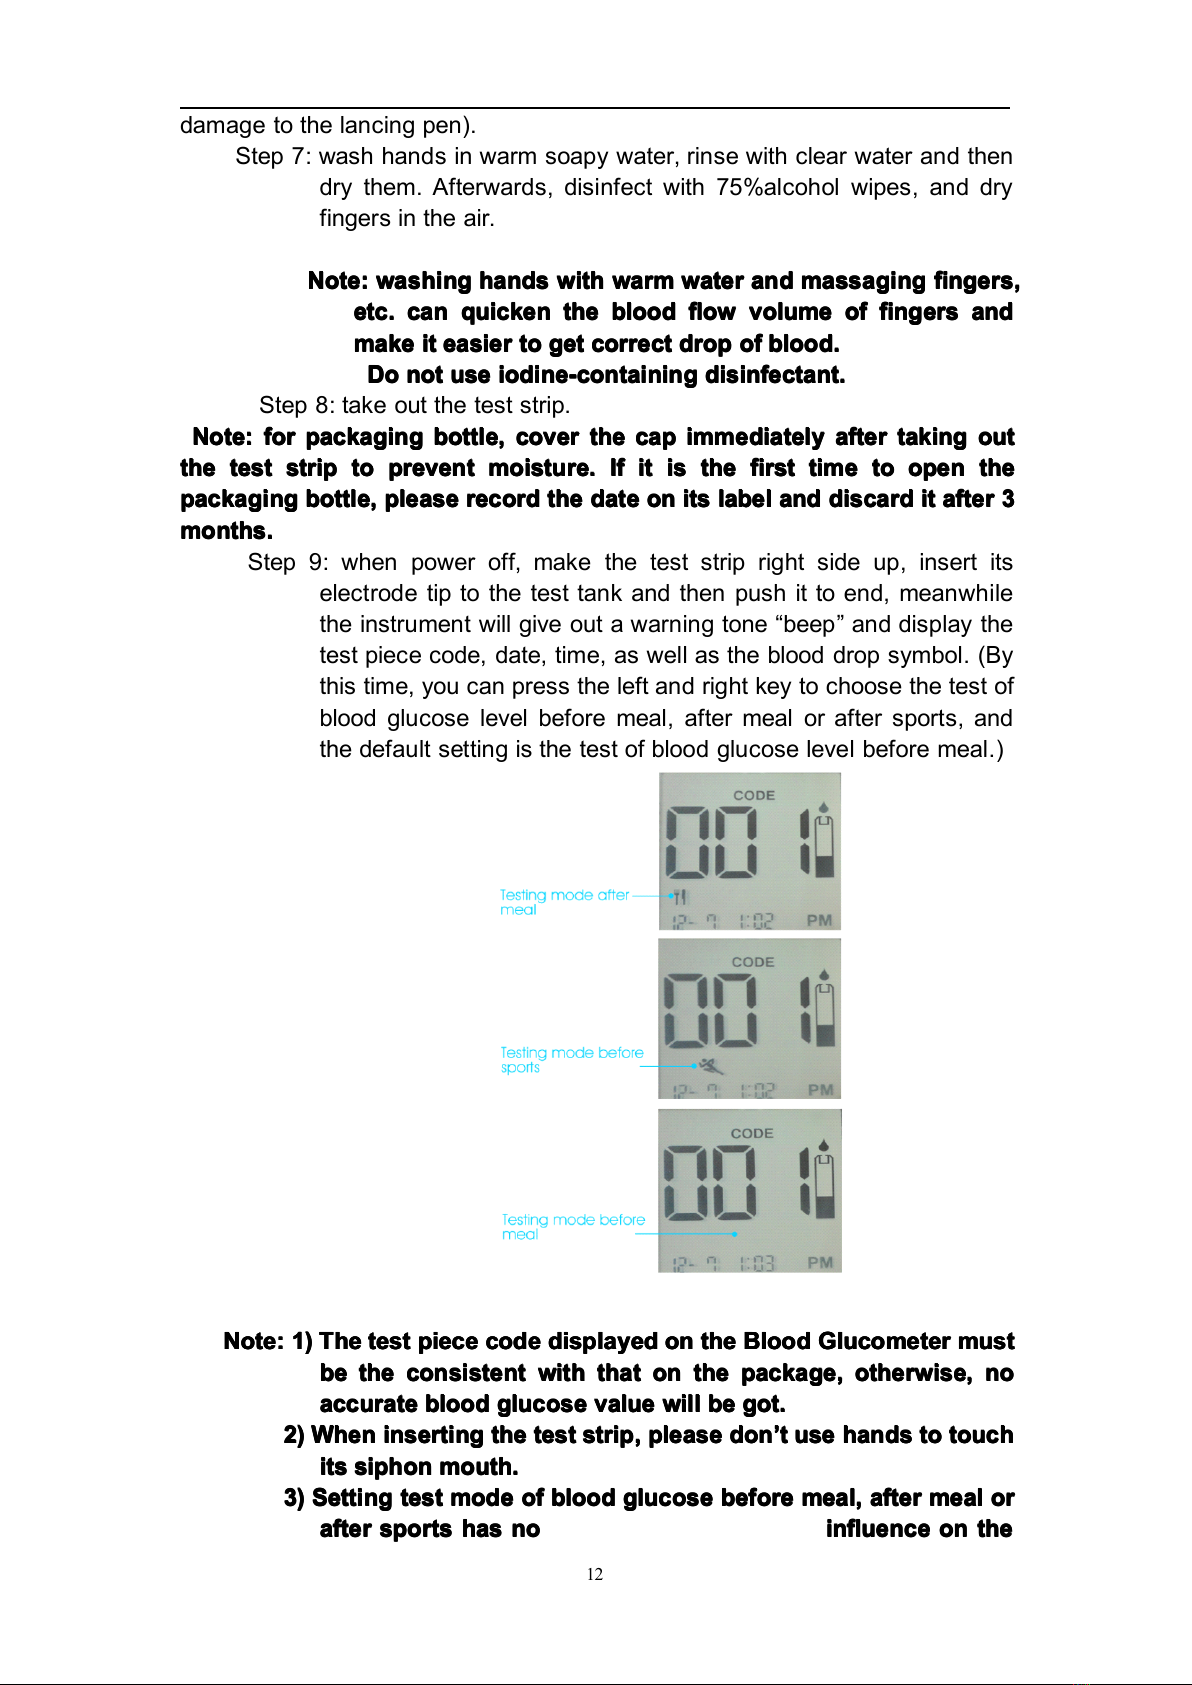
Step 9 : when power off, make the test strip right side up, insert its
electrode tip to the test tank and then push it to end, meanwhile
the instrument will give out a warning tone “ beep ” and display the
test piece code, date, time, as well as the blood drop symbol. (By
this time, you can press the left and right key to choose the test of
blood glucose level before meal, after meal or after sports, and
the default setting is the test of blood glucose level before meal.)
Note:
Note:
Note:
Note: 1)
1)
1)
1) The
The
The
The test
test
test
test piece
piece
piece
piece code
code
code
code displayed
displayed
displayed
displayed on
on
on
on the
the
the
the Blood
Blood
Blood
Blood Glucometer
Glucometer
Glucometer
Glucometer must
must
must
must
be
be
be
be the
the
the
the consistent
consistent
consistent
consistent with
with
with
with that
that
that
that on
on
on
on the
the
the
the package,
package,
package,
package, otherwise,
otherwise,
otherwise,
otherwise, no
no
no
no
accurate
accurate
accurate
accurate blood
blood
blood
blood glucose
glucose
glucose
glucose value
value
value
value will
will
will
will be
be
be
be got.
got.
got.
got.
2)
2)
2)
2) When
When
When
When inserting
inserting
inserting
inserting the
the
the
the test
test
test
test strip,
strip,
strip,
strip, please
please
please
please don
don
don
don ’
’
’
’ t
t
t
t use
use
use
use hands
hands
hands
hands to
to
to
to touch
touch
touch
touch
its
its
its
its siphon
siphon
siphon
siphon mouth.
mouth.
mouth.
mouth.
3)
3)
3)
3) Setting
Setting
Setting
Setting test
test
test
test mode
mode
mode
mode of
of
of
of blood
blood
blood
blood glucose
glucose
glucose
glucose before
before
before
before meal,
meal,
meal,
meal, after
after
after
after meal
meal
meal
meal or
or
or
or
after
after
after
after sports
sports
sports
sports has
has
has
has no
no
no
no influence
influence
influence
influence on
on
on
on the
the
the
the
All manuals and user guides at all-guides.com

13
test
test
test
test results
results
results
results and
and
and
and is
is
is
is just
just
just
just for
for
for
for reference
reference
reference
reference convenience.
convenience.
convenience.
convenience.
Step 10 : make the lancing pen close to the disinfection part, and press
down its button.
Step 11 : gently press the stabbed finger to form a small drop of blood and
then use the siphon mouth on the side of test strip to touch the
drop of blood, the blood will automatically fill the reaction area
and the Blood Glucometer will give out a warning note “ beep ” .
Afterwards, remove your finger, the screen will start countdown,
display test results after 10 seconds and automatically save
them.
Note:
Note:
Note:
Note: 1)
1)
1)
1) Don
Don
Don
Don ’
’
’
’ t
t
t
t press
press
press
press your
your
your
your finger
finger
finger
finger hard
hard
hard
hard when
when
when
when lancing
lancing
lancing
lancing for
for
for
for fear
fear
fear
fear of
of
of
of
incorrect
incorrect
incorrect
incorrect results.
results.
results.
results.
2)
2)
2)
2) Don
Don
Don
Don ’
’
’
’ t
t
t
t compress
compress
compress
compress the
the
the
the lanced
lanced
lanced
lanced part
part
part
part tightly
tightly
tightly
tightly with
with
with
with siphon
siphon
siphon
siphon
mouth.
mouth.
mouth.
mouth.
3)
3)
3)
3) Don
Don
Don
Don ’
’
’
’ t
t
t
t suck
suck
suck
suck simultaneously
simultaneously
simultaneously
simultaneously from
from
from
from both
both
both
both sides
sides
sides
sides of
of
of
of the
the
the
the
siphon
siphon
siphon
siphon mouth.
mouth.
mouth.
mouth. The
The
The
The blood
blood
blood
blood can
can
can
can only
only
only
only be
be
be
be sucked
sucked
sucked
sucked from
from
from
from one
one
one
one side
side
side
side
(left
(left
(left
(left or
or
or
or right).
right).
right).
right).
4)
4)
4)
4) If
If
If
If blood
blood
blood
blood fails
fails
fails
fails to
to
to
to fill
fill
fill
fill the
the
the
the reaction
reaction
reaction
reaction area
area
area
area for
for
for
for once,
once,
once,
once, please
please
please
please
replace
replace
replace
replace the
the
the
the test
test
test
test strip
strip
strip
strip for
for
for
for retest.
retest.
retest.
retest.
Step 12 : pull out the test strip, the instrument will send out a warning note
“ beep ” and shut down automatically.
Step 13 : dispose the used test strip and lancing needle as per medical
wastes.
2.5 Use of memory of Blood Glucometer
This Blood Glucometer can store 500 latest blood glucose records.
When the number of test results is greater than 500, the latest records will
be stored and the earliest records will be deleted.
2.5.1 Steps for result query:
Step 1 : when power off, shortly press the left or right key, the screen will
display the total number of records (as shown in the figure below: 26 test data).
Press the left or right key again, you can inquire the test records at different
times. Press the on/off key for shutdown.
Step 2 : when power off, press the on/off key, the screen will display characters
“ MEM ” and “ AVG ” . Press the left or right key, you can inquire the
average value of blood glucose of 1 to 4 weeks (if these data are not
stored in the Blood Glucometer, the screen will display “ --- ” ). Press
the on/off key for shutdown. As shown in the figure below: the
average value of blood glucose of the last 4 weeks is 5.3mmol/L.
All manuals and user guides at all-guides.com

14
2.5.2 Deletion of results:
When power off, press and hold the right key, the instrument will give out
a sound “ beep ” , and the screen will display the cyclical variation of “ dEL ”
and “ RLL ” (as shown below) to prompt whether to delete the data or not.
Press the left key, the screen will display “ OK ” and shut down
automatically, which means all records stored in this instrument are
deleted. Instead, press the on/off key, the screen will display “ OFF ” and
shut down automatically, while the records will not be deleted.
Note:
Note:
Note:
Note: when
when
when
when the
the
the
the test
test
test
test strip
strip
strip
strip is
is
is
is inserted
inserted
inserted
inserted to
to
to
to the
the
the
the instrument,
instrument,
instrument,
instrument, you
you
you
you
can
can
can
can ’
’
’
’ t
t
t
t inquire
inquire
inquire
inquire the
the
the
the results.
results.
results.
results.
2.6 Quality control of Blood Glucometer and Test Strip (Recommended)
The blood glucose QC solution is only used to verify whether FED
Series Blood Glucometer and the supporting blood glucose test strip are
in normal operation. Regular QC of blood glucometer and test strip can
further ensure the accuracy of test results of blood glucose.
2.6.1 When you encounter the following circumstances, it is recommended to
conduct quality control to the blood glucose monitoring system:
a. When you suspect the Blood Glucometer or Test Strip can not work
normally;
b. When you suspect that the test results are not accurate;
c. When the Blood Glucometer is collided violently;
Note:
Note:
Note:
Note: blood
blood
blood
blood glucose
glucose
glucose
glucose QC
QC
QC
QC solution
solution
solution
solution is
is
is
is not
not
not
not for
for
for
for sale,
sale,
sale,
sale, but
but
but
but is
is
is
is specially
specially
specially
specially used
used
used
used
to
to
to
to conduct
conduct
conduct
conduct quality
quality
quality
quality control
control
control
control of
of
of
of FED
FED
FED
FED blood
blood
blood
blood glucose
glucose
glucose
glucose monitoring
monitoring
monitoring
monitoring
system.
system.
system.
system. The
The
The
The blood
blood
blood
blood glucose
glucose
glucose
glucose monitoring
monitoring
monitoring
monitoring system
system
system
system has
has
has
has passed
passed
passed
passed a
a
a
a
strict
strict
strict
strict quality
quality
quality
quality control
control
control
control before
before
before
before leaving
leaving
leaving
leaving the
the
the
the plant.
plant.
plant.
plant. In
In
In
In case
case
case
case of
of
of
of the
the
the
the
above
above
above
above problems,
problems,
problems,
problems, you
you
you
you are
are
are
are recommended
recommended
recommended
recommended to
to
to
to conduct
conduct
conduct
conduct the
the
the
the free
free
free
free
quality
quality
quality
quality control
control
control
control in
in
in
in the
the
the
the agencies
agencies
agencies
agencies of
of
of
of FED
FED
FED
FED Blood
Blood
Blood
Blood Glucometer.
Glucometer.
Glucometer.
Glucometer.
2.6.2 Quality control steps:
Step 1 : place the Blood Glucometer, Test Strip and QC solution under the
condition of 20-25 ℃for over 30min.
All manuals and user guides at all-guides.com
15
Step 2 : after inserting the Test Strip, the screen will display the test piece
code and blood drop symbol. Please ensure the test piece code
is consistent with that on the package of test strip.
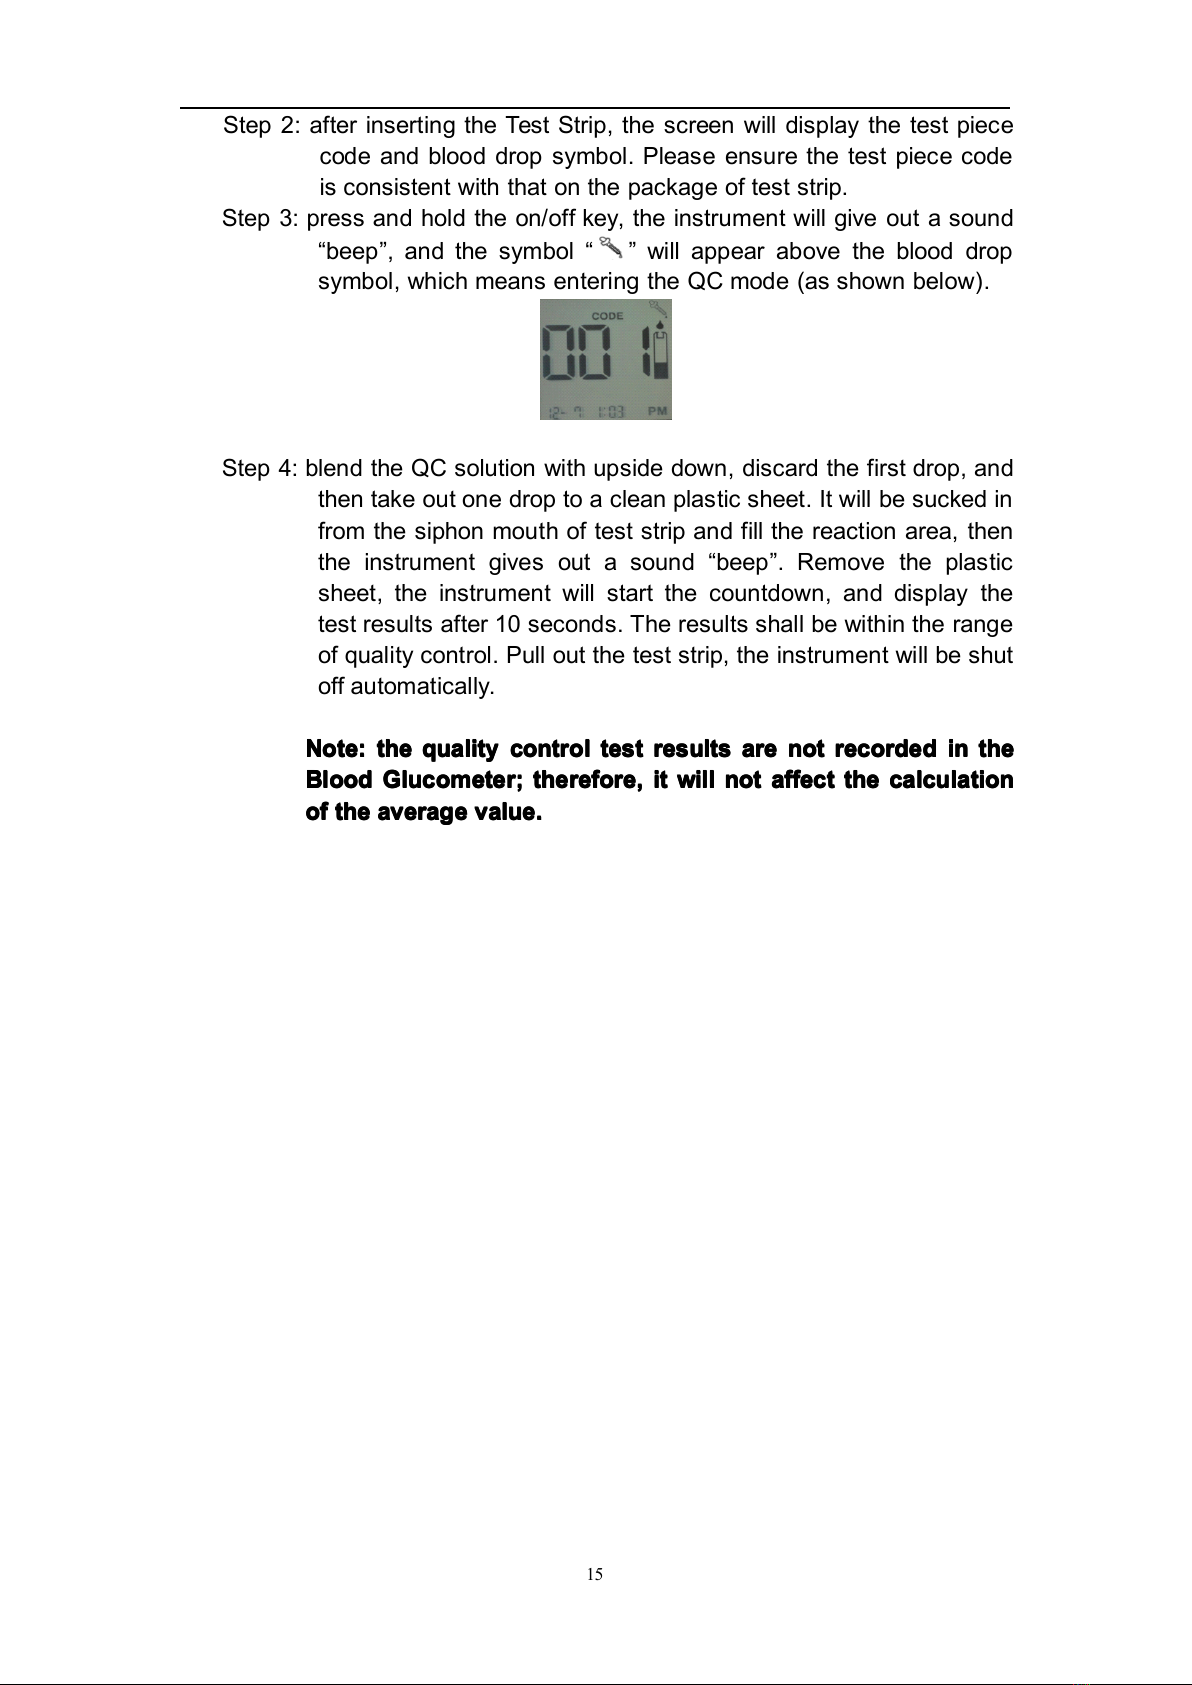
Step 3 : press and hold the on/off key, the instrument will give out a sound
“ beep ” , and the symbol “ ” will appear above the blood drop
symbol, which means entering the QC mode (as shown below).
Step 4 : blend the QC solution with upside down, discard the first drop, and
then take out one drop to a clean plastic sheet. It will be sucked in
from the siphon mouth of test strip and fill the reaction area, then
the instrument gives out a sound “ beep ” . Remove the plastic
sheet, the instrument will start the countdown, and display the
test results after 10 seconds. The results shall be within the range
of quality control. Pull out the test strip, the instrument will be shut
off automatically.
Note:
Note:
Note:
Note: the
the
the
the quality
quality
quality
quality control
control
control
control test
test
test
test results
results
results
results are
are
are
are not
not
not
not recorded
recorded
recorded
recorded in
in
in
in the
the
the
the
Blood
Blood
Blood
Blood Glucometer;
Glucometer;
Glucometer;
Glucometer; therefore,
therefore,
therefore,
therefore, it
it
it
it will
will
will
will not
not
not
not affect
affect
affect
affect the
the
the
the calculation
calculation
calculation
calculation
of
of
of
of the
the
the
the average
average
average
average value.
value.
value.
value.
All manuals and user guides at all-guides.com
16
VII.
VII.
VII.
VII. Precautions
Precautions
Precautions
Precautions in
in
in
in Use
Use
Use
Use
When you use this test system, please pay attention to the following
restrictions:
1. This product is only applicable for monitoring in vitro.
2. Physiological and pathological factors disturbing the testing results:
a) Abnormal hematocrit (beyond the range of 30%~55%);
b) The following substances have no significant impacts on the test
results in normal blood or normal treatment concentration, but can cause
deviation of the test results when their concentration in blood are abnormally
high. E.g.: uric acid, acetaminophen, ascorbic acid (vitamin C) and other
reducing substances.
c) Cholesterol level is higher than 500mg/dL
d) Blood volume of peripheral blood circulation disturbance decreases,
such as severe dehydration and shock.
3. Factors affecting test results due to improper operation:
a) Disinfect with disinfectant which contains "iodine";
b) After alcohol disinfection, lancing is carried out before the full
volatilization of alcohol;
c) Blood volume is inadequate. Reaction area of test strip is not fully filled
with blood at once or is refilled with blood again;
d) Blood sample is got by pressing fingers hard in lancing;
e) After opened, the test strip is placed in an environment with high
humidity for too long;
f) The test strip is overdue;
g) This test strip is not suitable for newborn babies;
h) When the difference between the storage temperature of Blood
Glucometer and the testing environment temperature is great, there is
not enough time (more than 30 min) to balance the temperature.
VIII.
VIII.
VIII.
VIII. Maintenance
Maintenance
Maintenance
Maintenance &
&
&
& Storage
Storage
Storage
Storage
1. There shouldn ’ t be any dirt in the jack and the interior of Blood
Glucometer. If there is any dirt on the surface of the Blood
Glucometer, a soft cloth can be used to gently wipe.
2. Blood Glucometer shall be stored in a well-ventilated room without
corrosive gases and with the relative humidity of not higher than
85%.
3. Please remove the battery when the Blood Glucometer is not in use
for a long time.
All manuals and user guides at all-guides.com
17
IX.
IX.
IX.
IX. Problems
Problems
Problems
Problems &
&
&
& Trouble-shooting
Trouble-shooting
Trouble-shooting
Trouble-shooting
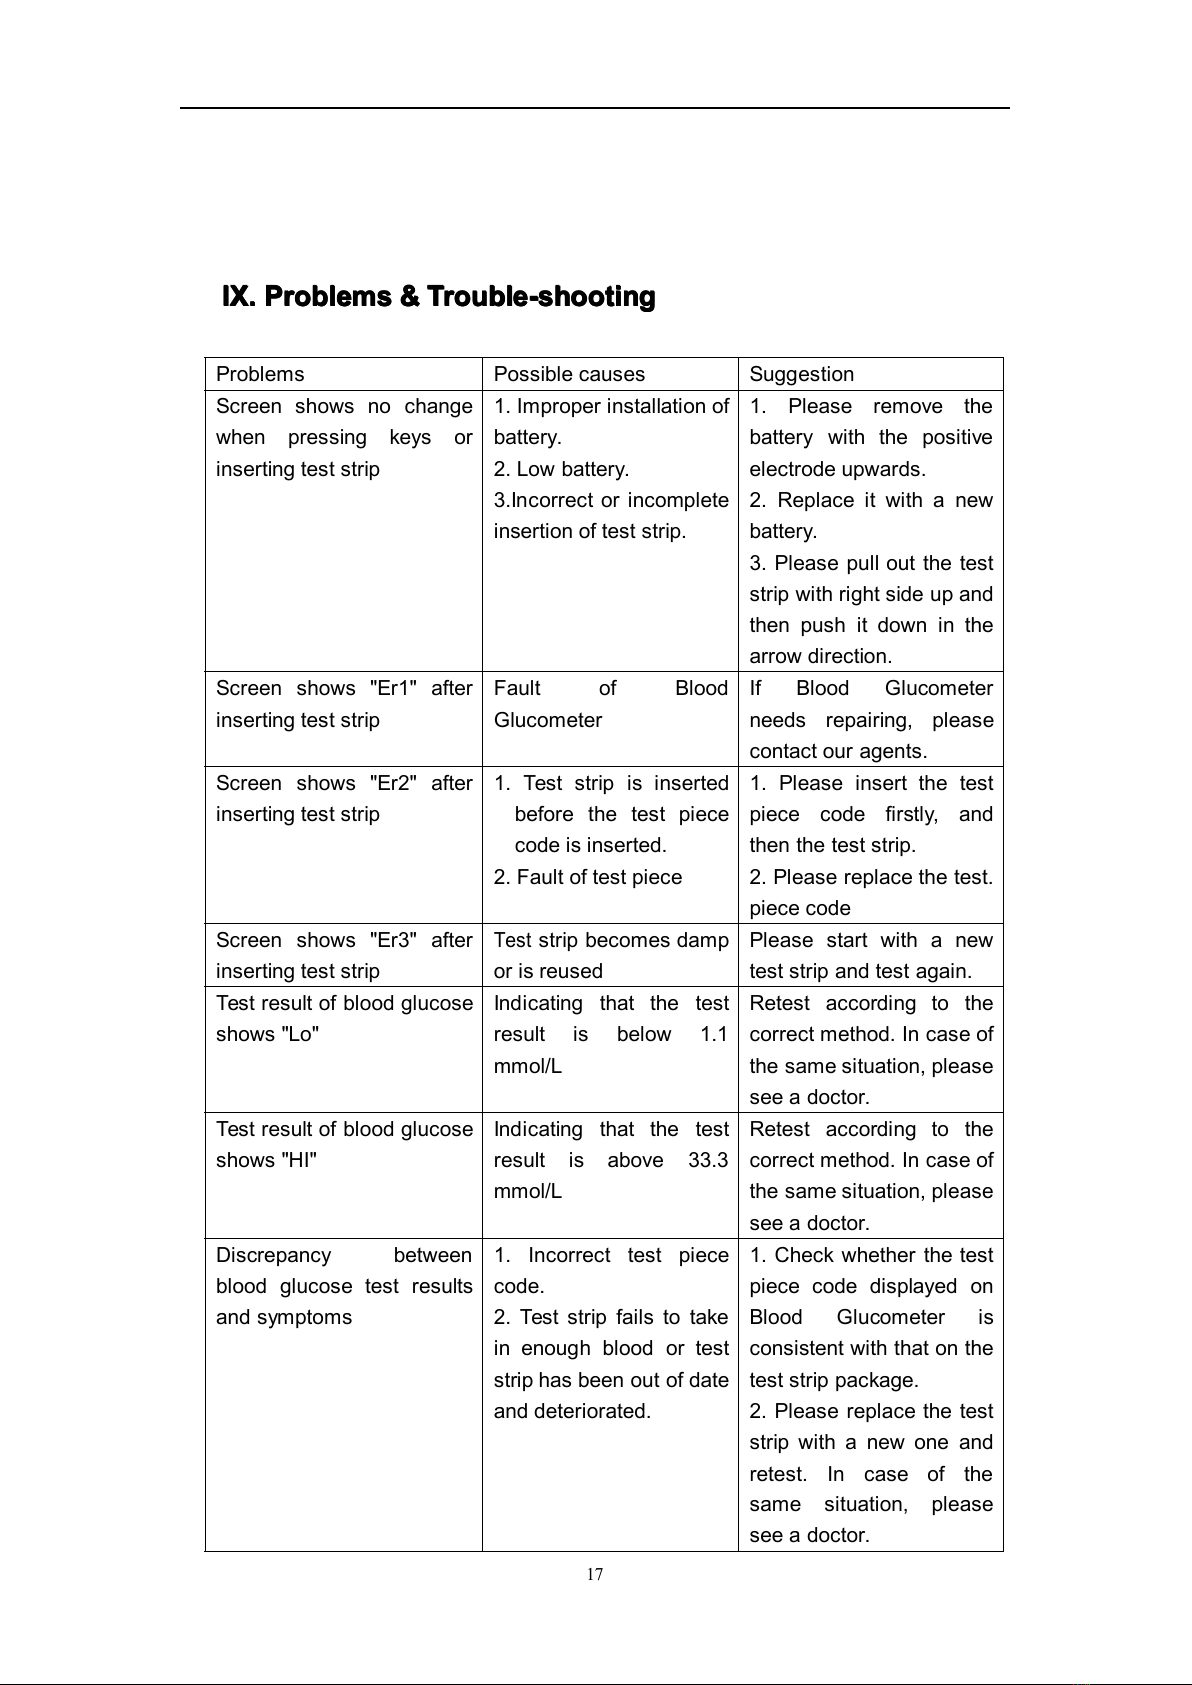
Problems Possible causes Suggestion
Screen shows no change
when pressing keys or
inserting test strip
1. Improper installation of
battery.
2. Low battery.
3.Incorrect or incomplete
insertion of test strip.
1. Please remove the
battery with the positive
electrode upwards.
2. Replace it with a new
battery.
3. Please pull out the test
strip with right side up and
then push it down in the
arrow direction.
Screen shows "Er1" after
inserting test strip
Fault of Blood
Glucometer
If Blood Glucometer
needs repairing, please
contact our agents.
Screen shows "Er2" after
inserting test strip
1. Test strip is inserted
before the test piece
code is inserted.
2. Fault of test piece
1. Please insert the test
piece code firstly, and
then the test strip.
2. Please replace the test.
piece code
Screen shows "Er3" after
inserting test strip
Test
strip becomes damp
or is reused
Please start with a new
test strip and test again.
Test result of blood glucose
shows "Lo"
Indicating that the test
result is below 1.1
mmol/L
Retest according to the
correct method. In case of
the same situation, please
see a doctor.
Test result of blood glucose
shows "HI"
Indicating that the test
result is above 33.3
mmol/L
Retest according to the
correct method. In case of
the same situation, please
see a doctor.
Discrepancy between
blood glucose test results
and symptoms
1. Incorrect test piece
code.
2. Test strip fails to take
in enough blood or test
strip has been out of date
and deteriorated.
1. Check whether the test
piece code displayed on
Blood Glucometer is
consistent with that on the
test strip package.
2. Please replace the test
strip with a new one and
retest. In case of the
same situation, please
see a doctor.
All manuals and user guides at all-guides.com
18
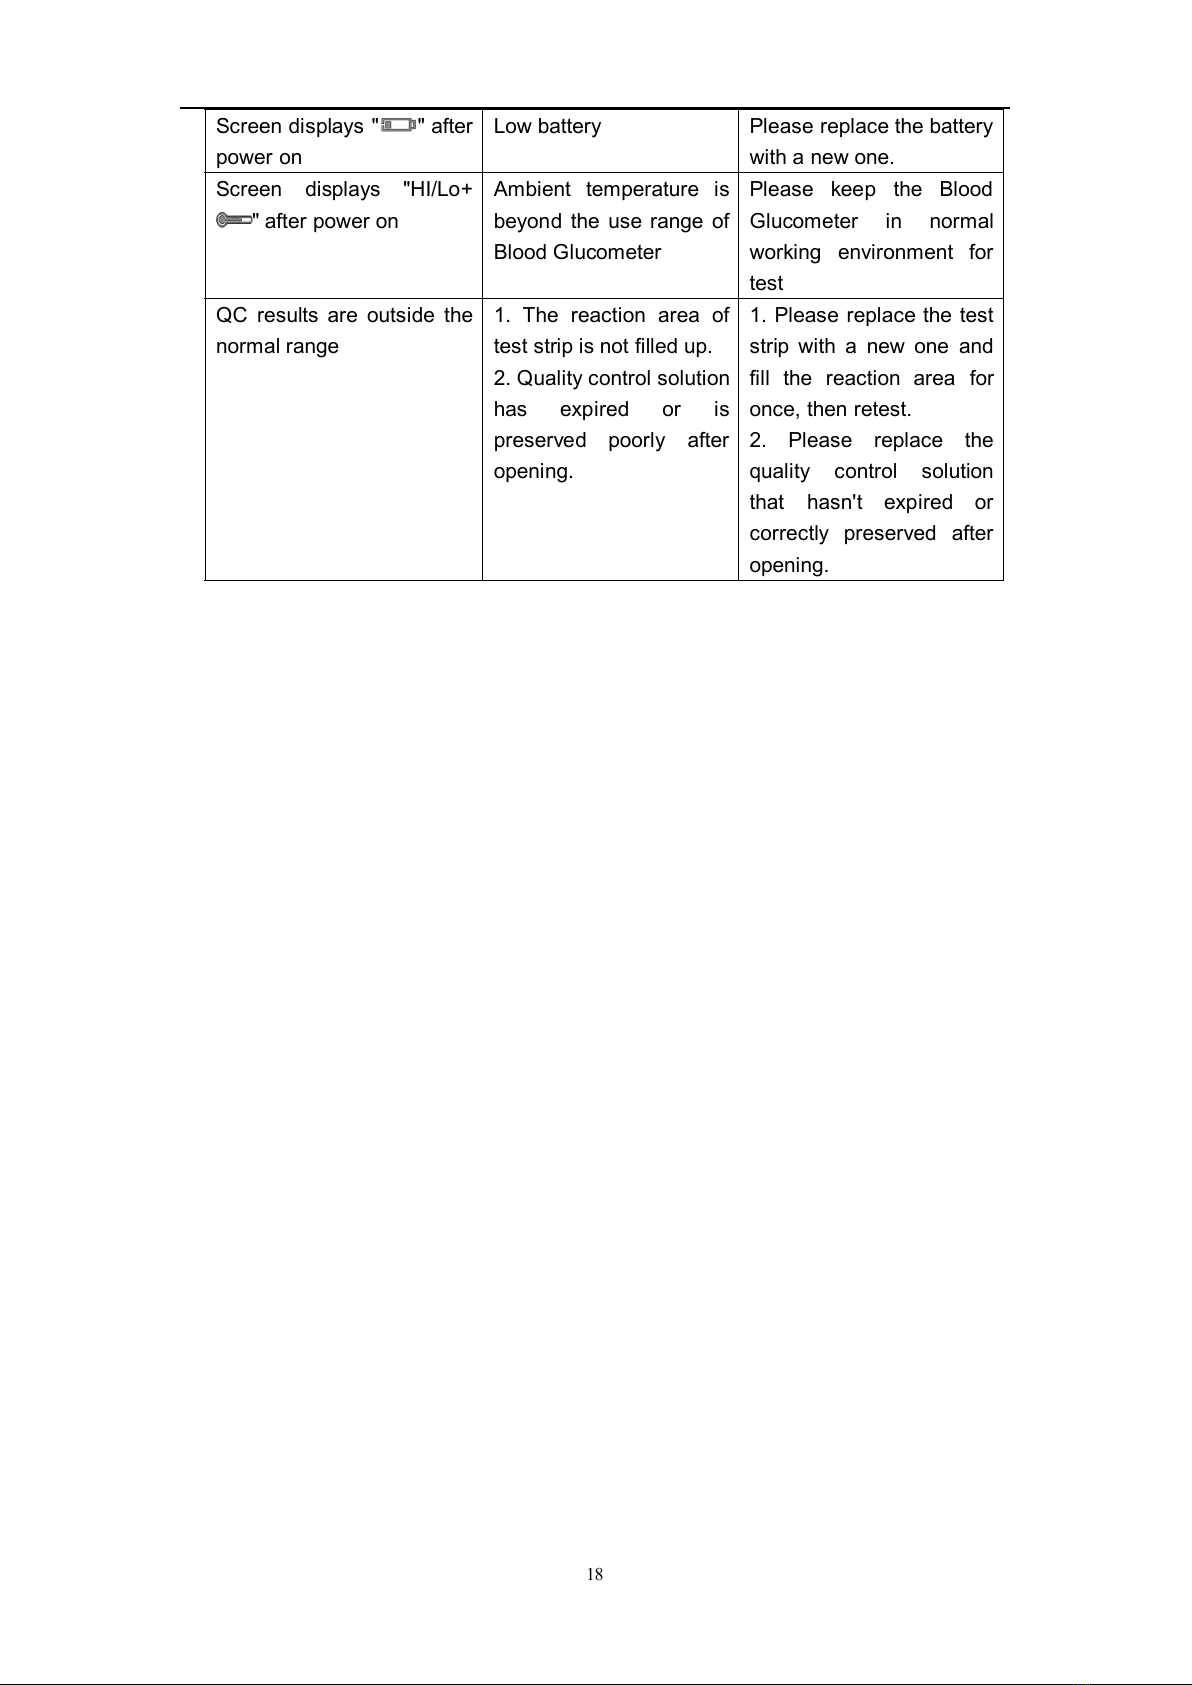
Screen displays " " after
power on
Low battery Please replace the battery
with a new one.
Screen displays "HI/Lo+
" after power on
Ambient temperature is
beyond the use range of
Blood Glucometer
Please keep the Blood
Glucometer in normal
working environment for
test
QC results are outside the
normal range
1. The reaction area of
test strip is not filled up.
2. Quality control solution
has expired or is
preserved poorly after
opening.
1. Please replace the test
strip with a new one and
fill the reaction area for
once, then retest.
2. Please replace the
quality control solution
that hasn't expired or
correctly preserved after
opening.
All manuals and user guides at all-guides.com

19
X.
X.
X.
X. Ideal
Ideal
Ideal
Ideal Blood
Blood
Blood
Blood Glucose
Glucose
Glucose
Glucose Control
Control
Control
Control Range
Range
Range
Range
In general, the ideal blood glucose level of non-diabetic patients is:
Fasting: 3.9~6.1mmol/L (70~110mg/dL)
2 hours after meal: less than 7.8mmol/L (140mg/dL)
Blood glucose control standard of type 2 diabetes
(Made by Asian-Pacific Type 2 Diabetes Policy Group in 2002)
Project Good General Poor
Fasting blood glucose 4.4~6.1mmol/L
(80mg/dL~110mg/d
L)
≤ 7.0 mmol/L
( ≤ 126mg/dL)
>7.0 mmol/L
(>126mg/dL)
Non-fasting blood
glucose
4.4~8.0mmol/L
(80mg/dL~144mg/d
L)
≤ 10.0
mmol/L
( ≤ 180mg/dL)
>10.0.0
mmol/L
(>180mg/dL)
Note:
Note:
Note:
Note: if
if
if
if your
your
your
your test
test
test
test result
result
result
result is
is
is
is outside
outside
outside
outside the
the
the
the above
above
above
above range,
range,
range,
range, please
please
please
please see
see
see
see a
a
a
a
doctor
doctor
doctor
doctor timely
timely
timely
timely and
and
and
and receive
receive
receive
receive treatment
treatment
treatment
treatment under
under
under
under the
the
the
the guidance
guidance
guidance
guidance of
of
of
of a
a
a
a
professional
professional
professional
professional doctor.
doctor.
doctor.
doctor.
XI.
XI.
XI.
XI. Warranty
Warranty
Warranty
Warranty
Thank you for using FED Blood Glucometer. We will provide five-year
guarantee replacement and lifelong maintenance services if it is used properly.
Therefore, please carefully fill out the warranty card and send the "Archive
Copy" back to our company. Abnormal spoilage is not in the scope of
guarantee replacement or maintenance. Thanks for your understanding!
All manuals and user guides at all-guides.com
Other manuals for BGM-II
1
Table of contents
Other FED Blood Glucose Meter manuals


