Wellion Galileo GLu/KET User manual

OWNER‘S
GUIDE

2
Dear Wellion GALILEO GLU/KET (plus) Owner,
Thank you for choosing theWellion GALILEO GLU/KET (plus) Blood Glucose and Ketone
Monitoring System to help you easily monitor your blood sugar level and blood ketone
level.
Your new Wellion GALILEO GLU/KET (plus) Blood Glucose and Ketone Monitoring
System is a system that does not require you to code the meter manually so testing
errors can be greatly reduced. All of the information you need to use and maintain your
new Wellion GALILEO GLU/KET (plus) Blood Glucose and Ketone Monitoring System is
included in this manual.
The Wellion GALILEO GLU/KET (plus) Blood Glucose and Ketone Monitoring System
contains two test modes: glucose mode and ketone mode. It has many convenient new
features to help you manage test results, such as hypoglycemia and hyperglycemia
warnings, before & after meal marker, exercise marker and medication/insulin marker.
Moreover, the illuminated test strip port and the backlit display will help measuring in
dim surroundings.
All the information needed to use and maintain your new meter is included in this
manual. Please read it carefully.

3
INTENDED USE
The Wellion GALILEO GLU/KET (plus) Blood Glucose and Ketone Monitoring System
is intended to quantitatively measure blood glucose in fresh capillary whole blood
drawn from ngertips, palm, or forearm, and blood ketone in venous whole blood or
capillary whole blood from ngertips. Alternative site testing for glucose test should
be performed only during steady-state (when glucose is not changing rapidly). Testing
is done outside the body (In Vitro diagnostic use).
The system is intended for self-testing by people with diabetes or in clinical settings by
healthcare professionals, as an aid in monitoring blood glucose level and blood ketone
level in diabetes mellitus. It is not indicated for diagnosis or screening of diabetes or
for neonatal use.
IMPORTANT:
tDehydration – Severe dehydration may lead to inaccurate blood glucose test result.
If you suspect you are severely dehydrated, contact your healthcare professional
immediately.
tHaematocrit range - A haematocrit range that is higher than 70% or lower than 20%
can cause inaccurate blood glucose test results. A haematocrit range that is higher
than 60% or lower than 20% can cause inaccurate blood ketone test results.
tSuitable for self-testing.
tNot intended for use on neonates.

4
YOUR NEW MEASURING KIT
The Wellion GALILEO GLU/KET (plus) measuring kit includes the following items:
Wellion GALILEO GLU/KET (plus) meter incl. batteries
Wellion GALILEO Glucose Strips (optional)
Wellion GALILEO Ketone Strips (optional)
Wellion Lancing device
Wellion Lancets
Compact Pouch
Owner‘s guide
Easy Start Picture Guide

5
Wellion GALILEO GLU/KET (plus) Blood Glucose and Ketone meter
AB 000000
MED TRUST Handelsges.m.b.H.
Gewerbepark 10
7221 Marz, AUSTRIA
www.wellion.at www.medtrust.at
W10-40KW Rev A 03/2016
0197
WELL10-00KW
Data Port
Transmits data to
a computer via the
USB-cable, when
connected with
suitable software*
Battery Compartment
Holds 2 x CR2032 3V lithium coin cell
batteries
Eject Button (if available)
Push and eject a used test strip. Meter will
turn o automatically when the test strip
is ejected.
*The correct reading of your data can be ensured only with the original Wellion GALILEO USB cable.
Arrow buttons
t 4DSPMMCFUXFFOTFMFDUJPOT
when setting up the meter
t 4DSPMMCFUXFFOEJòFSFOU
memorized values when in
the memory recall mode
Illuminated Test Strip Port
This is where you insert the test
strip. The illumination facilitates
measurements in
a dark environment.
OK button
Use to turn the meter on/o, to access the meter memory mode and
the set-up mode. Also used to select specic functions when in memory
recall mode and set-up mode.
Meter Display
Shows your test results, memory
values, average, and other
messages

6
Meter Display Screen
G
l
u
GLU/KET - indicates whether the
meter is in glucose or ketone test
mode
Exercise Marker - displayed
when marking a result as after
exercise, or viewing a marked
result
Before-/After-Meal Marker
- displayed when marking a
result as before-meal or after-
meal, or viewing a marked
result
Date - indicates the
date (dd/mm)
Time - indicates the time Medication/Insulin Marker
- displayed when marking
a result as being near to
medication/insulin intake, or
viewing a marked result
hypo warning -
displayed when
t 4FUUJOHVQZPVSIZQPHMZDFNJD
threshold value
t *OEJDBUFTZPVSUFTUSFTVMUXIFO
at or below your hypoglycemic
threshold value
t *OEJDBUFTUIFNFNPSJ[FE
result when at or below your
hypoglycemic threshold value.
hyper warning / ketose awareness warning
- displayed when
t 4FUUJOHVQZPVSIZQFSHMZDFNJDUISFTIPMEWBMVF
t *OEJDBUFTZPVSUFTUSFTVMUXIFOBUPSBCPWFZPVS
hyperglycemic threshold value
t *OEJDBUFTUIFNFNPSJ[FESFTVMUXIFOBUPSBCPWFZPVS
hyperglycemic threshold value

7
G
l
u
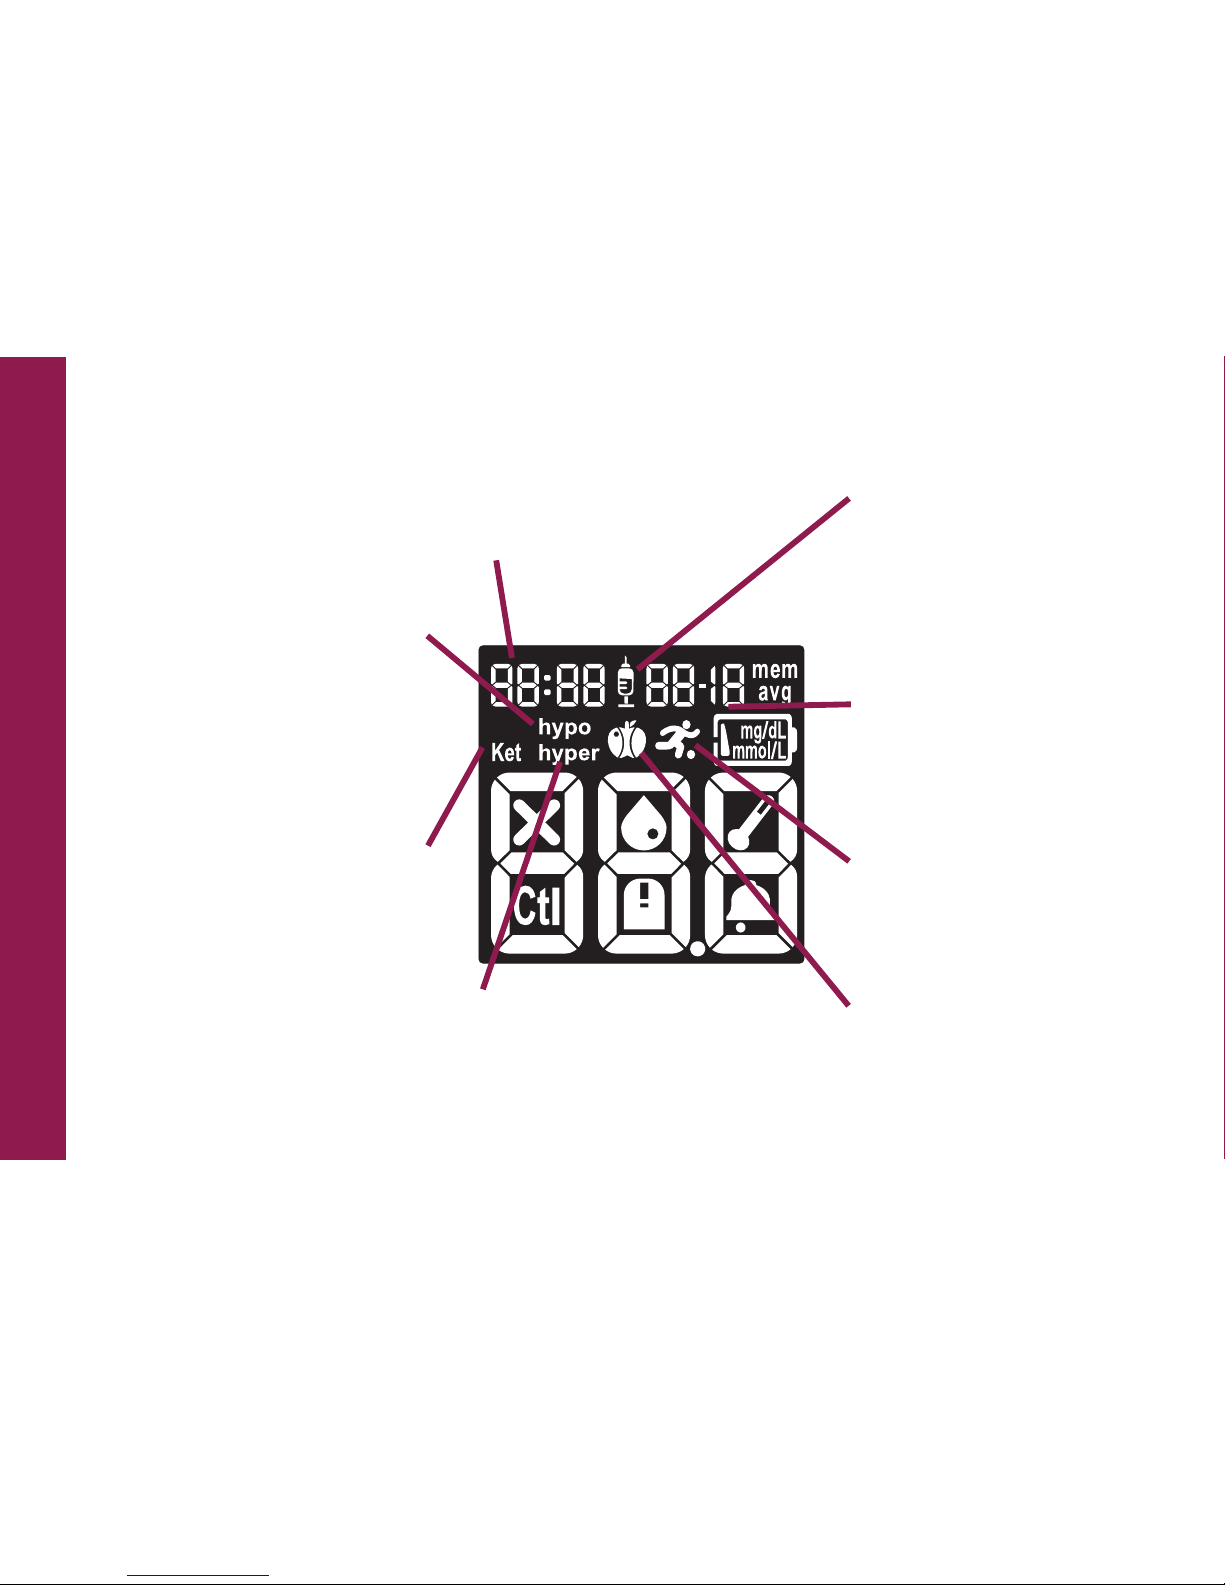
mem - indicates the meter is in memory recall
mode and the number on the main display
area is a memorized testing result
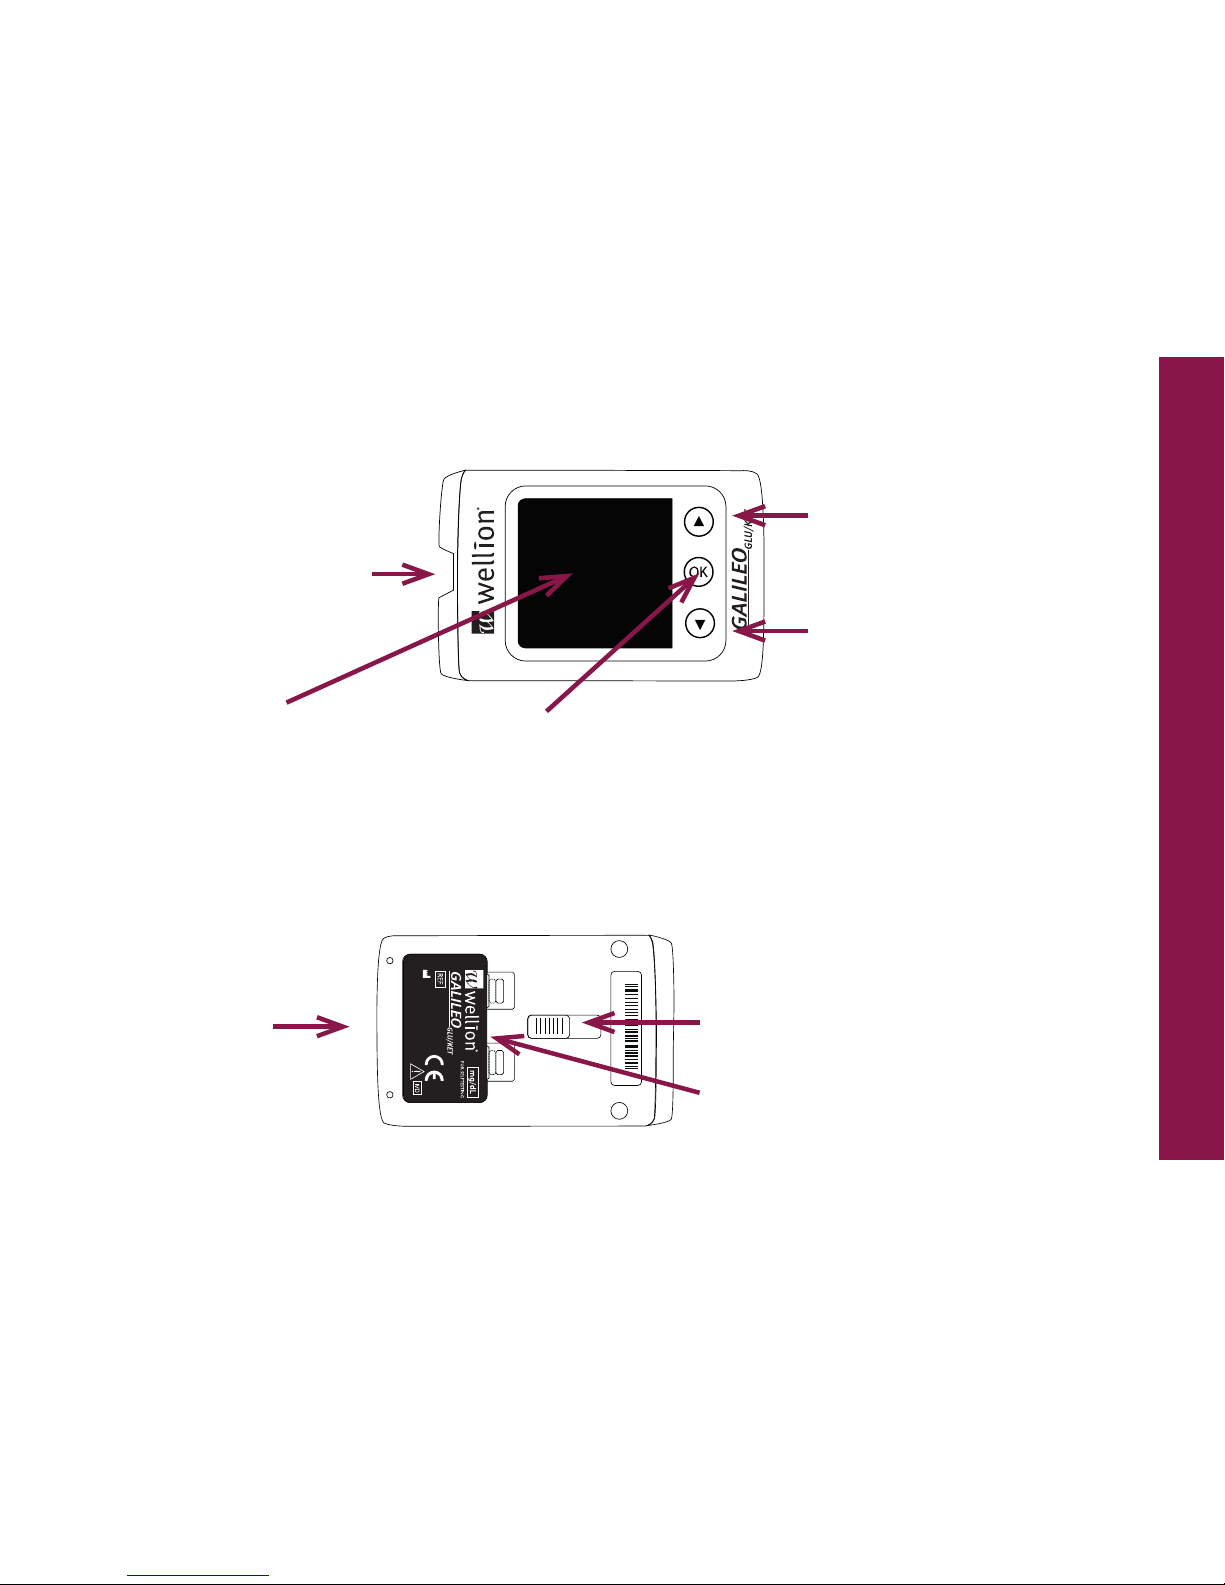
Main Display Area -
Displays test results,
memorized testing
results, errors and other
messages
AVG - displayed when viewing
the 1, 7, 14, 30, 60 and 90 day
averages. This is for glucose
values only
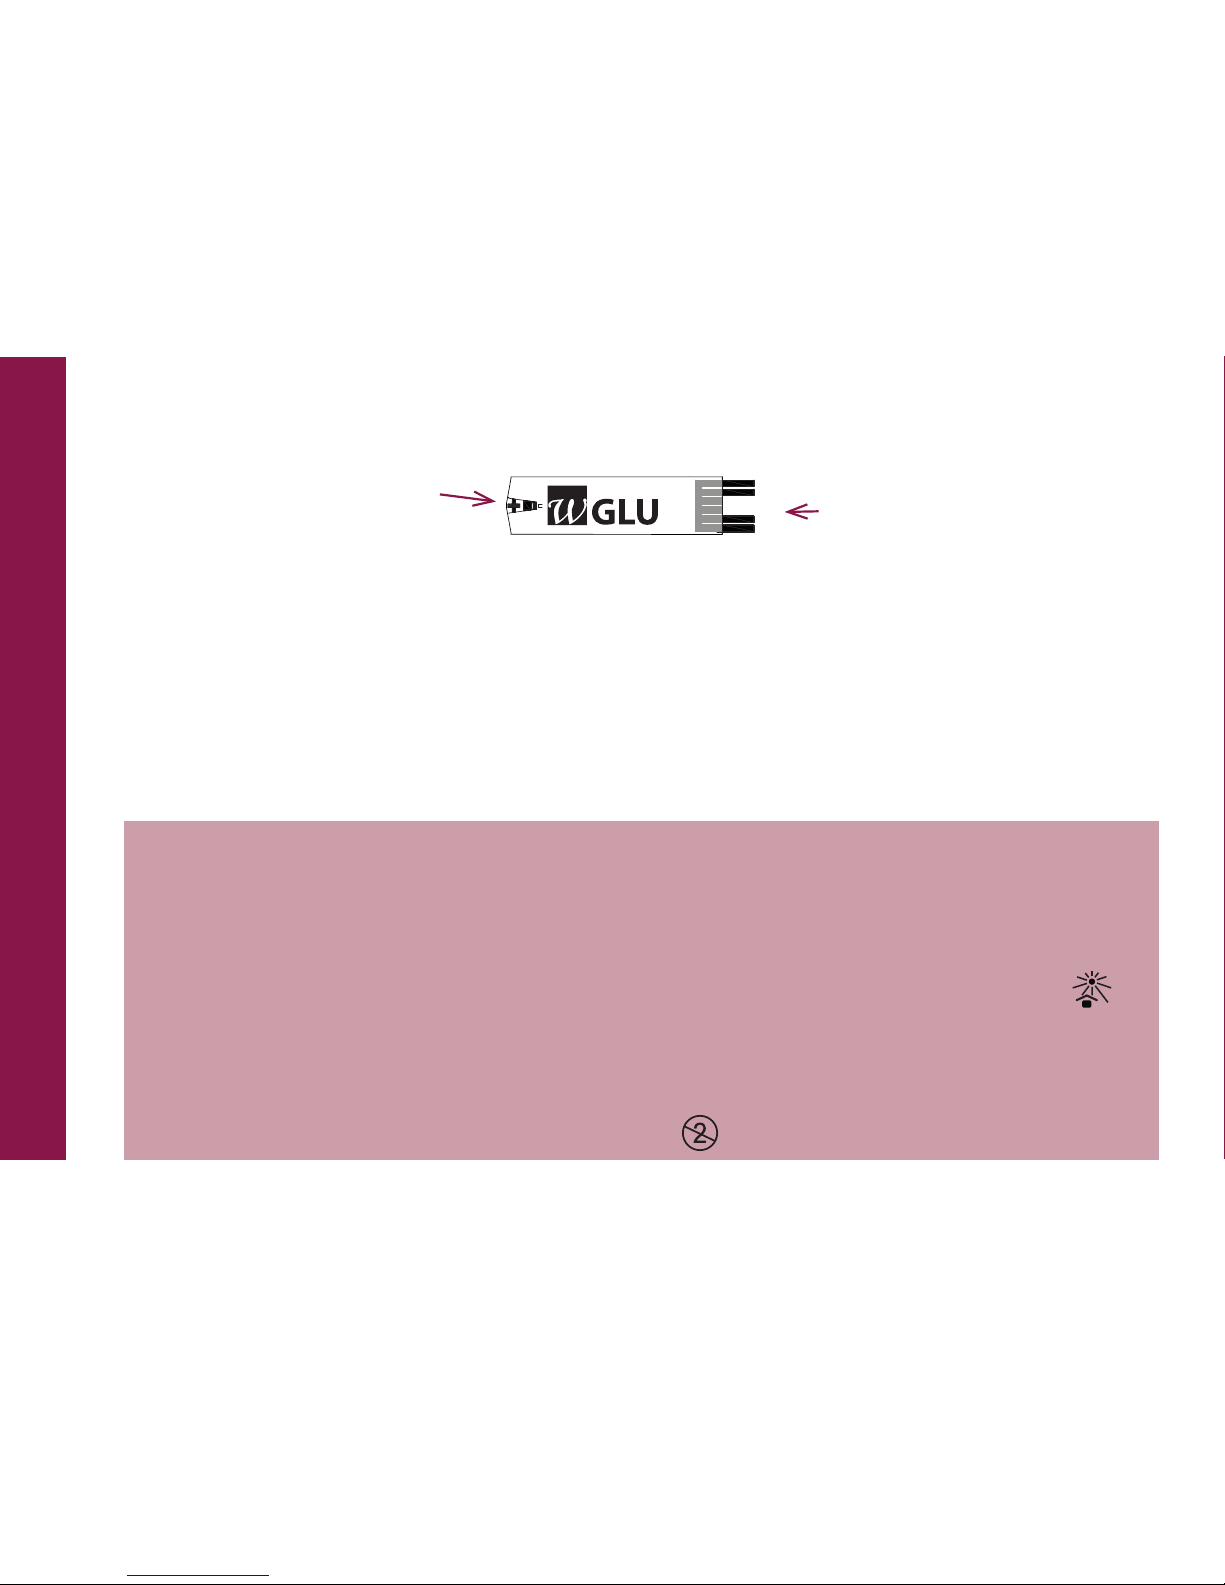
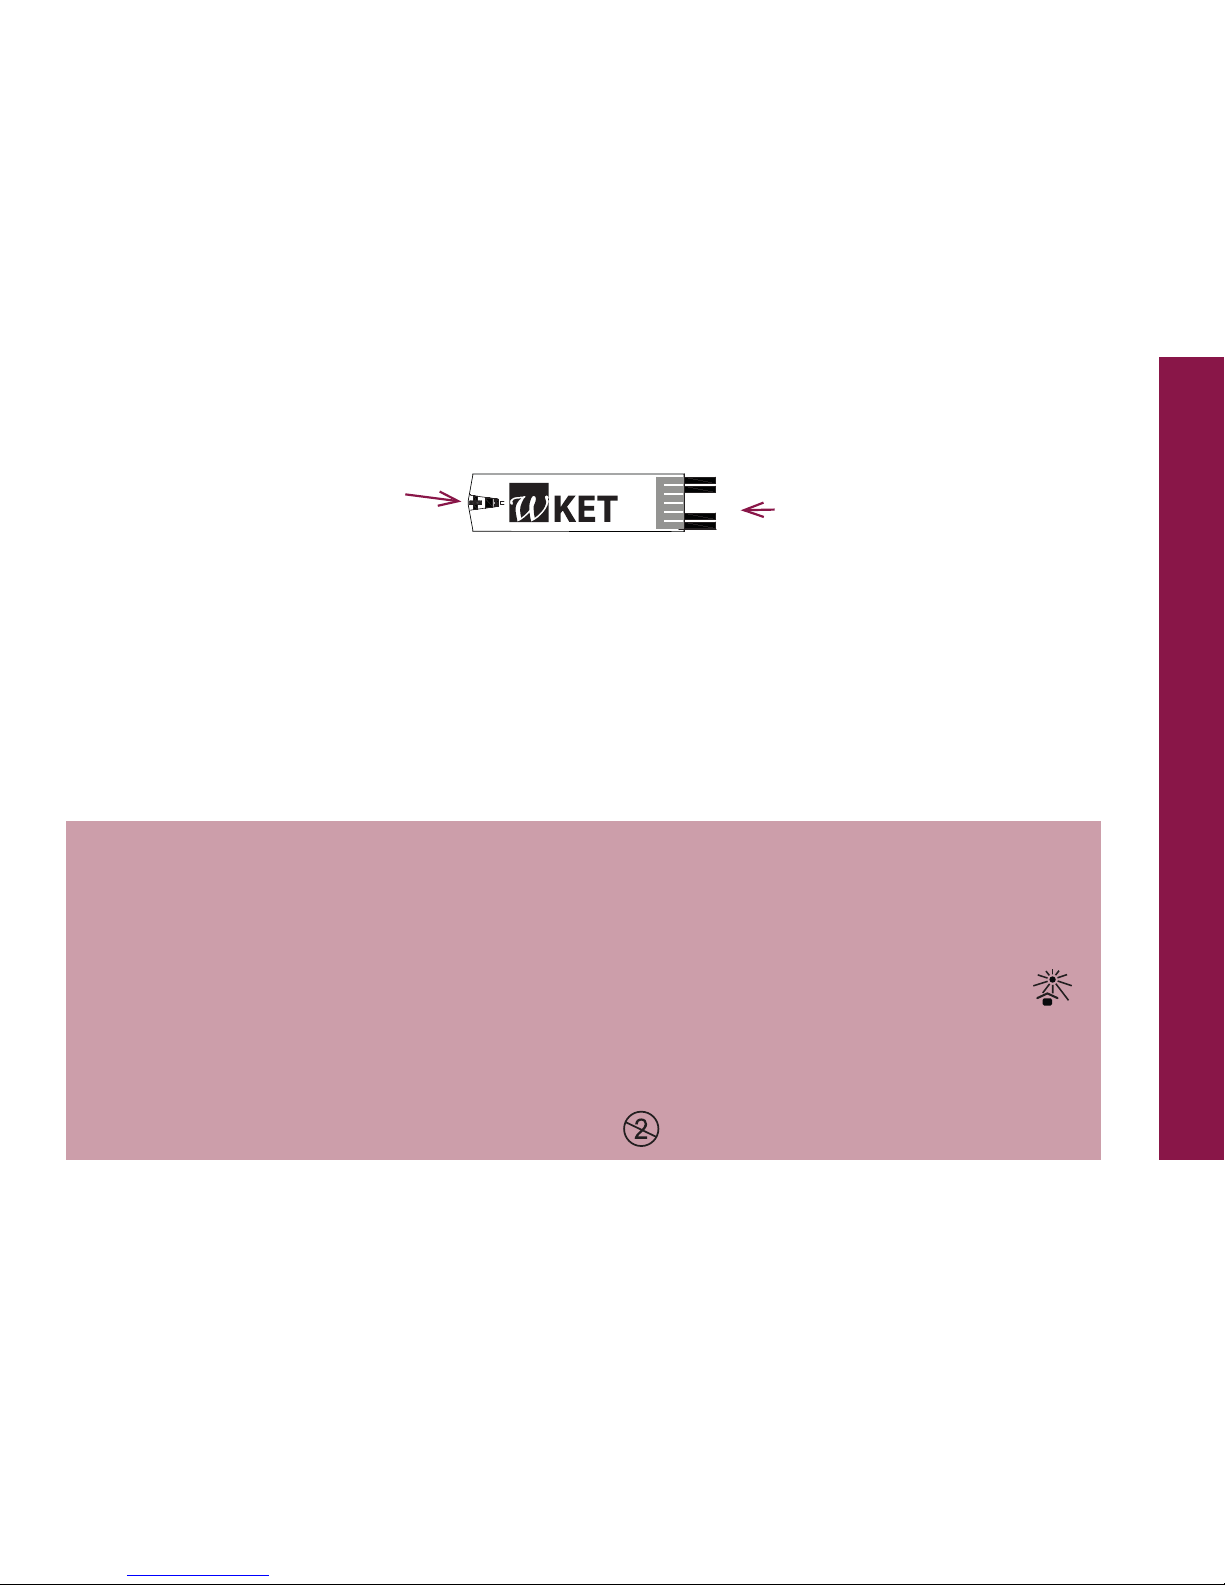
mg/dL, mmol/L - indicates
the unit of measurement for
glucose or ketone. The unit
of measurement is set in the
factory and cannot be changed.
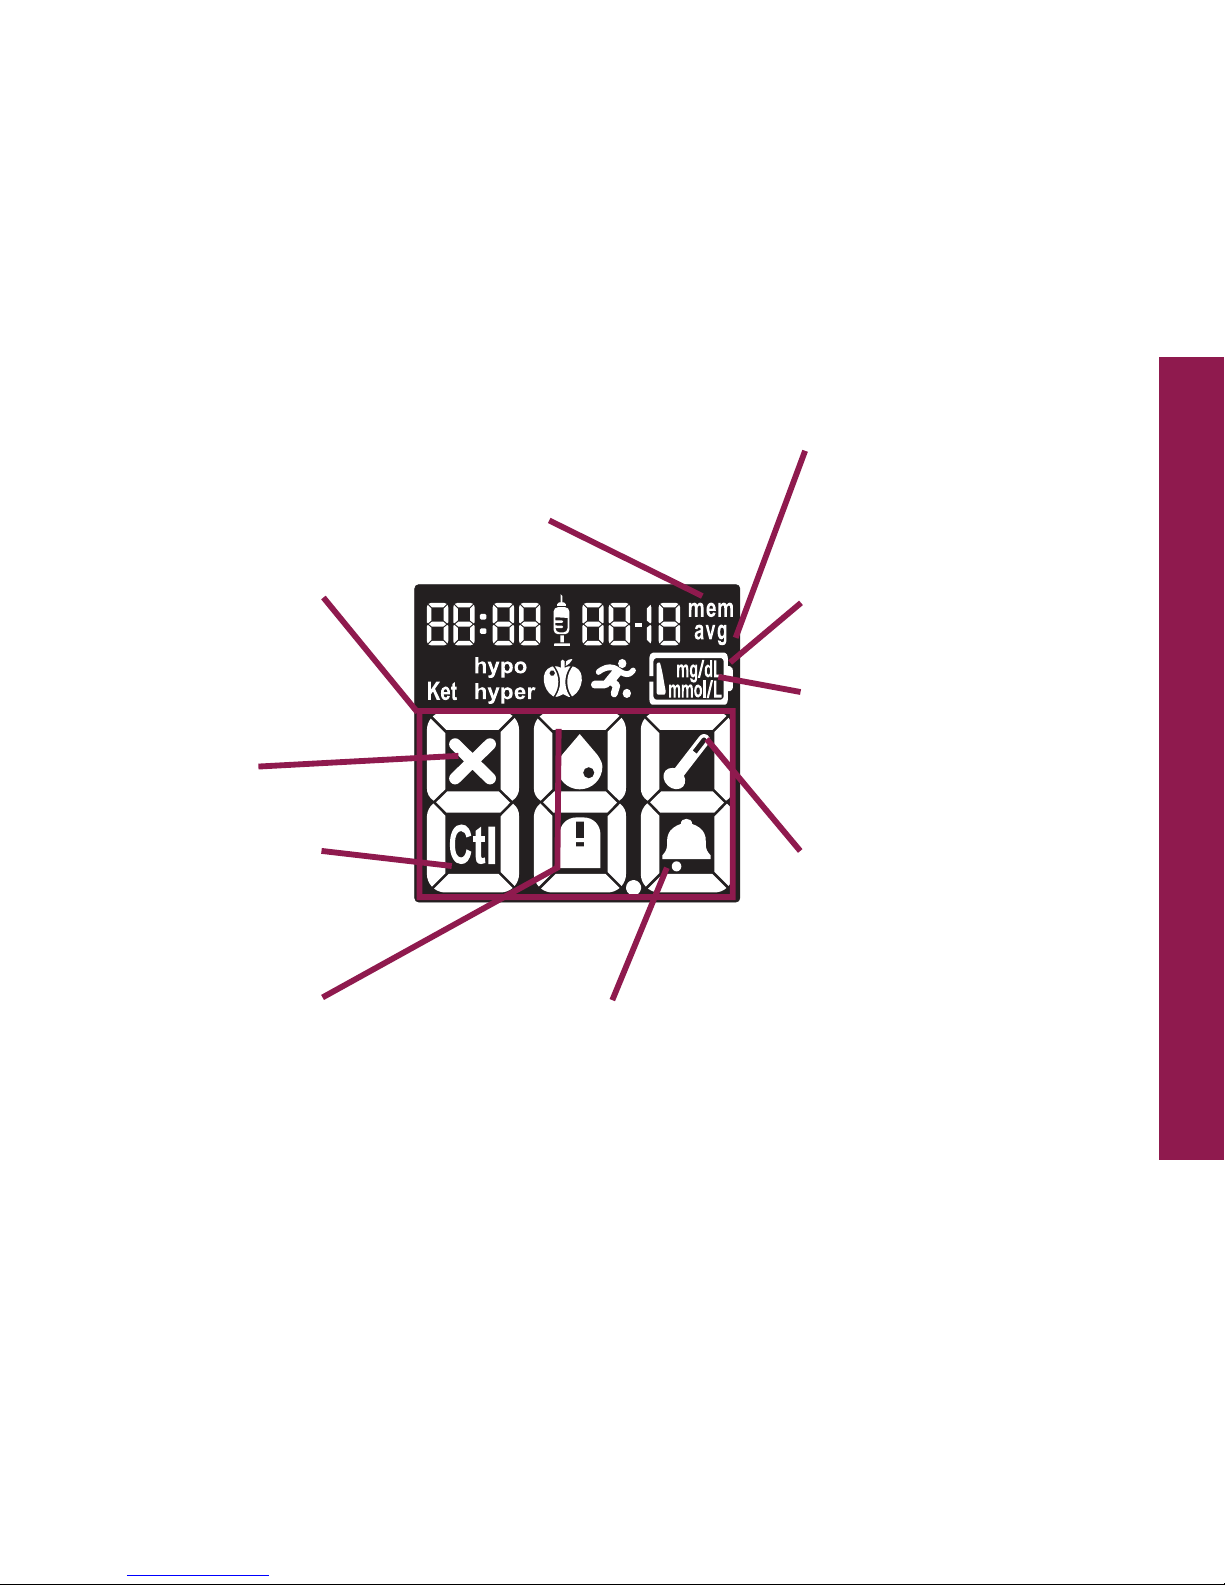
Ctl - indicates the meter
is in control solution
mode, or shows a mem-
orized control solution
result
Temperature icon - indicates
the meter is outside of its
operating temperature. The
meter will not test if outside of
this range. Move the meter to
an environment within its oper-
ating temperature range (such
as indoors) and wait 30 minutes
before testing.
Operating temperature:
for glucose test 5°C - 45°C;
for ketone test 10°C - 40°C
Blood drop and test strip icon - indicates the
meter is ready for testing if both icons are lit up.
Alarm - indicates
the alarm function
is ON
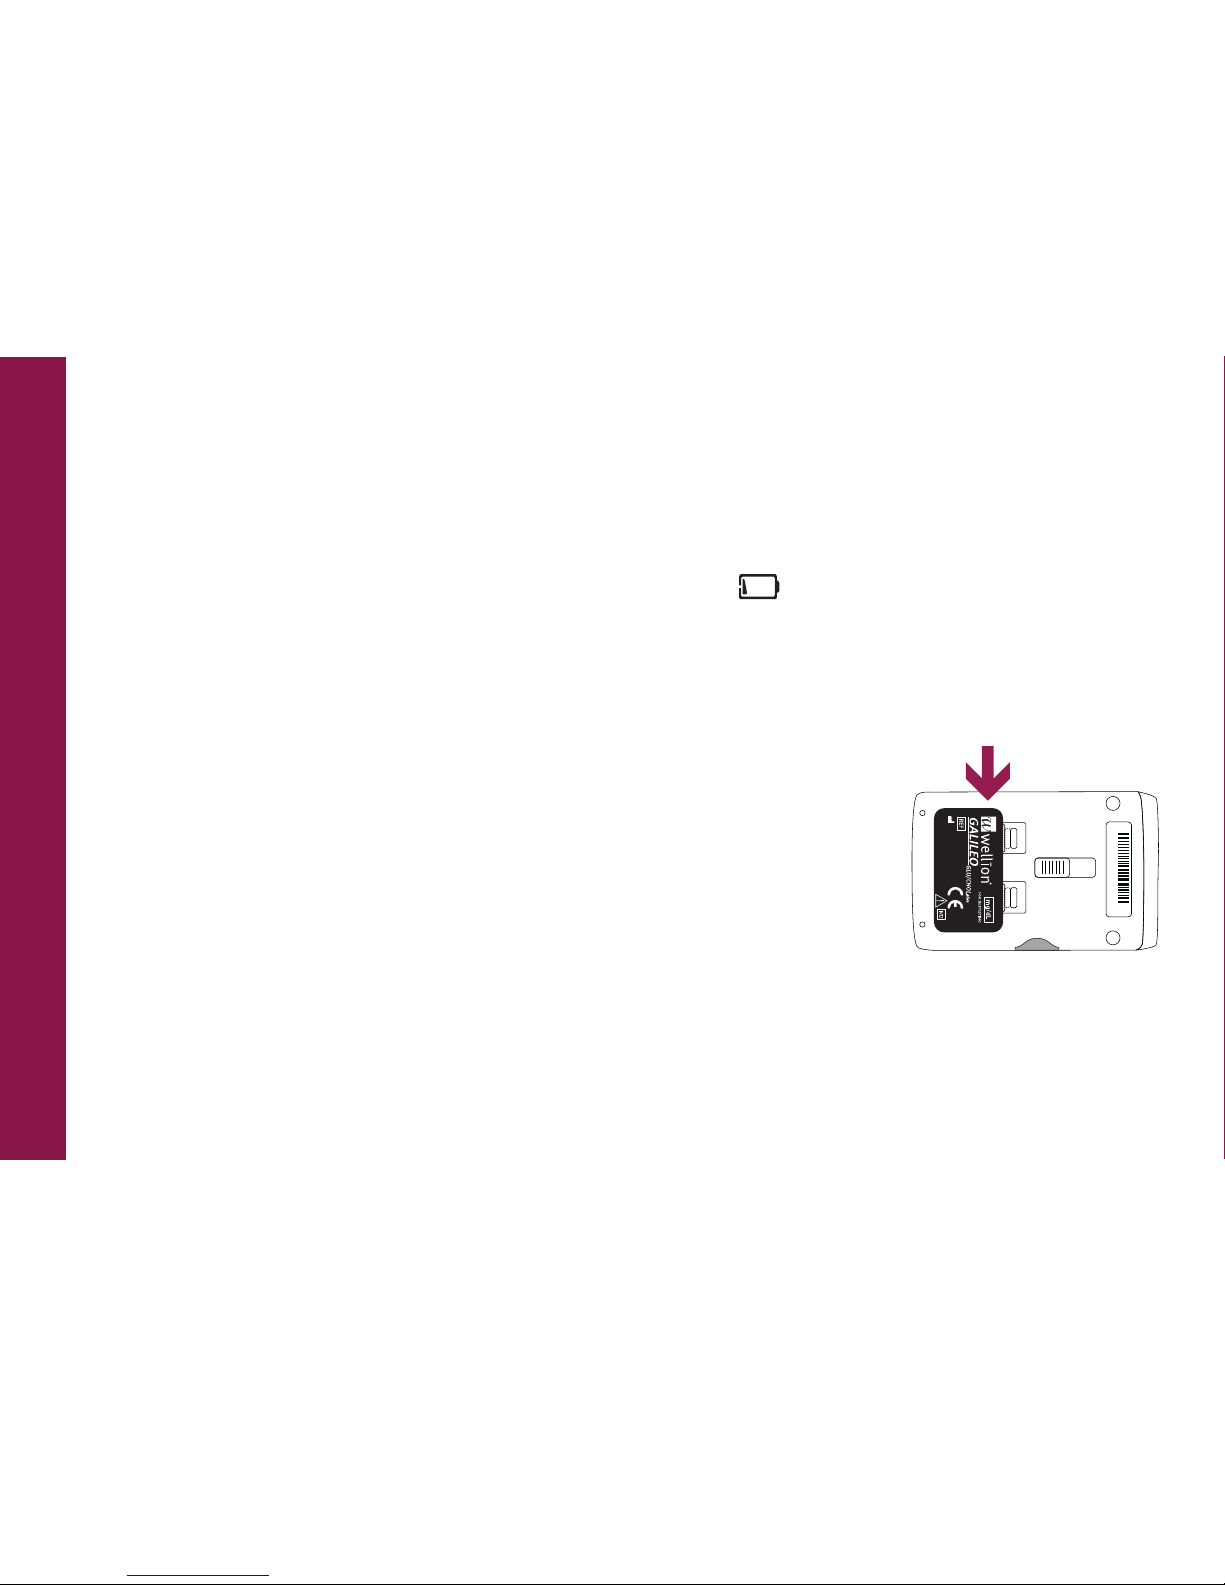
Battery Symbol - Lights up to
indicate a change of the battery
is necessary
Meter failure icon

8
The Wellion GALILEO GLU Blood Glucose Test Strip
The Wellion GALILEO Test Strip is a glucose specic, biosensor-based test strip that can
test glucose in capillary whole blood in as little as 5 seconds and requires a very small
blood sample. The test result is plasma referenced for easy comparison to lab results
and has under-ll detection to alert you when there is not enough blood to perform a
test, so you can be sure that each reading you get is an accurate and meaningful result.
Contact Points
Insert this end to the test strip
port on the meter
Sampling Area
The area where the blood sample
or control solution is applied
IMPORTANT
t #F TVSF UP VTF POMZ UIF 8FMMJPO ("-*-&0 #MPPE (MVDPTF 5FTU 4USJQ XJUI UIF
Wellion GALILEO GLU/KET (plus) Meter. Other brands of test strips will not work with the
meter.
t 5IF8FMMJPO("-*-&0#MPPE(MVDPTF5FTU4USJQTBSFTFOTJUJWFUPNPJTUVSFBOEMJHIUXXX , it
is important to tightly close the vial cap of the test strip bottle immediately after each use.
DO NOT leave any test strips outside the bottle while not in use.
t $BSFGVMMZEJTDBSEVTFEUFTUTUSJQTBOEMBODFUTJOBDDPSEBODFXJUIMPDBMHVJEFMJOFT
t %0/05SFVTF5FTUTUSJQJTGPSTJOHMFVTFPOMZ

9
The Wellion GALILEO KET Blood Ketone Test Strip
The Wellion GALILEO Blood Ketone Test Strip is a ketone specic, biosensor-based test
strip that can test blood ketone level in venous or capillary whole blood in as little as
8 seconds and requires a very small blood sample. The test result is plasma referenced
for easy comparison to lab results and has under-ll detection to alert you when there
is not enough blood to perform a test, so you can be sure that each reading you get is
an accurate and meaningful result.
Contact Points
Insert this end to the test strip
port on the meter
Sampling Area
The area where the blood sample or
control solution is applied
IMPORTANT
t #F TVSF UP VTF POMZ UIF 8FMMJPO ("-*-&0 #MPPE ,FUPOF 5FTU 4USJQ XJUI UIF
Wellion GALILEO GLU/KET (plus) Meter. Other brands of test strips will not work with the
meter.
t 5IF8FMMJPO("-*-&0#MPPE ,FUPOF5FTU 4USJQTBSF TFOTJUJWFUPNPJTUVSFBOE MJHIUXXX.
The test strip should be used within 10 minutes after removing from the aluminum foil
package.
t $BSFGVMMZEJTDBSEVTFEUFTUTUSJQTBOEMBODFUTJOBDDPSEBODFXJUIMPDBMHVJEFMJOFT
t %0/05SFVTF5FTUTUSJQJTGPSTJOHMFVTFPOMZ

10
SETTING UP YOUR NEW SYSTEM
Inserting (or Changing) the Batteries
The batteries need to be inserted before using your Wellion GALILEO GLU/KET (plus)
Meter for the rst time or when the battery icon XXX appears on the meter display
screen.
Material you will need:
2 x CR 2032 3V Lithium coin cell batteries
Your Wellion GALILEO GLU/KET (plus) Meter
Step 1: Turn the meter o. Remove the battery cover on the
back of the meter by pushing the tab and pulling the door up.
Remove the old batteries.
Step 2: Insert the new batteries with the “+“ side up. They do not snap into place but
rest on the metal contact. The door holds the batteries down. Put the battery door
back into place and snap it closed.
AB 000000
MED TRUST Handelsges.m.b.H.
Gewerbepark 10
7221 Marz, AUSTRIA
www.wellion.at www.medtrust.at
W10-40ECW Rev A 03/2016
0197
WELL10-00ECW

11
NOTE
t "GUFSDIBOHJOHUIFCBUUFSJFTUIFNFUFSBVUPNBUJDBMMZQSPNQUTZPVUPDIFDLUIFUJNFBOE
date when it is turned on either by inserting a test strip or pressing OK. If it is correct, press
OK to conrm setup and exit, or if the time and date are not correct, refer to the chapter
“Setting the Clock“.
t 5IFEBUFBOETUPSFESFTVMUTXJMMOPUCFFSBTFEXIFOUIFCBUUFSJFTBSFCFJOHDIBOHFE
t %JTDBSEVTFECBUUFSJFTBDDPSEJOHUPZPVSMPDBMHVJEFMJOFT
t 5IFNFUFSVTFTYWPMUMJUIJVNCBUUFSJFTDPJODFMM$35IJTUZQFPGCBUUFSZDBOCF
found in many stores. Always keep a spare packaged battery on hand.
t #FTVSFUIFCBUUFSJFTHPJOXJUIUIFiwTJEFVQ
t 3FNPWFUIFCBUUFSJFTJGZPVBSFOPUHPJOHUPVTFUIFNFUFSGPSBMPOHUJNF
Setting the Clock
Material you will need:
Your Wellion GALILEO GLU/KET (plus) Meter
Step 1: With the meter turned o, press and hold the OK
button until the screen displays “FunC“.

12
Step 2: Release the OK button and the meter will show the
current date and time. If you are setting the date and time for
the rst time, the month will now start ashing to indicate you
are in date and time set-up mode. If you are changing the date
BOEUJNFi4&UwXJMMTIPXPOUIFTDSFFOQSFTTUIF0,CVUUPO
to enter date and time set-up mode.
Step 3 - Set Month: The current month will ash. Use the arrow
buttons to select the correct month. Press the OK button to
conrm your choice and advance to set the day.
Step 4: Set Day: The current day will ash. Use the arrow
buttons to select the correct day. Press the OK button to
conrm your choice and advance to set the year.
Step 5: Set Year: The current year will ash. Use the arrow
buttons to select the correct year. Press the OK button to
conrm your choice and advance to set the hour.

13
Step 6 - Set Hour: The current hour will ash. Use the arrow
buttons to select the correct hour. Press the OK button to
conrm your choice and advance to set the minute.
Step 7 - Set Minute: The current minute will ash. Use the
arrow buttons to select the correct minute. Press the OK
button to conrm your choice and the result of your date and
time correction will ash as a whole.
Press the arrow buttons to select the next function to setup, or insert a test strip and
begin testing. You can also turn o the meter by pressing and holding the OK button
until the display screens shows OFF.
Anytime during setup, you may insert a test strip to begin testing. The changes you
have conrmed with OK so far will be memorized by the meter.

14
Setting Warning Values for Glucose / Ketose Awareness threshold
Your Wellion GALILEO GLU/KET (plus) Blood Glucose and Ketone Meter has a feature
to set your high and low blood glucose threshold (hyperglycemia and hypoglycemia
values) to better assist you in understanding your blood sugar levels and glycemic
state.
#BTFEPOUIFWBMVFTZPVIBWFTFUVQUIF-$%TDSFFOXJMMTIPXiIZQPwJGZPVSCMPPE
glucose test result is below your low glucose threshold value (hypoglycemia level),
PS UIF -$% TDSFFO XJMM TIPXiIZQFSw JG ZPVS CMPPE HMVDPTF UFTU SFTVMU JT BCPWF ZPVS
high glucose threshold level value (hyperglycemia level). Please consult your physician
or healthcare provider on your individual recommendation for the Hypo and Hyper
alarm thresholds.
IMPORTANT
t %POPUBMUFSPSTUPQZPVSNFEJDBUJPOCBTFEPOUIJTGFBUVSFBMXBZTDPOTVMUZPVSQIZTJDJBO
or healthcare provider before altering or stopping medication.
t 5IF 8FMMJPO ("-*-&0 (-6,&5 QMVT .FUFS DPNFT XJUI )ZQP)ZQFS XBSOJOH 0/ BT
preset, and the preset threshold value is 10 mmol/L (180 mg/dL) for Hyper and 3,9mmol/L
(70 mg/dL) for Hypo. Follow the steps below to adjust the Hyper and Hypo threshold
values.
Material you will need:
Your Wellion GALILEO GLU/KET (plus) Meter

15
Step 1: With the meter turned o, press and hold the OK
button until the screen displays “FunC“.
Step 2: Release the OK button and the meter will show the
current date and time will ash together with “SEt“. Press the
BSSPX CVUUPOT VOUJM UIF EJTQMBZ TIPXT i4&Uw UPHFUIFS XJUI
i(-6IZQFSwPSi(-6IZQPw1SFTTUIF0,CVUUPOUPFOUFSUIF
desired set up.
Step 3: Hyper warning / Ketose awareness threshold: Press
the OK button to enter hyper setup. Use the arrow buttons to
adjust the threshold for your individual hyper warning/ketose
awareness threshold. Conrm your choice with OK.
The hyper alarm threshold is the optimal tool to better assist
you in recognizing the risk of a ketosis. When the meter shows
a hyper warning with your glucose result, it is recommended
to make a ketone measurement.
To make a ketone measurement you can use your Wellion GALILEO GLU/KET (plus)
meter, together with the Wellion GALILEO ketone test strips (sold separately).
G
l
u
G
l
u

16
Step 4: Hypo warning: Press the OK button to enter hypo
setup. Use the arrow buttons to adjust the threshold for your
individual hypo warning. Conrm your choice with OK.
Press the arrow buttons to select the next function to setup or
insert a test strip and begin testing. You can also turn o the
meter by pressing and holding the OK button until the display
screens shows OFF.
Anytime during setup, you may insert a test strip to begin
testing. The changes you have conrmed with OK so far will
be memorized by the meter.
Turning ON/OFF Tone Sound
Turning o the beeper will cause you to miss many important
cues from your meter – such as conrmation or error messages.
Material you will need:
Your Wellion GALILEO GLU/KET (plus) Meter
G
l
u
G
l
u

17
Step 1: With the meter turned o, press and hold the OK
CVUUPOVOUJMUIFTDSFFOEJTQMBZTi'VO$w
Step 2: Press the arrow buttons, go to tone set up and press
the OK button to enter tone setup.
Step 3: Use the arrow buttons to turn the tone ON or OFF and
conrm by pressing OK.
Press the arrow buttons to select the next function to setup
or insert a test strip and begin testing. You can also turn o
the meter by press and hold the OK button until the display
screens shows OFF.
Anytime during setup, you may insert a test strip to begin
testing. The changes you have conrmed with OK so far will
be memorized by the meter.
Setting the Alarm
You can set up a total of 6 alarms - 3 for glucose and 3 for ketone - on your
Wellion GALILEO GLU/KET (plus) Meter. The default setting for all alarms is o. You
must set the clock before you can set the alarms.

18
When the GLU glucose alarm sounds, the meter will turn on and beep continuously.
When the KET ketone alarm sounds, the meter will turn on and make 3 beeps, pause,
3 beeps, pause, ... in repetition. Pressing Ok button or inserting a test strip will silence
the alarm.
Material you will need:
Your Wellion GALILEO GLU/KET (plus) Meter
Step 1: With the meter turned o, press and hold the OK but-
ton until the screen displays “FunC“.
Step 2: Release the OK button and the meter will show the
current date and time will ash together with “SEt“. Press the arrow buttons until to
display shows the alarm symbol XX UPHFUIFSXJUIi4&Uw1SFTTUIF0,CVUUPOUPFOUFS
alarms set up.
4UFQ5IFEJTQMBZTDSFFOXJMMøBTIi(MVwPSi,FUw'PSTFUUJOH
VQBMBSNTPOHMVDPTFUFTUJOHTFMFDUi(MVwVTJOHUIFBSSPXCVU-
tons and press the OK button. For setting up alarms on ke-
tone testing, select KET using the arrow button and press the
OK button.
G
l
u

19
Step 4: The display screen will indicate the alarm 1 status (the
default is OFF). You can turn it on by pressing OK and then
choosing the desired setting with the arrow buttons.
Step 5: Press OK and the hour will ash. Select the hour using
the arrow buttons. Conrm your choice by pressing OK and
advance to set minutes.
Step 6: The current minutes will ash. Use the arrow buttons
to select the correct minutes. Press OK to conrm your choice
and advance to set alarm 2.
Step 7: Set alarm 2 and 3 following steps 4 to 6.
Press the arrow buttons to select the next function to setup or
insert a test strip and begin testing. You can also turn o the
meter by pressing and holding the OK button until the display
screens shows OFF.
Anytime during setup, you may insert a test strip to begin testing. The changes you
have conrmed with OK so far will be memorized by the meter.
G
l
u
G
l
u
G
l
u

20
CONTROL SOLUTION TESTING
Performing a Glucose Control Solution Test
The purpose of glucose control solution testing is to validate the performance of the
Wellion GALILEO GLU/KET (plus) Blood Glucose and Ketone Monitoring System using the
testing solution with a known range of glucose. Control solutions are sold separately.
You should perform control solution testing when:
t 6TJOHUIFNFUFSGPSUIFöSTUUJNF
t :PVPQFOBOFXCPUUMFPG8FMMJPO("-*-&0#MPPE(MVDPTF5FTU4USJQT
t :PVMFBWFUIFDBQPGUIFUFTUTUSJQWJBMPQFOGPSBXIJMF
t :PVESPQUIFNFUFS
t :PV TVTQFDU ZPVS 8FMMJPO ("-*-&0 (-6,&5 QMVT .FUFS BOE 8FMMJPO ("-*-&0
Blood Glucose Test Strips are not working properly
t 5IFCMPPEHMVDPTFUFTUSFTVMUTEPOPUSFøFDUIPXZPVGFFM
t :PVXBOUUPQSBDUJTFUIFUFTUJOHQSPDFEVSF
Materials you will need:
Wellion GALILEO Glucose Control Solution (Level 0, Level 1 or Level 2)
Your Wellion GALILEO GLU/KET (plus) Meter
A new Wellion GALILEO GLU Blood Glucose Test Strip
Table of contents
Other Wellion Blood Glucose Meter manuals