FEELTONE Monolini User manual

Monolini
Playing the Monochord creates a relaxing and soothing sound sphere and which has been successfully utilized to
enhance meditation and overtone vocalization.
Over the last years more and more kindergartens, schools , clinics, institutions, yoga and wellness centers are be-
ginning to incorporate the Monochord in their work with their cliental.
Our Monolini Monochord is a perfect companion as everyone can play it. If you run your fingers over the strings you
will create an overtone rich sound and feel the soft vibration this sound creates in the wooden body of the Mono-
chord.
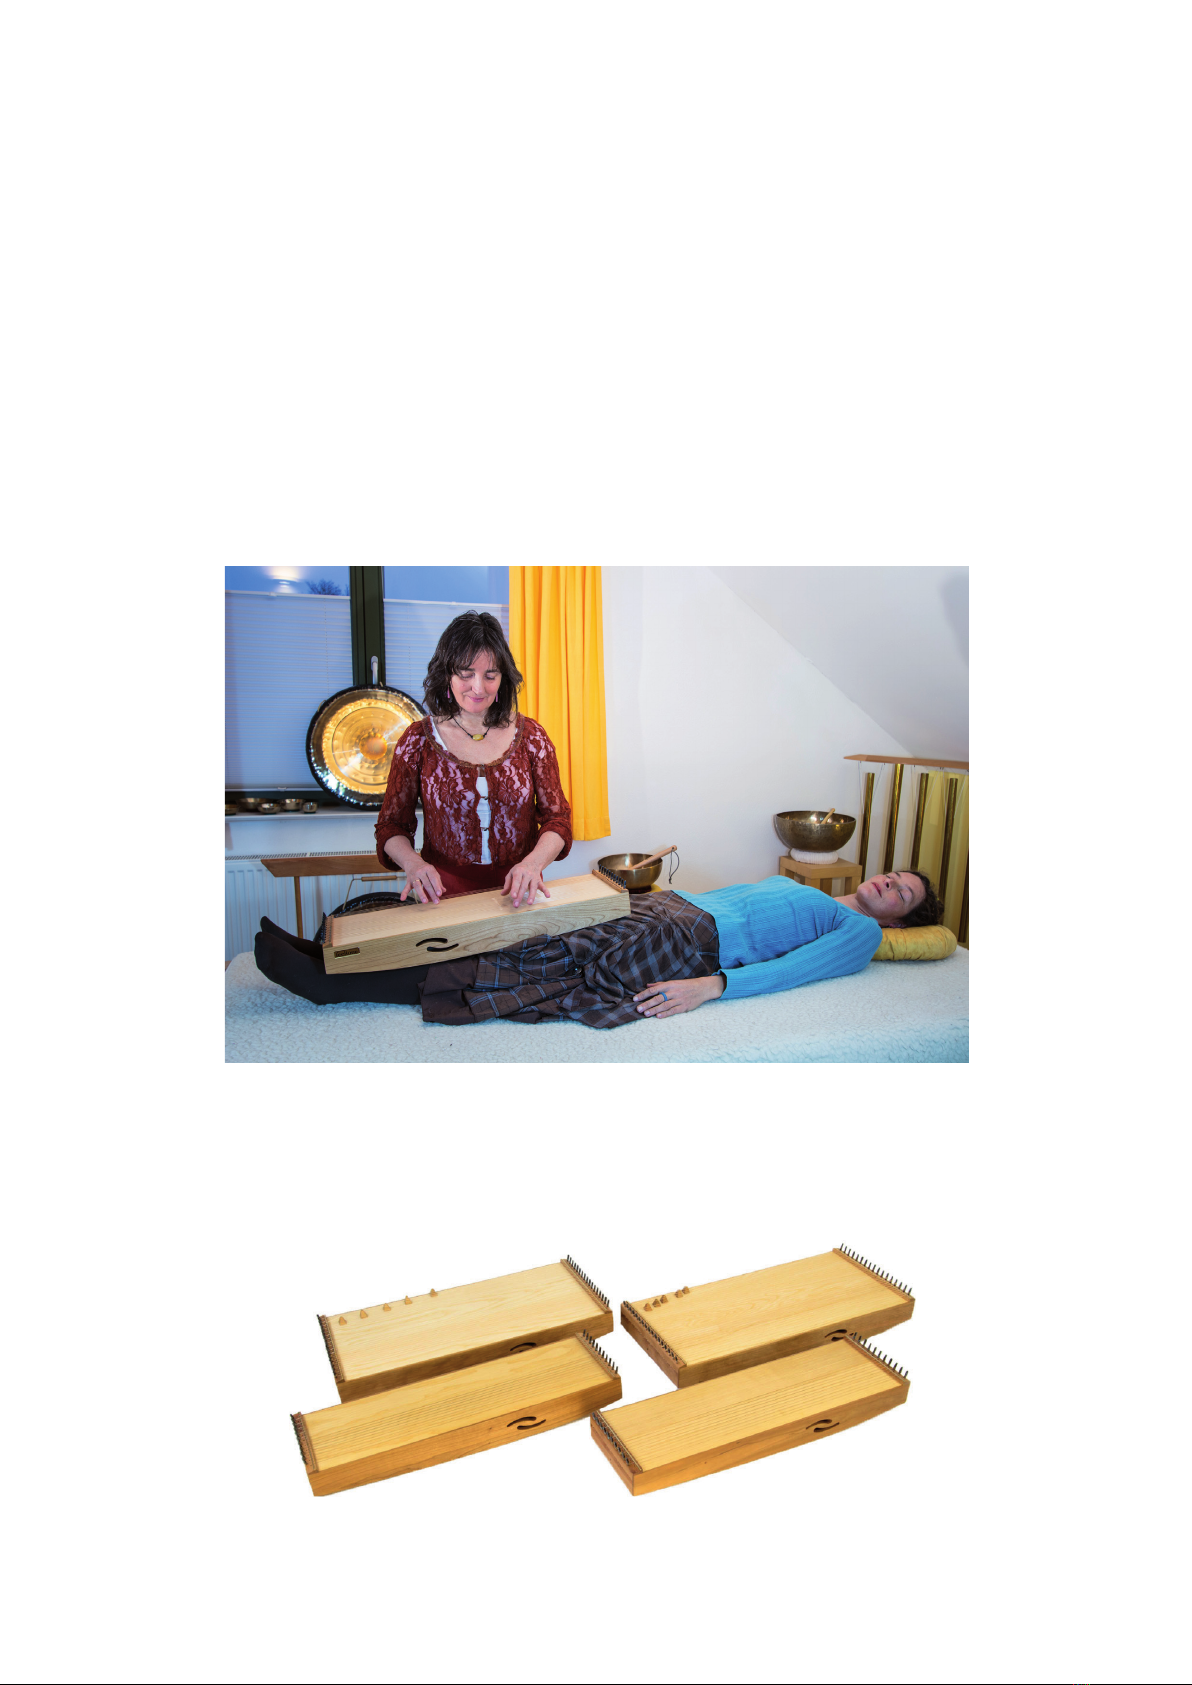
It was designed to be easily placed on the body (front, back) of a person when you use the instrument for a sound
massage.
Wether you are a beginner or professional, if you want to incorporate natural sounds and vibration into your work
and are looking for an easy to transport versatile monochord, this is the right choice for you.
Compact size monochord, easy to play, great for vocal toning and soundmassage
Monolini in 4 tunings D - F - A - C
by feeltone products
1
www.feeltoneusa.com
Utility model grant
The Monolini has 21 strings, made out of ash and cherry. size 29” x 8” x 4”, weight 4lbs.
Inclusive: 1 tuning key, 1 tuner, replacement strings and a pair of sticks that can be used to play the strings.
designed by Ingo Böhme
ash & cherry
28.4 x 8.3 x 4.3“
1,9 kg
The Monolini is available in four different base tunings D - F - A - C
Each version has its own costom made string set to create the different tunings. You see the standard tuning in
light blue in the model listing below and the replacement string order number in brackets.
It is important to only use our feeltone strings for the instrument.
Monolini D (d, D, A):
11 thin wound strings in d (SA-21 D)
5 strong wound bass strings in D (SA-21 D-B)
5 thin wound fifth strings in A (SA-21 D-Q)
Monolini F (f, F, c):
11 thin wound strings in f (SA-21 F)
5 strong wound bass strings in F (SA-21 F-B)
5 thin wound fifth strings in c (SA-21 F-Q)
Monolini A (a, A, e):
11 blanc strings in a (SA-21 A)
5 strong wound bass strings in A (SA-21 A-B)
5 thin wound fifth strings in e (SA-21 A-Q)
Monolini C (c`, c, g):
11 blanc strings in c` (SA-21 C)
5 strong wound bass strings in c (SA-21 C-B)
5 thin wound fifth strings in g (SA-21 C-Q)
for
example:
MO-21 A
11 x a
5 x A
5 x e
2
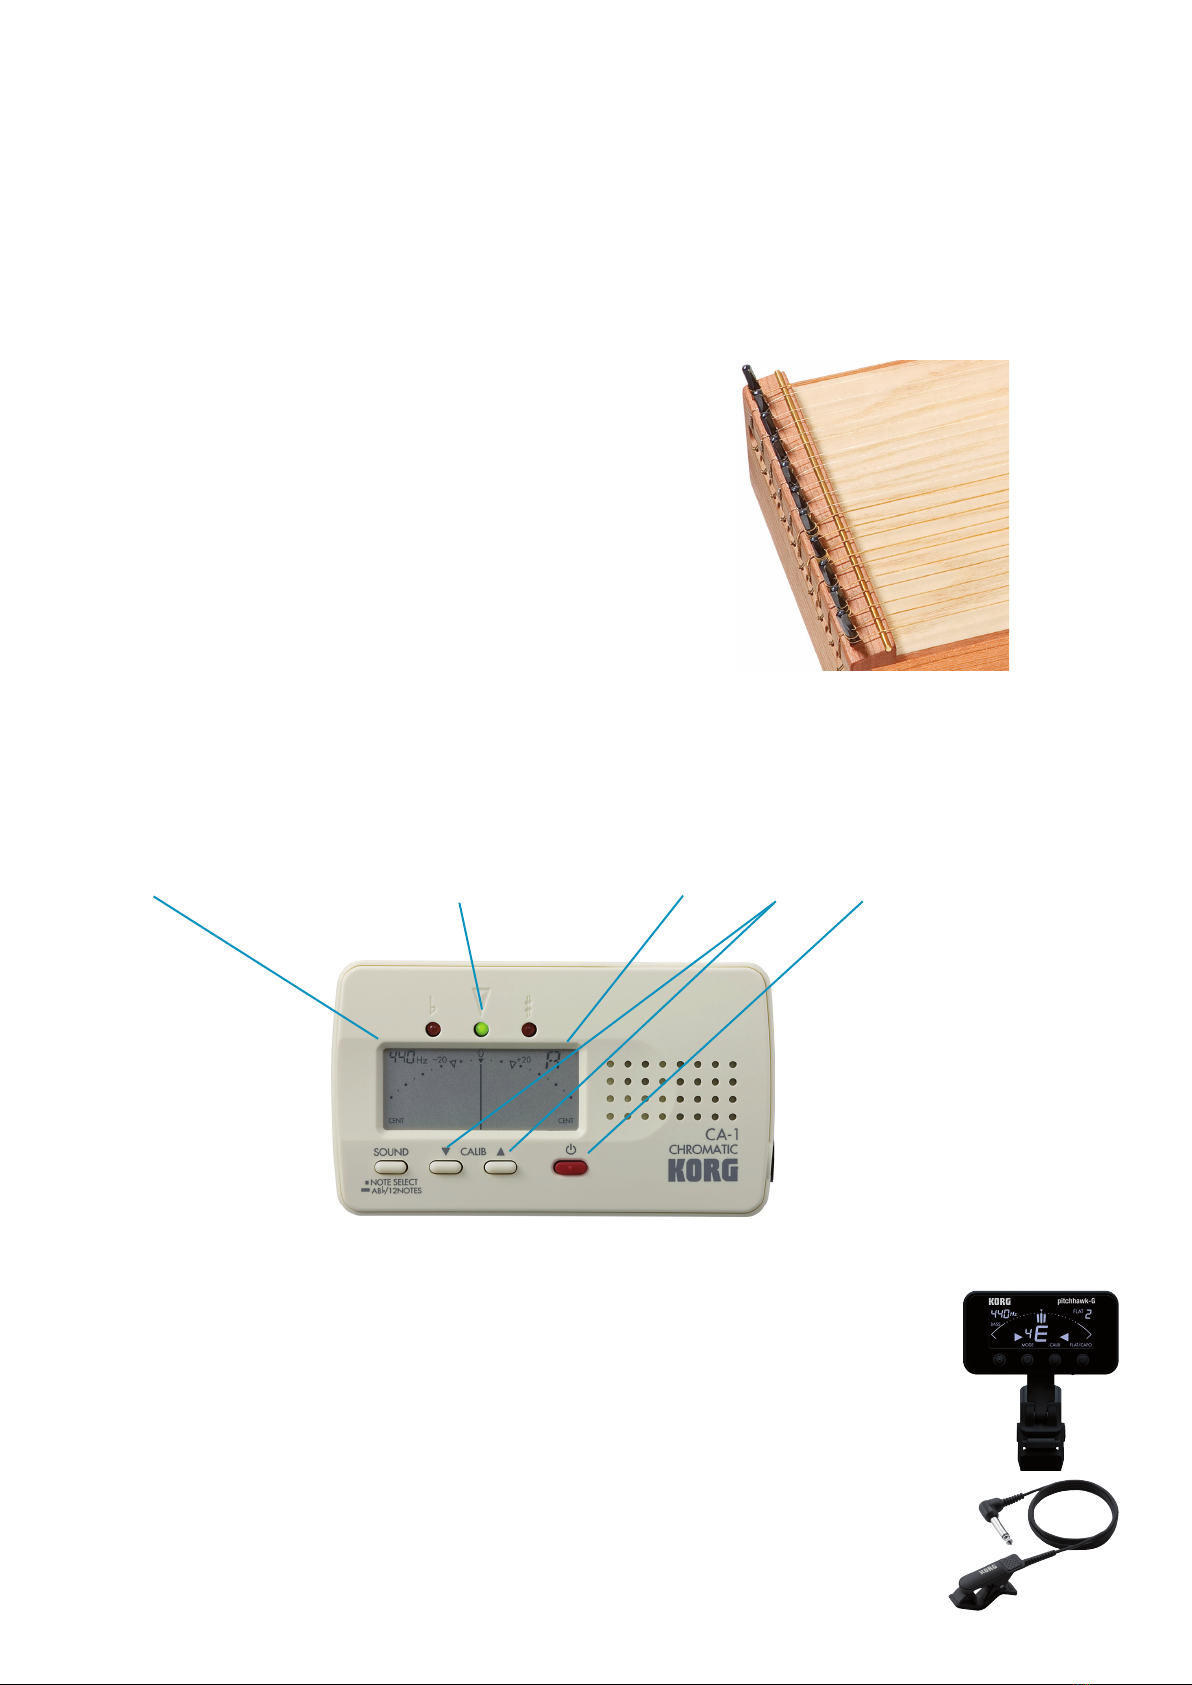
This compact and easy to use tuner encompasses the whole range of tones from C1 (32,70Hz) to C8 (4186,01Hz) .
Our recommendation for the tuning is to set the tuner to 432 or 440 Hz (a).
If the tuner is set an another frequency you can change the frequence by pressing the button (d).
This tuner works best when used in a low noise environment.
This tuner displays the notes like this: C,D,E,F,G,A,B, no matter which octave .
For example c‘ and c will be displayed as „C“.
(a) (b) (c) (d) (on/off)
The tuner
The included tuner is designed to be used in a silent environment. If you have to tune in a noisy
environment we recomment a clipon tuner (CA-AW3G) or a contact microphone (CA-CM200).
This allows you to tune independent of the noise level around you.
Both are not included and can be purchased through feeltone.

3
First tuning:
This example assumes you are tuning the instrument to C.
Put the tuning key onto the first peg , plug the string and look at the tuner
( Which you have turned on and set to 432 or 440Hz) .
-> displayed tone is C and the needle is left from the center or displayed tone is even a deeper note (A# / B)
= the tone is to low, you need to tighten the string
--> to tune to a higher pitch you have to move the tuner clockwise
-> displayed tone is C and the needle right from the center or displayed tone is even a higher note (C# / D)
= the tone is to high, you need to loosen the string.
--> to lower the pitch you have to turn the tuner counterclockwise
Just relax and listen to the sound and you will get into it quickly.
The string is tuned correctly when the needle of the tuner is in the middle and the green LED (b) is on.
Continue to tune the other strings. Because the pegs are on the right and on the left side, it might be easier to tune
the pegs on one side, then turn the instrument around and tune the other side.
Second tuning:
We recommend a proper tuning every day for at least two weeks. Don’t worry if you don’t have time every day,
even if you tune every other day it just takes a little bit longer for the instrument to stabilize.
After this period the tone will be stable for a long time and even under changed conditions. Perhaps you think that
tuning is a lot of work. But this procedure helps you to connect to the instrument, to hear the right tone, the overto-
nes and other sound phenomena.
If you use sound in pedagogic or therapeutic settings, you can use the event of tuning as a kind of aware-
ness test.
For a clear, overtone rich sound, a proper tuning is very important!
The tuning process
Please notice that you only need to move the tuning key slightly
one degree at a time to change the note. For example a quarter
turn of the tuning key will move the tone up several notes and that
could even cause the string to break.
We ship the instrument pretuned. But because strings and wood are reacting with temperature you will need to
tune the instrument upon arrival and after a couple of retunings it will keep its tuning for long period of time.
Let the instrument rest and acclimate to the new surrounding. After the instrument was unpacked and had
rested for a day use the tuning key and the tuner coming with the instrument to tune it.
The setting for the tuner can be between 440 -432 Hertz (Hz). Use 432 Hz
for a natural harmonic tone. If you are playing this instrument together
with other kind of traditional instruments use 440 Hz to be compatible.
You find more information about this topic in the internet.

4
1.)Take the new string , pull it through the hole in the wood on the bottom and then pull the string through the peg
hole.
2.)Take 1/2 inch of the end of the string and bend it down at a 90 degree angle, using your fingers or a small pliers.
Than pull the string back so the bent down piece of the string points downwards at the peg. You want the first two
winding of the string to go over the bent down piece of string. If this sounds confusing just look at the other pegs
which already have strings on them so you see the end result.
4.)Start to turn the tuning key to slightly tighten the string. Guide the string so that the first two windings of the
strings will be over the bent down end of the string the next ones below that.
Now you can start the tuning process (see „the tuning process“).
Important: only use the original Monolini Strings as they are custom-made to fit the instrument!
How to replace a broken string
I If a string is broken, first remove the string completely.
Look at the other strings of the same typ: how often are they
twisted around the pegs? Please turn the peg of the broken
string counterclockwise just as often!
If you don’t do this the peg will be pushed deeper and deeper
in the wood during the tuning process and either the peg will
break or the wood will split.
Now aline the peg, so the hole in the peg should point toward
the string side.
Check out our videos on YouTube at the feeltone products channel!
Here you will find more information about our instrument,
exampels how to play them, tuning tips and more.
www.youtube.com -> channel enter Feeltone
or
https://www.youtube.com/channel/UCVsN6xeKSfgwZODzRAMt38g
5
We recommend:
Try playing the differently tuned instruments together
for a variety rich sound experience.
Playing instructions
Tip If you intend a relaxing effect we recommend to play smooth and steady on the monochord strings to create
an even sound wave. Imagine a small, long wave that rolls back and forth on the beach.
a.) Put one finger (middle or ring finger) of the right (or left) hand in the middle of the top string and
run it smoothly across all strings towards your body. Before the finger reaches the last string, the finger of the
other hand starts at the top string. After a short period bright overtone will apear and resonate with the movement
of your fingers.
b.) After you have established the basic tone you can start varying the tone: Try out what happens when you play
with the tip or the center part of the finger. While keeping the flowing movement of the fingers you can move
one finger to an other position of the string and play there and other overtones will appear. Also the strength and
speed of your motion changes the sound quality.
c.) To avoid getting blisters on your fingers you can either press more lightly or use a leather plectrum.

Enjoy your New Instrument!
6
Care and warranty instructions
Wood is a natural material that is alive and reacts with the temperature and humidity. Treat the instrument like you
would treat a violin, harp or other fine wood string instruments.
All string instruments appreciate an even room temperature to stay in tune. If the air is too hot and dry, the wood
can dry out and it can form cracks!
We recommend to keep the humidity between 50%-60%!!!
Care Instruction and Tips to create the best environment for your Instrument:
Don‘t expose the instrument to extreme temperatures, chose a moderate room temperature.
You can use an air humidifier during the heating period in the winter month or if you live in a dry climate.
Plants in the room with the instrument will help to regulate air moisture.
Important: especially if you have floor heating, never set a wood instrument on the floor as this will destroy
your instrument by drying out the wood which will result into the wood cracking.
Please note that our warranty is voided, if the instrument was exposed to high temperatures or dry air.
Feedback
We love to hear back from you about your experiences, suggestions or comments while working with our instru-
ments.
Table of contents
Other FEELTONE Musical Instrument manuals


