Feider Machines FC6LS User manual
Original Instruction manual
Oil free compressor
Feider France
ZI –32, rue Aristide Bergès, 31270 Cugnaux, France
MADE IN RPC 2018
Warning: Please read the manual carefully before using this machine!
FC6LS
FC24LS
FC50LS

1. SAFETY SYMBOLS
Read this instruction manual
Wear hearing protection.
Risk of electric shock
Do not open the valve before connecting the air hose.
Do not use the machine with open or removed covers. Do not move it during operation.
Danger - automatic control.
Attention! Hot surface.
Prohibition: do not start
Warning: Maintenance work in progress

2. MACHINE DESCRIPTION
A
air filter
I
secondary pressure regulator
B
motor
J
locking nut
C
handle
K
quick-coupling
D
tank
L
outlet pressure gauge
E
wheel
M
tank pressure gauge
F
drain valve
N
inspection hole*
G
main switch
O
supporting foot
H
self-propelled handle
P
pressure relief valve
*Inspection hole is used for inspection and cleaning of the pressure tank - may only be performed by
an authorized service centre.
3. SPECIFICATIONS
Model
FC6LS
FC24LS
FC50LS
Rated voltage
220-230V~
220-230V~
220-230V~
Rated frequency
50Hz
50Hz
50Hz
Motor
4 poles
4 poles
4 poles
Input power
0.5 kW
0.8 kW
1.15 kW

Max. output pressure
0.8Mpa (8 bars)
0.8Mpa (8 bars)
0.8Mpa (8 bars)
Engine speed
1400/min
1400/min
1400/min
Air-tank volume
6 l
24 l
50 l
Suction power
89 l/min
125 l/min
180 l/min
Oil lubrication
Oil free
Oil free
Oil free
Degree of protection
IP20
IP20
IP20
Operating conditions
-5°C - +35°C
-5°C - +35°C
-5°C - +35°C
Weight
13.8kg
21kg
36.5kg
Noise emission
Max. 97dB(A)
Max. 97dB(A)
Max. 97dB(A)
* At temperatures below 0°C is necessary to follow the instructions for winter use.
Specifications are subject to change without notice
1). Models FC50LS, is the basic model;
2). other models were designed to same structure with FC50LS except rated power and the volume of tank
3). the assessment of each type of model covers each series of machine of essentially identical design
b) Input temperature: 10℃-40℃, intermediate temperature: 170-200℃,
c) Discharge Temperature: 10℃-40℃.
d) Input pressure: 0 Bar, Intermediate and discharge pressure: 0~8Bar.
e) For Air Compressor filter, suggest cleaning the core 1 time each month. Open the metal cover, clean and
inside core by air duster and cover back is OK.
4. SPARE PART
Extract from the spare parts list, part numbers are subject to change without notice, complete and actual
spare parts list can be found on WWW. Europe-SWAP.com
5. ILLUSTRATED GUIDE

6. CONDITIONS OF USE
WARNING!
PLEASE READ THE OPERATING INSTRUCTIONS! Read all instructions before operation. Pay special attention to safety instructions.
FAILURE TO FOLLOW THE INSTRUCTIONS AND FAILURE TO RESPECT SECURITY MEASURES MAY RESULT IN
DAMAGE OF THE PRODUCT OR SERIOUS INJURIES OR EVEN FATAL INJURY.
If you notice any damage during transport or unpacking, notify your supplier immediately. DO NOT PUT
INTO OPERATION.
SPECIFIC TERMS AND CONDITIONS OF USE
This product is exclusively intended for the use:
-for generating compressed air for tools operated by compressed air. your new air compressor can
be used for operating paint sprayers, air tools, grease guns, airbrushes, caulking guns, sandblasters,
inflating tires and plastic toys, spraying weed killer and insecticides, etc. In most of these
applications is needed to set up the compressor according to manufacturer of the accessory or
applicated preparation.
-according to the corresponding descriptions and safety instructions in these operating instructions.
Any other use is not as intended.

If the product is used for any purpose other than the intended purpose or if unauthorized modification is
made, the statutory warranty and statutory responsibility for defects as well as any liability on the part of
the manufacturer will be void.
Do not overload! Use the product only for the powers it was designed for. The product designed for a
given purpose performs it better and safer than one that has a similar function. Therefore, always use the
correct one for a given purpose.
Please keep in mind that our products are not designed for commercial, trade or industrial use according
to their intended purpose. We accept no liability if the product is used in these or comparable conditions.
Where it is required, follow the legal guidelines and regulations to prevent possible accidents during
operation.
CAUTION!
Never use the product if it is close to people, especially children or pets. The user is liable for all damages
caused to third parties or their property.
! Keep these instructions manual and use them whenever you need more information. If you don't
understand some of these instructions, contact your dealer. If the product is lent to another person, it is
necessary to lent this instruction manual with it.
7. TRAINING
All operating personnel must be adequately trained in the use, operation and setting and especially
familiar with prohibited activities,
8. SAFETY INSTRUCTIONS
WARNING!
Failure to follow the warnings and instructions may result in electric shock, fire and/ or serious injury.
The use of other accessories or attachments other than those specified in the instructions for use, can
cause injury.
•Get to know this product. Carefully read the instruction manual. Learn how to use this product, all
restrictions, and what risks could related with its use. Learn the product quickly stop and turn off the
controls.
•Be careful at work, be concentrated on actual work, and use the common sense.
•If the product is not in use, it should be stored in a dry and secure place out of the reach of children.
•Never pull the plug from the socket by pulling on the cord. Keep the supply cord away from heat,
grease and sharp edges.
•Always disconnect the product from the mains supply before repairing, when changing accessories, and
when the product is not used.
•Make sure when plugging into a socket that the switch is in "off" position.
•If the product is used outside, use only extension cord designed for outdoor use and marked as such.
•Pay attention to what you are doing, be concentrated and think sensibly, do not work with the product
if you are tired, under the influence of alcohol, drugs or medication.
•Faulty switches must be entrusted to an authorised repair service for replacement.
•Do not use this product if the main switch does not allow it to switch on or off.
•This product is designed in accordance with all applicable safety requirements and standards applicable
to it. All repairs should be only made by qualified person and spare parts replaced by original parts,
otherwise the user may be in serious danger.
SAFETY INSTRUCTIONS FOR WORKING WITH THE COMPRESSOR
TANK SAFETY VALVE
•This valve is factory installed to prevent the pressure circuit, the compressor and motor from damage.
•It is factory set at a specific limit for your particular model and adjustment and should never be
tampered with adjustment by user will automatically void warranty.
PRESSURE SWITCH
• The air pressure switch is set at the factory for optimum performance of your equipment. Never bypass

or remove this switch as serious damage to equipment or personal injury could result from too high an
air pressure.
MOTOR AND COMPRESSOR PUMP
•Air compressors get hot while in operation. Never touch the motor, pressure piping or compressor.
•If the switch is turned on, the compressor operates automatically while the power is connected.
•Never attempt any adjustment with the power on and/or connected power cable.
COMPRESSED AIR CAUTION
•Compressed air from the unit may contain carbon monoxide. Air produced is not suitable for breathing
purposes.
•Always use a respirator when spraying paint or in dusty conditions.
•Using compressed air can cause circulation of dust and/or solid particles - always wear safety glasses.
•If the machine is used for spraying flammable substances, place it against the wind and in a safety
distance.
•Never point a spray gun at oneself or any other person or animals.
SYSTEM OF COMPRESSED AIR
•Over pressurizing of pressure circuit could cause an explosion or rupture. To protect from over
pressurizing a factory preset safety value is included. Do not remove, make adjustments or
substitutions for this valve.
•Occasionally pull the ring of safety value (fig. 8) on the valve to make sure that the valve operates freely.
If the valve does not operate freely, it must be replaced. Never weld to, drill into, or modify parts of the
pressure circuit in any way.
•If any of the above conditions are changed or tampered with this will result in voiding of the
manufacturer's warranty. Be advised that any replacement parts should be purchased with the same
specification as the original equipment. Please contact your authorized dealer for replacement parts or
specifications.
AIR NOZZLE
•If the air nozzle leaks, showing signs of deep corrosion, mechanical damage or escape the air,
immediately turn off the machine and entrust it to an authorized service center.
Using the machine with a damaged air nozzle may lead to rupture of the air nozzle or the unexpected leaking of high
pressure air and thus to a mortal or serious personal injury or other damage to persons or property!
ELECTRICAL REQUIREMENTS
•The machine must be plugged into a properly grounded outlet.
•Never use at the nominal voltage other than 220-230V/50Hz. The circuit must be properly and
accordingly current protected.
•Only connect to an electrical circuit that is protected by the current protector with actuating current
not exceeding 30 mA.
PROTECTIVE EQUIPMENT
•Wear eye protection! The operation of machine can result in foreign objects being thrown into your
eyes which may result in severe eye damage. Normal glasses are not sufficient for eye protection. For
example, corrective glasses or sunglasses do not provide adequate protection because they have not
special safety glass and aren't enough closed from the sides.
CAUTION! The machine is very noisy
•Wear adequate noise protection equipment! The impact of noise can cause hearing damage or hearing
loss. Take frequent work breaks. Limit the amount of exposure per day.
•Safety equipment such as a dust mask or hard hat used for appropriate conditions will reduce personal
injuries, especially when the machining operation creates dust or there is a risk of hitting your head on
protruding or low level obstructions.
PREVENTION AND FIRST AID
Note: Werecommendalwayshaving:
-A suitable fire extinguisher (snow, powder) at your disposal.
-A fully equipped first-aid kit, easily accessible for accompaniment and operator.
-Mobile phone or other device for quickly calling emergency services.
Accompaniment familiar with the principles of first aid. Accompaniment must keep a safe distance from
the workplace while always seeing you!

Always follow the principles of first aid in case of any injuries.
•When an electric shock is caused, it is necessary more than anywhere else to put emphasis on safety
and risk elimination for the rescuers. The affected person usually stays in contact with electrical
equipment (source of injury) because of muscle spasms caused by the electric shock. Traumatic
process continues in this case. It is therefore necessary to TURN THE POWER OFF FIRST using any
possible way. Subsequently CALL AN AMBULANCE or other professional service.
IN CASE OF FIRE:
•If the motor starts to burn or it the smoke appears from it, turn the product off, disconnect power
supply and move away to safety.
•To extinguish the fire, use suitable fire extinguisher (CO2, Dry Powder, halotron).
•DO NOT PANIC. Panic can cause even more damage.
RESIDUAL RISKS
Even if the product is used according to instructions, it's impossible to eliminate all the risks
associated with its operation. The following risks may occur arising from product construction:
Electrical hazard caused by touch with parts under high voltage (direct contact) or with parts,
which came under a high voltage due to failure of the product (indirect contact).
Heat hazard resulting in burning or scalding and other injuries caused by possible contact with high
temperature objects or materials including heat sources.
Dangers caused by contact with harmful liquids, gas, mist, smoke and dust or by their inhalation
(for example breathing in).
Dangers caused by failing in ergonomic principles by construction of the product, for example
dangers caused by unhealthy position of body or excessive overcharge and unnature to the
anatomy of the human hand-arm, relate to construction of handle, equilibrium of the product.
Dangers caused by unexpected starting, unexpected exceeding of engine revs caused by
defect/failure of control system, relate to the defects by the handle and placing of drivers.
Dangers caused by impossibility to stop the product in best conditions, relate to solidity of the
handle and placing of engine shut down product.
Dangers caused by defect of product control system, relate to solidity of the handle, placing of
drivers and marking.
Dangers caused by shooting up of subjects or splashing of liquids.
Mechanical hazard, caused by cut and throw off.
Noise risk resulting in loss of hearing (deafness) and other physiological disorders (e.g. loss of
balance, loss of consciousness).
Vibration risk (resulting in vascular and neurological harm in the hand-arm system, for example so
called "white finger disease")
WARNING!
The product produces an electromagnetic field of a very weak intensity. This field may interfere with
some pacemakers. To reduce the risk of serious or fatal injury, persons with pacemakers should consult
the use with their physician.
When over-current protection is not supplied, the user has to make provision for the installation of the over-current
protection of the power circuit. It must in accordance with the requirements of the norm EN60204-1. Ask advice to an
electrician.
Do not use this compressor in a potentially explosive atmosphere: there are risk serious accidents and fire.
High oil viscosity can arrive during cold start up, clogged oil filters or valve malfunction can result in oil starvation;
Openings shall be closed when the compressor is in operation.
Identify when the compressor unit is under automatic or remote control. Take necessary actions to prevent starting
automatically or from a remote position when the compressor is being serviced, maintained or inspected: lock the main
electrical isolator.
Risk of coke formation in the delivery piping causing a fire or explosion

The concentration of processed gases that can displace breathing air shall be kept within acceptable levels. The user
shall see the norm EN 12021 for acceptable levels of contaminants in breathing air.
Separators, traps and draining facilities are required to process liquids produced by the compressor before putting the
compressor unit into use as these are not supplied;
9. Unpacking
Carefully check all parts after unpacking the product from the box.
Do not throw away packaging materials until you have not reviewed carefully if they did not
remain a part of the product.
Parts of the packaging (plastic bags, paper clips, etc.) do not leave within reach of children,
could be a possible source of danger. There is a danger of swallowing or suffocating!
If you notice transport damage or while unpacking, notify your supplier immediately. Do not
operate the product!
We recommend save the package for future use. The packaging materials must still be recycled
or disposed of in compliance with the relevant legislation. Sort different parts of the packaging
according to material and hand it to the appropriate collection sites. For further information
contact your local administration.
Fasteners can become loose during transport in the packaging.
PACKAGE CONTENTS
1x compressor body, 2x wheel with assembly kit (for 24L, 50L), 2x feet with assembly kit, 1x air filter, 1x
manual for use
•Standard accessories are subject to change without notice.
This product requires assembly. The product must be assembled correctly before use
After unpacking the box check the status of the compressor for signs of damage. In particular, carefully
check the air nozzle.
Place the compressor on a horizontal, flat and firm surface so that the compressor body is directed
upward.
Install transport wheels (if not already installed) to the holders of the wheels on the bottom of the air
nozzle using screws enclosed (fig. 2).
Install support foot (if not already installed) to the holder on the bottom of the air nozzle using screw
enclosed (fig. 3).
Put the air filter on the thread and tighten it clockwise with your hand (fig. 4).
Check the tightening of the air tank drain valve (fig. 7).
Locate the compressor in a clean, dry and well-ventilated area. The compressor should be located 12 to 18
inches from a wall or any other obstruction that would interfere with the air flow through the fan. Place
the compressor on a firm level surface. The compressor is designed with heat dissipation fins that allow for
proper cooling. Keep the fins and other parts that collect dust or dirt clean. A clean compressor runs cooler
and provides longer service. Do not place rags, containers, or other material on top of the compressor.
Set the maximum pressure and connect compressor to the power supply. After reaching the maximum
pressure, properly working compressor off and then check by listening for leaks of compressed air. If you

find air leak, release the pressure from the air nozzle and before further use secure a control and
compressor repair at the authorized service center.
CAUTION!
Never use a compressor which has a compressed air leak!
Move the machine only by lifting the handle, never by pulling hoses and cables attached.
PREPARATION FOR OPERATION
WARING!
Compressor use, always store and transport in operating position (standing by supporting foot and
wheels on a level solid surface - tank down and compressor engine up. Compressor never tilt or upside
down!
CONNECTING AND DISCONNECTING OFTHE AIR HOSE
The machine is equipped with quick-coupling to connect the air hose.
•Use of the compressed air for the various purposes envisaged (inflation, air- powered tools, painting,
washing with water-based detergents only, etc.) requires knowledge of and compliance with the
rules established for each individual use.
•Always bleed pressure from the tank before attempting maintenance, attaching tools or accessories.
When connecting an air-powered tool to a hose of compressed air supplied by the compressor,
interruption of the flow of air from the hose is compulsory.
Interruption of the flow of air from the hose is compulsory.
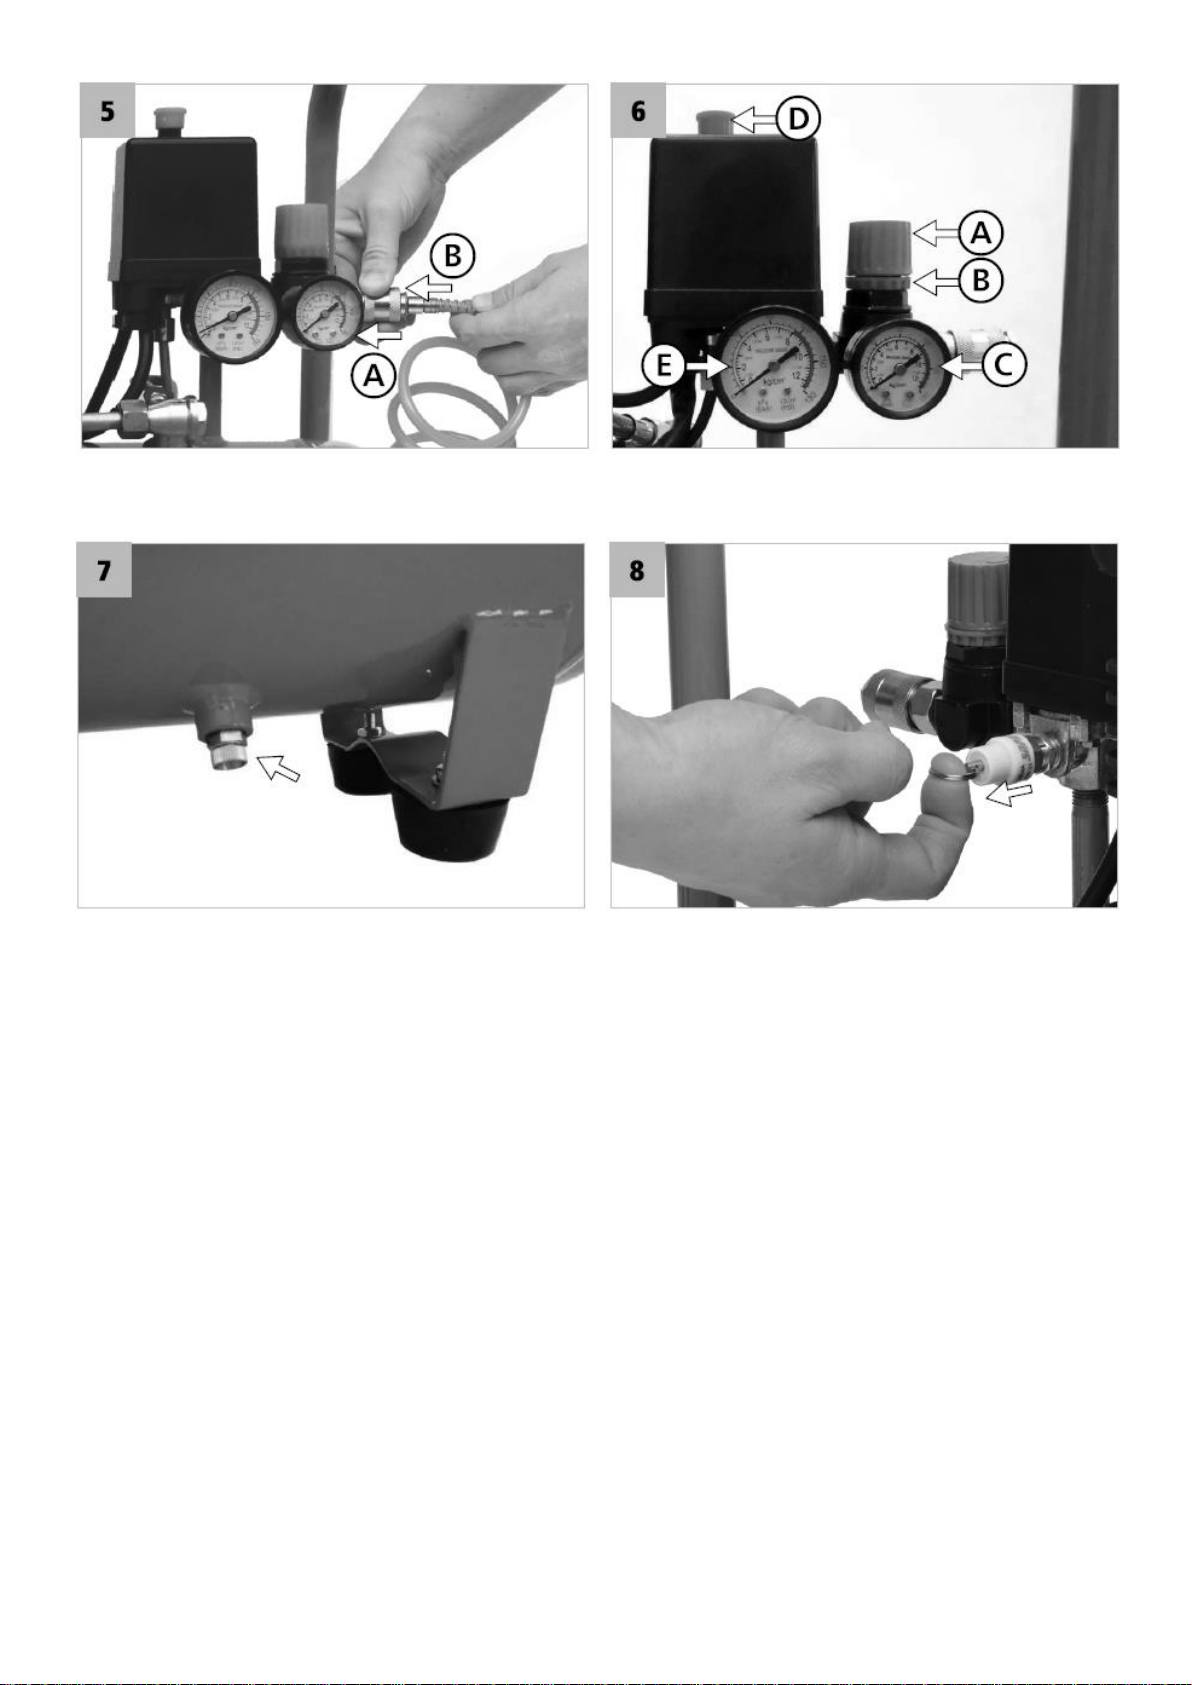
CONNECTING OF THE AIR HOSE
1. Pull collar back in direction to manometer (fig. 5A).
2. Push the air hose connector into the socket (fig. 5B) and release the collar.
3. Check if the air hose is connected properly.
DISCONNECTING OF THE AIR HOSE
1. Push the air hose connector into the socket.
2. Pull collar back in direction to manometer.
3. Pull the air hose connector out and release the collar.
SETTING OF THE OPERATING PRESSURE
Adjusted operating pressure can be read on the manometer (fig. 6C).
Rotate with the regulator (fig. 6A) according to the arrows for increasing or decreasing of operating
pressure (locking nut have to be loosened (fig. 6B). During pressure reducing is the change on the
manometer note only after the partial reduction of air.
The setting can be locked by red lock nut (fig. 6B), by adjust of needed pressure and the locking nut
unscrew to the knob. After the temporary reduction in pressure, it can be easily to set back the pressure in
the output needed by turning of the valve to the locking nut. For new pressure adjusting is necessary to
unscrew the lock nut to the bottom position. If you cannot turn the valve, it is probably too tight to the
lock nut.
CAUTION!
Never exceed the maximum operating pressure level of the connected device. Do not tighten the
lock nut by the excessive force.
OPERATION
Please, read carefully the following steps before using of machine:
Always bleed pressure from the tank before attempting maintenance, attaching tools or accessories.
•Check if are the nuts and bolts tightened well

•Check if the condensate is drained from the air tank and drain plug is closed.
•Check the condition of safety vent, air-tank and all pressure accessories.
•If is the air filter dirty, you should replace or clean it.
•Check if the air hose connect properly.
START / TURNING OFF
•Start the machine by push of the bottom on the main switch (fig. 6D).
•Turn off the machine by push of the bottom on the main switch.
1. Start the machine, leave the air-tank get the pressure and check if there is some air leakage.
2. Adjust the operation pressure needed.
3. If is the air-tank well pressured, the machine is automatically turned off.
4. If is the pressure too low, the machine is automatically started.
5. Turn off the machine always after the work. Open the ventilating of the tank and de-aerate and drain
the accumulated condensate.
MAINTENANCE AND STORAGE
CAUTION!
To ensure proper functioning of the machine, it is necessary to have it checked and adjusted by
qualified personnel in an authorized service centre at least once a year.
Proper maintenance is essential for safe, economic and trouble-free operation of the machine.
Failure to follow the maintenance instructions and safety precautions may cause serious injury or death.
Always follow the procedures, safety precautions, recommended maintenance and recommended checks
mentioned in this manual.
WARNING
Prior to any work on the machine (maintenance, inspection, replacement of accessories, servicing) or
before storing it, ALWAYS SWITCH THE ENGINE OFF, wait for all moving parts to stop and allow the
machine to cool down. Prevent the engine from being started accidentally (disconnect the power unit
from the mains). Always bleed pressure from the air hose and tank before attempting maintenance,
attaching tools or accessories.
Unplug the tool from the supply mains. Never plug and switch off the tool during maintenance.
•Always make sure that all nuts and bolts are firmly tightened and make sure the machine is in good
working order.
•Keep the machine in good condition, if necessary change warning and instruction labels on the
machine.
•Always ensure that the ventilation openings are kept clear of debris.
•For safety reasons, replace worn or damaged parts. Only use original spare parts and accessories. Parts
not tested and approved by the equipment manufacturer can cause unforeseeable damage.
•Repair and maintenance work other than described in this section, which are more complicated, or it
needs special tools, let it on our authorized service.
DRAINAGE OF AIR-TANK
It is necessary to drain the condensate from the tank after the each use. Periodically (or after completing
work if for more than an hour), drain the condensate that forms inside the reservoir due to the humidity
in the air in order to protect the reservoir from rust and so as not to restrict its capacity.
1. Drainage has to be done under the pressure,
max. 1 -2 bar.
2. Tilt the tank to the position of the drainage
output to the lowest part of the tank (fig. 7).
3. Remove the screw carefully; the air pressure
will displace the condensate from the tank.
4. When the tank contains only the clean air,
close and tight the screw.
THE CONTROL OF THE SAFETY VALVE
Check the condition of the safety valve before each use.
1. Make sure that the tank doesn’t include the pressure. Manometer (fig. 6E) should indicate 0 bar.
2. Pull the ring several times (fig. 8). The pin should be moved loosely.
3. If is the pin blocked inside the safety valve, don't use the machine and contact authorized service.
Never adjust the safety valve by yourself.
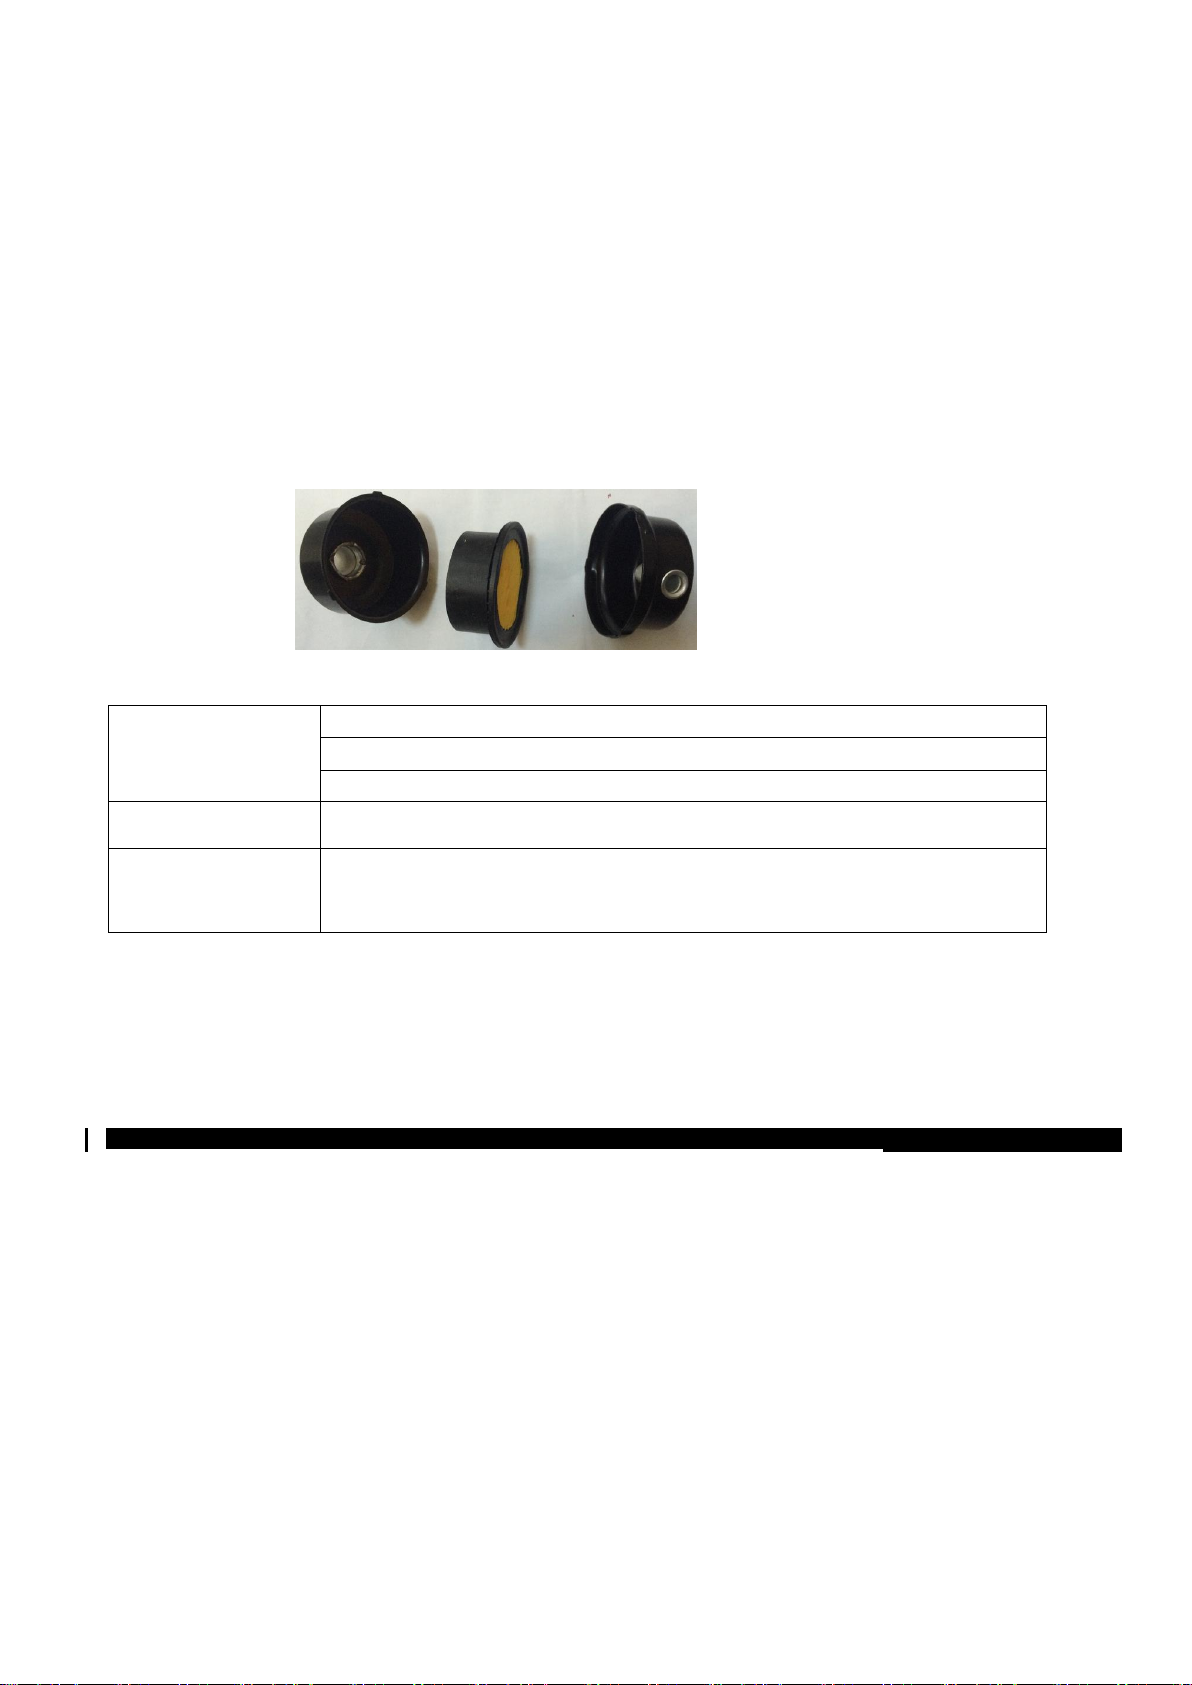
AIR FILTER CLEANING
1. Open the air filter cap (fig. 4B).
2. Remove the filter element.
3. To loosen debris, gently tap the filter on a hard surface. Never try to brush the dirt off, brushing will
force dirt into the fibers. If the filter is excessively dirty, replace with a new filter.
MAINTENANCE TABLE
Perform maintenance more frequently if compressor is used near paint spraying operations or in dusty
environments.
All others maintenance and repairs shall be provided only by our service agent
CLEANING
CAUTION!
Never spray the product with water or expose it to water. Never use aggressive
detergents or solvents for cleaning.
Carefully clean the machine after each use.
Do not let the handles contaminate with oil or grease. Clean the handle clean with a damp cloth
washed in soapy water. Never use aggressive detergents or solvents for cleaning. This can cause
irreparable damage to the product. The plastic parts can be eaten away by chemicals.
Wipe down the product with a slightly damp cloth or with brush.
Clean the cover of the machine, especially the ventilation holes.
STORAGE
•Store the machine out of reach of children.
Turn the motor off and disconnect the mains plug if the machine is not used.
Confirm that the outlet pressure is at zero (0) psi by fully turning the regulator knob to fully reduce air
pressure at the outlet.
• Remove the air tool or accessory.
• Let the machine to cool down. Drain water from air tank by opening drain valve on bottom of
tank. • Do not store the machine a long time in direct sunlight.
Before each use
Drain condensation from tank
Check for any unusual noise or vibration
Be sure all nuts and bolts are tight
Every 10 operating
hours
Clean air filter.
Every 40 operating
hours
Inspect air system for leaks by applying soapy water to all joints of
pressure circuit. Tighten those joints if leakage is observed (contact
the authorized service center).

• Replace worn or damaged parts for safety.
• Store machine in a clean, dry, dark and frost-free place, protected from dust and out of reach of
children. The ideal storage temperature is between 5 and 30°C.
• Use the original packaging to storage whenever possible.
• Cover unit with a suitable protective cover that does not retain moisture. Do not use sheet
plastic as a dust cover. A nonporous cover will trap moisture around the machine, promoting
rust and corrosion.
TRANSPORT
Turn the motor off and disconnect the mains plug. When transporting, be careful not to drop, or
otherwise shock the machine. For transport, the machine has to be fixed against slipping and
tipping over. Do not place objects on the machine.
TROUBLESHOOTING
A
CAUTION!
Failures of your machine which require larger interference must always be eliminated by
specialized workshop. Unauthorized interferences can cause damages. If you can not rectify
the fault using the measures described here, contact an authorized service.
SERVICE AND SPARE PARTS _________________________________________________________
•Have your device serviced by a qualified repair personnel using only identical replacement
parts. This will ensure that the safety of the device is maintained.
•Whether you need technical advice, repairs, or genuine factory replacement parts, contact
SWAP. Information on service locations, visit WWW.SWAP-EUROPE.COM
•When ordering spare parts, please quote the part number, this can be found at
WWW.SWAP-EUROPE.COM
DISPOSAL_______________________________________________________________
Electrical products should not be discarded with household products. According to the
European Directive 2012/19/EU on waste electrical and electronic equipment and its
implementation into national law, electrical products used must be collected separately
and disposed of at collection points provided for this purpose. Talk with your local
authorities or dealer for advice on recycling.
Trouble Possible cause Corrective action
No start
condition
a) Failure mains power
supply
b) Loose electrical
connections
c) Overheated motor
a) Check for cause of blown fuse/breaker and
replace or reset
b) Contact the authorized service center
c) Let the engine cool
Low
pressure
a) Air leak in safety valve
b) Restricted air filter
c) Defective check valve
a) Check valve manually by pulling on rings. If
condition persists replace valve by an
authorized service.
b) Clean or replace as necessary.
c) Replace check valve by an authorized
service
Safety valve
releasing
a) Defective pressure
switch or improper
adjustment
a) Check for proper adjustment and if
problem persists, replace pressure switch
by an authorized service.

EC DECLARATION OF CONFORMITY
Declaration of conformity
FEIDER FRANCE
ZI, 32 RUE ARISTIDE BERGES –312070 CUGNAUX –FRANCE
Declares that the machinery designated below:
OIL FREE COMPRRESSOR
Model: FC6LS, FC24LS, FC50LS
Serial number:
FC6LS:
FC24LS:
FC50LS:
Complies with the provisions of the Directive « Machinery » 2006/42/EC and national laws transposing it:
Also complies with the following European directives:
EMC Directive 2014/30/EU
Also complies with European standards, with national standards and the following technical provisions:
EN 1012-2010
EN 61000-6-1:2007
EN 61000-6-3:2007/A1:2011
Cugnaux, 12/10/2018
Philippe MARIE / PDG
This manual suits for next models
2
Table of contents
Other Feider Machines Air Compressor manuals

Popular Air Compressor manuals by other brands

EINHELL
EINHELL BT-AC 240/50/10 OF Original operating instructions

Hyundai
Hyundai HC20V4A-A Original instructions

DeWalt
DeWalt D55146 instruction manual

Craftsman
Craftsman 919.724132 owner's manual

CompAir
CompAir CL15SS Operation and maintenance manual

American Eagle
American Eagle SUH-43/23P owner's manual


Thunder Scientific
Thunder Scientific ACS-517B Operation and maintenance manual

Sullivan-Palatek
Sullivan-Palatek D185PKR Operation & service manual

Bambi
Bambi PT Series Operator's handbook

Alkin
Alkin W4 Series Instruction manual & parts list

California Air Tools
California Air Tools 1610A owner's manual

BE
BE AC708RB user manual