Feider FHAEP121520L User manual

Operating Instructions
Wet and Dry Vacuum Cleaner
FHAEP121520L
FEIDER HOME
32 Rue Aristide Bergès, 31270 CUGNAUX - FRANCE

1
1
2
8
3
6
7
13
4
4
5
9
3
2
13
10
15
12
14
11
16
18
6
10
11
7
15
6
15
9
9c
7
10
7
13
5
14
7
8
8
10
3
17
18
9a
9b
11
12
11
16

Important!
When using equipment, a few safety precautions must be observed to avoid injuries and
damage. Please read the complete operating manual with due care. Keep this manual in a
safe place, so that the information is available at all times. If you give the equipment to any
other person, give them these operating instructions as well.
We accept no liability for damage or accidents which arise due to non-observance of these
instructions and the safety information.
1. Safety information
⚫Important: Read the operating instructions before assembling and using the appliance
for the first time.
⚫Check that the mains voltage is the same as the mains voltage specified on the rating
plate.
⚫Only connect the appliance to a properly fitted 230V~ 50/60 Hz shock-proof socket.
⚫Pull out the power plug in the following circumstances: Whenever the appliance is not in
use, before opening the appliance and before all cleaning and maintenance work.
⚫Never clean the appliance with solvents.
⚫Never pull the plug out of the socket by pulling the cable.
⚫Never leave the appliance unattended when operational.
⚫Keep away from children.
⚫Take care to ensure that the power cable does not get damaged by being run over,
crushed, pulled or suchlike.
⚫Do not use the machine if the power cable is in a less than perfect condition.
⚫If the power cable has to be replaced, the replacement must comply with the design
specifications of the manufacturer. Power cable: H 05 VV - F 2 x 1.0 mm2
⚫Never vacuum the following: Burning matches, smoldering ash and cigarette butts,
combustible, caustic, inflammable or explosive substances, vapor or liquids.
⚫This appliance is not suitable for vacuuming dust which can be harmful to health.
⚫Store the appliance in a dry indoor location.
⚫Never use the appliance if it is damaged.
⚫Only allow the appliance to be serviced by an authorized after sales service outlet.
⚫Only use the appliance to carry out work for which has been designed.
⚫Take extra care when cleaning steps.
⚫Use only genuine accessories and spare parts.
This appliance can be used by children aged from 8 years and above and persons with
reduced physical, sensory or mental capabilities or lack of experience and knowledge if they
have been given supervision or instruction concerning use of the appliance in a safe way
and understand the hazards involved. Children shall not play with the appliance. Cleaning
and user maintenance shall not be made by children without supervision.
If the supply cord is damaged, it must be replaced by the manufacturer, its service agent or
similarly qualified persons in order to avoid a hazard..

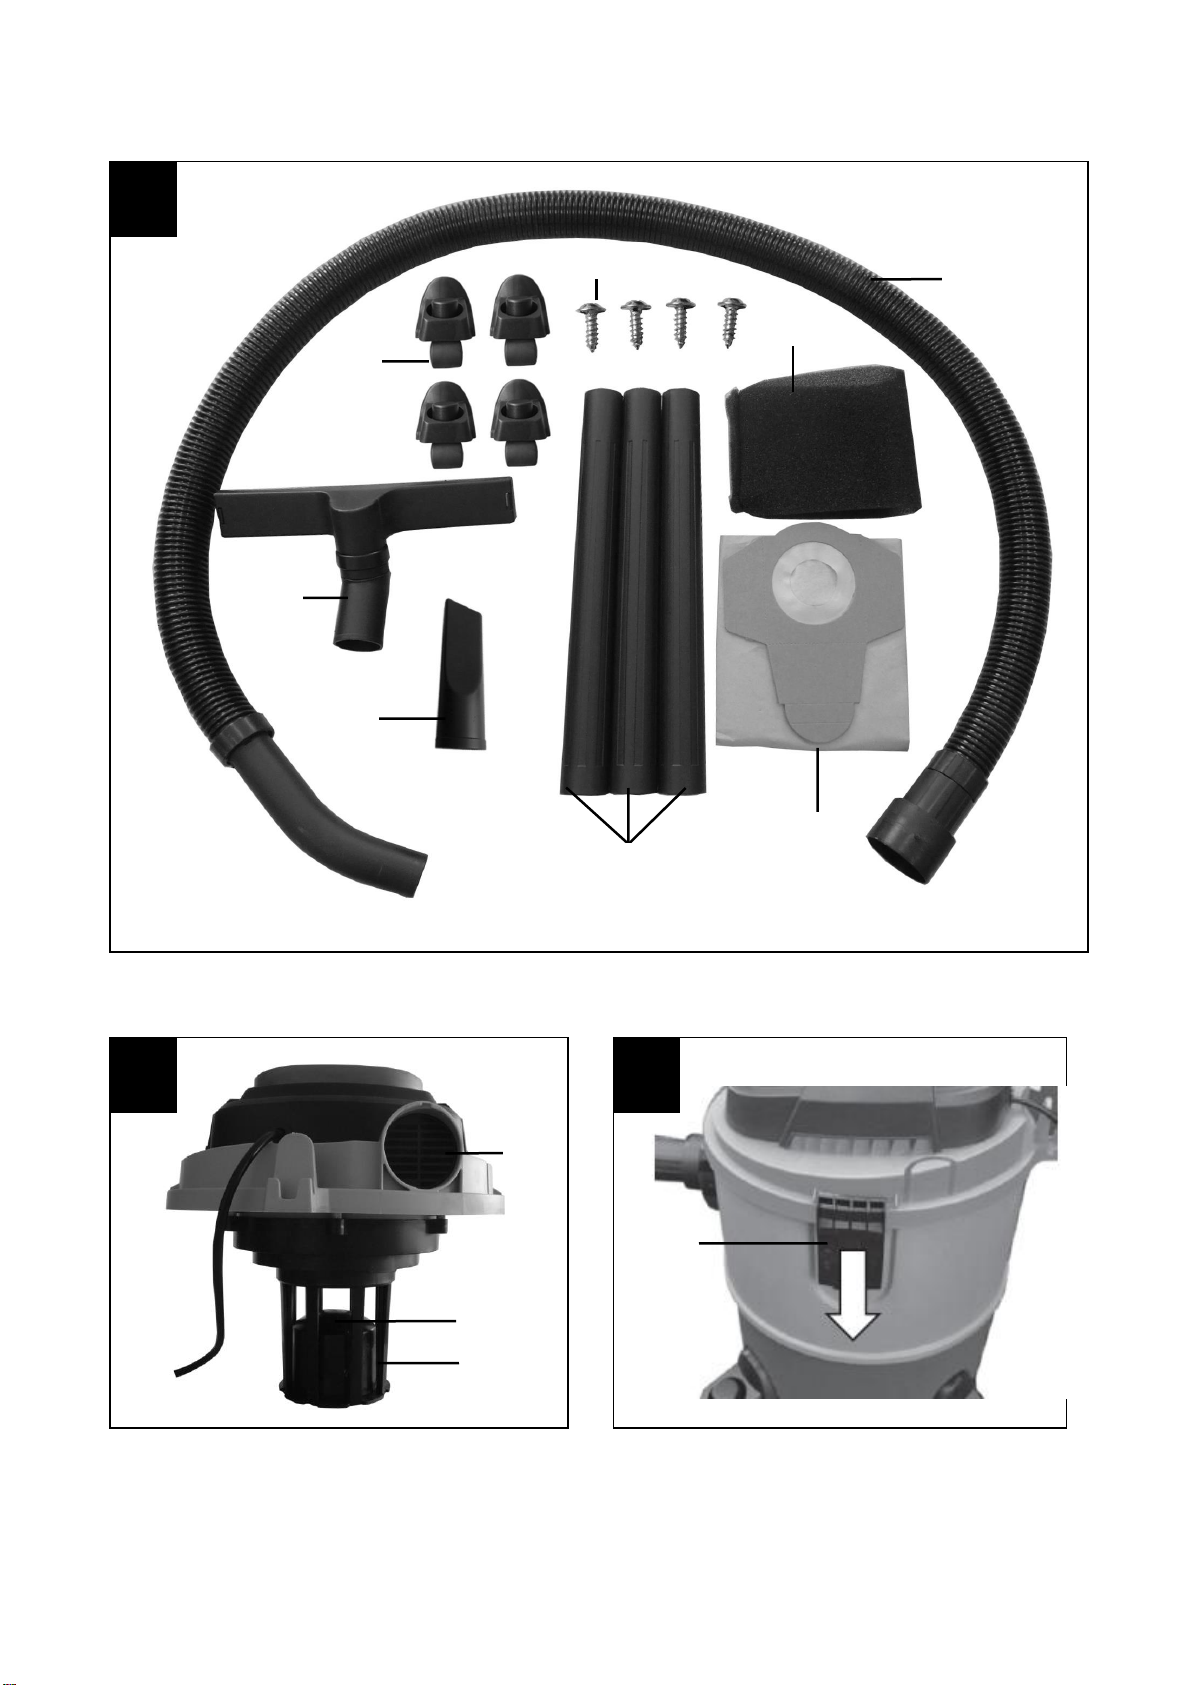
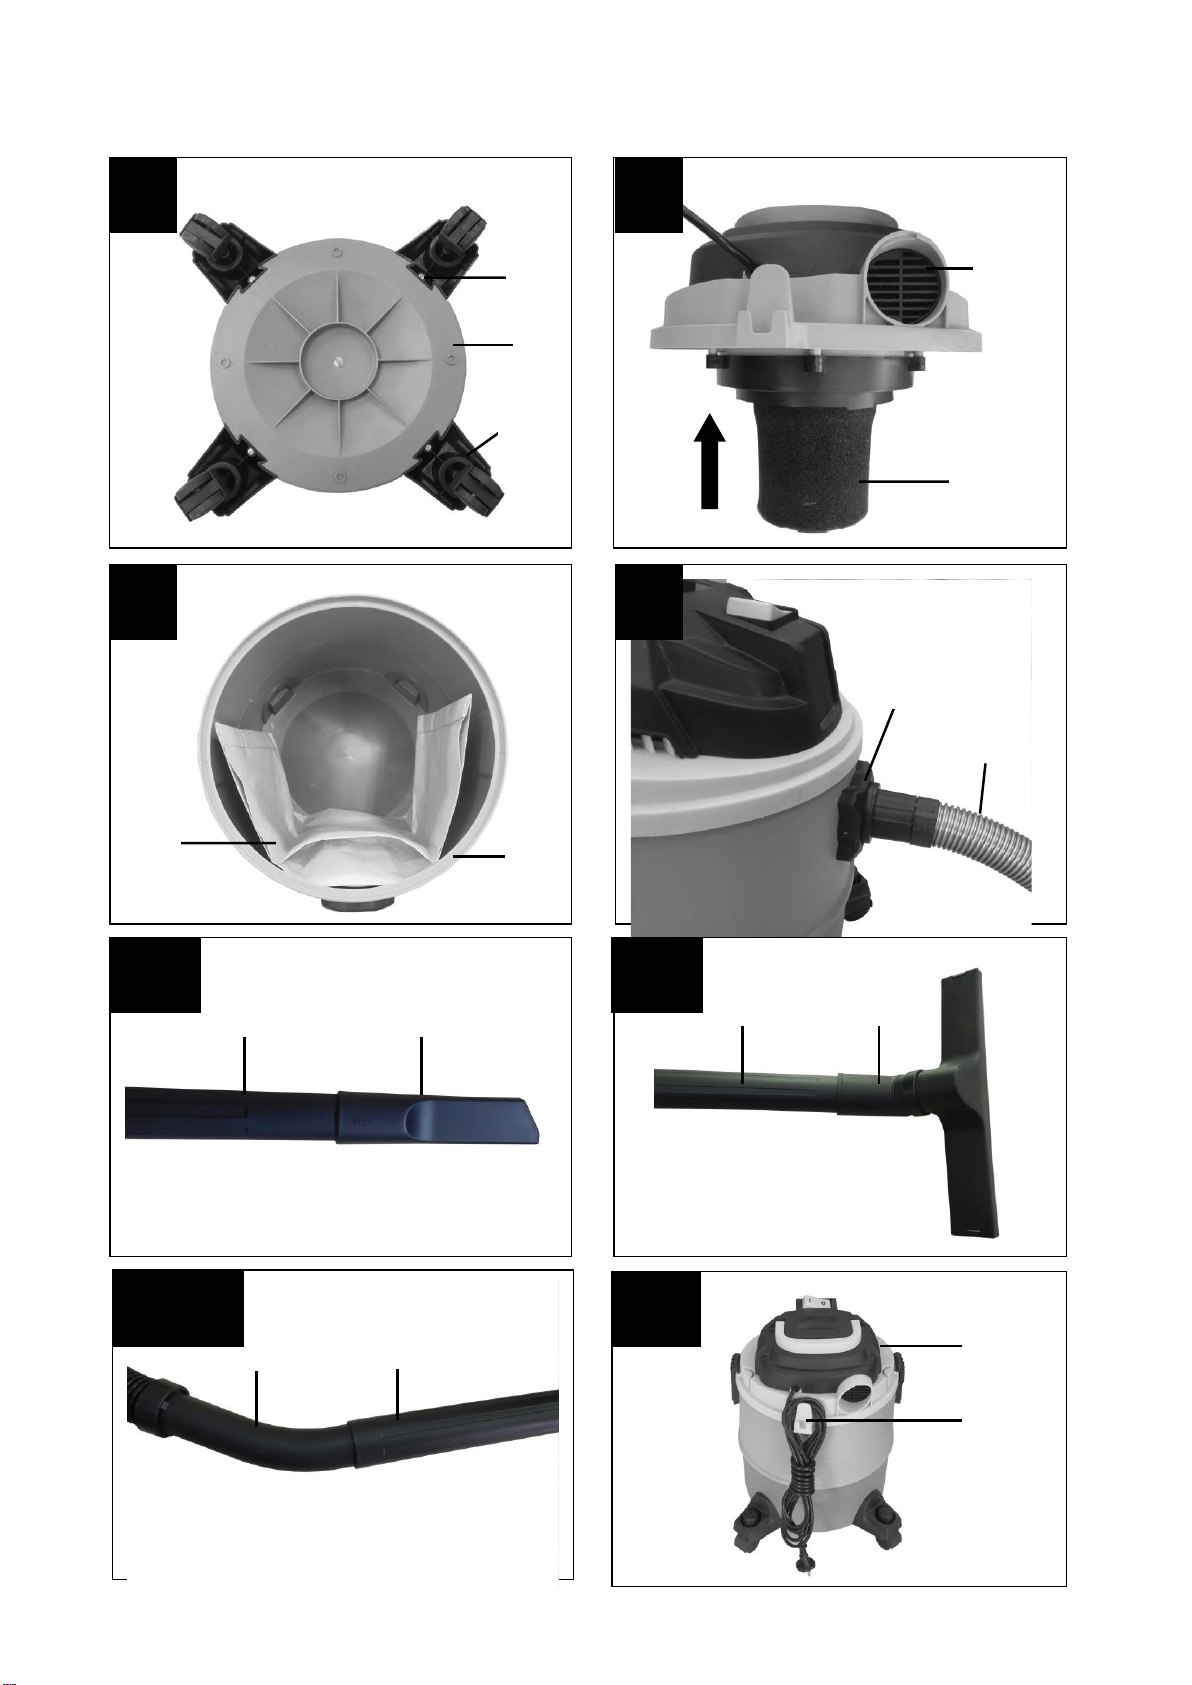
2. Layout and items supplied (Fig. 1-10)
1. Handle
2. ON/OFF switch
3. Head
4. Filter cage
5. Safety float valve
6. Locking hook
7. Tank
8. Suction hose connection
9. Blow connector
10. Flexible suction hose
11. 3-part suction tube
12. Combination nozzle
13. Wheels
14. Dirt bag
15. Foam filter
16. Crevice nozzle
17. Hook for cable store
18. Screw (4pcs)
3. Intended use
The wet and dry vacuum cleaner is designed for wet and dry vacuuming using the
appropriate filter. The appliance is not suitable for the vacuuming of combustible, explosive
or harmful substances.
The machine is to be used only for its prescribed purpose. Any other use is deemed to be a
case of misuse. The user / operator and not the manufacturer will be liable for any damage
or injuries of any kind caused as a result of this.
Please note that our equipment has not been designed for use in commercial, trade or
industrial applications. Our warranty will be voided if the machine is used in commercial,
trade or industrial businesses or for equivalent purposes.
4. Technical data
Mains voltage: 230V~ 50/60 Hz
Model: MWW305-20L-1250WA
Power input: 1250W
Tank volume: 20L
Net weight: 4.5kgs
5. Before starting
Important!
⚫Before you connect the appliance to the mains supply make sure that the data on the
rating plate are identical to the mains data.
⚫The appliance may only be connected to a shockproof socket.
5.1 Appliance assembly
Fitting the appliance head (Fig. 4)
The appliance head (3) is fastened to the container (7) by the locking hook (6). To remove
the appliance head (3), open the locking hook (6) and remove the appliance head (3). When
fitting the appliance head (3), make sure that the locking hook (6) locks into place correctly.
Assembling the wheels (Fig. 5)
Fit the wheels (13) into the appropriate mountings on the underside of the tank (7). Push the
wheels (13) firmly into the mounting until they engage with each other and fix by four screws
(18) supplied (Fig. 5).
5.2 Fitting the filter
Important!
Never use the wet and dry vacuum cleaner without a filter.
Check that the filter is securely fitted at all times.
Fitting the foam filter (Fig. 6)
For wet vacuuming, slip the supplied foam filter (15) over the filter cage (Fig. 3/4).
Assembling the dirt bag (Fig. 7)
For dry vacuuming, slip the dirt bag (14) over the vacuuming hole. The dirt bag (14) is
suitable for dry vacuuming only. The dirt bag makes it easier to dispose of the sucked-in
dust.
5.3 Fitting the suction hose (Fig. 8, 9)
Connect the suction hose (10) to the corresponding connector on the wet and dry vacuum
cleaner, depending on the application required.
Vacuuming
Connect the suction hose (10) to the suction hose connector (8).
Blowing
Connect the suction hose (10) to the blow connector (9).
The 3-part suction tube (11) can be attached to the suction hose (10) to extend it.
5.4 Suction nozzles
Combination nozzle (12)
The combination nozzle (12) with attachments is for vacuuming solids and liquids over
medium to large areas. The crevice nozzle (16) is specially designed for cleaning cervices
and edges.
6. Operation
Important!
Switch off the equipment if liquid or foam is emitted with the exhaust air when wet vacuum
cleaning.
6.1 On/Off switch (Fig. 1)
Switch position 0: Off
Switch position I: On
6.2 Dry vacuuming
Use the dirt bag (14) for dry vacuuming (see point 5.2).
Always ensure that the filters are perfectly secure.
6.3 Wet vacuuming
For wet-vacuuming, use the foam filter (15) (see point 5.2).
Check that the filter is securely fitted at all times.
Important!
When wet vacuuming, the floating safety switch (5) closes when the maximum tank level is
reached. In doing so, the suction noise of the equipment will change and become louder.
You must then switch off the equipment and empty the tank.
Important!
The wet and dry vacuum cleaner is not suitable for the vacuuming of combustible liquids.
For wet vacuuming, use only the supplied foam filter.
6.5 Blowing
Connect the suction hose (10) to the blow connector (9) on the wet and dry vacuum cleaner.
6.6 Cable storage (Fig. 10)
The power cable can be wound up onto the hook (17).
7. Cleaning, maintenance and ordering of spare parts
Important!
Always pull out the mains power plug before starting any cleaning work.
7.1 Cleaning
⚫Keep all safety devices, air vents and the motor housing free of dirt and dust as far as
possible.
⚫We recommend that you clean the appliance immediately after you use it.
7.2 Cleaning the appliance head (3)
Clean the appliance regularly with a damp cloth and some soft soap. Do not use cleaning
agents or solvents; these may be aggressive to the plastic parts in the appliance.
7.3 Cleaning the container (7)
The container can be cleaned with a damp cloth and some soft soap or under running water,
depending on the amount of dirt.
7.4 Cleaning the foam filter (15)
Clean the foam filter (15) with a little soft soap under running water and allow it to air-dry.
7.5 Maintenance
At regular intervals and before each use, check that the filters in the wet and dry vacuum
cleaner are securely fitted.
7.7 Ordering replacement parts
Please quote the following data when ordering replacement parts:
⚫Type of machine
⚫Replacement part number of the part required
8. Disposal and recycling
This marking indicates that this product should not be disposed with other household wastes
throughout the EU. To prevent possible harm to the environment or human health from
uncontrolled waste disposal, recycle it responsibly to promote the sustainable reuse of
material resources. To return your used device, please use the return and collection systems
or contact the retailer where the product was purchased. They can take this product for
environmental safe recycling.

EC Declaration of conformity
FEIDER FRANCE
32, rue Aristide Bergès - ZI 31270 Cugnaux –France declare that the machine
Designation: Wet and Dry Vacuum Cleaner
Model: FHAEP121520L
Serial number:
Is in conformity with the European Directives:
LVD Directive 2014/35/EU
EMC Directive 2014/30/EU
ROHS Directive: 2011/65/EU
This product is also in conformity with the following standards:
EN 60335-2-2:2010+A11:2012+A1:2013
EN 60335-1:2012+AC:2014+A11:2014
EN 62233:2008
EN 55014-1:2006+A1:2009+A2:2011
EN 55014-2:1997+A1:2001+A2:2008
EN61000-3-2:2014
EN 61000-3-3:2013
Responsable du dossier technique : Olivier Patriarca
Philippe MARIE / PDG
Cugnaux, le 01/07/2019
Other Feider Vacuum Cleaner manuals


