Feldon Shelter Hawk's Nest User manual

Hawk’s Nest −Rooop Tent
We have teamed up with mother nature by dedicating ourselves to offering
an easy escape for those that are keen to explore that bit further.
It’s great to have you on board.
We all know that our country is the most beautiful place in the world,
adventures into the wild. So thank you for joining us and we hope you have
as much fun as we do. But before you rush off please do your homework
and carefully read this user guide. Doing so will see you enjoy your fresh
new Hawk’s Nest Rooftop Tent for many moons to come.
WELCOME TO THE FAMILY!
User Guide


05 06
01 - Safety Instructions
You will need to closely follow these installation
instructions & vehicle requirements carefully to
ensure proper installation on your vehicle and
safe use of the your Hawk’s Nest Rooftop Tent.
rating of your roof rack. Not all vehicles and
roof racks are built equal and not all can safely
accommodate the Hawk’s Nest. Always follow
the vehicle & roof rack requirement in this user
guide.
Improper installation or use of the Hawk’s Nest
may result in serious injury or death.
It’s also important to note that the installation
of the rooftop tent to your vehicle (similar to
any other load on your roof rack) will change
your vehicle’s center of gravity, height and
handling.
The manufacturer disclaims all responsibility in
case of accidents due to improper use, improper
maintenance, or checking the tightness of the
roof rack system.
Feldon Shelter Company - the manufacturer
shall not be liable for special, indirect incidental
or consequential damages.
First things first, safety.
☐Check all Rooftop Tent & Roof Rack attachments regularly. This
includes nut and bolt checks to make sure fastenings are tight and in
good condition.
☐
☐Do not stand on the rooftop tent shell when closed, load should only
be put on the tent mounted racks (available separately).
☐
extreme driving conditions.
☐
within these guidelines to safely support your rooftop tent.
☐A rooftop tent will effect your vehicles handling. The manufacturer
disclaims all responsibility in relation to accidents due to improper
use, incorrect maintenance, or negligence in maintaining fastening
hardware.
☐
☐Remember, your vehicle is taller when entering areas with height
restrictions.
☐
location and park with the back of the tent facing into the wind.
☐Never drive without securely fastening your rooftop tent closed.
☐When placing load onto your Tent Mounted Racks, do not exceed
your vehicles roof or roof rack load ratings. No more than 100kg
weight on top when closed or 30kg when tent is open.
☐The Rooftop tent is rated to 200kg of adventurers inside. Do not
exceed this.
☐
☐
devices be used inside or near the tent. Do not operate any device
which burns fuel inside the tent.
☐
☐Always Keep a clear exit and exit plan in case of emergency.
Safety Warning

07 08
☐Safety 01
☐
☐Roof Rack & Vehicle Requirements 03
☐Pre-Installation 04
☐Installation / Fitting to your vehicle 05
☐Opening / Unfolding adventure 06
☐Packing away and storage 07
☐Care instructions 08
☐Warranty and contact 09
☐Schedule 1 - Tent Rack Mounting 10
Contents
Hawk’s Nest - User Guide
Please read & understand all
instructions prior to install. If anything isn’t clear,
feel free to give us a call. We’re here to help!
INSPECTIONS: IT’S IMPORTANT
THAT OVER YOUR TRAVELS
YOU REGULARLY CHECK THAT
ALL HAWK’S NEST MOUNTING
HARDWARE & ROOF RACK
HARDWARE REMAINS TIGHT AND IN
GOOD CONDITION.

Hawk’s Nest - User Guide
02 - Specications
Tent
360g Polyester X-Canvas. Waterproof, mould
and mildew resistant. High grade 130g
mosquito mesh.
Rain Fly
420 denier Ripstop Polyester X-Canvas.
Waterproof, mould and mildew resistant.
Tent Shell
Durable Powder coated Aluminum
Construction.
Components
Marine Grade 316 Stainless Steel Components
throughout. Weather, salt & UV resistant.
Mattress
60mm ErgoCell dual-layer mattress featuring
section. Removable cotton cover & waterproof
ripstop underside
.
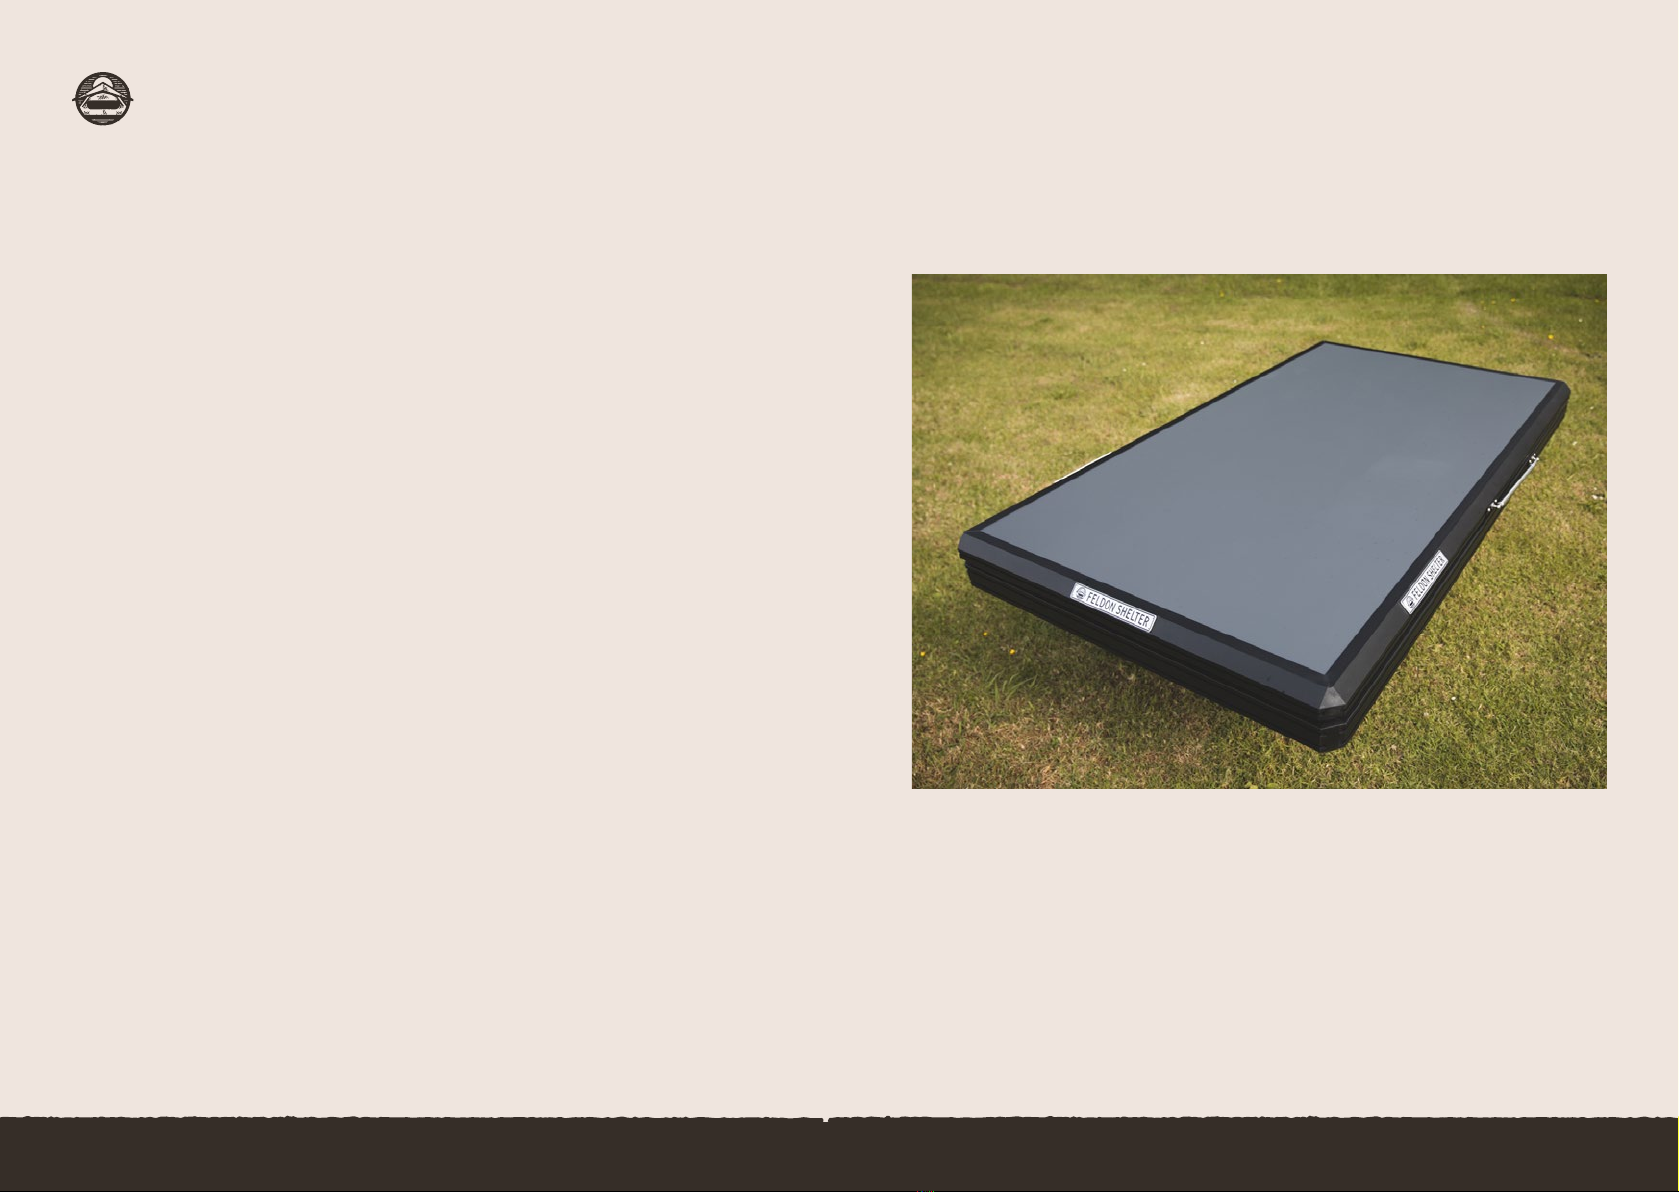
Closed
Low-Pro: 230cm L x 130cm W x 16cm H
Standard: 230cm L x 130cm W x 20cm H
Wide: 230cm L x 145cm W x 20cm H
Open
230cm L x 130 or 140cm W x 130cm H
Weight
Low-Pro: 70kg
Standard: 74kg
Wide: 78kg
Material
Your Hawk’s Nest Rooftop Tent Includes:
1x Hawk’s Nest Rooftop Tent
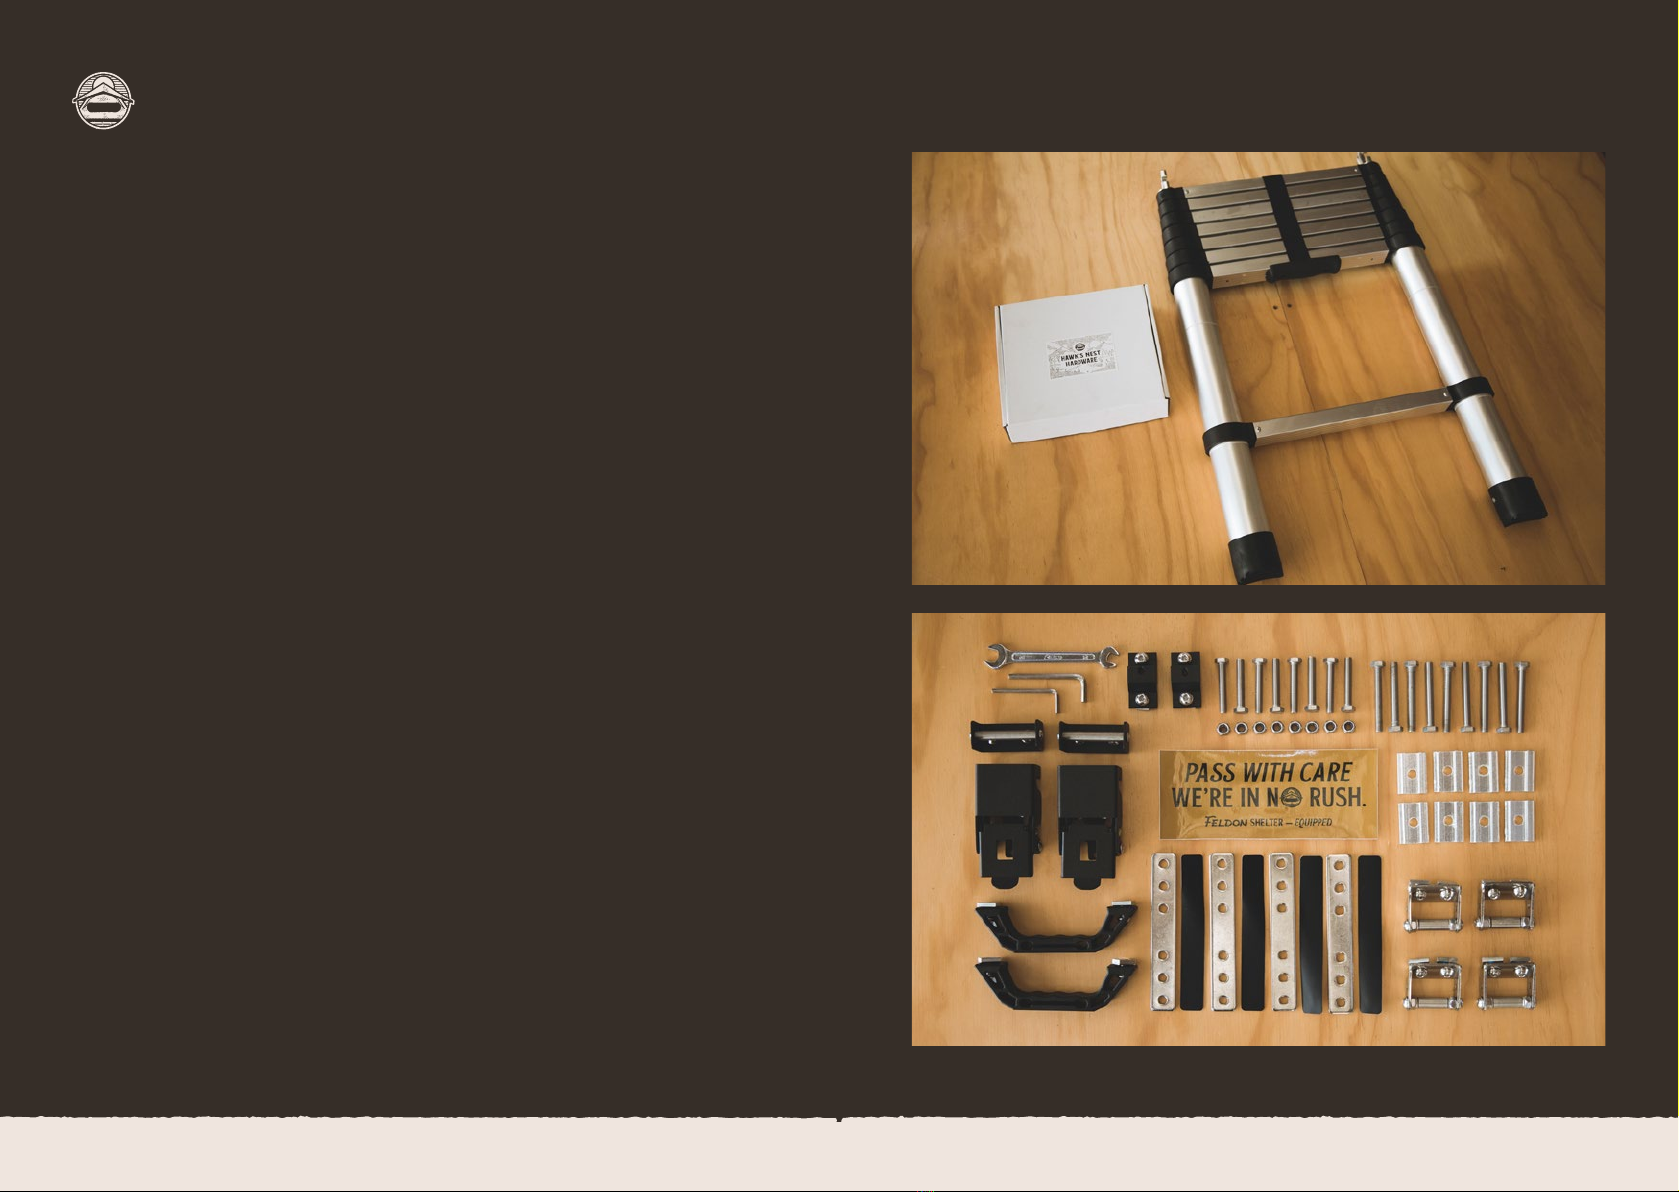
1x Hawk’s Nest Ladder
Note: For ‘Standard’ & ‘Wide’ models, this is found inside your Rooftop Tent.
Note: For ‘Low-Pro’ Models, this is shipped or packaged separately.
1x Hawk’s Nest Hardware Kit (located inside your ladder box)
Dimensions
09 10
Hawk’s Nest - User Guide
11 12
03 - Roof Rack Requirements
Please ensure both your vehicle & vehicles roof racks follow these guidelines:
☐To mount a Hawk’s Nest Rooftop Tent both your vehicle & roof racks must be rated to a minimum
of 100kg Dynamic Load. Please check with your vehicle & roof rack manufacturer before
mounting your tent.
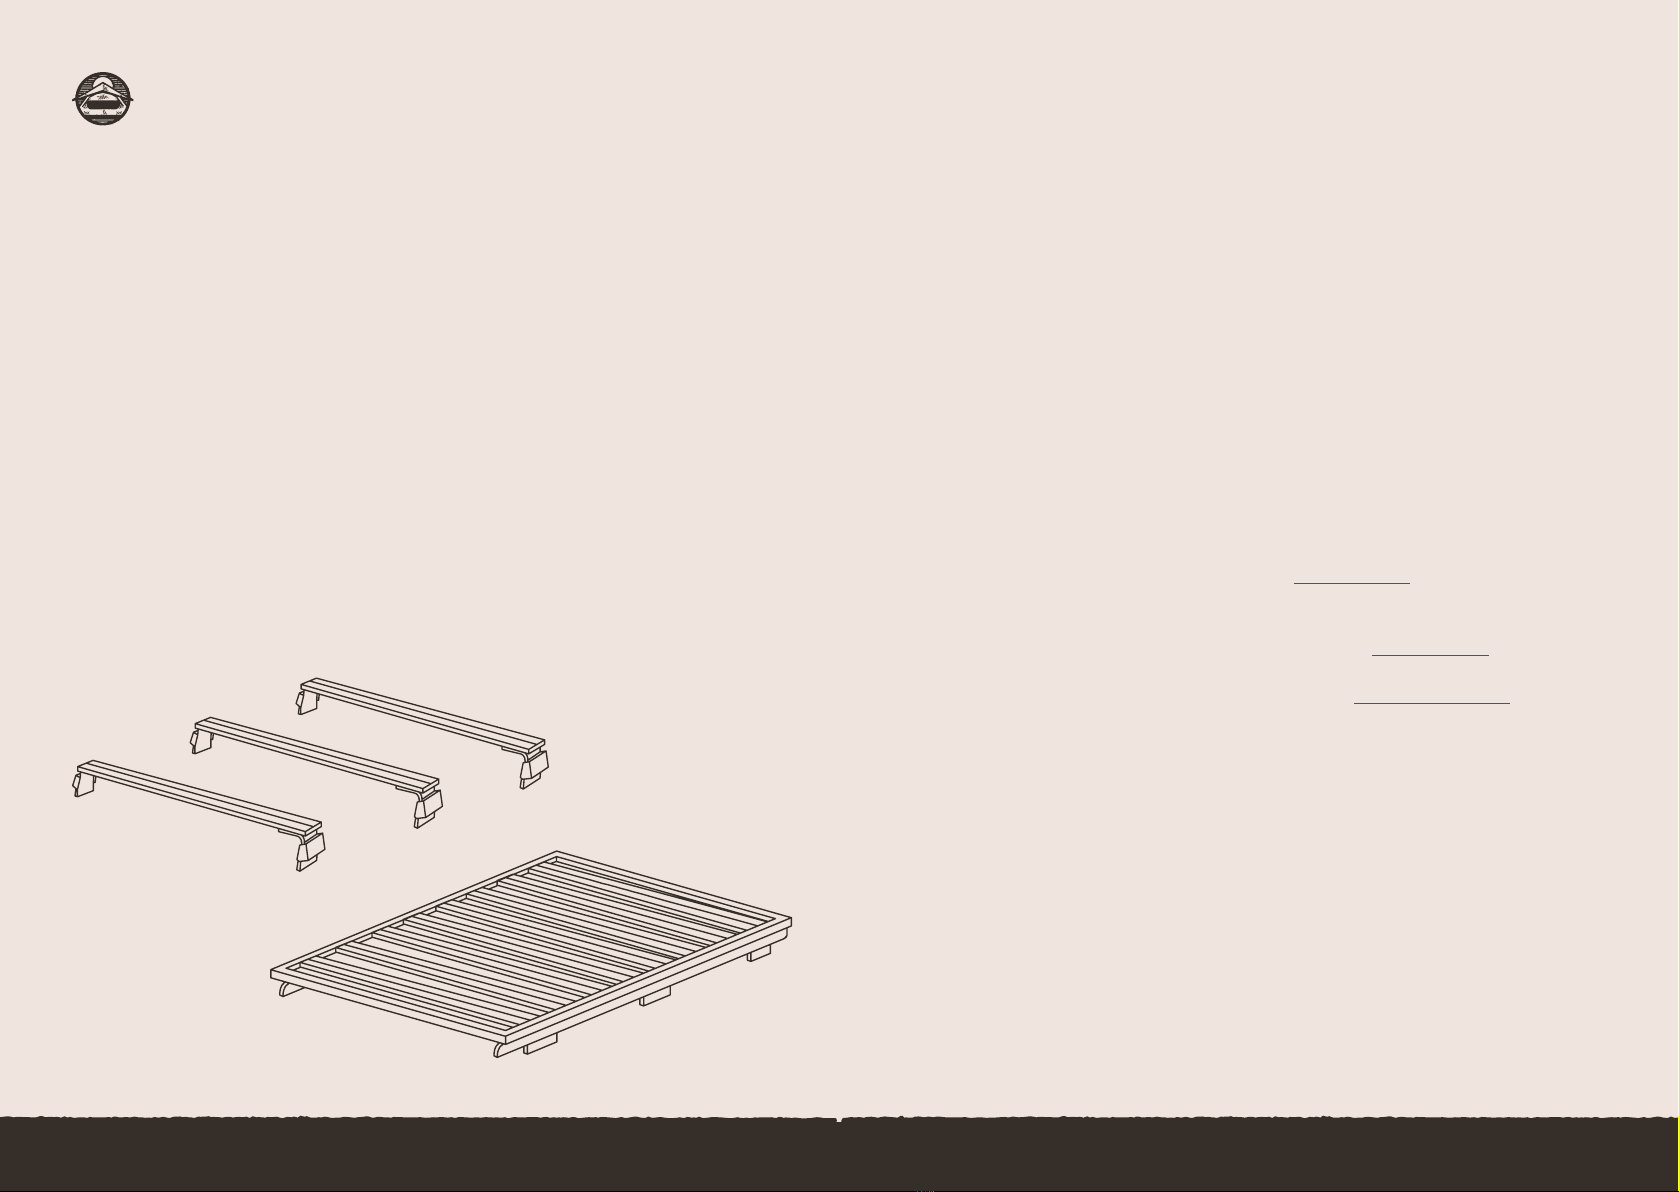
☐Three roof rack bars or a roof platform with a minimum of 6 mounting points to your vehicles
roof is required.
☐The minimum mounting distance between the front and rear bar (or ends of your roof platform)
is 1400mm.
☐Please ensure the distance between your vehicle roof, and the underside of your roof racks is at
least 30mm.
☐
roof rack styles.
☐This kit comes with everything you need to mount to most popular brands of roof racks.
☐When mounting to roof platforms or custom racks, please contact us as we produce and stock
many specialized mounting kits for most major roof platform brands.
☐If you are unsure your roof racks or vehicle are up to that task, please contact us.
☐We stock most major brands of roof racks for most vehicles, feel free to get in touch if roof racks
are required.
Here’s what you need for your new rooftop home
13 14
Hawk’s Nest - User Guide
04 - Pre-Installation
Ok, let’s get started. First up, we’ll get stuck in getting that new rooftop home out of it’s box.
☐Grab a buddy or two and remove the cardboard lid, exposing your new Hawk’s Nest Rooftop
Tent.
Feldon Fact: Make sure not to cut into the cardboard carton, this could damage your tent shell.
☐When removing the Hawk’s Nest from it’s carton, place it mounting side down (the side of the
tent with the two mounting channels attached) onto a soft surface. The cardboard lid of the
carton is perfect for this.
☐Remove protective packaging & sit back and admire your new rooftop home.
Time to get stuck in!

15 16
Hawk’s Nest - User Guide
04 - Ladder Box
☐For ‘Standard’ & ‘Wide’ Models: This is found inside your Hawk’s Nest. Slowly lift the upper
shell of the Hawk’s Nest (Warning: make sure you guide the shell upwards slowly, as the gas
struts will open the tent quickly) & unzip a side to gain access.
☐For ‘Low-Pro’ Models: Your ladder box has been shipped or packaged separately. There is no
need to open your Hawk’s Nest yet.
☐
☐
Locate your ‘Hawk’s Nest Ladder Box’
17 18
Hawk’s Nest - User Guide
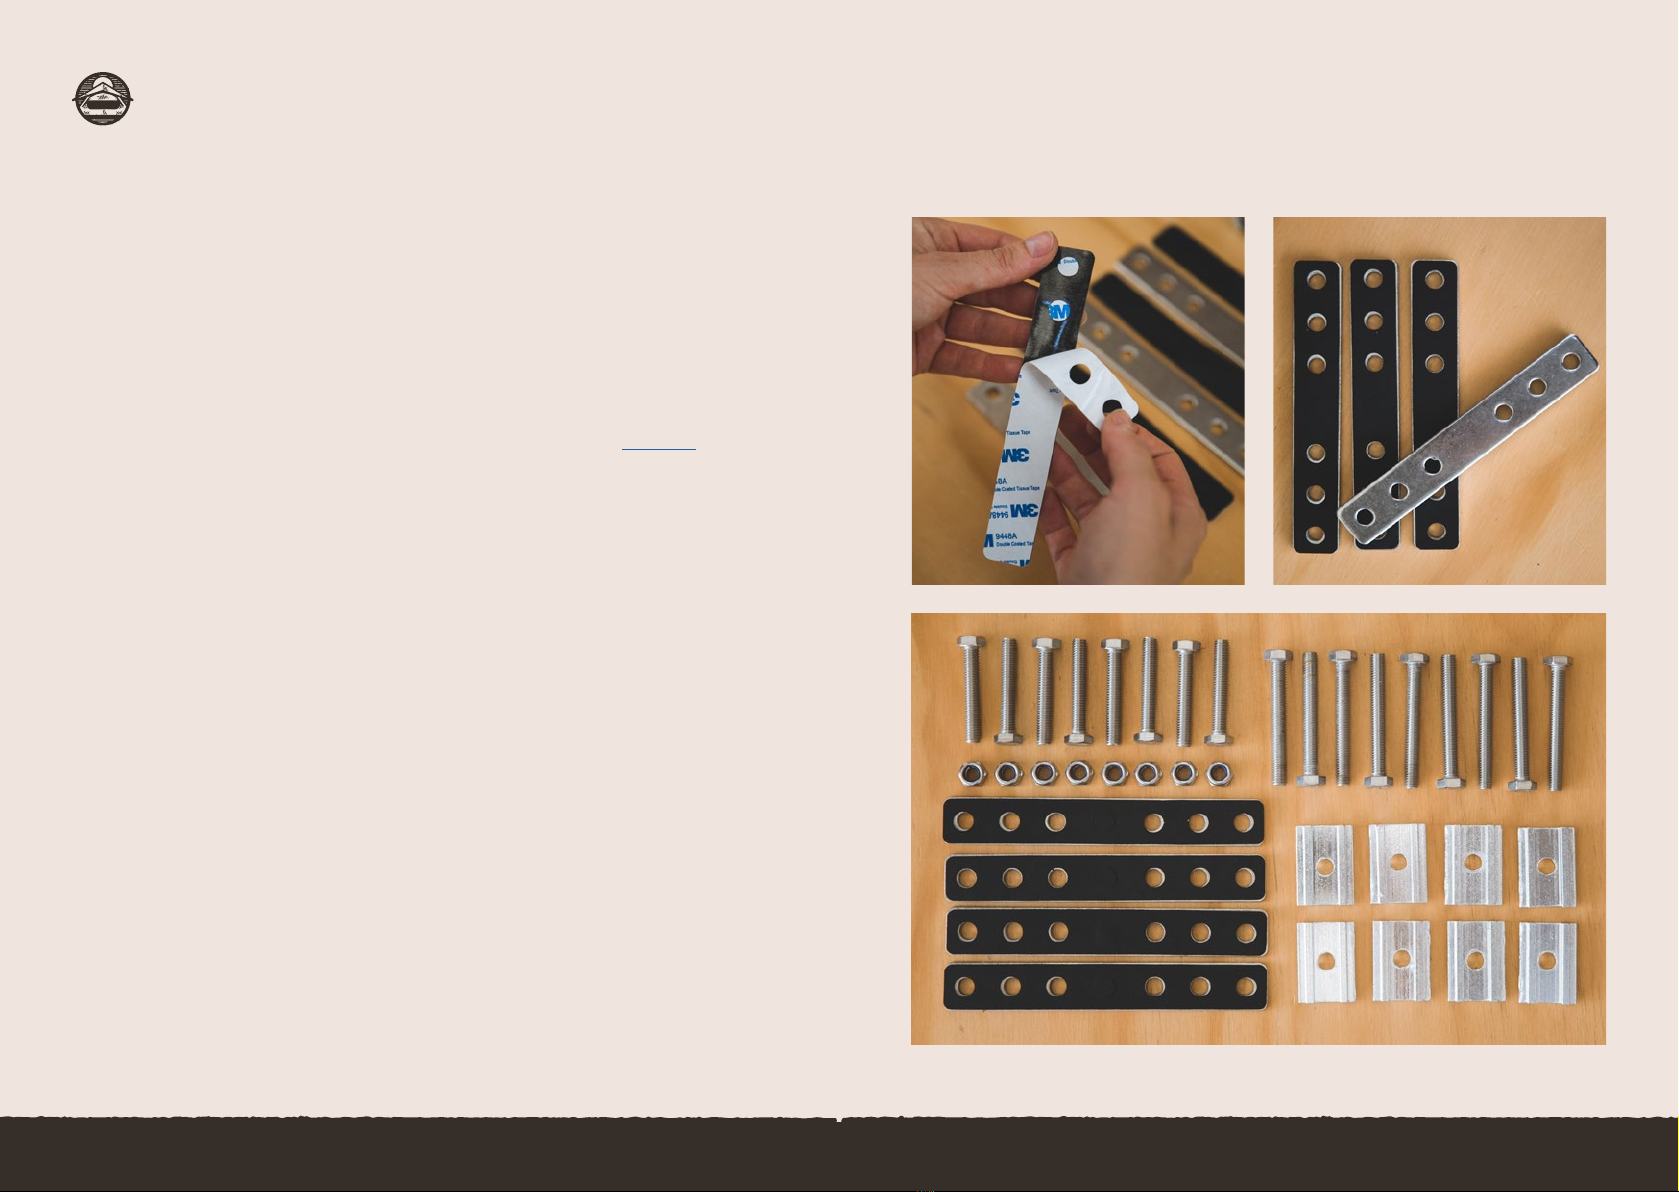
04 - Hawk’s Nest Hardware
Mounting Hardware (to mount the Hawk’s Nest to your Roof Rack):
☐8 x M8x50 & 8x M8x65 Roof Rack Mounting Bolts
☐8 x Mounting Channel Slide Plates
☐4 x Mounting Brackets
☐4 x Mounting Bracket Rubber Protectors (with 3M adhesive)
☐8 x M8 Mounting Nyloc Nuts
Lower Shell Components (mounted to the lower shell of your Hawk’s Nest):
☐2 x Lockable Lower Latches (with 4x M8x16 Button Head Bolts & Rectangle Nuts)
☐4 x Ladder Brackets (with 8x M8x16 Button Head Bolts & Rectangle Nuts)
☐2 x Spring Pole Mounts (with 4x M8x16 Button Head Bolts & Rectangle Nuts)
Upper Shell Components (mounted to the upper shell of your Hawk’s Nest):
☐2 x Upper Latch Hooks (with 4x M8x16 Button Head Bolts & Rectangle Nuts)
☐2 x Handles (with 4x M8x16 Button Head Bolts & Rectangle Nuts)
Tools:
☐1 x Spanner (10mm & 13mm)
☐2 x Allen Keys (3mm & 5mm)
Everything you need

19 20
13mm Spanner, 5mm &
4mm Allen Key
Spring Pole Mounts
(For Lower Shell) 50mm M8 Mounting Bolts
(For Mounting to Most Roof Racks) 65mm M8 Mounting Bolts
(For Mounting to Taller Roof Racks)
Mounting Channel
Side Plates
Ladder Brackets
Mounting Bracket
Rubber Protectors
Mounting Bracket
Handles (For Upper Shell)
Lockable Latch
(For Lower Shell)
Latch Hook
(For Upper Shell)
21 22
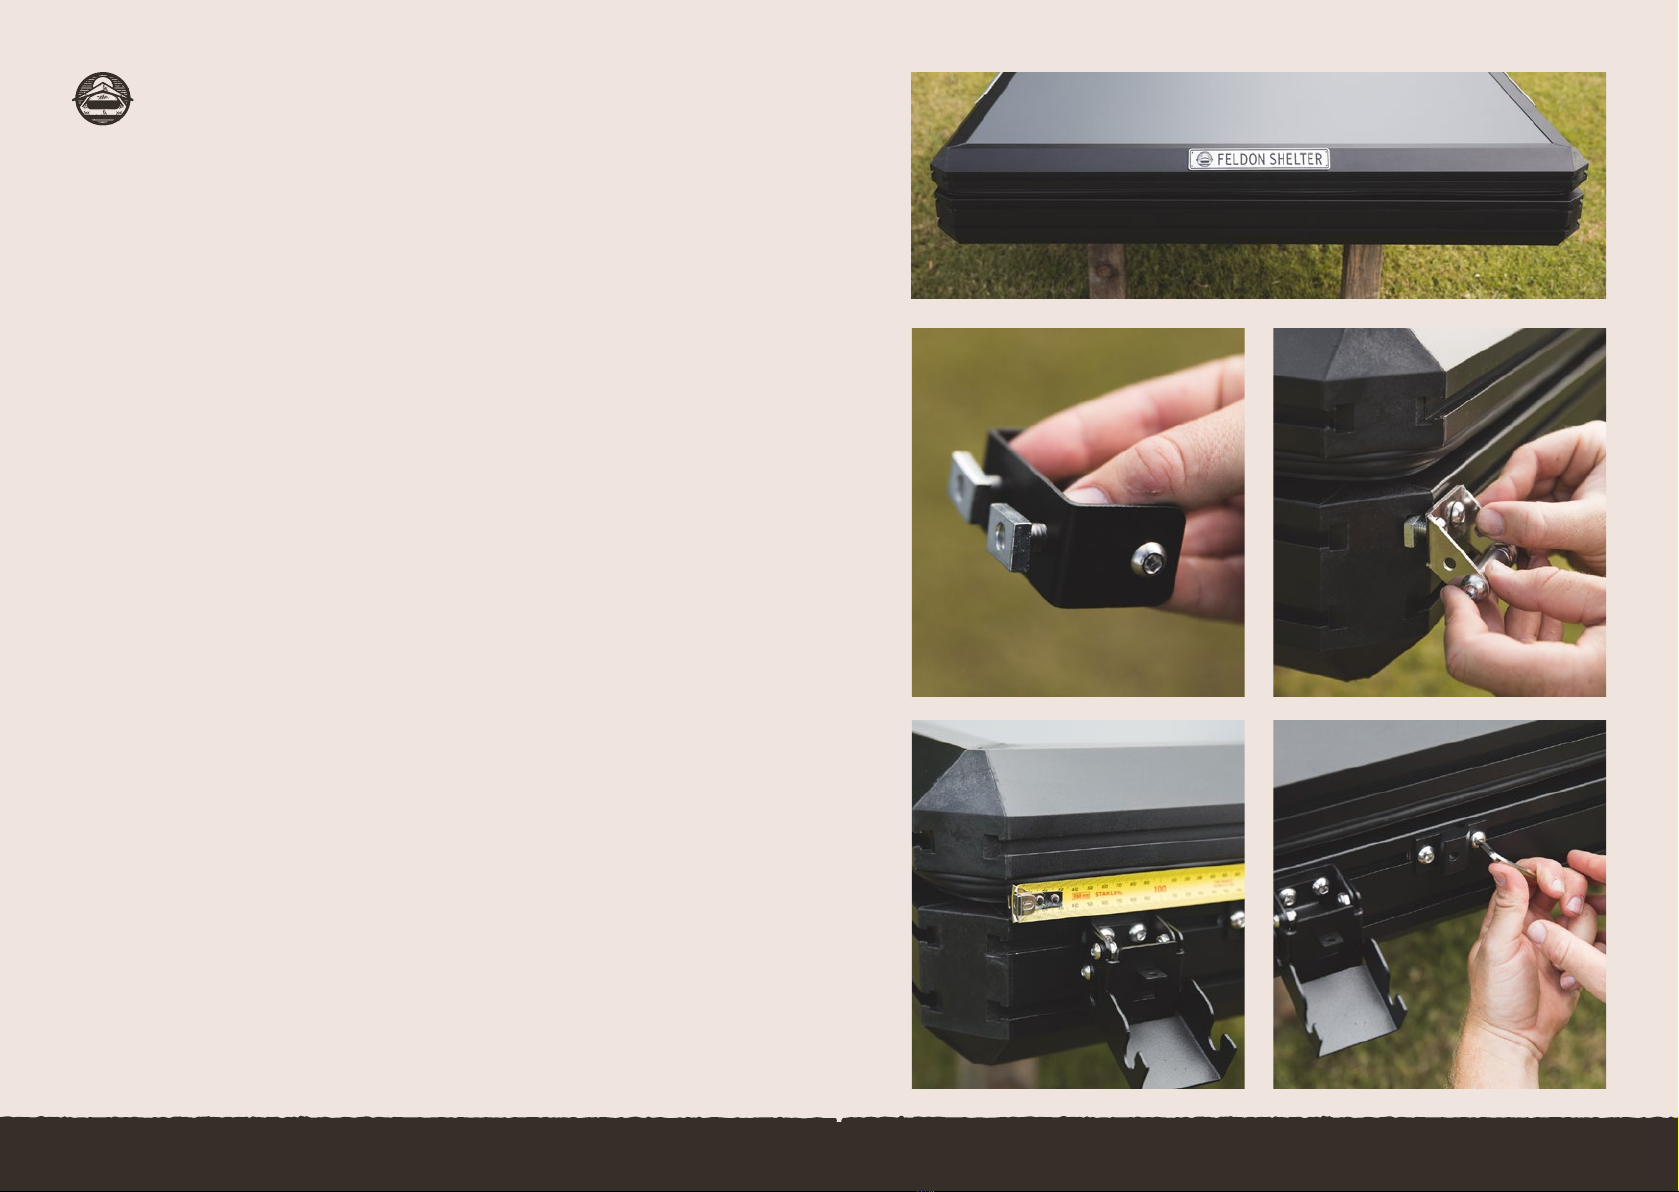
04 - Lower Shell Components
All Hawk’s Nest Shell components use M8x16 Dome Headed Bolts & Rectangle Nuts that slide
into the T-Track on either the upper or lower shell for attachment.
☐Firstly, loosen the rectangle nuts on all shell components. Enough that the slide easily into the
☐Starting with the Lower Shell Components, locate the T-Track on the rear edge of the tent (the
rear edge is the short edge that is opposite the hinged edge).
Note: For ‘Standard’ & ‘Wide’ Models, use the upper of the two T-Tracks on the lower shell.
☐Slide on your Lower Shell Components as pictured (2x Ladder Brackets, 2x Spring Pole Mounts,
2x Lockable Lower Latches)
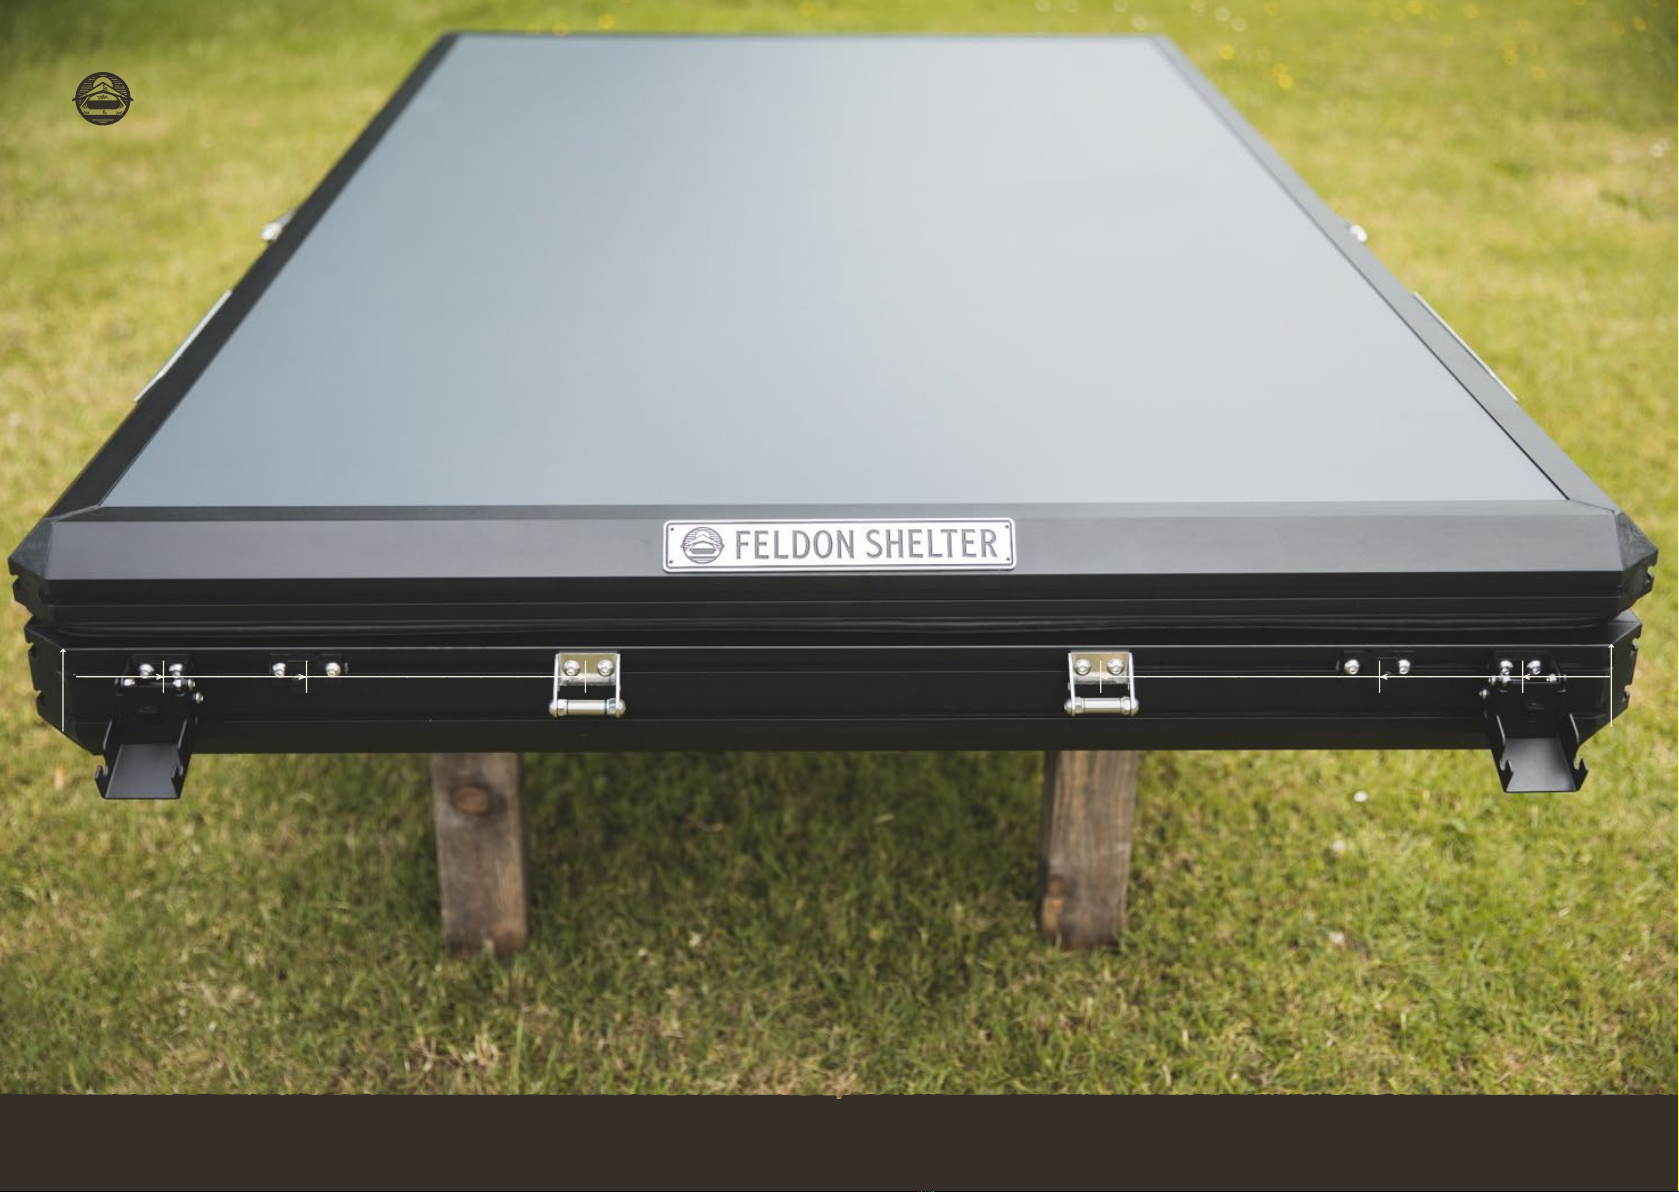
☐Starting with the left half of the lower tent shell, measuring from the left rear corner of the lower
shell, place your components as pictured:
- Lockable Lower Latches: 70mm
- Spring Pole Mounts: 180mm
Feldon Fact: Pole mounts should be positioned so the hole faces towards the outer corner of the shell
- Ladder Bracket: 400mm
☐Repeat this for right half of lower tent shell.
☐Tighten down all components using the 5mm Allen key.
Take care to ensure all components aren’t twisted and are mounted square with the shell.
Let’s start mounting the goodies
Hawk’s Nest - User Guide
23 24
Measure from rear most corner of lower shell Measure from rear most corner of lower shell
70mm 400mm180mm 180mm400mm 70mm

25 26
Hawk’s Nest - User Guide
04 - Upper Shell Components
Ok, onto the top shell components. These are made up of 2x Handles & 2x Upper Latch Hooks:
☐Depending on your vehicle setup, the two Handles can be placed on the rear edge (as pictured)
or the side edges of your upper shell. Plan the most convenient location to grab these once the
tent is mounted on your vehicle.
Feldon Fact: If the handles are placed on the side edge of the shell, they must be mounted towards
the rear of the tent for maximum leverage closing.
☐
☐Locate the Upper Latch Hook position by using the Lower Latches as a reference, then tighten
☐Test your lockable latches.
Now let’s tackle the stuff up top

27 28
Hawk’s Nest - User Guide
04 - Using Your Latches
Now the rear end of your Hawk’s Nest is complete. Here’s how to use your new lockable latches
☐Firstly, lift the Lower Latch onto the Upper Latch Hook.
☐
☐If adjusted & installed correctly, the Locking tab will smoothly lock in with a satisfying thud.
Feldon Fact: These latches are lockable to ensure no one opens up your tent when you’re not
Here’s the first step to opening & closing

29 30
04 - Side Ladder Brackets
Your Hawk’s Nest comes with a second pair of ladder brackets. This is so you can set up two
access points for your ladder.
☐Choose the left or right edge of the lower shell (whichever is most convenient for your vehicle
setup)
☐Slide on the two remaining ladder brackets.
☐Position the ladder brackets at 600mm & 1000mm from the rear corner of the lower shell.
☐
Now it’s time to get your new rooftop home installed onto your vehicles roof.
Two entrances makes life easy
31 32
Hawk’s Nest - User Guide
05 - Installation
Double check you have read our roof rack & vehicle requirements on page 10. Your vehicle &
roof rack setup must meet all requirements before installation. Feel free to contact us with any
questions.
☐Prepare your mounting hardware brackets by sticking the Rubber Mounting bracket protector
to each bracket. The new rubber side of the mounting bracket should face upward against the
underside of your roof racks when mounting.
☐
☐With a buddy or two helping, carefully lift the Hawk’s Nest onto your roof rack. The hinge side of
the tent should be facing the front of your vehicle.
☐Position the Hawk’s Nest centrally both front-to-back & side-to-side on your roof racks.
Note: If your vehicle has an upwards opening boot, open the boot and position the Hawk’s Nest so it
does not contact your boot door when open.
Let’s get your new rooftop home on the roof!
33 34
Hawk’s Nest - User Guide
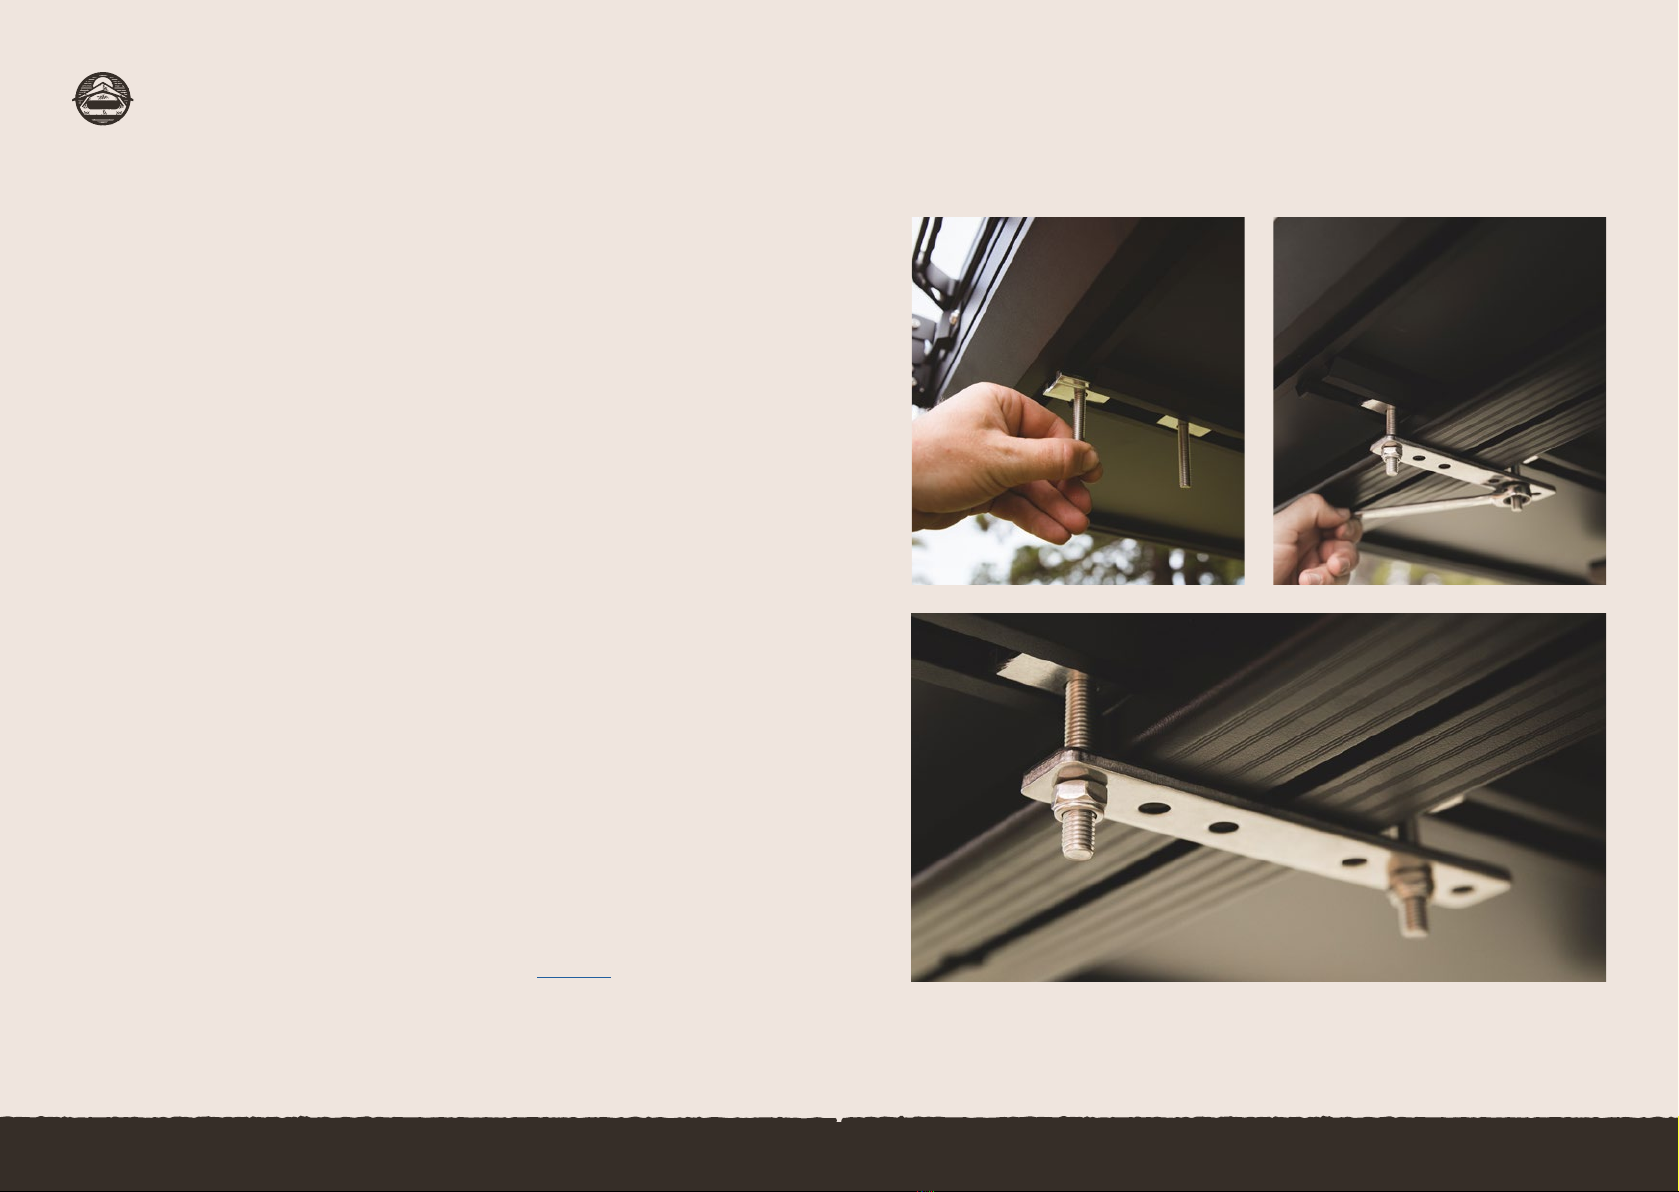
05 - Installation
☐Slot your chosen length M8 Bolts into the 8x Mounting Channel Slide Plates and slide the plates
into the two Mounting Channels on the underside of your Hawk’s Nest (4 bolts/slide plates per
mounting channel).
☐Using the Mounting Brackets, choose the two holes in the bracket that suit the width of your
roof rack bar best. Using the 2x M8 Bolts (now hanging from your mounting channels) & the M8
Nyloc Nuts, clamp the tent to the roof rack as pictured. You will need to lift the front & rear end of
the tent to slide the M8 bolts through to the inside of the roof rack bars. These Mounting brackets
should be positioned on the most forward & rearward roof rack bars, with two brackets clamped
per bar.
☐
☐
driving.
☐IMPORTANT: Regularly check all mounting hardware of your Hawk’s Nest. Including your roof rack
hardware.
When mounting to Roof Platforms, custom racks or other custom setups. Other mounting
including a full range of different length mounting bolts. Please contact us to discuss mounting
options.
Clamping it down safely

Hawk’s Nest - User Guide
Take a few steps back and admire your new rooop home!
Now it’s time to unfold your new Hawks Nest for the rst
time and get out there and enjoy it.
Congratulations
37 38
Hawk’s Nest - User Guide
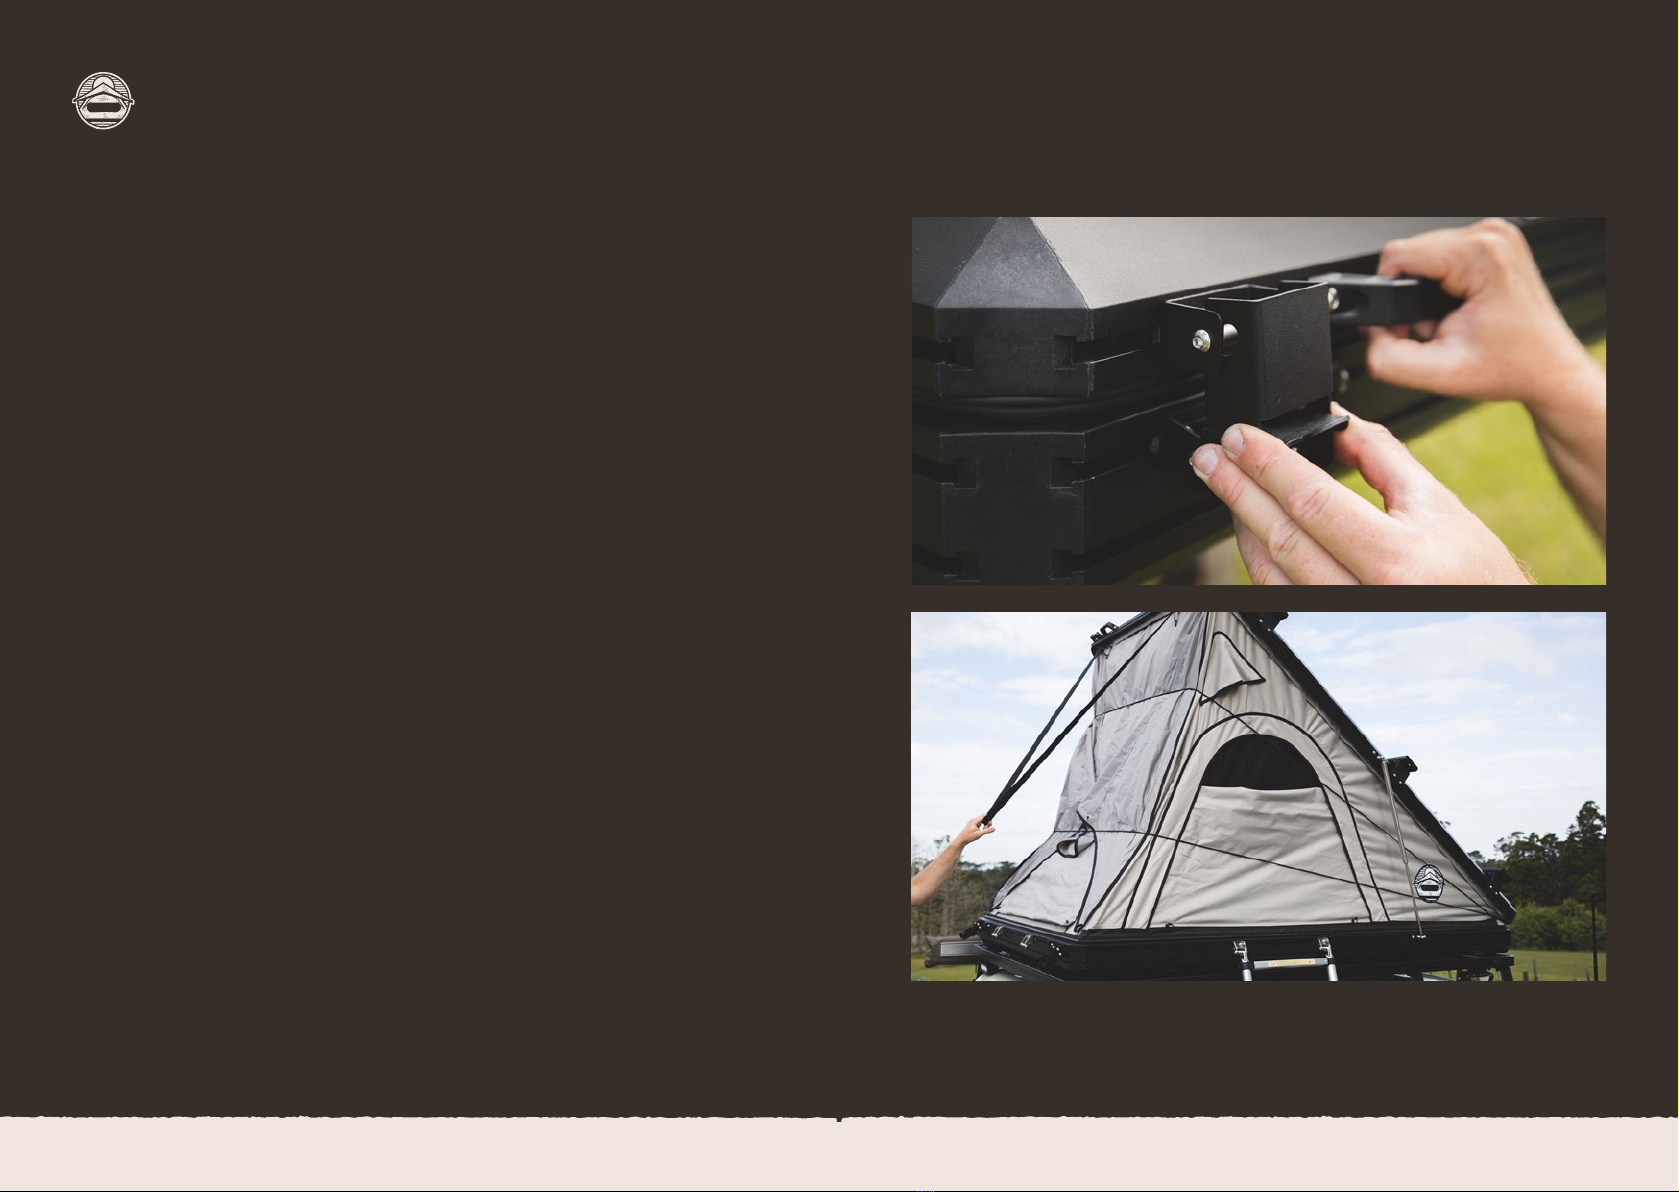
06 - Unfolding Adventure
☐Unlatch the two Lockable Latches and push gently on the upper shell handles to start the opening
of the upper shell, guiding it upwards slowly as you lift.
Feldon Fact: If using the Tent Mounted Racks with a load on top of the upper shell. Firstly make sure
the load is securely tied down with no way of sliding forward. It may take slightly more force to get
the opening process started if heavier loads are present on top.
☐The Gas struts will take over automatically and do all the work for you, fully opening the Hawk’s
Nest.
Feldon Fact: If you have the upgraded gas struts that suit the Tent Mounted Racks, please be weary
that your Hawk’s Nest may open quickly when no load is present on the top shell.
☐
panels unzipped. This will allow the hot, moist air from inside the tent escape easier in periods of
low wind or extreme cold, avoiding any condensation buildup inside the tent.
Opening your Hawk’s Nest setup for the first time
39 40
Hawk’s Nest - User Guide
Table of contents
Other Feldon Shelter Tent manuals

Popular Tent manuals by other brands


One Stop Gardens
One Stop Gardens 90099 Assembly and operating instructions

Wanderer
Wanderer 594899 Assembly instructions

Woods
Woods Atmospheric Plus owner's manual

KMART
KMART 43159079 user manual

Eureka
Eureka N!ergy 9 Assembly instructions

Quest Engineering
Quest Engineering Signature Emperor instructions