Feldon Shelter Crow's Nest Regular - Bonus Room User manual

Crow’s Nest Regular - Bonus Room
User Guide
Welcome to Feldon Shelter! We have teamed up with mother nature by
dedicating ourselves to offering an easy escape for those that are keen to
explore that bit further.
It’s great to have you onboard.
We all know that our country is the most beautiful place in the world,
adventures into the wild. So thank you for joining us and we hope you have
as much fun as we do. But before you rush off please do your homework
and carefully read this user guide. Doing so will see you enjoy your fresh
new Crow’s Nest Rooftop Tent for many moons to come.
Crow’s Nest Extended - Bonus Room User Guide
Feldon Shelter
Company

03
Contents
Please read & understand all
instructions prior to installation
Bonus Room Regular - User Guide
02
☐Warnings 01
☐
☐Whats in the bag? 03
☐Setting up 04
☐
☐High winds 06
☐Closing, storage & care instructions 07
☐Warranty and contact 08

05
Bonus Room Regular - User Guide
01 Warning
You will need to follow these installation
instructions carefully to ensure proper
installation on your vehicle and safe use of
the Crow’s Nest. Please contact your vehicle
rack. Not all factory roof racks or aftermarket
roof bars can safely accommodate the Crow’s
Nest. Improper installation or use of the Crow’s
Nest may result in serious injury or death.
The installation of the Crow’s Nest to your
vehicle (similar to any other load on your
roof rack) will change your vehicle’s centre of
gravity, height and handling. The manufacturer
disclaims all responsibility in case of accidents
due to improper use, improper maintenance, or
checking the tightness of the brackets regarding
For your safety and protection, ensure correct
placement and angle of ladder. Do not climb
on ladder until the correct angle is achieved
(approx. 70 degrees between ladder and
ground).
Feldon Shelter Company - the manufacturer shall
not be liable for special, indirect incidental or
consequential damages.
First things first, Safety!
☐
from the tent materials
☐
devices be used inside or near the tent
☐
☐Keep a lookout for any airborne burning embers
that may come into contact with the tent
☐
☐Do not smoke within the tent
☐Do not operate any device which burns fuel inside the tent
☐Keep exit clear
Safety Warning
04
02 Specications
Bonus Room
Waterproof, mould and mildew resistant.
Floor
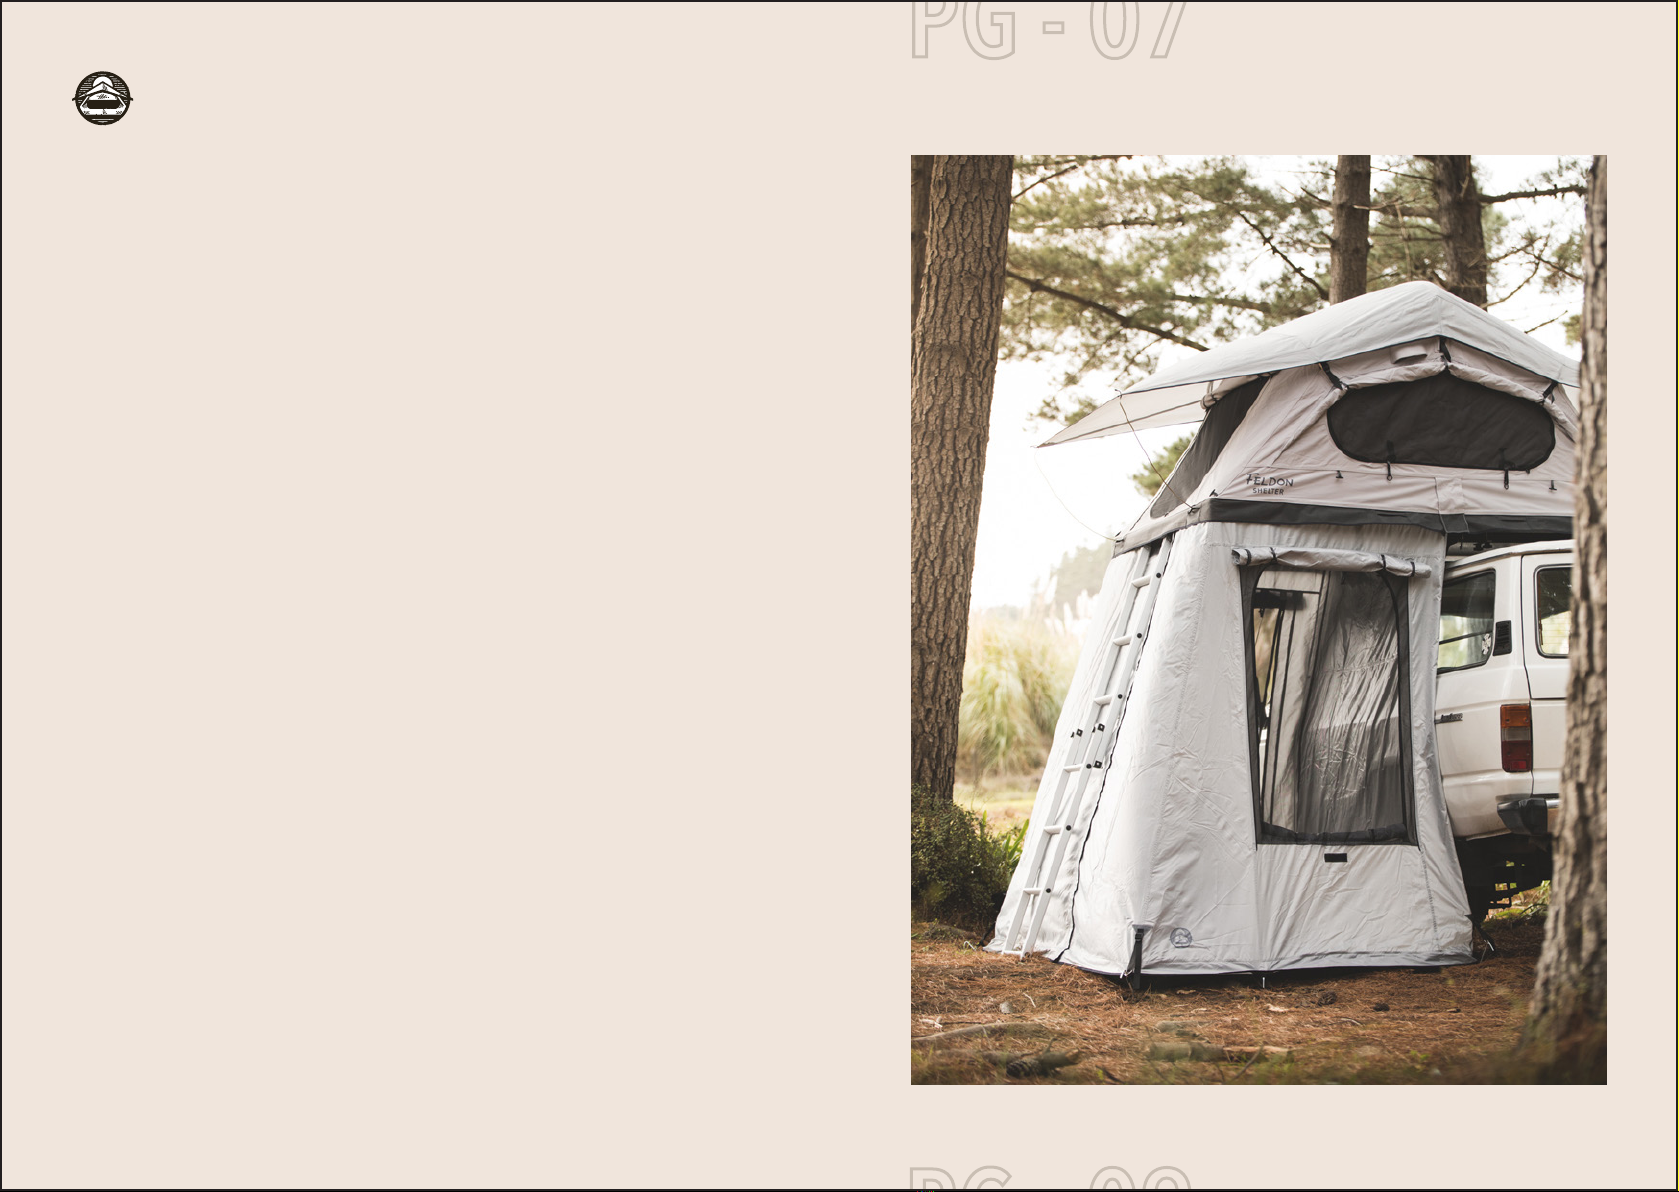
Crow’s Nest Regular - Bonus Room
07
Bonus Room Regular - User Guide
06

03 What’s in the Bag
☐1x Bonus Room body.
☐
☐7x Pegs.
Crow’s Nest Regular - Bonus Room
09
Bonus Room Regular - User Guide
08

04 Seing Up
☐Unzip & remove travel cover from the tent.
☐Slide travel cover off tent base by pulling the rope track sideways.
☐Stow travel cover inside your vehicle.
Getting your Crow’s Nest tent ready
11
Bonus Room Regular - User Guide
10

04 Seing Up
☐Unfold your Bonus Room body on soft ground.
☐
Using the rope track
13
Bonus Room Regular - User Guide
12

04 Seing Up
☐Locate the rope insert at the top of the cover.
☐Slide the rope insert into the same rope track your travel cover has just come out from.
If you slide your ladder to the highest setting and move the
ladder towards your vehicle this will lift the tent base upwards creating more space for ease of
sliding the rope insert into the track.
Using the rope track
15
Bonus Room Regular - User Guide
14

04 Seing Up
☐Slide the rope track all the way through, until the two seams are in line with the corners of
the tent base (as pictured).
Using the rope track
17
Bonus Room Regular - User Guide
16

04 Seing Up
☐
☐Grab the rope insert on one end & feed up the rope track on the side of the tent.
☐Repeat this for the other end of the rope insert.
Sliding on the sides
19
Bonus Room Regular - User Guide
18

04 Seing Up
☐Now slide both ends of the rope insert into the front corners of the base.
☐Wrap the remaining Bonus Room body behind the ladder & attach the zipper.
Sliding on the sides
21
Bonus Room Regular - User Guide
20
04 Seing Up
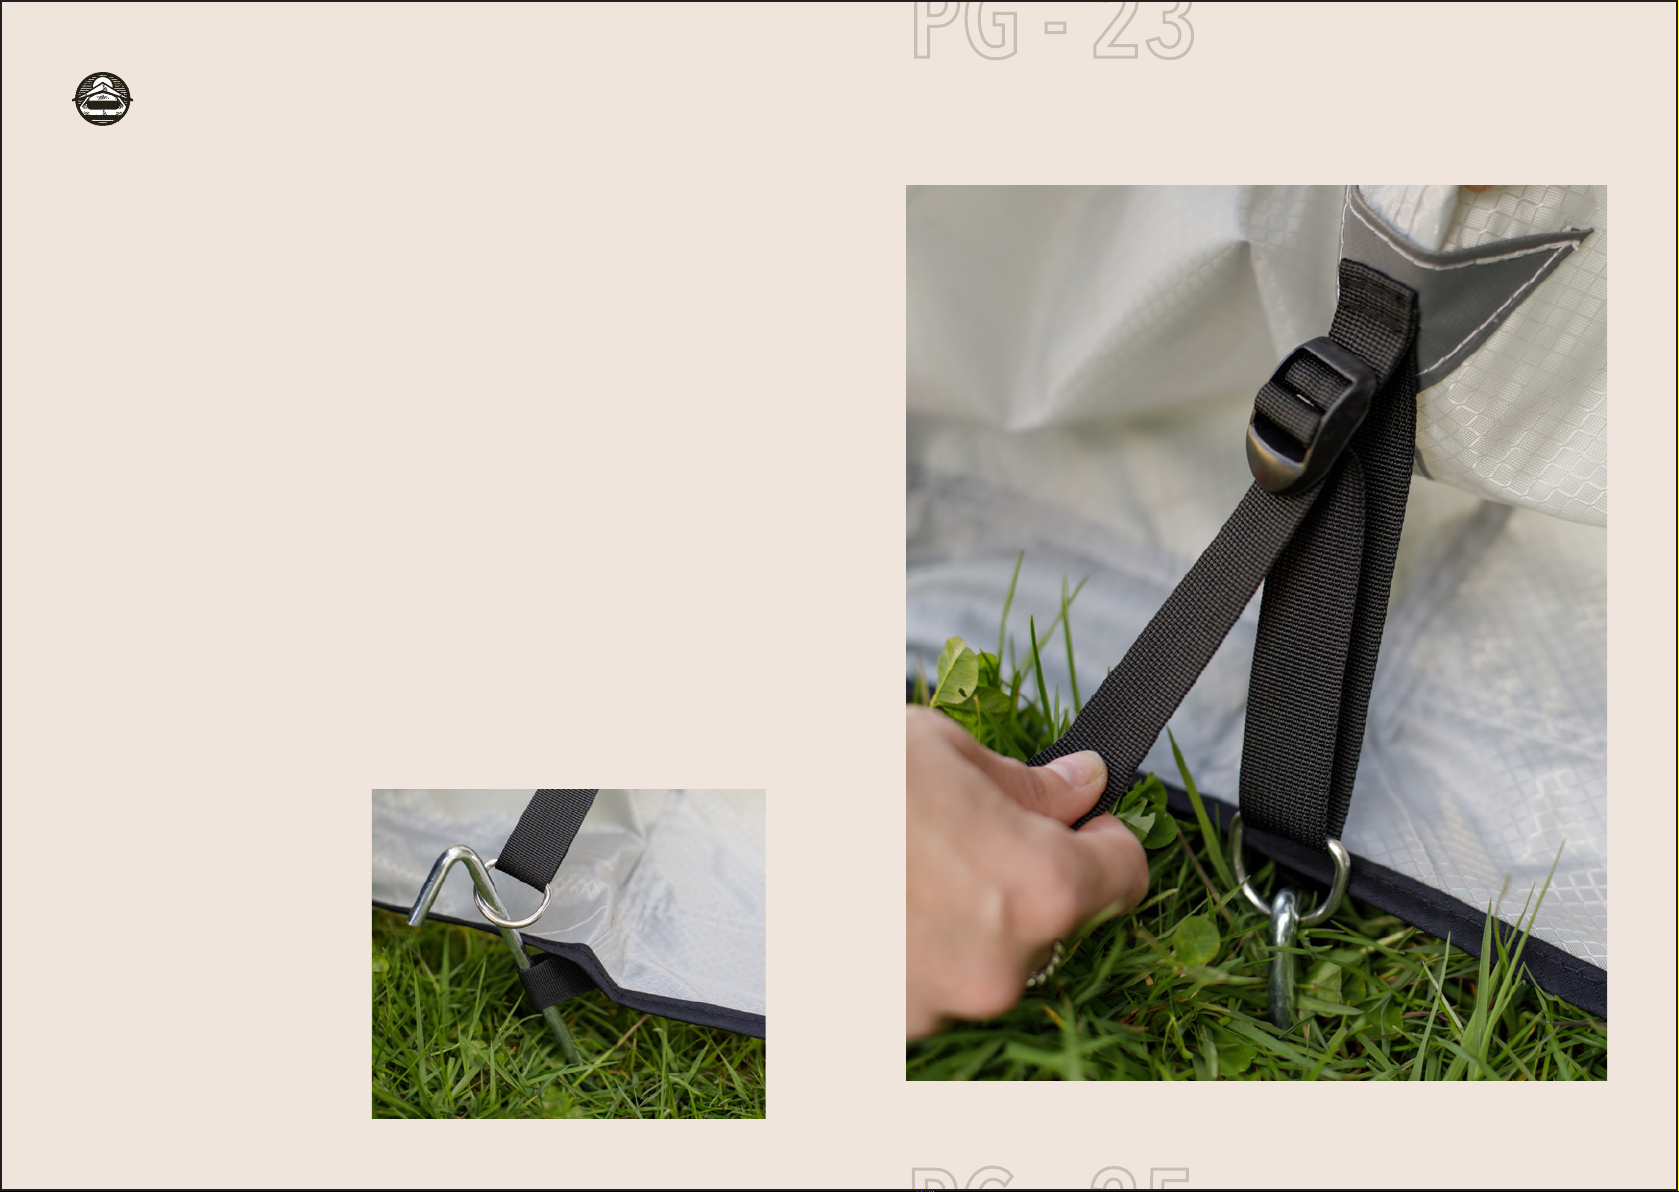
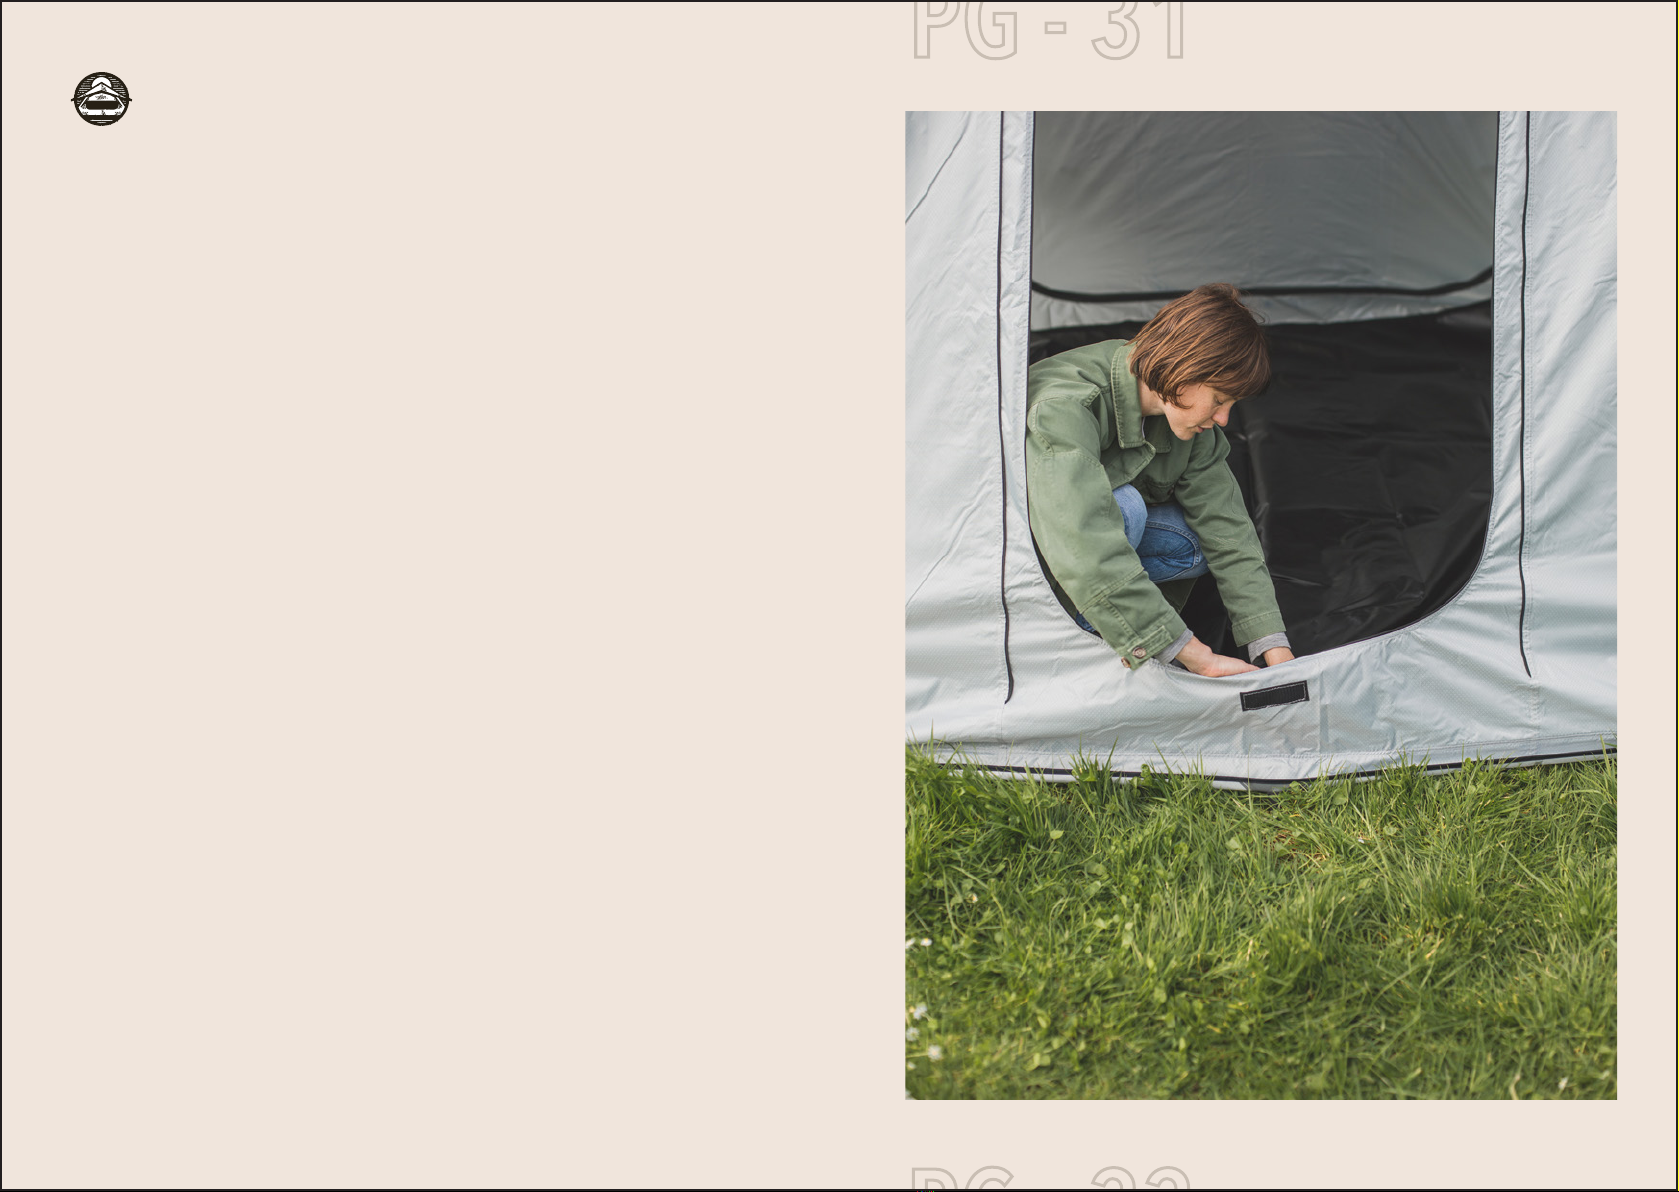
☐Now the Bonus Room body is attached to the tent on all 4 sides, it’s time to peg it down.
☐Insert all pegs into the material loops & stainless d-rings (as pictured below).
☐Using the adjustable straps, adjust Bonus Room to your correct height.
Peg it down
23
Bonus Room Regular - User Guide
22

04 Seing Up
☐Your Bonus Room should now look something like this. You are now ready to jump in & enjoy
yourself.
Enjoy!
25
Bonus Room Regular - User Guide
24
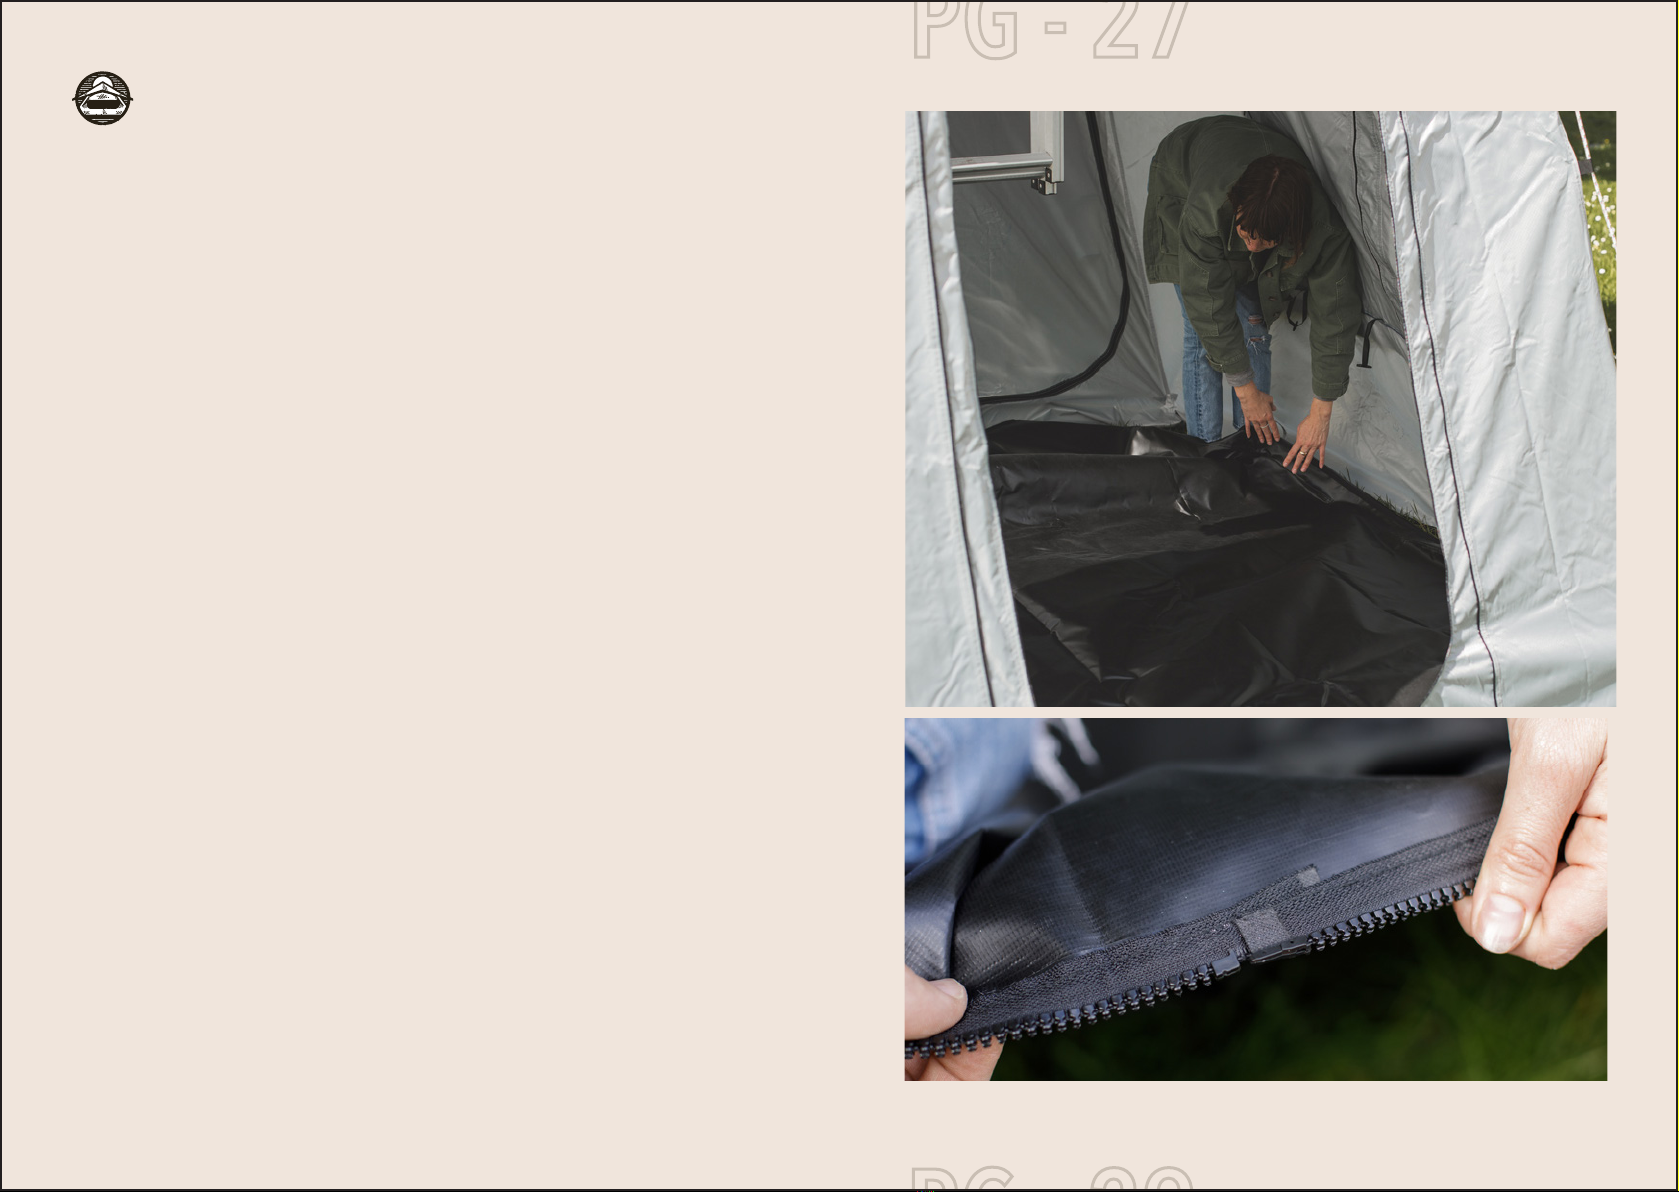
05 Adding the Floor
☐
to match the Bonus Room body.
☐Locate the start of the plastic zip teeth.
Unfolding
27
Bonus Room Regular - User Guide
26
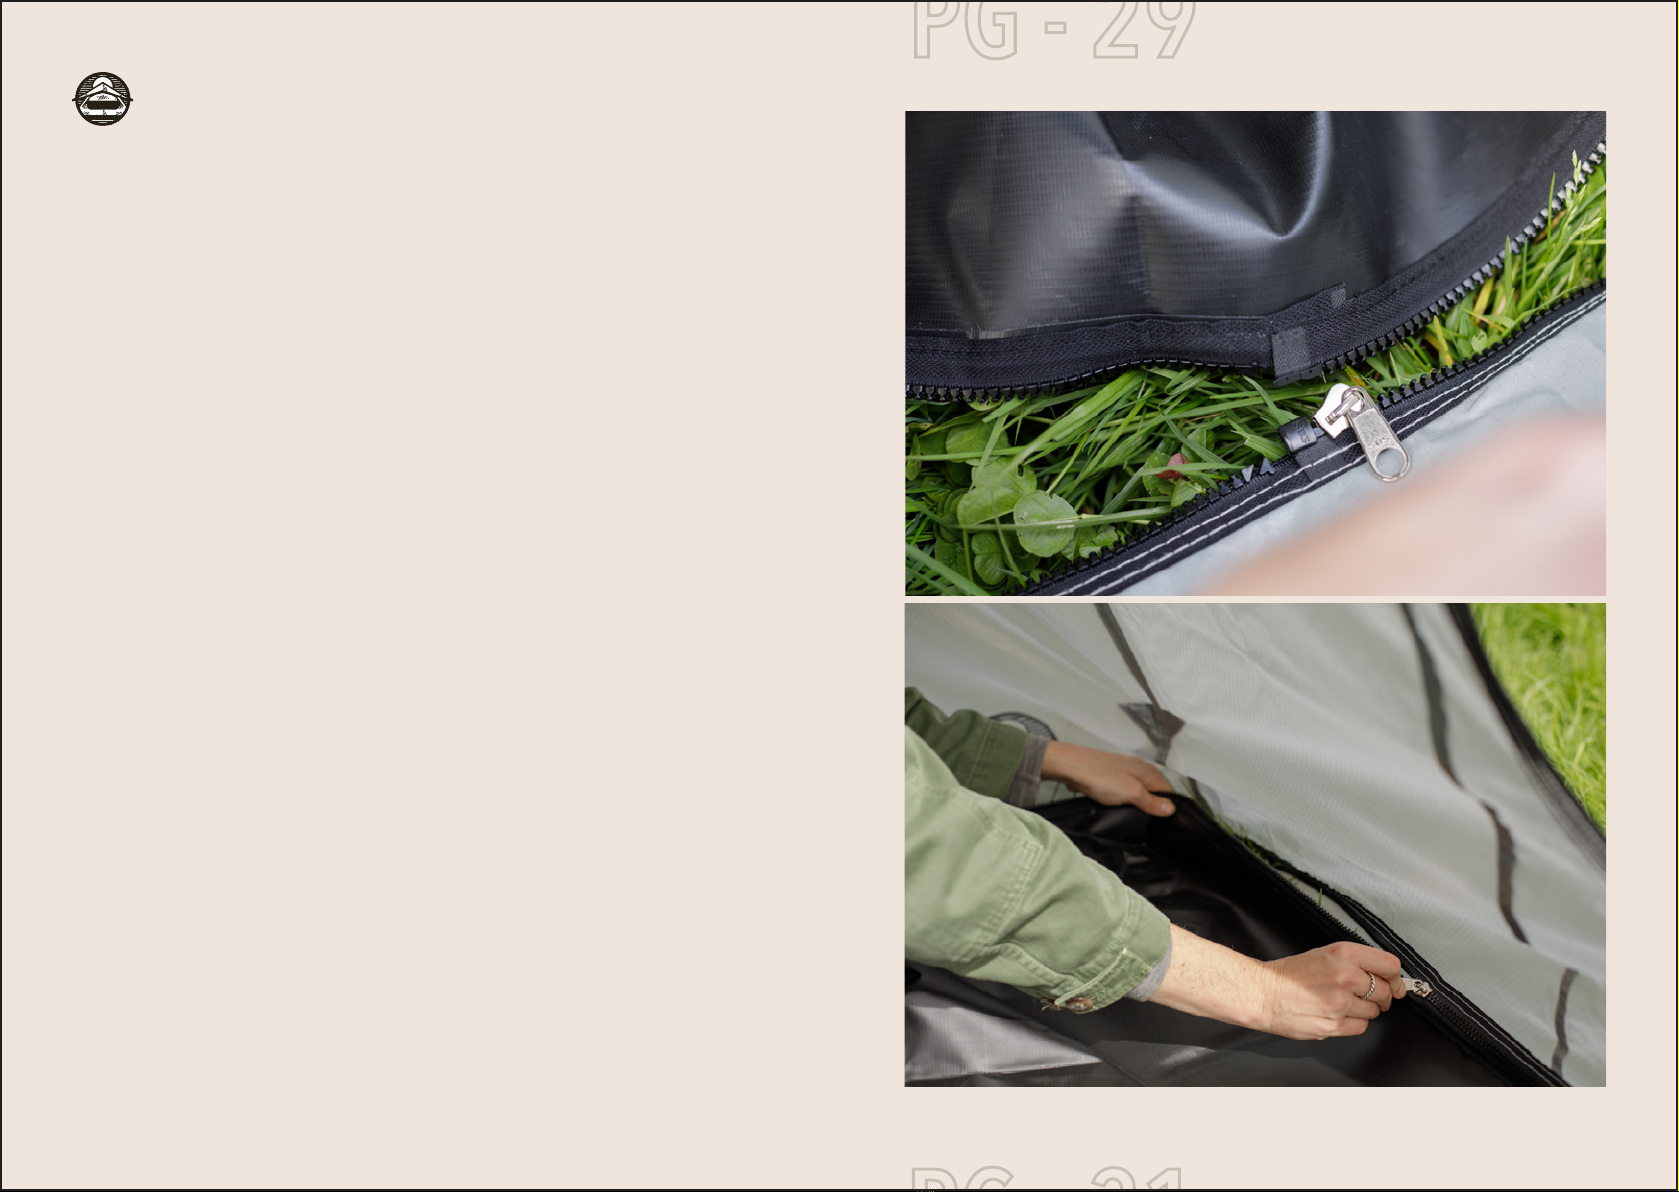
05 Adding the Floor
☐
☐
Attaching
29
Bonus Room Regular - User Guide
28
05 Adding the Floor
☐Slide the ladder back down to normal position and enjoy your clean camp space.
Enjoy!
31
Bonus Room Regular - User Guide
30

07 Removing Bonus
Room and Storage
☐
☐
☐
days to be dried out.
occur from incorrectly stored Bonus Rooms.
Always store away dry You are now ready for your first Bonus Room
adventure - See you out there
33
Bonus Room Regular - User Guide
32

09 Warranty and
Contact
A. Warranty and Warranty Periods. Feldon Shelter warrants to the original end user (“Customer”) that Feldon
Shelter products will be free from faulty manufacturing or defects in workmanship including materials. Feldon
commencing from the original date of purchase.
This Limited Warranty is non-transferable and covers only the original end purchaser of the applicable Feldon
Shelter Product. Proof of purchase in the form of the original purchase receipt or packing slip is required for
warranty validation. Please note that Feldon Shelter cannot be held liable, in any manner, for damages to your
personal property resulting from any misuse or improper care and maintenance of the Feldon Shelter Product.
B. Feldon Shelter Obligation Under Warranty. Feldon Shelter’s sole obligation under the above warranty shall
be to repair or replace products and parts during the warranty period. If a substantial defect in material and/or
workmanship arises and a valid warranty claim is received by Feldon Shelter within the Warranty Period, Feldon
Shelter will replace or repair the defective Product. If the item is unable to be repaired or replaced, then another
is not available, Feldon Shelter will issue you with a full refund of the purchase price (shipping and handling are
non-refundable).
Some jurisdictions do not allow limitations on how long an implied warranty lasts, so the above limitation may not
apply to particular end users.
D. Limitations. This Limited Warranty applies only to the normal use of the covered Feldon Shelter Product, in
accordance with the written user guide provided. Not including damage caused by misuse or abuse, wear and tear,
condensation, extreme weather, accidents, incorrect set up, damage caused by mould, insects, animals and children.
This also excluded damage caused by a jammed, snagged zipper or excessive force applied to zipper causing
WITH FELDON SHELTER PRODUCTS AND/OR PARTS. Some jurisdictions do not allow the exclusion or limitation
of incidental or consequential damages, so the above limitation or exclusion may not apply to particular end users.
3. Failure of the end user or any third party to exercise caution to protect any Feldon Shelter product from conditions
beyond those for which the product was intended or
Warranty
35
Bonus Room Regular - User Guide
34

09 Warranty and
Contact
F. Return Appointment Process. As a condition precedent to the above Limited Warranty, the end user must:
1. Contact Feldon Shelter via phone and/or email at unfold@feldonshelter.com for returns authorization. Attaching
any appropriate photos of the alleged defect for question from the Feldon returns team.
end user’s responsibility and may be cause to void the warranty claim.
3. Feldon Shelter will review the Product and advise whether the conditions of this warranty have been met.
proof of purchase. Shipment by the end user may be requested in the following situations:
- If the defect in question is approved or
- If the defect in question cannot be approved via photos and the returns team requires the physical item for closer
inspection.
G. Transportation Costs. Feldon Shelter will pay surface freight to return products covered by this Limited Warranty
to the customer. However, if Feldon Shelter determines in the exercise of its reasonable but sole discretion that the
product returned for warranty service is not defective, or does not otherwise qualify for warranty service, end user
shall be liable for all costs of handling and transportation.
Where Feldon Shelter accepts a customer’s warranty claim, Feldon Shelter will rectify any defective workmanship
or materials at its own expense.
Returns and contact details
37
Bonus Room Regular - User Guide
36

Keep us up to date with your adventures
#feldonfamily & @feldonshelter
See you out ere!
This manual suits for next models
1
Table of contents
Other Feldon Shelter Tent manuals

Popular Tent manuals by other brands

Coleman
Coleman SUNDOME 9180-121 instructions

GigaTent
GigaTent Redleg 3 BT013 owner's manual

ShelterLogic
ShelterLogic Shed-in-a-Box 70423 Assembly manual

Exped
Exped Scout Tarp Extreme instructions

LifeSpan Kids
LifeSpan Kids KOKO owner's manual

TopTec Products
TopTec Products Standard Frame Deluxe 20 x 20 installation instructions


Mannagum
Mannagum KALBARRI TOURER TC015 Owner's handbook

Palram
Palram CANOPIA PALERMO 4.3x4.3 / 14x14 How to assemble

Exped
Exped VELA I EXTREME instructions

Dometic
Dometic Rally AIR Pro 240 TG Installation and operating manual

Aqua Products
Aqua Products M3 Super Wrap Instruction guide

Cabela's
Cabela's 58-2649 GEAR GUIDE