Khyam Windsor User manual

KHYAM QUICK ERECT TENTS
ASSEMBLY INSTRUCTIONS & USER HINTS
THE RIDGI-DOME WINDSOR
Please read these instructions fully and watch the customer service video
enclosed or provided by your retailer prior to using your Ridgi-dome for the
first time.
Lisez attentivement ces instructions et visionnez la vidéo jointe avant de
monter votre Ridgi-dome pour la première fois.
WARNING: AVERTISSEMENT :
If this tent is not erected in accordance with the instructions damage could be caused to the joints,
poles or fabric. It is important that the tent is properly guyed at all times, particularly in strong
winds – otherwise pole or joint damage may occur.
Les mâts, les articulations ou les tissus de votre tente peuvent être endommagés si vous ne la
montez pas conformément à ces instructions. Il est très important que la tente soit piquetée et
haubanée correctement si le vent est fort, pour éviter d’endommager les mâts ou les articulations.
DO NOT PUSH TENT PEGS IN BY HAND, ALL TENT PEGS SHOULD BE DRIVEN
HOME USING A WOODEN OR RUBBER FACED MALLET OR SIMILAR TOOL.
N’ENFONCEZ PAS LES PIQUETS A LA MAIN, TOUS LES PIQUETS DOIVENT
ÊTRE MIS EN PLACE EN UTILISANT UN MAILLET BOIS OU CAOUTCHOUC,
OU UN OUTIL SIMILAIRE.
New ‘On Line’ guarantee registration service, simply go to
www.khyam.co.uk/guarantee
for UK sales only to register your Khyam tent guarantee.

KHYAM GUARANTEE
KHYAM guarantee the quality of all our products should any defects in material or
workmanship occur within 12 months from date of purchase we will at our discretion repair
or replace at no charge. This guarantee is in addition to the buyers statutory rights.
Warranty is valid provided that the KHYAM tent is used under normal conditions for the
specified purpose and that the instructions have been carefully followed.
The guarantee does not cover faults caused by abuse, misuse, negligence or damage caused
by unusually extreme weather conditions. Should you have any problems or questions
regarding your new tent you should in the first instance contact your stockist from whom
you made your purchase.
Except for the limited warranty stated above Eurotech Leisure Ltd and it’s registered dealers
are without any further liability including, but not limited to, consequential damages.
*Please note that the photographs and figures in these instructions may not be of your
particular model but demonstrate the common features of KHYAM tents.
KHYAM reserve the right to alter specifications as considered necessary without notice.
GARANTIE KHYAM
KHYAM garantie la qualité de tous nos produits. Si vous détectez des défauts de fabrication
(matière ou main d’œuvre) dans les 12 mois suivant votre achat, nous réparerons ou
remplacerons (selon notre appréciation) gratuitement le produit. La garantie intervient
seulement si la tente est utilisée dans des conditions normales, pour un usage adéquat, et si
les instructions ont été scrupuleusement suivies.
Cette garantie ne couvre pas les défauts causés par la mauvaise utilisation, le mauvais
traitement, la négligence ou les dégâts provoqués par des conditions atmosphériques
extrêmes. Les questions doivent être posées au revendeur.
Hormis la garantie limitée énoncée ci-dessus, Khyam et ses revendeurs agréés sont dégagés
de toute autre responsabilité y compris (mais non exhaustivement) les dommages indirects
ou subséquents.
* Veuillez noter que les photographies de ce livret ne correspondent pas nécessairement à
votre modèle de tente. Leur rôle est de montrer les points communs aux tentes Khyam.
Khyam se réserve le droit de modifier sans préavis les caractéristiques de ses produits.
2

THE KHYAM RIDGI-DOME ERECTION
INSTRUCTIONS.
Erecting The main Structure And Bedroom Sections.
Montage de la structure principale et des chambres.
1/ We recommend using the optional Khyam Stone Protection
Sheet to protect the groundsheet of your tent from stones e.t.c.
The SPS sheet will also keep the underside of your main tent
Groundsheet clean and dry making it easier and quicker when
striking camp.
1/ Nous recommandons d’utiliser le Tapis de Protection Khyam
en option pour protéger le tapis de sol de votre tente des pierres,
épines, etc. Le TdP permettra également de conserver le dessous
du tapis de sol de la tente propre et sec rendant ainsi le départ du
camp plus facile et rapide
2/ Carefully remove the tent from the carry bag and place
upright in front of you with the pole end bag covers pointing
upwards. ( You will se that one end has the pole joints covered
by a separate fabric bag, this end should be pointing upwards ).
2/ Sortez la tente de son sac et placez-là verticalement face à
vous avec la capote de maintien de l’extrémité des mâts placée
en haut. ( Vous remarquerez qu’un coté du paquet de la tente a
un petit sac pour maintenir les mâts, celui-ci doit être en haut ).
3/ Remove the pole joint cover and you will see a secondary
pole joint cover over a central group of poles. Allow the outer
lower poles, positioned around the central poles to gently lower
to the ground.
3/ Retirer la capote de maintien des mâts et vous découvrirez
une seconde capote sur le dessus du groupe de mâts central.
Laissez les mâts externes plus court situés autour des mâts du
centre s’étaler sur le sol.
4/ Remove the pole joint cover over the central group of poles as
well.
4/ Retirez également la capote du groupe de mâts central.
( Please note that the protective covers are there to protect the
main fabric of you tent from becoming trapped or damaged
between the poles or joints during packing and pitching. These
covers should be put back into place before striking your tent )
( Veuillez prendre note que les capotes de protection et maintien
des mâts servent à éviter que le tissu de la tente ne soit pincé et
esquinté entre les mâts ou les articulations au montage et
démontage. Ces capotes de protection doivent être mise en place
lorsque vous pliez la tente. )
3

THE KHYAM RIDGI-DOME ERECTION
INSTRUCTIONS.
Erecting The main Structure And Bedroom Sections.
Montage de la structure principale et des chambres.
5/ Now allow all the central poles to gently lower to the ground.
5/ Etalez les mâts du groupe central en étoile sur le sol.
6/ You should now have the tent flat on the ground with all the
poles forming a star shape in front of you.
6/ Votre tente est maintenant à plat sur le sol, les mâts formant
une étoile.
7/ The Windsor is a very big family tent and we strongly
recommend the assistance of a second person when erecting this
tent. Placing your hand under the central hub, carefully lift the
Central hub to waste height ensuring that fabric is not trapped in
either the central hub or any of the joints.
7/ La Ridgi-dome Windsor est une très grande tente familiale et
nous vous recommandons fortement l’assistance d’une seconde
personne pour effectuer le montage. Placez vos mains sous le
moyeu central et soulevez-le à une hauteur suffisante vous
permettant de vous assurer que le tissu n’est pas coincé soit dans
le moyeu central ou dans les articulations.
8/ With one person holding the central hub now a little higher,
around shoulder height, the second person can now take the
lower sections of one pole a pull them outwards.
8/ Avec une personne soulevant maintenant le moyeu central un
peu plus haut, environ à hauteur d’épaule, la seconde personne
peut maintenant saisir les sections inférieures des mâts et les
écarter en reculant vers l’extérieure.
4

THE KHYAM RIDGI-DOME ERECTION
INSTRUCTIONS.
Erecting The main Structure And Bedroom Sections.
Montage de la structure principale et des chambres.
9/ Placing the lowest ‘Knee’ joint on the floor – ‘A’
The upper ‘Auto’ joint ‘B’ will then lock into place as you push
Gently down on the top manual joint ‘C’ until it locks into place.
9/ Placez l’articulation inférieure sur le sol – ‘A’
L’articulation “automatique” intermédiaire ‘B’ se verrouillera en
position automatiquement lorsque vous pousserez l’articulation
manuelle supérieure ‘C’ jusqu’à ce que la bague de verrouillage
soit en position.
10/ With the second person still supporting the central hub
repeat point ‘8’ on the second main pole.
10/ La seconde personne soutenant toujours le moyeu central,
répétez la séquence ‘9’ sur le deuxième mât principal.
11/ Finally repeat point ‘8’ on the opposite 2 main poles, again
assistance from a second person to support the hub is useful.
11/ Répétez finalement la séquence ‘9’ sur les 2 mâts principaux
opposés, l’assistance de la seconde personne pour soutenir le
moyeu central est toujours très utile.
12/ Unroll the ‘Tri Guys’ from their pouches and peg out as
shown.
12/ Sortez et déroulez les cordes de haubanage de leur pochette
et piquetez comme indiqué surla photo.
13/ Remove the protective padded covers from the 4 corner
Auto joints.
13/ Retirez les housses de protection moltonnées des 4
articulations intermédiaires automatiques.
A
B
C
5

THE KHYAM RIDGI-DOME ERECTION
INSTRUCTIONS.
Erecting The main Structure And Bedroom Sections.
Montage de la structure principale et des chambres.
14/ Should the padded cover be trapped in the joint simply push
the joint inwards slightly which will open the joint and allow the
fabric to be removed. ( Please note that the protective cover is
there to protect the main fabric of you tent from becoming
trapped in the joint during packing and pitching. These covers
should be put back into place before striking your tent )
14/ Si une housse de protection moltonnée est coincée dans
l’articulation, poussez simplement légèrement l’articulation vers
la tente pour lui permettre de s’ouvrir un peu et permettre ainsi
de pouvoir dégager le tissu. ( Veuillez prendre note que les
housses de protection servent à éviter que le tissu de la tente ne
soit pincé et esquinté dans l’ articulation au montage et
démontage. Ces housses de protection doivent être remise en
place lorsque vous pliez la tente.)
15/ Locate the Dual Roof and position along side the front of the
tent. You will see 3 reinforced clip points along 2 sides. These
sides should run parallel to the tent.
15/ Prenez le “surtoit” et positionnez-le sur la face avant de la
tente. Vous remarquerez 3 crochets de fixation sur 2 cotés du
“surtoit”. Ceux-ci doivent être positionnés parallèlement à la
tente.
16/ Gently pull the Dual Roof fabric across the roof of the tent.
16/ Placez le “surtoit” par dessus le toit de la tente.
17/ Secure the tie points around the upper manual joints as
shown.
17/ Attachez les lanières de fixation sur les articulations
supérieures comme sur la photo ci-contre.
18/ Position the ‘C’ clips ‘A’ as shown.
18/ Mettez le crochet “A” comme sur la photo ci-contre. A
6

THE KHYAM RIDGI-DOME ERECTION
INSTRUCTIONS.
Erecting The main Structure And Bedroom Sections.
Montage de la structure principale et des chambres.
19/ Clip the fast buckles in the corners as shown.
19/ Attachez les boucles à attache rapide à chaque angles comme
sur la photo ci-contre.
20/ Remove the protective bags on the lower 4 sets of Tripod
feet.
20/ Retirez le sac de protection des 4 jeux de pieds “Tétrapode”.
21/ Loosen the guy rope at position ‘A’
21/ Détendez le hauban avec le curseur de tension ‘A’
22/ Gently lift the upper pole sections and unfold the lower
‘Tripod’ set of poles from underneath the tent.
22/ Soulevez la section supérieure du mât et dépliez le jeu de
pieds “Tétrapode” de dessous la tente.
A
7

THE KHYAM RIDGI-DOME ERECTION
INSTRUCTIONS.
Erecting The main Structure And Bedroom Sections.
Montage de la structure principale et des chambres.
23/ With the ‘Tripod’ pole set feet on the ground, push gently
inwards at position ‘A’ and the pole will lock automatically.
Then tighten the guy rope at position ‘B’ as shown to support
the pole now at full height.
23/ Positionnez les pieds du tetrapode au sol et poussez
l’articulation vers l’intérieur en position ‘A’ qui se verrouillera
automatiquement. Tendez maintenant le hauban avec le curseur
de tention ‘B’ comme sur la photo pour sécuriser le mât.
24/ Repeat this on the remaining 3 main poles so the tent is
standing at full height.
24/ Répétez la séquence 23 sur les 3 autres mâts pour finir le
montage
25/ Adjust the main corner ‘Dual Roof’ clips as shown so the
‘Dual Roof’ fabric is securely fixed into place.
25/ Tendez les sangles à attache rapide du “surtoit” au 4 coins et
assurez-vous qu’il soit fixé solidment en position.
26/ Clip the front and rear ‘Dual Roof’ clips to the main roof
seam guy points and adjust to fit as shown.
26/ Accrochez l’attache rapide du “surtoit” située à l’avant et à
l’arrière au point de haubanage central du double-toit et ajustez-
le correctement comme sur la photo ci-contre.
A
B
8

THE KHYAM RIDGI-DOME ERECTION
INSTRUCTIONS.
Erecting The main Structure And Bedroom Sections.
Montage de la structure principale et des chambres.
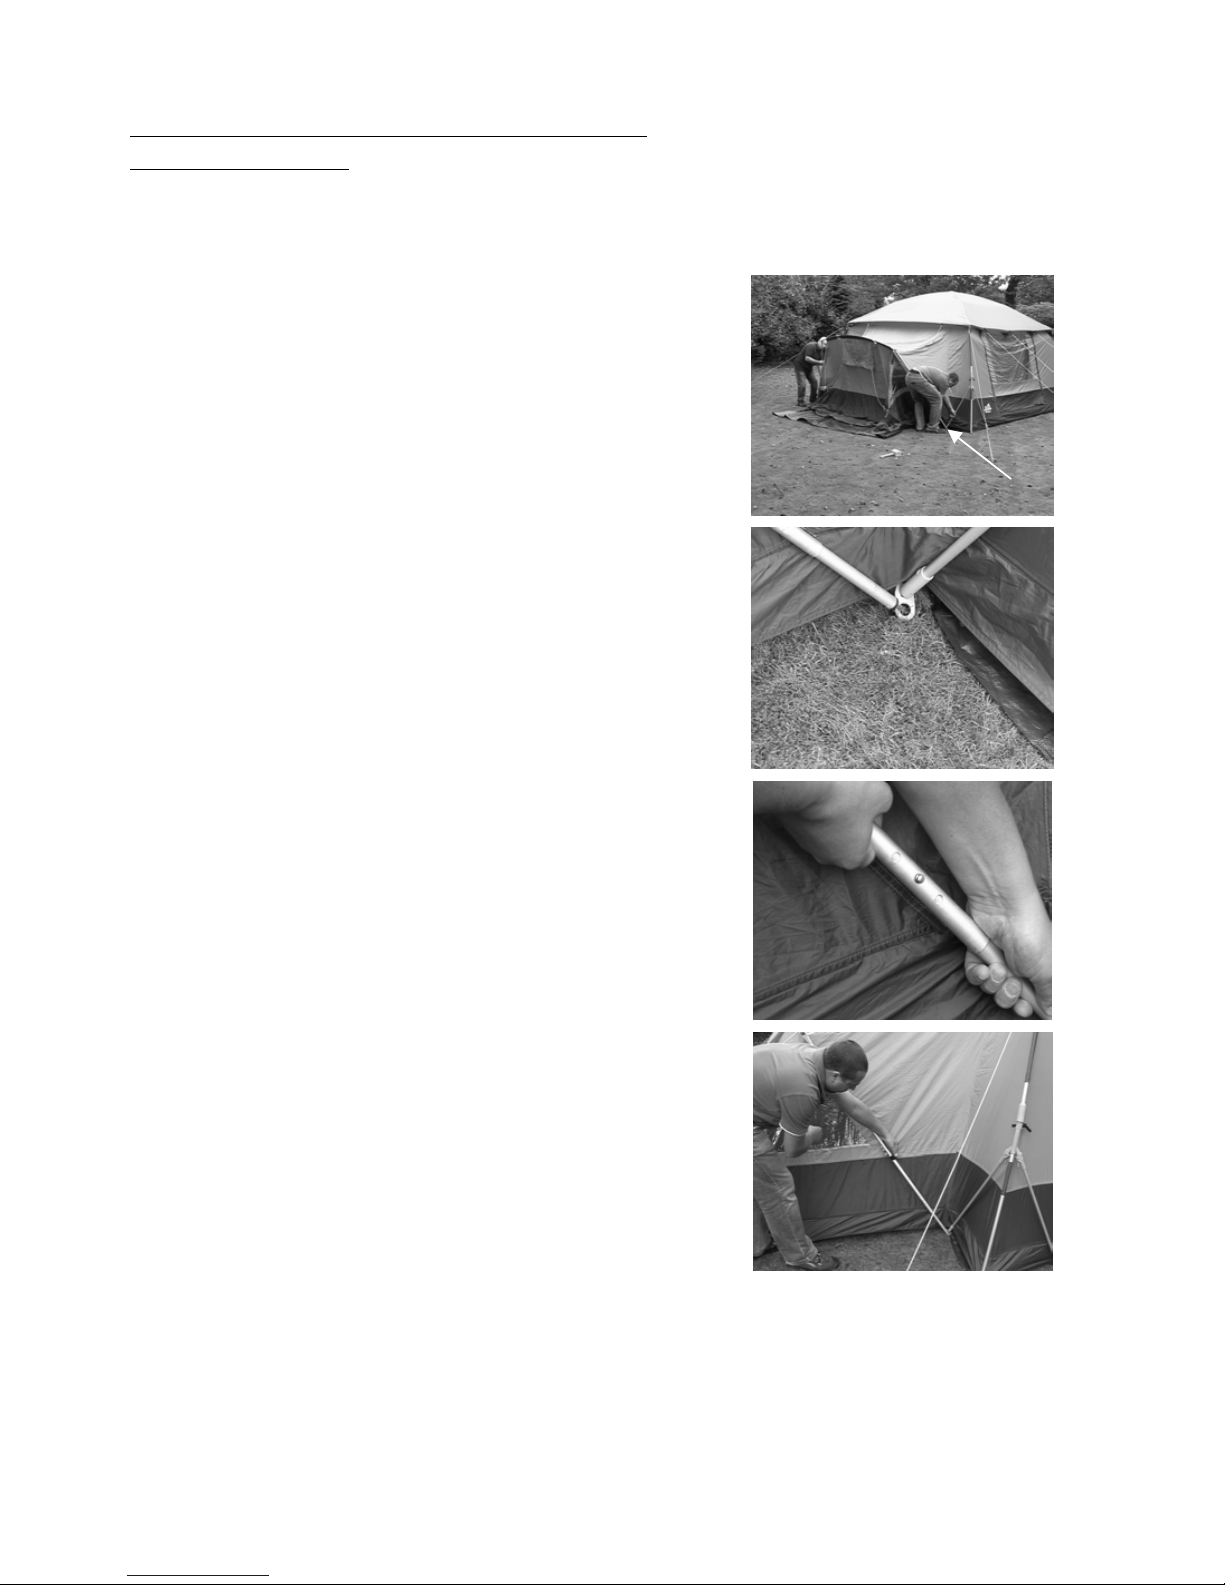
27/ Remove the guy ropes from the guy point pouches.
27/ Sortez les haubans de leur pochette de rangement.
28/ Peg all 6 main roof guys as shown.
28/ Piquetez les 6 haubans principaux comme sur la photo.
29/ Locate all the bedroom poles.
One bedroom pole set is made up of a 2 section adjustable
aluminium upright pole which is linked by a grey folding auto
joint, to two shock corded aluminium roof pole sections . The
other 2 section bedroom pole set will be the same but the grey
folding auto joint will only link it to one aluminium roof pole
section.
29/ Repérez les mâts d’extension des chambres.
Un jeu de mâts d’extension de chambre est composé d’un mât de
relevé vertival à 2 sections réglables en aluminium et de 2
sections de mât de toit en aluminium reliées par une articulation
automatique grise. L’autre mât de relevé vertival à 2 sections
réglables en aluminium est identique mais avec 1 seule section
de mât de toit en aluminium reliéé par une articulation
automatique grise.
30/ Take the upright adjustable pole section which is linked to
two aluminium roof poles and assemble the pole. Ensuring the
joint has ‘locked out’ the correct way – SEE ‘A’ with the small
plastic eye facing the flysheet.
30/ Prenez le mât de relevé vertical relié aux 2 sections de mât
de toit en aluminium et assemblez-les. Assurez-vous que
l’articulation est en position ‘ouverte’ VOIR ‘A’ avec le petit
crochet en plastique situé du coté du double-toit.
31/ Thread the top two sections of roof pole through the sleeves
of the bedroom roof section of the flysheet as shown
Repeat the same with the upright adjustable pole section with
one aluminium roof pole linked via the grey auto joint, however
thread this in from the opposite side of the bedroom until the
swaged section of one pole meets with
the open section of the opposite pole.
31/ Glissez les 2 sections de mât de toit dans les fourreaux
d’extension de chambre. Répétez cette opération avec le mât de
relevé vertical n’ayant qu’une section de mât de toit par le coté
opposé des fourreaux jusqu’à ce que l’extrémité “cintrée” d’un
mât.se rencontre avec l’extrémité “ouverte” du mât opposé.
ONE COMPLETE BEDROOM POD POLE
SET
A
9

THE KHYAM RIDGI-DOME ERECTION
INSTRUCTIONS.
Erecting The main Structure And Bedroom Sections.
Montage de la structure principale et des chambres.
32/ Once you have assembled and threaded the bedroom
Pole set, ensure you have not missed any bedroom pole
sleeves out and then gently push the spiked end of the
bedroom pole towards the main corner base section of the
bedroom compartment ‘A’.
32/ Lorsque vous avez glissé et assemblé le jeu de mâts
d’extension de chambre, assurez-vous de ne pas être passé
à coté d’un des fourreaux et enfoncez l’extrémité pointue
du mât de relevé vertical vers la base de l’angle principal
du compartiment chambre ‘A’.
33/ Place the spike on the end of each bedroom pole
through the hole in the ‘Tripod’ foot section as shown.
33/ Enfoncez l’extrémité pointue de chaque mât de relevé
vertical dans le trou de l’embase du pied du “Tetrapod”
comme sur la photo ci-contre.
34/ The standard position for the adjustment is with the
spring button centrally positioned as shown. Adjustments
can then be made ‘up’ or ‘down’ as required.
34/ Le réglage standard est avec le bouton à ressort en
position centrale. Les réglages peuvent se faire vers le
haut ou le bas suivant la nécessité.
35/ Fix the side bedroom clips into position as shown.
35/ Fixez les “Clips” latéraux des chambres en position
comme sur la photo.
A
10

THE KHYAM RIDGI-DOME ERECTION
INSTRUCTIONS.
Erecting The main Structure And Bedroom Sections.
Montage de la structure principale et des chambres.
36/ Peg the adjustable webbing loops on each main corner of the
bedroom section.
36/ Piquetez les boucles de sangles réglables situées sur chaque
angle principal des extensions de chambre.
37/ Peg the main corner and vent tri guy system into position on
each side of the bedroom as shown.
37/ Piquetez le haubanage 3 points de l’angle principal et du
volet de ventilation de chaque coté de l’extension de chambre
comme sur la photo.
38/ Locate the ‘Dual Roof’ side guy as shown at position ‘A’
and rest the guy rope over the corner joint on that side of the
bedroom section position ‘B’
38/ Repérez le haubanlatéral du “surtoit” au point ‘A’et
attachez-le par dessus l’articulation automatique située à l’angle
supérieur de l’extension de chambre au point ‘B’
39/ Wrap the guy rope around the joint between the hinged
section and the beginning of the pole sleeve fabric as shown.
39/ Enroulez la corde de haubanage autour de l’articulation entre
la charnière et le fourreau de tissu comme sur la photo.
A
B
11

THE KHYAM RIDGI-DOME ERECTION
INSTRUCTIONS.
Erecting The main Structure And Bedroom Sections.
Montage de la structure principale et des chambres.
40/ Take the brass hook on the end of the guy down towards the
Black plastic ring on the bedroom corner /vent ‘Triguy’ system.
40/ Prenez le crochet en cuivre situé à l’extrémité du hauban
situé au dessous du hauban 3 points à l’angle de l’extension
chambre.
41/ Fix the brass hook to the black plastic ring as shown. Repeat
points 28 to 40 on the opposite bedroom section.
41/ Fixez le crochet en cuivre à l’anneau en plastique noir
comme sur la photo ci-contre. Répétez les séquences 29 à 41 sur
l’extension de chambre opposée.
42/ Now securely peg all remaining intermediate pegging and
guy points.
Also securely peg the lower base side skirt all around the edge of
the tent.
42/ Maintenant piqueter correctement tous les autres points de
piquetage situés à la base du double-toit et tous les haubans
complémentaires.
12

THE KHYAM RIDGI-DOME ERECTION
INSTRUCTIONS.
Fitting the inner tents.
Mise en place des chambres intérieures.
43/ Lay one of the two inner tents out flat in the chosen bedroom
compartment as shown. Ensure that the plastic clips and the back
two corners of the inner tent are positioned into the corner
sections at the rear of the bedroom compartment.
43/ Etalez une des deux chambres intérieures dans une extension
chambre comme sur la photo. Assurez-vous que les
mousquetons en plastique cousus aux angles à l’arrière sont
positionnés du coté du fond de l’extension chambre.
44/ Clip the rear of the inner tents to the ‘D ring in each corner
of the bedroom compartment.
44/ Fixez les mousquetons cousus à l’arrière de la chambre après
les anneaux de fixation en forme de “D” au fond du
compartiment chambre
45/ Starting at the back lift up and clip the brass hooks on the
inner tent to the rings in the roof of the bedroom section. Open
an inner tent door and step onto the groundsheet of the inner tent.
This will ensure the roof and wall fabric of the inner tent is free
to move as you lift it up.
45/ En commençant par le fond, soulevez et accrochez les
crochets en cuivre de la chambre après les anneaux sous le toit
de l’extension chambre. Ouvrez une porte de chambre pour
marchez sur le tapis de sol de la chambre. Ceci permettra au toit
et aux murs de la chambre d’être libre de tout mouvement quand
vous les soulèverez.
46/ Once the inner tent has been clipped into position it should
appear as shown.
46/ Lorsque la chambre a été mise correctement en place, elle
doit être comme sur la pfoto ci-contre.
13

THE KHYAM RIDGI-DOME ERECTION
INSTRUCTIONS.
Fitting the inner tents.
Mise en place des chambres intérieures.
47/ The pegging cowls in the main tent groundsheet should be
opened up as shown. If you have erected your tent on a Khyam
SPS stone protection sheet then ensure that the purpose made
holes in the SPS sheet match up with the pegging cowls. If not
the SPS groundsheet should be repositioned so the holes match
up with the pegging cowls.
47/ Les trappes de piquetage du tapis de sol de la tente principal
doivent être ouvert comme sur la photo ci-contre. Si vous avez
monté votre tente au dessus d’un Tapis de Protection Khyam,
assurez-vous que les trous permettant le piquetage à travers le
TdP soient en face des trappes de piquetage. Si tel n’est pas le
cas, le Tapis de protection doit être repositionné correctement de
sorte que les trous soient en face des trappes de piquetage.
48/ Taking a peg, position the peg through the webbing loop of
the inner tent and into position directly into the ground that can
be seen through the pegging cowl and purpose made hole in the
SPS groundsheet. Drive the peg into the ground with a mallet.
48/ Prenez et placez un piquet dans la boucle de sangle de la
chambre et piquetez-le directement dans le sol visible à travers
la trappe et le trou du Tapis de Protection. Enfoncez le piquet
dans le sol à l’aide d’un maillet.
49/ Finally close the draw string cord around the corner of the
inner tent as shown.
Repeat points 41 to 47 on the remaining inner tent if required.
49/ Fermez ensuite la trappe de piquetage en serrant la corde
autour de l’angle de la chambre comme sur la photo.
Répétez les séquences 43 à 49 avec l’autre chambre si besoin.
14

THE KHYAM RIDGI-DOME ERECTION
INSTRUCTIONS.
Taking your tent down.
Démontage de votre tente
1/ Taking your Ridgi-dome down is simply a reversal of the
erection procedure. First unclip, unpeg and remove all inner
tents and fold neatly in half keeping the inner fabric inwards to
protect it from mud and wet grass etc. Place the inner tents to
one side.
1/ Le démontage de votre Ridgi-dome est tout simplement la
procédure inverse du montage. Tout d’abord, retirez les piquets,
démontez les chambres et pliez-les par moitié, en les
enveloppant dans le tapis de sol pour les protéger de la boue, de
l’herbe humide, etc. Placez les chambres de côté.
2/ Un peg all the guy ropes and peg points including any pegs
in the mud walling / base skirt etc. It is always best to leave the
tri-guy system on until the tent is sitting on its ‘knees’. Striking
camp in windy conditions is covered in greater detail in the
customer service video enclosed. Again we strongly recommend
the assistance from a second person when taking a large family
tent down.
2/ Dépiquetez tous les haubans et points d’ancrage y compris
les piquets fixant jupe basse du double-toit. Par temps venteux, il
est préférable de laisser les haubans en place jusqu’à ce que la
tente repose sur les «genoux». Il est également conseillé d’être
deux pour le démontage. L’installation par temps de vent fait
l’objet d’une description particulière dans le film vidéo (en
anglais) offert.
3/ Leave ‘The tri-guy Ropes’ and standard guys tied in position
ready for next time, but it is advisable to gather each guy rope
neatly together and tie it into a loose knot to keep it from
becoming tangled in the frame work of your Ridgi-dome. Where
available place the guy rope into the guy pouch of the guy point.
3/ Vous pouvez laisser le haubanage en place pour la prochaine
fois mais il est recommandé d’enrouler soigneusement chaque
corde et de la fixer par un nœud afin d’éviter qu’elle s’emmêle
dans l’armature de votre tente. Si elles existent, rangez les
haubans dans les pochettes de haubanage spécialement conçues.
4/ Unclip and remove all the bedroom support poles and place
them into the bag provided.
4/ Démontez ensuite tous les mâts des chambres et rangez-les
dans le sac.
15

A
B
THE KHYAM RIDGI-DOME ERECTION
INSTRUCTIONS.
Taking your tent down.
Démontage de votre tente
5/ Once all the bedroom poles have been removed, you will be
ready to strike the main dome.
5/ La séquence 5 étant terminée, vous pouvez maintenant
démonter le dôme principal.
6/ Starting at any of the four main poles, loosen the main guy
rope on that pole and take hold of the lower manual ‘Tripod’
joint upper collar and apply a small amount of pressure inwards
towards the centre of the tent See ‘A’. This will take the tension
off the joint and it should now be possible to slide the moveable
grey collar upwards approximately 2 – 3cm see ‘B’
6/ En commençant par un des quatre mâts principaux, détendez
le hauban principal de ce mât, et saisissez la bague de
verrouillage de l’articulation inférieure du “Tetrapode” en
poussant légèrement vers le centre de la tente Voir ‘A’. Cette
action de poussée relachera la tension sur l’articulation et il sera
maintenant possible de faire glisser la bague de verrouillage vers
le haut sur 2 ou 3cm Voir ‘B’
16

THE KHYAM RIDGI-DOME ERECTION
INSTRUCTIONS.
Taking your tent down.
Démontage de votre tente
7/ As the collar moves upwards the lower section ‘Tripod’
system can be folded inwards slightly.
7/ Quand la bague de verrouillage est soulevée, le système de
“Tetrapode” inférieur peut-être replié vers le mât central.
8/ The locking tabs on the top of each side support pole of the
‘Tripod’ system should now be depressed which will unlock the
hinge and allow the each side pole to fold flat against the main
central upright pole as shown.
8/ Enfoncez les pattes de verrouillage au dessus de chaque mât
latéraux du système “Tetrapode” pour leur permettre d’être
replié contre le mât central principal comme sur la photo.
9/ The lower ‘Tripod’ section can now be folded fully inwards
under the main section of tent lowering that pole down onto it’s
‘knees’ tighten the main guy rope to support the pole again.
9/ La section inférieure “Tetrapode” peut maintenant être
complètement pliée vers l’intérieur sous le dôme central,
abaissant le mât pour qu’il repose sur le “Genou”. Retendez à
nouveau le hauban principal pour sécurisé et maintenir la tente
s’il y a du vent.
10/ Repeat on the remaining 3 main poles until the tent is sitting
fully on it’s ‘knees as shown. The ‘Dual Roof should now be
unclipped and removed.
10/ Répétez cette séquence sur les 3 autres mâts jusqu’à ce que
la tente repose complètement sur ses “genoux” comme sur la
photo. Le “Surtoit” doint maintenant être détaché et retiré.
17

THE KHYAM RIDGI-DOME ERECTION
INSTRUCTIONS.
Taking your tent down.
Démontage de votre tente
11/ At this point the protective bags should be tied securely over
the ‘Tripod’ feet.
11/ Les housses de protection doivent maintenant être remise en
place solidement par dessus les mâts des “Tetrapodes”.
12/ The padded protective covers for the Auto joints should be
fitted securely into place as shown.
12/ Les housses moltonnées de protection pour les articulations
automatiques doivent maintenant être solidement remise en
place comme sur la photo.
18

THE KHYAM RIDGI-DOME ERECTION
INSTRUCTIONS.
Taking your tent down.
Démontage de votre tente
13/ With all the covers securely in place the main 4 roof joints
can now be released.
13/ Lorsque toutes les housses de protection sont solidement en
place, les 4 articulations supérieures principales peuvent être
déverrouillées.
To release the joints first press downwards slightly as shown.
Pour déverrouiller une articulation, poussez légèrement vers
l’intérieur de la tente.
Slide the collar away from the centre of the joint.
Faites glisser la bague de verrouillage en l’éloignant du centre de
l’articulation.
The joint will then hinge upwards.
L’articulation pourra ainsi être ouverte et être remonter.
Release all 4 main roof joints as shown.
Relachez les 4 articulations supérieures du toit comme sur la
photo.
19

THE KHYAM RIDGI-DOME ERECTION
INSTRUCTIONS.
Taking your tent down.
Démontage de votre tente
14/ Once all roof joints are release the tent will fold back down
into the star shape where you began.
14/ Lorsque toutes les articulations sont déverrouillées, la tente
retombe sur le sol dans la même position en forme d’étoile,
comme au commencement du montage.
15/ All pole end and joint covers should now be securely tied
into position.
15/ Toutes les extrémités des mâts et housses de protection des
articulations doivent maintenant tendues solidement en position
16/ The outer fabric protective bags should be tied securely into
Position.
16/ Les sacs de protection supérieurs doivent être solidement
tendus en position.
20
Table of contents
Other Khyam Tent manuals

Khyam
Khyam Biker Plus User manual

Khyam
Khyam Michigan User manual

Khyam
Khyam RIDGI-DOME XL Owner's manual

Khyam
Khyam Hub User manual

Khyam
Khyam FAMILY 6 User manual

Khyam
Khyam Igloo Instruction Manual

Khyam
Khyam Nimbus Mini User manual

Khyam
Khyam Oregon Deluxe User manual

Khyam
Khyam Nebraska User manual

Khyam
Khyam MOTORDOME CLASSIC PRO User manual

Khyam
Khyam Explorer User manual

Khyam
Khyam TORONTO User manual

Khyam
Khyam Cleveland 6 User manual

Khyam
Khyam TOURER 400PLUS User manual

Khyam
Khyam Dakota User manual

Khyam
Khyam AIRTEK 4 + User manual

Khyam
Khyam MOTORDOME TOURER User manual

Khyam
Khyam KAMPER SLEEPER User manual

Khyam
Khyam AIRTEK KAMPER PRO 1 User manual

Khyam
Khyam AIRTEK KAMPER PRO 4 User manual