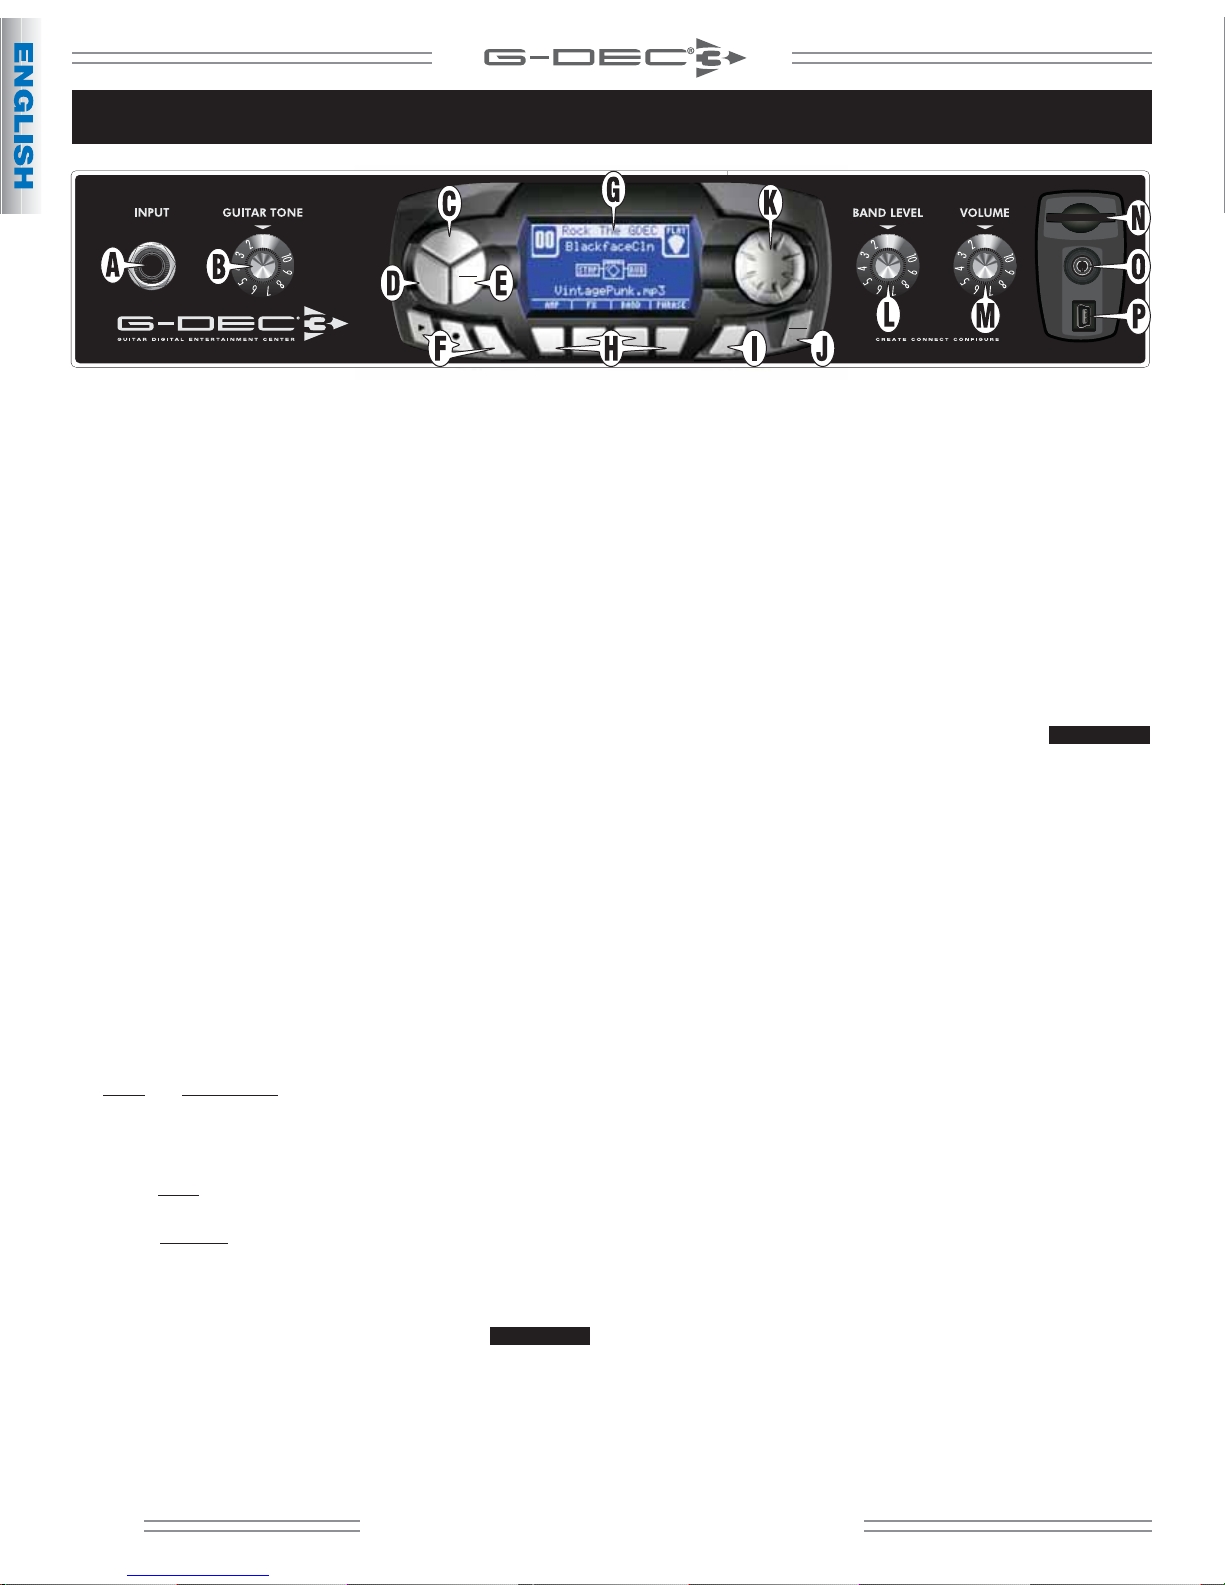
A. INPUT — Plug your guitar in here.
B. GUITAR TONE — Adjusts the tone of your guitar. This does not
affect the sound of the Band or Auxiliary input.
C. START-STOP — Press to start the Band track so that you can play
along on guitar. Press again to stop the Band. The title of the
Band track is displayed on screen. See Band Mode on page 7 to
learn how to change the Band track and modify a variety of Band
parameters.
D. QUICK ACCESS (QA) — Press to enter Quick Access (QA) mode.
Press QUICK ACCESS repeatedly to change the file type and
location of the Band tracks displayed. Press EXIT {J} to leave QA
mode.
In QA mode you can assign three presets to soft keys {H} for quick
access to your favorites. To assign a QA preset, press and hold a
QA1, QA2 or QA3 soft key while turning the ENCODER knob {K}.
One of the cool things you can do in QA mode is scroll through
all your Band tracks and instantly play them with any of your QA
presets simply by pressing START-STOP. Press the LOOP soft key
to play the Band track repeatedly.
E. TAP /TUNER — Press and hold this key to activate the TUNER.
Strike an open string on your guitar and the Tuner displays the
nearest note and the tuning needle shows if you are in tune.
TAP: You can also use this key to tap "by feel" the delay interval
of delay effects (while in FX mode, Delay Time menu) and the
tempo of MIDI tracks (while in Band mode, Tempo menu) rather
than selecting the time values using the ENCODER knob.
F. PHRASE SAMPLER — Use the Phrase Sampler to record G-DEC 3
audio for a variety of sampling and overdubbing functions.
Press: To start/stop...
Playback of a sampled phrase
Sampling (recording) a new phrase
DUB Overdubbing (adding layers) to original phrase
Phrase input levels are affected by your guitar volume level and
the BAND LEVEL {L} setting.
Phrase playback level is adjusted in the Phrase mode PHRASE
LEVEL menu and is also affected by VOLUME {M}.
See Phrase Mode on page 7.
G. SCREEN — The screen displays everything that's going on with
the G-DEC 3. Turn the ENCODER knob to edit the highlighted
item on screen.
H. SOFT KEYS — The function of each key is displayed on screen.
In Play mode for example, pressing the soft keys will take you to
Amp, FX, Band and Phrase modes.
I. SAVE — The SAVE key will turn red to indicate that you have
made changes to the current preset. Press SAVE if you want to
keep your changes. It's a two step process:
1. Press SAVE once. From this screen you can select any preset to
overwrite. To change the name of the preset: Press soft keys to
move the cursor, select case/number or insert space, then turn
the ENCODER knob to change the highlighted character.
2. Press SAVE a second time to complete the save process.
J. EXIT / UTILITY MODE — Press EXIT to return to Play mode from
other modes.
Press and hold EXIT to enter Utility mode where you can perform
system functions like importing presets and monitoring memory
usage. See Utility Mode on page 8.
K. ENCODER KNOB — Turn this knob to edit the highlighted
item on screen. In Play mode for example, the preset name is
highlighted and therefore the ENCODER knob changes presets.
L. BAND LEVEL — Adjusts the volume level of the Band track as
well as the Auxiliary input levels.
M. VOLUME — Adjusts the overall loudness of the G-DEC 3.
N. SD CARD SLOT — You can use an SD flash memory card to have
additional Band tracks available to the G-DEC 3. You can use MP3
or WAV files (stereo/mono 16 bit, 44.1k) or MIDI files (type 0 or
type 1 ). You can also import and export presets to the SD card.
Insert an empty SD card in the G-DEC 3 and the G-DEC will
automatically create the appropriate folders for you. Then you
can load MP3 or WAV files from your computer onto the SD card
"Audio" folder to use as Band tracks. Presets, phrase and MIDI
tracks go in their respective folders.
NOTE: For reliable performance use only premium quality SD
cards. Log on to fender.com for a list of approved brands.
O. PHONES — Plug in your headphones, ear buds, or power
speakers to enjoy the G-DEC 3's stereo features. This jack may
also be used as a stereo recording output. The amp's internal
speaker will be muted.
P. USB — You can connect the G-DEC 3 to your computer and use
Fender® Fuse™ software (included) to transfer/edit presets and media
files beyond what the G-DEC 3 is capable of alone. See the Fender
Fuse software owner's manual on the G-DEC 3 DVD for details.
The USB connection can also be used to stream stereo 16 bit,
44.1k audio (playback and recording). The included G-DEC 3 DVD
contains Ableton® Live Lite 8 Fender Edition recording software
and drivers.
NOTE: While recording through the USB connection the Phrase
Sampler and Band track functions are disabled. Do not connect
the G-DEC 3 through a USB hub.
ControlPanelOverview
SD
PHONES
USB
START-
STOP
QUICK
ACCESS
TAP
HOLD FOR
TUNER
DUB
EXIT
HOLD FOR
UTIL
SAVE
4
fender.com