Ferguson EYE DRIVE FHG200 User manual

English

SAFETY MEASURES
We request that you read the instruction manual and recommendations set forward therein.
•In order to avoid an electric shock, never open the housing. Damage to the warranty seal
shall void the warranty.
•Do not attempt to disassemble car DVR and drop from high place.
•eep the car DVR away from water and other liquids.
•After prolonged use, it is normal that the unit temperature will rise.
•The best working temperature range is: -10 – 55 .℃
•Please use the accessories provided by the manufacturer.
•The device supports maximum 32GB TF cards, please use 8GB (Class 10) or above.
DOWNLOADABLE SOFTWARE
Ferguson has taken every effort to provide users with software updates in order to ensure that the
parameters of the device are up to date. Ferguson reserves itself the right to amend, change or
modify the software used in the device as it shall choose and without prior notification. The latest
version of the software is available on the website http://www.ferguson-digital.eu
ABOUT THE INSTRUCTION MANUAL
Ferguson Sp. z o.o. has made every effort to provide the most current information about its
products. Ferguson Sp. z o.o. does not grant any guarantee as to the contents of the present
instruction manual and disclaims any implied guarantees concerning market value or suitability for
specific purposes. The information contained herein is an instruction intended to enable the correct
usage and maintenance of the receiver. Ferguson Sp. z o.o. reserves itself the right to introduce
amendments, changes or translations of the instruction manual without prior notification thereof.
For this reason, we recommend you regularly visit our website in order to obtain the latest
information.
2

MARKINGS AND SIGNS APPLIED TO THE DEVICE
Risk of electric shock - do not
open. This notice warns the user
not to open the device housing. The
housing may be opened solely by
authorized service technicians.
CE logo.
The logo informs that the device
conforms to the terms and conditions
of Directive 2004/108/EC concerning
observance by Member States of
provisions regulating electromagnetic
compatibility, and to the terms and
conditions of Directives 2006/95/EC
concerning observance by Member
States of provisions regulating low
voltage electricity and safety with
relation to the handling and operation
of electrical equipment.
Your product is designed and
manufactured with high quality
materials and components, which
can be recycled and reused.
When this crossed-out wheeled bin
symbol is attached to a product it
means that the product is covered
by the European Directive
2002/96/EC. Please inform
yourself about the local separate
collection system for electrical and
electronic products.
Please act according to your local
rules and do not dispose of your old
products with your normal
household waste.
Correct disposal of your old
product helps to prevent potential
negative consequences for the
environment and human health.
R&TTE Hereby Ferguson Sp. z o.o., declares
that the device is in compliance with
the essential requirements and other
relevant provisions of Directive
1999/5/EC. You can find the
Declaration of Conformity on
www.deklaracje.ferguson.pl
This product has been designed, tested
and manufactured according the
European R&TTE directive
1999/5/EC.
This product supports Wireless LAN.
Your product contains batteries
covered by the European Directive
2006/66/EC, which cannot be
disposed with normal household
waste. Please inform yourself about
the local rules on separate
collection of batteries because
correct disposal helps to prevent
negative consequences for the
environmental and human health.
When this logo is attached to a
product, it means a financial
contribution has been paid to the
associated national recovery and
recycling system.
3

1. General in ormation about the car DVR
1.1 Product Features
•Simple and elegant appearance.
•Supports GPS function, and track restore function.
•170-degree 6G high-resolution ultra wide-angle lens, convenient to operate in a variety of
occasions, high resolution video capture and easy to carry.
•Photosensitive device developed for car recorder, it can capture ultra clear pictures in dark
places.
•WDR image processing technology: overcomes the hard light, glare and halos, which makes
night vision better.
•Built-in WIFI wireless transmission. Smartphone can control the camera through APP, and
the camera files can be transferred to the phone.
•Safer: Embedded battery over-temperature protection, when the temperature is too high, it
can protect the battery from battery leakage and prevent fire explosion
•Cycle recording function, cancel the former files and store the new files automatically.
•Start the recording function automatically when the car is on
•Combining with the triaxial 3D gravity-sensing chip, the videos will be protected by locks
automatically based on vehicle driving state.
•More parking monitoring modes are added to keep your car in an all-round and full-time
manner.
1.2 Preparation for First Use Device Installation
•Fix the vehicle-mounted power line based on that the
specific interior environment can’t affect the driving sight.
Recorder should be located in front of the interior mirror to
get more comprehensive view.
•Do not install the equipment in the position which will
scatter the driver’s attention or block the sight line.
•Part of the vehicles model still have power source unit
after the engine is gone. You should pull out the vehicle-
mounted power line when leaving the car to avoid the
accident.
1.3 Installing the TF card
•Please choose the TF card of class 10 and above. We’d better to choose the TF card with 8
GB or above to keep a more complete record.
•Please format the TF card before using the machine when using the TF card in the first time.
4

2. Car DVR settings
2.1 Software Setup
•Language setting. Pressing the Menu button and enter the main menu. Choose language
selection,press the OK button to do the language selection. Press Up and Down buttons to
choose the language you want, and press the OK button to confirm it.
•Time and time zone settings:
✔When using for the first time, please go the system menu to enter the option of
“Clock setting” to set the time as the current date and time.
✔Time zone setting: There is GPS time service function on this machine. After GPS
positioning successfully, the date and time of the machine would be updated
automatically. To get the correct time service, please go the option of “Time Zone
Selection” to choose the corresponding time zone after learning your local time zone.
•You can enter the system menu to do the other individual settings.
2.2 The Ma or Function and Basic Operation of Machine:
•The On and Off of the Machine
✔In normal driving mode: Connect the vehicle-mounted power well. The machine
would be on and start to record automatically when the car is on, which shall be off
automatically when the car is off.
✔Manual mode: You can press the ower button manually to turn on or off the
machine.
•WIFI Mode. After startup, initial setup of WIFI is off. When using, the following
operations should be completed:
✔Please press and hold on the Up button to turn on the WIFI; then press and hold on
the Up button again to turn it off.
✔Confirm that “Ferguson smart cam” APP application software is installed on the
device. Android version should be 4.0 or higher.
✔Download mode: for Android, please enter Google play or Android Market to search
“Ferguson smart cam ”.
✔Open the WLAN in the phone setup to connect to the network recorder. (Initial
password is: 1234567890).
NOTE: After opening APP software on the mobile phone, you can look at the camera's
real-time sync pictures on the mobile phone. You can send camera files to the phone and
operate the camera on your phone.
2.3 Parking Monitoring Mode
Two parking monitoring modes are available on this machine, that is, Mode and T Mode. The
specific application and description are as follow:
•P Mode (vibration boot): press and hold on the Down button to turn on or turn off the
function of vibration boot. When this function is on, the machine will automatically start
and record if collisions occur to vehicles. Then it will shut down on its own after 20s. As for
starting the mode, the power in the local battery will be consumed. Therefore, users can add
mobile power as the source in practical use; meanwhile, some certain setting shall be made
in the menu.
•T Mode (Time-lapse photography): press and hold on the OK button to turn on or turn off
the function of time-lapse photography. When this function is on, continuous recording will
5

•be possible in the speed of 1 photo per second, after which they will be played in the speed
of 30 photos per second. Users can enjoy the following items under such mode:
✔A. Available video time can be increased 30-fold, that is to say, if the normal video
time of the primary 8G TF card is 1 hour, then the video time can be increased to 30
hours under this mode. For the 32GB memory card, the video in at least one week
will not be covered.
✔B. Customers can view all the videos in the speed of 30X without missing the
unexpected abnormal events during recording period, that is, both contents and
efficiency are taken into consideration.
NOTE: This mode is mainly used to the real time monitoring when parking. The external
power source is needed because the machine has to work all the time during such process
and such external power source shall be selected by customers according to their own
actual situation.
2.4 Video Recording
After startup, video recording will be started automatically, and it will be stopped or restarted by
pressing OK.
2.5 Motion Detection Recording
When this function is on, the machine can detect what is ahead. The recording will be stopped if no
change happens, while it will be restarted if the object ahead removes, which in return makes your
recording files more valuable and disk space utilization more efficient.
2.6 Cycle Recording
When the TF card is full, the former unprotected files would be covered automatically when
recording again. For emergencies file protection, the device equipped with gravity sensor will
automatically protect current recording to avoid being overwritten when the car has a certain degree
of vibration. Meanwhile protected files will be named as: SOS_XXXX.mov for difference.
2.7 SOS Lock
In addition to the automatic protection mechanism, the machine also offers a manual protection
mechanism; in the process of recording, if the customer thinks that the current recording needs to be
protected, he can press the Menu button to enter the hand protection and press it again to cancel the
current file protection
NOTE: sensitivity of gravity sensor can be set in the system menu.
2.8 Photo Mode
In video recording mode, you can convert to photo mode by pressing the Mode button; you can take
a photo by pressing the OK button. We can use the digital zoom by pressing the Up and Down
buttons. Enter the main menu and choose the image mode to set the image resolution, AWB
sensitivity, special efficiency and to do the other mode selection.
2.9 Playback Mode
Under the playback mode, we can do the following three operations by pressing menu button: adjust
the music volume, delete the files, protect and unlock protect the files.
6
The playback mode includes MOV playback and image playback. Under video recording mode, we
can enter MOV mode by pressing Mode button two times, enter image playback mode by pressing
one more time.
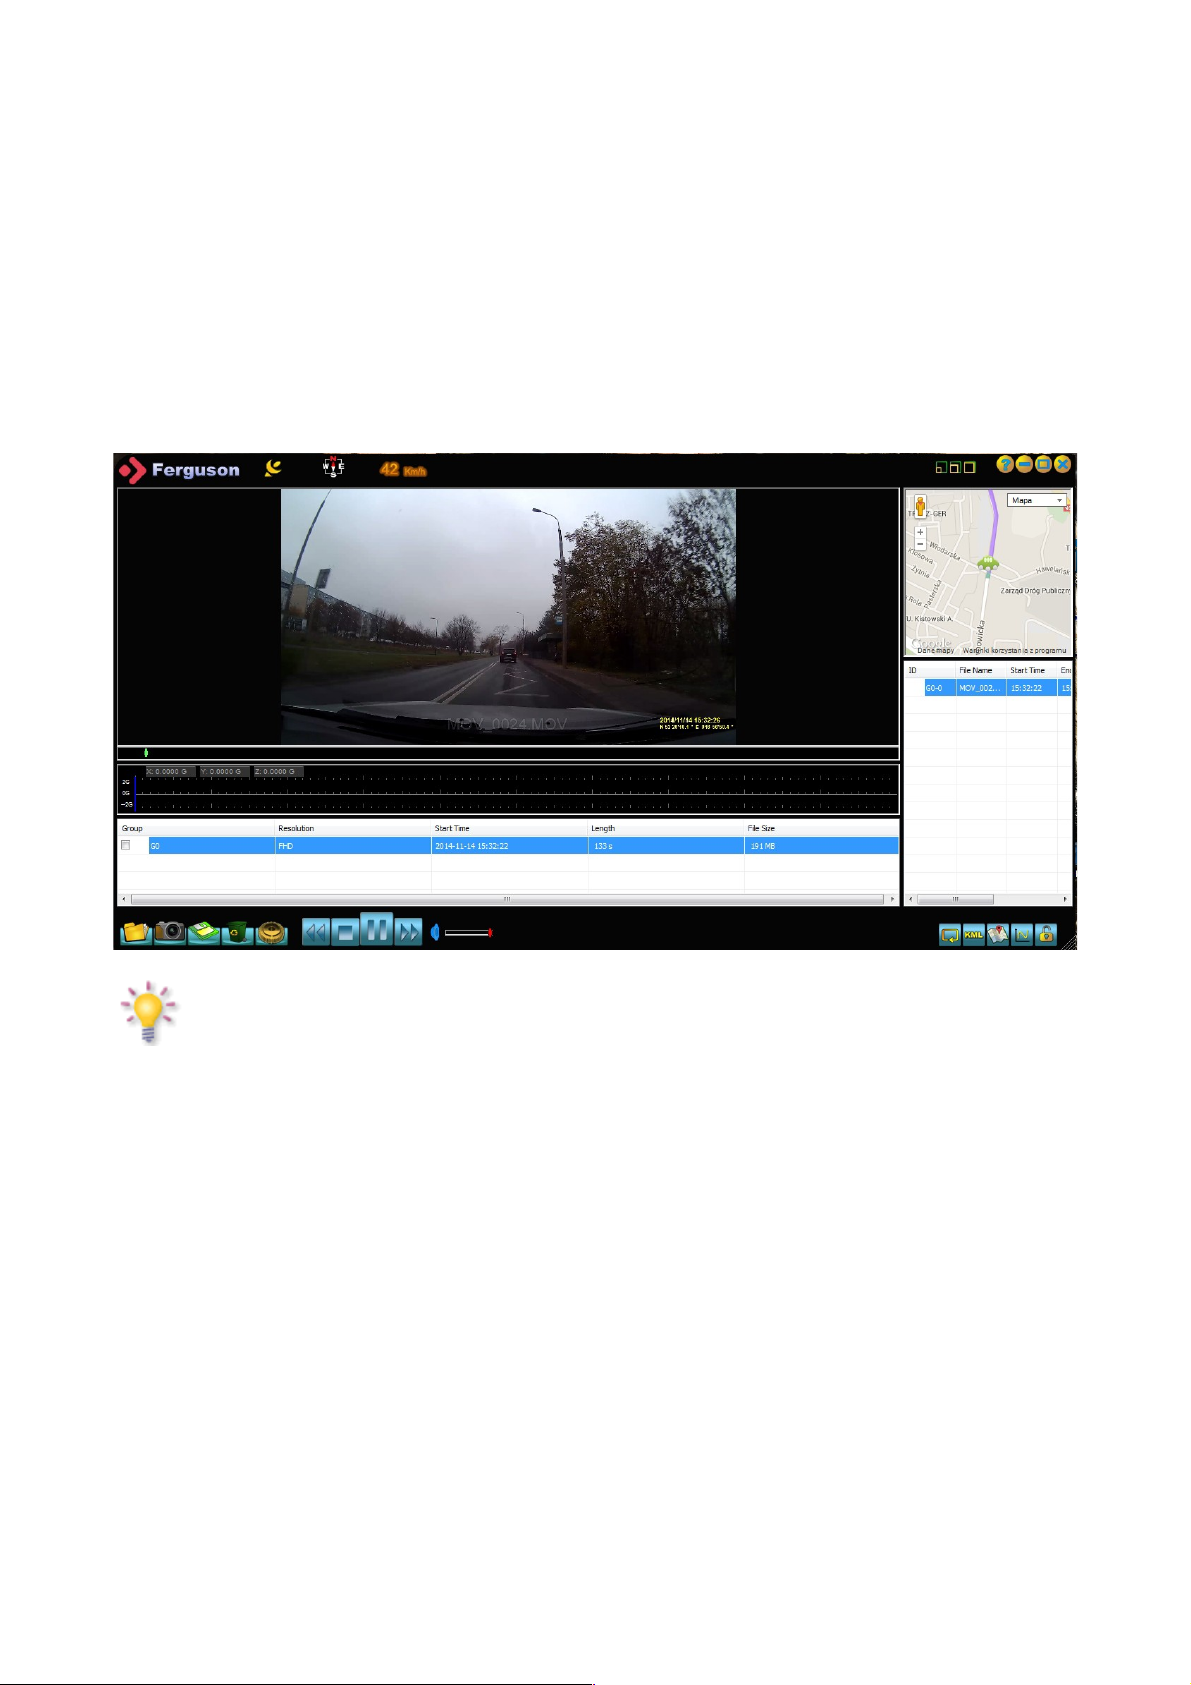
2.10 GPS Function
The device supports internal GPS positioning module to record the complete driving path for the
users.
When the GPS positioning unsuccessfully, the GPS shown on the screen is red, this would turn to
green when the GPS locates successfully. Meanwhile, the current longitude and latitude and
quantity of location satellites would be shown on the screen. To play the video by the attached
player, the complete and whole driving path and current position would be displayed
simultaneously. We can switch Google map in the player.
NOTE: The device does not support A-GPS function. The machine shall not be covered by
buildings on the top. GPS would not locate successfully in the underground parking lot and
in indoor environment.
2.11 Function Introduction of Shortcut Keys
•We can manually protect (unlock protect) the current video by pressing the Up button under
video recording.
•Turn on/off the WIFI function by pressing and holding on the Up button.
•Turn on/off the P mode (vibration boot) by pressing and holding on the Down button.
•Turn on/off the T mode (Time-lapse photography) by pressing and holding on the OK
button.
7

Technical Speci ications
LCD screen
size 2.7 display screen with high definition
Video
Perspective Oversized wide angle of 155 degree
Language
Selection English/Russian/Polish
Video
recording FHD 30fps/HD 60fps/HD 30fps/VGA 30fps
Built-in WIFI IEEE 802.11b/n/g
Video format MOV
SD card slot Micro SD
Microphone/Sp
eaker Built-in
Optical source 50Hz/60Hz
TV output NTSC/PAL
USB interface USB2.0
Power
interface
INPUT:DC 12/24V
OUTPUT: 5.5V 2A
Battery Built-in Li-polymer battery 110mA
System
requirement Windows 2000/XP/Vista/Windows 7
Note: The design and specifications of this machine would be amended at any time
without prior notice. Any difference, please refer to the entity.
8
Table of contents


