Ferguson rtyx k User manual

- WEBTV
- MULTIMEDIACENTER
- SATELLITERECEPTIONINHIGHDEFINITION
- PERSONALVIDEORECORDER(PVR)ready
User’smanual

INDEX
[2]
I. GENERAL INFORMATION
1. Safetyinstructions...............................................................................................5
2. Packagecontents................................................................................................5
3. Frontpanel..........................................................................................................6
4. Commoninterface...............................................................................................6
5. Rearpanel...........................................................................................................7
6. Connectingyourdevice
6.1 Connectingtheantenna....................................................................................7
6.2 Connectingtoyourtelevision............................................................................8
6.3 Connectingaudio............................................................................................10
6.4 ConnectingUSB2.0........................................................................................10
6.5 Connectingtoyournetwork...........................................................................11
7. Insertingthebatteries.......................................................................................11
8. PoweringOn/Off...............................................................................................11
9. Remotecontrolfunctions..................................................................................12
II. FIRST INSTALLATION
1. Firstinstallation.................................................................................................14
2. Operatingthemenu..........................................................................................14
3. Languageselection............................................................................................14
4. Satellitesearch..................................................................................................14
III. DAILY USAGE
1. Volumecontrol..................................................................................................15
2. Changingchannels.............................................................................................15
3. Channellists......................................................................................................15
4. Userlists............................................................................................................15
5. Zoommode.......................................................................................................15
6. Audiolanguage.................................................................................................15
7. Freezemode......................................................................................................15
8. Informationbar.................................................................................................16
9. Screenresolution..............................................................................................16
10. Audiochannel...................................................................................................16
11. Teletext.............................................................................................................17
12. Editchannels/Commoninterface/eventlist......................................................17
13. Photos/Picasa/Flickrradiosoundtrack..............................................................17
14. Jumptime.........................................................................................................17
15. Multifeed..........................................................................................................17
16. Subtitlelanguage...............................................................................................17
17. Edit/searchwindow..........................................................................................18
IV. PROGRAM GUIDE (EPG)
1. Programguide...................................................................................................18
V. RECORDING
1. Recordingguide.................................................................................................19
2. Instantrecording...............................................................................................20
3. Timeshiftrecording...........................................................................................20
4. Timerrecording.................................................................................................20

INDEX
[3]
VI. MENU
1. Operatingthemenu..........................................................................................21
2. Installation
2.1 Antenna..........................................................................................................21
2.2 Satellitesearch................................................................................................21
2.2.1Editsatellite.........................................................................................22
2.2.22.2.3Transpondersearch...................................................................22
2.2.3DiSEqC/USALS‐Multisearch................................................................22
2.2.4EditPID.................................................................................................23
2.3 DiSEqC1.2.......................................................................................................23
2.4 USBupdate.....................................................................................................23
2.5 Networkupdate..............................................................................................24
2.6 Factoryreset...................................................................................................24
3. Settings
3.1 Networkconnection.......................................................................................24
3.2 styxshare........................................................................................................25
3.3 Television........................................................................................................25
3.4 Softwareversion.............................................................................................25
3.5 Cardreader.....................................................................................................25
3.6 CommonInterface..........................................................................................26
4. User
4.1 Menu&audiolanguage.................................................................................26
4.2 Time&date....................................................................................................26
4.3 Pincode..........................................................................................................26
4.4 Menu&channellock......................................................................................26
4.5 Multimedia.....................................................................................................26
5. Create&edit
5.1 Editchannel....................................................................................................27
5.2 Edituserlists...................................................................................................27
5.3 Deletesatellite&transponder.......................................................................27
5.4 Export/importdata.........................................................................................27
5.5 styx‐i...............................................................................................................28
5.6 styx‐iprogram................................................................................................28
5.6.1Channeleditor......................................................................................28
5.6.2USBFilebrowser..................................................................................28
VII. styx MEDIA
1. Operatingthemenu..........................................................................................29
2. Mediaguide......................................................................................................29
3. Recordings&movies.........................................................................................29
4. Music................................................................................................................30
5. Photos...............................................................................................................30
6. Shoutcast..........................................................................................................31
7. Jamendo............................................................................................................31
8. Flickr&GooglePicasa.......................................................................................31
9. musicbox
9.1 Topsinglecharts...........................................................................................31

INDEX
[4]
9.2 JamendoTOP100.........................................................................................32
10. Arcadegames....................................................................................................32
VIII. styx WEB
1. Operatingthemenu...........................................................................................33
2. styxnews..........................................................................................................33
3. RSS....................................................................................................................33
4. Twitter..............................................................................................................33
5. Weather............................................................................................................33
6. Advertising........................................................................................................33
7. WorldTime.......................................................................................................33
IX. styx TV
1. Operatingthemenu...........................................................................................34
2. YouTube&XXX(YouPorn).................................................................................34
3. moviebox&styxnet.........................................................................................34
3.1 Downloadguide..............................................................................................34
3.2 moviebox........................................................................................................35
3.3 styxnet...........................................................................................................35
4. VLCMediaPlayer..............................................................................................35
4.1 Operatingthemenu.......................................................................................35
4.2 Playlist.............................................................................................................36
4.3 OpenMedia....................................................................................................36
4.4 Streamoutput.................................................................................................36
4.5 StreamingInternetTV....................................................................................37
4.5.1P2PPrograms.......................................................................................37
4.5.2PSPsettingsforVLCPlayer..................................................................37
FEATURE & SPECIFICATION................................................................................38

I.
GENERALINFORMATION
[5]
1.
Safetyinstructions
Please read the following safety precautions carefully.
Ensure that any repairs to your unit are carried out by qualified
personnel. Opening the unit and attempting to repair it yourself
voids all warranty claims!
Do not interrupt the booting process this can lead to data loss and
corruption of the software.
The unit may only be connected to the mains and turned on once
it has been connected to the antenna and to the TV set.
If you are away for an extended period, and during thunderstorms,
always switch the unit off at the mains and unplug it from the
socket.
Disconnect the mains plug before cleaning the unit. Only use a dry
cloth for cleaning and only clean the outer surface.
Do not place the unit close to a heater or expose it to direct
sunlight and do not operate it in damp locations. Only use the unit
in a moderate climate, not in tropical conditions!
Place the unit horizontally on a flat, even and stable surface. The
unit should never be installed in a cupboard or on shelves with
inadequate ventilation.
Do not place any objects on top of the unit. Never cover the cooling
slots on the unit (i.e. with other equipment, magazines, tablecloths,
clothing or curtains)! Otherwise the unit may overheat.
Protect the unit against moisture, dripping and splashed water (do
not place any filled objects such as vases on top of the unit).
2.
Packagecontents
Please check the package contents before using your product.
Remote control. Remote control batteries (2 x AAA 1.5V)
User’s manual.
HDMI cable.

I.
GENERALINFORMATION
[6]
3.
Frontpanel
USB
USB 2.0 host connector.
POWER ON/OFF
To power off and to reboot.
CHANNEL -,+ KEYS
To change programs.
LCD DISPLAY
Displays the channel name/number & functions, in standby
the time & date.
CARD READER
To insert a subscriber’s card. Always insert the card with
the chip facing up.
COMMON INTERFACE
To insert two conditional access modules.
4.
Commoninterface
Some TV and radio programs are scrambled and are only
available on a subscription basis. These scrambled programs
can only be viewed with a conditional access module (CAM)
and a subscription/pay-TV card of the scrambling system
(Smartcard). Common interface is the slot on your device to
insert the conditional access module. Your device has two
common interface slots.
Insert the subscription card into the conditional access module.
Insert the conditional access module into the common interface slot on the front of
your device.
To view information’s about the inserted conditional access module (CAM) and
subscription card enter Common interface (Settings menu).

I.
GENERALINFORMATION
[7]
5.
Rearpanel
LNB IN
LNB OUT Input to connect a satellite antenna.
Output to connect another digital receiver.
VIDEO
Composite Video output for television sets (CVBS).
AUDIO
Stereo audio outputs Left/Right.
MAINS
Mains ON/OFF switch.
ETHERNET RJ-45 port 10/100Mbit.
HDMI
Digital Audio/Video output for high definition television sets.
USB
USB 2.0 host connector.
S/PDIF
Optical Dolby digital output.
VIDEO (Y/Pb/PR)
Component video outputs for television sets (green, blue, red).
6.1
Connectingtheantenna
Connect your device to a satellite antenna to receive digital
television. Connect the antenna to LNB IN - Input.
Connect another digital receiver to use the same satellite
antenna. Connect the cable from the other receiver to LNB
OUT - Output.
I.
GENERALINFORMATION
[8]
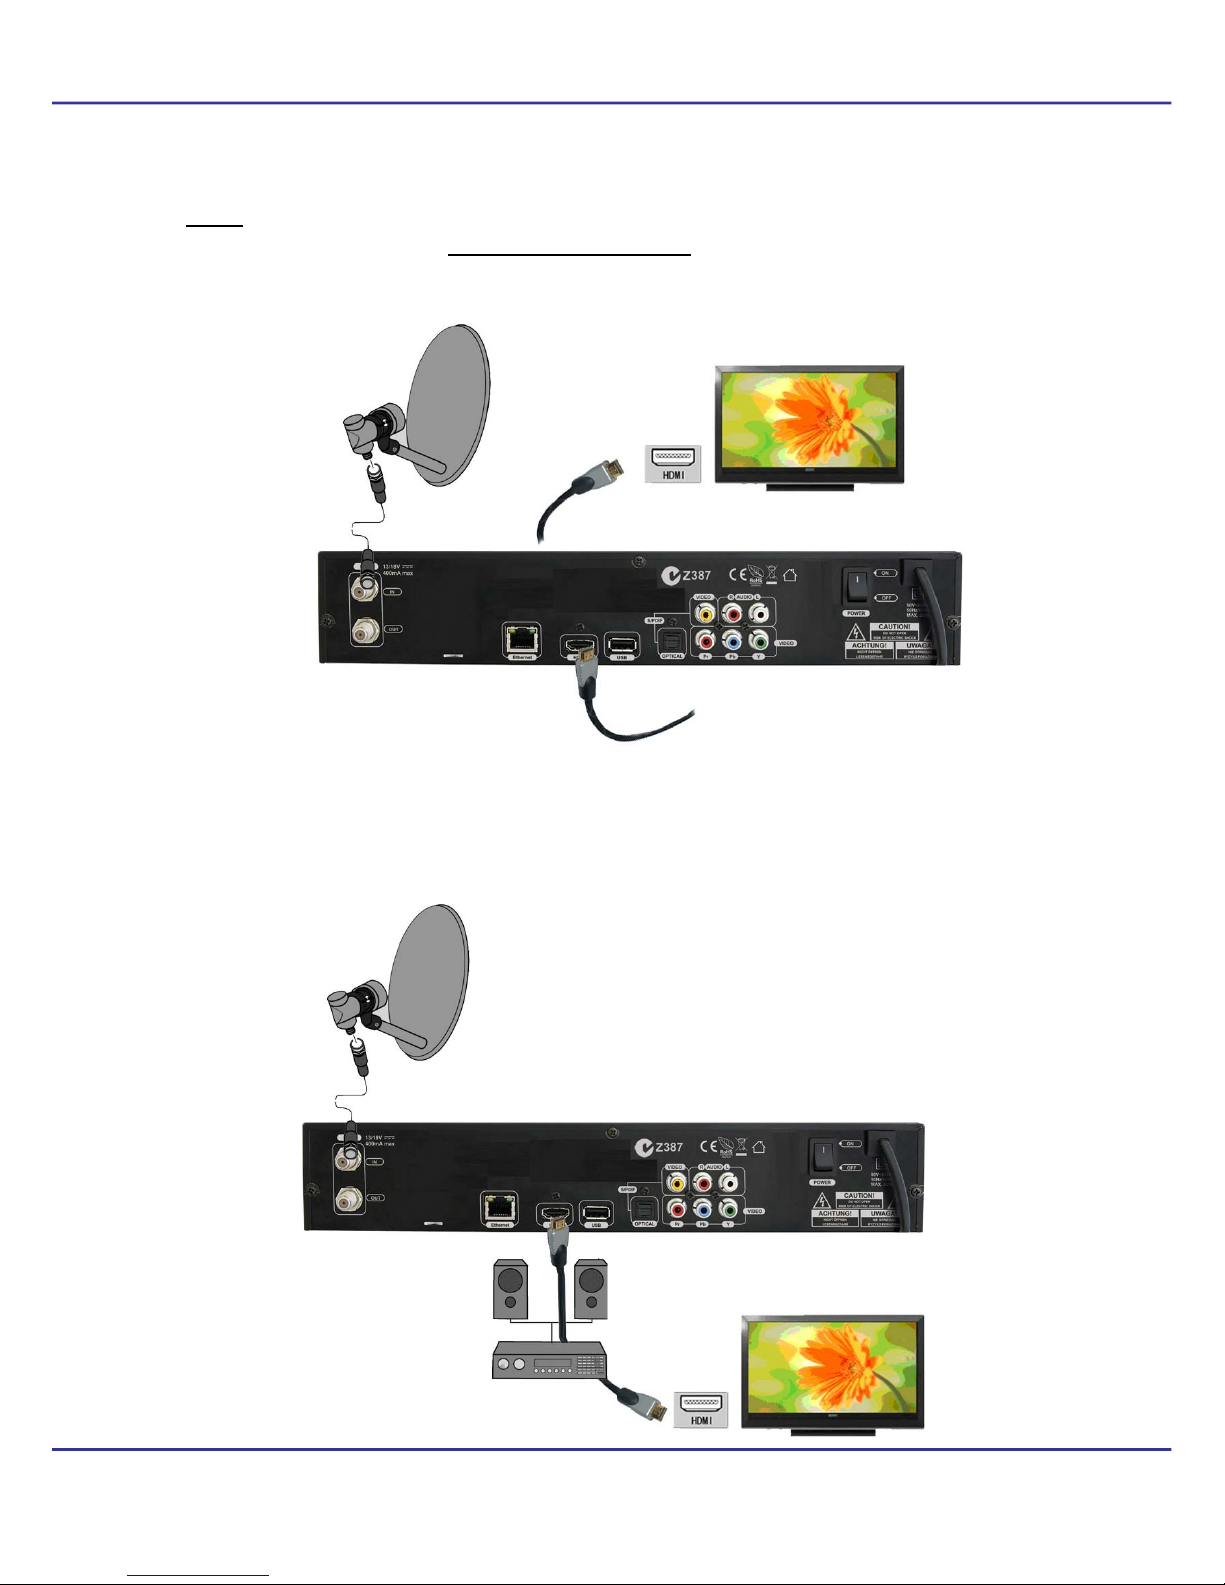
6.2
Connectingtoyourtelevision
HDMI
Connect your device to a high definition television set using a HDMI (High Definition
Multimedia Interface) cable to output digital video and audio.
If you have an amplifier with an HDMI Out/Input, which supports also audio over
HDMI, connect the devices by two HDMI cable. One cable to the amplifier and the
other cable from the amplifier to the television set.

I.
GENERALINFORMATION
[9]
Component (Y/Pb/Pr)
Connect your device to a high definition television set using a component video cable
(Y-green, Pb-blue, Pr-red) to output video. To output audio connect the audio cable
(red-audio right, white-audio left) from your device to the television or audio system.
Video (Composite CVBS)
Connect your device to a standard television set using a video cable to output video
(CVBS). To output audio connect the audio cable (red-audio right, white-audio left)
from your device to the television or audio system.
I.
GENERALINFORMATION
[10]
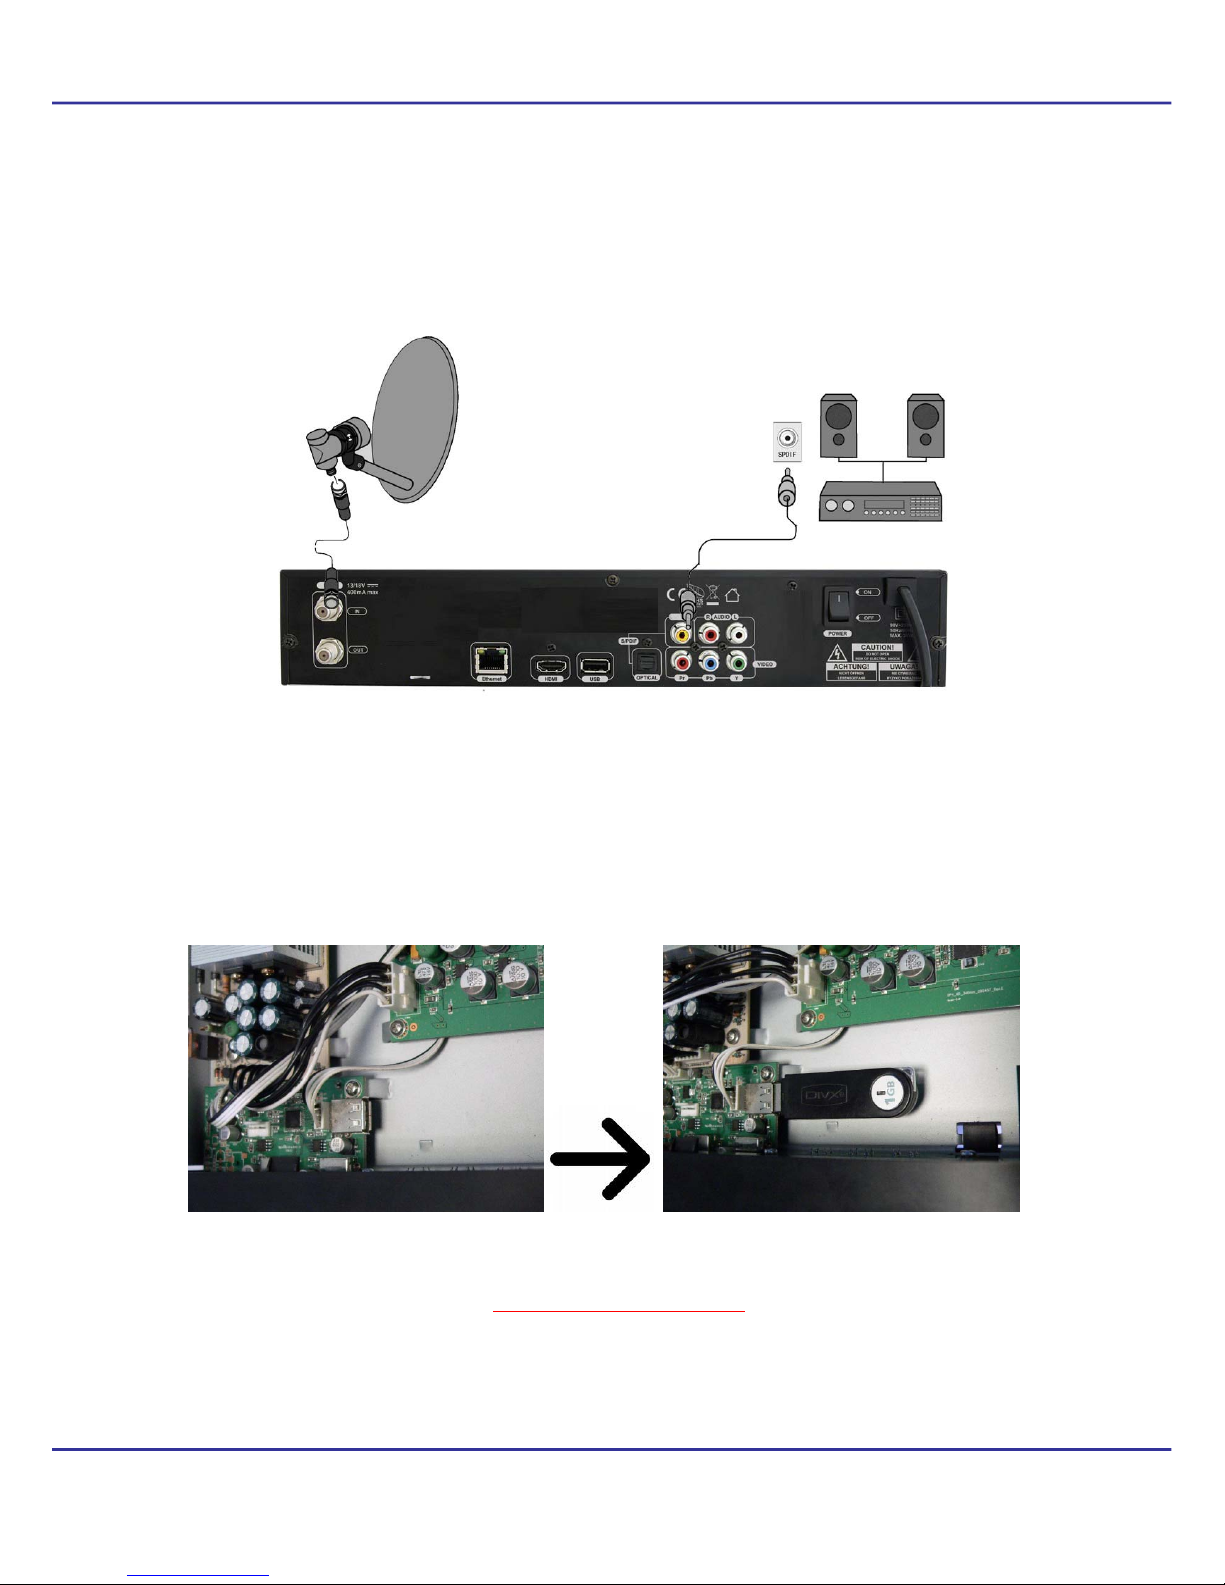
6.3
Connectingaudio
To enjoy Dolby digital audio, your television or audio system must be able to decode
Dolby digital audio. Connect your device to your television or audio system with an
optical S/PDIF cable.
6.4
ConnectingUSB2.0
Your device has 3 USB 2.0 (1 x rear, 1 x front, 1 x internal) host ports to connect
memory devices (memory stick, external hard disk) formatted in FAT32, EXT2, EXT3,
NTFS.
Connecting an internal USB memory device.
NOTE: For USB memory devices formatted in NTFS your device can only playback
files (movies, MP3s, pictures). Recording is not possible.
NOTE: If you connect the USB memory to the internal front port, you have to open
the cover and void the guarantee.

I.
GENERALINFORMATION
[11]
6.5
Connectingtoyournetwork
Ethernet RJ45 connector
Connect your device to the network with
an Ethernet cable.
NOTE: To operate all features of your
device connect your device to your
network via a Router which is connected
to the Internet.If you cannot connect to
your network or if ‘Connection failed!’ is
displayed for network features check
again the address and the network
connection and try again.
7.
Insertingthebatteries
Insert the batteries (2 x AAA 1.5V) into the remote control unit according to the
polarity.
8.
PoweringOn/Off
Power ON/Booting
Connect the power cord of your device to a mains socket. Turn On the mains switch
on the rear panel to start the booting.
Standby
Press the STANDBY key to switch between standby and operation mode. Timer
recordings will record in this mode.
Deep Standby
Hold the STANDBY key pressed for 5 seconds to switch to the Deep
Standby mode. To switch again to operation mode, press the
STANDBY key again. Timer recordings will not record in this mode.

I.
GENERALINFORMATION
[12]
9.
Remotecontrolfunctions
STANDBY
Switch between operation and
standby/deep standby mode and
to boot.
VOL+/VOL-
Adjust the audio volume.
CH UP/DOWN
Change channels (next/
previous).
UP/DOWN
TV : Change channels (next/previous).
MENU: Navigate in the menus.
LEFT/RIGHT
TV : Adjust the audio volume.
MENU: Navigate in the menus and
select options.
OK
TV : Enter the list mode.
MENU: Select options.
PAGE UP/DOWN
Scroll a page or list up and down. To scroll
continuously hold the key.
MUTE
Turn the sound on/off.
TV/RADIO
Change between TV and Radio mode.
LAST
Return to the previous channel.
NUMERIC KEYS
TV : Enter a channel number directly.
MENU: Enter values.
MENU
Enter/exit the menu and save changes in
menus.
EXIT
Exit all menu modes.
I.
GENERALINFORMATION
[13]
styx TV
Enter/exit styx TV.
styx WEB
Enter/exit styx web.
EDIT & CI
Enter/exit the edit menu.
EJECT
Eject the USB memory.
styx MEDIA
Enter/exit styx media.
These coloured keys have
different functions as displayed
in the menus.
USER
Enter/exit and edit user lists.
EPG
Enter/exit the program guide.
INFO
Enter/exit information about the
program, movies/recordings.
TEXT
Enter/exit Teletext.
ZOOM
Enter/exit the zoom mode.
FREEZE
Pause a live program.
RES
Change the screen resolution.
FEED
Select a Multifeed.
LANG
Select audio languages and encode the text
for movie subtitles.
SUBT
Select subtitle languages for programs and
display the subtitle for movies.
AUDIO
Select audio channels.
RECORDING
Record a program and select the duration.
PLAY
Start playback.
PAUSE
Start the Timeshift recording.
Pause playback.
STOP
Stop playback.
SLOW MOTION
Playback in slow motion. Each time you
press this key the speed will increase
(10%, 30%, 50%).
REWIND / FORWARD
Each time you press this key the rewind/
forward speed will increase (2, 4, 8).
JUMP
Jump back or forward during playback.

II.
FIRSTINSTALLATION
[14]
1.
Firstinstallation
After you turned on your device for the first time or after a factory reset, the installation
wizard will start automatically.
2.
Operatingthemenu
Select an option with the /,/keys.
Enter an option with the OK key.
3.
Languageselection
Menu language
Select the menu language.
Audio language
Select the standard audio language for programs.
Press MENU key to save the selection and to continue to the satellite search.
4.
Satellitesearch
Satellite
Select a satellite.
Transponder
Select a transponder.
LNB
Select the LNB frequency.
22Khz
Select On or Off.
DiSEqC Select the DiSEqC (A, B, C, D)/Mini A, Bport for the selected
satellite.
DiSEqC 1.1
Select the DiSEqC port (1-16) for the selected satellite.
LNB Power
Select the LNB power.
Search
Press key to start the search.
Search options
All/FTA/NIT/FAST SCAN Select an option to start the search.
DiSEqC/USALS Select this Option to search all satellites (DiSEqC
switch) at one time.
NOTE
Press EXIT key to install an Unicable/SCD / DiSEqC
1.2/USALS system.
III. DAILYUSAGE
[15]
1.
Volumecontrol
Volume Press VOL+/VOL- or /keys (while watching a program) to adjust the
volume.
Mute
Press MUTE key to turn the sound On and Off.
2.
Changingchannels
Change Press CH. UP/DOWN, /keys or enter the channel number with the 0-9
numeric keys to change channels.
Back
Press LAST key to return to the previous channel.
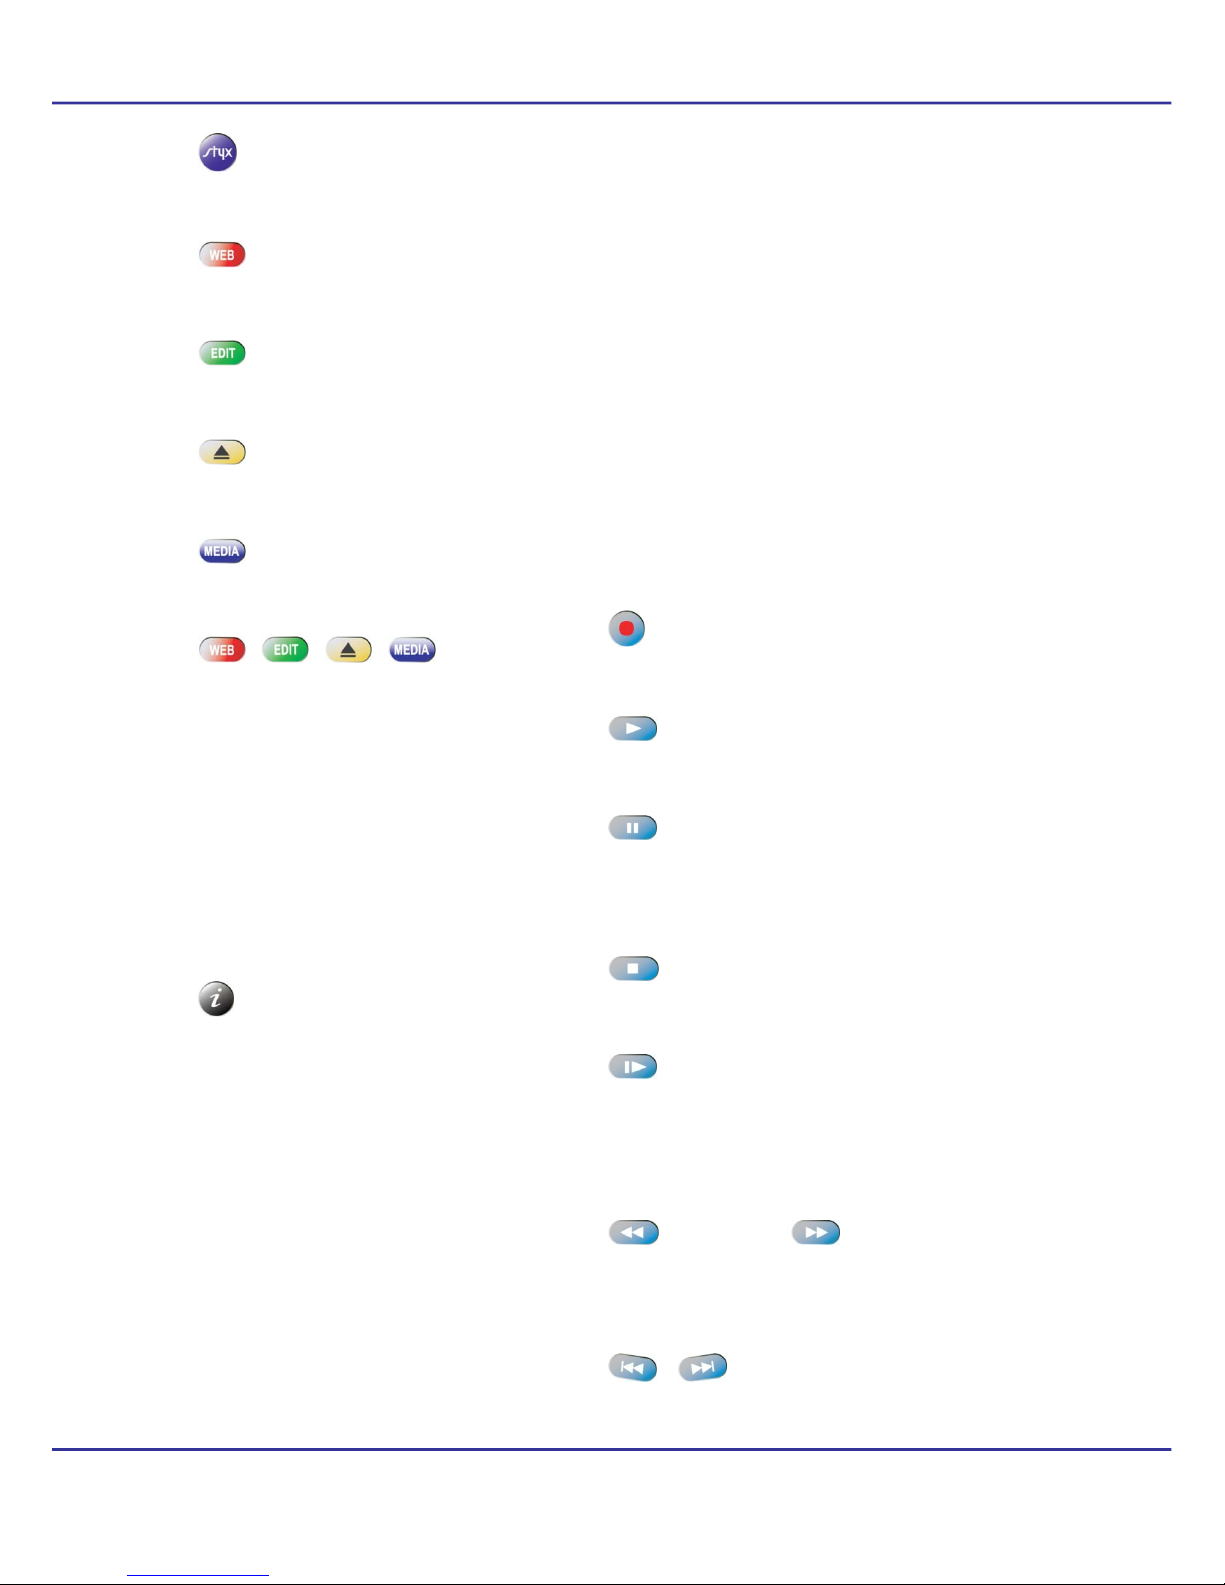
3.
Channellists
Press OK key to display all satellite/user lists and sort options.
Operation
Select columns with the /keys and select a sort option or channel
with the //OK keys.
Search
channel
To search a channel name, enter first the channel list and enter the
channel name with the Numeric keys.
You can search for a search term with max. 7 letters.
The search term is displayed in the 1st column at the bottom.
Press the key to delete a letter
4.
Userlists
Press USER key to display the 10 user lists.
List Select a column with the /keys and select an option or channel with
the //OK keys.
Rename
Select a list and press key to rename.
Edit Press key to edit.
5.
Zoommode
Press ZOOM key to enlarge a part of the screen.
Move the Zoom window with the /, /keys to the part of the screen to enlarge.
6.
Audiolanguage
TV
Press LANG key to select an audio language, if available. Select a
language with the //OK keys.
Movies Press LANG key to select the matching subtitle text code to display all
letters correctly.
Select the text code from the list with the //OK keys.
7.
Freezemode
Press FREEZE key to pause a live program.

8.
Press
I
The c
u
inform
a
SIGN
A
9.
Press
R
TV
Movie
s
10.
Press
A
Inf
o
I
NFO key
t
u
rrent and
a
tion is av
a
is dis
is dis
is dis
is dis
is dis
is dis
is dis
displ
a
A
L
displ
a
Scr
e
R
ES key t
o
Chang
50Hz,
4
Select
If the
T
Scart-
N
s
& VLC s
Full
S
Cine
m
Orig
i
Low
IPT
V
Aud
A
UDIO ke
y
Stereo.
Left/rig
h
o
rmat
i
t
o display
t
next pro
a
ilable, pr
e
played for
played, if
s
played, if
T
played, if
M
played for
played for
played for
a
ys the au
d
a
ys the si
g
e
enr
e
o
change t
e the sc
r
4
80p-60H
z
the resolu
T
V is con
n
N
TSC (N
T
treams.
S
creen.
m
a(Wide
i
na
l
.
Screen fo
V
Screen f
o
io
ch
a
y
to select
h
t channel
III.
i
onb
a
t
he chann
e
gram info
r
e
ss INFO
k
programs
s
ubtitle la
n
T
eletext is
M
ultifeeds
locked ch
pay TV c
h
programs
d
io chann
e
g
nal qualit
y
e
solu
t
he screen
r
een reso
l
z
) as the
T
tion with t
h
n
ected wit
T
SC TV).
Screen).
r low resol
o
r IPTV str
a
nnel
an audio
c
(Mono).
DAILY
U
[16]
a
r
e
l number
r
mation, i
f
k
ey again
t
in High D
e
n
guages a
r
available.
are availa
annels.
h
annels.
in Dolby
D
e
ls (mono,
y
and stre
n
t
ion
resolution
l
ution (10
8
T
V system
h
e
/
/O
h a Video
ution mov
i
eams.
c
hannel (
s
U
SAGE
& name, li
f
availabl
e
t
o display
t
e
finition.
r
e availabl
e
ble.
D
igital.
stereo).
n
gth.
.
8
0
i
-50Hz/
6
(50Hz=P
A
Kkeys.
cable, s
e
i
es.
s
tereo, m
o
st name, t
i
e
, will be
d
t
hem.
e
.
6
0H
z
, 72
0
A
L, 60Hz=
e
lect Scar
t
o
no left/ri
g
i
me.
d
isplayed.
0
p-50/60H
z
NTSC).
t
-PAL (P
A
g
ht).
If detail
z
, 576p-
A
L TV) or

III. DAILYUSAGE
[17]
11.
Teletext
Press TEXT key to display Teletext, if available. Operate the menu with the 0-9
numeric and coloured ( ) keys.
12.
Edit channels, Common Interface, event
list
Press key to display detail information about the channel.
Lock
Select On to lock the channel.
Descramble with
If 2 CAMs or a card are inserted, preset the channels to the
specific CAM or card for a faster decoding. Select the Slot (Slot
(Card),Slot 1, 2) to descramble (only satellite channels).
Save
Press MENU key to save the changes.
Delete
Press key to delete the channel.
Event list
Press key to display the event list for all recordings and
reservations. Select an event with the /keys. Press key
to delete an event, press key to delete all events.
13.
Photos/Picasa/Flickrradiosoundtrack
Enter styx media in radio mode to view Photos, Picasa and Flickr with radio as
soundtrack.
14.
Jumptime
Press the Jump keys to jump from a movie position backwards or forwards. Select the
jump time (1-10 min.) with the /keys.
15.
Multifeed
Some programs offer a variety of perspectives i.e. for sport events, these are called
Multifeeds. Press FEED key to display Multifeeds for a program, if available. Select a
feed with the //OK keys.
16.
Subtitlelanguage
TV
Press SUBT key to select subtitle languages, if available. Select a
language with the //OK keys.
Movies Supported formats: SRT, SMI, SUB.
Press SUBT key to display subtitles. Press this key again to deactivate
subtitles.
If the subtitle and movie are asynchronous, synchronize the subtitle
time. Press the /keys and adjust the time from -5 seconds to +5
seconds in 0.1 second steps.
NOTE
To display movie subtitles, the subtitle and menu language must be the
same and the movie file and subtitle file must have the same title.

IV. PROGRAMGUIDE(EPG)
[18]
17.
Edit/searchwindow
Select the edit/search window to rename (user lists, channels, recordings), to insert
(address, password, username) and to enter a search term.
Letter Select a letter with the //OK keys.
Delete Press key to delete a letter.
A/a/… Press key to change between capital/lower case letters and to display
special letters for a language.
Save Press key to save.
Cancel Press key to cancel.
IV. PROGRAMGUIDE(EPG)
1.
Programguide
Press EPG key to display the electronic program guide for current, next and scheduled
programs.
Now/next schedule.
Select a channel with the /keys to display the now/next schedule.
Enter the now/next schedule with the /keys.
Press OK key to change to the program.
Press OK key again to watch it in full screen.
Press INFO key to display detail information, if available.
Week schedule.
Select a program with the /, /keys.
Press the OK or INFO key to display detail information, if available.
Reserve
Press key to reserve programs (TV or Radio) to change to
this program at the scheduled time.
Mode Select an option (once, daily,weekly, daily (Mon-Fri)).
Date Enter the date with the 0-9 numeric keys for programs without
EPG schedule.
Begin Enter the start time with the 0-9 numeric keys for programs
without EPG schedule.
Press MENU key to save the event.
Record
Press key to set the timer for recordings.
Week Press key to switch between the now/next and week
schedule of the selected channel.
Event list Press key to display the event list for all recordings and
reservations. 20 Timer events (recordings and reservations) can
be programmed.
Delete Select an event with the /keys. Press key to delete.
Delete all Press key to delete all events.

V. RECORDING
[19]
1.
Recordingguide
USB memory
To record programs an USB memory 2.0 must be connected formatted in FAT32,
EXT2,EXT3.
To format an USB memory larger than 32GB with your windows PC in FAT32,
download the Fat32Formatter program from the internet to your PC.
To record HD programs the USB memory must have a minimum writing speed of
20 Mbps. It is recommended to record HD channels to a USB hard disk.
NOTE Ensure that there is enough free memory before recording. The recording
will not start, if there is not enough free memory.
Do not disconnect the USB memory from the device during recording or
playback as this could cause damage to the device and/or USB memory.
Highly fragmented or used memory may also not operate properly.
Recording to an USB memory formatted in NTFS is not possible.
USB Eject
Press the key to eject the connected USB memory. Always use this option before
disconnecting an USB memory. This function allows you to safely remove an USB
memory connected to your device to prevent loss of data.
Channel change
You can watch channels while recording one program of the same frequency. If the
recorded channel is not scrambled (FTA) you can select any other channel to watch. If
the recorded channel is scrambled, you can only select and watch not scrambled
channels.
Press CH UP/DOWN keys to change channels.
Press OK key and select a channel with the //OK keys.
Standby
Press STANDBY key during a recording to switch the device to standby mode after
the recording is finished.
For timer recordings, the device will switch to operation mode and start recording
at the specific time. After the recording is finished, the device will switch back to
standby mode (after 1 minute).
Timer
20 Timer events (recordings and reservations) can be programmed.
TV/Radio
Record TV and radio programs.
Playback
Enter Recordings (styx media) to playback recordings.

V. RECORDING
[20]
2.
Instantrecording
Recording Press RECORDING key to start the recording.
Duration The duration as set in Multimedia (User menu) is displayed.
Press the /keys to change the duration (max. 240 min.) in 10
min. steps.
Stop Press STOP/EXIT keys to stop a recording.
3.
Timeshiftrecording
Timeshift enables you to record and playback a program you are watching, while it is
still being broadcasted.
Start Press PAUSE key to start the Timeshift recording and to pause the
program.
Press PLAY key to start the playback.
Stop The recording stops, if you change to another channel, or if you press
STOP/EXIT keys.
Playback
Press the REWIND/FORWARD/SLOW MOTION/JUMP keys to playback
the recorded part.
Duration
The duration as set in Multimedia (User menu) is displayed (max. 180
min.).
File The Timeshift recording is stored in the TimeShift file in Recordings.
4.
Timerrecording
Press EPG key to program a timer.
Select a channel or program and press key.
Mode Select an option (once, daily,weekly, daily (Mon-Fri)).
Date Enter the date with the 0-9 numeric keys for programs without
EPG schedule.
Begin Enter the start time with the 0-9 numeric keys for programs
without EPG schedule.
Duration Select the duration (min. 10 min., max. 240 min.) for a recording.
Press MENU key to save the event.
Table of contents
Other Ferguson Set-top Box manuals


