Televes ZAS HBB User manual

HD DTT Set-top Box with TV on demand Access “zAs Hbb”
Ref. 511599
User Manual
www.televes.com


EN
ENGLISH
Index
1. Precautions .......................................................................... 6
2. General information .................................................................. 7
2. 1. Main characteristics ............................................................ 7
2. 2. Contents ..................................................................... 7
3. Description of connections . . . . . . . . . . . . . . . . . . . . . . . . . . . . . . . . . . . . . . . . . . . . . . . . . . . . . . . . . . . 8
3.1. Remote control unit ............................................................ 9
4. Installation of equipment ............................................................ 10
4.1. Connecting to a TV ............................................................. 10
5. Installation wizard ................................................................... 12
5. 1. Language selection ........................................................... 12
5. 2. Menu Positioning ............................................................... 12
5. 3. Country Selection ............................................................... 12
5. 4. Region Selection (if the country has several time zones) . . . . . . . . . . . . . . . . . . . . . . . . . 12
5. 5. Terrestrial Scanning ............................................................ 13
6. Basic functions ........................................................................ 14
6. 1. Channel selection .............................................................. 14
6. 2. Volume control ................................................................ 14
6. 3. Standby mode ................................................................. 14
6. 4. Teletext ........................................................................ 15
6. 5. Pop-ups ....................................................................... 15
6. 5. 1. Interactive pop-ups ...................................................... 15
6. 5. 2. Informational pop-ups ................................................... 16
7. LiveTV banner ....................................................................... 16
7. 1. Open / close .................................................................. 16
7. 2. Content ....................................................................... 16
7. 3. Detailed programme information . . . . . . . . . . . . . . . . . . . . . . . . . . . . . . . . . . . . . . . . . . . . . . 17
7. 4. Options ....................................................................... 17
8. Timeshifting ......................................................................... 18
8. 1. Switching from Live to TimeShifting . . . . . . . . . . . . . . . . . . . . . . . . . . . . . . . . . . . . . . . . . . . . 18
8. 2. TimeShifting banner . . . . . . . . . . . . . . . . . . . . . . . . . . . . . . . . . . . . . . . . . . . . . . . . . . . . . . . . . . . 19
8. 3. Trick modes .................................................................. 19
9. Main menu .......................................................................... 20
9. 1. Structure ..................................................................... 20
9. 2. Layout ........................................................................ 21
9. 3. Navigation ................................................................... 22
10. Channels list ....................................................................... 22
10. 1. Channel selection ............................................................ 22
10. 2. Options ...................................................................... 22
11. Electronic programme guide (epg) .................................................. 23
11. 1. Events list .................................................................... 23
11. 2. Detailed programme information . . . . . . . . . . . . . . . . . . . . . . . . . . . . . . . . . . . . . . . . . . . . . . 24
11. 3. Options ...................................................................... 24

4
ZAS Hbb
12. Recording .......................................................................... 25
12.1. Start ......................................................................... 25
12.1.1. From LiveTV banner .......................................................... 25
12.1.2. From channels list ....................................................... 25
12.1.3. From EPG ................................................................ 26
12.2. End time modication ......................................................... 26
12.2.1. From LiveTV banner ...................................................... 26
12.2.2. From channels list ...................................................... 26
12.2.3. From EPG ............................................................... 26
12.3. Stop .......................................................................... 26
12.3.1. From livetv banner ...................................................... 26
12.3.2. From channels list ...................................................... 27
12.3.3. From EPG ................................................................ 27
12.4. “My recordings” menu ........................................................ 27
12.4.1. Manage schedules ........................................................ 27
12.4.2. Manage recordings ....................................................... 29
12.4.3. Add a schedule ........................................................... 29
12.5. Conicts ...................................................................... 30
12.6. Failures management ......................................................... 30
13. Media center ....................................................................... 31
13.1. Media selection .............................................................. 31
13.2. Video banner ................................................................. 32
13.2.1. Open / close ............................................................. 32
13.2.2. Content .................................................................. 32
13.2.3. Detailed information ..................................................... 32
13.2.4. Options ................................................................. 32
13.2.5. Preview browsing ......................................................... 33
13.2.6. Trick modes ............................................................. 33
13.2.7. End of playback ......................................................... 34
13.3. Audio banner ................................................................ 34
13.3.1. Open / close .............................................................. 34
13.3.2. Content ................................................................. 34
13.3.3. Detailed information .................................................... 34
13.3.4. Options .................................................................. 35
13.3.5. Preview browsing ......................................................... 35
13.3.6. Trick modes .............................................................. 35
13.3.7. End of playback ........................................................... 35
13.4. Photo banner ................................................................ 35
13.4.1. Open / close ............................................................. 35
13.4.2. Content ................................................................ 36
13.4.3. Detailed information .................................................... 36
13.4.4. Options ................................................................. 36
13.4.5. Zoom .................................................................. 36
13.4.6. Preview browsing ....................................................... 37
13.4.7. Trick modes ............................................................ 37
13.4.8. End of playback ......................................................... 37
14. HbbTV content .................................................................... 38
14.1. How to access/exit HbbTV .................................................... 38
14.2. HbbTV navigation ............................................................. 38

5
EN
15. Settings ........................................................................... 39
15.1. Structure .................................................................... 39
15.2. Favorites lists .................................................................. 40
15.2.1. List selection ............................................................. 40
15.2.2. Add / remove ............................................................ 40
15.2.3. Reorder ................................................................. 41
15.2.4. Re-scanning .............................................................. 41
15.3. Video & audio .................................................................. 42
15.3.1. Screen ratio .............................................................. 42
15.3.2. HDMI resolution .......................................................... 42
15.3.3. Scart video format ....................................................... 42
15.3.4. Picture format ............................................................ 42
15.3.5. Audio output ............................................................. 43
15.4. User preferences .............................................................. 43
15.4.1. Menu language .......................................................... 43
15.4.2. Audio language .......................................................... 43
15.4.3. Subtitle language ........................................................ 44
15.4.4. Interface conguration ................................................... 45
15.4.5. HbbTV ................................................................... 45
15.4.6. Low power consumption .................................................. 45
15.5. Storage & recording ........................................................... 46
15.5.1. Storage .................................................................. 46
15.5.2. Start padding ............................................................ 47
15.5.3. End padding ............................................................. 47
15.5.4. Default recording duration ................................................ 47
15.5.5. Timeshifting ............................................................. 47
15.6. Advanced settings ............................................................. 47
15.6.1. Parental control .......................................................... 48
15.6.2. Network conguration .................................................... 49
15.6.3. Time zone ................................................................ 49
15.6.4. Channels search .......................................................... 49
15.6.5. Logical channel number .................................................. 50
15.6.6. Upgrade ................................................................. 50
15.6.7. Factory reset ............................................................. 50
15.7. Technical information .......................................................... 51
15.7.1. Connections state ......................................................... 51
15.7.2. System information . . . . . . . . . . . . . . . . . . . . . . . . . . . . . . . . . . . . . . . . . . . . . . . . . . . . . . . . 51
15.7.3. Legal notices .............................................................. 51
16. Software ugrade .................................................................... 52
16.1. Through USB .................................................................. 52
16.2. Through IP .................................................................... 52
Appendix A. Operating instructions for Remote Control Unit . . . . . . . . . . . . . . . . . . . . . . . . . . . . . 53
Appendix B. TV brand codes ............................................................. 55
Appendix C. Brand codes ................................................................ 58
Troubleshooting ........................................................................ 60
Technical Characteristics ................................................................ 62

6
ZAS Hbb
1. Precautions
¡Please read this manual before handling or connecting the equipment!
We recommend you to read the following safety instructions carefully.
POWER SUPPLY:
230V~ / 12V adapter.
The power supply adapter is the equipment’s disconnection device.
The power input base should be near the equipment and be easily accessible.
OVERLOAD:
To avoid the possibility of re or electrical discharge, do not overload power
inputs, extensions or adapters.
LIQUIDS:
Do not expose the power adapter to water spills or splashes.
Do not place objects or containers lled with liquid on or near the apparatus.
SMALL OBJECTS:
Avoid placing the equipment near small metal objects. They could enter
through the grooves or connectors on the adapter and cause serious damage.
CLEANING:
Unplug the adapter from the mains before cleaning.
Use a soft, damp cloth (without detergent) to clean the outside of the adapter.
VENTILATION:
Place the adapter in a well ventilated place with the grooves uncovered.
Avoid exposure to sun, heat sources or ames.
Do not place on top of other equipment.
CONNECTIONS:
Only use the recommended connections to avoid damaging the equipment.
CONNECTION TO TV:
Unplug the adapter before connecting or disconnecting it to a TV.
IF THESE GUIDELINES ARE NOT FOLLOWED, THE TV COULD SUFFER
DAMAGE.
LOCATION:
Position the adapter in an inside location protected from overloads, rain or
direct sunlight.
> 80 %
> 45 ºC
< -5 ºC

7
EN
2. General information
The ZAS Hbb is a hybrid DVB-T and IP, PVR over USB* ready,
set-top box.
DVB-T is the international standard for DVB (Digital Video
Broadcasting) terrestrial digital television. This standard
allows the transmission of multiple television services with
an extraordinary sound and image quality.
The reception of these programmes can be carried out
simply through an external or internal antenna, an ZAS
Hbb adapter and a television set.
In addition, to receive IP programmes, the ZAS Hbb must
be connected to the internet.
The ZAS Hbb is also compliant with the new HbbTV
standard.
Hybrid Broadcast Broadband TV or “HbbTV” is a major pan-
European initiative aimed at providing both broadcast and
broadband/web content on a at panel screen in the living
room.
Through the adoption of HbbTV, consumers will be able
to access new services from entertainment providers such
as broadcasters, online providers and CE manufacturers –
including catch-up TV, video on demand (VoD), interactive
advertising, personalization, voting, games and social
networking as well as programme-related services such as
digital text and EPGs.
To receive HbbTV services, the ZAS Hbb must be connected
to the internet.
This manual explains to you how to carry out the ZAS Hbb
installation and the necessary steps for using its dierent
functions.
2.1. Main characteristics
Free to Air channels (FTA) adapter.
Compatible with MPEG2 and MPEG4/H.264
HbbTV 1.1.1 compliant.
PVR over USB* ready: allows recording directly onto
external disk (formatted in FAT32, NTFS or ext3).
Recordings can be scheduled and recurrent.
Advanced reproduction functions (slow and fast
forward/rewind, pause, skip, go to).
USB Timeshifting function (manual or automatic).
Easy-to-use menu.
Initial installation is guided.
Multimedia function compatible with mp2/mp3 for
audio les, jpeg/jpg for photos and the following
formats for videos:
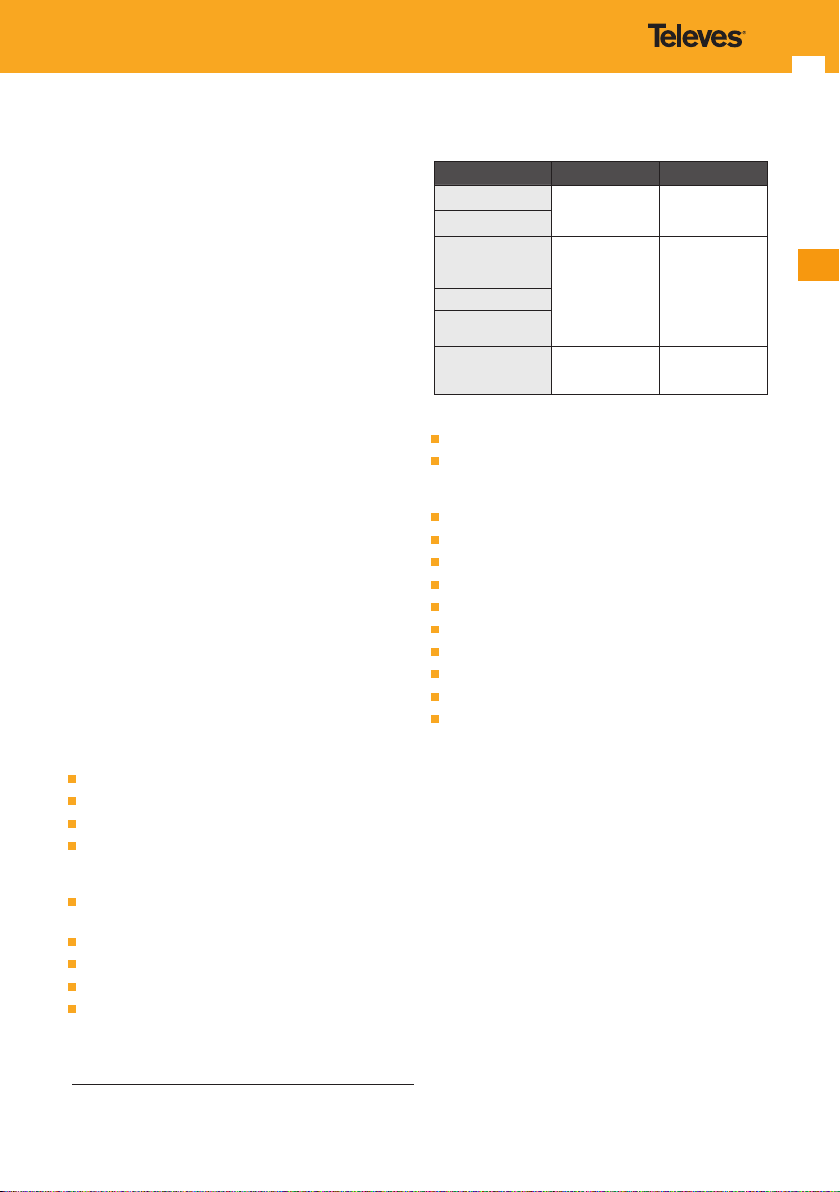
Container Video codec Audio codec
AVI (.avi, .divx)1MPEG-2 Part 2
H.264/MPEG-4 AVC
Xvid (MPEG-4 ASP)
AC-3
AAC
MPEG audio (1,2,3)
MKV (.mkv)
ISOM (.mp4, .mov,
.m4v, m4a, .3gp,
.3gp2, .3gpp, .3gpp2). MPEG-2 Part 2
H.264/MPEG-4 AVC
AC-3
AAC
MPEG audio (1,2,3)
MPEG TS (.ts)
M2TS / M2T (.m2ts,
.m2t)
MPEG PS (.mpg,
.mpeg, .m2v, .m2p,
.vob, .ps)
MPEG-2 Part 2
AC-3
AAC
MPEG audio (1,2,3)
1 Non indexed AVI les are not supported
HDMI/SCART video output.
Support of 8 interface languages (English, French,
Spanish, Italian, Polish, German, Portuguese and
Russian).
Support of LCN (Logical Channel Number).
7 lists of favourites (All TV, All Radio, A, B, C, D, E).
Up to 1000 channels.
Electronic Programme Guide (EPG).
Parental control.
OSD Teletext full and transparent.
Subtitles (ETSI EN 300 743 V1.2.1 & ETSI 300 472 V1.3.1).
Automatically saves last channel.
Low power consumption.
Fast and simple software upgrade via USB or IP.
2.2. Contents
Verify that the following components are included in the
packaging:
- 1 x ZAS Hbb adapter.
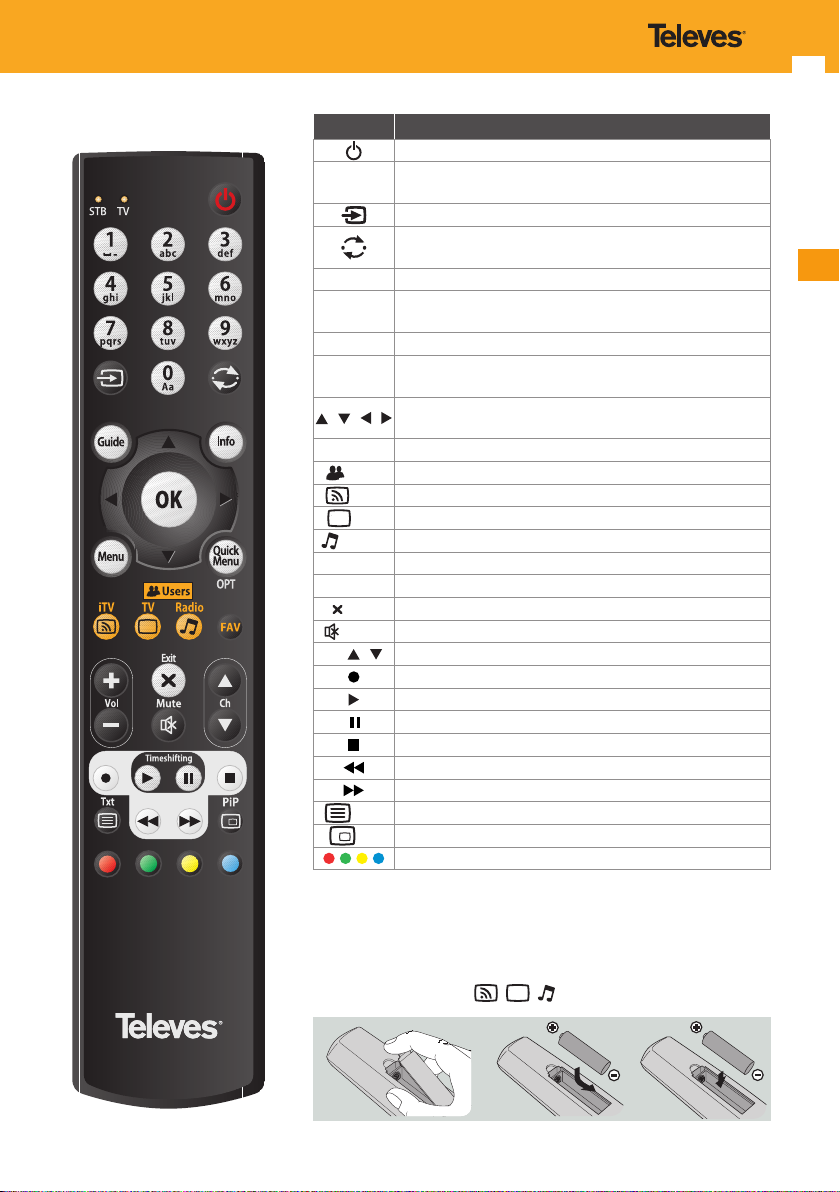
- 1 x remote control.
- 1 x antenna cable.
- 1 x HDMI cable.
- 1 x power adapter.
- 2 x type ”AAA” batteries.
- Instructions for use.
* Televés does not guarantee 100% compatibility with all USB
devices.

8
ZAS Hbb
No. Name Function
1 HOST USB Connection for a pen drive, memory card reader or external hard drive (FAT 32, NTFS and
EXT3). Some HDD models could require external power.
2 LED Operation Led. (Green: On, Red: Standby, Orange: No input signal).
3 IR IR sensor.
No. Name Function
4 RF-IN Signal input of terrestrial antenna.
5 RF-OUT RF signal output to connect to a TV or VCR.
6 LAN Ethernet connector.
7 SCART TV-OUT To connect to a TV via SCART (Euro) connector.
8 HDMI Interface for high denition signal connection.
9 OPTICAL Optical digital audio output.
10 DC-IN 12V Input to connect the 12V AC adapter.
3. Description of connections
Front panel
Back panel
4 5 6 7 8 9
10

9
EN
Button Function description
Switches between “power ON” and “STANDBY” mode.
0 ... 9 To select a desired program number.
Direct data entry on the menu.
This button is operative only in TV mode.
Return to the previous channel.
Go to the previous page in some interactive applications.
Guide Activates the EPG to the current program level.
Info Information about the TV program watched, and additional
contextual information.
MENU Activates the main menu on the screen.
Quick Menu
(OPT) Shortcut to contextual options.
/ / / Lets you move through the dierent menus and options in
each menu.
OK Conrm an option or a value in the menu.
Users Button not operative in this model*.
(iTV) Shortcut to the Media Center menu (video, music, photos).
(TV) Change to TV mode or show the list of channels.
(Radio) Change to Radio mode or show the list of channels.
FAV Activates favourite list.
Vol +/- Adjusts volume.
(Exit) Exit from menu or open window.
(Mute) Switch-o the sound (Mute).
Ch / Changes channel in TV or Radio modes.
Starts recording the selected channel.
Play the selected le.
It pauses the live program or pauses the le being played.
Stops either recording or playing.
Fast reverse play mode.
Fast or slow forward play mode
(Txt) Activates teletext for the displayed channel.
PiP Button not operative in this model*.
Functional buttons with interactive applications.
*Reserved for future use.
STB: Indicates operation in STB mode.
TV: Indicates operation in TV mode (Universal Remote Control Unit, see appendix
A: Operating instructions).
Note: The following keys are not active if the menu is opened or if the option panel
of a banner is opened: , , and FAV.
3.1. Remote control unit

10
ZAS Hbb
4. Installation of equipment
Dierent types of televisions and other equipment can be
connected to ZAS Hbb.
The most common forms of connecting it are shown in
this manual. If you have any problems connecting your
adapter, please contact your vendor.
There are two ways to connect the ZAS Hbb adapter to
your TV: by SCART lead or HDMI cable. If your TV has a
HDMI connector, use this type of connection to obtain the
best quality image.
When the connection is made using a SCART cable, the
ZAS Hbb can supply RGB or CVBS signals. By default, the
ZAS Hbb is already congured to supply the CVBS signal,
as some TVs do not support the RGB output. However, for
optimum image quality, it is recommended to select the
RGB option (as long as your TV is compatible with these
signals). To change the conguration from CVBS to RGB, do
it through the “Video Scart format” (see 15.3.3.- Scart video
format).
4.1. Connecting to a TV
- Connect the antenna signal to the RF IN connector of the
ZAS Hbb.
- Connect the audio and video between the ZAS Hbb
and the TV via SCART cable or HDMI connection
(recommended).
- Connect the RJ45 output (Ethernet output) to your
Internet router using an RJ45 patch cable.
- Switch on equipment sets (TV).
- Power the ZAS Hbb through the mains adapter.

11
EN
- Televés recommends using a HDMI cable category 2.
- If your TV only has a DVI connector, use a HDMI-DVI adapter. Connect an audio cable for the sound output.
- All the cables used for the adapter connections shall be shielded type.
- DO NOT PLUG IN the adapter to the mains before nishing all the unit connections.
- If you are using an inside antenna, verify that it is connected to the power supply.

12
ZAS Hbb
5. Installation wizard
Once all equipment connections have been made and the
adapter has been plugged into the electricity mains, when
powering on your product for the rst time after purchase,
the installation wizard will operate automatically.
Note: The installation wizard can be rerun from the beginning
by performing a reset to factory settings (see “Factory
reset” section).
5.1 Language selection
First you must select the language in which you would like
the screen menus to be displayed.
Select the menu language using the arrow keys and .
Press arrow key to conrm the selection.
Note: Default audio language is set according to language
selection.
Note: Languages supported are English, French, Spanish,
Italian, Polish, German, Portuguese and Russian.
Note: In all the screens of the installation wizard (except the
rst one), press arrow key to go back to previous
screen.
5.2 Menu Positioning
Then you have the possibility to ne-tune the position of
the main menu on the screen.
Press OK key to do so and use arrow keys , , and to
adjust the position of the menu.
Press OK key again to conrm the new position.
Press arrow key to move to next screen.
Note: The positioning area is limited to ± 90 pixels compared
to the factory position.
5.3 Country selection
On the next screen you must indicate the country where
the adapter is installed.
Select the country using the arrow keys and .
Press arrow key to conrm the selection.
Note: Countries supported are England, France, Spain, Italy,
Germany, Poland, Portugal, Russia and Other.
5.4 Region selection (if the country has several
time zones)
This screen is only displayed if you have chosen a country
with several time zones.
Select the region using the arrow keys and .
Press arrow key to conrm the selection.
Note: If you selected the country “Other”, instead of choosing
a region you have to choose your time zone.

13
EN
5.5 Terrestrial scanning
You can then apply lters to the channels scanning.
In a rst screen you can lter between radio and TV
channels.
By default, all channels types are scanned. To change that,
select a lter using the arrow keys and and press OK
to uncheck it.
Press arrow key on the top item to conrm the lters and
move to next screen.
In the second ltering screen you can lter between free to
air and scrambled channels.
By default, all channels types are scanned. To change that,
select a lter using the arrow keys and and press OK
to uncheck it.
Press arrow key on the top item to conrm the lters and
start the scanning.
Then channels search starts automatically.
This process may take some time. Please wait.
At the end of the search, channels are re-ordered and
numbered according to country LCN (Logical Channel
Number) if available.
When this is done you can navigate through the channels
list using arrow keys and .
Pressing OK exits the installation wizard and zaps to the
channel currently focused.
Note: You can cancel the search and go back to previous
screen at anytime by pressing arrow key .
Note: If the adapter has not found any channels at the end of
the search, a warning message is displayed. Once the
connections have been checked, press OK key to make
another search.

14
ZAS Hbb
6. Basic functions
This chapter describes some basic functions the product
provides such as channel selection, volume control and
standby mode.
6.1 Channel selection
You can switch the current channel by pressing the CH+/
CH- keys or entering the channel number directly using the
NUMERIC (0..9) keys.
Note: If there is no channel corresponding to the number
entered, the zapping is done on the rst lower channel
available in the channels list.
Note: The zapping sequence using CH+/CH- keys corresponds
to the order of the channels in the current favorites list.
Note: The channel number is coded on 4 digits maximum.
Note: You can also switch channels from the channels list or
EPG of the main menu.
To return to the previous channel, press key.
In case of scrambled channel the following image is
displayed.
In case of signal loss the following image is displayed.
6.2 Volume control
Press VOL+/VOL- keys to adjust the audio volume.
Press mute key ( ) to stop the audio temporarily.
Press this key again, or VOL+/VOL- to restore the sound.
VOL+/VOL- and mute keys are always active, except when
a pop-up is displayed.
Note: The mute function remains set while you switch
channels.
Note: 20 steps are dened to reach the maximum volume
level from the minimum one.
6.3 Standby mode
You can switch o the adapter (standby mode) using the
standby key .
When the adapter is in standby mode, press standby key
to activate it. The last viewed channel is then displayed.
When you start the adapter from power o, the adapter
goes into the state (standby or running) that was active
before the power cut. The last viewed channel before the
last standby is then displayed.

15
EN
Low Power Consumption (LPC) mode:
LPC mode is a mode in which most of the adapter elements
(A/V tuner, ethernet port, etc…) are cut to decrease the
adapter consumption below 1W.
After 5 minutes in standby mode, the adapter goes
automatically to LPC mode (this function can be
deactivated, see “Low power consumption” section).
Note:
Pressing the standby key while recording does not stop the
recording, the adapter goes to standby until the recording
completion then goes to LPC.
When entering standby, if a recording is scheduled in less
than 5 minutes, the adapter does not go to LPC. As described
above, it will only go to LPC after the recording completion.
When the adapter is in LPC, 5 minutes before the start of
a scheduled record, it goes to standby mode, in which the
recording is possible.
6.4 Teletext
On channels supporting Teletext, press successively TXT
key to start Teletext:
1. Start broadcast Teletext in full mode.
2. Start broadcast Teletext in transparent mode.
3. Close Tetelext.
Note: Teletext subtitles can be accessed on a particular
teletext page (for instance, usually page 888 in France).
6.5 Pop-Ups
6.5.1 Interactive pop-ups
Pop-up windows can be displayed at any time to allow
you to make a choice between alternative behaviors, to
enter information needed by the adapter or to actively
acknowledge a situation.
Interactive pop-ups can be displayed in the following
situations:
Conict management: A choice has to be made between
a zapping and a recording, or between two or more
schedules.
A recording will start in 3 minutes and there is no proper
storage device connected.
A new recording is scheduled in less than 3 minutes from
“My recordings…Add a schedule” or from the EPG and
there is no proper storage device connected.
Removal of a channel from “All TV” or “All radio” favorites
lists, when this channel is in another favorites list, or a
recording is in progress or scheduled on this channel.
Favorites lists reorder conrmation.
Password input.
File suppression conrmation.
File suppression error: An error as occurred during le
deletion, you have to acknowledge.
Recording lock conrmation.
Storage device ejection conrmation (when recording/
timeshifting/playback in progress).
Formatting conrmation.
Recording in progress while starting formatting.
Formatting progression/result: Pop-up during formatting
progression, and to acknowledge the completion.
OSD positioning instructions: You have to conrm when
OSD is positioned as desired.
Video resolution modication conrmation.
Playback resume: Start from last stopping point/start
from beginning.
Playback stop / end.
System update available: Update/Later.
System update conrmation.

16
ZAS Hbb
6.5.2 Informational pop-ups
Informational pop-ups are displayed when an event occurs,
but no direct user interaction is needed.
These pop-ups are displayed in the following situations:
A storage device has been plugged.
A storage device is installed and ready to be used.
The storage device can be safely unplugged.
A storage device has been unplugged.
A recording has started.
A recording is nished.
A recording has failed. This pop-up is displayed for
instance when a recording or timeshifting cannot start
because there is no proper storage device connected or
when a recording is stopped because the storage device
is unplugged during the recording.
The recording medium has reached a low threshold.
The recording medium is full.
The media being played has changed.
The current favorites list has changed.
You try to record or activate timeshifting function on a
radio channel (not allowed).
Radio key is pressed whereas there are no radio channels.
A remote control key reserved for a future functionality, is
pressed (for instance Users or PiP keys).
7. LiveTV banner
The LiveTV banner is the navigation interface you use to
navigate and interact with the adapter when watching live
content.
7.1 Open / Close
While watching live content, the LiveTV banner is displayed
when zapping using CH+/CH-, 0...9 or keys, or when
pressing INFO, OPT, FAV or (record) keys.
Note: 0...9 and keys could be caught by an HbbTV
application (note that the red button popup IS an
HbbTV application) and hence could not work as
described above in some cases.
To close the LiveTV banner:
Wait for a few seconds, the banner closes automatically
(duration congurable, see “Banner display duration”
section).
Press EXIT key.
Press arrow key or . This closes the banner and opens
the main menu on the EPG of the current channel.
7.2 Content
The LiveTV banner contains the following information:
Channel number and name (displayed only after a
zapping).
Channel logo.
Event name.
Start and end time of the event and a progress bar
indicating the elapsed time of the current event in
relation to the total duration.
Note: The progress bar is displayed only if the banner
corresponds to the event currently watched.

17
EN
Icons indicating some of the event attributes (displayed
only if the banner corresponds to the event currently
watched):
- Video format: or
- If the event is in HD:
- Age classication (possible values depend on country):
, , , ...
- If event is streamed in Dolby Digital Plus audio format:
- If the channel has Teletext:
- If the event is streamed in various audio formats:
- If the event has subtitles: one or more
- If subtitles for impaired hearing are available:
Event cover or a logo of the event type if the cover is not
available. Nothing is displayed if neither is available.
Note: If there is no programme information available, only
the channel number, name and logo are displayed.
Preview browsing:
When watching a channel with the LiveTV banner
displayed, if you press arrow keys or , the content of
the banner is changed to display the information of next or
previous event (passed events are not displayed). However,
the full screen video does not change.
When the banner is not on the current event, if you press
OPT key, record key or stop key , the focus comes back
to the current event, if an action corresponding to the key
pressed is applicable for the current event.
7.3 Detailed programme information
While the LiveTV banner is displayed, press INFO key to get
detailed programme information.
If the text occupies more than one page, use arrow keys
and to scroll up and down.
Press INFO again to close the detailed programme
information.
Note: Recording and timeshifting functions remain available.
7.4 Options
While watching live content or while the LiveTV banner is
displayed, press OPT key to display the options available
for the current programme.
The selected option appears highlighted. Use arrow keys
and to move about and select another option.
For each option, use arrow keys and to move about
the possible values (current value is highlighted), and press
OK to select one.
Available options are:
Audio language (if several languages are available).
Subtitle language (if subtitles are available).
Note: For audio and subtitles, both available languages
and special options (see “Special options” section of
the settings) are proposed. If an unknown language/
special option is available (means with an unknown
ISO 639 code), the ISO 639 code is displayed
unchanged. For instance it could be “v.o” or “org”, etc...
Picture format (if applicable).
Note: Persistency of the options audio language, subtitle
language and picture format is limited to the media
currently watched.

18
ZAS Hbb
Favorites list (if at least 2 non empty favorites lists are
available; only non empty lists are displayed).
Changing of favorites list zaps on the rst channel of
the newly selected favorites list, if the channel currently
watched is not in the newly selected favorites list.
Note: While watching live content or while the LiveTV
banner is displayed, press FAV key to display the
LiveTV banner with the option panel and the focus
sets on the favorites list’s eld.
This key is not active if there is only one non empty
favorites list.
Enable / disable (default) slideshow (only for radio
channels). This option is available if a photo or folder has
been previously selected as background slideshow (see
options on photo les in “Media Selection” section). When
enabled, the slideshow is played in loop mode. Press OPT
key again to close the options panel.
Press INFO key to replace the option panel by the detailed
programme information panel.
Note: Options remain available during timeshifting, and
changes done during timeshifting remains when going
back to live.
8. Timeshifting
For this function to be possible a storage device
formatted in FAT 32, NTFS or ext3, not read-only, with a
minimal available space of 3,6 Gb must be connected to
the adapter.
This storage device must be set as “default storage
device” in the settings (see “Storage” section).
If such a medium, properly congured in the settings,
is not connected to the adapter, an information pop-up
is displayed when you try to activate the timeshifting
function, indicating that the timeshifting is not possible.
The timeshifting buer is a circular buer limited to 50% of
the available space on the storage device; with a high limit
set to 18,8 Go. 3 modes are available (see “Timeshifting”
section of the settings):
Disabled: timeshifting function is not available.
Manual (default): buering starts only when you press pause
key . Going back to live resets the timeshifting buer.
Automatic: the programme is automatically buered
(temporarily) on the storage device as soon as you zap
onto the channel.
8.1 Switching from live to Timeshifting
While watching live content, press pause key to freeze
the image and switch to timeshifting. The timeshifting
banner is then displayed.
Pause makes the time gap or delay between the
broadcasting (live) point and watching point. The time
gap is equivalent to the period the programme has been
paused. Operations such as slow motion and fast rewind
also make the time gap.
Note: If the automatic mode is activated, you can also switch
from live to timeshifting by pressing directly the rewind
key .
To stop the timeshifting and go back to live:
Press stop key .
Use fast forward function until the current reading
position reaches the live point.
Perform a zapping using CH+/CH-, 0...9 or keys. This
also resets the timeshifting buer.

19
EN
8.2 Timeshifting banner
The timeshifting banner is displayed each time you use trick
modes, or when you press INFO key during timeshifting.
Note: Pressing INFO key when the banner is already displayed
has no eect as detailed programme information is not
available during timeshifting.
The timeshifting banner contains the following
information:
An icon on the channel logo indicating the operation in
progress (pause, play, forward, rewind) and the image
speed.
A timeline indicating the lling level of the timeshifting
buer.
A cursor indicating the position of the live in the
timeshifting buer.
A cursor indicating the current reading position and the
delay compared to the live.
As with the LiveTV banner, to close the timeshifting banner:
Wait for a few seconds, the banner closes automatically
(same duration as the LiveTV banner, see “Banner display
duration” section)
Press EXIT key.
Press arrow key or . This closes the banner and opens
the main menu on the EPG of the current channel.
Press OPT key to display the options available for the
current programme.
Available options are the ones described in the LiveTV
banner section.
8.3 Trick modes
To continue watching the programme from the same point
where it was paused, press play key .
Note: Whatever the watching speed in progress, pressing play
key will always go back to normal speed.
To navigate the time bar to search for a particular scene:
When video is playing (at normal speed or more):
Use the key for a fast rewind. Each time you press
the key, the rewind speed increases in the following
sequence: x-1, x-2, x-4, x-8, x-16, x-32, x-MAX (x-64).
Note: You can fast rewind back to the start point. If
you reach the start point while rewinding, the
programme is automatically played at normal
speed from that point.
Use the key for a fast forward. Each time you press
the key, the speed increases in the following sequence:
x2, x4, x8, x16, x32, xMAX (x64).
When video is paused (or in slow motion mode):
- Use the key for a slow forward. Each time you press
the key, the speed increases in the following sequence:
x1/8, x1/4, x1/2, x1.
Note: When reaching normal speed (x1 or x-1), you exit the
slow motion mode.
Skip function (jump of 30 seconds) can be activated by:
- A long press on key or . In this case a unique jump
forward or backward is done.
- Using skip keys. In this case a jump is done each time
the key is pressed.
To watch the programme frame by frame, press the pause
key successively.
Note: Frame by frame function is only available when the
video is playing at a speed of x1/8, x1/4, x1/2, x1, x2 or
x4.

20
ZAS Hbb
9. Main menu
Press MENU key to activate the main menu.
Press MENU or EXIT key to close the main menu.
9.1 Structure
The following diagram describes the main menu’s structure.
The settings sub-menus are described in details in the “Settings” section.
Table of contents