Ferm Industrial AGM1103P User manual

WWW.FERM-INDUSTRIAL.COM
EN
TR
Original instructions 04
Orijinal talimatların çevirisi 10
AGM1103P
AGM1103P
2
Fig. B
Fig. A
8
13
9
10
11
12 14
1 2
3

30 - 40o
3
Fig. C
Fig. D

4
EN
ANGLE GRINDER
AGM1103P 950W 115 mm
Thank you for buying this FERM product. By
doing so you now have an excellent product,
delivered by one of Europe’s leading suppliers.
All products delivered to you by Ferm are
manufactured according to the highest standards
of performance and safety. As part of our
philosophy we also provide an excellent customer
service, backed by our comprehensive warranty.
We hope you will enjoy using this product for
many years to come.
1. SAFETY INSTRUCTIONS
Read the enclosed safety warnings,
the additional safety warnings and the
instructions. Failure to follow the safety
warnings and the instructions may result in
electric shock, fire and/or serious injury. Save the
safety warnings and the instructions for future
reference.
The following symbols are used in the user
manual or on the product:
Read the user manual.
Denotes risk of personal injury, loss of life
or damage to the tool in case of non-
observance of the instructions in this
manual.
Risk of electric shock
Immediately remove the mains plug from
the mains if the mains cable becomes
damaged and during cleaning and
maintenance.
Risk of flying objects. Keep bystanders
away from the work area.
Always wear eye protection!
Wear hearing protection.
Wear safety gloves.
Do not press the spindle lock button
while the motor is running.
Risk of fire.
Do not dispose of the product in
unsuitable containers.
The product is in accordance with the
applicable safety standards in the
European directives.
Safety Warnings Common for
Grinding or Abrasive Cutting-Off
Operations:
a) This power tool is intended to function as
a grinder tool. Read all safety warnings,
instructions, illustrations and specifications
provided with this power tool. Failure to
follow all instructions listed below may result in
electric shock, fire and/or serious injury.
b) Operations such as sanding, wire brushing,
polishing are not recommended to be
performed with this power tool. Operations
for which the power tool was not designed
may create a hazard and cause personal injury.
c) Do not use accessories which are not
specifically designed and recommended
by the tool manufacturer.Just because the
accessory can be attached to your power tool,
it does not assure safe operation.
d) The rated speed of the accessory must
be at least equal to the maximum speed
marked on the power tool. Accessories
running faster than their rated speed can break
and fly apart.
e) The outside diameter and the thickness of
your accessory must be within the capacity
rating of your power tool. Incorrectly sized
accessories cannot be adequately guarded or
controlled.
f) Threaded mounting of accessories must
match the grinder spindle thread. For

5
EN
accessories mounted by flanges, the arbour
hole of the accessory must fit the locating
diameter of the flange. Accessories that do
not match the mounting hardware of the power
tool will run out of balance, vibrate excessively
and may cause loss of control.
g) Do not use a damaged accessory. Before
each use inspect the accessory such as
abrasive wheels for chips and cracks,
backing pad for cracks, tear or excess
wear, wire brush for loose or cracked wires.
If power tool or accessory is dropped,
inspect for damage or install an undamaged
accessory. After inspecting and installing
an accessory, position yourself and
bystanders away from the plane of the
rotating accessory and run the power tool
at maximum no-load speed for one minute.
Damaged accessories will normally break apart
during this test time.
h) Wear personal protective equipment.
Depending on application, use face
shield, safety goggles or safety glasses.
As appropriate, wear dust mask, hearing
protectors, gloves and workshop apron
capable of stopping small abrasive or
workpiece fragments. The eye protection
must be capable of stopping flying debris
generated by various operations. The dust
mask or respirator must be capable of filtrating
particles generated by your operation.
Prolonged exposure to high intensity noise
may cause hearing loss.
i) Keep bystanders a safe distance away from
work area. Anyone entering the work area
must wear personal protective equipment.
Fragments of workpiece or of a broken
accessory may fly away and cause injury
beyond immediate area of operation.
j) Hold the power tool by insulated gripping
surfaces only, when performing an
operation where the cutting accessory may
contact hidden wiring or its own cord.
Cutting accessory contacting a “live” wire may
make exposed metal parts of the power tool
“live” and could give the operator an electric
shock.
k) Position the cord clear of the spinning
accessory. If you lose control, the cord may
be cut or snagged and your hand or arm may
be pulled into the spinning accessory.
l) Never lay the power tool down until the
accessory has come to a complete stop.
The spinning accessory may grab the surface
and pull the power tool out of your control.
m) Do not run the power tool while carrying
it at your side. Accidental contact with the
spinning accessory could snag your clothing,
pulling the accessory into your body.
n) Regularly clean the power tool’s air vents.
The motor’s fan will draw the dust inside
the housing and excessive accumulation of
powdered metal may cause electrical hazards.
o) Do not operate the power tool near
flammable materials. Sparks could ignite
these materials.
p) Do not use accessories that require liquid
coolants. Using water or other liquid coolants
may result in electrocution or shock.
Kickback and Related Warnings
Kickback is a sudden reaction to a pinched or
snagged rotating wheel, backing pad, brush or
any other accessory. Pinching or snagging causes
rapid stalling of the rotating accessory which in
turn causes the uncontrolled power tool to be
forced in the direction opposite of the accessory’s
rotation at the point of the binding.
For example, if an abrasive wheel is snagged or
pinched by the workpiece, the edge of the wheel
that is entering into the pinch point can dig into
the surface of the material causing the wheel to
climb out or kick out. The wheel may either jump
toward or away from the operator, depending on
direction of the wheel’s movement at the point
of pinching. Abrasive wheels may also break
under these conditions. Kickback is the result
of power tool misuse and/or incorrect operating
procedures or conditions and can be avoided by
taking proper precautions as given below.
a) Maintain a firm grip on the power tool
and position your body and arm to allow
you to resist kickback forces. Always use
auxiliary handle, if provided, for maximum
control over kickback or torque reaction
during start-up. The operator can control
torque reactions or kickback forces, if proper
precautions are taken.
b) Never place your hand near the rotating
accessory. Accessory may kickback over your
hand.

6
EN
c) Do not position your body in the area where
power tool will move if kickback occurs.
Kickback will propel the tool in direction
opposite to the wheel’s movement at the point
of snagging.
d) Use special care when working corners,
sharp edges etc. Avoid bouncing and
snagging the accessory. Corners, sharp
edges or bouncing have a tendency to snag
the rotating accessory and cause loss of
control or kickback.
e) Do not attach a saw chain woodcarving
blade or toothed saw blade. Such blades
create frequent kickback and loss of control.
Safety Warnings Specific for
Grinding and Abrasive Cutting-Off
Operations:
a) Use only wheel types that are recommended
for your power tool and the specific guard
designed for the selected wheel. Wheels for
which the power tool was not designed cannot
be adequately guarded and are unsafe.
b) The grinding surface of centre depressed
wheels must be mounted below the plane of
the guard lip. An improperly mounted wheel
that projects through the plane of theguard lip
cannot be adequately protected.
c) The guard must be securely attached to the
power tool and positioned for maximum
safety, so the least amount of wheel is
exposed towards the operator. The guard
helps to protect the operator from broken
wheel fragments, accidental contact with
wheel and sparks that could ignite clothing.
d) Wheels must be used only for
recommended applications. For example:
do not grind with the side of cut-off wheel.
Abrasive cut-off wheels are intended for
peripheral grinding, side forces applied to
these wheels may cause them to shatter.
e) Always use undamaged wheel flanges
that are of correct size and shape for your
selected wheel. Proper wheel flanges support
the wheel thus reducing the possibility of
wheel breakage. Flanges for cut-off wheels
may be different from grinding wheel flanges.
f) Do not use worn down wheels from larger
power tools. Wheel intended for larger power
tool is not suitable for the higher speed of a
smaller tool and may burst.
Additional Safety Warnings Specific
for Abrasive Cutting-Off Operations:
Cut-off operations are only suitable
with a special protection guard (not
included)
a) Do not “jam” the cut-off wheel or apply
excessive pressure. Do not attempt to make
an excessive depth of cut. Overstressing the
wheel increases the loading and susceptibility
to twisting or binding of the wheel in the cut and
the possibility of kickback or wheel breakage.
b) Do not position your body in line with and
behind the rotating wheel. When the wheel,
at the point of operation, is moving away from
your body, the possible kickback may propel the
spinning wheel and the power tool directly at you.
c) When wheel is binding or when interrupting
a cut for any reason, switch off the power
tool and hold the power tool motionless
until the wheel comes to a complete stop.
Never attempt to remove the cut-off wheel
from the cut while the wheel is in motion
otherwise kickback may occur. Investigate
and take corrective action to eliminate the
cause of wheel binding.
d) Do not restart the cutting operation in the
workpiece. Let the wheel reach full speed
and carefully re-enter the cut. The wheel
may bind, walk up or kickback if the power tool
is restarted in the workpiece.
e) Support panels or any oversized workpiece
to minimize the risk of wheel pinching and
kickback. Large workpieces tend to sag under
their own weight. Supports must be placed
under the workpiece near the line of cut and
near the edge of the workpiece on both sides
of the wheel.
f) Use extra caution when making a “pocket
cut” into existing walls or other blind areas.
The protruding wheel may cut gas or water
pipes, electrical wiring or objects that can
cause kickback.
Electrical safety
When using electric machines always observe the
safety regulations applicable in your country to
reduce the risk of fire, electric shock and personal
injury. Read the following safety instructions and
also the enclosed safety instructions.

7
EN
Always check that the voltage of the
power supply corresponds to the voltage
on the rating plate label.
Class II machine - Double insulation - You
don’t need any earthed plug.
If operating a power tool in a damp location is
unavoidable, use a residual current device (RCD)
protected supply. Use of an RCD reduces the risk
of electric shock.
2. MACHINE INFORMATION
Intended use
Your angle grinder has been designed for grinding
masonry and steel materials without the use of
water. For cutting, a special protection guard
must be used (not included)
Technical specifications
Mains voltage 230 V~
Mains frequency 50-60 Hz
Power input 950W
Rated speed 12.000 /min
Wheel disc for grinding
Diameter 115 mm
Bore 22 mm
Spindle thread M14
Weight 2.0 kg
Sound pressure (LPA)89 + 3 dB(A)
Acoustic power (LWA)100 + 3 dB(A)
Vibration “Surface grinding” ah,AG 11.2 + 1.5 m/s2
Vibration level
The vibration emission level stated in this
instruction manual has been measured in
accordance with a standardised test given in
EN 60745; it may be used to compare one tool
with another and as a preliminary assessment of
exposure to vibration when using the tool for the
applications mentioned
• using the tool for different applications, or with
different or poorly maintained accessories,
may significantly increase the exposure level
• the times when the tool is switched off or when
it is running but not actually doing the job, may
significantly reduce the exposure level.
Protect yourself against the effects of vibration by
maintaining the tool and its accessories, keeping
your hands warm, andorganizing your work
patterns.
Description
The numbers in the text refer to the diagrams on
pages 2-3
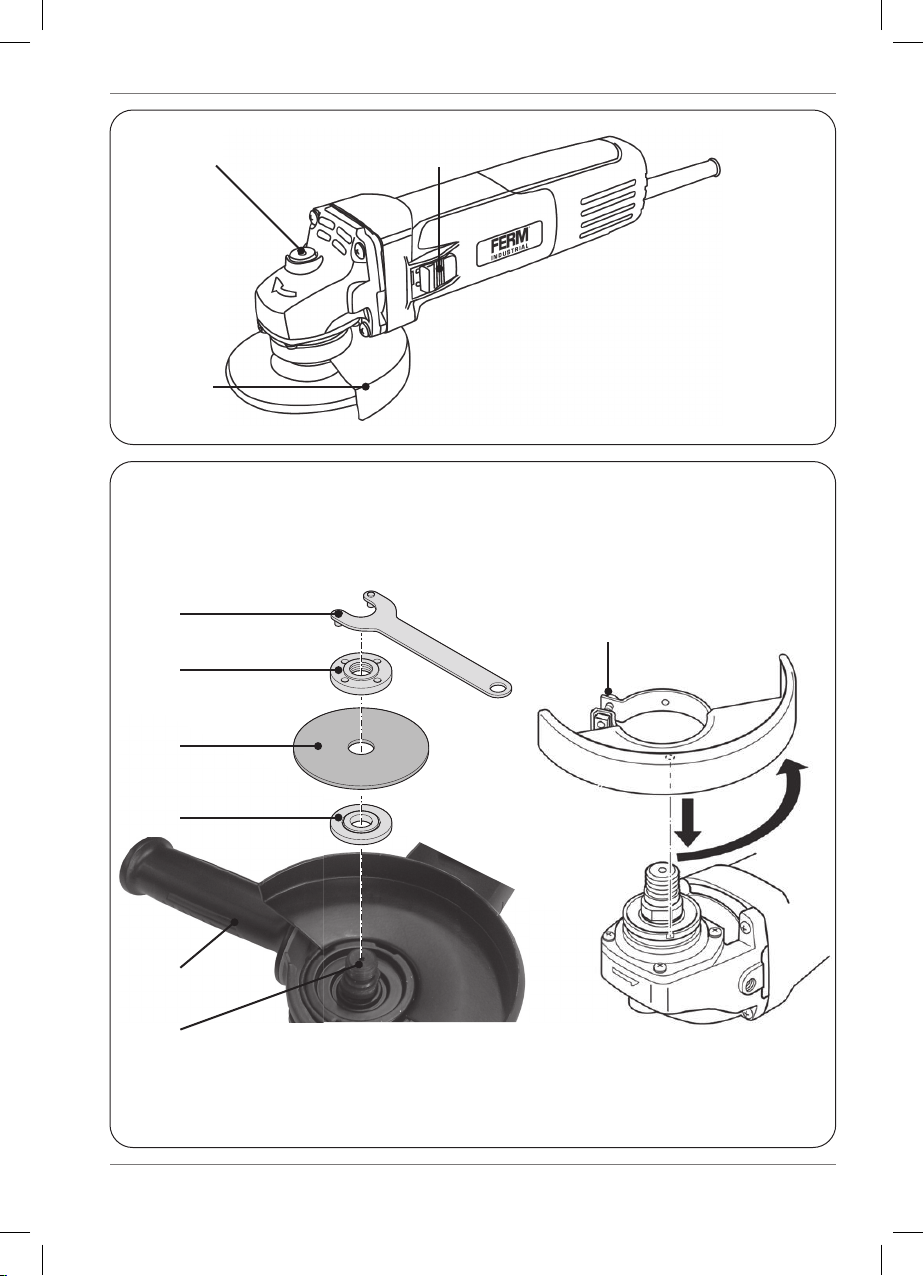
Fig. A
1. Spindle lock button
2. On/Off switch
3. Protection guard
Fig. B
8. Spindle
9. Mounting flange
10. Wheel disc (not included)
11. Clamping nut
12. Spanner
13. Side handle
Assembly
Before assembly, always switch off the
machine and remove the mains plug from
the mains.
Assembling the protection guard
(Fig. A and B)
• Place the machine on a tablewith the spindle
(8) facing upwards.
• Place the protection guard (3) over the
machine head as shown in Figure C making
sure the ridges on the protection guard fall into
the notches of the machine head.
• Turn the protection guard counter clockwise and
secure the guard by tightening the screw (14).
Never attempt to remove the guard.
Mounting and removing the wheel disc
(Fig. B)
• Always use suitable wheel disc for this
machine with diameter Ø 115 mm and a bore
from 22 mm the thickness of the wheel disc
should be 6 mm for wheel disc for grinding and

8
EN
3 mm for wheel disc for cutting, the mounting
wheel disc may not touch the safety guard.
Mounting
• Place the machine on a table with the
protection guard (3) facing upwards.
• Mount the flange (9) onto the spindle (8).
• Place the wheel disc (10) onto the spindle (8).
• Keep the spindle lock button (1) pressed and
firmly tighten the clamping nut (11) onto the
spindle (8) by using the spanner (12).
Removing
• Place the machine on a table with the
protection guard (3) facing upwards.
• Keep the spindle lock button (1) pressed and
loosen the clamping nut (11) using the spanner
(12).
• Remove the wheel disc (10) from the spindle (8).
• Keep the spindle lock button (1) pressed and
firmly tighten the clamping nut (11) using the
spanner (12).
3. OPERATING
Make sure that the work piece is properly
supported or fixed and keep the supply
cord routing away from the work area.
Switching on and off (Fig. A)
• To switch the machine on, press the On/off
switch (2).
• To switch the machine off, release the On/off
switch (2).
Hold the machine away from the work piece when
turning it on and off because the wheel disc could
damage the work piece.
• Clamp the work piece firmly or use another
method to ensure that it cannot move while
working.
• Check the discs regularly. Worn wheel discs
have a negative effect on the machine’s efficien-
cy. Change to a new wheel disc in good time.
• Always first turn the machine off after use
before removing the plug from the socket.
Deburring (Fig. C)
An angle of inclination of 30º to 40º will give the
best results when deburring. Move the machine
back and forth using light pressure. This will
prevent the work piece from discolouring or
becoming too hot and will avoid making groves.
Never use abrasive cutting discs for
deburring work!
Cutting (Fig. D)
For cutting, a special protection guard must be
used (not included).
Maintain firm contact with the work piece to
prevent vibration and do not tilt or apply pressure
and when cutting. Use moderate pressure when
working, appropriate to the material that is
being worked on. Do not slow down wheel discs
by applying sideways counter pressure. The
direction in which you want to cut is important.
The machine must always work against the
direction of the cut; so never move the machine
in the other direction! There is the risk that the
machine will catch in the cut causing kickback
and that you will lose control.
Hints for optimum use
• Clamp the work piece. Use a clamping device
for small work pieces.
• Hold the machine with both hands.
• Switch on the machine.
• Wait until the machine has reached full speed.
• Place the wheel disc on the work piece.
• Slowly move the machine along the work
piece, firmly pressing the wheel disc against
the work piece.
• Do not apply too much pressure on the
machine. Let the machine do the work.
• Switch off the machine and wait for the
machine to come to a complete standstill
before putting the machine down.
4. MAINTENANCE
Mains plug replacement (UK only)
If the moulded 3-pin plug attached to the unit is
damaged and needs replacing, it is important
that it is correctly destroyed and replaced by
an approved BS 1363/7A fused plug and that
9
EN
the following wiring instructions are followed.
The wires in the mains cable are coloured in
accordance with the following code:
• blue neutral
• brown live
As the colours of the wires in the mains cable
of the unit may not correspond to the coloured
markings identifying the terminals in the plug,
proceed as follows:
• The wire which is coloured blue must be
connected to the terminal which is marked
with the letter N or coloured black.
• The wire which is coloured brown must be
connected to the terminal which is marked
with the letter L or coloured red.
Before cleaning and maintenance, always
switch off the machine and remove the
mains plug from the mains.
Clean the machine casings regularly with a soft
cloth, preferably after each use. Make sure that
the ventilation openings are free of dust and
dirt. Remove very persistent dirt using a soft
cloth moistened with soapsuds. Do not use any
solvents such as gasoline, alcohol, ammonia,
etc. Chemicals such as these will damage the
synthetic components.
Replace power cords
If the supply cord is damaged, it must be replaced
by the manufacturer, its service agent or similarly
qualified persons in order to avoid a hazard.
Checking and replacing the carbon brushes
If the carbon brushes are worn, the machine will
start to run unevenly.
Carbon brush
If the carbon brushes are worn, the carbon
brushes must be replaced by the customer
service department of the manufacturer or a
similarly qualified person.
Only use the correct orginial type of
carbon brushes.
ENVIRONMENT
Faulty and/or discarded electrical or
electronic apparatus have to be collected
at the appropriate recycling locations.
Only for EC countries
Do not dispose of power tools into domestic
waste. According to the European Guideline
2012/19/EC for Waste Electrical and Electronic
Equipment and its implementation into national
right, power tools that are no longer usable must
be collected separately and disposed of in an
environmentally friendly way.
WARRANTY
The warranty conditions can be found on the
separately enclosed warranty card.
The product and the user manual are subject
to change. Specifications can be changed
without further notice.

10
TR
AÇILI TAŞLAYICI
AGM1103P 950W 115 mm
Bu Ferm ürününü satın aldığınız için teşekkür
ederiz. Bu sayede artık Avrupa’nın önde gelen
sağlayıcılarından biri tarafından teslim edilen,
mükemmel bir ürüne sahipsiniz. Ferm tarafından
size teslim edilen bütün ürünler en yüksek
performans ve güvenlik standartlarına göre
üretilmiştir. Felsefemizin bir parçası olarak ayrıca
kapsamlı garantimiz tarafından desteklenen
mükemmel bir müşteri hizmeti sağlıyoruz. Umarız
bu ürünü gelecek yıllar boyunca kullanmaktan
zevk alırsınız.
1. GÜVENLİK TALİMATLARI
Ekteki güvenlik uyarılarını, ilave
güvenlik uyarılarını ve talimatları
okuyun. Güvenlik uyarılarını ve talimatları
izlememek. Elektrik çarpması, yangın ve/veya ciddi
yaralanma ile sonuçlanabilir. Güvenlik uyarılarını
ve talimatları gelecekte referans olması için
saklayın.
Aşağıdaki semboller kullanıcı kılavuzunda veya
ürün üzerinde kullanılmaktadır:
Kullanıcı kılavuzunu okuyun.
Bu kılavuzdaki talimatlara uymama
durumunda bedensel yaralanma, can
kaybı veya alete hasar riskini belirtir.
Elektrik çarpması riski
Şebeke kablosu temizlik ve bakım
sırasında hasar görürse şebeke fişini
hemen şebekeden çıkarın.
Uçan nesne riski. Seyircileri iş alanından
uzak tutun.
Her zaman göz koruması takın!
Duyma koruması takın.
Güvenlik eldivenleri giyin.
Motor çalışırken mil kilidi düğmesine
basmayın.
Yangın riski.
Ürünü uygun olmayan kaplara atmayın.
Ürün Avrupa yönergelerindeki geçerli
güvenlik standartlarına uygundur.
Taşlama veya Aşındırıcı Kesme
İşlemleri için Güvenlik Uyarıları:
a) Bu elektrikli alet bir taşlama aleti işlevi için
amaçlanmıştır. Bu elektrikli aletle birlikte
sağlanan tüm güvenlik uyarılarını, talimatları,
çizimleri ve spesifikasyonları okuyun.
Aşağıda listelenen tüm güvenlik uyarılarını ve
talimatları izlememek elektrik çarpması, yangın
ve/veya ciddi yaralanma ile sonuçlanabilir.
b) Zımparalama, telli fırçalama, cilalama
gibi işlemlerin bu elektrikli aletle
gerçekleştirilmesi önerilmemektedir. Elektrikli
aletin tasarlanmış olmadığı işlemler bir tehlike
yaratabilir ve bedensel yaralanmaya neden
olabilir.
c) Alet üreticisi tarafından özellikle
tasarlanmamış ve önerilmemiş aksesuarları
kullanmayın. Aksesuar elektrikli aletinize
takılabiliyor diye güvenli işlemi garanti etmez.
d) Aksesuarın anma hızı elektrikli alet üzerinde
işaretli maksimum hıza en azından eşit
olmalıdır. Anma hızlarından hızlı çalışan
aksesuarlar kırılıp parçalanabilir.
e) Aksesuarınızın dış çapı ve kalınlığı elektrikli
aletinizin kapasite oranı içinde olmalıdır.
Yanlış boyuttaki aksesuarlar yeterince
korunamaz ve kontrol edilemez.
f) Aksesuarların dişli montajı öğütücü mil
dişiyle eşleşmelidir. Flençlerle monte
edilen aksesuarlar için, aksesuarın çark
deliği flençin yerleştirme çapına uymalıdır.
Elektrikli aletin monte donanımıyla eşleşmeyen
aksesuarlar dengesizleşecek, aşırı derecede
titreyecektir ve kontrol kaybına neden olabilir.

11
TR
g) Hasar görmüş bir aksesuarı kullanmayın.
Her kullanımdan önce taşlama çarklarını
aşınma ve çatlaklar, destek yastığını çatlaklar,
yırtılma veya aşırı yıpranma, tel fırçasını gevşek
veya çatlamış teller açısından gibi aksesuarı
kontrol edin. Elektrikli alet veya aksesuar
düşürülürse, hasar açısından kontrol edin
veya hasar görmemiş bir aksesuar takın. Bir
aksesuarı kontrol ettikten ve taktıktan sonra,
kendinizi ve izleyicileri dönen aksesuarın
yüzeyinden uzaklaştırın ve elektrikli aleti
bir dakikalığına maksimum yüksüz hızda
çalıştırın. Hasar görmüş aksesuarlar normal
olarak bu test süresi içinde parçalanacaktır.
h) Kişisel koruyucu donanım takın. Uygulamaya
bağlı olarak yüz siperi, koruyucu gözlük veya
emniyet gözlüğü kullanın. Uygun görüldüğü
şekilde, küçük aşındırıcı ve iş parçalarını
durdurabilecek toz maskesi, duyma
koruyucuları, eldivenler ve atölye önlüğü
giyin. Göz koruması çeşitli işlemler tarafından
üretilen uçuşan molozu durdurabilecek nitelikte
olmalıdır. Toz maskesi veya respiratör, yaptığınız
işlem tarafından üretilen parçacıkları filtre
edebilmelidir. Yüksek yoğunluktaki gürültüye
uzun süre maruz kalma, işitme kaybına neden
olabilir.
i) İzleyicileri iş alanından güvenli bir mesafede
tutun. Çalışma alanına giren herkes kişisel
koruyucu donanım giymelidir. İş parçası veya
kırılmış bir aksesuarın parçaları fırlayabilir ve
acil işlem alanının ötesinde yaralanmaya neden
olabilir.
j) Elektrikli aleti yalnızca izole edilmiş
tutma yüzeylerinden tutun, bir işlem
gerçekleştirirken kesme aksesuarı gizli
tellerle veya kendi kordonuyla temas
edebilir. Kesme aksesuarının “elektrikli” bir
telle temas etmesi, elektrikli aletin açık metal
kısımlarına “elektrik” verebilir ve operatörü
elektrik çarpabilir.
k) Kordonu dönen aksesuardan uzağa
konumlandırın.Kontrolü kaybederseniz,
kordon kesilebilir veya takılabilir ve eliniz veya
kolunuz dönen aksesuara kapılabilir.
l) Aksesuar tamamen durana kadar elektrikli
aleti asla bir yere koymayın. Dönen aksesuar
yüzeyi tutabilir ve elektrikli aleti kontrolünüzden
çıkarabilir.
m) Yan tarafınızda taşırken elektrikli aleti
çalıştırmayın. Dönen aksesuarla kazara temas
kıyafetinize takılabilir ve aksesuarı bedeninize
çekebilir.
n) Elektrikli aletin havalandırma deliklerini
düzenli olarak temizleyin. Motorun fanı tozu
yuvanın içine çekecektir ve toz haline gelmiş
metalin aşırı birikimi elektrik tehlikelerine neden
olabilir.
o) Elektrikli aleti alev alan maddelerin yakınında
çalıştırmayın. Kıvılcımlar bu maddeleri
tutuşturabilir.
p) Sıvı soğutucu gerektiren aksesuarlar
kullanmayın. Su veya diğer sıvı soğutucuları
kullanmak elektrik yüzünden ölüm veya elektrik
çarpmasıyla sonuçlanabilir.
Geri Tepme ve İlgili Uyarılar
Geri tepme, sıkıştırılmış veya takılmış dönen
çark, destek tamponu, fırça veya başka diğer
aksesuara ani bir tepkidir. Sıkıştırma veya takılma
dönen aksesuarın hızlı teklemesine neden olur,
bu da kontrol edilmeyen elektrikli aletin bağlama
noktasında aksesuarın dönüşün karşı yönünde
zorlanmasına neden olur. Örneğin, bir taşlama
çarkı iş parçası tarafından takılır veya sıkıştırılırsa,
sıkıştırma noktasına giren çarkın kenarı çarkın
yükselmesine veya atmasına neden olarak
materyalin yüzeyini delebilir. Çark sıkıştırma
noktasında çarkın hareketinin yönüne bağlı
olarak operatöre doğru veya operatörden uzağa
sıçrayabilir. Taşlama çarkları ayrıca bu koşullar
altında da bozulabilir. Geri tepme elektrikli aletin
hatalı kullanımı ve/veya yanlış işlem prosedürleri
veya koşullarının sonucunda oluşur ve aşağıdaki
gibi uygun önlemler alınarak engellenebilir.
a) Elektrikli aleti sıkı tutun ve bedeninizi ve
kolunuzu geri tepme kuvvetlerine dayanmaya
izin verecek şekilde konumlandırın. Eğer
sağlandıysa çalıştırma sırasında geri tepme
veya tork tepkisine karşı maksimum kontrol
için her zaman yardımcı tutamağı kullanın.
Doğru önlemler alınırsa, operatör tork tepkilerini
veya geri tepme kuvvetlerini kontrol edebilir.
b) Elinizi asla dönen aksesuarın yakınına
yerleştirmeyin.Aksesuar elinizin üzerinden geri
tepebilir.
c) Geri tepme meydana gelirse elektrikli
aletin hareket edeceği alana bedeninizi
konumlandırmayın. Geri tepme, aleti çarkın
takılma noktasındaki hareketinin aksi yönünde
itecektir.

12
TR
d) Köşelerde, keskin kenarlarda vs. çalışırken
özel dikkat gösterin. Aksesuarı sallamaktan ve
taktırmaktan kaçının. Köşeler, keskin kenarlar
veya sallamak, dönen aksesuarın takılması
eğilimine sahiptir ve kontrol kaybına veya geri
tepmeye neden olur.
e) Zincir testere oyma bıçağı veya dişli testere
bıçağı takmayın. Bu tür bıçaklar sıklıkla geri
tepme ve kontrol kaybı yaratır.
Taşlama veya Aşındırıcı Kesme
İşlemleri için Özel Güvenlik Uyarıları:
a) Yalnızca elektrikli aletiniz için önerilen çark
türlerini ve seçilen çark için olarak tasarlanmış
özel siperi kullanın. Elektrikli alet için
tasarlanmamış çarklar yeterince korunamaz ve
emniyetsizdir.
b) Ortası çukur çarkların taşlama yüzeyi, siper
contası düzleminin altına monte edilmelidir.
Siper contasının düzlemi içinden yansıtma yapan
uygun olmayan bir şekilde monte edilmiş çark ,
yeterince korunamaz.
c) Siper, elektrikli alete güvenli bir şekilde
takılı olmalı ve maksimum güvenlik için
konumlandırılmalıdır, böylece operatör en az
miktarda çarka maruz kalır. Siper operatörü
kırık çark parçalarından, giysileri tutuşturabilecek
çark ve kıvılcımlarla kaza sonucu temastan
korumaya yardımcı olur.
d) Çarklar yalnızca önerilen uygulamalar için
kullanılmalıdır. Örneğin: kesme çarkının
kenarıyla taşlama yapmayın. Aşındırıcı kesme
çarkları çevresel taşlama içindir, bu çarklara
uygulanan yan kuvvetler onların parçalanmasına
neden olabilir.
e) Her zaman, seçtiğiniz çark için doğru boyut
ve şekilde hasar görmemiş çark flençlerini
kullanın. Uygun tekerlek flençleri çarkı
destekleyerek çark kırılması olasılığını azaltır.
Kesme çarkları için flençler taşlama çemberi
flençlerinden farklı olabilir.
f) Daha büyük elektrikli aletlerin aşınmış
çarklarını kullanmayın. Daha büyük elektrikli alet
için amaçlanan çark, daha küçük bir aletin daha
yüksek hızı için uygun değildir ve patlayabilir.
Elektrik güvenliği
Elektrikli makineleri kullanırken yangın, elektrik
çarpması ve bedensel yaralanma riskini azaltmak
için ülkenizde geçerli güvenlik düzenlemelerine
her zaman uyun. Aşağıdaki güvenlik talimatlarını
ve ayrıca ekteki güvenlik talimatlarını okuyun.
Güç kaynağının voltajının, anma değeri
plakası etiketi üzerindeki voltaja karşılık
geldiğini her zaman kontrol edin.
corresponds to the voltage on the rating
plate label.
Sınıf II makine- Çift İzolasyon -
Topraklanmış prize ihtiyacınız yok.
Elektrikli aleti nemli bir konumda çalıştırmak
kaçınılmazsa, kaçak akım cihazı (RCD) korumalı
bir kaynak kullanın. RCD kullanımı elektrik
çarpması riskini azaltır.
MAKİNE BİLGİSİ
Kullanım amacı
Açılı taşlayıcınız su kullanmadan taş ve çelik
maddeleri taşlamak için tasarlanmıştır. Kesme
için özel bir koruma siperi kullanılmalıdır (dahil
değildir).
Teknik spesifikasyonlar
Şebeke voltajı 230 V~
Şebeke frekansı 50-60 Hz
Güç girişi 950W
Anma hızı 12.000/min
Taşlama için çark diski
Çap 115 mm
İç çap 22 mm
Dingil dişi M14
Ağırlık 2.0 kg
Ses basıncı (LPA) 89 + 3 dB(A)
Akustik güç (LWA) 100+ 3 dB(A)
Vibrasyon “Yüzey taşlama” ah,AG 11.2 + 1.5 m/s2
Vibrasyon seviyesi
Bu talimat kılavuzunda belirtilen vibrasyon
emisyon seviyesi EN 60745’te verilen bir standart
teste uygun olarak ölçülmüştür; bir aleti diğeriyle
karşılaştırmak ve aleti bahsedilen uygulamalar

13
TR
için kullanırken vibrasyona maruz kalmanın ön
değerlendirmesi olarak kullanılabilir
• aleti farklı uygulamalar veya farklı ya da kötü
bakılan aksesuarlarla kullanmak, maruz kalma
seviyesini büyük ölçüde artırabilir
• aletin kapalı olduğu veya çalışıp gerçekten işi
yapmadığı zamanlar maruz kalma seviyesini
büyük ölçüde düşürebilir
Aletin ve aksesuarların bakımını yaparak, ellerinizi
sıcak tutarak ve çalışma düzenlerinizi organize
ederek vibrasyonun etkilerine karşı kendinizi
koruyun.
Açıklama
Metindeki numaralar sayfa 2-3’teki şemaları işaret
etmektedir
Şek. A
1. Mil kilidi düğmesi
2. Açma/Kapama anahtarı
3. Koruma siperi
Şek. B
8. Mil
9. Monte flençi
10. Çark diski (dahil değil)
11. Sıkıştırma somunu
12. Açık ağızlı anahtar
13. Yan tutamak
Montaj
Montajdan önce her zaman makineyi
kapatın ve şebeke prizini şebekeden
çıkarın.
Koruma siperini monte etme (şek. A ve B)
• Makineyi mil (8) yukarı bakacak şekilde bir
masaya koyun.
• Koruma siperini (3) Şekil C’de gösterildiği
üzere, koruma siperi üzerindeki çıkıntıların
makine kafasının çentiklerine yerleştiğinden
emin olarak makine kafasının üzerine
yerleştirin.
• Koruma siperini saat yönünün tersine çevirin
ve vidayı sıkılaştırarak korumayı sabitleyin (14).
Makineyi sipersiz kullanmaya asla
kalkışmayın.
Diski monte etme ve çıkarma (şek. B)
• Bu makine için her zaman Ø 180mm çapında
ve 22.2 mm iç çapında uygun çark diski
kullanın, çark diskinin kalınlığı taşlama için
çark diski için 6 mm ve kesme için çark diski
için 3 mm olmalıdır, monte çark diski güvenlik
siperine temas etmeyebilir.
Monte
• Makineyi koruma siperi (3) yukarı bakacak
şekilde bir masa üzerine koyun.
• Flençi (9) mil (8) üzerine monte edin.
• Çark diskini (10) mil (8) üzerine yerleştirin.
• Mil kilit düğmesini (1) basılı tutun ve somun
anahtarını (12) kullanarak sıkma somununu (11)
mil (8) üzerine sıkın.
Sökme
• Makineyi koruma siperi (3) yukarı bakacak
şekilde bir masa üzerine koyun.
• Mil kilit düğmesini (1) basılı tutun ve somun
anahtarını (12) kullanarak sıkma somununu (11)
gevşetin.
• Çark diskini (10) mil (8) üzerinden sökün.
• Mil kilit düğmesini (1) basılı tutun ve somun
anahtarını (12) kullanarak sıkma somununu (11)
sıkın.
3. ÇALIŞTIRMA
İş parçasının düzgün bir şekilde
desteklendiğinden emin olun ve besleme
kablosunu çalışma alanından uzağa
yönlendirin.
Açma ve kapama (şek. A)
• Makineyi açmak için, Açık / Kapalı düğmesine
(2) basın
• Makineyi kapatmak için Açma/Kapama
anahtarını (2) serbest bırakın.
Çark diski iş parçasına zarar verebileceğinden
makineyi açıp kapatırken makineyi iş parçasından
uzak tutun.
• İş parçasını iyice sıkın veya çalışırken hareket
etmemesini sağlamak için başka bir yöntem
kullanın.
• Diskleri düzenli olarak kontrol edin. Aşınmış
çark diskleri makinenin verimliliği üzerinde
olumsuz etkiye sahiptir. Zamanı gelince yeni bir
çark diskiyle değiştirin.
14
TR
• Fişi prizden çıkarmadan önce her zaman
kullanımdan sonra önce makineyi kapatın.
Çapak giderme (şek. C)
Çapak giderirken 30º ila 40º eğim açısı en iyi
sonuçları verecektir. Hafif baskı uygulayarak
makineyi ileri geri hareket ettirin. Bu, iş parçasının
solmasını veya fazla ısınmasını önleyecek ve
koruma yapmaktan kaçınacaktır.
Çapak giderme işi için asla aşındırıcı
kesme diskleri kullanmayın!
Kesme (şek. D)
Kesme için özel bir koruma siperi kullanılmalıdır
(dahil değildir). Vibrasyonu önlemek için
iş parçasıyla sabit bir şekilde temas edin
ve keserken yana yatırmayın veya basınç
uygulamayın. Çalışırken orta derecede, üzerinde
çalışılan malzemeye uygun basınç kullanın. Yan
taraftan kaşı basınç uygulayarak çark disklerini
yavaşlatmayın. Kesmek istediğiniz yön önemlidir.
Makine her zaman kesim yönünün aksinde
çalışmalıdır; yani makineyi diğer yöne hareket
ettirmeyin! Makinenin kesime takılıp geri tepmeye
neden olması ve kontrolü kaybetmeniz gibi bir risk
vardır.
İdeal kullanım için ipuçları
• İş parçasını sıkın. Küçük iş parçaları için bir
sıkma cihazı kullanın.
• Makineyi iki elle tutun.
• Makineyi açın.
• Makine tam hıza ulaşana dek bekleyin.
• Çark diskini iş parçası üzerine yerleştirin.
• Makineyi çark diskini iş parçasına sabit bir
şekilde bastırarak iş parçası boyunca yavaşça
hareket ettirin.
• Makine üzerinde çok fazla basınç uygulamayın.
İşi makinenin yapmasına izin verin.
• Makineyi kapatın ve makineyi bir kenara
koymadan önce makinenin tamamen
durmasını bekleyin.
4. BAKIM
Şebeke fişi değişimi (yalnızca BK) Üniteye takılı
kalıplanmış 3 pimli fiş hasarlıysa ve değişmesi
gerekiyorsa, bunun doğru bir biçimde imha
edilmesi ve onaylı bir BS 1363/13A sigortalı
fişle değiştirilmesi ve aşağıdaki kablo tesisatı
talimatlarının izlenmesi önemlidir. Şebeke
kablosundaki teller aşağıdaki kodla uyumlu olarak
renklendirilmiştir:
• mavi nötr
• kahverengi akımlı
Ünitenin şebeke kablosu içindeki tellerin renkleri
fişteki uçları tanımlayan renkli işaretlere karşılık
gelemeyeceğinden, aşağıdaki gibi devam edin:
• Mavi olan tel N harfi veya siyah renkli uca
bağlanmalıdır.
• Kahverengi tel L harfli veya kırmızı renkli uca
bağlanmalıdır.
Temizlik ve bakımdan önce her zaman
makineyi kapatın ve şebeke prizini
şebekeden çıkarın.
Makine kaplamalarını yumuşak bir bezle, tercihen
her kullanımdan sonra düzenli olarak temizleyin.
Havalandırma deliklerinin toz ve kirden arınmış
olduğundan emin olun. Çok inatçı kirleri sabun
köpüğüyle ıslatılmış yumuşak bir bezle çıkarın.
Benzin, alkol, amonyak vs. gibi çözücü maddeleri
kullanmayın. Bunlar gibi kimyasallar sentetik
bileşenlere zarar verecektir.
Elektrik kablolarını değiştirin
Besleme kablosu zarar gördüyse, tehlikeden
kaçınmak için üretici, servis sorumlusu veya bu
gibi vasıflı kişiler tarafından değiştirilmelidir.
Karbon fırçaları kontrol etme ve değiştirme
Karbon fırçaları yıpranmışsa, karbon fırçalar
üreticinin müşteri hizmetleri departmanı
veya benzer şekilde vasıflı kişiler tarafından
değiştirilmelidir. Sadece doğru orijinal tipte karbon
fırça kullanın.
15
TR
ÇEVRE
Arızalı ve/veya atılmış elektrikli veya
elektronik ekipmanların uygun geri
dönüşüm konumlarında toplanması
gerekir.
Yalnızca AT ülkeleri için
Elektrikli aletleri evsel atık olarak atmayın. Atık
Elektrikli ve Elektronik Donanım için Avrupa İlkeleri
2012/19/EU ‘ye ve ulusal hak uygulamasına göre,
artık kullanılamaz olan elektrikli aletler ayrı olarak
toplanalı ve çevre dostu bir yolla imha edilmelidir.
GARANTI
Garanti koşulları ayrı olarak eklenmiş garanti kartı
üzerinde bulunabilir.
Ürün ve kullanıcı kılavuzu değişikliğe tabidir.
Spesifikasyonlar başka bir uyarı olmaksızın
değiştirilebilir.

16
Spare parts list
AGM1103P - Angle grinder 950W 115MM
No. Description Position
410210 Inner flange (M14) 1
410216 Outter flange (M14) 2
410747 Guard 3
410218 Spindle complete 5..11
410219 Seal ring 8
410220 Needle bearing 12
410221 Spindle lock complete 15..18
410222 Side handle 19
410223 Pinion gear 21
410224 Bearing 608NSK 23
410225 Rotor 26..28
410226 Bearing 626NSK + sleeve 29|30
410227 Wind ring 31
410228 Stator 33
410229 Switch 45
410230 Carbon brush set (2pcs) 38
410231 Carbon brush holder set (2pcs) 35..37
410232 Switch button + bar 42|43
410233 Flange key 50

17
Exploded view AGM1103P

18

19
EN 60745-1, EN 60745-2-3, EN 55014-1, EN 55014-2,
EN 61000-3-2, EN 61000-3-3,
2006/42/EC, 2011/65/EU, 2012/19/EU, 2014/30/EU
Zwolle, 01-04-2021 H.G.F Rosberg
CEO FERM
FERM - Lingenstraat 6 - 8028 PM - Zwolle - The Netherlands
(EN) We declare under our sole responsibility that this product is in conformity with
directive 2011/65/EU of the European parliament and of the council of 8 June on the
restriction of the use of certain hazardous substances in electrical and electronic
equipment is in conformity and accordance with the following standards and
regulations:
(DE) Der Hersteller erklärt eigenverantwortlich, dass dieses Produkt der Direktive
2011/65/EU des Europäischen Parlaments und des Rats vom 8. Juni 2011 über die
Einschränkung der Anwendung von bestimmten gefährlichen Stoffen in elektrischen
und elektronischen Geräten entspricht. den folgenden Standards und Vorschriften
entspricht:
(NL) Wij verklaren onder onze volledige verantwoordelijkheid dat dit product voldoet aan
de conform Richtlijn 2011/65/EU van het Europees Parlement en de Raad van 8 juni
2011 betreffende beperking van het gebruik van bepaalde gevaarlijke stoffen in
elektrische en elektronische apparatuur en in overeenstemming is met de volgende
standaarden en reguleringen:
(FR) Nous déclarons sous notre seule responsabilité que ce produit est conforme aux
standards et directives suivants: est conforme à la Directive 2011/65/EU du
Parlement Européen et du Conseil du 8 juin 2011 concernant la limitation d’usage de
certaines substances dangereuses dans l’équipement électrique et électronique.
(ES) Declaramos bajo nuestra exclusiva responsabilidad que este producto cumple con
las siguientes normas y estándares de funcionamiento: se encuentra conforme con
la Directiva 2011/65/UE del Parlamento Europeo y del Consejo de 8 de junio de 2011
sobre la restricción del uso de determinadas sustancias peligrosas en los equipos
eléctricos y electrónicos.
(PT) Declaramos por nossa total responsabilida-de que este produto está em
conformidade e cumpre as normas e regulamentações que se seguem: está em
conformidade com a Directiva 2011/65/EU do Parlamento Europeu e com o
Conselho de 8 de Junho de 2011 no que respeita à restrição de utilização de
determinadas substâncias perigosas existentes em equipamento eléctrico e
electrónico.
(IT) Dichiariamo, sotto la nostra responsabilità, che questo prodotto è conforme alle
normative e ai regolamenti seguenti: è conforme alla Direttiva 2011/65/UE del
Parlamento Europeo e del Consiglio dell’8 giugno 2011 sulla limitazione dell’uso di
determinate sostanze pericolose nelle apparecchiature elettriche ed elettroniche.
(SV) Vi garanterar på eget ansvar att denna produkt uppfyller och följer följande
standarder och bestämmelser: uppfyller direktiv 2011/65/EU från Europeiska
parlamentet och EG-rådet från den 8 juni 2011 om begränsningen av användning av
farliga substanser i elektrisk och elektronisk utrustning.
(FI) Vakuutamme yksinomaan omalla vastuullamme, että tämä tuote täyttää seuraavat
standardit ja säädökset: täyttää Euroopan parlamentin ja neuvoston 8. kesäkuuta
2011 päivätyn direktiivin 2011/65/EU vaatimukset koskien vaarallisten aineiden
käytön rajoitusta sähkö- ja elektronisissa laitteissa.
(NO) Vi erklærer under vårt eget ansvar at dette produktet er i samsvar med følgende
standarder og regler: er i samsvar med EU-direktivet 2011/65/EU fra Europa-
parlamentet og Europa-rådet, pr. 8 juni 2011, om begrensning i bruken av visse
farlige stoffer i elektrisk og elektronisk utstyr.
(DA) Vi erklærer under eget ansvar, at dette produkt er i overensstemmelse med følgende
standarder og bestemmelser: er i overensstemmelse med direktiv 2011/65/EU fra
Europa-Parlamentet og Rådet af 8. juni 2011 om begrænsning af anvendelsen af
visse farlige stoffer i elektrisk og elektronisk udstyr.
(HU) Felelősségünk teljes tudatában kijelentjük, hogy ez a termék teljes mértékben
megfelel az alábbi szabványoknak és előírásoknak: je v souladu se směrnicí
2011/65/EU Evropského parlamentu a Rady EU ze dne 8. června 2011, která se týká
omezení použití určitých nebezpečných látek v elektrických a elektronických
zařízeních.
(CS) Na naši vlastní zodpovědnost prohlašujeme, že je tento výrobek v souladu s
následujícími standardy a normami: Je v súlade s normou 2011/65/EÚ Európskeho
parlamentu a Rady z 8. júna 2011 týkajúcej sa obmedzenia používania určitých
nebezpečných látok v elektrickom a elektronickom vybavení.
(SK) Vyhlasujeme na našu výhradnú zodpovednosť, že tento výrobok je v zhode a súlade
s nasledujúcimi normami a predpismi: Je v súlade s normou 2011/65/EÚ Európske-
ho parlamentu a Rady z 8. júna 2011 týkajúcej sa obmedzenia používania určitých
nebezpečných látok v elektrickom a elektronickom vybavení.
(SL) S polno odgovornostjo izjavljamo, da je ta izdelek v skladu in da odgovarja nasledn-
jim standardom terpredpisom: je v skladu z direktivo 2011/65/EU Evropskega parla-
menta in Sveta z dne 8. junij 2011 o omejevanju uporabe določenih nevarnih snovi v
električni in elektronski opremi.
(PL) Deklarujemy na własną odpowiedzialność, że ten produkt spełnia wymogi zawarte w
następujących normach i przepisach: jest zgodny z Dyrektywą 2011/65/UE Parla-
mentu Europejskiego i Rady z dnia 8 czerwca 2011 r. w sprawie ograniczenia stoso-
wania niektórych niebezpiecznych substancji w sprzęcie elektrycznym i elektronic-
znym.
(LT) Prisiimdami visą atsakomybę deklaruojame, kad šis gaminys atitinka žemiau
paminėtus standartus arba nuostatus: atitinka 2011 m. birželio 8 d. Europos
Parlamento ir Tarybos direktyvą 2011/65/EB dėl tam tikrų pavojingų medžiagų
naudojimo elektros ir elektroninėje įrangoje apribojimo.
(LV) Ir atbilstoša Eiropas Parlamenta un Padomes 2011. gada 8. jūnija Direktīvai
2011/65/ES par dažu bīstamu vielu izmantošanas ierobežošanu elektriskās un
elektroniskās iekārtās.
(ET) Apgalvojam ar visu atbildību, ka šis produkts ir saskaņā un atbilst sekojošiem stand-
artiem un nolikumiem: ir atbilstoša Eiropas Parlamenta un Padomes 2011. gada 8.
jūnija Direktīvai 2011/65/ES par dažu bīstamu vielu izmantošanas ierobežošanu
elektriskās un elektroniskās iekārtās.
(RO) Declarăm prin aceasta cu răspunderea deplină că produsul acesta este în
conformitate cu următoarele standarde sau directive: este în conformitate cu
Directiva 2011/65/UE a Parlamentului European şi a Consiliului din 8 iunie 2011 cu
privire la interzicerea utilizării anumitor substanţe periculoase la echipamentele
electrice şi electronice.
(HR) Izjavljujemo pod vlastitom odgovornoĻśu da je strojem ukladan sa slijedeśim
standardima ili standardiziranim dokumentima i u skladu sa odredbama: usklađeno s
Direktivom 2011/65/EU europskog parlamenta i vijeća izdanom 8. lipnja 2011. o
ograničenju korištenja određenih opasnih tvari u električnoj i elektroničkoj opremi.
(SRL)Pod punom odgovornošću izjavljujemo da je usaglašen sa sledećim standardima ili
normama: usaglašen sa direktivom 2011/65/EU Evropskog parlamenta i Saveta od
8.juna.2011. godine za restrikciju upotrebe određenih opasnih materija u električnoj i
elektronskoj opremi.
(RU) Под свою ответственность заявляем, что данное изделие соответствует
следующим стандартам и нормам: соответствует требованиям Директивы
2011/65/EU Европейского парламента и совета от 8 июня 2011 г. по
ограничению использования определенных опасных веществ в электрическом
и электронном оборудовании
(UK) На свою власну відповідальність заявляємо, що дане обладнання відповідає
наступним стандартам і нормативам: задовольняє вимоги Директиви 2011/65/
ЄС Європейського Парламенту та Ради від 8 червня 2011 року на обмеження
використання деяких небезпечних речовин в електричному та електронному
обладнанні.
(EL) Δηλώνουμε υπεύθυνα ότι το προϊόν αυτό συμφωνεί και τηρεί τους παρακάτω
κανονισμούς και πρότυπα: συμμορφώνεται με την Οδηγία 2011/65/ΕΕ του Ευρωπαϊκού
Κοινοβουλίου και του Συμβουλίου της 8ης Ιουνίου 2011 για τον περιορισμό της χρήσης
ορισμένων επικίνδυνων ουσιών σε ηλεκτρικό και ηλεκτρονικό εξοπλισμό.
(AR) نعلن على مسئوليتنا وحدنا أن هذا المنتج يتوافق مع المعايير والتوجيهات التالية:
(TR) Tek sorumlusu biz olarak bu ürünün aşağıdaki standart ve yönergelere uygun olduğunu
beyan ederiz.
(МК) Изјавуваме со наша целосна одговорност дека производот е во согласност со
Смерницата 2011/65/EU на Европскиот парламент и е во согласност според Советот
од 9 јуни за ограничување на користење на одредени опасни супстанции во
електричната и електронската опрема и дека е според следните стандарди и
регулативи:
DECLARATION OF CONFORMITY
AGM1103P - ANGLE GRINDER

WWW.FERM-INDUSTRIAL.COM ©2021 FERM
2104-22
Table of contents
Languages:
Other Ferm Industrial Sander manuals


