Rupes RH253 Manual

RH253 - RH256 - RH259
RH253A - RH256A - RH259A
Levigatrici rotorbitali pneumatiche con aspirazione
Random-orbital pneumatic sanders with dust extraction
Ponceuses rotorbitales pneumatiques avec aspiration
Pneumatische Exzenterschleifer mit Staubabsaugung
Lijadoras rotórbitales neumáticas con aspiración
Pneumatisch roterend excentrische schuurmachine
met stofafzuiging
Пневматические вращательно-орбитальные шлифовальные
машины с пылеудалением
ISTRUZIONI PER L'USO E LA MANUTENZIONE 4
OPERATING AND MAINTENANCE INSTRUCTIONS 8
NOTICE D'EMPLOI ET D'ENTRETIEN 12
BEDIENUNGS-UND WARTUNGSANLEITUNG 16
INSTRUCCIONES DE USO Y MANUTENCION 20
AANWIJZINGEN VOOR HET GEBRUIK EN HET ONDERHOUD 24
ИНСТРУКЦИЯ ПО ЭКСПЛУАТАЦИИ И ОБСЛУЖИВАНИЮ 28
RUPES S.p.A.
Via Marconi, 3A
20080 VERMEZZO (Mi) - Italy
Tel. 02/946941
Fax 02/94941040
Uff. Vendite e assistenza clienti
Tel. 02/94694312
web: http://www.rupes.com
COD. 9.2481 - MARZO 2014
Leggere tutte queste istruzioni prima di azionare il presente prodotto.
Indicazioni importanti per la sicurezza dell’ utilizzatore
Utilizzare i dispositivi di protezione individuale.
SIMBOLI GRAFICI
Read the following instruction first before operating the product.
Important safety indications
Use personal protective equipment.
PICTOGRAPH
Lire toutes ces instructions avant d’utiliser le présent produit.
Indications importantes pour la sécurité de l’utilisateur
Utiliser un équipement de protection individuelle.
SYMBOLES
Lea las siguientes instrucciones antes de utilizar el producto.
Indicaciones importantes para la seguridad del usuario.
Utilice un equipo de protección individual.
SÍMBOLOS GRÁFICOS
Lees de volgende instructie voor u het product gebruikt
Belangrijke veiligheidsinstructies
Draag persoonlijke beschermingsmiddelen.
PICTOGRAMMEN
Важные указания по технике безопасности.
Используйте индивидуальные средства защиты
УСЛОВНЫЕ ОБОЗНАЧЕНИЯ
Lesen Sie vor Bedienung des Geräts folgende Anweisungen.
Indicazioni importanti per la sicurezza
Verwenden Sie persönliche Schutzausrüstung.
PIKTOGRAMM
Перед началом работы с данным устройством следует
ознакомиться с инструкцией.
RH253A-256A-259A cop MARZO 2014 COD 92481_Layout 1 04/07/2014 10.43 Pagina 1

4
DATI TECNICI ITALIANO 4
MODELLO RH253 RH256 RH259 RH253A RH256A RH259A
PRESSIONE DI ESERCIZIO bar/PSI 6,2/90 6,2/90 6,2/90 6,2/90 6,2/90 6,2/90
CONSUMO ARIA l/min 320 320 360 320 320 360
REGOLAZIONE DELLA VELOCITÀ SI SI SI SI SI SI
GIRI/min 0 ÷ 11.500 0 ÷ 10.500 0 ÷ 9.500 0 ÷ 11.500 0 ÷ 10.500 0 ÷ 9.500
DIAMETRO ORBITA mm 3 6 9 3 6 9
DIAMETRO PLATORELLO mm 150 150 150 150 150 150
TIPO PLATORELLO VELCRATO VELCRATO VELCRATO VELCRATO VELCRATO VELCRATO
SISTEMA D’ASPIRAZIONE - - - SI SI SI
MASSA Kg 0,750 0,750 0,800 0,750 0,750 0,800
6
VACUUM
SYSTEM
Le istruzioni per la sicurezza e la prevenzione degli infortuni sono
riportate nel fascicolo “INDICAZIONI PER LA SICUREZZA” che
costituisce parte integrante della presente documentazione, Il
presente MANUALE D’ISTRUZIONI per l’uso riporta solamente le
informazioni aggiuntive strettamente correlate all’uso specifico
dell’utensile.
UTILIZZO CONFORME AGLI SCOPI PREVISTI
Questo utensile è destinato a funzionare come levigatrice.
Leggere tutti gli avvertimenti di sicurezza, le istruzioni, le
illustrazioni e le specifiche forniti con questo utensile. Il mancato
rispetto di tutte le istruzioni sotto riportate può causare una scossa
elettrica, un incendio e/o un incidente grave.
Le operazioni di molatura, lucidatura, spazzolatura metallica o di
taglio non sono consigliate con questo utensile. Le operazioni per
le quali l’utensile non è previsto possono provocare un pericolo e
causare danni alle persone.
Non utilizzare accessori non specificatamente realizzati per l’uso
previsto o non consigliati dal produttore. Il semplice fatto che
l’accessorio possa essere fissato al vostro utensile non garantisce un
funzionamento in tutta sicurezza.
La velocità nominale dell’accessorio deve essere almeno pari alla
velocità massima indicata sull’utensile. Gli accessori fatti funzionare
a una velocità superiore a quella nominale possono rompersi ed es-
sere proiettati in aria.
Il diametro esterno e lo spessore del vostro accessorio devono
essere adatti alle caratteristiche di capacità del vostro utensile. Gli
accessori che hanno dimensioni non corrette non possono essere
protetti o controllati adeguatamente.
La conformazione degli accessori deve adattarsi correttamente al
mandrino dell’utensile. Gli accessori dotati di fori dell’albero che
non corrispondono agli elementi di montaggio sull’utensile non
rimarranno in equilibrio, vibreranno eccessivamente e potranno
provocare una perdita di controllo. Non usare un accessorio
danneggiato. Se l’utensile o l’accessorio ha subito una caduta,
esaminare i danni eventuali o installare un accessorio non
danneggiato. Dopo aver esaminato e installato un accessorio,
mettetevi, insieme alle persone presenti, a una distanza di
sicurezza dall’accessorio rotante e fate funzionare l’utensile alla
velocità massima a vuoto per un minuto. Gli accessori danneggiati
si romperanno in genere in questo periodo di prova.
AVVERTENZE GENERALI
La macchina deve funzionare collegata ad un opportuno sistema di aspirazione (non fornito).
DISEGNO VERSIONE
NO ASPIRAZIONE IN
ARRIVO
RH253A-256A-259A cop MARZO 2014 COD 92481_Layout 1 04/07/2014 10.43 Pagina 2

5
PARTI DELLA MACCHINA
1 - Etichetta di identificazione
2 - Leva di comando immissione aria compressa
3 - Comando regolatore di velocità
4 - Corpo macchina
5 - Attacco aria compressa con filettatura da 1/4”
6 - Attacco tubo di aspirazione Ø int. 29 mm (SERIE A)
7 - Silenziatore
8 - Cuffia di aspirazione
9 - Platorello velcrato portadisco di carta abrasiva
10 - Vite di fissaggio del platorello
MESSA IN FUNZIONE
Prima di mettere in funzione la macchina accertarsi che:
- l’imballo sia integro e non mostri segni di danneggiamento
dovuti a trasporto e magazzinaggio;
- la macchina sia completa; controllare che numero e natura dei
componenti siano conformi a quanto riportato sul presente
libretto;
- l’impianto di produzione e distribuzione di aria compressa a
disposizione sia in grado di soddisfare i requisiti indicati in
tabella e riportati sulla targhetta di identificazione della
macchina il cui facsimile, con spiegazioni, è riportato a pag. 7.
MONTAGGIO DELLA MACCHINA
Montare il raccordo aria compressa (non fornito) avvitandolo
nella apposita sede (5).
RACCORDO DI ADDUZIONE ARIA COMPRESSA
(NON FORNITO)
La macchina viene fornita sprovvista del raccordo di
alimentazione; a scelta dell’utilizzatore possono essere usati sia
raccordi ad innesto rapido sia portagomma adeguati purchè
entrambi abbiano un foro di passaggio aria da mm. 8.
Nel secondo caso occorre fissare stabilmente con una fascetta
stringitubo il tubo di alimentazione al portagomma.
SMONTAGGIO E MONTAGGIO DEL PLATORELLO
- Svitare con la chiave la vite di fissaggio del platorello (10);
- per il montaggio operare in senso inverso.
MONTAGGIO DEI DISCHI DI CARTA ABRASIVA
Fare aderire mediante pressione il disco di carta abrasiva al
platorello avendo cura che i fori della carta abrasiva coincidano
con i fori di aspirazione esistenti sul platorello.
PRIMA DELLA MESSA IN SERVIZIO
Accertarsi che:
- il regolatore di velocità (3) sia nella posizione MAX;
- raccordo e tubo di adduzione aria compressa siano in perfetto
stato;
- il dispositivo di azionamento sia efficiente operando però a
macchina non alimentata;
- tutti i componenti della macchina siano montati correttamente e
non presentino segni di danneggiamento;
- la macchina sia correttamente collegata ad un sistema
d’aspirazione idoneo ed efficiente.
AVVIAMENTO E FERMATA
- Avviamento: spingere la leva di comando (2) verso il corpo
macchina e mantenerla premuta.
- Fermata: rilasciare la leva di comando.
FUNZIONAMENTO DI PROVA
Avviare la macchina e controllare che non siano presenti
vibrazioni anomale o scentrature del disco di carta abrasiva.
In caso contrario spegnere la macchina immediatamente e
provvedere ad eliminare le anomalie.

6
REGOLAZIONE DEL NUMERO DI GIRI
La regolazione del numero dei giri si ottiene manovrando
opportunamente il regolatore (3) da MAX a OFF. La scelta della
velocità va fatta in funzione delle caratteristiche dei dischi di carta
abrasiva e del materiale da lavorare.
SOSTITUZIONE DEI DISCHI DI CARTA ABRASIVA
- Asportare a strappo il disco di carta abrasiva usato;
- applicare il nuovo disco di carta abrasiva premendo lo stesso
sul platorello ed avendo cura che i fori praticati sul disco di carta
abrasiva coincidano con i fori di aspirazione del platorello.
UTENSILI DI LAVORO AMMESSI
Dischi velcrati di carta abrasiva Ø mm 150 con fori per
l’aspirazione.
MANUTENZIONE
Tutte le operazioni vanno eseguite a macchina scollegata.
A fine lavoro, od in caso di necessità, spolverare con getto di aria
compressa il corpo macchina.
Lubrificare periodicamente (ogni 50 ore di lavoro) la macchina
inserendo 2/3 gocce d'olio per uso specifico (olio sintetico
senza silicone ISO 32) nell'attacco aria compressa
dell'utensile tenendo lo stesso in posizione verticale con
l'attacco in alto. Dopo questa operazione collegare la
macchina all'alimentazione e azionarla per alcuni secondi.
Prima di riporre l'utensile per un lungo periodo di inattività
procedere all'operazione di lubrificazione come sopra
descritto.
Si escludono dalla garanzia tutti i danni derivanti da una
scorretta o inadeguata lubrificazione.
Non sono ammessi altri interventi da parte dell'utente.
Per la manutenzione e la periodica pulizia delle parti interne,
come cuscinetti, ingranaggi, etc. o altre necessità rivolgersi ai
Centri di Assistenza autorizzati.
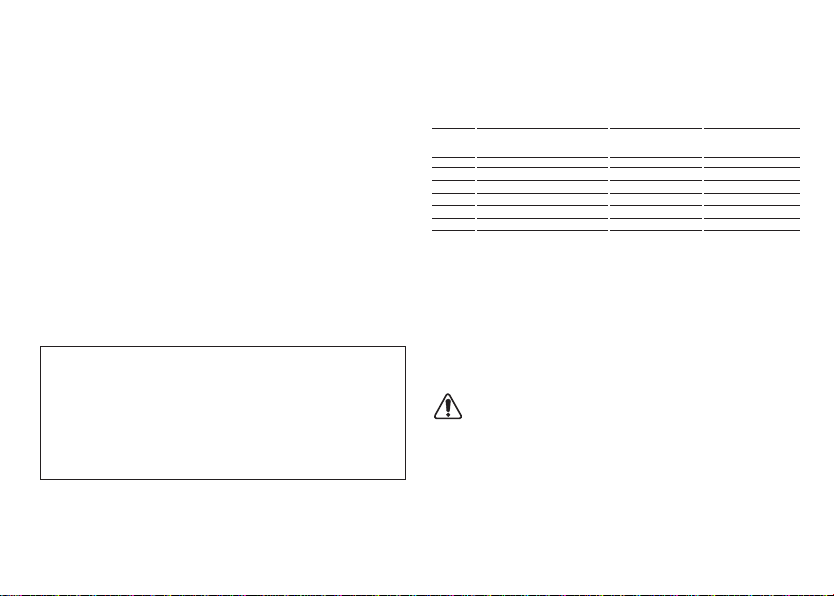
FORMAZIONE DI RUMORE/ VALORE MEDIO DELL'ACCELERAZIONE
Il livello equivalente di pressione sonora (rumorosità) e Il valore
quadratico medio dell'accelerazione è misurati secondo le norme
UNI EN ISO 15744 - EN ISO 28927.
I valori di emissione indicati sono comparativi e utilizzabili per una
valutazione provvisoria dei rischi di esposizione dell’operatore
durante il periodo di lavoro. La corretta valutazione del periodo di
lavoro deve comprendere anche i tempi di funzionamento a
vuoto e di arresto dell’utensile. I valori di emissioni indicati sono
rappresentativi delle principali applicazioni dell’utensile. Se
l’utensile viene utilizzato per altre applicazioni, con altri accessori
o se non viene sottoposto a regolare manutenzione, i valori di
emissione possono aumentare sensibilmente durante il
funzionamento.
Livello di Pressione acustica Livello di vibrazioni
Potenza sonora su 3 assi su 1 asse*
LPA LWA Incertezza ahIncertezza ahIncertezza
dB(A) m/s2m/s2
RH253 73 84 3 2,80 0,20 <2,5 0,2
RH256 75 86 3 3,00 0,30 2,6 0,3
RH259 76 87 3 3,20 0,35 2,8 0,35
RH253A 74 85 3 2,80 0,20 <2,5 0,2
RH256A 76 87 3 3,00 0,30 2,6 0,3
RH259A 77 88 3 3,20 0,35 2,8 0,35
Attenzione! i valori di misura indicati sono validi solo per utensili nuovi.
Nell’impiego quotidiano i valori di rumore e vibrazione cambiano.
* Vibrazione come definite nella EN ISO 8662

7
DICHIARAZIONE DI CONFORMITÀ
Dichiariamo sotto la nostra responsabilità che l’utensile portatile non
elettrico, al quale fa riferimento il presente manuale, è conforme ai
Requisiti Essenziali della Direttiva:
2006/42/CE Macchine
Le prove/verifiche sono eseguite in accordo alle seguenti Normative:
UNI EN ISO 11148-8:2012 - UNI EN ISO 15744 - UNI EN ISO 28927
Fascicolo tecnico presso:
RUPES S.p.A.
Via Marconi, 3A
20080 VERMEZZO (Mi) - Italy
Vermezzo (MI), 01/03/2014
IL PRESIDENTE
G. Valentini
S.p.A
TARGHETTA DI IDENTIFICAZIONE DELLA MACCHINA
POSIZIONAMENTO E SIGNIFICATO DEI DATI
1 - Tipo della macchina
2 - Consumo di aria a pieno regime
3 - Pressione di esercizio
4 - Diametro delle orbite
5 - Numero di matricola o di serie della macchina
6 - Dimensioni dei tamponi di lucidatura
7 - Numero max/minimo di giri/minuto
8 - Leggere tutte queste istruzioni
prima di azionare il
presente prodotto.
GARANZIA
Tutte le macchine costruite dalla RUPES Spa sono garantite per
12 mesi dalla data di acquisto contro difetti di materiale e di
fabbricazione.
Le macchine devono essere utilizzate esclusivamente con
accessori e ricambi originali RUPES: si declina ogni
responsabilità per danni o incidenti provocati dall’inosservanza
della presente norma che causa anche il decadimento della
garanzia. La garanzia decade qualora non vengano rispettate le
prescrizioni del presente libretto o qualora venga fatto uso
improprio della macchina.
Decade altresì se la macchina viene smontata o manomessa o se
vi sono evidenti danni derivanti da cattiva cura della stessa.
La garanzia è subordinata alla compilazione del tagliando
riportato sull’ultima pagina di copertina del presente libretto
d'istruzioni.
In caso di accertato malfunzionamento la macchina,
accompagnata dal certificato di garanzia, dovrà essere
consegnata o spedita franco di porto, non smontata e nell'imballo
originale, al fabbricante o ad un Centro di Assistenza autorizzato
riportato nell'elenco allegato al presente libretto. In ogni caso la
garanzia non dà diritto alla sostituzione della macchina.
La RUPES Spa si riserva di apportare qualsiasi modifica alle
caratteristiche tecniche o estetiche dei propri prodotti senza
preavviso. Non si assume nessuna responsabilità per eventuali
errori di stampa. Il presente stampato annulla e sostituisce i
precedenti.

8
TECHNICAL DATA ENGLISH 8
The safety and accident prevention instructions are reported in
the “SAFETY INSTRUCTION” booklet which forms an integral part
of these documents. This OPERATING INSTRUCTION MANUAL
indicates the additional information required specifically for use
of the tool.
CORRECT USAGE
This tool is designed to be used as a sander. Read all the
warnings, instructions, indications provided on drawings and
specifications supplied with this tool.Failure to comply with all the
instructions provided below may cause serious injuries.
This tool is not intended to be used for metal brushing,polishing
and cutting operations. The use of this tool for unintended
applications may cause hazards and injuries to people.
Do not use accessories that are not specifically designed for the
intended use of the tool or that have not been recommended by
the manufacturer. The fact that an accessory can be fixed to the tool
does not imply that it can be used safely.
The rated speed of the accessory must be at least equivalent to
the maximum speed specified on the tool. Using the accessories at
speeds above the rated one, may cause them to break or be
projected into the air.
The external diameter and thickness of the accessory must match
the specifications of the electrical tool. Accessories with incorrect
dimensions cannot be adequately protected or controlled.
The configuration of accessories must match the tool. The use of
accessories that cannot be perfectly fitted on the tool may result in
imbalance, excessive vibrations and in the impossibility of controlling
the tool.
Do not use damaged accessories. Before use, inspect all the
accessories. Inspect the supporting pads and verify there are no
cracks, tears or excessive wear. If the tool or accessory has fallen,
verify that it is not damaged or install a new accessory. After
inspecting or installing an accessory, move to a safe distance with
any other person present and operate the tool at maximum speed
without load for one minute. Damaged accessories generally break
during this test period
GENERAL WARNINGS
The tool must be connected to a suitable dust extraction system (not supplied).
TYPE RH253 RH256 RH259 RH253A RH256A RH259A
WORKING PRESSURE bar/PSI 6,2/90 6,2/90 6,2/90 6,2/90 6,2/90 6,2/90
AIR CONSUMPTION l/min 320 320 360 320 320 360
SPEED CONTROL YES YES YES YES YES YES
RPM 0 ÷ 11.500 0 ÷ 10.500 0 ÷ 9.500 0 ÷ 11.500 0 ÷ 10.500 0 ÷ 9.500
ORBITAL DIAMETER mm 3 6 9 3 6 9
DISC PAD DIAMETER mm 150 150 150 150 150 150
DISC PAD TYPE VELCRO FACED VELCRO FACED VELCRO FACED VELCRO FACED VELCRO FACED VELCRO FACED
EXTRACTION SYSTEM - - - YES YES YES
WEIGHT Kg 0,750 0,750 0,800 0,750 0,750 0,800

9
PARTS OF THE TOOL
1 - Identification plate
2 - Compressed air on/off lever
3 - Speed control
4 - Tool body
5 - Compressed air connection with 1/4” thread
6 - 29 mm. int. Ø suction pipe connection (A SERIES)
7 - Silencer
8 - Suction cowling
9 - Velcroed abrasive disc backing pad
10 - Back-up pad screw
STARTING UP
Before starting-up the tool, ensure that:
- the packaging is complete and does not show signs of having
been damaged during storage or transport;
- the tool is complete; check that the number and type of components
comply with that reported in this instruction booklet;
- the available compressed air production and distribution plant is
capable of satisfying the requirements reported on the tool’s
identification plate reproduced and explained on page 11.
ASSEMBLING THE TOOL
Assemble the compressed air connection (not supplied) by
screwing it into its seating (5).
COMPRESSED AIR CONNECTION (NOT SUPPLIED)
The tool is supplied without the compressed air connection; the
user can use either a quick release coupling or hose type
connection according to his needs, purke they have an hole of air
passing mm. 8. In the latter case the air line must be fixed to the
nozzle by a hose clip.
In the latter case the air line must be fixed to the nozzle by a hose
clip.
REMOVING AND MOUNTING THE BACKING PAD
- Use the spanner to unscrew the back-up pad bolt (10);
- reverse the procedure when fitting the dsc pad.
FITTING ABRASIVE PAPER DISCS
Press the abrasive disc into the pad ensuring that the holes in the
abrasive paper coincide with extraction holes in the disc pad.
BEFORE STARTING THE TOOL
Ensure that:
- the speed control (3) is in MAX position;
- the compressed air feed line and connection are in perfect
working order;
- the start lever is working properly. This must be done with the air
supply switched off;
- all the components of the tool are mounted correctly and do not
show any signs of damage;
- the tool must be connected to a suitable and efficient aspiration
device.
STARTING AND STOPPING
- Starting: push the control lever (2) forward towards the body of
the tool and keep it pressed.
- Stopping: release the control lever.
TEST RUN
Start the tool and check that there are no unusual vibration, no
dismatching of the abrasive paper disc.
Otherwise switch-off the tool immediately and eliminate the
cause.

10
SELECTING THE RPM
The number of revolutions can be adjusted by using the speed
control (3) from MAX to OFF. The choice of speed depends on the
characteristics of the abrasive paper disc and the material to be
worked.
REPLACING THE ABRASIVE PAPER DISCS
- Used discs can be removed by simply tearing them off;
- new velcro discs are mounted by simply pressing them into the
backing pad, making sure that the holes cut in the disc coincide
with those in the backing pad.
USABLE DISCS
Ø mm 150 velcro backed abrasive paper discs with dust
extraction holes.
MAINTENANCE
All maintenance operations are carried out with the tool
disconnected from the compressed air supply.
At the end of each work session, or when required, remove any
dust from the body of the tool using a jet of compressed air.
Lubricate the machine regularly (every 50 hours of operation)
by inserting 2/3 drops of specific oil (synthetic oil without
silicone, ISO 32) into the compressed air connection, keeping
the device in a vertical position, with the connection facing
upwards. After this operation, connect the machine to the
power supply and set it in motion for a few seconds.Lubricate
the machine as described above before storing it for long
periods of inactivity.All damages deriving from incorrect or
inadequate lubrication are excluded from the warranty.
No other maintenance operations must be undertaken by the user.
Maintenance and cleaning of the inner parts, must be carried out
only by an authorized customer-service workshop.
NOISE / MEAN ACCELERATION VALUE
The noise level produced and themean quadratic acceleration
value are measured according to regulation
UNI EN ISO 15744 - EN ISO 28927.
Displayed emission values are comparative and are to be
employed for a provisional assessment of the operator’s risk
exposure during the work period. Appropriate evaluation of work
period must also include tool’s idle and stop periods. These
emission values represent the tool’s main applications. If the tool
is used for other applications, with other accessories, or if it does
not undergo regular maintenance, emission values can
significantly increase during operations.
Danger! The indicate measurements refer to new power tools. Daily usa
causes the noise and vibration values to change.
Sound pressure level Vibration level
Sound power level 3 axis 1 axis*
LPA LWA Uncertainty ahUncertainty ahUncertainty
dB(A) m/s2m/s2
RH253 73 84 3 2,80 0,20 <2,5 0,2
RH256 75 86 3 3,00 0,30 2,6 0,3
RH259 76 87 3 3,20 0,35 2,8 0,35
RH253A 74 85 3 2,80 0,20 <2,5 0,2
RH256A 76 87 3 3,00 0,30 2,6 0,3
RH259A 77 88 3 3,20 0,35 2,8 0,35
* According to the EN ISO 8662.

11
IL PRESIDENTE
G. Valentini
S.p.A
CONFORMITY DECLARATION
We declared on our responsability that the hand-held non-electric
power tool, which is mentioned in the present operating manual, is in
comformity with the Essential Requirements of Safety of the following
Directive:
2006/42/CE Machinery
The tests have been carried out in accordance with following Standards:
UNI EN ISO 11148-8:2012 - UNI EN ISO 15744 - UNI EN ISO 28927
Technical file at:
RUPES S.p.A.
Via Marconi, 3A
20080 VERMEZZO (Mi) - Italy
Vermezzo (MI), 01/03/2014
TOOL IDENTIFICATION PLATE
POSITION AND MEANING OF INFORMATION
1 - Type of tool
2 - Air consumption at full power
3 - Working pressure
4 - Orbital diameter
5 - Tool code number or serial number
6 - Dimensions of the Polishing pad
7 - Maximum rpm
8 - Read all these instructions before
operating this product and save
these instructions.
GUARANTEE
All tools manufactured by RUPES Spa are guaranteed for 12
months from the date of purchase against fabrication and
material defects.
All tools must be used only with RUPES original accessories and
spare parts: we refuse all responsibility for damages or accidents
caused by non-observance of this rule which will also cause the
termination of the guarantee.
The guarantee will no longer be valid if the instructions contained
in this booklet are not followed, if the tool is used for purposes
other than that for which it is intended, if it is dismantled,
interfered with in any way or damaged due to neglect.
The guarantee will be made valid by filling-in the form on the
inside back cover of this instruction booklet.
If the tool is found to be defective or malfunctions, it should be
returned carriage free in one piece in its original packing together
with the guarantee certificate to the manufacturer or to one of the
Assistance Centres listed in the appendix to this booklet.
The guarantee does not automatically imply replacement of the
tool.
RUPES Spa reserves the right to make any technical or design
modification to its products without prior notice.
The manufacturer is not liable for any print errors.
This document voids and replaces previous ones.

12
CARACTERISTIQUES TECHNIQUES FRANÇAIS 12
Les instructions relatives à la sécurité et à la protection contre les
accidents du travail sont contenues dans le fascicule
"INDICATIONS RELATIVES A LA SECURITE" qui fait partie
intégrante de la présente documentation. Le present NOTICE
D'INSTRUCTIONS relatives à l'utilisation indique uniquement les
informations complémentaires qui sont étroitement linées à
l'utilisation spécifique de outil.
UTILISATION CONFORME
Cet outil est prévu pour fonctionner en tant que ponceuse. Lire
toutes les prescriptions de sécurité, les instructions, les
illustrations et les spécifications fournies avec cet outil. Le non-
respect de toutes les instructions susmentionnées peut provoquer une
décharge électrique accident grave.
Il est déconseillé d’effectuer des opérations de brossage
métallique, polissage ou de coupe avec cet outil. Les opérations
pour lesquelles l’outil n’est pas prévu peuvent provoquer un danger et
causer des blessures aux personnes.
N’utilisez pas d’accessoires n’ayant pas été spécialement réalisés
pour l’utilisation prévue ou conseillés par le fabricant. Le simple fait
que l’accessoire puisse être fixé sur votre outil ne garantit pas un
fonctionnementen toute sécurité.
La vitesse nominale de l’accessoire doit être au moins égale à la
vitesse maximale indiquée sur l'outil. Les accessoires que l’on
utilise à une vitesse upérieure à la vitesse nominale peuvent se casser
et être projetés en l’air.
Le diamètre extérieur et l’épaisseur de votre accessoire doivent
être adaptés aux caractéristiques de capacité de votre outil. Il est
impossible de protéger ou de contrôler de façon appropriée les
accessoires présentan des dimensions non correctes.
La conformation des accessoires doit s’adapter correctement au
mandrin de l’outil. Les accessoires munis de trous de l’arbre qui ne
correspondent pas aux éléments de montage sur l’outil ne resteront
pas en équilibre, ils vibreront excessivement et pourront provoquer
une perte de contrôle.
Ne pas utiliser un accessoire endommagé. Avant toute utilisation,
examiner les accessoires. Si l’outil ou l’accessoire est tombé,
examiner les éventuels dégâts ou installer un accessoire non
endommagé. Après avoir examiné et installé un accessoire,
placez-vous, ainsi que les personnes présentes, à une certaine
distance de l’accessoire en rotation et faites fonctionner l’outil
électrique à sa vitesse maximale à vide pendant une minute. En
général, les accessoires endommagés se cassent au cours de cet
d’essai.
RECOMMANDATIONS GENERALES
La machine doit fonctionner reliée à un système d’aspiration approprié (non fourni).
TYPE RH253 RH256 RH259 RH253A RH256A RH259A
PRESSION DE SERVICE bars/PSI 6,2/90 6,2/90 6,2/90 6,2/90 6,2/90 6,2/90
CONSOMMATION AIR l/min 320 320 360 320 320 360
REGLAGE DE LA VITESSE OUI OUI OUI OUI OUI OUI
TOURS/min 0 ÷ 11.500 0 ÷ 10.500 0 ÷ 9.500 0 ÷ 11.500 0 ÷ 10.500 0 ÷ 9.500
DIAMETRE ORBITE mm 3 6 9 3 6 9
DIAMETRE PORTE DISQUE mm 150 150 150 150 150 150
TYPE PORTE DISQUE FIXATION VELCRO FIXATION VELCRO FIXATION VELCRO FIXATION VELCRO FIXATION VELCRO FIXATION VELCRO
SYSTEME D’ASPIRATION - - - OUI OUI OUI
MASSE Kg 0,750 0,750 0,800 0,750 0,750 0,8000

13
PARTIES DE LA MACHINE
1 - Ètiquette d’identification
2 - Levier de commande entrée air comprimé
3 - Régulateur de vitesse
4 - Corps de la machine
5 - Raccord air comprimé avec filetage 1/4”
6 - Bouche d’aspiration Ø 29 mm (SERIES A)
7 - Silencieux
8 - Coiffe d’aspiration
9 - Porte-disque abrasif à fixation par velcro
10 - Vis de fixage du plateau
MISE EN SERVICE
Avant de mettre la machine en service, s'assurer que:
- l'emballage est intégre et qu'il ne montre aucun signe d'endomma-
gements dus au transport et au stockage;
- la machine est complète; s'assurer que le nombre et la nature
des composants sont conformes aux indications contenues
dans le présent livret d'instructions;
- l’installation de production et de distribution d’air comprimé à
disposition est en mesure de satisfaire les conditions indiquées
dans le tableau et sur la plaquette d’identification de la machine,
dont le fac-similé et les explications relatives sont fournis à la
page 15.
MONTAGE DE LA MACHINE
Monter le raccord air comprimé (non fourni) en le vissant dans le
siége prévu à cet effet (5).
RACCORD D’ARRIVEE AIR COMPRIME (NON FOURNI)
La machine est fournie sans raccord d’alimentation; au choix de
l’utilisateur, il est possible d’utiliser des raccords à attache rapide
ou des porte-joints appropiés à conditions qu’ils aient une
ouverture de passage d’air mm. 8.
Dans le second cas, fixer solidement le tuyau d’alimentation au
porte-joint à l’aide d’un collier serre-tube.
DEMONTAGE ET MONTAGE DU PORTE-DISQUE
- Dévisser avec la clé la vis de fixage du plateau (10);
- pour le montage, agir dans le sens inverse.
MONTAGE DES DISQUES DU PAPIER ABRASIF
Appliquer le disque abrasif par pression en veillant à ce que les
trous du papier abrasif correspondent aux trous d’aspiration qui
se trouvent sur le porte-disque.
AVANT LA MISE EN SERVICE
S’assurer que:
- le régulateur de vitesse (3) est en position MAX;
- raccord et tuyau d’arrivée air comprimé sont en parfait état;
- l’interrupteur de mise en marche/arrêt est efficace en agissant
cependant lorsque la fiche est débranchée;
- tous les composants de la machine sont montés correctement
et ne présentent pas de signes d’endommagement;
- la machine soit relièe à un dispositif d’aspiration appropriè et
efficace.
MISE EN MARCHE ET ARRET
- Mise en marche: pousser le levier de commande (2) vers le
corps de la machine et ne pas relâcher.
- Arrêt: relâcher le levier de commande.
FONCTIONNEMENT D'ESSAI
Mettre la machine en marche et s’assurer qu’il n’y a pas de
vibrations anomales et que le disque abrasif n’est pas décentré.
Dans le cas contraire, énteindie la machine immédiatement et
éliminer les anomalies.

14
SELECTION DU NOMBRE DE TOURS
Le réglage du nombre de tours s'effectue en agissant de manière
adéquate sur le régulateur (3) de MAX à OFF. Le choix de la
vitesse doit être fait en fonction des caractéristiques des disques
du papier abrasif et du matèriau à usiner.
REMPLACEMENT DES DISQUES DU PAPIER ABRASIF
- Arracher les disques usés;
- le montage des nouveaux disques abrasifs à fixation par velcro
s’obtient simplement en appuyant les disques contre le porte-
disque et en ayant soin de faire en sorte que les trous
d’aspiration prèsents sur le disque correspondent à ceux du
porte-disque.
OUTILS DE TRAVAIL ADMIS
Disques du papier abrasif à fixation par velcro Ø mm 150 avec
trous d’aspiration.
ENTRETIEN
Toutes le opèrations.sur la machine ait lieu la machine étant
dèbranchée de l’installation d’air comprimé.
A la fin du travail et en cas de nècessitè, dèpoussièrer le corps de
la machine à l’aide d’un jet d’air comprimè.
Lubrifier régulièrement (toutes les 50 heures de travail) la
machine, en mettant 2/3 gouttes d'huiles pour usage
spécifique (huile synthétique sans silicone ISO 32) au niveau
du raccordement de l'air comprimé de l'outil en le tenant en
position verticale avec le raccordement tourné vers le haut.
Après cette opération, brancher la machine et l'allumer
pendant quelques secondes.Avant de ranger l'outil pour une
longue période d'inactivité, procéder à l'opération de
lubrification, comme décrit ci-dessus.Tous les dommages
dérivant d'une mauvaise lubrification sont exclus de la
garantie.
Aucune autre intervention de l’utilisateur n’est pas admise.
Tous les travaux d’entretien et les travaux de polissage des piéces
internes, doivent être effectuer par un Centres d’Assistance autorisé.
FORMATION DU BRUIT / VALEUR MOYENNE DE L'ACCELERATION
Le niveau équivalent de la pression sonore (niveau de bruit) e la
valeur quadratique moyenne de l'accèlérationest est mesurés
conformément aux normes
UNI EN ISO 15744 - EN ISO 28927.
Les valeurs d’émission relevées sont comparatives et ne doivent
être employées que pour une évaluation provisoire du risque
auquel l’opérateur est exposé au cours de la période de travail.
Une évaluation appropriée de la période de travail doit également
inclure des périodes d’inactivité et d’arrêt de l’outil. Ces valeurs
d’émission sont représentatives des principales applications
auxquelles l’outil est destiné. Si l’outil est utilisé dans d’autres
applications, avec d’autres accessoires, ou s’il ne bénéficie pas
d’un entretien régulier, les valeurs d’émission en cours de
fonctionnement peuvent s’accroître dans des proportions
significatives.
Attention! Les valeurs de mesure indiquées s’appliquent aux appareils
neufs. Pendant le mise en ceuvre quotidienne, les valeurs de bruit et de
vibrations varient.
Niveau de pression acoustique Niveau des vibration
Niveau de puissance acoustique selon 3 axies selon 1 axies
*
LPA LWA Incertitude ahIncertitude ahIncertitude
dB(A) m/s2m/s2
RH253 73 84 3 2,80 0,20 <2,5 0,2
RH256 75 86 3 3,00 0,30 2,6 0,3
RH259 76 87 3 3,20 0,35 2,8 0,35
RH253A 74 85 3 2,80 0,20 <2,5 0,2
RH256A 76 87 3 3,00 0,30 2,6 0,3
RH259A 77 88 3 3,20 0,35 2,8 0,35
* Valeurs d'oscillation selon norme NE ISO 8662.

15
DÉCLARATION DE CONFORMITÉ
IL PRESIDENTE
G. Valentini
S.p.A
Nous déclarons sous notre responsabilité que l’outil portable non
électrique, auquel se réfère le présent manuel, est conforme aux
Conditions Essentielles de la Directive :
2006/42/CE Machines
Les essais/contrôles sont effectués conformément aux normes suivantes:
UNI EN ISO 11148-8:2012 - UNI EN ISO 15744 - UNI EN ISO 28927.
Dossier technique auprès de:
RUPES S.p.A.
Via Marconi, 3A
20080 VERMEZZO (Mi) - Italy
Vermezzo (MI), 01/03/2014
PLAQUETTE D’IDENTIFICATION DE LA MACHINE
EMPLACEMENT ET SIGNIFICATION DES DONNEES
1 - Type de la machine
2 - Consommation d’air à plein régime
3 - Pression de service
4 - Diamètre orbites
5 - Numéro d’immatriculation ou de série de la machine
6 - Dimension des tampon de polissage
7 - Nombre maximum de tours par minute
8 - Lire toutes ces instructions avant de
mettre en marche le
présent produit.
GARANTIE
Toutes les machines construites par la Société RUPES Spa sont
garanties pendant 12 mois à compter de la date d’achat contre
les défauts matériau et de fabrication.
Les machines ne doivent être utilisées qu'avec les pièces
détachées et les accessoires originaux RUPES: nous déclinons
toute responsabilité en cas d'accidents ou de dégâts matériels
provoqués par le non-respect de cette norme, qui entraînera en
outre l'annulation de la garantie.
La garantie prend fin en cas de non-respect des prescriptions
du présent livret ou en cas d’utilisation impropre de la machine.
Elle prend fin également si la machine est démontée ou
modifiée ou en cas de dommages évidents dérivant d’un
mauvais entretien.
La garantie est subordonnée au remplissage du coupon qui
se trouve à la dernière page de couverture du présent livret
d’instructions.
En cas de mauvais fonctionnement, la machine, accompagnée
de son certificat de garantie, devra être remise ou envoyée en
port payé, non démontée et dans son emballage d’origine, au
fabricant ou à un Centre d’Assistance agrée indiqué sur la liste
annexée au présent livret. La garantie ne donne pas en aucun
cas droit au remplacement de la machine. RUPES Spa se
réserve le droit de modifier sans préavis les caractéristiques
techniques ou esthétiques des ses produits. Nous déclinons
toute responsabilité quant aux erreurs d'impression éventuelles.
Ce document annule et remplace tous les précédents

16
TECHNISCHE DATEN DEUTSCH 16
Die Sicherheits- und Unfallverhütungsvorschriften sind im
beiliegenden Heft „HINWEISE ZUR SICHERHEIT" enthalten. Das
Heft ist integrierender Bestandteil der vorliegenden
Dokumentation; Diese BEDIENUNGSANLEITUNG enthält daher
nur Zusatzinformationen, welche den spezifischen Einsatz dieses
Geräts betreffen.
BESTIMMNGSGEMÄSSE VERWENDUNG
Dieses Werkzeug ist für den Einsatz als Schleifmachine bestimmt.
Alle Sicherheitshinweise, die Anweisungen, die Abbildungen und
die technischen Daten beachten, die mit diesem Werkzeug
geliefert werden. Die mangelnde Beachtung aller unten aufgeführten
Anweisungen kann zu elektrischen Schlägen,Unfällen führen.
Von Vorgängen des Feinschleifens, Polierens, metallischen
Bürstens oder Schneidens wird mit diesem Werkzeug abgeraten.
Die Vorgänge, für die das Werkzeug nicht vorgesehen ist, können
eine Gefahr darstellen und Personenschäden verursachen.
Kein Zubehör verwenden, das nicht ausdrücklich für den
vorgesehenen Gebrauch hergestellt oder vom Hersteller
empfohlen wurde. Die bloße Tatsache, dass das Zubehör auf Ihrem
Werkzeug angebracht werden kann, garantiert keine Funktionsweise
unter völlig sicheren Bedingungen.
Die Nenngeschwindigkeit des Zubehörs muss mindestens der
auf dem Werkzeug angegebenen Höchstgeschwindigkeit
entsprechen. Zubehör, das bei einer höheren Geschwindigkeit als
der Nenngeschwindigkeit betrieben wird, kann brechen und in die
Luft geschleudert werden.
Der Außendurchmesser und die Stärke Ihres Zubehörs müssen
sich für die Charakteristiken Ihres Werkzeugs eignen. Zubehör mit
nicht korrekten Abmessungen kann nicht angemessen geschützt
oder kontrolliert werden.
Die Beschaffenheit des Zubehörs muss sich korrekt an das
Spannfutter des Werkzeugs anpassen. Zubehör mit Bohrungen der
Welle, die nicht mit den Montageelementen auf dem Werkzeug
übereinstimmen, bleiben nicht im Gleichgewicht, vibrieren zu stark
und können zu einem Kontrollverlust führen.
Kein beschädigtes Zubehör verwenden. Ist das Werkzeug oder
das Zubehör heruntergefallen, auf eventuelle Schäden
untersuchen oder nicht beschädigtes Zubehör installieren.
Nachdem ein Zubehörartikel untersucht und installiert wurde,
begeben Sie sich gemeinsam mit den anwesenden Personen in
einen Sicherheitsabstand von dem rotierenden Zubehörartikel
und lassen Sie das Werkzeug bei Höchstgeschwindigkeit eine
Minute lang leer laufen. Beschädigtes Zubehör bricht im
Allgemeinen während dieses
Probezeitraums.
ALLGEMEINE HINWEISE
Die genannten Gerätes dürfen nur zusammen mit einer passenden Staubabsaugung betrieben werden (kein Lieferbestandteil).
TYP RH253 RH256 RH259 RH253A RH256A RH259A
BETRIEBSDRUCK bar/PSI 6,2/90 6,2/90 6,2/90 6,2/90 6,2/90 6,2/90
LUFTVERBRAUCH l/min 320 320 360 320 320 360
DREHZAHLREGELUNG JA JA JA JA JA JA
UMDREHUNGEN U/min 0 ÷ 11.500 0 ÷ 10.500 0 ÷ 9.500 0 ÷ 11.500 0 ÷10.500 0 ÷ 9.500
SCHWINGKREIS Ø mm 3 6 9 3 6 9
SCHLEIFTELLER Ø mm 150 150 150 150 150 150
TYP SCHLEIFTELLER KLETTSYSTEM KLETTSYSTEM KLETTSYSTEM KLETTSYSTEM KLETTSYSTEM KLETTSYSTEM
ABSAUGVORRICHTUNG - - - JA JA JA
GEWICHT Kg 0,750 0,750 0,800 0,750 0,750 0,800

17
BAUTEILE DER MASCHINE
1 - Schild mit Geräte-Kenndaten
2 - Bedienhebel z. Einleitung der Druckluft
3 - Drehzahleinstellung
4 - Gerätegehäuse
5 - Druckluftanschluß mit 1/4” - Gewinde
6 - Anschluß f. Absaugschlauch; Innenweite Ø 29 mm (SERIES A)
7 - Schalldämpfer
8 - Absaughaube
9 - Schleifteller m. Klettverschluß für Haftschleifscheiben
10 - Schraube für Stützteller
INBETRIEBNAHME
Vor einer Inbetriebnahme des Geräts sollten Sie sicherstellen:
- daß die Verpackung unversehrt ist und keine Beschädigungen
durch Transport bzw. Lagerung aufweist;
- daß das Gerät vollständig ist, also Anzahl und Art der Geräte-
komponenten mit den Angaben in dieser Bedienungsanleitung
überein stimmen;
- ob die Druckluftaufbereitung und -zuleitung die in der Tabelle
sowie auf dem Geräteschild genannten Anforderungen erfüllt.
Die Kenndaten des Geräteschilds sind auf Seite 19
wiedergegeben und erläutert.
ZUSAMMENBAU DER MASCHINE
Das Druckluft-Kupplungsstück (nicht mitgeliefert) in die
entsprechende Bohrung (5) einschrauben.
DRUCKLUFTANSCHLUß (NICHT MITGELIEFERT)
Die Maschine wird ohne Druckluft-Kupplungsstück geliefert. Der
Anwender kann hierzu wahlweise eine Schnellkupplungs-
Stecktülle bzw. einen Stecknippel anschließen vorausgeselzt daß
es ein 8 mm.
Loch für den Luftdurchfluss gibt. Im zweiten Fall muß man den
Sclauch mit einer Schelle stabil auf dem Stecknippel festspannen.
DEMONTAGE DER BEFESTINGUNG VON SCHLEIFTELLERS
- Benutzen Sie den Werkzeugschlüssel für das Wechseln des
Stütztellers (10);
- zur Montage in umgekehrter Reihenfolge vorgehen.
BEFESTINGUNG DER SCHLEIFPAPIERSCHEIBEN
Die Schleifpapierscheibe unter Andrücken auflegen. Dabei darauf
achten, daß die Löcher in der Schleifpapierscheibe über den
Absau-göffnungen im Schleifteller liegen.
VOR DER INBETRIEBNAHME
Stellen Sie folgende Sicher:
- der Drehzahlregler (3) in Stellung MAX ist;
- Schlauch und Kupplungsstück der Druckluftversorgung sind in
einwandfreiem Zustand;
- der EIN/AUS-Schalter funktioniert einwandfrei. Allerdings ohne
Druckluft;
- Sämtliche Gerätekomponenten sind ordnungsgemäß montiert
und weisen keine Zeichen von Beschädigung auf;
- die Maschine muß an eine sinngemäß bemessene und
funktionstüchtige Staubabsaugung angeschlossen sein.
EINSCHALTEN UND AUSSCHALTEN
- Einschalten: den Bedienhebel (2) zum Gerätegehäuse hin
bewegen und gedrückt halten.
- Ausschalten: den Bedienhebel loslassen.
TESTLAUF
Schalten Sie das Gerät ein und stellen Sie sicher, daß es nicht
ungewöhnlich vibriert, order die Schleifteller f. Haftschleifcheiben
berührt wird.
Andernfalls das Gerät sofort ausschalten und die Störung beheben.

18
EINSTELLUNG DER DREHZAHL
Die Drehzahlregelung wird über entsprechendes Betätigen des
Reglers erzielt (3) von MAX bis OFF. Wählen Sie die Drehzahl
passend zur Art der Schleifpapierscheibe sowie den Eigenschaften
des bearbeiteten Materials.
ABNEHMEN UND ERSETZEN DER SCHLEIFPAPIERSCHEIBEN
- Verbrauchte Schleifpapierscheibe nehmen Sie durch Abreißen ab;
- die neue Haftschleifpapierscheibe mit Klettsystem drücken Sie
einfach auf den Schleifteller Dabei ist darauf zu achten daß die
Absauglöcher der Scheibe über den Öffnungen im
Schleiftellerliegen.
ZULASSIGE WERKZEUGE
Haftschleifpapierscheiben 150 mm Ø mit Absauglöchern.
WARTUNG DES GERÄTES
Sämtliche Eingriffe bei gezogenem an der Maschine nur bei
gezogenem Druckluftanschluß ausfuhren.
Das Gerät nach der Arbeit sowie bei Bedarf mit Druckluft von Staub
befreien.
Schmieren Sie die Maschine regelmäßig (alle 50
Betriebsstunden). Geben Sie hierzu 2-3 Tropfen Spezialöl
(synthetisches Öl ohne Silikon, ISO 32) in den Stutzen der
Pressluftzufuhr am Werkzeug. Halten Sie das Werkzeug hierbei
senkrecht, mit dem Stutzen nach oben. Schließen Sie die
Maschine anschließend an die Stromversorgung an und lassen
Sie sie für einige Sekunden laufen.Führen Sie die vorstehend
beschriebene Schmierung auch durch, wenn das Werkzeug für
längere Zeit eingelagert werden soll.Schäden, die durch falsche
oder unangemessene Schmierung verursacht werden, sind von
der Garantie ausgeschlossen.
Sonstige Eingriffe durch den Geräteanwender sind nicht zulässig.
Für die Wartung und die periodische Reinigung von den inneren oder
andere Bedürfnisse wenden Sie sich bitte an einer autorisierten
Kundendienststelle an.
SCHALLPEGEL / MITTLERE BESCHLEUNIGUNG
Der Schalldruckpegel (Geräuschentwicklung) und die mittlere
quadratische Beschleunigungder Maschine, gemessen gemäß
UNI EN ISO 15744 - EN ISO 28927.
Achtung! Di angegebenen Messwerte gelten für neue Geräte. Im
täglichen Einsatz verändern sich Geräusch-und chwingungswerte.
Schalldruckpegel Vibrationspegel
Schalleistungspegel 3-Achsen 1-Achsen*
LPA LWA
Messunsicherheit
ah
Messunsicherheit
ah
Messunsicherheit
dB(A) m/s2m/s2
RH253 73 84 3 2,80 0,20 <2,5 0,2
RH256 75 86 3 3,00 0,30 2,6 0,3
RH259 76 87 3 3,20 0,35 2,8 0,35
RH253A 74 85 3 2,80 0,20 <2,5 0,2
RH256A 76 87 3 3,00 0,30 2,6 0,3
RH259A 77 88 3 3,20 0,35 2,8 0,35
* Schwingungswerte nach der alten EN ISO 8662.
Bei den gezeigten Pegelwerten handelt es sich um Vergleichswerte,
die zu einer vorläufigen Einschätzung des Risikos für den
Bedienenden während der Arbeitszeit dienen. Für eine angemessene
Einschätzung der Arbeitszeit müssen die Zeiten berücksichtigt
werden, in denen sich das Gerät im Ruhezustand befindet oder
ausgeschaltet ist. Diese Werte wurden anhand der
Haupteinsatzgebiete des Geräts ermittelt. Wenn das Gerät für andere
Aufgaben oder mit anderen Zubehörprodukten verwendet wird oder
keine regelmäßigen Wartungsarbeiten durchgeführt werden, können
diese Werte beim Betrieb deutlich überschritten werden.

19
KONFORMITÄTSERKLÄRUNG
IL PRESIDENTE
G. Valentini
S.p.A
Wir erklären in unserer Verantwortung, dass die handgeführten Nicht-
Elektro-Werkzeuge die in diesem Betriebshandbuch beschrieben
werden, in Übereinstimmung mit den wesentlichen Anforderungen an die
Sicherheit der folgenden Derektives ist:
2006/42/CE Maschinenrichtlinie
Die Test sind in Übereinstimmung mit den nachfolgenden
Standards durchgeführt worden:
UNI EN ISO 11148-8:2012 - UNI EN ISO 15744 - UNI EN ISO 28927.
Technische Unterlagen bei:
RUPES S.p.A.
Via Marconi, 3A
20080 VERMEZZO (Mi) - Italy
Vermezzo (M), 01/03/2014
KENNDATENSCHILD DES GERÄTES
ANORDNUNG UND BEDEUTUNG DER ANGABEN
1 - Gerätetyp
2 - Luftverbrauch bei Vollast
3 - Betrifebsdruck
4 - Schwingkreis-Durchmesser
5 - Gerät-bzw. Seriennummer der Maschine
6 - Abmessungen der Polierballens
7 - Max. Drehzahl in Umdrehungen/Minute
8 - Lesen Sie diese Hinweise aufmerksam
durch, bevor Sie das vorliegende
Produkt in Betrieb nehmen.
GARANTIE
Für alle von ihr hergestellten Geräte leistet die Fa. RUPES Spa
Gewähr im von Mangeln, die innerhalb von 12 Monaten ab dem
Kaufdatum aufgrund Material-oder Fabrikationsfehlern auftreten.
Die Maschinen dürfen ausschließlich mit Originalzubehör und
Originalersatzteilen von RUPES betrieben werden: Das
Unternehmen haftet nicht für Unfälle oder Schäden, die auf die
Nichtbeachtung dieser Bestimmung zurückzuführen sind, die
außerdem zum unverzüglichen Verfall der Garantie führt.
Der Garantieanspruch entfällt bei unsachgemäßem Gebrauch
des Gerätes oder der Nichteinhaltung dieser
Gebrauchasanleitung.
Er entfällt ebenfalls, wenn das Gerät demontiert bzw. umgerüstet
wurde oder sichtbare Schäden infolge mangelhafter Pflege
aufweist.
Die Inansprunchnahme der Garantieleistung ist nur möglich,
wenn der Abschnitt auf der vorletzten Umschlagseite dieser
Gebrauchsanleitung ausgefüllt ist.
Im Fall einer nachweislichen Funktiosstörung muß das Gerät dem
Hersteller komplett montiert, originalverpackt und mit
beiliegender Garantiekarte fracht und portofrei übergeben bzw.
zugesendet werden. Die Übergabe an ein autorisiertes
Kundendienstzentrum (siehe beiliegendes Verzeichnis) ist
ebenfalls möglich.
In keinem Fall leitet sich aus dem Garantieanspruch ein
Rechtsanspruch auf die Ersetzung des Gerätes ab. Die Fa.
RUPES SpA behält sich das Recht vor, ohne Vorankündigung
technische und ästhetische Änderungen an ihren Produkten
vorzunehmen.
Das Unternehmen haftet nicht für eventuelle Druckfehler.
Vorliegendes Dokument annulliert und ersetzt alle früheren
Veröffentlichungen.

20
DATOS TECNICOS ESPAÑOL 20
Las instrucciones para la seguridad y la prevención de accidentes se
ilustran en el opúsculo "INDICACIONES PARA LA SEGURIDAD" que
forma parte de la presente documentación. El MANUAL DE
INSTRUCCIONES para el uso ilustra solamente quella informaciones
adicionales estrictamente relacionadas con el uso especifico de la
herramienta.
USO CONFORME A LO DETERMINADO
Esta herramienta está destinada a funcionar como ljadora. Leer
todas las advertencias de seguridad, las instrucciones, las
ilustraciones y las especificaciones suministradas con esta
herramienta. El incumplimiento de las instrucciones puede causar
descargas eléctricas, accidentes graves.
Se recomienda no ejecutar con esta herramienta operaciones de
acepilladura metálica, pulido o corte. El empleo de la herramienta en
operaciones para las cuales la herramienta no está diseñada puede
causar peligros y daños a las personas.
No utilizar accesorios no realizados específicamente para el uso
previsto o no aconsejados por el productor. El hecho de que el
accesorio se pueda fijar en la herramienta no garantiza un
funcionamiento totalmente seguro.
La velocidad nominal del accesorio debe ser al menos igual a la
velocidad máxima indicada en la herramienta. Los accesorios que se
hagan funcionar a una velocidad superior a la nominal se pueden romper
y saltar por el aire.
Las características de su accesorio deben responder a las
características de su herramienta. Los accesorios de dimensiones no
correctas no se pueden proteger y controlar adecuadamente.
La conformación de los accesorios debe adaptarse correctamente al
mandril de la herramienta. Los accesorios cuyos orificios en el eje no
correspondan a los elementos de montaje en la herramienta no
permanecerán en equilibrio, vibrarán excesivamente y podrán provocar
una pérdida de control.
No utilizar accesorios dañados. Antes de cada uso, examinar los
accesorios. Si la herramienta o el accesorio ha sufrido una caída,
verificar si hay daños o instalar un accesorio no dañado. Una vez
examinado e instalado un accesorio, colocarse a una distancia de
seguridad del accesorio giratorio, al igual que las demás personas
presentes, y poner en funcionamiento la herramienta a la velocidad
máxima en vacío durante un minuto. Los accesorios dañados
generalmente se rompen durante el período de prueba.
ADVERTENCIAS GENERALES
La máquina debe funcionar conectada con un adecuado sistema de aspiración (no suministrado).
TYPO RH253 RH256 RH259 RH253A RH256A RA259A
PRESION DE OPERACION bar/PSI 6,2/90 6,2/90 6,2/90 6,2/90 6,2/90 6,2/90
CONSUMO AIRE l/min 320 320 360 320 320 360
REGULACION DE LA VELOCIDAD SI SI SI SI SI SI
REVOLUCIONES/min (r.p.m.) 0 ÷ 11.500 0 ÷ 10.500 0 ÷ 9.500 0 ÷ 11.500 0 ÷ 10.500 0 ÷ 9.500
DIAMETRO ORBITA mm 3 6 9 3 6 9
DIAMETRO PLATILLO mm 150 150 150 150 150 150
TIPO PLATILLO CON VELCRO CON VELCRO CON VELCRO CON VELCRO CON VELCRO CON VELCRO
SISTEMA DE ASPIRACION - - - SI SI SI
MASA Kg 0,750 0,750 0,800 0,750 0,750 0,800
This manual suits for next models
7
Table of contents
Languages:
Other Rupes Sander manuals
Popular Sander manuals by other brands

Metabo
Metabo SXE 425 TURBOTEC - operating instructions

EINHELL Bavaria
EINHELL Bavaria BSS 105 operating instructions

Ryobi
Ryobi R18B-0 Original instructions

King Industrial
King Industrial KC-689-OSC instruction manual

Hitachi
Hitachi SV 13YB Handling instructions

Tractel
Tractel Tempo 3 Operating and maintenance instructions