FERMOD KIT 5010 User manual
Kit5010ExpSécu_Elec-A
1
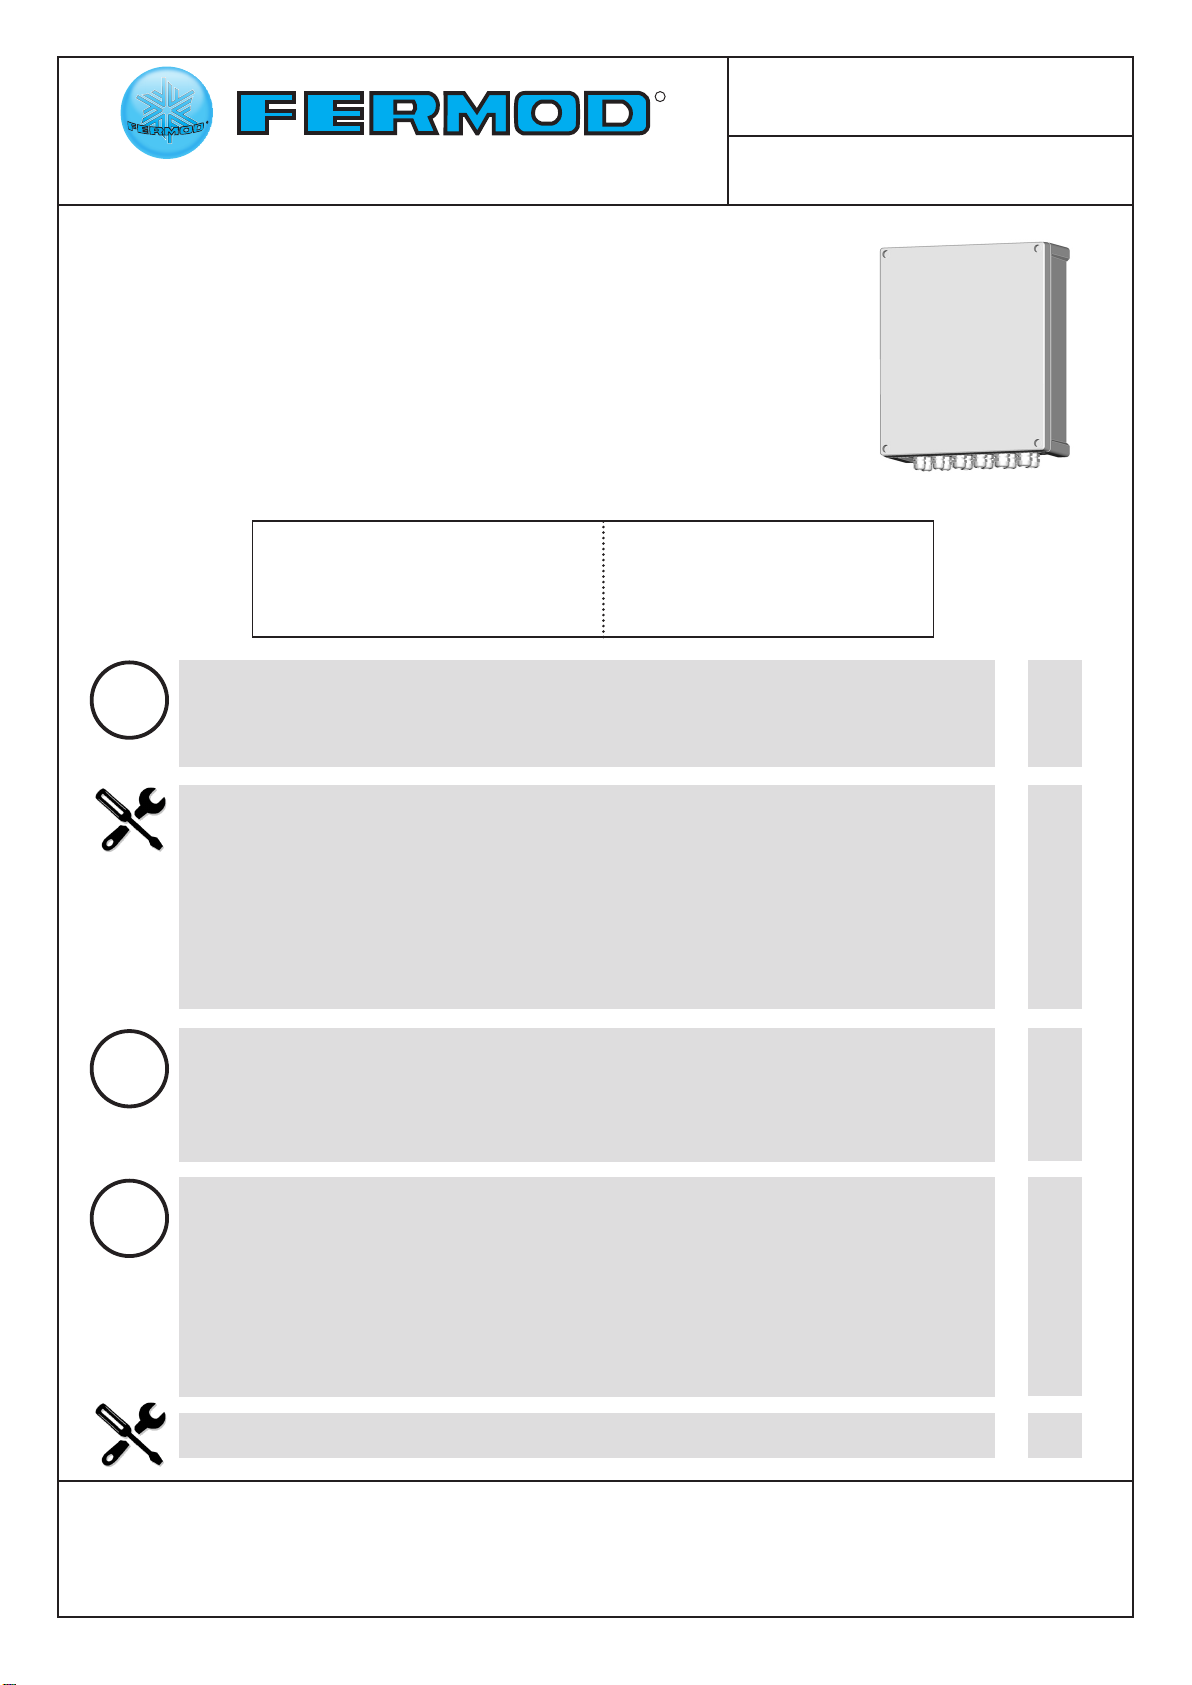
KIT 5010
'ÚS Fermatic manuFMMBTLFOTZTUFN :
For manual Fermatic systems:
2120 / 2130 / 2150 - 2320 / 2420
3430 / 3530 / 7530
01/2016
R
.POUBHFBOWJTOJOH/ Mounting Electric part
NMkit5010ExpSécu_Elec-A
Den här instruktionen innehåller montage, driftsättning och underhållsinstruktioner.
Läs den och förvara den lätt åtkomligt.
This instructions manual includes the mounting, utilization and the maintenance instructions. We recommend to read this carefully and to place it at the user’s
disposal. The english version of our general conditions of sales and mounting instructions are not binding, and are only given for information purposes.
Only the french version can be used in case of legal action.
Spänning : 220-240V AC
50/60 Hz enfas
Motoreffekt : 370W
Power supply : 220-240V AC
50/60 Hz monophase
Motor power : 370W
i
i
i
p.2
p.2
p.3
p.3
p.7
p.9
p.10
p.10
p.12
p.17
p.19
p.19
p.19
p.19
p.20
p.20
p.20
p.20
p.21
p.21
p.21
p.22
1 - Generell information / General informations............................................
2 - Produktegenskaper / Characteristics...............................................
3 - Monteringsanvisningar / Mounting precautions........................................
4 - Elanslutningar / Wiring..........................................................................
5 - Fotocell / Horizontal safety device............................................
6 - Montage av påkörningsskydd (passivt) / Passive edgemount security...
7 - Parametrar / Parameters.............................................................................
7.1 - Uppstart av automatiken / Initialization/First power on............
7.2 - Användande av tangentbord / Control keyboard using..........................
7.3 - Informationskoder / Information codes......................................................
8 - Tillgängliga funktioner / Available functions...................................................
8.1 - Låsfunktion / Lock function.........................................................
8.2 - Stoppfunktion / Stop command..........................................................
8.3 - Brandfunktion / Fire detection............................................................
9 - Användande / Using.....................................................................................
9.1 - Normalt användande / Normal using...................................................
9.2 - Risker / säkerhet ... / Risks following intentional acts..................
9.3 - ID-märkningar / Identication stickers......................................
9.4 - Rengöring / Cleaning..........................................................................
10 - Underhåll / Maintenance..............................................................................
11 - Skrotning / Scrapping................................................................................
12 - Felsökning / Malfunctioning...................................................
Kit5010ExpSécu_Elec-A
2
1 - GENERELL INFORMATION / GENERAL INFORMATIONS
Automatiken skall installeras i enlighet med den här manualen. I övrigt skall lokala föreskrifter följas.
This material must be installed as per our mounting instructions and the following instructions.
The installation must be realised in accordance with local regulations.
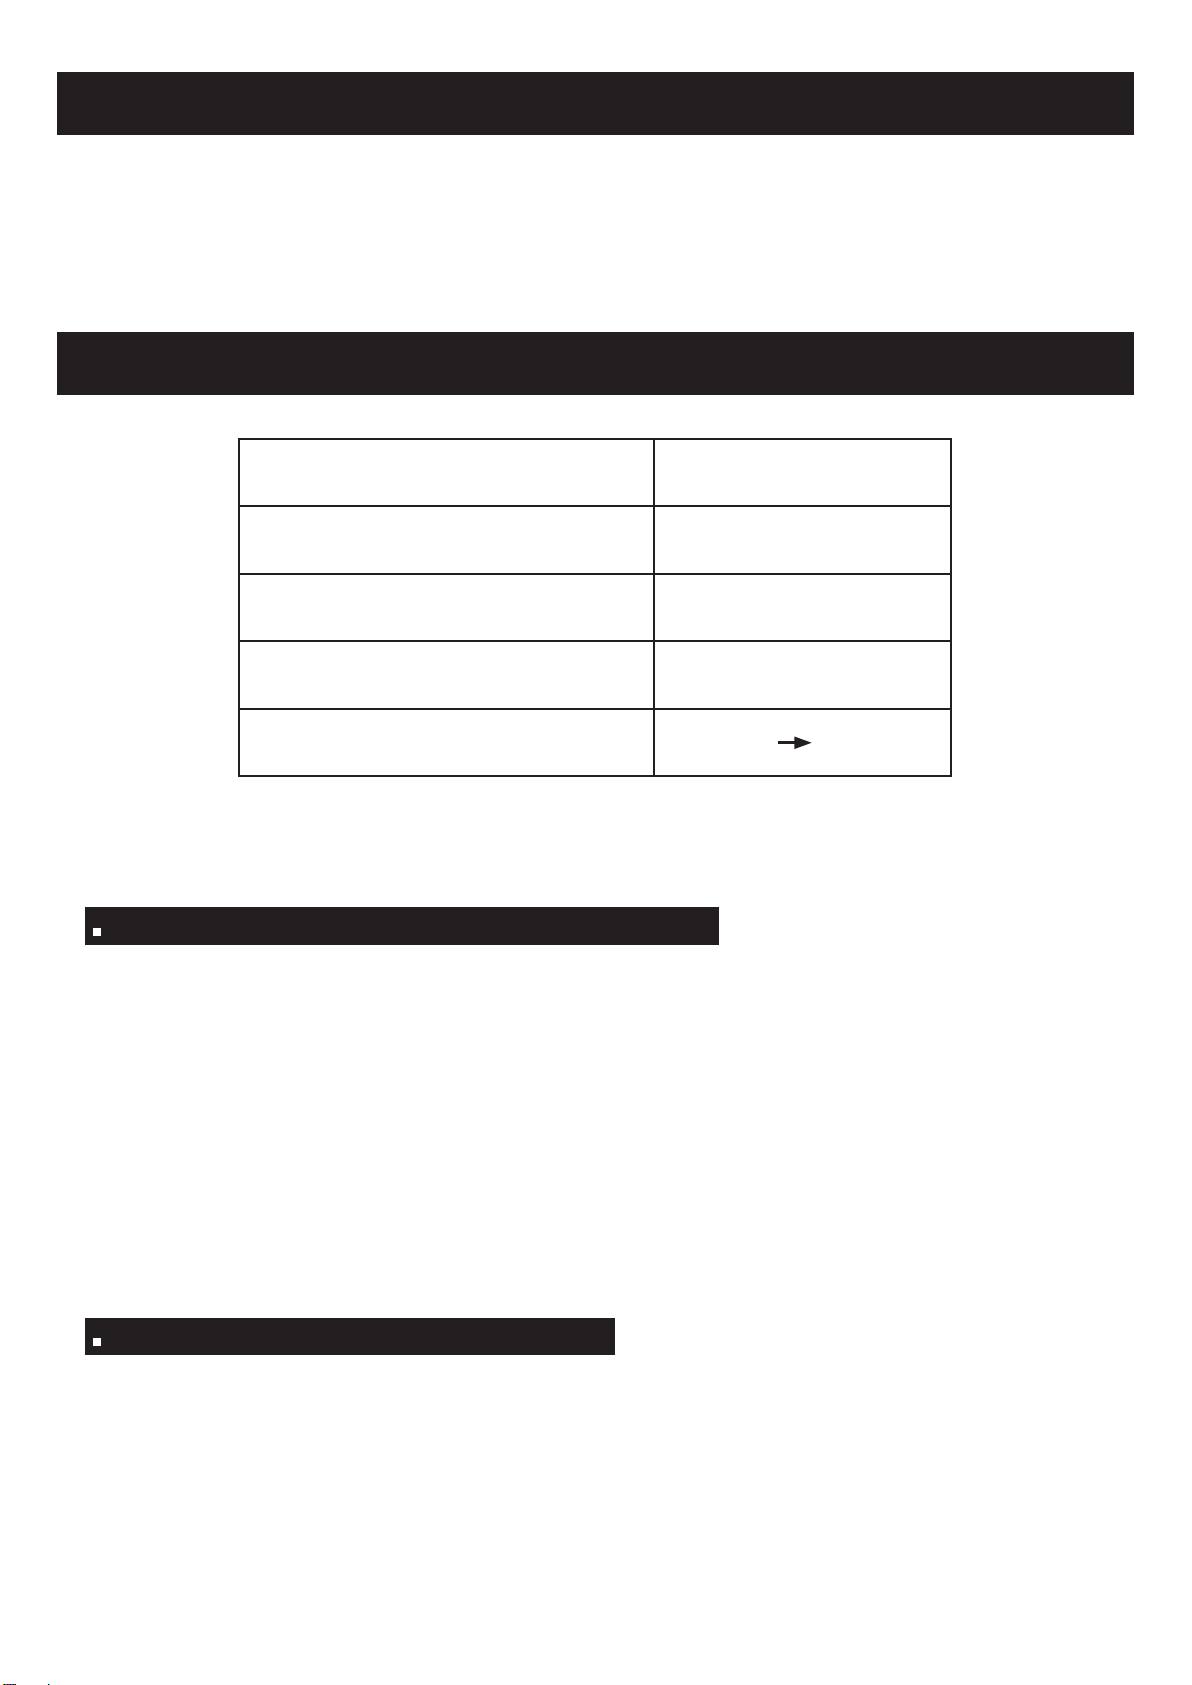
2 - PRODUKTEGENSKAPER / CHARACTERISTICS
Spänningsmatning
Power supply
220-240V AC 400W Mono
50/60 Hz
Motoreffekt
Motor power 370W
Kapslingsklass för motor
Protection of the motor IP 55
Kapslingsklass för styrskåp
Protection of the command box IP 65
Temperaturområde
Using temperature -30°C +45°C *
*Vid montage i minusgrader se vidare information.
*For negative temperature see «option for minus temperature»
Separate mounting instructions
Automatik kit 5000 har tre olika funktionsalternativ:
The automatic electronic kit 5000 has 3 function modes:
Timer läge / Timer mode
Standardläge / Standard mode
Tryck och håll inne knapp för öppna/stänga / «Press and hold to open/close the door» mode
Automatiken har en inbyggd låsfunktion (ersätter ej ett mekaniskt lås fullt ut), kan förses med horisontell
eller vertikal säkerhetsvakt för att kunna tillgodose lokala bestämmelser för automatiserade portar.
It has an integrated lock (which does not replace the use of a mechanical lock), and can be equipped with
horizontal or vertical safety device (according to the regulations that apply in the country of installation).
Funktionsalternativ / Function modes
Tillbehör / Options
Säkerhetsvakter (för att kunna tillgodose lokala bestämmelser för automatiserade portar)
Blixtljus
Kontakta oss för mer information angående övriga tillbehör.
Horizontal or vertical safety device (according to the regulations that apply in the country of installation)
Flashing light
Please contact us for other options (resistive edgemount, pull cord...).

Kit5010ExpSécu_Elec-A
3
Skåpsvärme (tillb)
Heating element
(option)
Displayenhet
Control keyboard
Säkring
Circuit breaker
Matningskort
Power supply card
Motorkort
Motor card
238
320
Kabellängd : 2m
Cables length: 2m
!
Ø4
- Elnät : 220-240V AC - 50/60 Hz - L+N+Jord.
- Dimention matningskabel : 3G2,5 mm².
- Ska anslutas via automatsäkring karateristik D.
- Electrical network: 220-240V AC - 50/60 Hz.
- Connection cable section : 3G2,5 mm².
- Connect each Kit to a dedicated power line protected by a circuit breaker D curve.
!
3 - MONTAGEANVISNING / MOUNTING PRECAUTIONS
Följ lokala bestämmelser som gäller i det land automatiken ska installeras i.
Kontrollera följande innan installation :
- Kontrollera vilken omgivningstemperatur som är aktuell. Om temperaturen understiger -10°C,
ska ett styrskåp avsett för detta ändamål användas (OBS, ej standardskåp).
- Kontrollera så att skensystemet är kompatibelt med automatiken kit 5000.
Följ därefter avsedda instruktioner från Fermod.
Please respect the regulations that apply in the country of installation.
- Check the temperature of the environment. For temperatures lower than –10°C, a low temperature
command box is required.
- Check the compatibility between the Automatic Kit to be installed with the Fermatic Manual System.
Please refer to our mounting instructions.
4 - ELANSLUTNING / WIRING
Styrskåp / Command box
M10

Kit5010ExpSécu_Elec-A
4
!
Anslutning av Motor och pulsräknare / Motor and encoder connection
Motor (kabellängd 2m)
Motor (grey cable/2m)
Pulsräkn. (kabellängd 2m)
Encoder (black cable/2m)
Förlängningskabel 5m (max 2 st 5m. förlängning)
Extension cable 5m (maxi 2 extensions endwise)
Borrning Ø 20mm min.
Drilling Ø 20mm mini
to pass the connectors
Rör Ø 20mm minimum.
Use tube Ø 20mm mini to pass the cables
OPTION
i
M10
M10
M6
M6
Vy bakifrån
Back view
Anslutningar
Oriented slots
Bryt matningsspänningen innan urkoppling av motor
Absolutely cut the power supply before disconnecting the motor
Kit5010ExpSécu_Elec-A
5
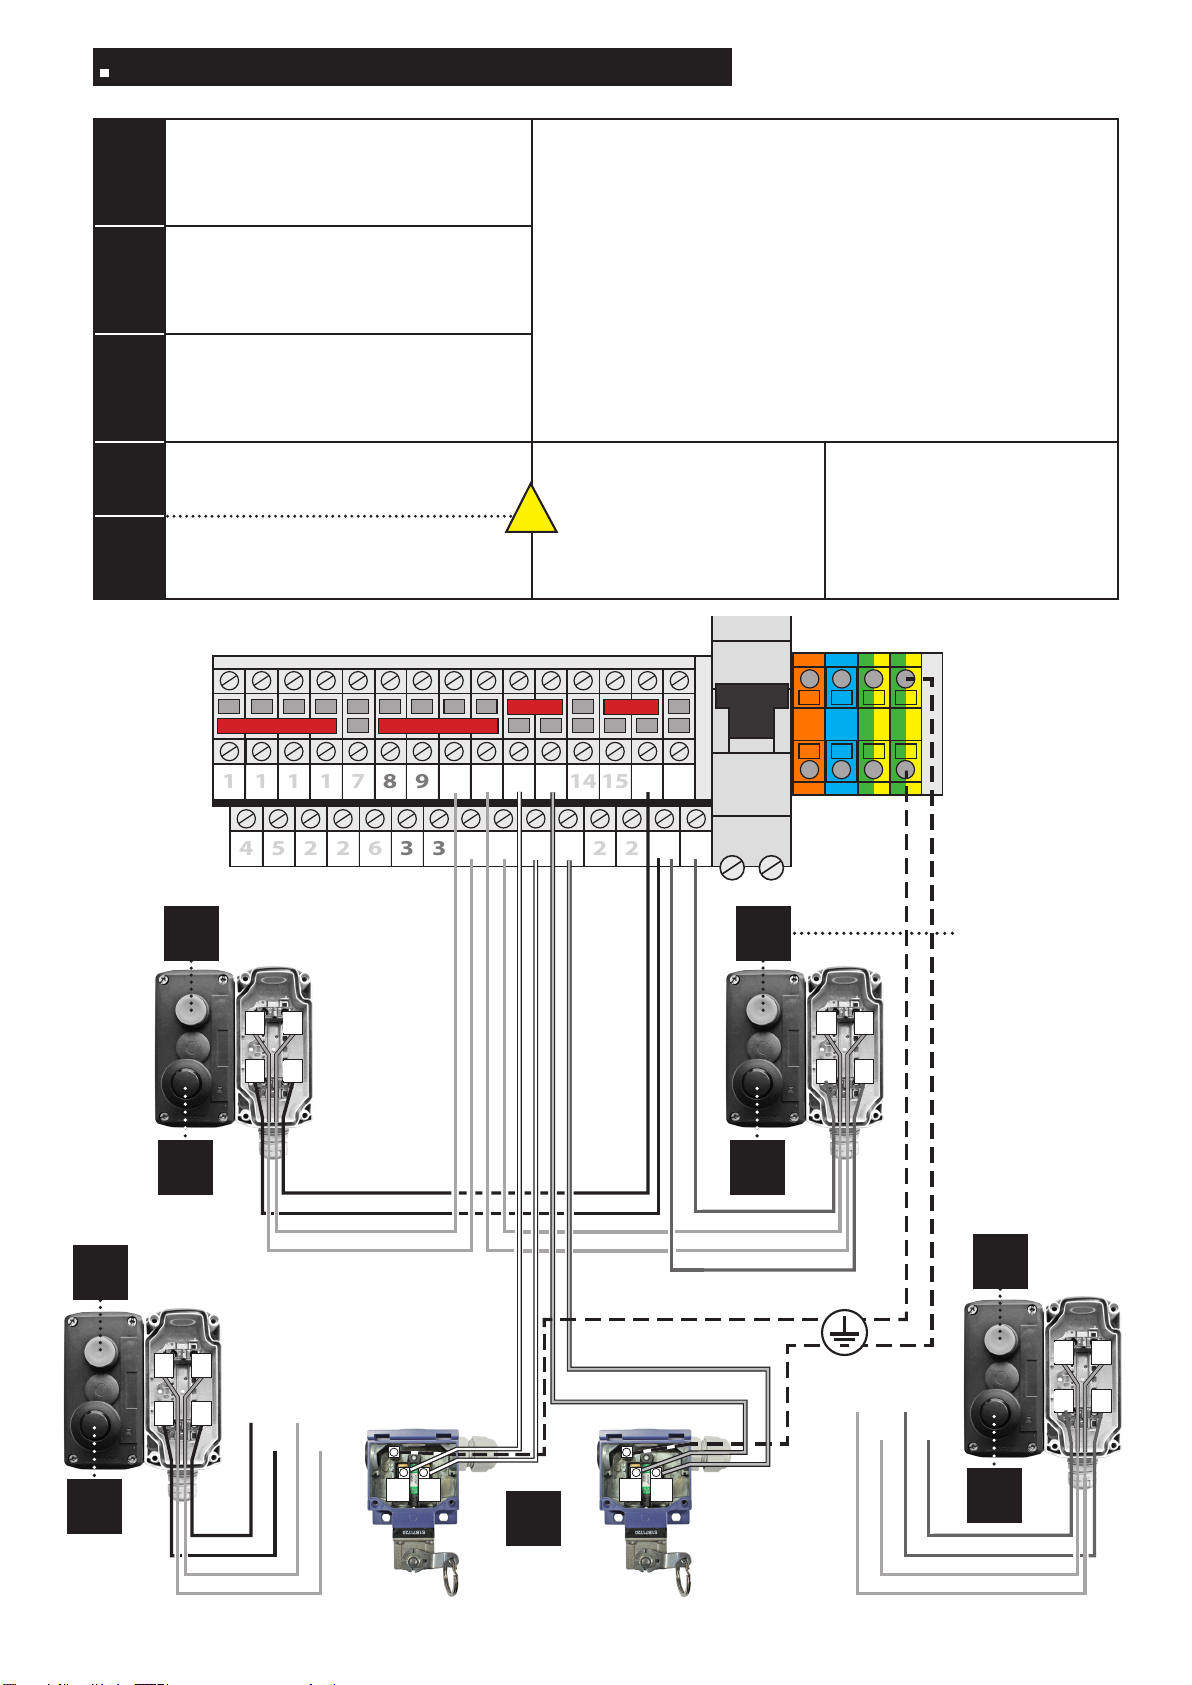
Inkoppling av ingångar / Interface card wiring
1314 1314
18 19
2
2
2222
3
3
6
2
2
5
4
1
16 17
15
14
13121110
9
8
7
1
1
1
43
1 2
43
18 3
16 8
1 2
C
43
1 2
43
1 2
18
319
DD
A
E
B
E
B
Hel öppning
Total opening Hel öppning
Total opening
Hel öppning
Total opening
Delvis öppning
Partial opening
Delvis öppning
Partial opening
PE PE
9
A
A
Hel öppning plint 2-10 och 2-11
(eller tryck och håll funktion)
Total opening command 1/2
or press and hold command (push-button) Alla knappar för öppning måste vara av
impulstyp annars förblir dörren öppen så länge
kontakten är sluten.
All the opening commands must be impulse model
(otherwise the door remains open as long as
the contact is active)
B
Delvis öppning plint 3-8 och 3-9
(eller tryck och håll funktion)
Partial opening command 1/2
or press and hold command (push-button)
C
Hel öppning plint 2-12 och 2-13
(signal från dragsnöre, radar, fjärrkontroll)
Total opening command 1/2
(pull cord, radar, magnetic loop...)
DNödstopp plint 18-16 och 18-19
Stop 1/2 (hold-on contact) Ta bort byglingar vid
inkoppling av nödstopp
Remove the corresponding shunt
to wire the stop commands
Koppla inte in nödstopp D
och E på samma plint
Do not wire a stop button D in
the same connecting terminals
than a button E
ENödstopp plint 18-16 och 18-19
Stop 1/2 (hold-on contact)
!
Kit5010ExpSécu_Elec-A
6
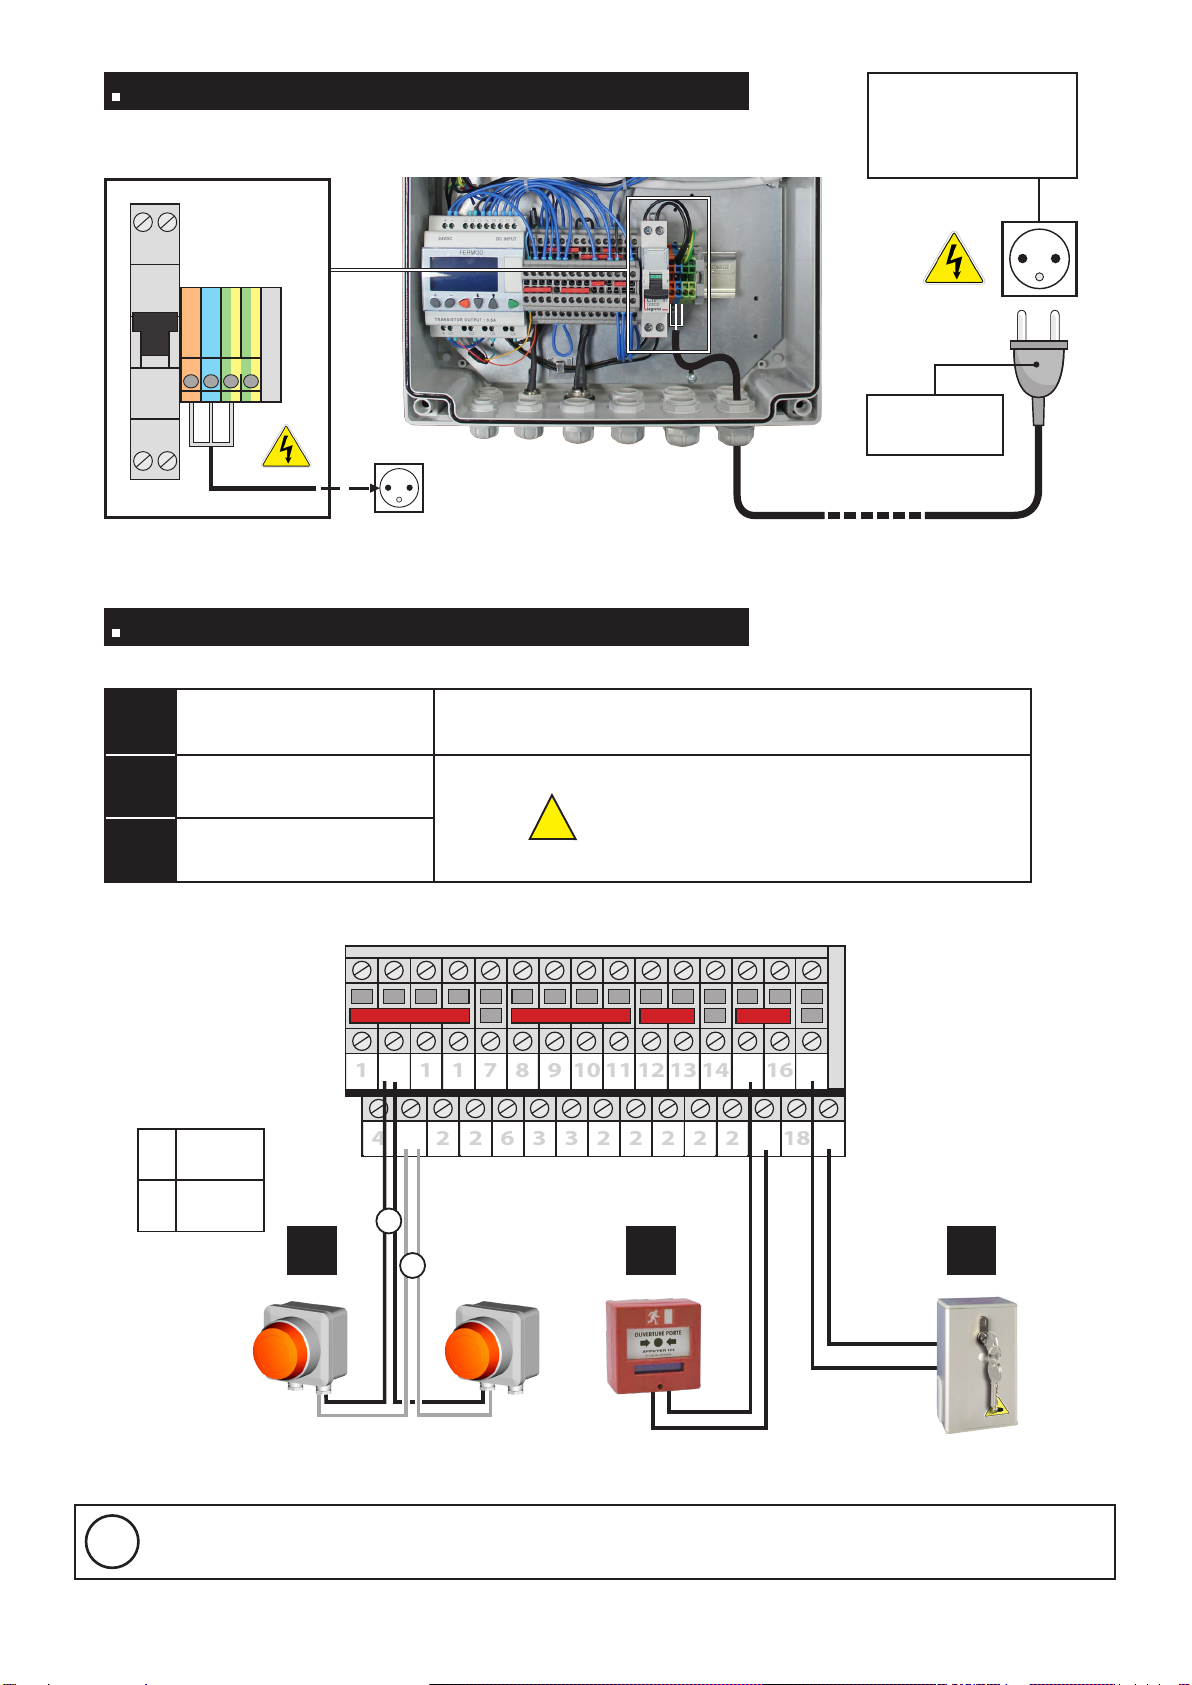
Inkoppling av tillbehör/ Options wiring
Anslutning av matning / Power supply connection
Ingår ej
Not provided
N
L1
PE
= Nolla
Neutral
= Fas/Phase
= Jord
Earth
Matningsspänning /
Power supply :
220-240V AC
50/60 Hz mono
ABlixtljus 1/2
Flashing light 1/2
Fast spänning då blixtljus aktiveras
Information for ashing lights command doesn’t ash
BBrandingång
Fire detection Slutande kontakt (ej impuls)
Demontera bygling innan installation
Hold-on contact
Remove the corresponding shunt
CLåsinkoppling
Lock
!
18
192
2
2
2
2
2
3
3
6
2
2
5
4
1
16
1715
14
13
12
11
10
9
8
7
1
1
1
CB
NSvart
Black
RRöd
Red
A
Se separata instruktioner i manual NMoptionsKit5000Exp för att ansluta tillbehör.
Please see separate mounting instructions: NMoptionsKit5010Exp to wire the dierent options.
i
N
BLÅ/ BLUE
L1
GRÖN / GUL
PE
ORANGE
GREEN / YELLOW
R
N
3G2,5 mm
Kit5010ExpSécu_Elec-A
7
500
PORTE
DOOR
HUISSERIE
FRAME
Placering av fotocell
och reflektor
Single cell position
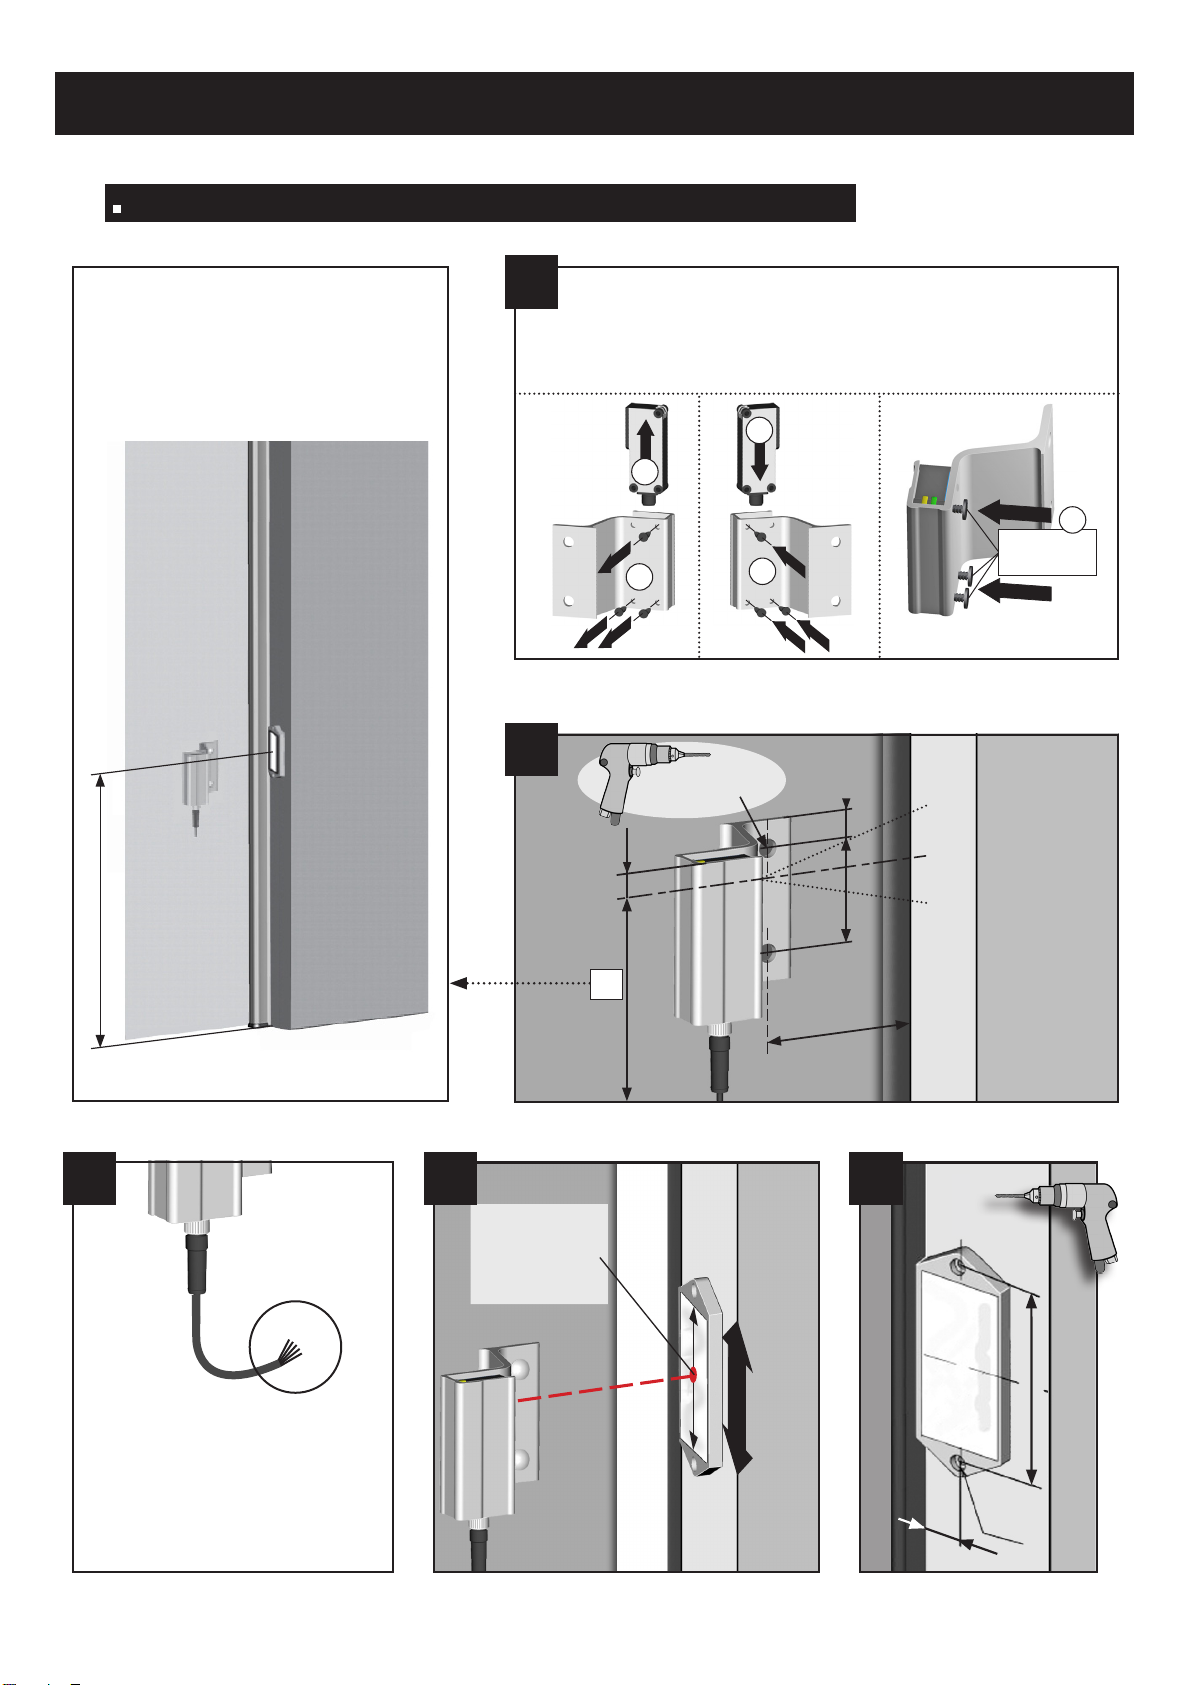
5 - FOTOCELL / HORIZONTAL SAFETY DEVICE
Montage av sändare och reflektor - Cell/reector mounting
1
2
14
3
Tryck
/ Push
Vänd själva sändaren så att det passar för
aktuell öppningsriktning
Reverse the direction of the cell according to
the opening side of the door
Ø8
52
10
14
DÖRR STÄNGD
DOOR CLOSED
65 mini
Anslut fotocellen
(se nästa sida)
Electrically connect the cell
(see next page)
3
5
H1
x
2
==
PORTE OUVERTE
DOOR OPEN
Kit5000CE_Elec-A
12
Câblage / Wiring
Couper
Cut
37 41
38 4240
39
33
34
35
36
B
H1
BN
BL
M
G
ORANGE
ALIGNEMENT OK
ALIGNMENT OK
Blanc / White
Bleu / Blue
Gris / Grey
Marron / Brown
Noir / Black
G
B
Bl
M
N
VERT / GREEN
ALIMENTATION OK
POWER SUPPLY OK
29 30 32
31
Retirer le shunt
Remove shunt
!
B
!
H1
Sens ouverture
Opening side
==
116 ==
Ø5,5
15
Point rouge
du faisceau
Red point
of the beam
PORTE OUVERTE
DOOR OPEN
Pour le câblage d’un double barrage horizontal (option) se reporter à la notice séparée :
Wiring double horizontal safety device (option): please see separate mounting instructions:
NMoptionsKit5000CE
i
4
4
Röd punkt
i centrum
Red point
of the beam
Kit5000CE_Elec-A
12
Câblage / Wiring
Couper
Cut
37 41
38 4240
39
33
34
35
36
B
H1
BN
BL
M
G
ORANGE
ALIGNEMENT OK
ALIGNMENT OK
Blanc / White
Bleu / Blue
Gris / Grey
Marron / Brown
Noir / Black
G
B
Bl
M
N
VERT / GREEN
ALIMENTATION OK
POWER SUPPLY OK
29 30 32
31
Retirer le shunt
Remove shunt
!
B
!
H1
Sens ouverture
Opening side
==
116 ==
Ø5,5
15
Point rouge
du faisceau
Red point
of the beam
PORTE OUVERTE
DOOR OPEN
Pour le câblage d’un double barrage horizontal (option) se reporter à la notice séparée :
Wiring double horizontal safety device (option): please see separate mounting instructions:
NMoptionsKit5000CE
i
4
5
Kit5010ExpSécu_Elec-A
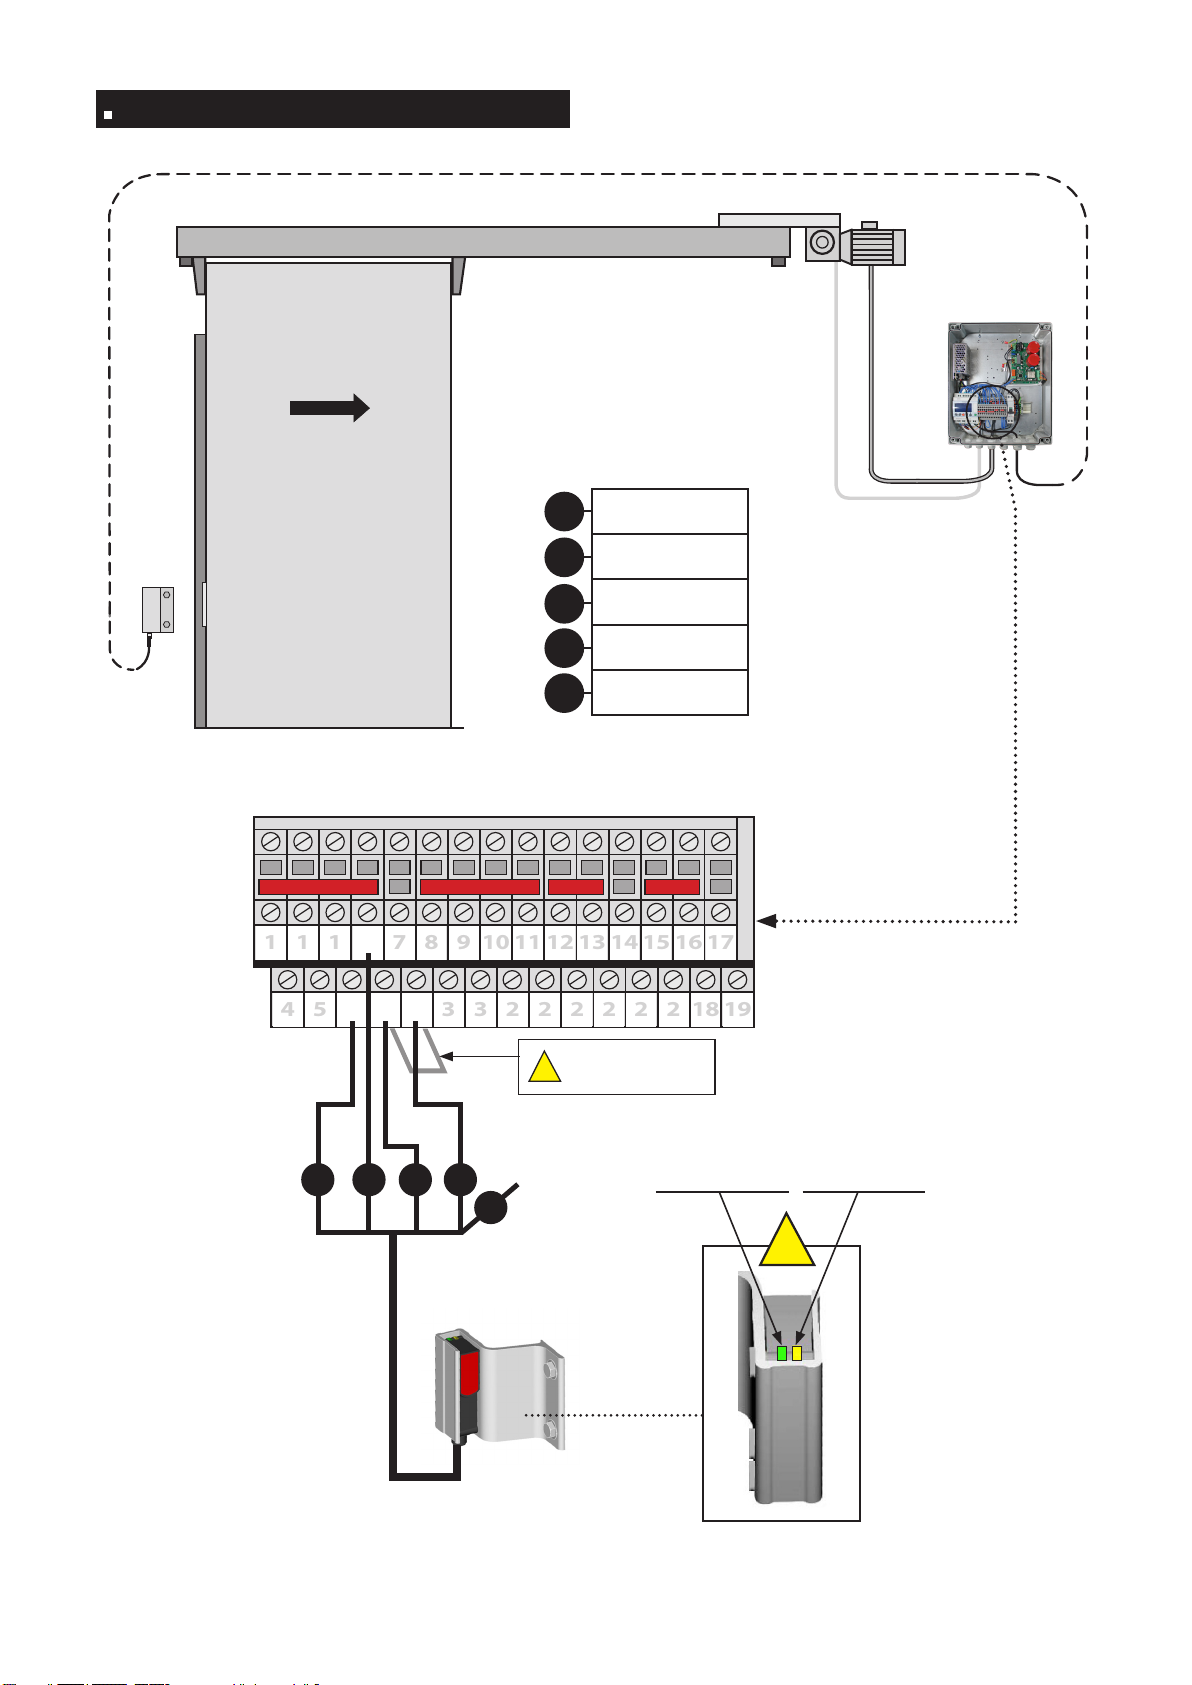
8
Inkoppling / Wiring
H1
ORANGE
SIGNAL OK
ALIGNMENT OK
Vit / White
Blå / Blue
Grå/ Grey
Brun / Brown
Svart / Black
G
B
Bl
M
N
GRÖN / GREEN
Spänning OK
POWER SUPPLY OK
!
H1
Sens ouverture
Opening side
18
19
2
2
2
2
2
2
3
3
62 2
5
4
1
16
17
15
14
13
12
11
10
9
8
7
1
1
1
Kapas
Cut
B
BL M
G N
Ta bort bygling
Remove shunt
!
Kit5010ExpSécu_Elec-A
9
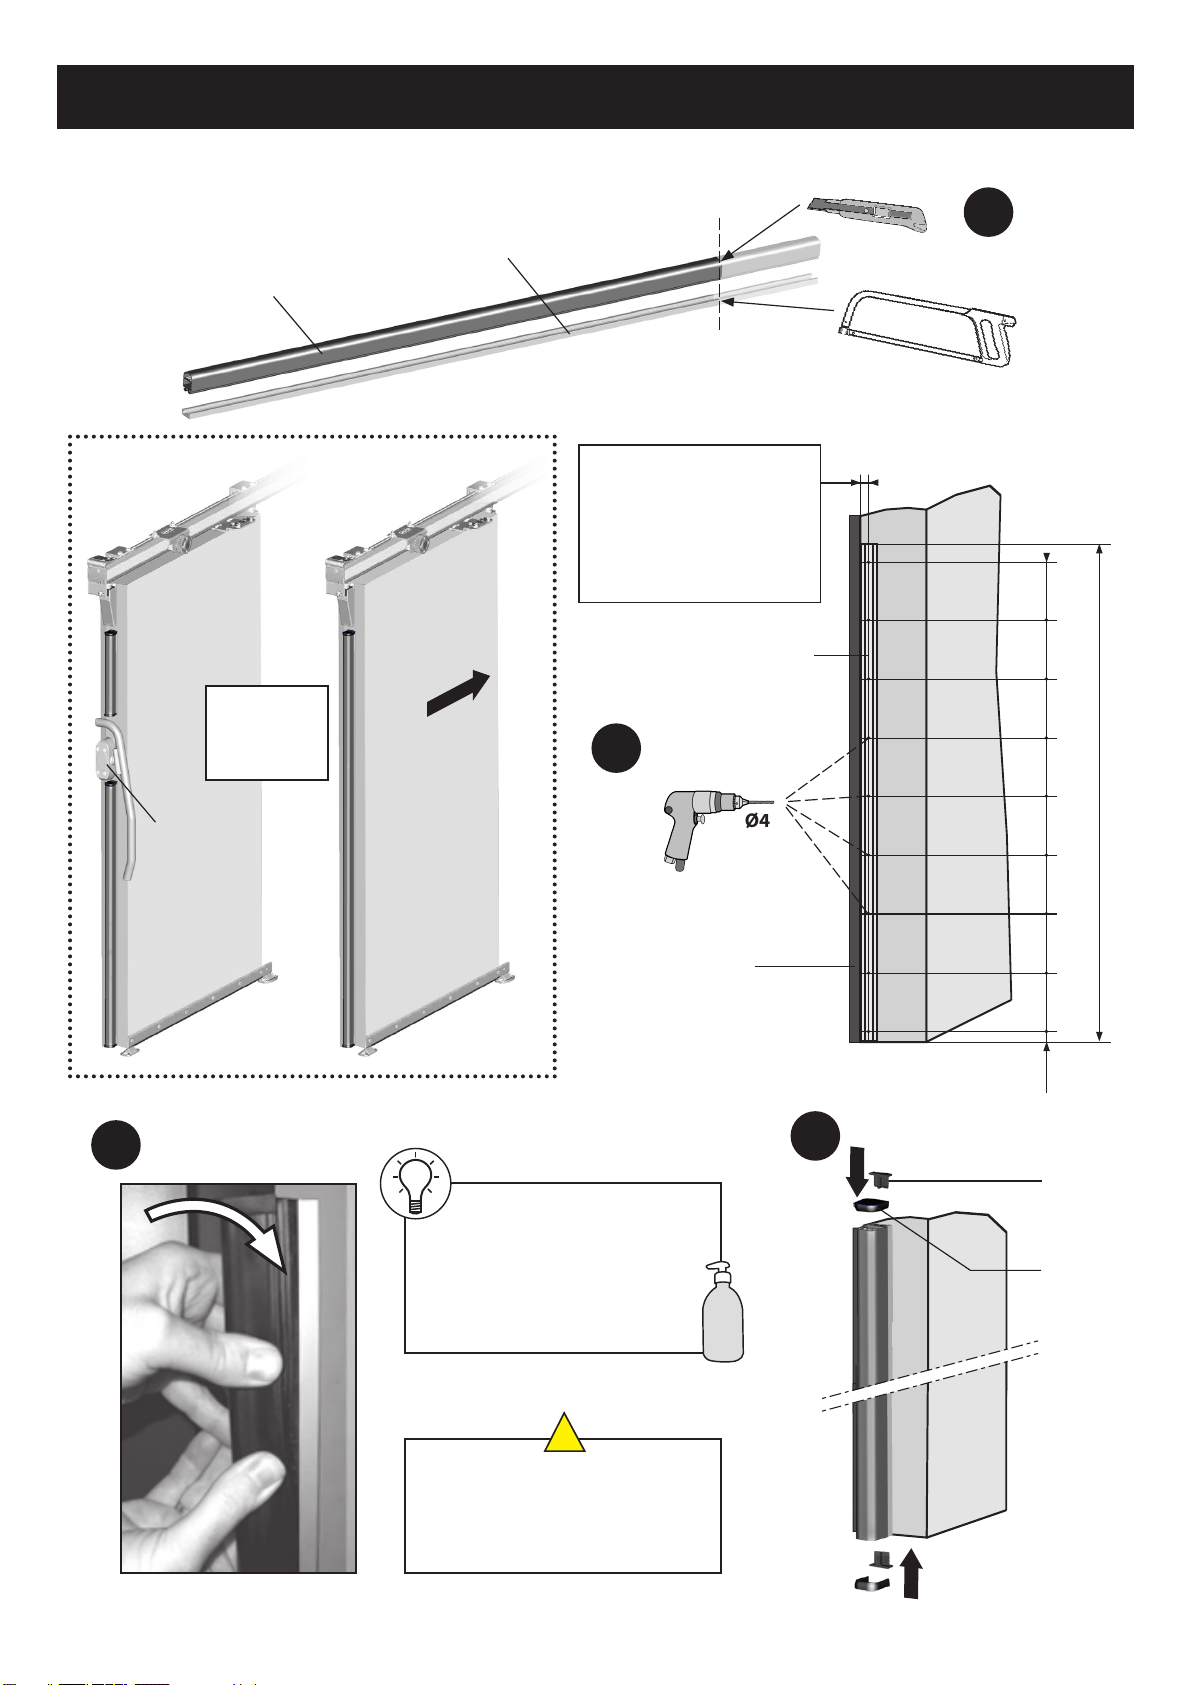
Montageprofil
Fixation prole
Lock
Stick
Lås
Slot
Kontrollera skicket på listen regelbundet
Control good status of the passive
edgemount security regularly.
Påkörningsskydd
Gasket
2500
40 300 300 300 300 300 300 300 300
Ø4
Sens
Ouverture
2
34
!
Montera påkörningsskyddet
genom att trä i det uppifrån.
Lite såpvatten underlättar montaget.
If possible slip the rubber gasket from
above. Use liquid soap to mount
more easily.
savon
soap
Poignée
Handle
Exemples
de montage
Mounting
examples
Borra + skruv fast
Drill + Fix
Montera list
Introduce
Monteras så långt in på
dörrbladet som möjligt
To mount closest to the inner
edge of the door (according to
possibilities)
6 - MONTAGE AV EVENTUELLT PÅKÖRNINGSSKYDD / PASSIVE EDGEMOUNT SECURITY
Kapa
Cut
1
Passivt påkörningsskydd
Security gasket
Montageprofil
Fixation prole
Kit5010ExpSécu_Elec-A
10
2 3
5 - PARAMETRAR / PARAMETERS
Kontrollera att säkerhetsutrustning är ansluten el byglad.
Mekanisk injustering av dörren ska vara klar och dörren
ska gå lätt att flytta för hand.
Ändstopp ska vara monterade på skenan.
Under initieringen så är alla säkerhetsdetaljer och
tryckknappar i drift.
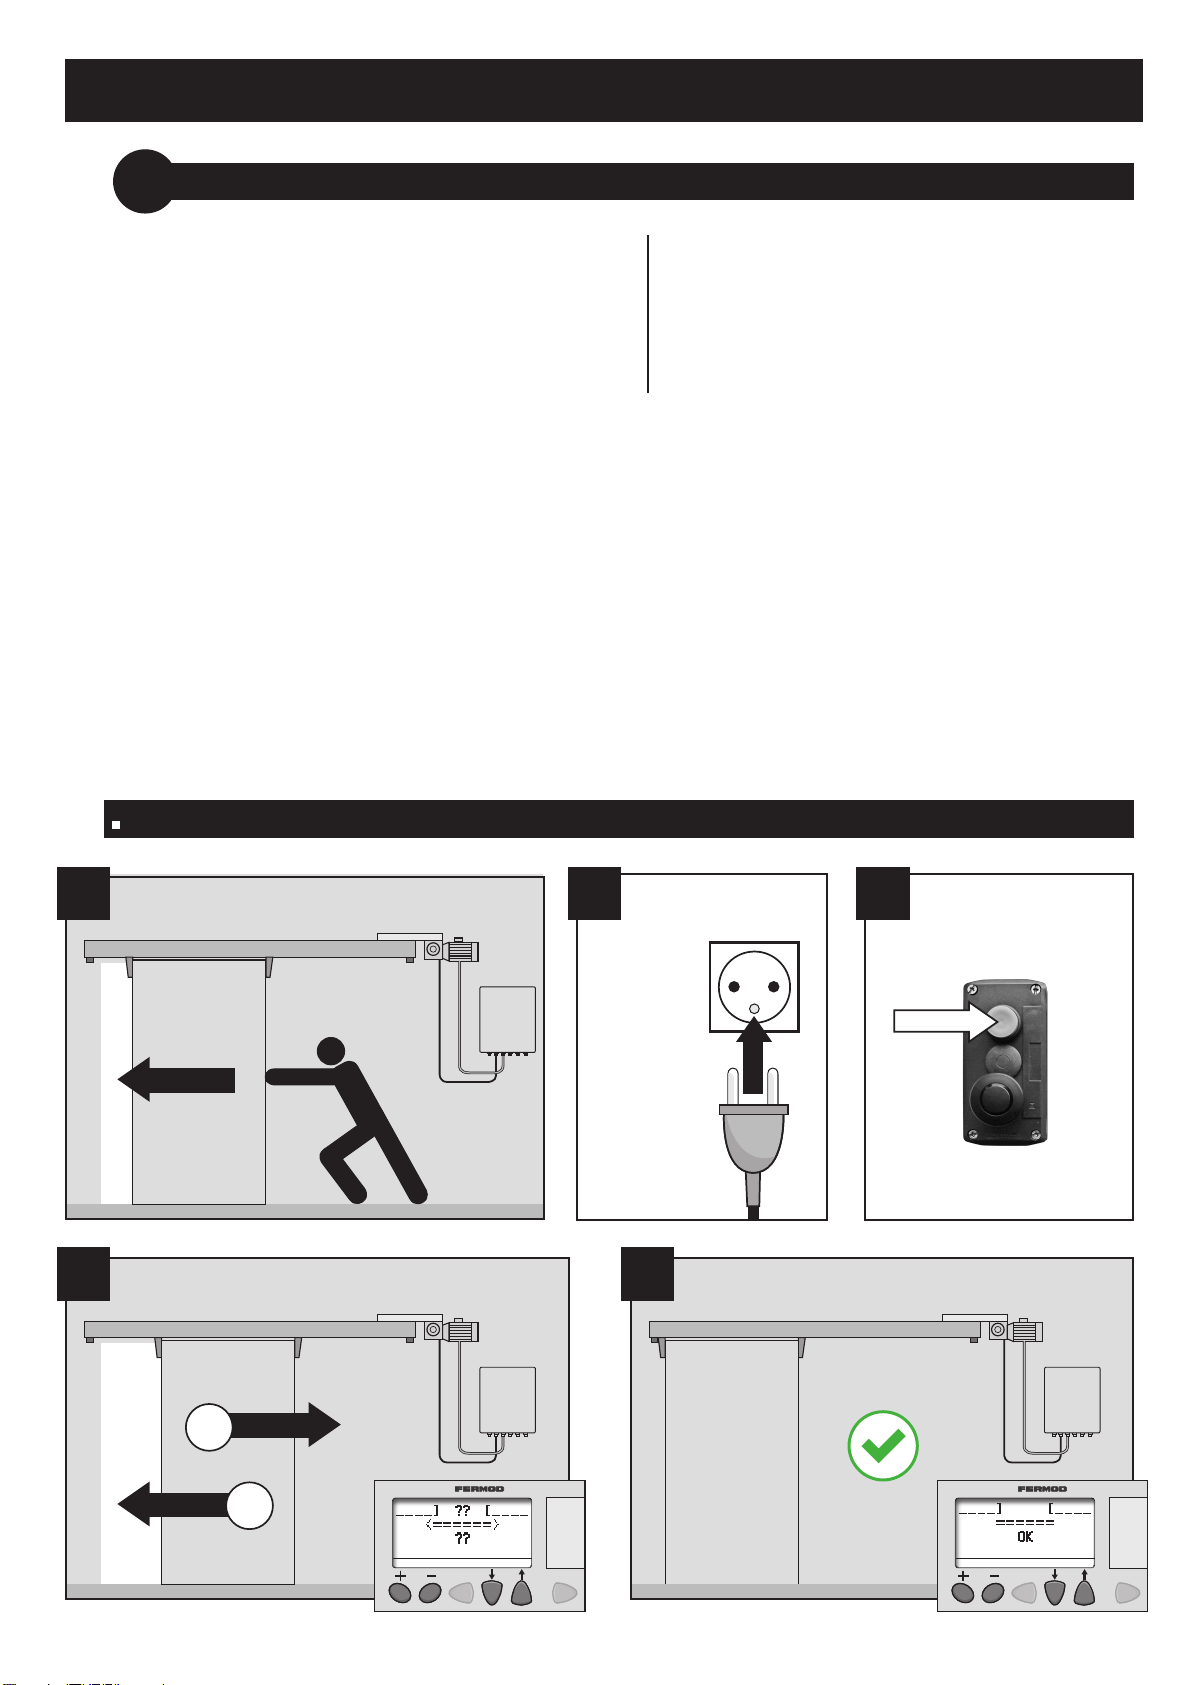
5.1 Uppstart av automatiken - INITIALIZATION / FIRST POWER ON
Check that all securities are connected or shunted.
The door must be easily steered with hand.
Butts must be mounted.
During door setting, horizontal and vertical safety
devices and opening commands are active.
Första uppstarten är mycket viktig. Automatiken gör en självinlärning och kontrollerar:
Dörrens öppningsriktning.
Kontroll av höger och vänster ändläge.
För att kunna avgöra öppningsriktning så ska dörren stängas manuellt innan uppstart.
Slå på strömmen och tryck sedan knapp för full öppning.
Kontrollera också att remmen är tillräckligt sträckt.
The rst opening command is important. Control unit determines:
the door opening side
the open and closed door maxi positions
To determine opening side, close manually the door before doing rst opening command,
otherwise the door could open on the wrong side. Check that the belt is tight enough.
Procedur för självinlärning / How to set rotation way
STÄNG
CLOSE
SLÅ PÅ
STRÖMMEN
TRYCK PÅ KNAPP
FÖR HEL ÖPPNING
(eller annan typ av signal)
OPENING COMMAND
(push-button, badge...)
POWER
ON
1
2
DÖRR
STÄNGD
DOOR
CLOSED
4
1
??
??
5
OK

Kit5010ExpSécu_Elec-A
11
VÄNTA TILLS
INITIERINGEN
ÄR FÄRDIG
WAIT UNTIL THE
END OF THE
INITIALIZATION
1 2
Om öppningsriktning blivit fel / In case of opening side reversal
5
STÄNG
CLOSE
OPENING COMMAND
(push-button, badge...)
KONTROLLERA
CHECK
(se/see p. 14)
1
2
C8 = 00000
4TRYCK PÅ KNAPP
FÖR HEL ÖPPNING
(eller annan typ av signal)
Håll inne dessa fyra
knappar i 3s.
Hold on together about 3s
DÖRR
STÄNGD
DOOR
CLOSED
OK
C1:
C3:
C5:
C7:
C2:
C4:
C6:
C8:00000
??
??
OK
Felsökning :
se s. 22
Malfunctioning:
see table p. 23
i
3
6
??
??
7
OK

Kit5010ExpSécu_Elec-A
12
5.2 ANVÄNDNING AV DISPLAYENHETEN / CONTROL KEYBOARD USING
OK
Status OK
OK
Initiering
Initialization
??
??
Dörren är i rörelse
Moving door
Dörren är öppen
Open door
Nedräkning timer
Timer countdown
00020
Informationskoder
Information codes
00001
ÖMTÅLIG - Tryck inte direkt på displayen / Do not press on control keyboard display
Ingen information finns lagrad i displayenheten / There’s no information stored in control keyboard
!
Gör så här för att nå parameterlistan :
Stäng dörren (display visar "OK")
Tryck in nödstopp (display visar "0001")
Det finns två menyer : «+» och «-»
Tryck på sen el för att nå menyn«+»
Tryck på sen el för att nå menyn«-»
Under programmeringsfasen är alla ingångar för öppning spärrade.
Tryck el för att bläddra mellan parametrarna.
Tryck el för att öka eller minska värde.
(håll inne knappen mer än två sekunder för öka/minska snabbare)
Tryck på och för att lämna programmeringsläget.
(display visar «OK») : Dörren är nu färdig för att användas (glöm inte att återställa nödstopp).
To enter into the parameters :
Close the door ("OK" on display)
Engage a stop command ("0001" on display)
There is 2 menus : «+» and «-»
Press then or to enter in «+» menu
Press then or to enter in «-» menu
When setting parameters, all opening commands are o.
Press or to scroll parameters when setting
Press or to increase or decrease parameters values (hold on 2 secondes to quickly change)
Simultaneously press both buttons and to go out of set up or counter mode («OK» on display) :
door is ready for use (remember to desactivate stop command).
or
el.

Kit5010ExpSécu_Elec-A
13
1234BCDE
1234A
12:00
1234BCDE
1234A
12:00
OU
OR
Bläddra mellan
parametrar
Parameters scrolling
Inställning
av värde
Values setting
Inställning
av värde
Values setting
Bläddra mellan
parametrar
Parameters scrolling
OU
OR
Avsluta
Exit
Menu "+"
(LÅS/LOCK)
se s 12 /see p.12
EL.
OR
OK
00001
Dörren stängd
Door closed
Nödstopp 1 eller 2 är aktiverat
Stop command 1 or 2 activated
N/A N/A N/A N/A
Menu "-"
(parameter C1 -C8)
(parameters C1 to C8)
se s / see p.11
Räknare
Counters
se s /see p.12
Tryck
samtidigt
Hold on
+
1234BCDE
1234A
12:00
CNT: 000000025
KIT 5000
FERMOD
v4.0
Visning av in och
utgångar
Input/output display
Se s./see p.13
Släpp / Release
C1:00000
C3:
C5:
C7:
C2:00000
C4:
C6:
C8:
LOCK:00000
C1 / C2:00000 / 10000
C5 / C7:00000 / 00010
C8:00000 / 00002
LOCK:00000 / 00001
EL
OR EL
OR
+
Kit5010ExpSécu_Elec-A
14
Para-
meter
Para -
meters
Fabriks-
inställn.
Factory
settings
Inställn.
område
Settings
Beskrivning / Description
C1 0 0 →10000
sec.
Tid i sekunder som dörren står öppen vid full öppning
Timer for door opening when total opening
C2 0 0 →10000
sec.
Tid i sekunder som dörren står öppen vid delvis öppning
Timer for door opening when partial opening
C3/C4 N/A
C5 0 0 →10
Anger hur mycket dörren öppnas vid delvis öppning / Partial opening distance
0 : Min, 0% dock minst 350 mm / mini opening (350 mm)
10 : Max, 100% av dörrens bredd / maxi opening
C6 0 0 →10
Öppningshastighet / Opening speed (0,1m/s →1,0m/s)
0 : Min, 0,1 m/s / mini speed
10 : Max, 1,0 m/s / maxi speed
C7 0 0 →10
Stängningshastighet / Closing speed (0,1m/s →0,5 m/s)
0 : Min, 0,1 m/s / mini speed
10 : Max, 0,5 m/s / maxi speed
C8 0
0
Timerfunktion / Timer mode
Dörren öppnar helt eller delvis och står öppen enligt tidsinställningarna
under parameter C1 ou C2.
The door opens with total or partial opening command and automaticaly closes at
the end of C1 or C2 timer setting
1
Standard inställning / Standard mode
Dörren både öppnas och stängs med tryckknapp (eller annan slutning)
Om en tryckknapp påverkas innan dörren är helt öppen så stängs den igen
The door opens and closes with opening commands. If a push button is pressed
before the door is totally open, the door stops and closes.
2
Mode pression maintenue à l’ouverture et à la fermeture
«Press and hold to open/close the door» mode
Tryckknappen måste hållas inne för att öppna och stänga dörren
Om knappen släpps under öppning eller stängning stoppar dörren. Dörren
går mot öppet läge när knappen trycks in igen.
It’s necessary to press and hold command to open and close the door.
If the command is released during the opening/ closing of the door, the door stops.
The door opens if the command is pressed again.
Menu «-»
C1 / C2 Timerns nedräkning visas i displayen
Timer countdown appears on display
C6 / C7 Dörrens maxhastighet måste anpassas till dörrbladsvikten
Maxi speed must be adapted to door weight
C7
C7 är bara justerbar om en vertikal säkerhetsvakt är ansluten till ingången, plint XX-XX
Om ingen vertikal säkerhetsvakt är ansluten är hastiheten maximerad till = 0,25 m/s
C7 is adjustable only if a vertical security is wired
If a passive edgemount is mounted: xed speed = 0,25 m/s
C8
Timerfunktion / Timer mode
Om timer har börjat räkna ner och man åter igen trycker på knappen så återställs timern. (tid C1 el C2)
Door open, using opening command or securities restart timers
i

Kit5010ExpSécu_Elec-A
15
CNT: 000000025
KIT 5000
FERMOD
v4.0
Simultaneously press both buttons and to display counter and kit reference
Release the 2 buttons to display "input/output" screen.
Simultaneously press both buttons and to come back to display "OK".
Menu «+»
Räknare / Counter
Räknarens data finns lagrat i styrenheten och
byts denna ut så förloras data för räknaren.
Counter is stored into control unit. If control unit
must be changed, counter informations will be lost.
Tryck samtidigt in knapparna och för att nå räknare samt information om
programversion.
Släpp dessa två knappar för att läsa av status på in och utgågar.
Tryck samtidigt in och för komma tillbaka till "OK"
!Tryck
samtidigt
Press both
Para-
meter
Para-
meters
Fabriks-
inställn.
Factory
settings
Inställn.
Settings Beskrivning / Description
LOCK 0
0Dörren låses ej i stängt läge
Door doesn’t lock when closed
1
Dörren låses automatiskt i stängt läge och kan endast öppnas med
elektrisk insignal. (kan ej öppnas manuellt)
Om nödstopp 1 eller 2 påverkas kan dörren öppnas manuellt
Om brandingången är påverkad kan dörren manövreras via tryckknapp
som vanligt (låsfunktionen åsidosätts)
Door locks when closed: it’s impossible to open manually the door (electrical
command is required).
Stop command 1 or 2 allows to unlock the door for a manual opening.
Fire detection command allows to open the door electrically.

Kit5010ExpSécu_Elec-A
16
1234BCDE
1234A
12:00
Status för in och utgångar - Input/output display
Tryck
Press Eller / OR
Ingångar (status information för
tryckknappar, nödstopp etc...)
Inputs (input informations: push-
button, stops, cells...)
Utgångar (status information för
reläer*, blixtljus etc...)
Outputs (output informations: relay
informations*, ashing lights...)
Ej fylld bakgrund = OFF
Input or output is o
Svart bakgrund = ON
Input or output is on
1
1
(standard konfiguration/
standard conguration)
*Option : Kontakta Thermod AB / Option: please contact us
INGÅNGAR / INPUTS
PORTE OK
DOOR OK N° FÖRKLARING / DESIGNATION
- 1 Impulskodare / Impulse coder
- 2 Riktningskodare / Direction coder
ON 3 Optisk horisontell sensor*
Optical safety device*
OFF 4 Spänning aktiverad för lågtemperaturdrift
Current injection for minus temperature
ON B Brandingång / Nödstopp 1 eller 2 / Låskontakt
Fire detection / Stop command 1 or 2 / Lock contact
OFF C Ingång 1 eller 2 för öppning aktiv
Pull cord opening command 1 or 2
OFF D Ingång för delvis öppning aktiv
Partial/total opening command 1/2 (push-button)
ON E Påkörningsskydd på stängningssida aktivt*
Active edgemount/closing side*
UTGÅNGAR / OUTPUTS
Dörr OK
DOOR OK N° FÖRKLARING / DESIGNATION
OFF 1 Motordrift och blixtljus
Motor working command and ashing lights
OFF 2 Öppningsriktning höger eller vänster
Motor side command
OFF 3 Momentindikering
Motor couple command
OFF 4 Hastighetsövervakning
Motor speed command
i

Kit5010ExpSécu_Elec-A
17
00001
5.3 INFORMATIONSKODER / INFORMATION CODES
Displayenheten visar koder för
uppstart och felsökning
Control unit gives information codes for starting up
or debuging system.
KOD
CODE
INFORMATION Technical
default release
0000 En signalingång för öppning är aktiv / An opening command is active
0001 Ett nödstopp är aktivt och/eller låskontakt aktiv
A stop command is active or/and a lock is active
0002 Dörren känner av ett hinder eller ökad friktion
The door detects hard spot or exceeding frictions
0004 Dörren känner av motorblockering, dörr för trög att öppna / motor blocking
0008
Dörren känner av försök till manuell öppning med LOCK = 1
eller med aktiverad låsingång
The door detects manual opening attempt whith LOCK = 1 or with an active lock
0016 Brandingång är aktiv / Fire detection is active
0032 Minst en säkerhetsvakt är aktiverad, i testläge eller ur funktion
One safety device at least is active or testing in progress or out of order
0256
Dörrens läge kan inte identifieras (efter fem försök) på grund av
rembrott, blockerad dörr eller fel på pulsräknaren
Door position is lost (after 5 attempts) due to belt skipping, blocked door
or internal malfunction of control unit
X
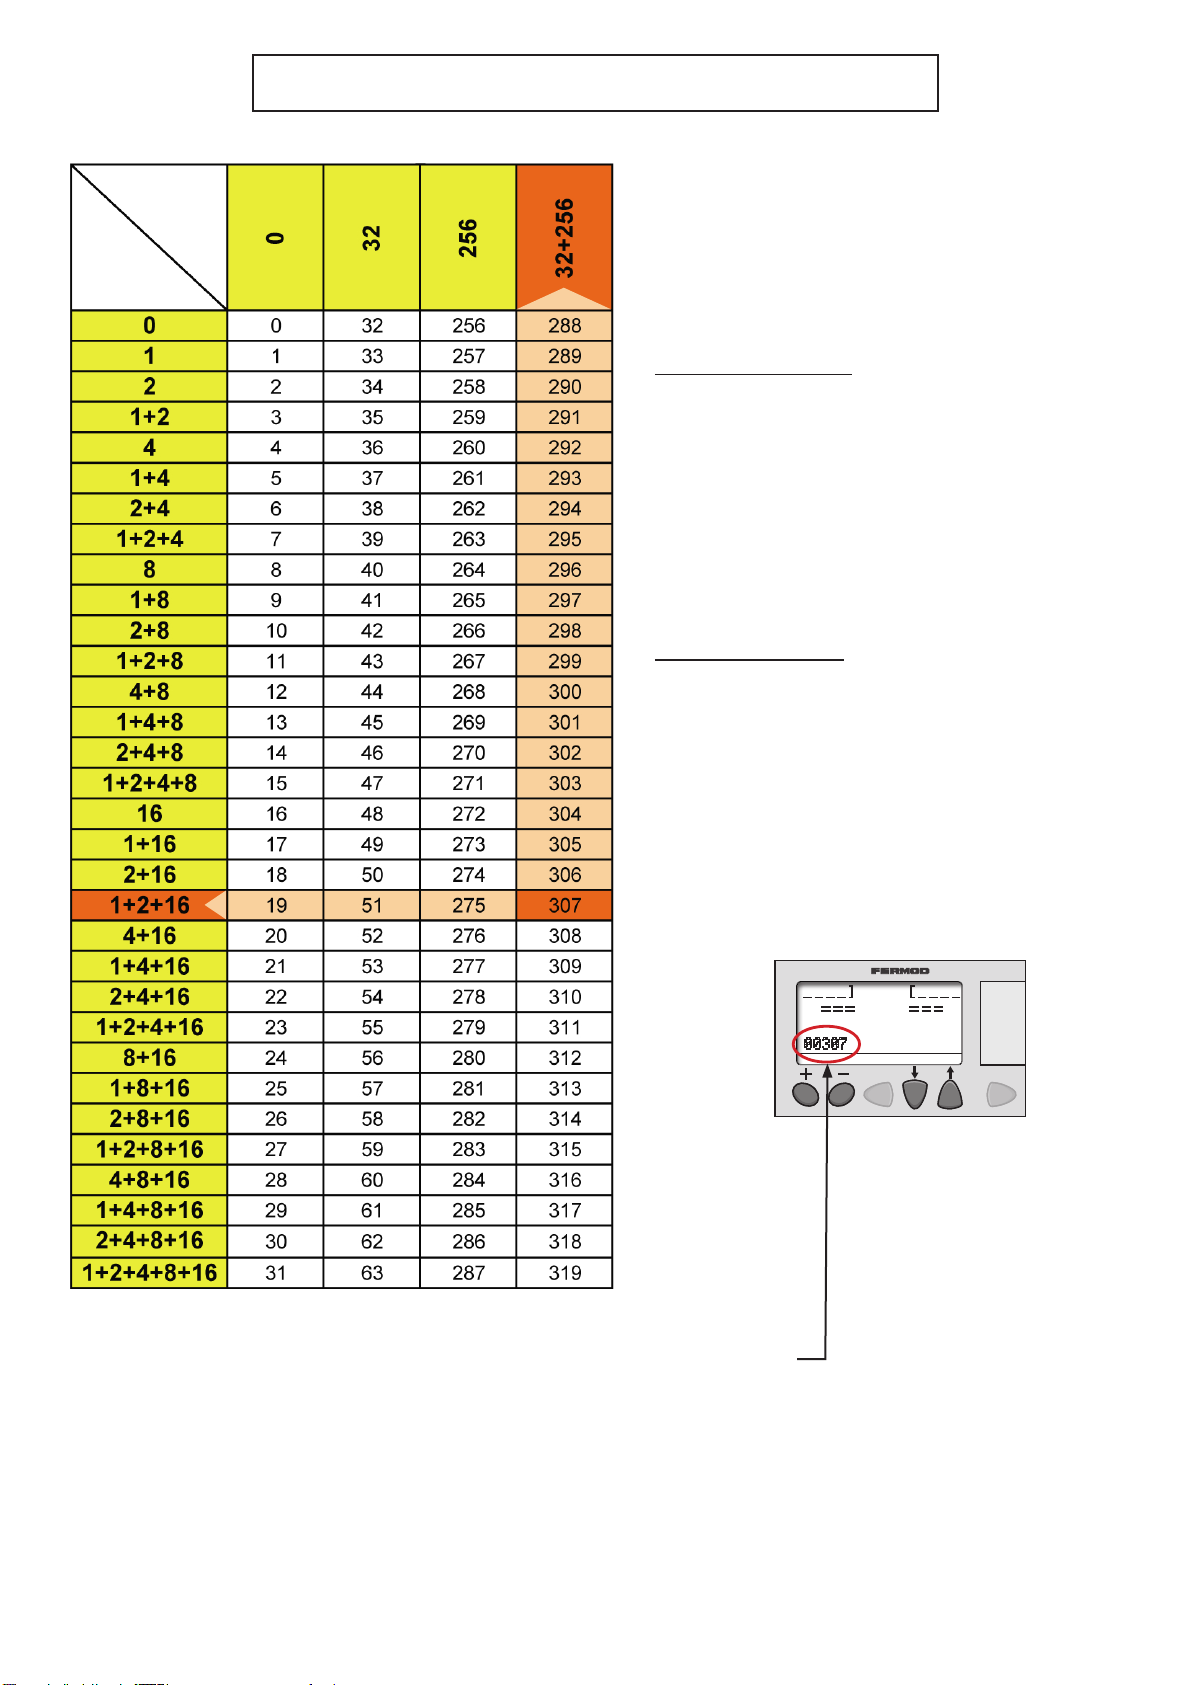
Informationskoder som adderas till varandra (se kodtabell på nästa sida)
För att förstå koderna måste tabellen användas.
I den här tabellen finns varje kod i skärningspunkten mellan en horisontell och en vertikal linje
som visar en kombination av koder.
När du hittar felkoden i tabellen följer du bara motsvarande linjer horisontellt och vertikalt för att få
felinformationen.
Information codes can add each other (see code table next page)
To understand codes you must use codes table.
In this table each code is at the intersection of one horizontal and one vertical line which show
addition of informations.
When you nd the error code in the table, just follow the corresponding lines to get error informations.
!
!
Kit5010ExpSécu_Elec-A
18
00307
(nödstopp aktiverat + hinder i vägen + brandingången aktiverad
+ säkerhetsingång aktiv eller under test + dörrens position kan inte identifieras)
(stop button on + hard spot + re detection is active
+ securities under test + lost of door positioning)
Example: code 307
Look for 307 code on table and follow the lines
On horizontal line you can read: 1+2+16
On vertical line you can read: 32+256
Informationskoder / Information codes table
Exempel : code 307
Leta upp kod 307 och följ linjerna
På den horisontella linjen
kan man läsa 1+2+16
På den vertikala linjen
kan man läsa 32+256
CODE 307 = 1+2+16+32+256
Kit5010ExpSécu_Elec-A
19
Aktivering av låsfunktion kan göras på två sätt:
This function is activated by 2 ways:
En utilisant le contact "verrou"
6 - TILLGÄNGLIGA FUNKTIONER / AVAILABLE FUNCTIONS
6.1 LÅSFUNKTION / LOCK FUNCTION
Parameter
LOCK = 1
(se meny«+»)
Positioning
LOCK = 1
(see «+» menu)
Varje gång dörren når stängt läge låser den automatiskt.
Dörren är då omöjlig att öppna manuellt, elektrisk
insignal för öppning är nödvändig.
Eachtimethedoorclosesitlocks electrically.it’s impossible to
open manually the door: electrical command is required.
För att öppna manuellt kan ett nödstopp
aktiveras eller bryta strömmen till
automatiken.
Active stop command or turn power o
to open manually the door.
Brandingång tvingar dörren att öppna (slutning mellan plint 2 och 15)
The re detection compels the door to open (connecting terminals 2 and 15).
i
Aktiverat nödstopp möjliggör manuell öppning även om LOCK=1
Detta förutsätter att det inte finns en slutning på plint 16/18 eller 18/19
! Aktiverat nödstopp hindrar dörren att öppna vid brand (slutning på brandingång)
!
6.2 NÖDSTOPP / STOP COMMAND
Stop information allow to unlock the door even if LOCK=1: door can be operating manually.
This information is shunted by default in connecting terminals 16/18 and 18/19.
The stop button prohibits to open the door with re detection.
Denna ingång är vid leverans byglad (plint 2 och 15). En brytning av ingången tvingar dörren att
öppna även om låsfunktionen används. Funktionen åsidosätts om ett nödstopp är aktiverat,
låskontakten är aktiv eller att systemet saknar spänning.
Om brandfunktionen ej är aktiverad stänger dörren automatiskt utan timerfördröjning.
6.3 BRANDINGÅNG / FIRE DETECTION
This function is shunted by default in connecting terminals 2and 15. It compels the door to open even if
LOCK function is used. On the contrary this function is o if stop button is on, if lock contact is used or if
the power supply is restored following a power failure.
When re detection function is desactivated, the door automatically closes (without timer).
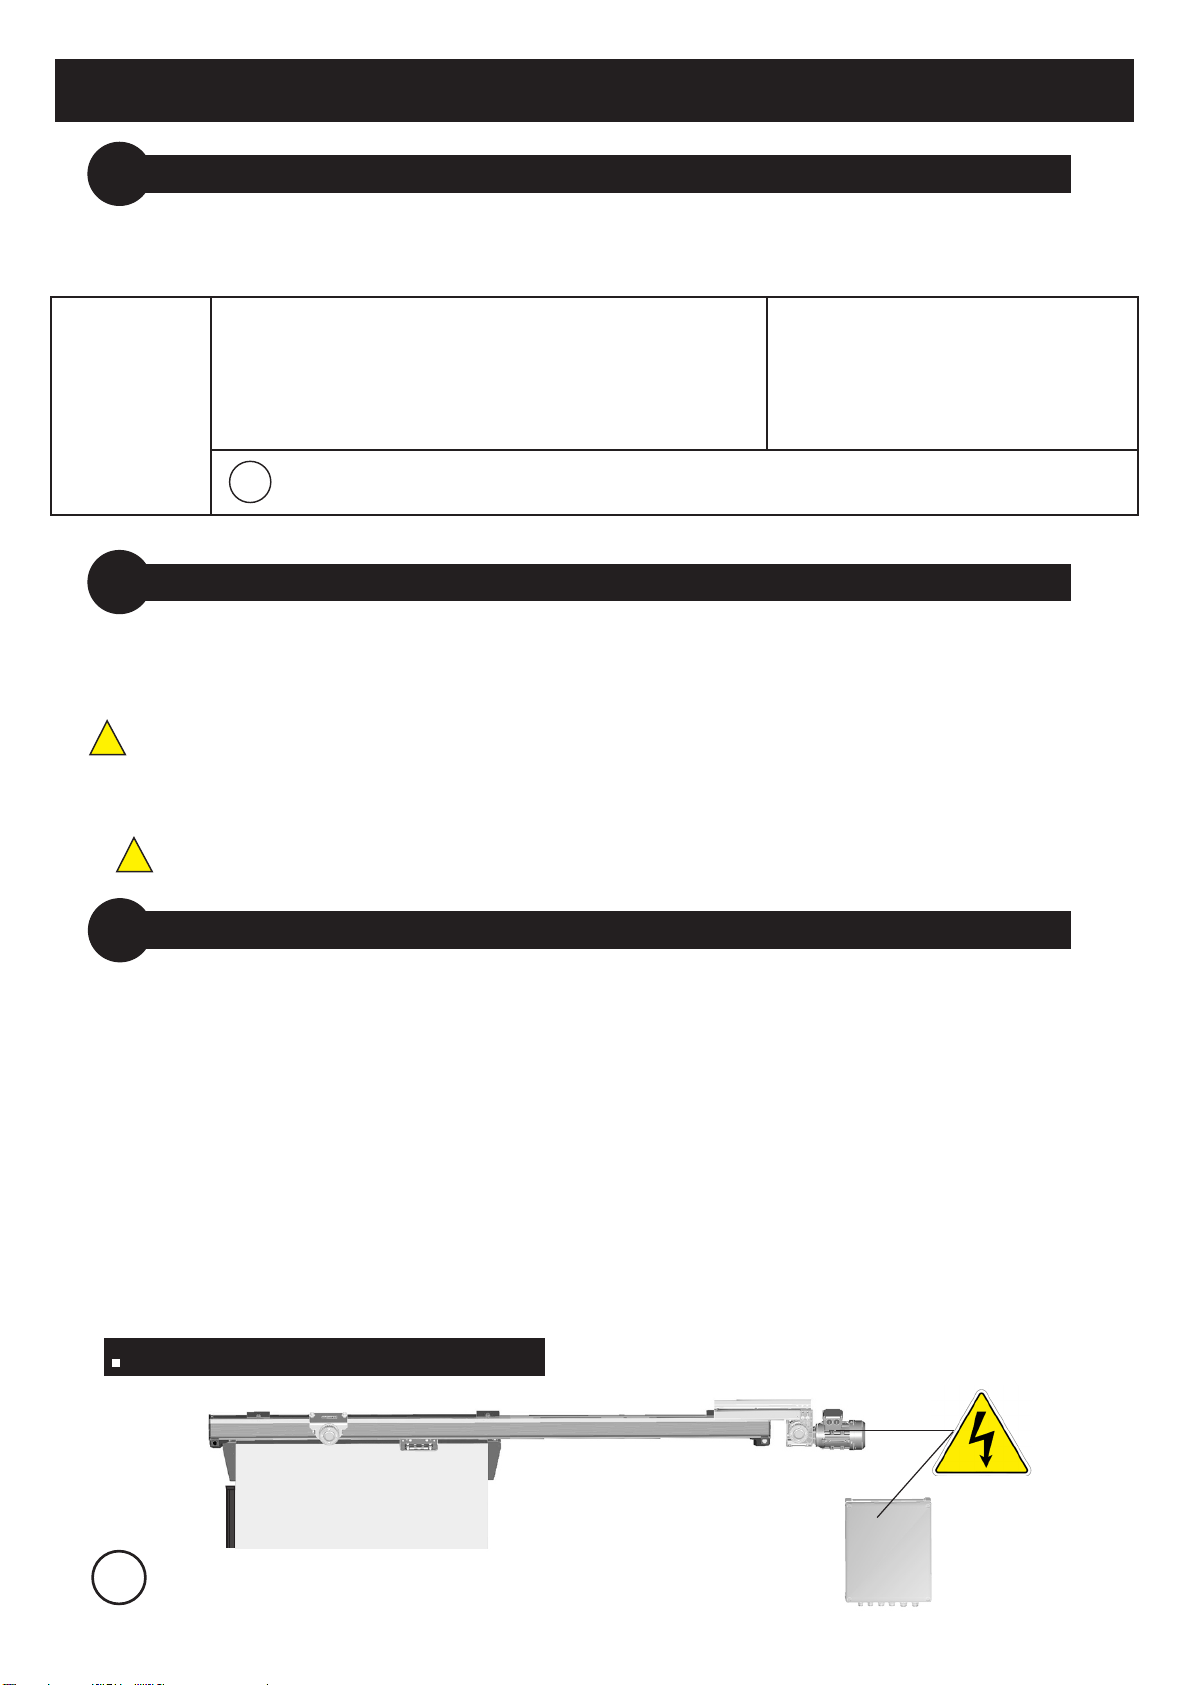
Placering av varningsetiketter
Varningsetiketter ska placeras så nära riskkällan som möjligt
Stickers must be as nearest as possible to the risk.
i
Kit5010ExpSécu_Elec-A
20
7 - ANVÄNDANDE / USING
Respektera specifikationer i § 5 - Produktspecifikationer. Använd avsedda/lämpliga manöverdon (knappar etc.).
Om fel uppstår:
Användaren kan öppna och stänga dörren manuellt med invändigt och utvändigt handtag.
Säkerhetsåtgärder:
Nödfall : Tryck in nödstopp (stoppar motorn).
Vid fel på automatiken : Bryt spänningen och använd manuella handtag.
7.1 NORMAL ANVÄNDNING / NORMAL USING
Respect § 5 specications - Product Characteristics. Use the required commands (wall button, badge ...).
In case of failure:
The user can open the door with the internal or external handle.
Safety measures:
In case of emergency: push on the black button of the wall command box ( stop the motor).
In case of failure: put the switch o and use the required handle.
.Risk för elektrisk stöt
. Spola ej vatten direkt på automatiken
. Utsätt inte automatiken för damm och spån
. Stoppa inte in främmande föremål i
styrboxen
7.2 Risker som kan uppstå vid montage, uppstart och service (annat än normal användning)
Risks following intentional acts of persons other than the user
. Danger: risk of electric shock
. Do not spray with water
. Do not spray dust or shavings
. Do not introduce anything into
command box
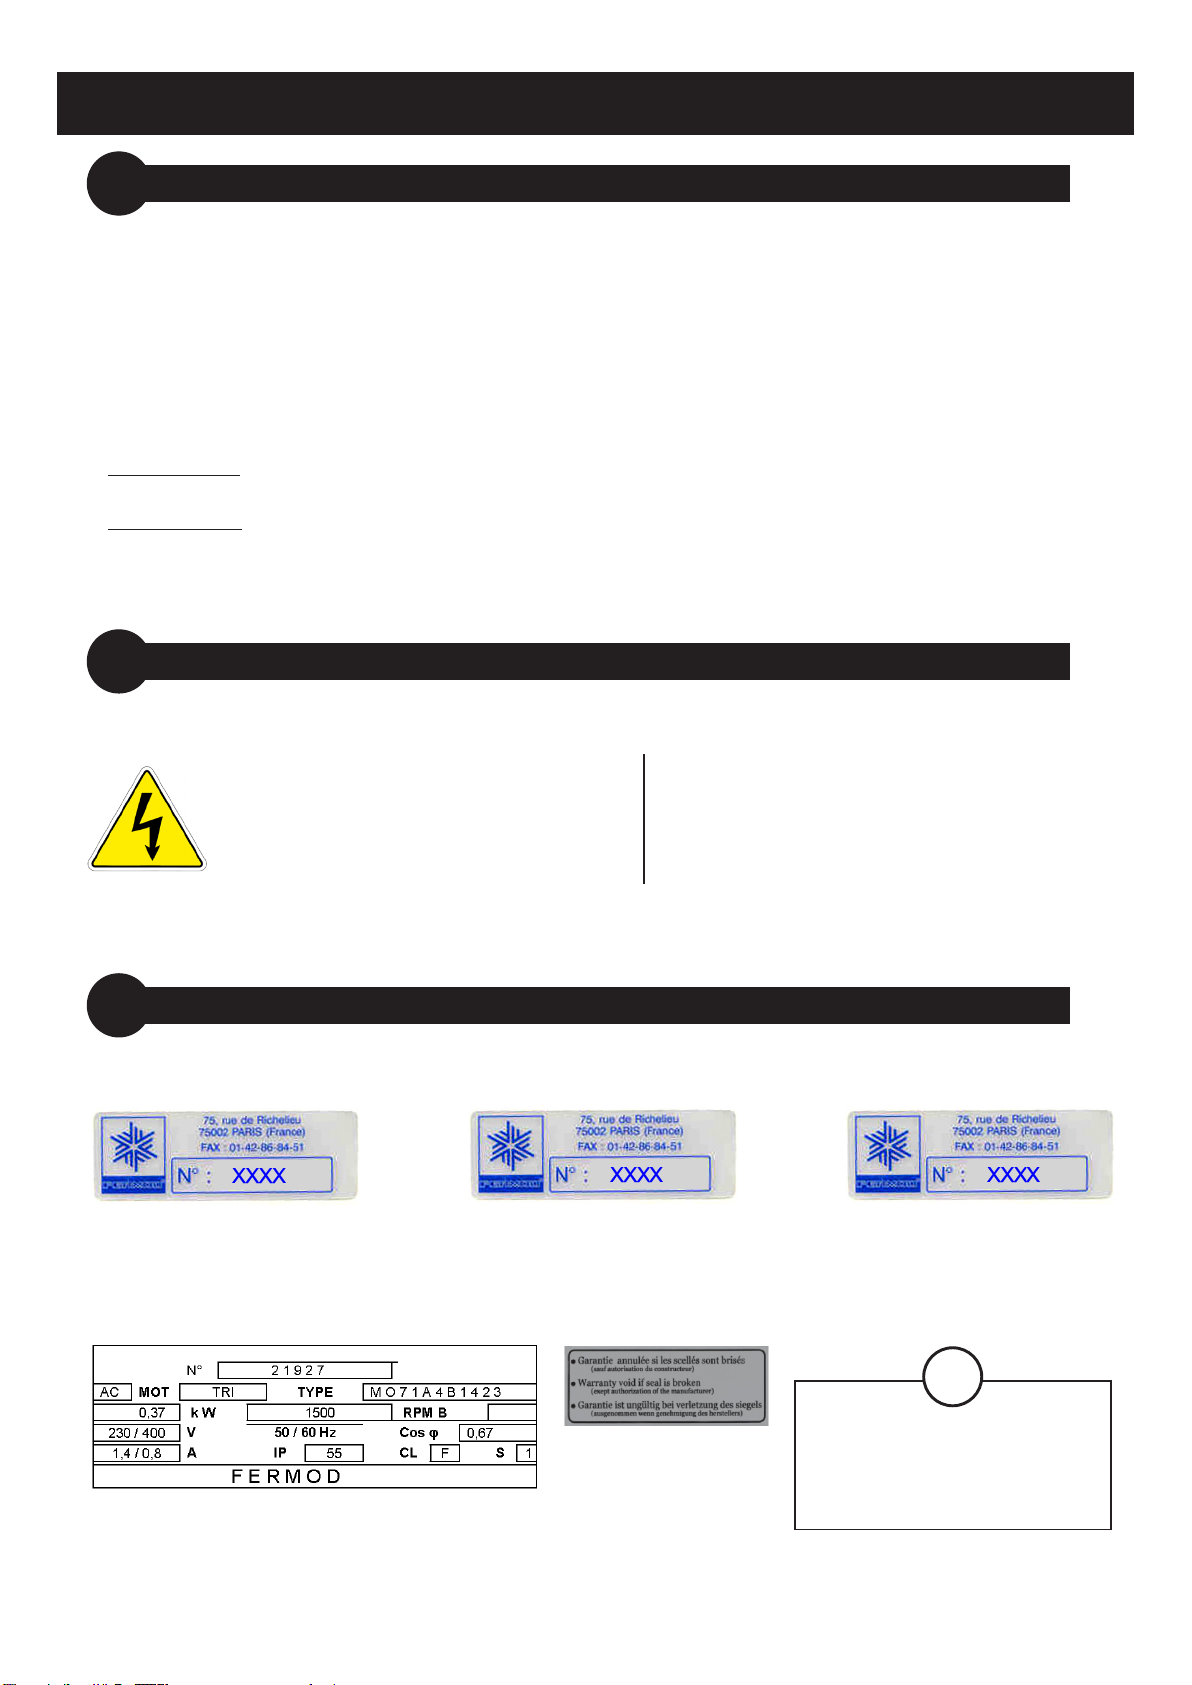
Märkskylt elmotor /
Motor identication
SPECIMEN
SPECIMEN
Motorenhet
Motor bracket
SPECIMEN
Styrskåp
Door driving assembly
SPECIMEN
Remspännare
Belt adjuster
Garanti information
Warranty conditions
Etiketter är endast till för information
och kan komma att ändras
Stickers data only for information -
Subject to modications
i
7.3 IDENTIFIERINGSETIKETTER / IDENTIFICATION STICKERS
Other manuals for KIT 5010
3
Other FERMOD Garage Door Opener manuals

Popular Garage Door Opener manuals by other brands

Tucker
Tucker ZAP THE BUTLER installation guide

Chamberlain
Chamberlain 8550W user guide

Chase Doors
Chase Doors DuraShield installation manual

CSI
CSI Classic installation instructions

Automatic Technology
Automatic Technology GDO-9V1 SecuraLift installation instructions

Chamberlain
Chamberlain Merlin MS105MYQ Installation and operating instructions

Chamberlain
Chamberlain 3110 owner's manual

Abloy
Abloy DA460 Installation and commissioning manual

Chamberlain
Chamberlain Security+ 1215EM FS2 owner's manual

Chamberlain
Chamberlain 1280-298LMC - 1/2 HP owner's manual

SUGATSUNE
SUGATSUNE LAMP FD50-H installation manual

ACDC
ACDC RAPTOR Installation instructions and user guide


