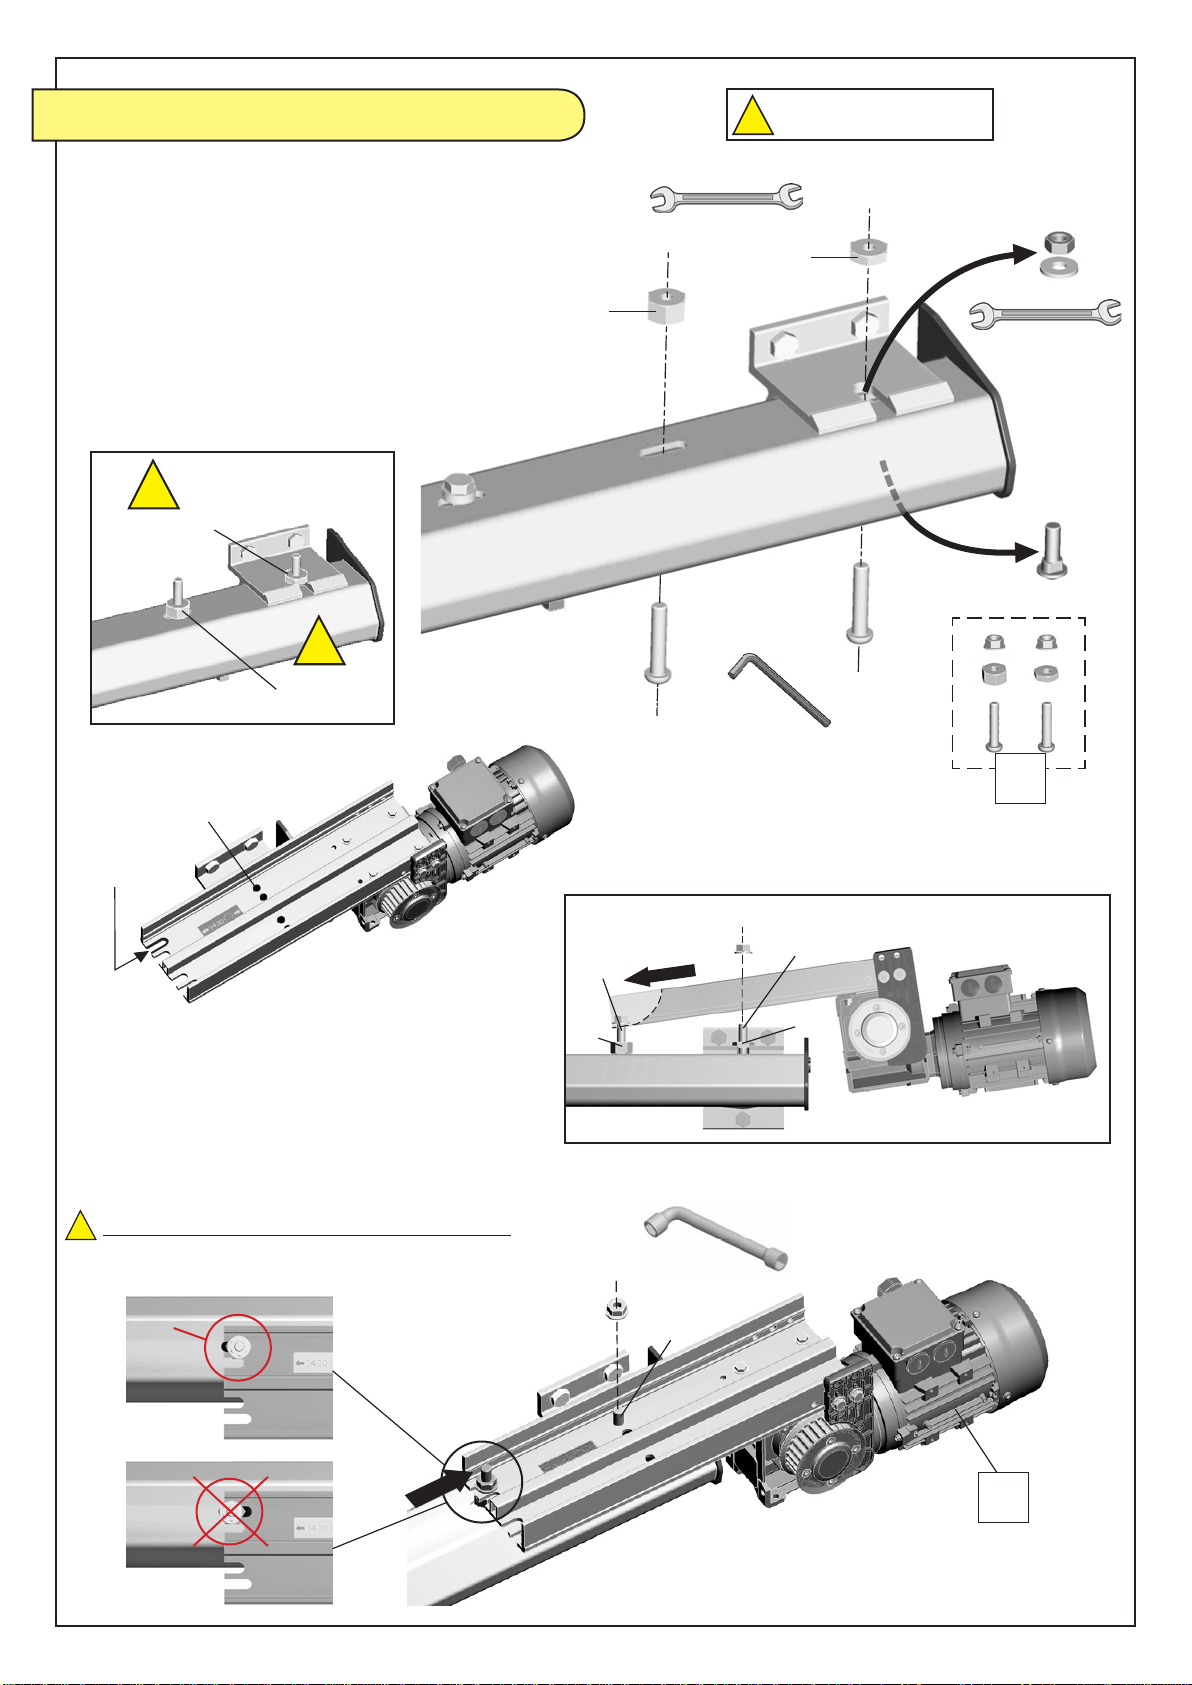
FERMOD KIT 5000 User manual

Kit5000_GB-A
This instructions manual includes the mounting, utilization and the maintenance instructions. We recommend to read this carefully and to place it at the user’s
disposal. The english version of our general conditions of sales and mounting instructions are not binding, and are only given for information purposes.
Only the french version can be used in case of legal action.
Power supply : 220-240V AC
50/60 Hz monophase
Motor power : 400W (24Vcc)
NMkit5000_GB-A
July 2014
RMounting Instructions
i
For manual Fermatic systems:
2120 / 2130 / 2150 - 2320 / 2420
3430 / 3530 / 7530
KIT 5000
2120 / 2130 / 2150
2320 / 2420
3430 / 3530 / 7530
- 1 -

Kit5000_GB-A
1 - General informations...............................................................................................
1.1 - Regulations and obligations...............................................................................
1.2 - Liabilities...........................................................................................................
2 - Transport..................................................................................................................
3 - Storage.....................................................................................................................
4 - Mounting precautions.............................................................................................
5 - Characteristics........................................................................................................
FERMATIC 2120 / 2130 / 2150 - 2320 / 2420 SYSTEMS
6 - Mounting onto 2120 / 2130 / 2150 - 2320 / 2420 systems.....................................
6.1 - Rail preparing....................................................................................................
6.2 - Belt adjuster......................................................................................................
6.3 - Door driving assembly.......................................................................................
6.4 - Motor................................................................................................................
6.5 - Belt...................................................................................................................
FERMATIC 3430 / 3530 / 7530 SYSTEMS
7 - Mounting onto 3430 / 3530 / 7530 systems...........................................................
7.1 - Belt adjuster......................................................................................................
7.2 - Door driving assembly.......................................................................................
7.3 - Motor................................................................................................................
7.4 - Belt...................................................................................................................
8 - 90° motor mounting.................................................................................................
9 - Left side motor mounting........................................................................................
10 - Passive edgemount security..................................................................................
11 - Command box..........................................................................................................
12 - Wiring........................................................................................................................
13 - Horizontal safety device.........................................................................................
14 - Parameters................................................................................................................
14.1 - Initialization/First power on..............................................................................
14.2 - Control keyboard using....................................................................................
14.3 - Information codes............................................................................................
15 - Available functions..................................................................................................
15.1 - Lock function....................................................................................................
15.2 - Stop command.................................................................................................
15.3 - Partial opening.................................................................................................
15.4 - Fire detection...................................................................................................
16 - Using.........................................................................................................................
16.1 - Normal using....................................................................................................
16.2 - Risks following intentional acts........................................................................
16.3 - Identication stickers.......................................................................................
16.4 - Cleaning...........................................................................................................
17 - Maintenance.............................................................................................................
18 - Scrapping..................................................................................................................
SUMMARY
- 2 -
p.3
p.3
p.3
p.4
p.4
p.4
p.5
p.8
p.9
p.9
p.10
p.11
p.13
p.15
p.16
p.17
p.18
p.24
p.26
p.28
p.31
p.32
p.32
p.35
p.37
p.37
p.37
p.42
p.44
p.44
p.44
p.44
p.44
p.45
p.45
p.45
p.45
p.46
p.46
p.46

Kit5000_GB-A
The product you have acquired is integrated into an industrial door. Its being put on the European Union market
implies EC marking by a certied agency, under the liabilities of the manufacturer and/or installer of the door.
The design, manufacture and installation of an industrial door must respect the essential requirements of health and
safety determined by the following European directives:
NM2480CE/J
1
–
GENERAL INFORMATION
1.1.Regulations & Obligations
The product you have acquired is integrated into an industrial door. Its being put on the European
Union market implies EC marking by a certified agency, under the liabilities of the manufacturer
and / or installer of the door.
The design, manufacture and installation of an industrial door must respect the essential
requirements of health and safety determined by the following European directives:
European Directives Manual door Motorised door
Construction Products Directive 89/106/EEC X X
Low Voltage Directive 2006/95/CE X
Electro-magnetic Compatibility Directive 2004/108/CE X
Machines and Working Equipment Directive 2006/42/EC X
The proof of conformity to the regulation texts, mentioned above, is obtained by the respect of the
standard reference detailed by the standard of product NF EN 13241-1. - Industrial, Commercial
and Garage Doors (Part 1: products without fire and smoke proofing characteristics)
Terminology standard Safety standard Environmental
standard Electrical and DCEM
standard
EN 12433-1
Types of doors EN 12604
Mechanical aspects EN 12424
Resistance to wind EN 60204-1
Machine electrical safety
EN 12433-2
Components of doors EN 12605
Test methods EN 12444
Tests and calculations EN 61000-6-2 (DCEM)
Immunity to industrial
environment
EN 12453
Safety of use EN12425
Water penetration EN 61000-6-3 (DCEM)
Harmonic measure emission
EN 12445
Test methods EN 12489
Test methods EN 61000-6-4
Industrial environment
emission
EN 12978
Safety devices EN 12426
Permeability to air
EN 12635
Installation and use EN 12427
Test methods
EN 12428
Thermal transmission
FERMOD has taken the standards that apply to the supplied products into consideration.
- 22 -
1.2 – Liabilities
1–Themanufacturerofthedoor,theinstallerandtheusermustobservethesafetyrules(collectiveprotection,individual
protection)applicable duringtransport,assembly,use,and discardingof thedoor oritscomponents.
2– Theliabilityoftheuser maybe engagedin circumstancesthatarenotmarginal. Thus,the usermust scrupulously
complywiththerecommendationsforstorage,assembly,use,maintenance,healthandsafety,use-bydate,etc.supplied
bythemanufacturer.
Likewise,wheretheproducerbeheldliableforthenon-conformityoftheproduct,theusermayalsosharetheliability,
insofar as he has not, from his side, checked this conformity, even if the product in question is administratively in
conformity.Theuserisalsoheldliableifhehimselfincreasesthefaultintheproduct.
The proof of conformity to the regulation texts, mentioned above, is obtained by the respect of the standard reference
detailed by the standard of product NF EN 13241-1: Industrial, Commercial and Garage Doors (Part 1: products without
re and smoke proong characteristics).
FERMOD has taken the standards that apply to the supplied products into consideration.
NM2480CE/J
1
–
GENERAL INFORMATION
1.1.Regulations & Obligations
The product you have acquired is integrated into an industrial door. Its being put on the European
Union market implies EC marking by a certified agency, under the liabilities of the manufacturer
and / or installer of the door.
The design, manufacture and installation of an industrial door must respect the essential
requirements of health and safety determined by the following European directives:
European Directives Manual door Motorised door
Construction Products Directive 89/106/EEC X X
Low Voltage Directive 2006/95/CE X
Electro-magnetic Compatibility Directive 2004/108/CE X
Machines and Working Equipment Directive 2006/42/EC X
The proof of conformity to the regulation texts, mentioned above, is obtained by the respect of the
standard reference detailed by the standard of product NF EN 13241-1. - Industrial, Commercial
and Garage Doors (Part 1: products without fire and smoke proofing characteristics)
Terminology standard Safety standard Environmental
standard Electrical and DCEM
standard
EN 12433-1
Types of doors EN 12604
Mechanical aspects EN 12424
Resistance to wind EN 60204-1
Machine electrical safety
EN 12433-2
Components of doors EN 12605
Test methods EN 12444
Tests and calculations EN 61000-6-2 (DCEM)
Immunity to industrial
environment
EN 12453
Safety of use EN12425
Water penetration EN 61000-6-3 (DCEM)
Harmonic measure emission
EN 12445
Test methods EN 12489
Test methods EN 61000-6-4
Industrial environment
emission
EN 12978
Safety devices EN 12426
Permeability to air
EN 12635
Installation and use EN 12427
Test methods
EN 12428
Thermal transmission
FERMOD has taken the standards that apply to the supplied products into consideration.
- 22 -
1.2 – Liabilities
1–Themanufacturerofthedoor,theinstallerandtheusermustobservethesafetyrules(collectiveprotection,individual
protection)applicable duringtransport,assembly,use,and discardingof thedoor oritscomponents.
2– Theliabilityoftheuser maybe engagedin circumstancesthatarenotmarginal. Thus,the usermust scrupulously
complywiththerecommendationsforstorage,assembly,use,maintenance,healthandsafety,use-bydate,etc.supplied
bythemanufacturer.
Likewise,wheretheproducerbeheldliableforthenon-conformityoftheproduct,theusermayalsosharetheliability,
insofar as he has not, from his side, checked this conformity, even if the product in question is administratively in
conformity.Theuserisalsoheldliableifhehimselfincreasesthefaultintheproduct.
REGULATIONS & OBLIGATIONS
1.1
- 3 -
LIABILITIES
1.2
1 – The manufacturer of the door, the installer and the user must observe the safety rules (collective protection, individual
protection) applicable during transport, assembly, use, and discarding of the door or its components.
2 – The liability of the user may be engaged in circumstances that are not marginal. Thus, the user must scrupulously
comply with the recommendations for storage, assembly, use, maintenance, health and safety, use-by date, etc... supplied
by the manufacturer.
Likewise, where the producer be held liable for the non-conformity of the product, the user may also share the liability,
insofar as he has not, from his side, checked this conformity, even if the product in question is administratively in
conformity. The user is also held liable if he himself increases the fault in the product.
The liability of the manufacturer can be reduced or eliminated, taking all the circumstances into consideration, when the
damage is caused jointly by the product, and by the fault of the victim or a person for whom the victim is responsible
(D. general safety of products 92/59/EEC et D. liability from the fact of faulty products 85/374/EEC).
3 – Safety devices tted to the doors are not intended to prevent any wilful act of the operator or persons nearby
(EN12604 §4.1.2).
4 – The choice of options follows the type of door installed. It is the manufacturer’s responsibility to ensure the compatibility
of accessories according to the characteristics of the door and the conditions of use (EN12604 § 4.2.1).
1 - GENERAL INFORMATIONS

Kit5000_GB-A
5 – The manufacturer and / or installer must give each customer a le showing that the products used do not emit any
dangerous substance beyond the maximum authorized levels, specied in the appropriate European standards or in other
national specications, in the event of re (EN 13241-1 §4.2.9).
6 – The installer is required to ensure the traceability of assembly and inspection operations eectively carried out (EN
13241-1 §6.4).
7 – The sta of the company installing the equipment, and / or sta of the user company in charge of specic functions,
such as maintenance, must be qualied, trained and certied in the case of particularly risky work, such as work under
power (D. Safety at work 89/655/EEC modied 95/63/EEC art.7 / CT art. R 233-2).
8 – The nal user must carry out the periodical yearly or twice-yearly checks, or have them carried out, with keeping of a
maintenance register (D. Safety at work - 89/655/EEC modied 95/63/EEC - art. 4b / CT R 233-1-2 and R 233-11-1).
9 – The installation of a motorised system involves the implementation of safety dispositions in compliance with the
essential requirements of health and safety, decreed by the European directives and / or regulations in force in the
countries of installation (EN12453 §5.1.1.6).
10 – The installation of a motorised door in a blind place involves:
- either a second door (for persons to walk through)
- or a sound alarm in case of a person being trapped (EN12453 §5.4.2).
11 - The installation of a motorised door involves:
The installation of adequate lighting of the area where the door is installed to prevent any movement in darkness.
Marking out and signalling of the danger area, at oor level (CT R232-1-13/ EN12453 §5.1.3).
- 4 -
2 - TRANSPORT
This equipment must be protected from bad weather during transport.
The original packing is designed for all types of transportation means.
The packed kit withstands stacking of 4 others automatic kits.
The liability of FERMOD ceases:
- as soon as the customer or installer opens the package or a part of the packaging,
- as soon as the package has suered a considerable impact in such a way that it’s damaged.
3 - STORAGE
This equipment must be protected from bad weather during storage.
The packed kit withstands stacking of 4 others automatic kits.
4 - MOUNTING PRECAUTIONS
Please respect the regulations that apply in the country of installation.
The volume of door or gate opening must have sucient lighting. A lighting level of 50 lux measured at oor level must be
ensured, and the opening area must be marked out on the oor. Any movement of the door or gate must be signalled by a
flashing orange light visible from both sides. In France, this marking and signalling must comply with the decree of Article
R 232-1-13 of the code of labour (decree of 21/12/1993).
In Europe, the manufacturer and / or the installer of the door must attach the plate of overall characteristics to the door, in
conformity with the instructions of standard NF EN 13241-1- §4.6.
Please refer to our mounting instructions.
- Check the temperature of the environment. For temperatures lower than –10°C, a low temperature command box is required.
- Check the compatibility between the Automatic Kit to be installed with the Fermatic Manual System.
- The door drive sub-assembly xations must be well made and made of suitable material, having an appropriate resistance
and be exempt from any obvious fault for their intended working life (in conformity with EN 12604:2000,4-2-1).
- Electrical network: 220-240V AC - 50/60 Hz.
- Connection cable section : 3G2,5 mm².
- Connect each Kit to a dedicated power line protected by a circuit breaker D curve.
!

Kit5000_GB-A
- 5 -
5 - CHARACTERISTICS
AUTOMATIC ELECTRONIC KIT 5000
The automatic electronic kit 5000 is designed to motorize the Fermatic manual systems:
These manual systems are used for horizontal sliding doors with defined characteristics (iso-thermal,
acoustical, clean room, dust-tight…).
The automatic electronic kit 5000 has 5 function modes (see p 39):
Timer 1 mode•
Standard mode•
Timer 2 mode•
«Press and hold to close the door» mode•
«Press and hold to open/close the door» mode•
It has an integrated lock, a passive edgemount safety device and an horizontal safety device
(according to the regulations that apply in the country of installation).
Function modes
Options
Horizontal safety device• (according to the regulations that apply in the country of installation)
Flashing light•
Please contact us for other options (resistive edgemount, pull cord...).
Handles :
Every handle for Fermatic manual systems t on systems equiped with kit 5000.
2120 2130
2320 2150
2420 3430 3530
7530
Maxi door weight 60 Kg 80 Kg 120 Kg 150 Kg 200 Kg
Power supply 220-240V AC 400W Mono 50/60 Hz
Protection of the motor IP 55
Using temperature
-30°C to +50°C
(For negative temperature see «option for
minus temperature» - Separate mounting instructions)
2120 / 2130 / 2150 2320 / 2420 3430 3530 / 7530

Kit5000_GB-A
- 6 -
Rep Designation
M1 Belt adjuster
M2 Adjuster screws 2120/30/50 - 2320 - 2420
M3 Adjuster screws 3430 - 3530 - 7530
M4 Door driving assembly
M5 Driving assembly screws 3430 - 3530 - 7530
M6 Motor unit
M7 Motor screws 2120/30/50 - 2320 - 2420
M8 Motor screws 3430 - 3530 - 7530
M9 Belt
M10 Command box
M4M1
M2
M3 M5
M6
M8
M7
M9
M10
TOOLS
Parts list / Tools
8 - 10
13 - 17 4 - 6
8
8 - 10 - 17
24 - 30 - 32

Kit5000_GB-A
2120
2130 2150 2320 2420
3430 / 3530 / 7530
3431
3531
7531
3432
3532
7532
3433
3533
7533
3434
3534
7534
3435
3535
7535
3436
3536
7536
3537
7537
3538
7538
X
mini 900 900 900 900 840 1141 1441 1741 2041 2341 2641 2941
maxi 2600 2600 2600 2595 1140 1440 1740 2040 2340 2640 2940 3240
A2X + 224 2X + 224 2X + 190 2X + 200 2550 3150 3750 4350 4950 5550 6150 6750
B377 347 370 365 355 (Fermatic 3430) / 360 (Fermatic 3530-7530)
C2X + 601 2X + 571 2X + 560 2X + 565
2905 3505 4105 4705 5305 5905 6505 7105
2910 3510 4110 4710 5310 5910 6510 7110
A
C
B
2120 :
2130/2150 : *
**
179
188
200
600
X
A
C
B
200
600
X
2120 / 2130 / 2150
3430 / 3530 / 7530
A
C
B
300
600
X
2320 / 2420
RR
R + 178R + 168
R + 174*
R + 187**
R
3530 3430
166*
183**
3430 :
3530/7530 : *
**
- 7 -
X = door width
X = door width
Dimensions
X = door width

Kit5000_GB-A
5 countersunk
screws Ø8
NOT SUPPLIED
Screws
M2
M1 M4 M6
M7 M8
M3
6 - MOUNTING ONTO FERMATIC 2120 / 2130 / 2150 - 2320 / 2420 SYSTEMS
- 8 -
MOUNTING ONTO 3430 / 3530 / 7530 SYSTEMS ............... See page 15
Installation of the Kit 5000• is the same regardless of the opening side of the
door. It’s recommended to install the motor right side of the rail.
Motor can be mounted in standard or 90° direction.•
90° MOTOR MOUNTING See page 26
Depending on the system installation, the space available in the right end rail•
can be short for mounting the motor in its standard conguration.
In that event it’s possible to mount the motor left side of the rail.
LEFT SIDE MOTOR MOUNTING See page 28
CAUTION
2320
2420
2130/2150
2120
Opening
side (RH)
STANDARD MOUNTING
Belt adjuster
p. 9
Door driving
assembly p. 10
Motor
p. 11
Opening
side (LH)

Kit5000_GB-A
- 9 -
RAIL PREPARING
6.1
BELT ADJUSTER
6.2
OK
!
M1
1 - Remove the 2 end covers.
2 - Insert the screws into the upper groove of the rail (see drawings below).
2120 / 2130 / 2150
1
2
2320 / 2420
2
1
13 13
6
C = for cover
M = for motor
T = for belt adjuster
C CC MT
C C C
T
T
C C C C
X3
M
M
X6
X6
X8
X5
X7

Kit5000_GB-A
600
- 10 -
DOOR DRIVING ASSEMBLY
6.3
Central
bracket
M2
M1
Drilling
A
DOOR/OUTSIDE
1020
32,5
32,5
32,5
32,5
32,5 210
5 holes for
screws Ø 8
13
Fixing
M4
5 countersunk
screws Ø 8
1 - Fix the belt adjuster (M1)
on the top of the rail:
600mm to central bracket.
Block the 2 screws.
Nota :
When mounting a Kit 5000 onto a manual Fermatic system already installed:
wedge the door, unscrew the 2 door brackets (A) and push them aside to access the upper edge
of the door.
1 - Fix door driving assembly (M4)
on the top of the door with
5 countersunk screws Ø8
(screws not supplied).
2 - Block the screws.
DOOR/OUTSIDE
Nota :
When mounting a Kit 5000 onto a
manual Fermatic system already installed:
mount the 2 door brackets (A) and block
them.
Remove the blocks.

Kit5000_GB-A
206
≈ 150
A
B
Shoulder
to the top
!
Imperative
!
2150
13
B A
- 11 -
MOTOR
6.4 90° MOTOR MOUNTING See page 26
LEFT SIDE MOTOR MOUNTING See page 28
1 - Right side of the rail, remove the screw of the end bracket (2120/2130 systems).
2150 system : remove the left screw of the end bracket.
2 - Replace it with spacer (B) from small bag (M7).
Fix spacer with a screw, do not drive the screw.
3 - Position spacer (A) on the rail aligning with nut
which is into the upper groove of the rail.
2120 / 2130 / 2150 SYSTEMS
d
eB
DE
A
e
M6
E
D
4 - Lift the washer and engage the screw
(D) into slot (d) of motor bracket.
5 - Align spacer (A) and its nut
with hole (e) of motor bracket.
6 - Engage the second screw (E) from small
bag (M7) into hole (e) of motor bracket.
Block the 2 screws.
M7
ABC
13
2120-2130
A
B
13
206
≈ 150

Kit5000_GB-A
- 12 -
M7
B
CA
2320 / 2420 SYSTEMS
M6
e
E
D
B
DE
C
e
d
4 - Lift the washer and engage the screw (D)
into slot (d) of motor bracket.
5 - Engage the second screw (E) from small
bag (M7) into hole (e) of motor bracket.
Block the 2 screws.
!
B
C
170 (2320)
175
(2420)
!
13
6
Shoulder
to the top
Imperative
13
1 - Right side of the rail, remove the left screw
of the end bracket and the left screw of the
butt bracket.
2 - Replace the screw of the end bracket with
spacer (B) from small bag (M7).
Fix spacer with a screw,
do not drive the screw.
3 - Replace the screw of the butt bracket with
spacer (C).
BC

Kit5000_GB-A
- 13 -
BELT
6.5
Link belt/door
1
2
3
OK
1 - Unscrew the 4 screws of the driving assembly ange.
2 - Engage the belt into the ange to its middle.
3 - Tighten the 2 screws of the ange to block the belt.
4 - Remove the belt guide (A).
5 - Engage the belt around the motor pulley, then around the belt adjuster
pulley.
6 - Tighten the belt. Cut the belt at the middle of the driving assembly ange.
7 - Engage the belt into the ange as seen above (1).
Tighten the 2 screws of the ange to block the belt.
8 - Mount the belt guide (A).
8
5
5
8
6 7 Block
A
410

Kit5000_GB-A
Tighten the belt
- 14 -
1 - Remove cover (A) with a screw-
driver
2 - Loosen screw (B) of about 1/4turn
3 - Tighten the screw (C) of the belt
adjuster to tighten the belt: the
upper strand (D) must be horizontal.
4 - When the belt is tensioned, block
the screw (B) .
5 - Mount cover (A).
Nota :
The belt adjuster may be moved
laterally as necessary.
13
10
C
B
A
17
D
PASSIVE EDGEMOUNT SECURITY Voir page 31
COMMAND BOX/WIRING/PARAMETERS Voir page 32

Kit5000_GB-A
Installation of the Kit 5000• is the same regardless of the opening side of the
door. It’s recommended to install the motor right side of the rail.
Motor can be mounted in standard or 90° direction.•
90° MOTOR MOUNTING See page 26
Depending on the system installation, the space available in the right end rail•
can be short for mounting the motor in its standard conguration.
In that event it’s possible to mount the motor left side of the rail.
LEFT SIDE MOTOR MOUNTING See page 28
CAUTION
MOUNTING ONTO 2120 / 2130 / 2150 - 2320 / 2420 SYSTEMS ............... See page 8
Door driving
assembly p. 17
Motor
p. 18
- 15 -
Screws
M2
M1 M4 M6
M7 M8
M3 M5
7 - MOUNTING ONTO FERMATIC 3430 / 3530 / 7530 SYSTEMS
3430
3530
7530
Belt adjuster
p. 16
STANDARD MOUNTING
Opening
side (RH)
Opening
side (LH)

Kit5000_GB-A
BELT ADJUSTER
7.1
3430
3530
7530
1 - Insert the 2 screws from small bag (M3) into 2 slots of the rail:
600mm (4th and 5th slot) to central bracket (see drawing below).
2 - Fix the belt adjuster (M1) on the top of the rail.
Block the 2 screws.
- 16 -
!
8
M3
13
1
2
3
4
5
Central
bracket
M1
600

Kit5000_GB-A
- 17 -- 17 -
DOOR DRIVING ASSEMBLY
7.2
300
M5
5 - Fix the door driving assembly (M4)
under the mobile part with the 2
screws and washers from (M5).
Dimension 300 mm imperative.
6 - Mount the door bracket.
7 - Mount the end cover.
Remove the blocks.
!
!
When mounting a Kit 5000 onto a manual Fermatic
system already installed:
1 - Wedge the door.
2 - Remove the right end cover of the mobile part.
3 - Unscrew the door bracket/right side (A)
to remove it .
4 - Insert the 2 nuts from small bag (M5)
into the groove of the mobile part.
A
3530 - 7530
3430
!
30
4
17

Kit5000_GB-A
- 18 -
MOTOR
7.3
The motor mounting depends on Manual Fermatic system (3430 or 3530/7530) and
butt model mounted onto the rail.
There are 5 dierent ways to mount the motor:
CASE N°2
page 20
A
CASE N°3
page 21
D
C
B
CASE N°5
page 23
CASE N°1
page 19
CASE N°4
page 22
G
F
E
OR
3430
3530
7530
3530
7530
90° MOTOR MOUNTING See page 26
LEFT SIDE MOTOR MOUNTING See page 28
Opening
side
Opening
side
Opening
side
Opening
side
Opening
side
Opening
side

Kit5000_GB-A
d
Sticker
3430
c
- 19 -
CASE N°1 - FERMATIC 3430
A
B
6
!
!
BLOCK
DO NOT
BLOCK
M8
A B
D
M6
OK
A B
CD
1 - Right side of the rail, remove the screw
of the end bracket.
2 - Replace the screw of the end bracket with
a screw and the spacer (B) from small bag
(M8). Block screw and spacer.
3 - Left side of the end bracket, mount spacer (A)
with the second screw from (M8) into the
rst hole of the rail.
Do not block.
4 - Engage a nut and a washer from small bag
(M8) on screw (C).
5 - Tip the motor bracket to engage the screw (C)
in the slot (c) and position the motor bracket
by engaging the screw (D) into the hole (d) of
the bracket.
6 - Push the screw (C) in the slot (c).
Block spacer (A) and nut of the screw (C).
7 - Block the nut of screw (D).
PUSH THE DOOR LEFT SIDE
!
24
17
17
!

Kit5000_GB-A
- 20 -
CASE N°2 - FERMATIC 3530 / 7530
A
B
6
M8
A B
!
!
BLOCK
DO NOT
BLOCK
D
M6
OK
1 - Right side of the rail, remove the screw
of the end bracket.
2 - Replace the screw of the end bracket with
a screw and the spacer (B) from small bag
(M8). Block screw and spacer.
3 - Left side of the end bracket, mount spacer (A)
with the second screw from (M8) into the
rst hole of the rail.
Do not block.
4 - Engage a nut and a washer from
small bag (M8) on screw (C).
5 - Tip the motor bracket to engage
the screw (C) in the slot (c) and position
the motor bracket by engaging
the screw (D) into the hole (d) of the bracket.
6 - Push the screw (C) in the slot (c).
Block spacer (A) and nut of the screw (C).
7 - Block the nut of screw (D).
DOOR CLOSED
!
d
c
AB
CD
24
17
17
!
Table of contents
Other FERMOD Garage Door Opener manuals
Popular Garage Door Opener manuals by other brands

Chamberlain
Chamberlain RJO70 manual

EINHELL
EINHELL BGT 63 Mounting and operating instructions

AlluGuard
AlluGuard Qompact Q2R Original operation instructions

Cardin Elettronica
Cardin Elettronica SL Series instruction manual

Phonomation
Phonomation phonomator Quick installation guide

tau
tau TSKY-B Use and maintenance manual

Chamberlain
Chamberlain Security+ PD300D owner's manual

Craftsman
Craftsman 200.57983 owner's manual

Automatic Technology Australia
Automatic Technology Australia GDO-5-AS installation instructions

GOGOGATE
GOGOGATE Garage Door Opener user manual

Chamberlain
Chamberlain 1345C 1/3HP owner's manual

Chamberlain
Chamberlain 8200 1/2 HP owner's manual