FERREX GLB3300A Product information sheet

P
RODUCED IN CHINA FOR:
GB IE
Great care has gone into the manufacture of this product and it should
the
refore provide you with years of good service when used properly. In
the event of p
roduct failure within its intended use over the course of the
first 3 years a
fter date of purchase, we will remedy the problem as quickly
as possible once it has been b
rought to our attention. In the unlikely event
of such an occur
rence, or if you require any information about the product,
please con
tact us via our helpline support services, details of which are to be
found both in this manual and on the p
roduct itself.
A
LDI STORES LTD. PO BOX 26, ATHERSTONE
W
ARWICKSHIRE, CV9 2SH
A
LDI STORES (IRELAND) LTD.
P
OBOX 726, NAAS, CO. KILDARE
Visit us at www.aldi.com
AFTER SALES SUPPORT 818441
EIBG
MODEL:
GLB3300A 09/2022
+44(0) 1904727501 +353(0) 19022605
YEAR
3
WARRANTY
User Manual
ELECTRIC LEAF BLOWER
Original User Manual

2
1
2
3
4
5
11
10
9
8
7
6

Package contents
1
Motor housing
2
Top vacuum tube
3
Bottom vacuum tube
4
Top blow tube
5
Bottom blow tube
6
Screw (x 4)
7
Collecting bag
8
Star grip nut
9
Screw for extra handle
10
Extra handle
11
Shoulder strap
Tools required (not supplied)
12
PH1 Phillips screwdriver
12
Package contents
3

Table of content
Overview................................................................................................................................ 2
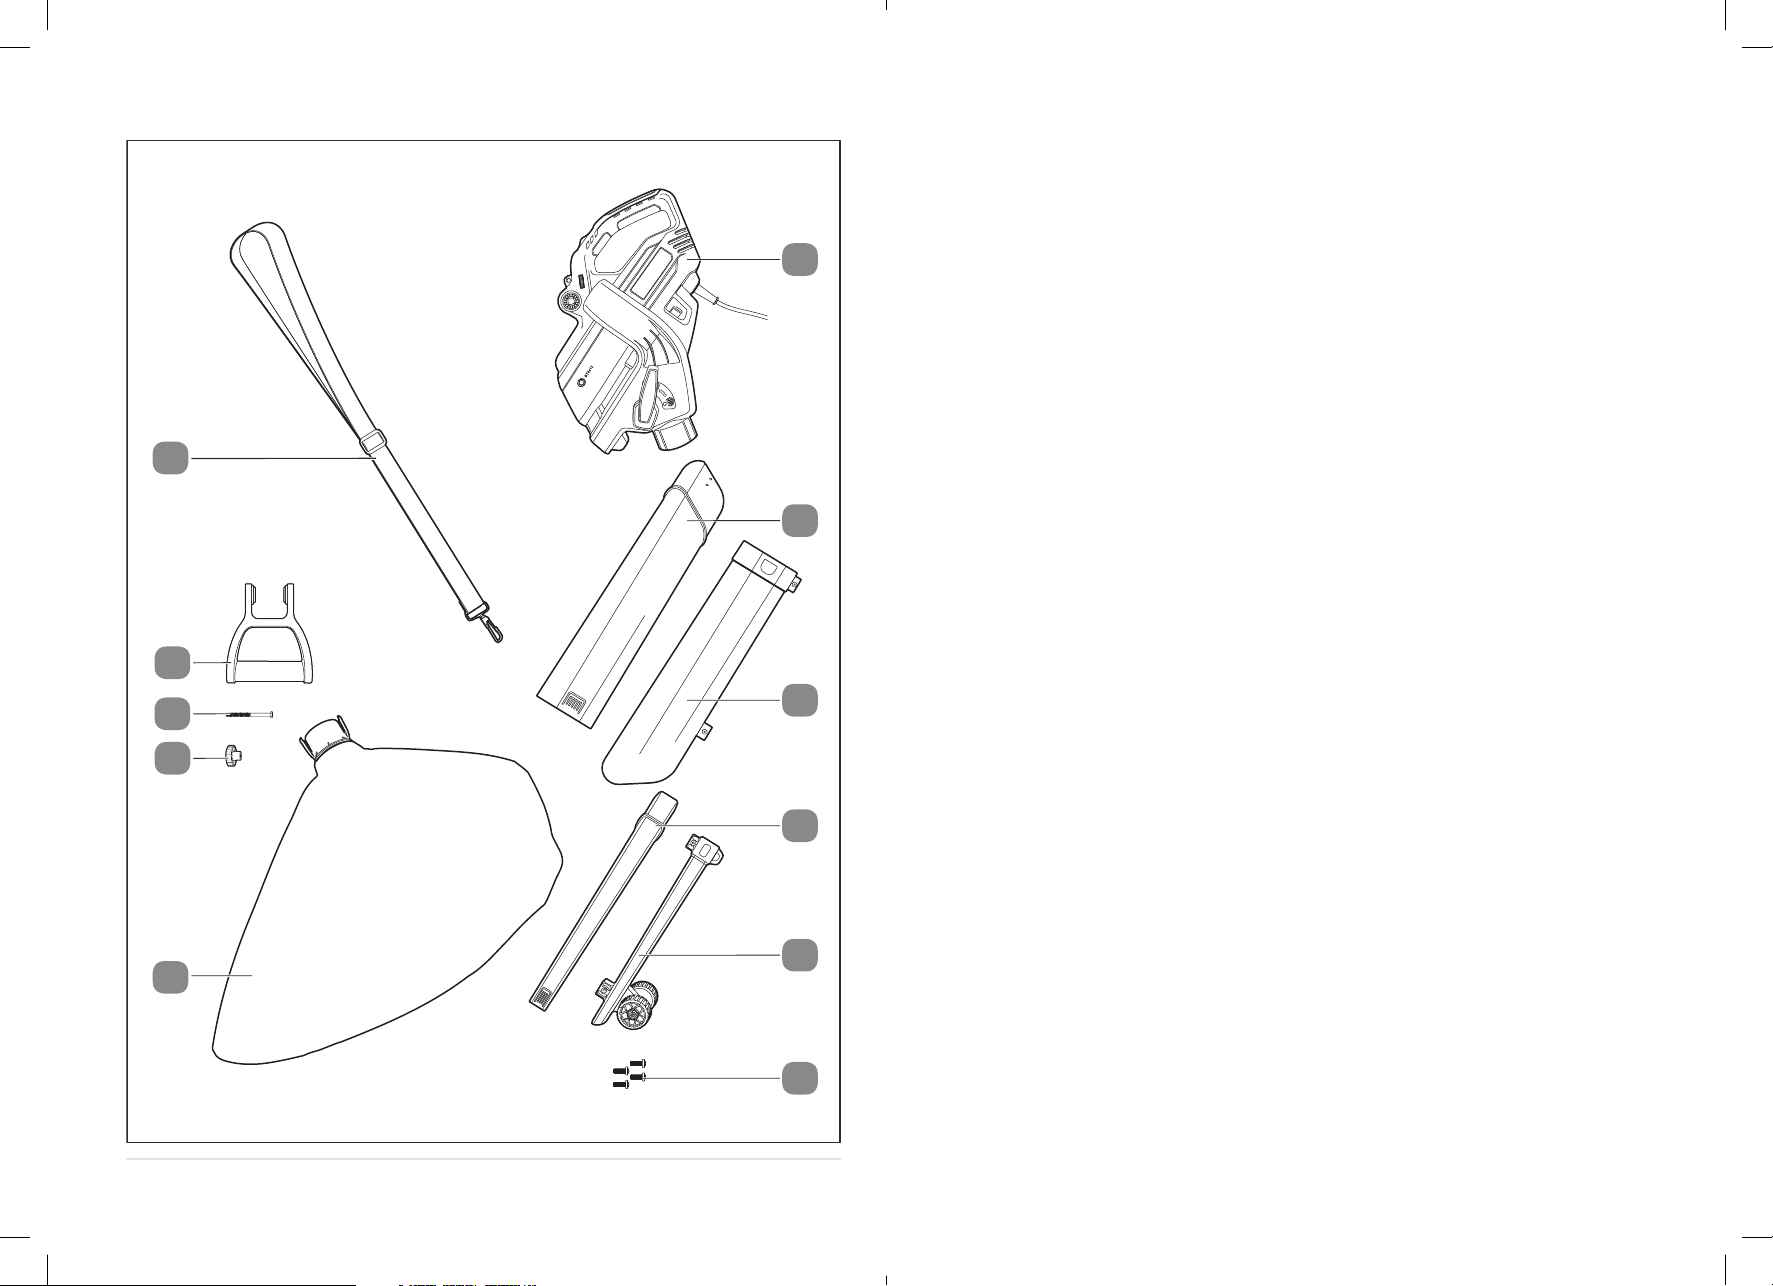
Package contents...................................................................................................................3
General information...............................................................................................................5
Reading and storing the user manual............................................................................................5
Proper use...........................................................................................................................................5
Explanation of symbols......................................................................................................... 6
Safety..................................................................................................................................... 8
Before first use......................................................................................................................16
Check the device and scope of delivery........................................................................................16
Assembly instruction............................................................................................................ 17
Installing the blow and vacuum tubes..........................................................................................17
Attaching the collecting bag...........................................................................................................18
Attaching the extra handle.............................................................................................................19
Attaching the shoulder strap..........................................................................................................19
Operation..............................................................................................................................19
Adjusting the extra handle.............................................................................................................20
Setting the operating mode...........................................................................................................20
Setting the speed..............................................................................................................................21
Turning the device on and off.........................................................................................................21
Removing the collecting bag......................................................................................................... 22
Emptying the collection bag...........................................................................................................23
Use........................................................................................................................................ 23
Using the shoulder strap.................................................................................................................23
Preparing the extension cable.......................................................................................................23
Connecting the power cable.......................................................................................................... 24
Assuming the work position...........................................................................................................24
Vacuuming/blowing leaves........................................................................................................... 24
Cleaning and maintenance..................................................................................................25
Testing.................................................................................................................................. 26
Storage................................................................................................................................. 26
Transport.............................................................................................................................. 26
Load securing for transport............................................................................................................26
Spare parts........................................................................................................................... 26
Technical data.......................................................................................................................27
Noise/vibration information........................................................................................................... 27
Declaration of conformity.................................................................................................... 29
Disposal................................................................................................................................ 30
Disposing of packaging.................................................................................................................. 30
Dispose of old electrical device......................................................................................................30
Table of content
4

General information
Reading and storing the user manual
This user manual is part of the electric leaf blower (hereinafter also called
"device"). It contains important information on how to set up and use the
device.
Before using the device, read the operating manual carefully, in particular
the safety instructions. Failure to follow this operating manual may lead to severe
injuries or product damage.
This user manual is based on the standards and regulations that are valid within the
European Union. Outside the EU, please also note the country-specific directives and
laws.
Keep this operating manual for future reference. If you pass this device on to a third
party, you must also supply this operating manual.
This user manual is also available in PDF format from our after
sales support.
Proper use
The device is exclusively intended for private users in the hobby
and DIY sector for the following purposes:
-In vacuuming mode, for picking up dry leaves or general dry,
light garden waste
- In blow mode, for piling up leaves or general garden waste
This device is intended for private use only and is not suitable for
commercial use. Use the device only as described in this operating
manual. Any other use is improper and may lead to product
damage or even personal injury. This device is not a toy.
The manufacturer or retailer assume no liability for damage
caused by improper or incorrect use.
Residual risks
Despite proper use, hidden residual risks cannot be completely
excluded.
General information
5

Depending on the type of device, the following risks may occur:
- Lung damage if not wearing a suitable dust mask;
- Hearing damage if not wearing suitable hearing protection;
- Health risks which may result from vibrations on the arm and
hand if you use the device for a long time or if it is not properly
used or maintained.
Explanation of symbols
The following symbols and signal words are used in this user manual, on the device
or on the packaging.
WARNING! Please read the instructions carefully before starting the
machine.
This symbol provides you with useful additional information on
handling and use.
Declaration of conformity (see chapter “Declaration of conformity”):
Products marked with this symbol meet all the applicable Community
regulations of the European Economic Area.
The new UKCA (UK Conformity Assessed) marking declares that the
product conforms to all applicable U.K. legislative requirements and
that appropriate conformity assessment procedures have been
successfully completed.
Wear goggles.
Wear a dust mask.
General information
6

Wear hearing protection.
Wear safety shoes.
Caution! Risk of injury due to flying scraps! Keep a safe distance when
operating the device!
Caution! Rotating parts!
Warning! Disconnect the mains plug if the cord becomes damaged or
entangled.
SWITCH OFF: Disconnect the mains plug before cleaning and
maintenance work.
Do not point the blower at persons.
Do not use the device in the rain.
Explanation of symbols
7

104
The symbol shows the maximum sound power level LWA.
Safety
The following signal words are used in this user manual.
WARNING! This signal symbol/word denotes a
hazard with an average risk level that
could lead to death or severe injury if
it is not avoided.
CAUTION! This signal symbol/word denotes a
hazard with a low risk level that could
lead to mild or moderate injury if it is
not avoided.
NOTE! This signal word provides a warning
about potential material damage.
General safety notes for power tools
WARNING!
Read all safety notes, instructions, illustrations and technical
data provided with this power tool. Failure to follow the
instructions below may result in electric shock, fire and/or
serious injury.
Keep all safety notes and instructions for future reference.
The term "power tool" used in the safety notes refers to both
mains-operated power tools (with power cord) and battery-
powered power tools (without power cord).
Explanation of symbols
8

Workplace safety
-Keep your work area tidy and well lit.
Clutter or unlit work
areas can lead to accidents.
-Do not operate power tools in explosive atmospheres,
such as in the presence of flammable liquids, gases or
dust.
Power tools create sparks which may ignite the dust or
fumes.
-Keep children and bystanders away while operating a
power tool.
Distractions can cause you to lose control.
Electrical safety
-Power tool plugs must match the outlet. Never modify the
plug in any way. Do not use any adapter plugs with
earthed (grounded) power tools.
Unmodified plugs and
matching outlets will reduce risk of electric shock.
-Avoid body contact with earthed or grounded surfaces,
such as pipes, radiators, ranges and refrigerators.
There is
an increased risk of electric shock if your body is earthed or
grounded.
-Do not expose power tools to rain or wet conditions.
Water
entering a power tool will increase the risk of electric shock.
-Do not misuse the power cord, such as to carry or hang
the power tool or to pull the plug out of the socket. Keep
the power cord away from heat, oil, sharp edges or
moving parts.
Damaged or entangled power cords increase
the risk of electric shock.
-When operating a power tool outdoors, use an extension
cord suitable for outdoor use.
Use of a cord suitable for
outdoor use reduces the risk of electric shock.
-If operating a power tool in a damp location is
unavoidable, use a residual current device (RCD)
Safety
9

protected supply.
Use of an RCD reduces the risk of electric
shock.
Personal safety
-Stay alert, watch what you are doing and use common
sense when operating a power tool. Do not use a power
tool while you are tired or under the influence of drugs,
alcohol or medication.
A moment of inattention while
operating power tools may result in serious personal injury.
-Use personal protective equipment. Always wear eye
protection.
Protective equipment such as a dust mask, non-
skid safety shoes, hard hat or hearing protection used for
appropriate conditions will reduce personal injuries.
-Prevent unintentional starting. Ensure the switch is in the
off-position before connecting to power source and/or
battery pack, picking up or carrying the tool.
Carrying
power tools with your finger on the switch or energising
power tools that have the switch on invites accidents.
-Remove any adjusting key or wrench before turning the
power tool on.
A wrench or a key left attached to a rotating
part of the power tool may result in personal injury.
-Do not overreach. Keep proper footing and balance at all
times.
This enables better control of the power tool in
unexpected situations.
-Dress properly. Do not wear loose clothing or jewellery.
Keep your hair and clothing away from moving parts.
Loose clothes, jewellery or long hair can be caught in moving
parts.
-If devices are provided for the connection of dust
extraction and collection facilities, ensure these are
connected and properly used.
Use of dust collection can
reduce dust-related hazards.
Safety
10

-Do not let familiarity gained from frequent use of tools
allow you to become complacent and ignore tool safety
principles.
A careless action can cause severe injury within a
fraction of a second.
Using and handling the power tool
-Do not overload the power tool. Use the appropriate
power tool for your work.
The right power tool allows you to
work better and safer in the specified power range.
-Do not use any power tool that has a defective switch.
Power tools that can no longer be switched on or off are
dangerous and must be repaired.
-Disconnect the plug from the socket and/or remove any
removable batteries before making adjustments to the
device, changing any insert tool parts, or putting the
power tool away.
This precaution helps prevent
unintentional starting of the power tool.
-Keep power tools out of the reach of children when not in
use. Whoever is not familiar with the power tool or who
has not read these instructions should not be allowed to
use it.
Power tools are dangerous if used by inexperienced
persons.
-Power tools and insert tools must be subject to careful
maintenance. Check whether moving parts function
properly without jamming, and whether parts are broken
or damaged to such an extent that they impair the
functions of the power tool. Have damaged parts repaired
before using the power tool.
Many accidents happen due to
poorly maintained power tools.
-Use power tools, insert tools, insert tool parts, etc.
according to these instructions. While doing so, take into
account the working conditions and the activity to be
Safety
11

performed.
The use of power tools for applications other
than those intended can lead to dangerous situations.
-Keep handles and grip surfaces dry, clean and free of oil
and grease.
Slippery handles and grip surfaces hinder safe
operation and control of the power tool in unforeseen
situations.
Service
-Have your power tool serviced by a qualified repair
person using only identical replacement parts.
This will
ensure that the safety of the power tool is maintained.
Additional safety notes for handheld cordless leaf vacuums
with blow function
Instructions
- Read the instructions carefully. Familiarise yourself with the
controls and the proper handling of the device.
- Never allow children or persons with reduced physical,
sensory or mental abilities or lack of experience and
knowledge to use the device.
- Please note that the operator or user is responsible for
accidents or risks to other persons or their property.
Preparation
- Use ear protectors and protective goggles. Wear these the
whole time while using the device.
-Always wear sturdy shoes and long trousers when operating
the device. Do not use the device barefoot or with open
sandals. Avoid wearing loose-fitting clothing or clothing with
dangling attachments or ties.
- Do not wear any loose-fitting clothing or jewellery that could
get sucked into the suction opening. Keep long hair away
from the suction opening.
Safety
12

- Operate the device in a recommended position and only on a
solid and level surface.
- Do not use the device on paved or gravel surfaces; debris
flung out of the device can cause injuries.
-Before using the device, always perform a visual inspection to
ensure that the shredder, the pins of the shredder and other
attachments are secured, that the housing is undamaged and
that the safety devices and screens are in place. Replace worn
or damaged components to maintain equilibrium. Replace
damaged or illegible labels.
-Check the power cable and the extension cable for signs of
damage or ageing before use. If a cable is damaged during
use, disconnect the power cable immediately from the mains.
Do not touch the cable while it is still attached to the mains. Do
not use the device if the cable is damaged or worn.
-Keep the extension cable away from moving parts to prevent
damage.
- Never operate the device while persons, especially children,
or pets are in the vicinity.
Operation
- Prior to starting the device, make sure that the inlet is empty.
-Keep your face and body away from the filling hole.
- Make sure that hands, other body parts or clothing are not
located in the inlet, the discharge chute or close to moving
parts.
- Make sure to keep your balance and ensure firm footing,
especially on inclines. Avoid uncomfortable working
positions.
-Walk, don't run.
Safety
13

- Do not stand in the ejection zone during operation of the
device.
- When vacuuming up material with the device, take extreme
care to avoid sucking up metal objects, stones, bottles, tins or
other foreign objects.
- Switch the device off and wait until the device has stopped if
the cutting mechanism hits a foreign object or if the device
starts vibrating heavily. Disconnect the device from the mains
and carry out the following steps before restarting and
operating the device:
•check the device for damage;
• replace or repair damaged parts;
• check for loose parts and tighten these.
- Do not let processed material collect in the ejection zone as
this prevents proper ejection and might cause material that
has already been processed to be drawn in again via the
filling hole.
- If the device is clogged, switch it off and disconnect it from the
mains before removing any debris.
- Never operate the device with defective safety devices or
screens, or without safety devices such as the attached
collecting bag.
- Keep waste and collected debris away from the motor to
prevent damage or a possible fire.
- Do not transport the device while the motor is running.
Safety
14

- Switch the device off and disconnect it from the mains. Make
sure that all moving parts come to a complete standstill:
• every time you leave the device unattended;
• before removing any blockages or clearing clogged ducts;
• before checking, cleaning or carrying out any other work
on the device.
- Do not operate the device during bad weather, especially
during thunderstorms.
Maintenance and storage
- When stopping the device for maintenance, storage or
changing accessories, switch off the motor, disconnect the
device from the mains and make sure that all moving parts
have come to a stop. Let the device cool down prior to
inspection, adjustments, etc.
- Store the device in a dry place and out of the reach of
children.
- Replace worn or damaged parts for safety reasons. Only use
original replacement parts and accessories.
- Switch the device off and disconnect it from the mains before
attaching or removing the collecting bag.
Recommendation
-Operate the device via a residual current device (RCD) with a
trigger current of max. 30 mA.
WARNING!
Risk of electric shock!
Faulty electric installation or excess mains voltage can cause an
electric shock.
- Only connect the power cable if the mains voltage of the
socket matches the information shown on the rating plate.
Safety
15

- If the power cable of the device is damaged, it must be
replaced by the manufacturer, the manufacturer's customer
service or a similarly qualified person in order to prevent
hazards.
Before first use
Check the device and scope of delivery
NOTE!
Risk of damage!
If opening the packaging with a sharp knife or other pointed
objects, careless handling can damage the device.
- Therefore, be very careful when opening.
1. With both hands, lift the device out of the packaging.
2. Check that the delivery is complete (see chapter “Package contents”).
3. Inspect the device and individual parts for damage. Do not operate a damaged
device; instead, contact the manufacturer via the service center listed on the
warranty card.
Safety
16

Assembly instruction
Installing the blow and vacuum tubes
12
4
3
1
5
1. Push the top vacuum tube
2
into the large opening on the motor housing
1
until it audibly snaps into place.
2. Push the bottom vacuum tube
3
into the open end of the top vacuum tube
until it audibly snaps into place.
3. Push the top blow tube
4
into the small opening on the motor housing until it
audibly snaps into place.
4. Push the bottom blow tube
5
into the open end of the top blow tube until it
audibly snaps into place.
Assembly instruction
17

2
12
13
13
6
1. Using a Philips screwdriver PH1
12
, screw the screws
6
into the illustrated
positions in the clockwise direction.
Screw in an additional screw on the opposite side of the motor housing.
The blow/vacuum tubes are installed.
Attaching the collecting bag
1. Push the connecting piece of the
collecting bag
7
into the bottom
opening of the motor housing
1
until it audibly snaps into place.
2. Attach the snap hook of the collecting
bag
7
to the eyelet on the bottom
blow tube
5
.
The collecting bag is attached.
3
7
1 5
Assembly instruction
18

Attaching the extra handle
1. Attach the extra handle
10
to the
mount for the extra handle
13
with
the bulge pointing down.
The teeth on the mount and on the
extra handle must engage.
2. Push the screw for the extra handle
9
through the hole in the mount and
in the extra handle.
3. Screw the star grip nut
8
clockwise
onto the thread of the screw and
tighten it.
Attaching the shoulder strap
- Connect the clip of the shoulder strap
11
with the attachment point for the
shoulder strap
14
.
Operation
CAUTION!
Risk of injury!
A damaged device or damaged accessories can lead to injuries.
- Check the device and the accessories (see section "Testing").
This chapter describes how to operate the device. The following instructions for use
serve for your own safety and for successful, safe use of the device.
4
10
13
8
9
511
14
Assembly instruction
19

Adjusting the extra handle
Adjust the extra handle
10
to obtain the optimum working position. Always make
sure that the teeth on the extra handle and on the mount
13
engage.
1. Undo the star grip nut
8
.
2. Set the desired position of the extra handle.
3. Tighten the star grip nut again.
Setting the operating mode
Blow function: use this function to blow away dirt outdoors.
Vacuum function: use this function to vacuum up dirt outdoors.
- Set the blow/vacuum selection lever
15
to vacuum.
The vacuum function is active.
-Set the blow/vacuum selection lever
15
to blow.
The blow function is active.
815
915
Operation
20
This manual suits for next models
1
Table of contents
Other FERREX Blower manuals
Popular Blower manuals by other brands

Air King
Air King B600 operating manual

FLORABEST
FLORABEST FLB 3000 A1 translation of original operation manual

Silvercrest
Silvercrest SAB 4.8 A2 operating instructions

Go-On
Go-On ELS 2500 E Translation of the original instructions

XPower
XPower BR-18LZ owner's manual

VentAHood
VentAHood Magic Lung CLEANING