FERREX 13177 User manual

User Manual
Product
Info
51.7CC 2 STROKE
PETROL BACKPACK
BLOWER
https://help.tools
Read all safety warnings and all instructions thoroughly before operating this product.
Ensure you keep your manual in a safe place for future reference.
IM Ed4 02/2020
13177

QR codes take you where you want to go
quicky and easily
Whether you require product information, spare parts or accessories,
details on warranties or after sales service, or if you want to watch
a product demonstration video, our QR codes will take you there in
no time at all.
What is a QR code?
A QR-code (QR=Quick Response) is a type of matrix that can be read
with a smartphone camera and that contains a link to a website or
contact details, for example.
Advantage: You are not required to manually enter a website address
or contact details.
How it works
To scan the QR code, all you need is a smartphone with QR codes
reader
software and an Internet connection*. This type of software can be
downloaded for free from your smartphone’s app store.
Try it out now
Just scan the QR code with your smartphone and
nd out more about the Aldi product you have
purchased*.
* Depending on your tari you may be charged for the connection.
Product
Info

Contents
Pack contents / parts 2
Description of symbols 3
General Safety Warnings 4
Additional safety rules for Petrol Blowers 9
Parts List 11
Assembly 14
Preparation 19
Operation 23
Maintenance 29
Storage and Transportation 32
Environmental Protection 32
Noise and vibration 33
Warranty 34
Troubleshooting 36
Specications 37

Pack contents / parts
Congratulations on the purchase of your Ferrex® 51.7cc 2 Stroke Petrol Backpack
Blower. When you open your packaging, rst remove all items and check there
are no parts damaged or missing. If you nd anything wrong, do not operate the
product until the parts have been replaced or the fault has been rectied. Failure
to do so could result in serious personal injury.
Intended use of 51.7cc 2 Stroke Petrol Backpack Blower
NOTE: This product is for private domestic DIY use only. It is not suitable for
commercial or trade use.
This 51.7cc 2 Stroke Petrol Backpack Blower is designed for moving leaves and
other garden debris; perfect for patios and driveways.
IMPORTANT INFORMATION.
NOTE: This is a 51.7cc 2 Stroke Petrol Backpack Blower. The fuel tank must be
lled with a 40:1 mix of fuel and 2 stroke oil. Fresh unleaded fuel must be used in
this unit.
Do NOT use Ethanol based fuels. Use good quality 2 Stroke oil.
NOTE: First time users or inexperienced operators pay particular attention to the
operation of the Blower, including details of starting and stopping and correct
use of the Blower on pages 23-27, as well as the maintenance instructions on
pages 28-30.
Contents of carton
1 x 51.7cc Petrol Backpack Blower
1 x Flexible pipe with 2 adjustable
clamps (not tted)
1 x Upper blow tube with tting clamp
ring for throttle handle (not tted)
1 x Middle blow tube with
assembly screw (not tted)
1 x Lower blow tube with
assembly screw (not tted)
1 x Throttle control handle (not tted)
1 x Socket spanner for spark plug
1 x Combination screwdriver
(Philips / slot type)
1 x Fuel / Oil mixing bottle
1 x Instruction manual
1 x Warranty Card & Certicate
1 x Quick Start Guide
2

Description of symbols
3
The instruction manual, rating plate, or on the product itself, may show
these symbols. These represent important information about the product or
instructions on its use.
Read instruction manual before operating this machine
Keep bystanders away. Beware of objects being ung out. Use at a distance of at
least 15m from other people.
Warning of hazard. Risk of hand and feet injuries.
Warning
Explosive material
Extremely hot surface. Do not touch a hot muer, gear box or cylinder, you may
get burned. These parts get extremely hot from operation and remain hot for a
short time after the unit is turned o.
Conforms to relevant standards for electrical safety and electromagnetic compatibility.
Wear breathing protection. Wear hearing protection. Wear eye protection
Do not put in water or expose to rain.
Wear protective gloves
Wear protective footwear
60 Months Warranty (5 years)

General safety warnings
4
Safety instructions
WARNING! Read and understand all instructions. Failure to
follow all instructions listed below may result in electric
shock, re and/or serious injury.
The term“power tool”in all of the warnings below refers to your mains-
operated (corded) power tool, garden power tool, battery-operated
(cordless) power tool or your petrol operated garden tool.
Save these instructions
Work area
• Ensure the area to be blown is clear and free of debris, rocks, gravel,
garden furniture etc.
• Keep work area clean and well lit. Cluttered and dark areas invite
• accidents.
• Do not operate power tools in explosive atmospheres, such as in
the presence of ammable liquids, gases, or dust. Power tools create
sparks which may ignite the dust or fumes.
• Ensure all animals, children and bystanders are at least 20m away
while operating this blower. Distractions can cause you to lose control.
Personal safety
• Stay alert, watch what you are doing and use common sense when
operating a power tool. Do not use a power tool while you are tired
or under the inuence of drugs, alcohol, or medication. A moment of
inattention while operating power tools may result in serious personal
injury.
• Use safety equipment. Always wear eye protection. Safety equipment
such as a dust mask, non-skid safety shoes, hard hat, or hearing pro-
tection used for appropriate conditions will reduce personal injuries.

5
• Remove any adjusting key or spanner before turning the tool on. A span-
ner or a key that is left attached to a rotating part of the power tool may
result in personal injury.
• Do not overreach. Keep proper footing and balance at all times. This ena-
bles better control of the power tool in unexpected situations.
• Dress properly. Do not wear loose clothing or jewellery. Keep your hair,
clothing and gloves away from moving parts. Loose clothes, jewellery or
long hair can be caught in moving parts.
• If devices are provided for the connection of dust extraction and collection
facilities ensure that these are connected and properly used. Use of these
devices can reduce dust-related hazards.
Power tool use and care
• Do not force the power tool. Use the correct power tool for your applica-
tion. The correct power tool will do the job better and safer at the rate for
which it was designed.
• Do not use the power tool if the switch does not turn it on and o. Any
power tool that cannot be controlled with the switch is dangerous and
must be repaired.
• Turn tool o completely before making any adjustments, changing acces-
sories, or storing power tools. Such preventive safety measures reduce the
risk of starting the power tool accidentally.
• Store idle power tools out of the reach of children and do not allow per-
sons unfamiliar with the power tool or these instructions to operate the
power tool. Power tools are dangerous in the hands of untrained users.
• Maintain power tools. Check for misalignment or binding of moving parts,
breakage of parts and any other condition that may aect the power tool’s
operation. If damaged, have the power tool repaired before use. Many ac-
cidents are caused by poorly maintained power tools.
• Keep cutting tools sharp and clean. Properly maintained cutting tools with
sharp cutting edges are less likely to bind and are easier to control.
• Use the power tool, accessories and tool bits etc., in accordance with these
instructions and in the manner intended for the particular type of power
tool, taking into account the working conditions and the work to be per-
formed. Use of the power tool for operations dierent from intended could
result in a hazardous situation.

Safety rules for Petrol Backpack Blowers
Training
• Read the instructions carefully. Get familiar with the controls and proper
use of the equipment.
• Non-skilled persons and rst time users should read and understand the
full instruction manual before proceeding with use of the product or
recommended maintenance tasks.
• Only use the blower for the purpose for which it was designed, i.e.
blowing garden debris. Any other use can be hazardous, causing dam-
age to the machine.
• Never allow children or people unfamiliar with these instructions to use
the blower. Local regulations may restrict the age of the operator.
• Never use the blower:
– When people, especially children, or pets are nearby.
– If the operator has taken medicine or substances that can aect his abil-
ity to react and concentrate.
• Remember that the operator or user is responsible for accidents or haz-
ards occurring to other people or their property.
• Do not use unit around people with long hair.
• Dress appropriately. Do not operate with loose clothing or jewellery.
Ensure there is a gap between the air intake and the operator.
Preparation
• While blowing always wear sturdy non-skid footwear and long trousers.
Do not operate the equipment with bare feet or open sandals.
WARNING: DANGER!
Engine fuel is highly ammable:
– Store fuel in containers specically designed for this purpose.
– Refuel using a funnel and outdoors only. Do not smoke while refuelling
or whenever handling the fuel.
– Add fuel before starting the engine. Never remove the cap of the fuel
tank or add fuel while the engine is running or when the engine is hot.
– If fuel is spilled, do not attempt to start the engine but move the ma-
6

chine away from the area of spillage and avoid creating any source of igni-
tion until the fuel has evaporated and the vapour dispersed.
– Replace all fuel tanks and containers caps securely.
• Substitute faulty silencers.
• Before use, always inspect the machine and check that the screws are not
worn or damaged.
• It is advisable to wear suitable eye protection (safety glasses) ear protec-
tion, and sturdy gloves when operating the blower.
• Always check for any objects that may block the air intake screen before
beginning work. A clogged air intake reduces the machine’s blowing ca-
pacity and increases the engine’s working temperature, which can result in
engine failure. Stop the engine and remove the object.
Maintenance and storage
• Keep all nuts, bolts and screws tight to be sure the equipment is in safe
working condition. Regular maintenance is essential for safety and perfor-
mance.
• Never store the equipment with fuel in the tank inside a building where
vapour may reach a ame or a spark or a source of extreme heat i.e a water
heater.
• Allow the engine to cool before storing in an enclosed space.
• To reduce the re hazard, keep the engine, exhaust silencer, battery
compartment (if applicable) and fuel storage area free of grass, leaves, or
excessive grease.
• If the fuel tank has to be drained, this should be done outdoors and when
the engine is cool.
• For reasons of safety, do not use the equipment with worn or damaged
parts. Parts are to be replaced and not repaired. Parts that are not of the
same quality can damage the equipment and be dangerous for your
safety.
• Fuel goes o fairly quickly. If you nd your blower does not start, rst
change the fuel in the tank with newly purchased fuel.
Service
• Have your power tool serviced by a qualied repair personnel using only
7

identical replacement parts (recoil starter, spark plug, collection bag,
tubes, blades / impellor). This will ensure that the safety of the power
tool is maintained.
Operation safety instructions
WARNING. Stop the engine and unplug the spark plug before
any repairs or maintenance operations.
• This machine is extremely noisy and operators must wear acoustic
protection equipment.
• Rotating parts can cause serious injury, avoid contacting the rotating
parts when is still rotate.
• Try not to cause any disturbance. Use this machine at reasonable
times of the day only (not early morning or late evening when the
noise could cause disturbance).
• Check that all nuts, bolts and screws are well tightened before every
use.
• Do not run the engine in an enclosed and/or poorly ventilated area.
The gas of the engine contains carbon monoxide, which is dangerous
to your health.
• Work only when there is sucient light.
• Do not use the blower when it is raining or when the grass is wet.
• Do not use the blower near open windows due to possible debris
entering.
• Caution must be taken while blowing on slopes.
• Turn o the engine if you must leave the blower unattended.
• Never change the rated speed of the engine in any way.
• Stop the engine and remove the spark plug cover in these cases:
– Before any maintenance, repairing or checking operations.
– If you leave the blower unattended.
– If the blower vibrates in an abnormal way, take the blower to an au-
thorised service centre.
– Check the bolts and nuts regularly. Bolts and nuts may vibrate loose
over time.
8

WARNING: DANGER!
Engine fuel is highly ammable:
• Keep fuel in a fuel can specially made for this purpose.
• Fill the fuel tank with a funnel and outside. Do not smoke or use a mobile
phone during this process.
• Fill with fuel / 2 Stroke oil mix before starting the engine. Never open the
cap of the fuel tank to add fuel / 2 stroke oil mix while the engine is run-
ning or still hot.
• Do not start the engine if there is spilt fuel on the blower or in the area sur-
rounding. Take the blower away from the zone where fuel has been spilt
and avoid any contact from a hot source as long as the spilt fuel is com-
pletely evaporated.
• Tighten the fuel tank cap and fuel can cap tightly.
WARNING: This blower is not suitable for use for children below
the age of 14 years old. Children below the age of 14 years old
should not use, or be in reach of this blower during its operation.
WARNING: If something breaks or an accident occurs while work-
ing, turn o the engine immediately and move the machine away
to prevent further damage; if an accident occurs with injuries or
third parties are injured, carry out the rst aid measures most suitable
for the situation immediately and contact the medical authorities for
any necessary health care. Carefully remove any debris that might cause
damage or harm persons or animals should they not be seen.
Additional safety rules for Petrol Blowers
• Do not operate in a hazardous location. Such areas include where there is
a risk of explosion of petrol fumes, leaking gas or explosive dust.
• Do not operate in a conned area. Exhaust gases, smoke or fumes could
reach dangerous concentrations.
• Protect your blower. This blower is NOT WEATHERPROOF and should not
be exposed to direct sunlight, high ambient temperature and damp, wet
or high humidity conditions.
9

10
• Do not smoke while refuelling. This is potentially dangerous as it may
ignite the fuel and cause an explosion.
• Take care not to spill fuel. When refuelling the blower ensure that the
motor has been switched o. Prevent the spilling of fuel as this may
also ignite with the hot motor. Never refuel whilst the engine running.
• Be careful where you store the blower. Store the blower in a dry area
away from ammable liquids.
• Keep your distance. The blower emits exhaust fumes. Ensure bystand-
ers keep a safe distance.
• Fill with Fuel / oil mix before starting the engine. Never open the cap
of the fuel tank to add the fuel / oil mix while the engine is running or
still hot. The engine may overheat and cause damage to the blower.
• Never ll fuel tank indoors. Never ll fuel tank when engine is running
or hot.
• Do not smoke when lling fuel tank.
• Stop the engine before re-fuelling.
• Stop the engine and disconnect the spark plug wire:
– If the blower starts to vibrate abnormally (nd and remove the cause
of the vibration immediately).
• Reduce the throttle before turning o the engine and turn the fuel o
when you have nished blowing.
• The user is responsible for the safety of other people, animals and
objects in the working area. Keep children and domestic animals at a
safe distance while the blower is in use.
WARNING: This blower is not suitable for use for children
below the age of 14 years old. Children below the age of 14
years old should not use, or be in reach of this blower during its
operation.

AFTER SALES SUPPORT
(toll free)
51.7cc 2 Stroke Petrol Backpack Blower
MODEL: №. SBV521 • 02/2020 • 13177
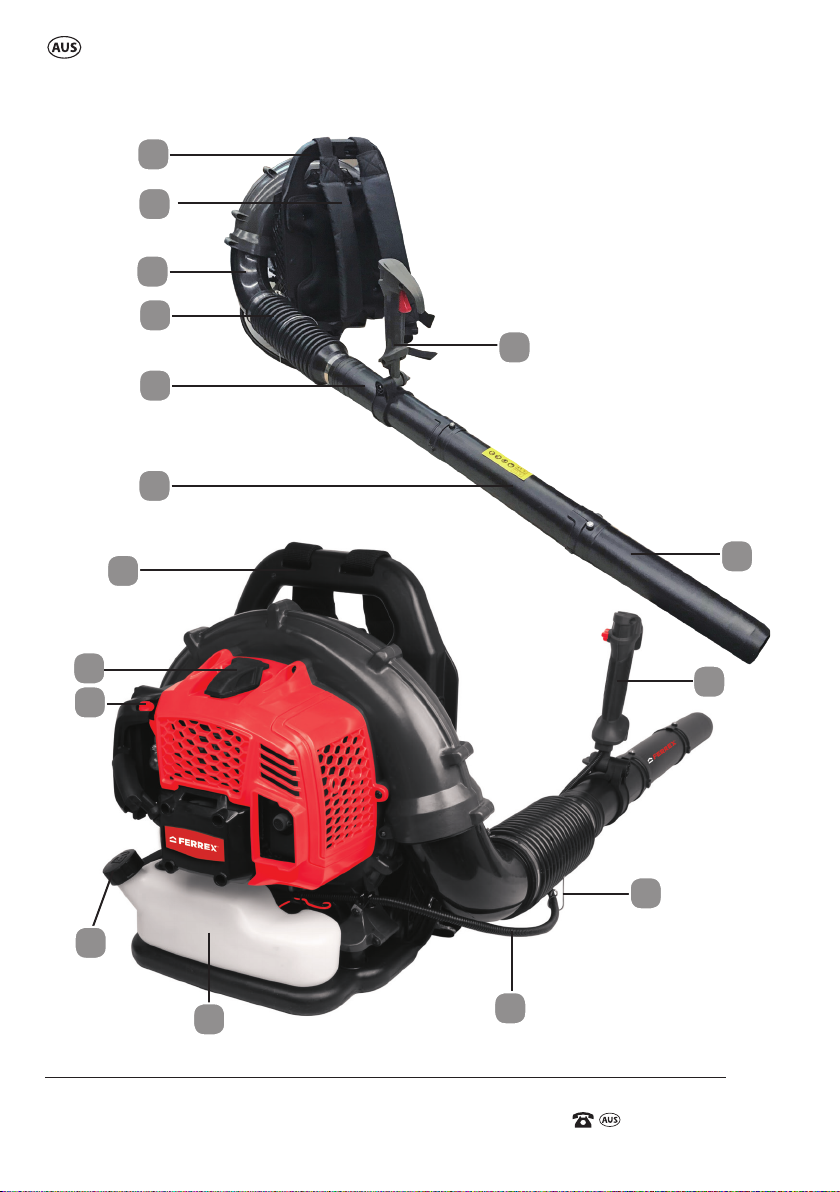
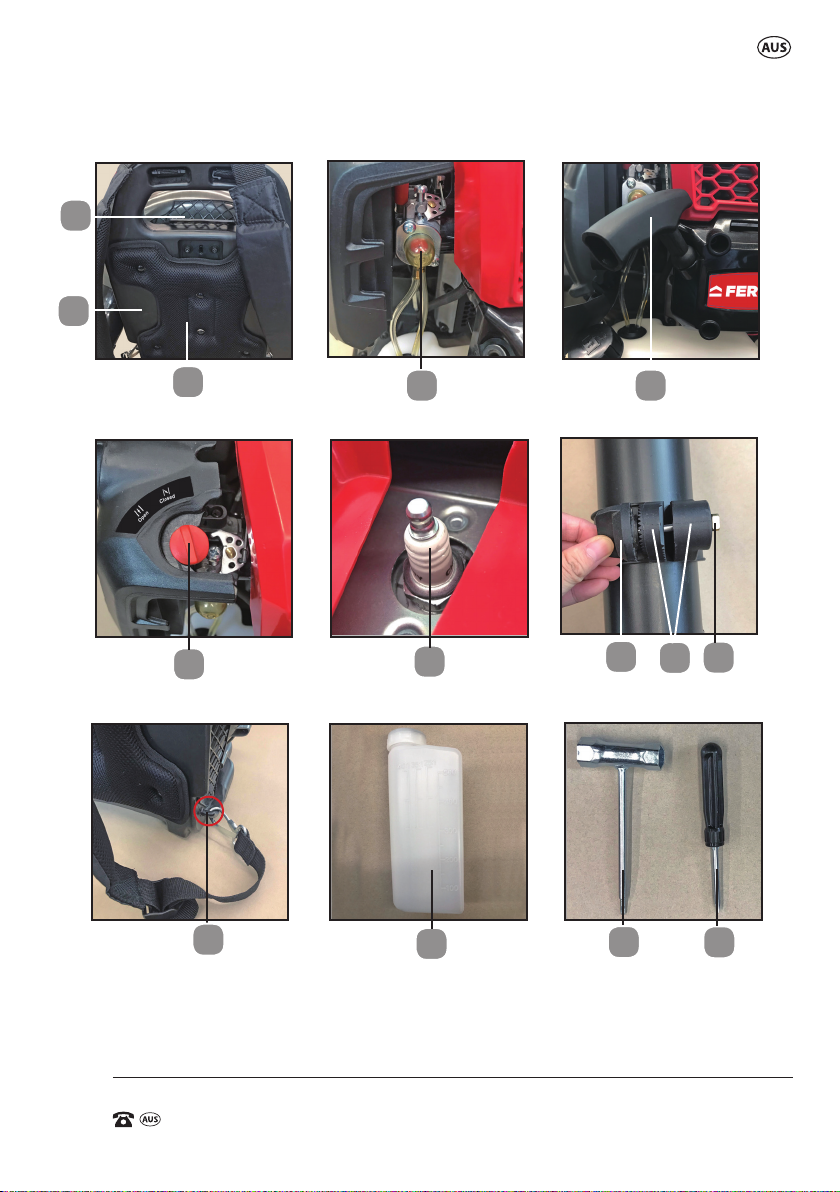
11
1. Carry handle
2. Shoulder straps
3. Elbow tube
4. Flexible pipe (with 2 x adjust-
able clamps)
5. Upper blow tube (with tting
clamp ring for throttle handle)
6. Middle blow tube (with assem-
bly screw)
7. Lower blow tube (with assembly
screw)
8. Throttle control handle
9. Spark plug cover
10. Choke knob
11. Fuel tank cap
12. Fuel tank
13. Throttle cable
14. Fixing clip for throttle cable
15. Throttle trigger
16. Stop/Start/MAX speed lever
17. Air lter cover
18. Air lter locking knob
19. Air lter
20. Plastic netting
21. Plastic harness
22. Padded harness
23. Primer bulb
24. Recoil starter
25.
Spark plug
26. Lock knob for xing throttle
handle
27. Clamp gear(s) on clamp ring for
xing throttle handle
28. Lock nut for xing throttle
handle
29. Shoulder strap connection
point(s)
30. Fuel / Oil mixing bottle
31. Socket spanner for spark plug
32. Combination screwdriver
(Philips / slot type)
Parts List
17
15
16 18 19
51.7cc 2 Stroke Petrol Backpack Blower
AFTER SALES SUPPORT
MODEL: №. SBV521 • 02/2020 • 13177 (toll free)
12
4
5
6
1
3
7
2
12
11
13
8
14
1
9
10
8
AFTER SALES SUPPORT
(toll free)
51.7cc 2 Stroke Petrol Backpack Blower
MODEL: №. SBV521 • 02/2020 • 13177
13
27
22
26 28
23
30 32
31
29
20
21
25
24
10

51.7cc 2 Stroke Petrol Backpack Blower
AFTER SALES SUPPORT
MODEL: №. SBV521 • 02/2020 • 13177 (toll free)
14
Preparation of the blower prior to use
This Petrol Backpack Blower requires some
assembly prior to use. This includes joining of the
blower tubes (4,5,6,7), and securing the throttle
control handle (8) to the upper blow tube (5).
Setting up for use
WARNING: Blower tube installation aects
both blower balance and performance.
Stop the engine before installing or removing the
blower tubes. Never perform any maintenance or
assembly procedures on this machine while the
engine is running.
Assembling the exible pipe (4)
1) Place the blower in an upright position on the
ground or on a sturdy work surface (See Fig A1).
2) Loosen the 2 x adjustable clamps on the exible
pipe (4) using the slot end of the combination
screwdriver (32) by turning the screw on the
clamp in an anti-clockwise direction until they
are loose on each end of the exible pipe (4) (See
Fig. A2)
3) Insert the larger opening end of the exible pipe
(4) over the end of the elbow tube (3) to the end
until it hits the raised ridge on the end of the
elbow tube (3) (See Fig. A3)
4) Secure the adjustable clamp on the exible
pipe (4) using the slot end of the combination
screwdriver (32) by turning the screw on the
clamp in a clockwise direction until it tights. (See
Fig. A4)
5) Before proceeding to add the other tubes for
assembly, the throttle control handle (8) needs to
be assembled onto the upper blow tube (5) rst.
Assembly
A1.
A2.
A3.
A4.
AFTER SALES SUPPORT
(toll free)
51.7cc 2 Stroke Petrol Backpack Blower
MODEL: №. SBV521 • 02/2020 • 13177
15
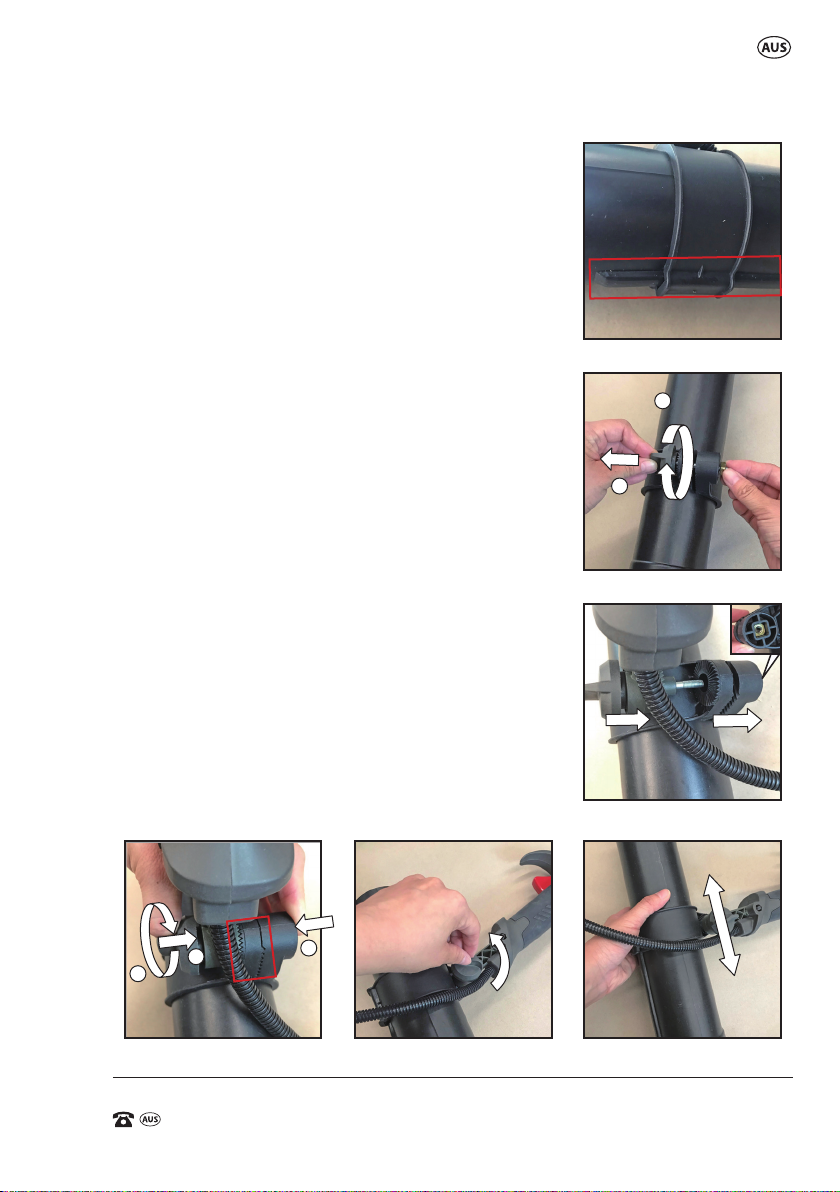
Assembling the throttle control handle (8) to
the upper blow tube (5)
1) Rotate the clamp ring and push it further along
the tube, to ensure the notch on the clamp ring
engages the raised channel on the upper blow tube
(5). (See Fig. B1)
2) Loosen the lock knob (26) for xing throttle handle
by turning it in an anti-clockwise direction. Then
remove the lock knob (26) from the lock nut for
xing throttle handle (28). Be careful not to lose the
lock nut (28). (See Fig. B2)
3) Keep the lock nut (28) in its original hole in the
clamp gear (27) on the clamp ring. Align and insert
the lock knob for xing throttle handle (26) through
the raised cylinder at the bottom of the throttle
control handle (8), and the 2 clamp gear(s) on clamp
ring for xing throttle handle (27). (See Fig. B3)
4) Clamp and make sure the raised cylinder at the
bottom of the throttle control handle (8), and the
2 clamp gear(s) on clamp ring for xing throttle
handle (27) bite each other tightly. Secure the
throttle control handle (8) by turning it in a
clockwise direction until the lock knob (26) tightens
securely. (See Fig. B4)
5) To adjust the position of the throttle control handle
(8), rst loosen but do not remove the lock knob
(26) by turning it in an anti-clockwise direction, then
slide the clamp ring forwards or backwards along
the upper blow tube (5). Tighten the lock knob
(26) to lock the throttle handle (8) in the required
position. (See Fig. B5, B6)
B1.
B2.
B6.B5.B4.
B3.
1
2
1
1
2

51.7cc 2 Stroke Petrol Backpack Blower
AFTER SALES SUPPORT
MODEL: №. SBV521 • 02/2020 • 13177 (toll free)
16
Assembling the upper blow tube (5) to the
exible pipe (4)
1) With the throttle control handle (8) now
secured to the upper blow tube (5), insert the
end of the upper blow tube (5) with raised
ridges on it into the exible pipe (4) to the end,
until the end of the exible pipe (4) hits the
raised ridges of the upper blow tube (5). (See
Fig. C1)
2) Secure the other adjustable clamp on the
exible pipe (4) using the supplied slot end of
the combination screwdriver (32) by turning
the screw on the clamp in a clockwise direction
until tight. (See Fig. C2)
Fixing the throttle cable (13)
1) Find the xing clip for the throttle cable (14)
hooked onto the exible pipe (4). (See Fig. D1)
2) Fit the throttle cable (13) into the xing clip
(14). (See Fig. D2)
Assembling the Middle & Lower Blow Tubes
(6/7)
1) To attach the middle blow tube (6), rstly
loosen the assembly screw by turning it in an
anti-clockwise direction using the supplied
philips end of the combination screwdriver
(32) until the screw end is sitting ush on the
internal side of the middle blow tube (6). (See
Fig. E1)
2) Align the 2 raised locking pins on each side of
the end of the upper blow tube (5) with the 2
channels on the middle blow tube (6). Push the
tubes together, insert the middle blow tube (6)
to the end until it cannot be pushed anymore.
Rotate the middle blow tube (6) clockwise to
the end (about 90 degrees). You will feel the
tubes engage if done correctly. (See Fig. E2) D2.
D1.
C2.
C1.

AFTER SALES SUPPORT
(toll free)
51.7cc 2 Stroke Petrol Backpack Blower
MODEL: №. SBV521 • 02/2020 • 13177
17
3) Tighten the assembly screw using the supplied philips end of the
combination screwdriver (32) in a clockwise direction until tight. (See Fig.
E3)
4) To attach the lower blow tube (7), rstly loosen the assembly screw by
turning it in an anti-clockwise direction using the supplied philips end of
the combination screwdriver (32) until the screw end is sitting ush on
the internal side of the lower blow tube (7). (See Fig. E4)
5) Align the 2 raised locking pins on each side of the end of the middle
blow tube (6) with the 2 channels on the lower blow tube (7). Push the
tubes together, insert the lower blow tube (7) to the end until it cannot
be pushed anymore. Rotate the lower blow tube (7) clockwise to the end
(about 90 degrees). You will feel the tubes engage if done correctly. (See
Fig. E5)
6) Tighten the assembly screw using the supplied philips end of the
combination screwdriver (32) in a clockwise direction until tight. (See Fig.
E6)
E1. E2. E3.
E4. E5. E6.
1
2
1
2
51.7cc 2 Stroke Petrol Backpack Blower
AFTER SALES SUPPORT
MODEL: №. SBV521 • 02/2020 • 13177 (toll free)
18
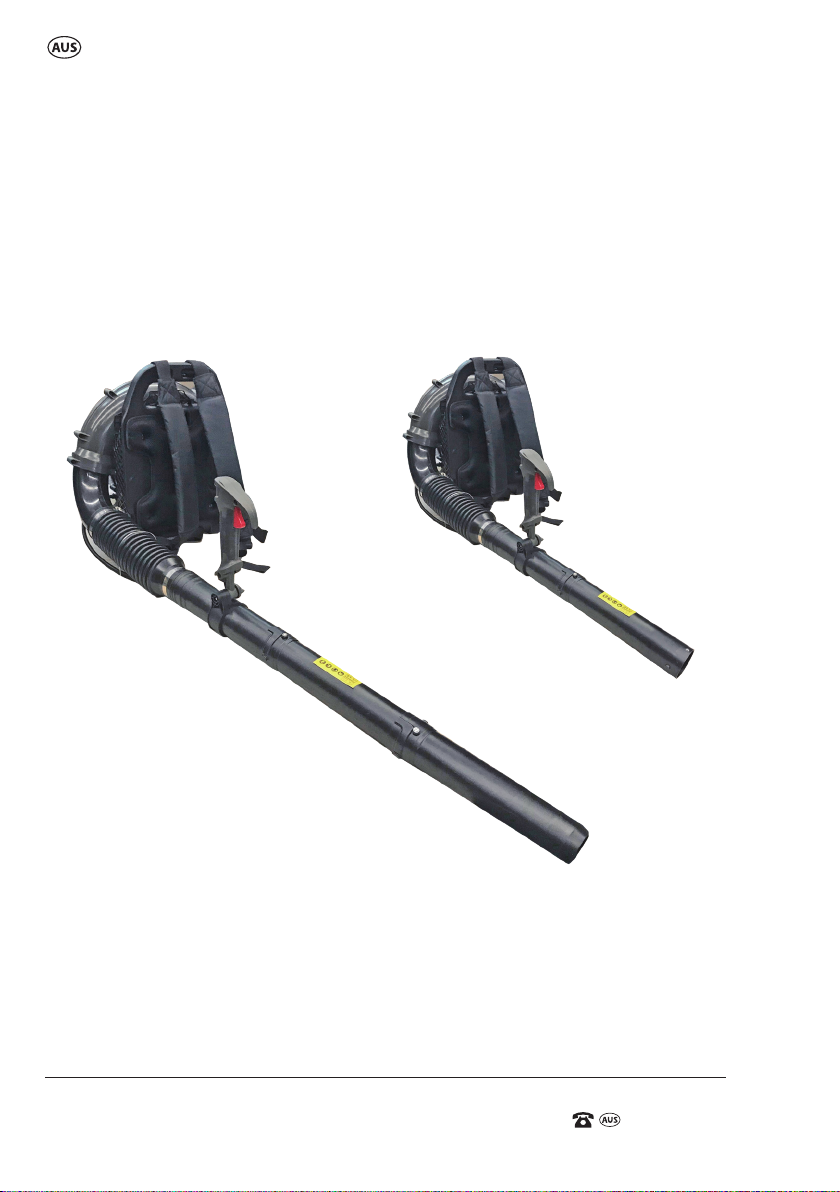
Alternative variation of the blow tube assembly
The previous assembly details using all 3 tubes on the Petrol Backpack
Blower (See Fig. F1).
If your task does not require the blow tube assembly to be this long, the
below variation can also be used:
1) Assemble only the upper (5) and middle (6) blow tubes, and no need to
assemble the lower blow tube (7) (See Fig. F2).
F2.F1.
Table of contents
Other FERREX Blower manuals


