FESLEY FST400M User manual

INSTRUCTION
MANUAL
Electric Guitar
To connect directly with our Support team
FST400M
TO LEAD A NEW COOL
Attach strings to the bridge of your guitar. Locate the proper string to replace your old string. Then, from the end of
the string that does NOT have a ball at the end, feed the string through the bridge via the open hole. The string
should be pulled through until the ball is secure at the bottom of the bridge.
Secure the string to the headstock end of your guitar via the tuning machine. To do so, make sure the eye/hole of the
tuning machine is parallel to the neck/headstock of the guitar. Feed the string through the eve of the tuning machine,
and pull the string fairly taut. The string should have a bit of slack (about 1-2 inches).
Secure the string to the tuning machine by winding the part of the string that has come out through the tuning
machine back underneath the part of the string that is running between the bridge and the tuning machine, Then,
pull the string back up and over the string running through the tuning machine (see diagram). The string should now
be secure.the guitar string needs to be restrung again. Remember it is easy to cut more off later, but impossible to
add string back.
Begin to tune the string, winding the tuning peg until the desired sound is produced. After hearing the desired tune,
pull the string lightly. The string will go slightly out of tune. Readjust the tuning peg until receiving the desired tune
again. Repeat the process a few more times. This will ensure that your string will stay in tune while playing.
You may cut off the excess string, but it is important to leave some excess still attached (about ¼-1inch) in case the
guitar string needs to be restrung again. Remember it is easy to cut more off later, but impossible to add string
1-877-748-4799
www.fesleymusic.com

Thank you for purchasing the Fesley Guitar. In order to get the best
performance and enjoy more fun with the Fesley guitar, it is strongly
recommended that you read this instruction before using it.
Please store this instruction in a safe place for future reference.
FST400M ELECTRIC GUITAR x1
PARTS
Attach strings to the bridge of your guitar. Locate the proper string to replace your old string. Then, from the end of
the string that does NOT have a ball at the end, feed the string through the bridge via the open hole. The string
should be pulled through until the ball is secure at the bottom of the bridge.
Secure the string to the headstock end of your guitar via the tuning machine. To do so, make sure the eye/hole of the
tuning machine is parallel to the neck/headstock of the guitar. Feed the string through the eve of the tuning machine,
and pull the string fairly taut. The string should have a bit of slack (about 1-2 inches).
Secure the string to the tuning machine by winding the part of the string that has come out through the tuning
machine back underneath the part of the string that is running between the bridge and the tuning machine, Then,
pull the string back up and over the string running through the tuning machine (see diagram). The string should now
be secure.the guitar string needs to be restrung again. Remember it is easy to cut more off later, but impossible to
add string back.
CARRYING CASE x1 TREMOLO ARM x1
ALLEN KEY x1
Begin to tune the string, winding the tuning peg until the desired sound is produced. After hearing the desired tune,
pull the string lightly. The string will go slightly out of tune. Readjust the tuning peg until receiving the desired tune
again. Repeat the process a few more times. This will ensure that your string will stay in tune while playing.
You may cut off the excess string, but it is important to leave some excess still attached (about ¼-1inch) in case the
guitar string needs to be restrung again. Remember it is easy to cut more off later, but impossible to add string
CLEANING CLOTH TUNER1/4” CABLE
STRAP GUITAR PICK

GUITAR STRING MAINTENANCE
CHANGING STRINGS
If strings are difficult to play or do not play correctly:
Removing Old Strings:
Installing New Strings:
Replacing guitar strings can remedy many problems involving poor sound. All strings can be changed at once or
strings can be changed individually. To change a guitar string, the old string should be removed entirely before
attaching the new string. After the new string is attached, the guitar must be re-tuned.
Remove a guitar string, first, find the tuning machine and tuning peg that the string is attached to. Loosen the string
by winding the tuning peg until the string has no tension.
Continue to wind the string loose until the string can be pulled loose from the top. The strings can be pulled out via
the bridge at the bottom of the guitar.
If you do not wish to use the old string again. you can cut the string near the middle of the strings via wire cutters. If
you choose to do this, be careful and hold the string securely next to the cut; otherwise, the string may pop up and
can potentially harm you.
Attach strings to the bridge of your guitar. Locate the proper string to replace your old string. Then, from the end of
the string that does NOT have a ball at the end, feed the string through the bridge via the open hole. The string
should be pulled through until the ball is secure at the bottom of the bridge.
Secure the string to the headstock end of your guitar via the tuning machine. To do so, make sure the eye/hole of the
tuning machine is parallel to the neck/headstock of the guitar. Feed the string through the eve of the tuning machine,
and pull the string fairly taut. The string should have a bit of slack (about 1-2 inches).
Secure the string to the tuning machine by winding the part of the string that has come out through the tuning
machine back underneath the part of the string that is running between the bridge and the tuning machine, Then,
pull the string back up and over the string running through the tuning machine (see diagram). The string should now
be secure.the guitar string needs to be restrung again. Remember it is easy to cut more off later, but impossible to
add string back.
Begin to tune the string, winding the tuning peg until the desired sound is produced. After hearing the desired tune,
pull the string lightly. The string will go slightly out of tune. Readjust the tuning peg until receiving the desired tune
again. Repeat the process a few more times. This will ensure that your string will stay in tune while playing.
You may cut off the excess string, but it is important to leave some excess still attached (about ¼-1inch) in case the
guitar string needs to be restrung again. Remember it is easy to cut more off later, but impossible to add string

Adjusting String Action:
If you feel that you have difficulty fretting or hear a buzzing noise, the strings may be set too high or too low. In this
case, the action (the space between the strings and the fretboard) will have to be adjusted. Adjusting the action will
let you achieve the desired string level. This can easily be remedied by lowering or raising the string saddles located
on the bridge. The saddles are the parts in front of the bridge where the strings sit. You can raise or lower the saddle
by turning the hex screws on the saddle with a hex wrench. Turn the screw clockwise to raise the saddle and
counterclockwise to lower it. If the saddle has two hex screws, be sure to turn them the same amount.
Adjusting String intonation:
Adjusting Truss Rod:
If you notice that your strings are fretting sharp or fretting flat, or that your guitar is in tune near the bottom of the
guitar but loses tune the further up the frets you go, you may need to adjust the intonation. First, determine if all
strings are having the issue or a particular string. You can adjust the intonation of a string by moving the saddle away
from the nut if the string is fretting sharp. and toward the nut if the string is fretting flat. Don't forget that adjusting
the saddle for a string only corrects that string. You may need to adjust the intonation for each string. Check the
strings as you adjust the intonation to keep the guitar in tune.
The neck of your guitar can go out of adjustment, or you may want to readjust the neck to get a different sound. The
neck on every guitar will eventually need to be readjusted -this is normal guitar maintenance. Inside the neck of the
guitar is a "backbone" of the guitar: a truss rod. This rod helps keep your neck adjusted. If your strings are creating
too high a sound and are hard to fret or create low, buzzing noise, these can signal the guitar neck needs adjustment.
If the sound is too high and the strings are hard to fret, the truss should be tightened. If the sound is low or "buzzy",
it should be loosened.
Attach strings to the bridge of your guitar. Locate the proper string to replace your old string. Then, from the end of
the string that does NOT have a ball at the end, feed the string through the bridge via the open hole. The string
should be pulled through until the ball is secure at the bottom of the bridge.
Secure the string to the headstock end of your guitar via the tuning machine. To do so, make sure the eye/hole of the
tuning machine is parallel to the neck/headstock of the guitar. Feed the string through the eve of the tuning machine,
and pull the string fairly taut. The string should have a bit of slack (about 1-2 inches).
Secure the string to the tuning machine by winding the part of the string that has come out through the tuning
machine back underneath the part of the string that is running between the bridge and the tuning machine, Then,
pull the string back up and over the string running through the tuning machine (see diagram). The string should now
be secure.the guitar string needs to be restrung again. Remember it is easy to cut more off later, but impossible to
add string back.
You can adjust the truss rod with a nut located on one end. It should be located on the headstock, under a cap just
behind the nut, or where the neck joins the body under the fingerboard. You may need a truss-rod wrench to adjust
Begin to tune the string, winding the tuning peg until the desired sound is produced. After hearing the desired tune,
pull the string lightly. The string will go slightly out of tune. Readjust the tuning peg until receiving the desired tune
again. Repeat the process a few more times. This will ensure that your string will stay in tune while playing.
You may cut off the excess string, but it is important to leave some excess still attached (about ¼-1inch) in case the
guitar string needs to be restrung again. Remember it is easy to cut more off later, but impossible to add string
it, which can be purchased at any local music store. To tighten the truss rod, turn the nut clockwise a quarter-tun at a
time, giving the neck a few minutes to adjust. To loosen the truss rod, turn counterclockwise a quarter turn at a time,
giving the neck a few minutes to adjust. Remember that over-tightening or over-loosening a truss rod can potentially
damage the neck and body, so please do so with care!
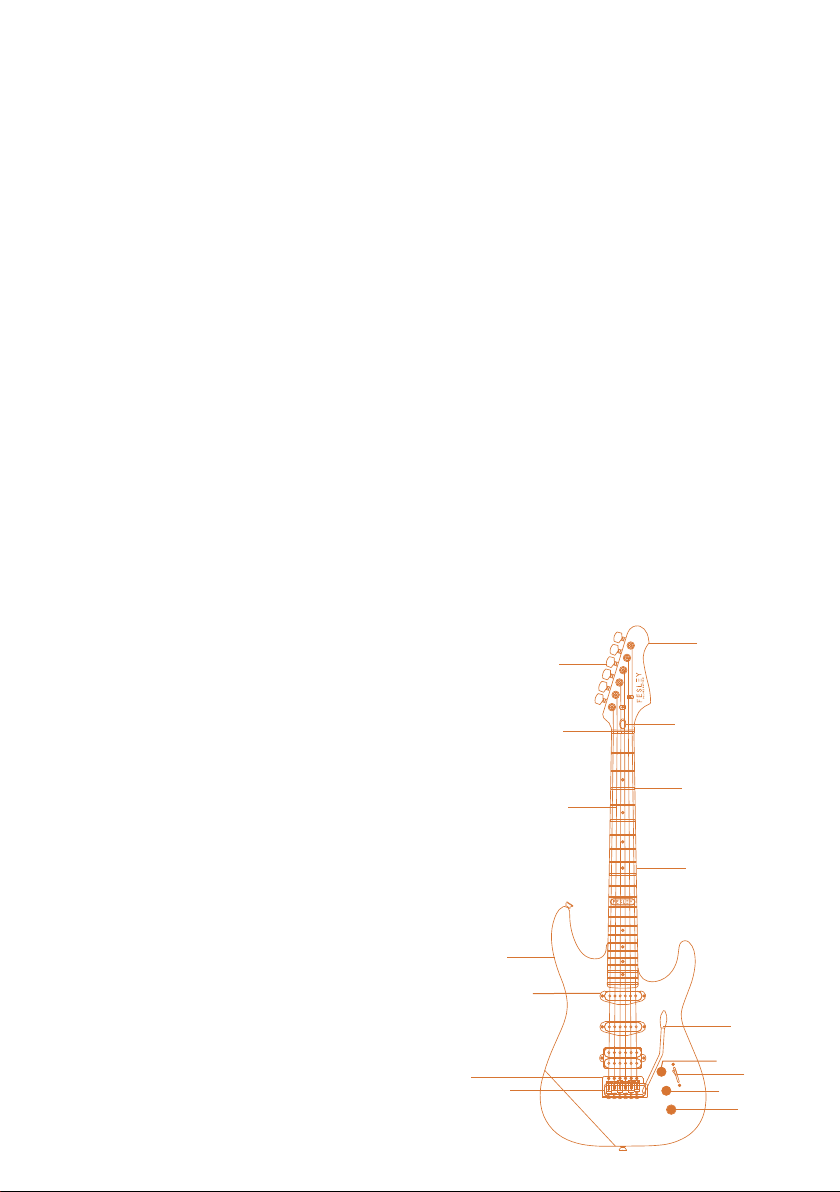
GUITAR ANATOMY
If there are any electrical components on your guitar that you think need to be fixed, please be aware that we
recommend taking your guitar to your local music store to fix it. Beginner musicians and people unfamiliar with
repairing the electrical parts of a guitar should not attempt to do so, especially without supervision.
GUITAR HARDWARE & CARE
Attach strings to the bridge of your guitar. Locate the proper string to replace your old string. Then, from the end of
the string that does NOT have a ball at the end, feed the string through the bridge via the open hole. The string
should be pulled through until the ball is secure at the bottom of the bridge.
Secure the string to the headstock end of your guitar via the tuning machine. To do so, make sure the eye/hole of the
tuning machine is parallel to the neck/headstock of the guitar. Feed the string through the eve of the tuning machine,
and pull the string fairly taut. The string should have a bit of slack (about 1-2 inches).
Secure the string to the tuning machine by winding the part of the string that has come out through the tuning
machine back underneath the part of the string that is running between the bridge and the tuning machine, Then,
pull the string back up and over the string running through the tuning machine (see diagram). The string should now
be secure.the guitar string needs to be restrung again. Remember it is easy to cut more off later, but impossible to
add string back.
1. Tuning Machine
2. Truss Rod (behind the head)
3. String
4. Saddle
5. Bridge
6. Headstock/Head
7. Fret
8. Neck
9. Body
10. Nut
11. Pickup
12. Tremolo Arm
13. Pickup 5-Way Selector Switch
14. Volume Knob
15. Tone Knob
16. Tone Knob
You can adjust the truss rod with a nut located on one end. It should be located on the headstock, under a cap just
behind the nut, or where the neck joins the body under the fingerboard. You may need a truss-rod wrench to adjust
Begin to tune the string, winding the tuning peg until the desired sound is produced. After hearing the desired tune,
pull the string lightly. The string will go slightly out of tune. Readjust the tuning peg until receiving the desired tune
again. Repeat the process a few more times. This will ensure that your string will stay in tune while playing.
You may cut off the excess string, but it is important to leave some excess still attached (about ¼-1inch) in case the
guitar string needs to be restrung again. Remember it is easy to cut more off later, but impossible to add string
it, which can be purchased at any local music store. To tighten the truss rod, turn the nut clockwise a quarter-tun at a
time, giving the neck a few minutes to adjust. To loosen the truss rod, turn counterclockwise a quarter turn at a time,
giving the neck a few minutes to adjust. Remember that over-tightening or over-loosening a truss rod can potentially
damage the neck and body, so please do so with care!
Dust and other foreign matter can harm the quality of your electric guitar. Make sure to regularly clean and maintain
your guitar, including around the tuning pegs and bridge. Do not leave your guitar exposed to the elements, and be
aware that guitars are sensitive to changes in temperature, humidity, and altitude.
If you hear any rattling or buzzing noises while playing, some hardware may be loose. You can tighten any hardware
with the appropriate tool. It could be possible that a nut on the bridge post may be loose. If you hear a rattling noise,
try strumming the guitar with one hand to re-create the noise while touching various parts with your other hand. The
rattling should stop once you touch the affected part, and then you can tighten the part that is loose.
6
1
2
10
7
8
9
11
12
13
14
15
16
4
5
3

Attach strings to the bridge of your guitar. Locate the proper string to replace your old string. Then, from the end of
the string that does NOT have a ball at the end, feed the string through the bridge via the open hole. The string
should be pulled through until the ball is secure at the bottom of the bridge.
Secure the string to the headstock end of your guitar via the tuning machine. To do so, make sure the eye/hole of the
tuning machine is parallel to the neck/headstock of the guitar. Feed the string through the eve of the tuning machine,
and pull the string fairly taut. The string should have a bit of slack (about 1-2 inches).
Secure the string to the tuning machine by winding the part of the string that has come out through the tuning
machine back underneath the part of the string that is running between the bridge and the tuning machine, Then,
pull the string back up and over the string running through the tuning machine (see diagram). The string should now
be secure.the guitar string needs to be restrung again. Remember it is easy to cut more off later, but impossible to
add string back.
Begin to tune the string, winding the tuning peg until the desired sound is produced. After hearing the desired tune,
pull the string lightly. The string will go slightly out of tune. Readjust the tuning peg until receiving the desired tune
again. Repeat the process a few more times. This will ensure that your string will stay in tune while playing.
You may cut off the excess string, but it is important to leave some excess still attached (about ¼-1inch) in case the
guitar string needs to be restrung again. Remember it is easy to cut more off later, but impossible to add string
CAUTION
IMPORTANT
PRODUCT WARRANTY INFORMATION
Repairs to the electrical components of the guitar should be done by a professional.
If replacing the fuse or conducting any repairs, unplug the amplifier from the electricity or electric mains before
replacing the fuse or conducting repairs.
The fixed bolt should not be over 4 mm (Diameter)x 30 mm (Length) to prevent the fixed bolt from touching the
switch and fuse holder.
To avoid the risk of electrical shock, do not expose to water or humidity.
Always connect the instrument cord to the guitar before connecting the cord to the amplifier to avoid damage to the
speaker.
Do not leave the guitar unattended with the volume level turned up.
Neon or fluorescent lighting near the amplifier may cause a hum from the amplifier.
All items can be returned for any reason within 30 days of the receipt and will receive a full refund as long as the item
is returned in its original product packaging and all accessories from its original shipment are included. All returned
items will receive a full refund back to the original payment method. All returned items will not be charged a
re-stocking fee.
Pictures may be required for some returns to ensure an item is not damaged prior to its return. Items returned are
not considered undamaged until they are received by Fesley and verified as such. All damages to items are the
customer’s responsibility until the item has been received by and acknowledged by Fesley as undamaged.


To connect directly with our Support team
1-877-748-4799
Manufacturer and seller expressly disclaim any and all liability for personal
injury, property damage, or loss, whether direct, indirect, or incidental, resulting
from the incorrect attachment, improper use, inadequate maintenance, or
neglect of this product.
WARNING
www.fesleymusic.com
Table of contents
Other FESLEY Musical Instrument manuals


