Fifine H9 User manual
Fifine H9
User Manual • Uživatelský manuál •
Užívateľský manuál • Használati utasítás •
Benutzerhandbuch

2
English
3 –22
Čeština
23 –42
Slovenčina
43 –62
Magyar
63 –82
Deutsch
83 –102

3
Dear customer,
Thank you for purchasing our product. Please read the following instructions carefully
before first use and keep this user manual for future reference. Pay particular attention
to the safety instructions. If you have any questions or comments about the device,
please contact the customer line.
www.alza.co.uk/kontakt
✆+44 (0)203 514 4411
Importer Alza.cz a.s., Jankovcova 1522/53, Holešovice, 170 00 Praha 7, www.alza.cz
4
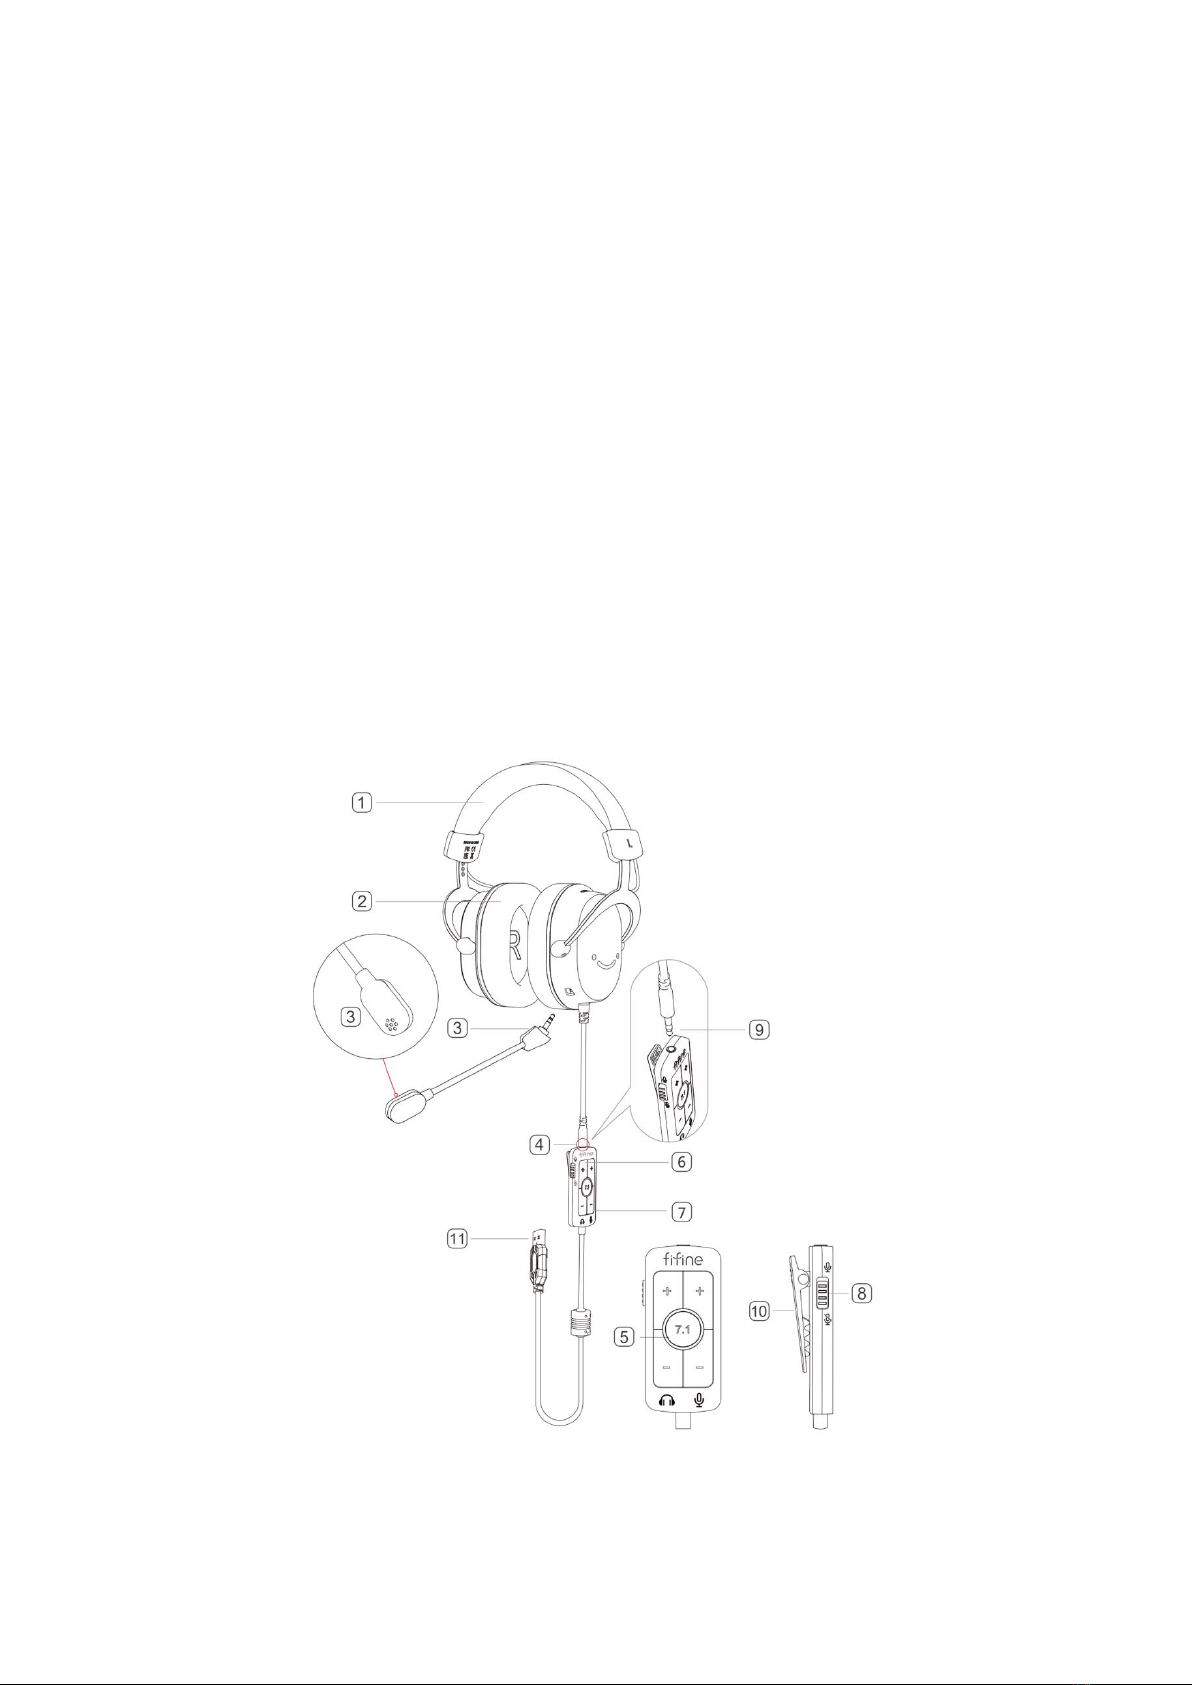
Product Description
1. The headband is made of soft and comfortable materials.
2. The earmuffs have cooling ear pads.
3. The detachable omni-directional microphone has a gooseneck design that can be adjusted
and detached.
4. The in-line control includes a switch for the 7.1 surround sound mode, buttons to adjust the
headset volume (+/-), a button to turn the microphone on/off, and buttons to adjust the
microphone volume (+/-).
5. The 7.1 surround sound mode switch can be turned on/off by pressing the button with an
LED light indicator. When the light is on, the mode is on, and when the light is off, the mode is
off. Turning on the mode enhances the sense of presence.
6. The headset volume +/- button is used to adjust the volume of the headset.
7. The microphone volume +/- button is used to adjust the volume of the microphone.
8. The microphone on/off button is used to mute/unmute the microphone.
9. The 3.5mm interface is used to connect the headset with your computer, phone, mixer, and
the included USB in-line control.
10. The clip that can be attached to your clothing.
11. The USB interface is used to connect the headset with your computer, game console, or Xbox.

5
Packaging
1× USB gaming headset
1× Detachable microphone
1x User’s manual
Headphone Features
1. The headset delivers audio performance across high, alto, and low sounds.
2. The earmuffs and headband are designed to be wearproof and comfortable during
extended use.
3. The headband is adjustable, providing a user-friendly design that can accommodate
different head sizes.
4. The headset features a rugged design and convenient folding construction for easy
storage and portability.
5. The in-line control offers four functions in one, including a 7.1 surround sound mode
switch, buttons to adjust the headset volume (+/-), a button to turn the microphone
on/off, and buttons to adjust the microphone volume (+/-).
6. The headset is equipped with a USB device interface, allowing it to be easily
connected to various devices.

6
Guidelines For Usage
Adjusting The Headband
To ensure optimal transmission quality and maximum comfort, adjust the headband to
fit your head properly using the snap-in locking mechanism located on both the left and
right sides. This feature allows you to easily customize the headband size for a secure
and comfortable fit.
Installing and Detaching The Microphone
To detach the microphone from the headset, simply unplug it by pulling it outward. This
will separate the microphone from the headset. When you want to reattach the
microphone, insert it fully into the microphone jack, ensuring a secure connection with
the headset. Remember to double-check that the microphone is inserted completely
into the jack to ensure proper functionality.
7
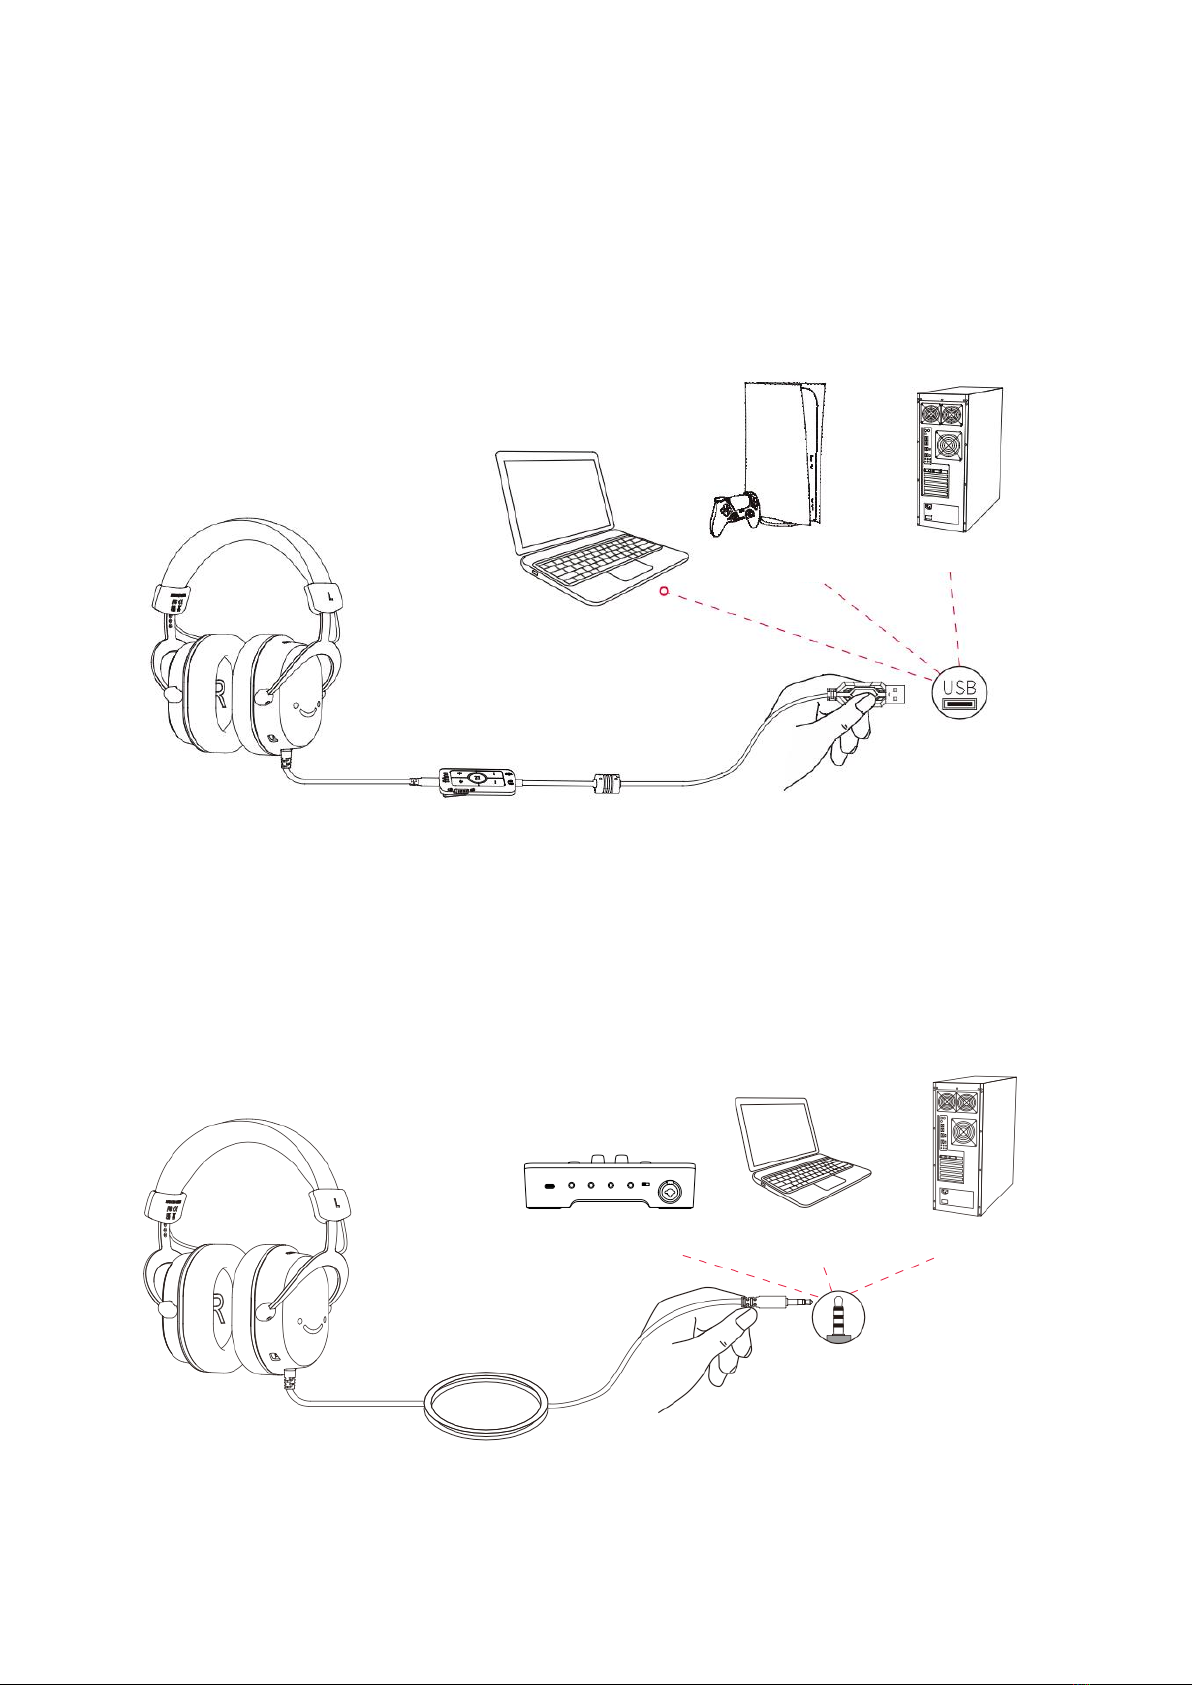
Connection via USB
To establish a connection, ensure that you fully plug the USB connector into your
computer, PS4/5, or Xbox. This will ensure a secure and reliable connection between the
headset and the device.
Connection via 3.5mm Jack
The 3.5mm interface can be plugged into either the sound card or the computer to listen
to the output sound. By connecting the headset to the appropriate port, you will be able
to hear the audio output from your device.
Laptop
PS4/PS5
Desktop
Laptop
Desktop
Sound Card
8
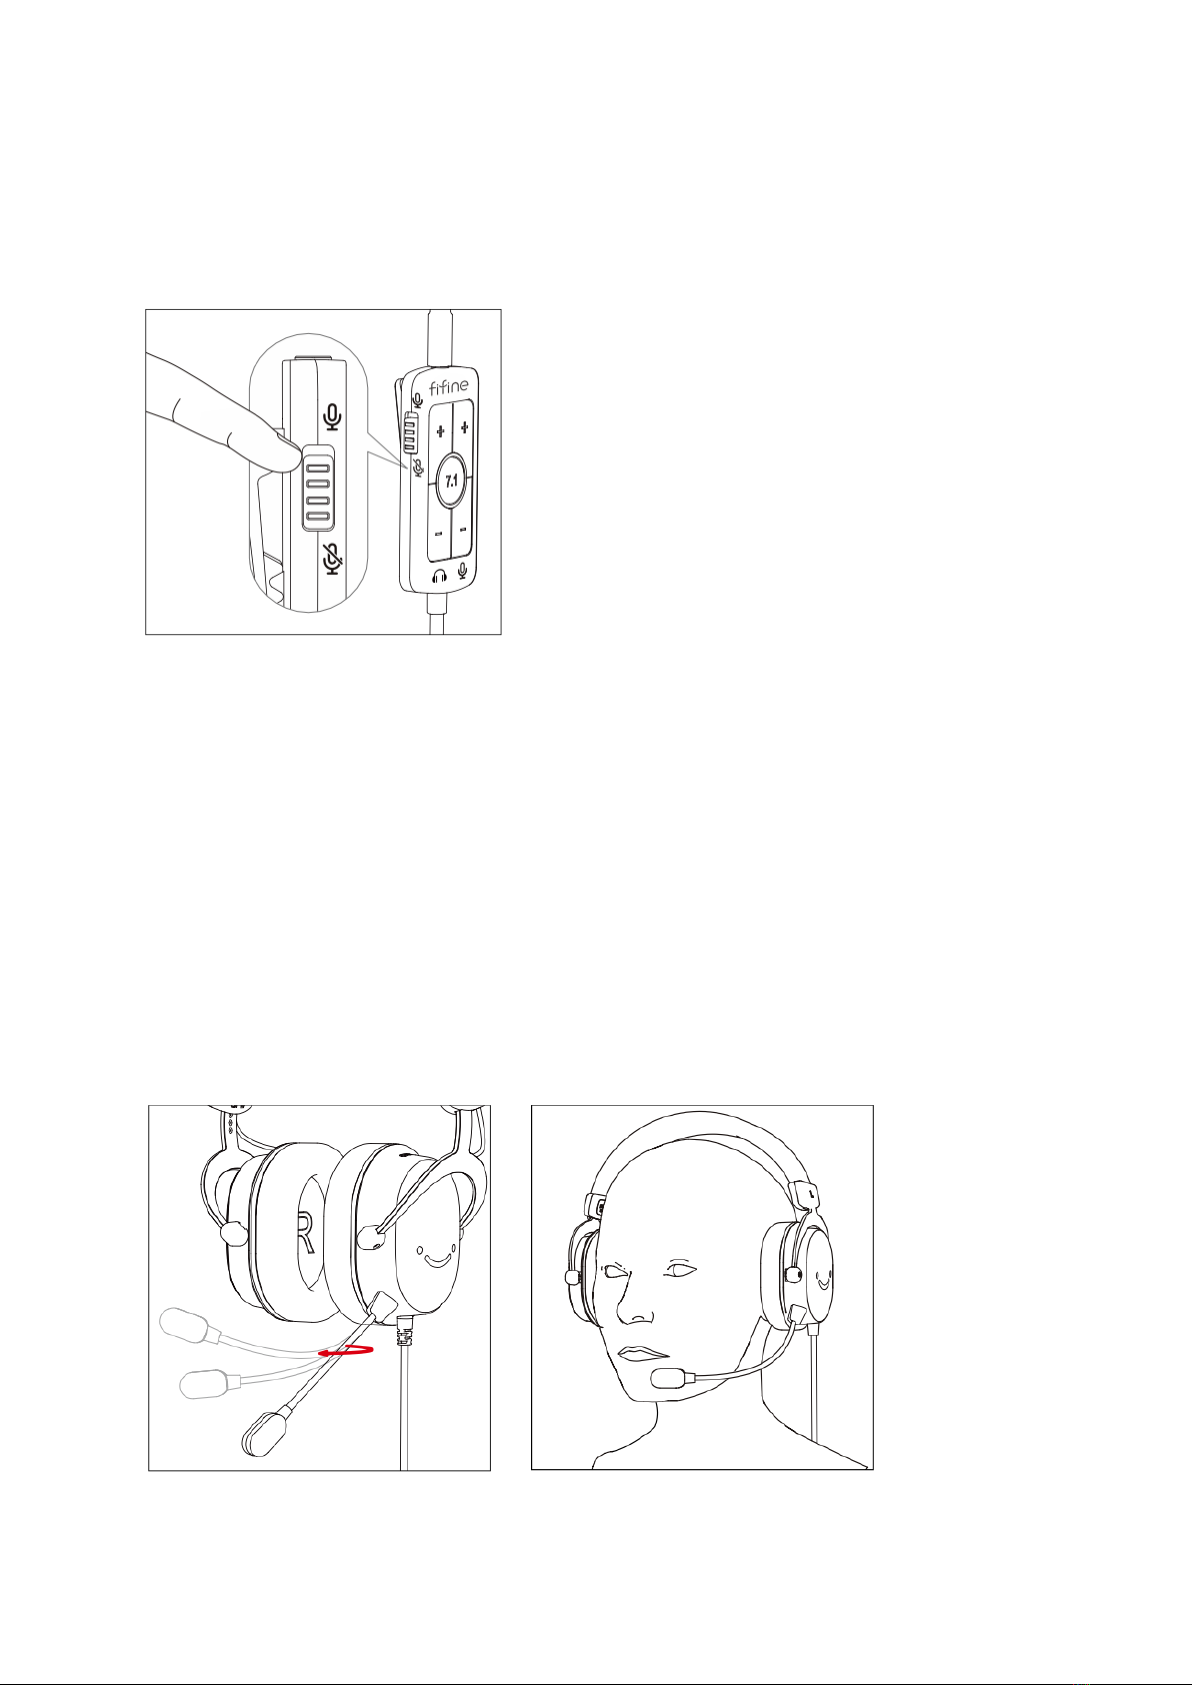
Switching Microphone On and Off
To mute or unmute the microphone, use the microphone on/off switch located on the
side of the in-line control. Simply toggle the switch to turn the microphone on or off,
enabling or disabling its functionality as desired.
Microphone Usage
The gooseneck microphone with an omni-directional pickup pattern provides flexibility
in adjusting both the speaking distance and angle according to your preference. You can
easily modify the position of the microphone to achieve the desired distance and angle.
For optimal performance, it is recommended to position the microphone slightly below
your mouth, ideally at a distance of 2 to 3 centimeters. Additionally, adjusting the
microphone at a 30 to 45-degree angle off-axis from your mouth can help minimize the
pickup of popping sounds.
By following these tips, you can ensure clear and high-quality audio capture while
maintaining comfort during voice communication.

9
In-Line Control Usage
7.1 Surround Sound Switch
To activate or deactivate the 7.1 surround sound mode, simply press the switch that is
accompanied by a light indicator. When the light is illuminated, it signifies that the 7.1
virtual mode is activated. Conversely, when the light is turned off, it indicates that the
virtual 7.1 mode is deactivated. By toggling the switch, you can easily enable or disable
the 7.1 surround sound experience according to your preference.
Headset and Microphone Volume Control
To adjust the volume of the headset or microphone, use the designated buttons. Press
the "+" button to increase the volume and press the "-" button to decrease the volume.
These buttons allow you to conveniently and easily control the volume levels of both the
headset and microphone to achieve the desired audio levels.
Light is turned off - 7.1 surround
sound mode is deactivated
Light is turned on - 7.1 surround
sound mode is activated
10
Connecting To Windows Computer via USB
Headset Settings
1. Connect the USB end of the headset to the USB port on your PC/Laptop. Ensure that
you fully plug it into the correct port. Additionally, make sure that neither the
headset nor the microphone is disabled or muted.
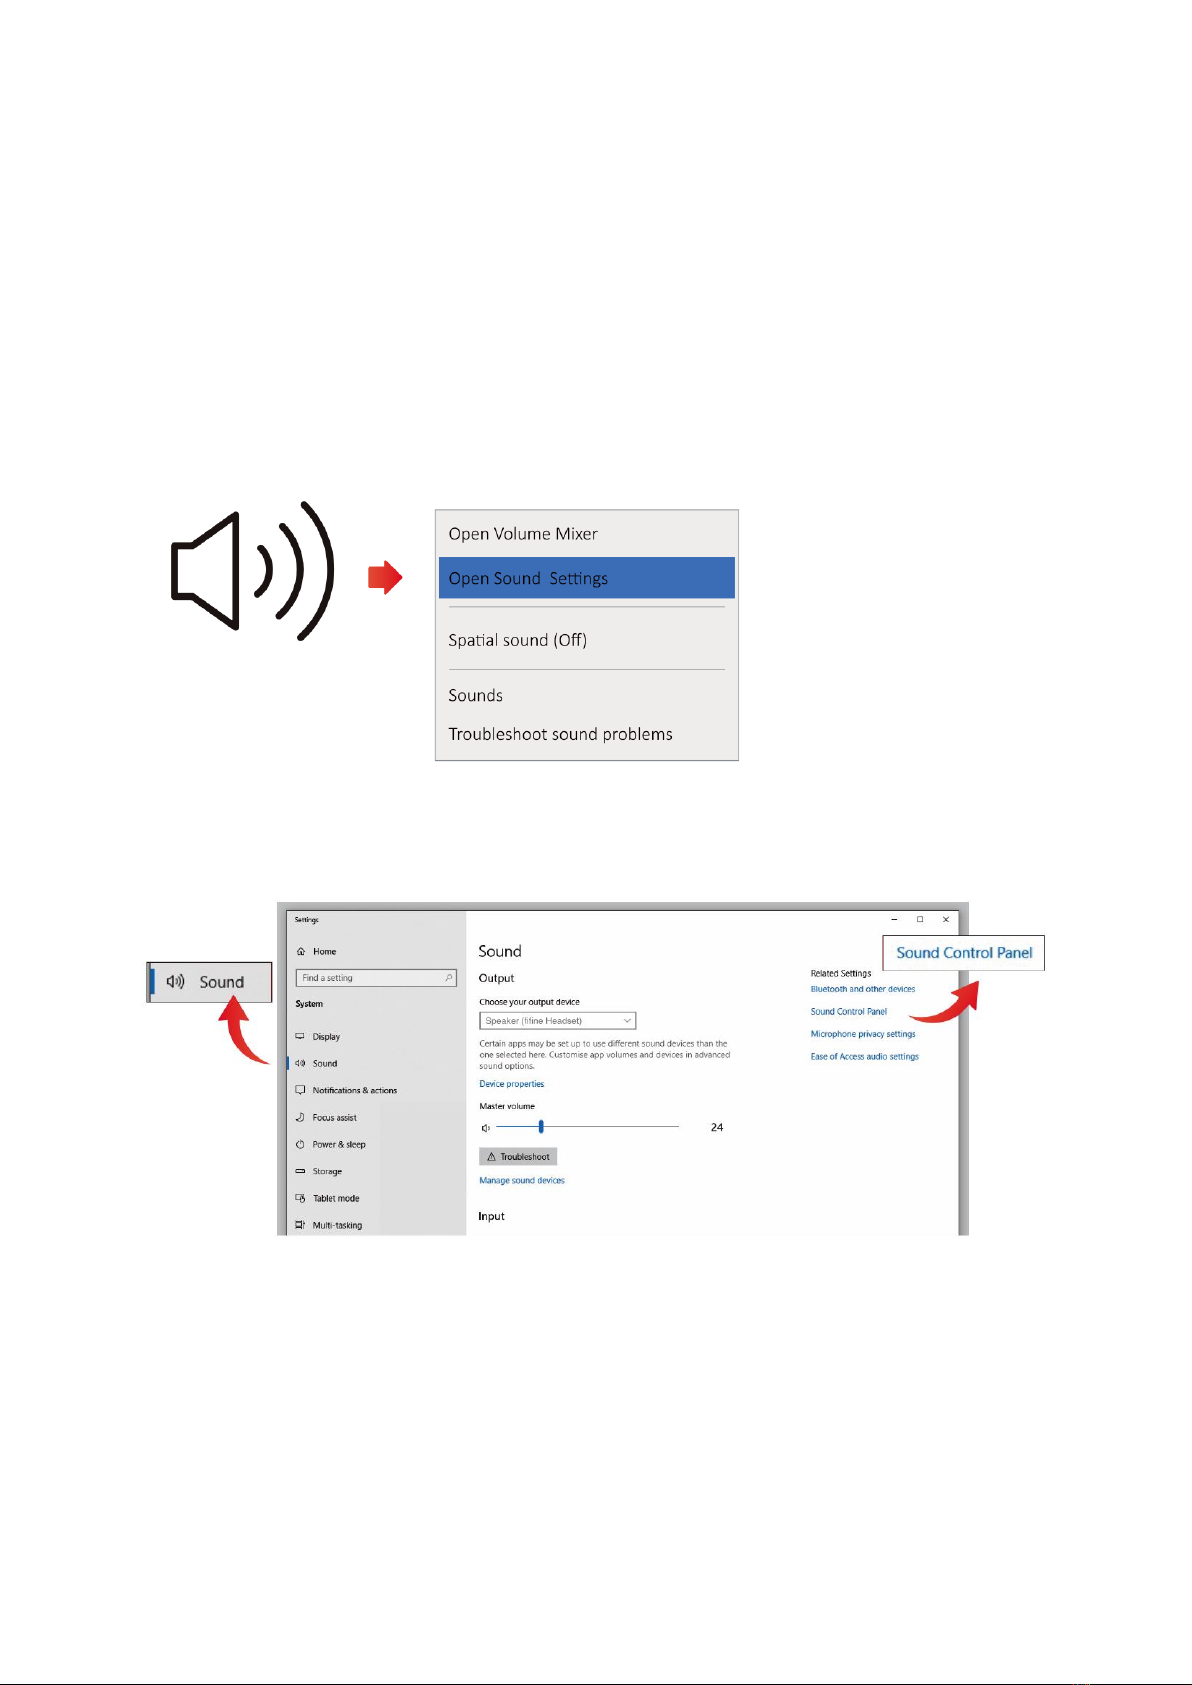
2. Right-click on the speaker icon located at the bottom right corner of your screen.
From the context menu, select "Open Sound Settings."
3. In the Sound Settings window, locate and click on the option labeled "Sound Control
Panel."
11
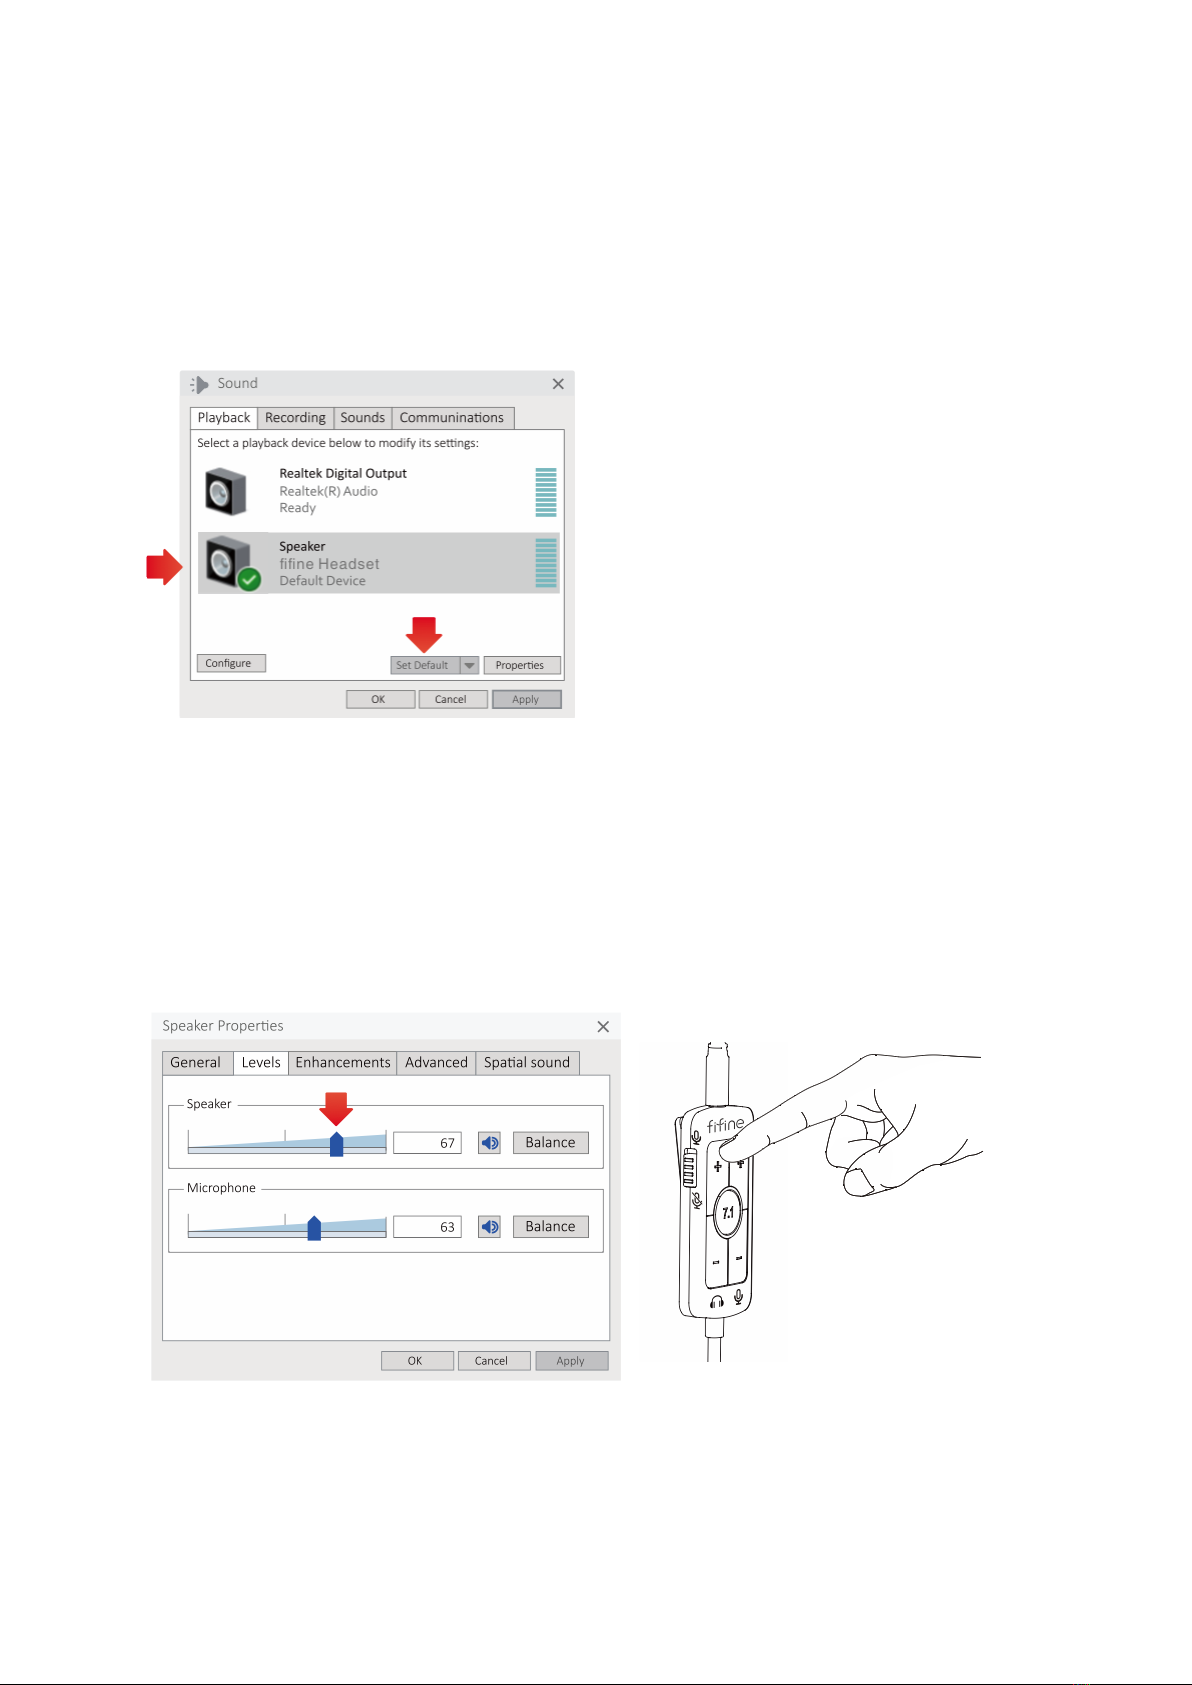
4. In the Sound Control Panel, navigate to the "Playback" tab. Look for the option
labeled "fifine Headset" and select it as the default device for audio playback. When
audio is played back, you should see a bar-type icon turning green and bouncing. If
the icon does not change, please try resetting your computer and reconnecting the
headset to different available USB ports. Additionally, ensure that the audio volume
is turned on.
5. To adjust the headset volume, double-click on the "fifine Headset" option in the
Sound Control Panel. This will open the Speaker Properties window. Within the
Speaker Properties window, navigate to the "Levels" tab. You will see a process bar
that allows you to adjust the headset volume. Drag the process bar up or down to
increase or decrease the headset volume accordingly. Alternatively, you can also
adjust the headset volume by using the volume buttons on the in-line control of the
headset.

12
Microphone Settings
1. Right-click the speaker icon at the bottom right of the screen and select "Open Sound
Settings."
2. In the Sound Settings window, click on the "Sound Control Panel".
13
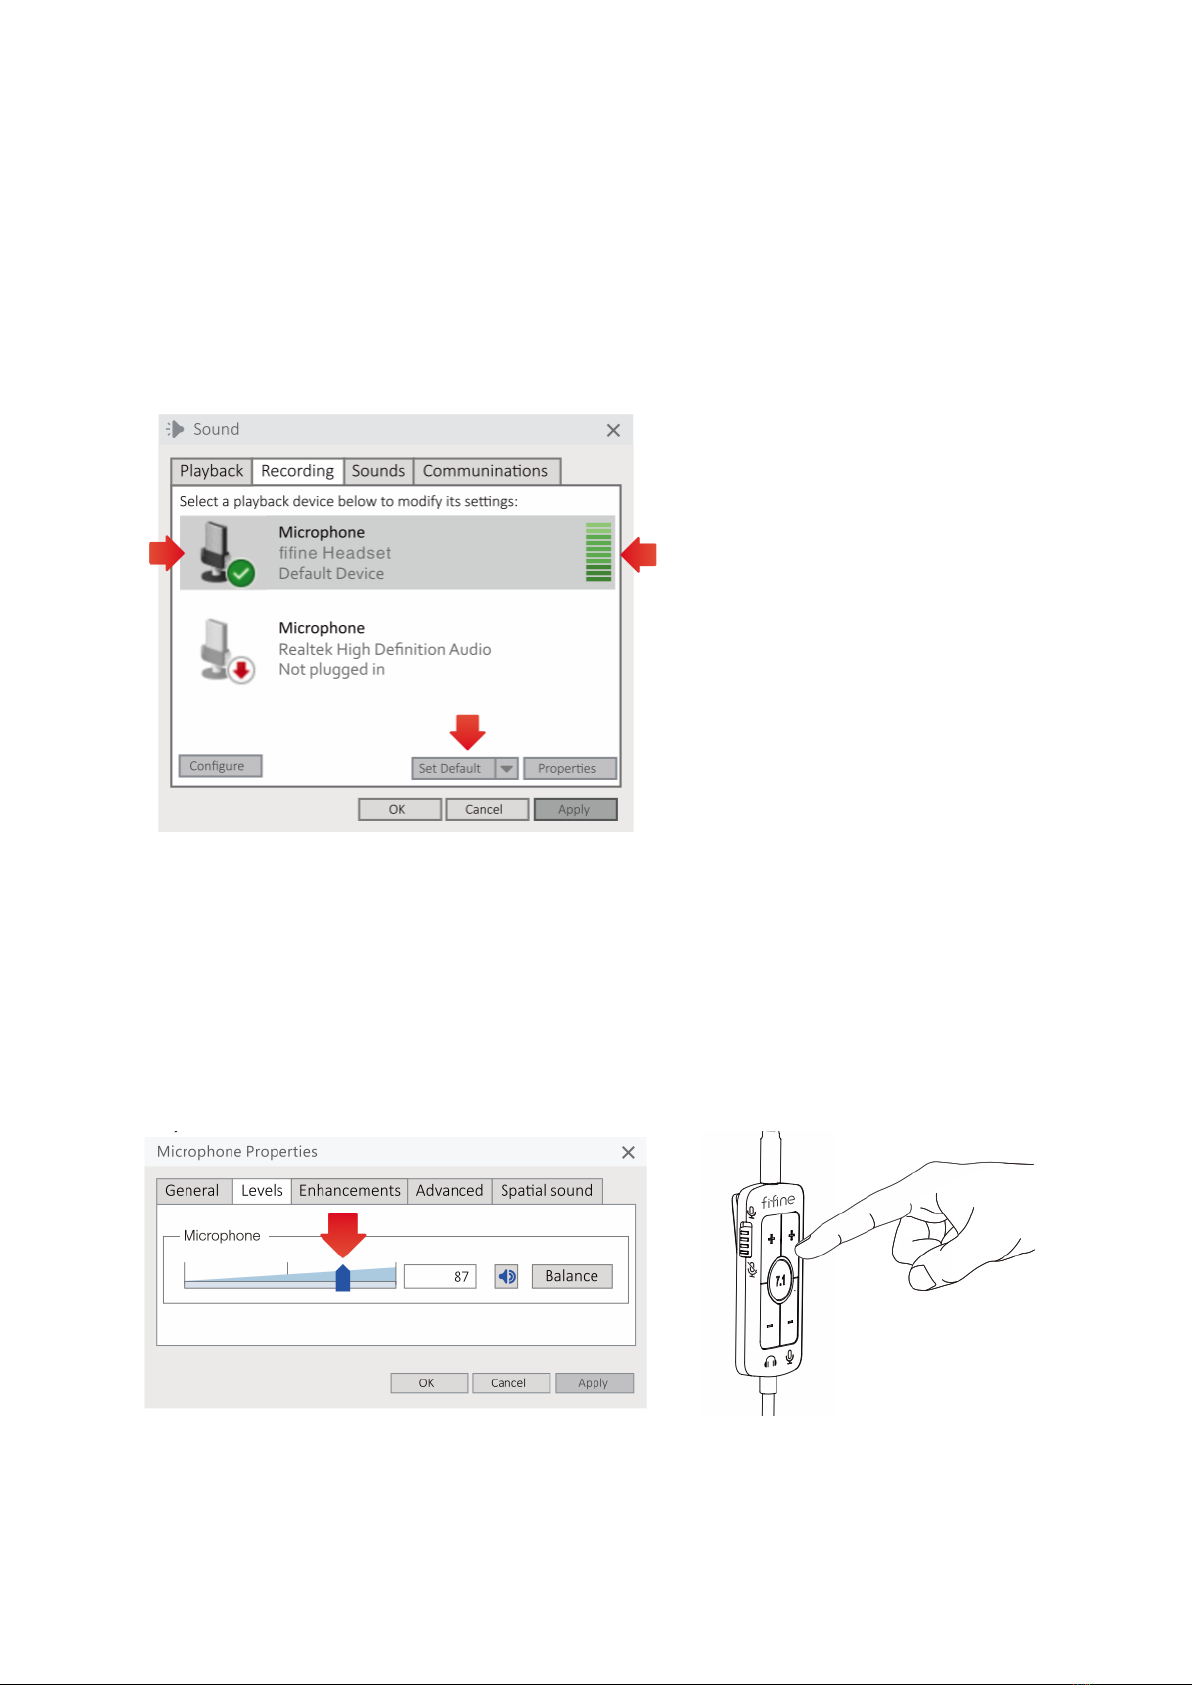
3. To set up the microphone correctly, right-click the speaker icon at the bottom right of
the screen and select "Open Sound Settings." In the Sound Settings window, click on
the "Sound Control Panel" link. Navigate to the "Recording" tab and choose "fifine
Headset" as the default device. When speaking into the microphone, check for a
green and bouncing bar-type icon, indicating proper audio capture. If the icon
remains unchanged, you can try troubleshooting by resetting the computer and
reconnecting the headset to different USB ports, ensuring the microphone is fully
inserted, and verifying the unmute option on the in-line control is switched on.
4. To adjust the microphone volume, double-click on the "fifine Headset" to open the
Microphone Properties window. Within the window, navigate to the "Level" tab and
find the process bar. Drag the process bar to increase or decrease the microphone
level according to your preference. Alternatively, you can adjust the microphone
volume directly using the volume button on the in-line control of the headset. By
following these steps, you can easily adjust the microphone volume either through
the Microphone Properties window or using the in-line control for optimal recording
levels.
14
Connecting To Mac Computer via USB
Headset Settings
1. Connect the USB end of the headset into the appropriate USB port on your
PC/Laptop, ensuring a secure and fully inserted connection. Also, make sure that
neither the headset nor the microphone is disabled or muted.
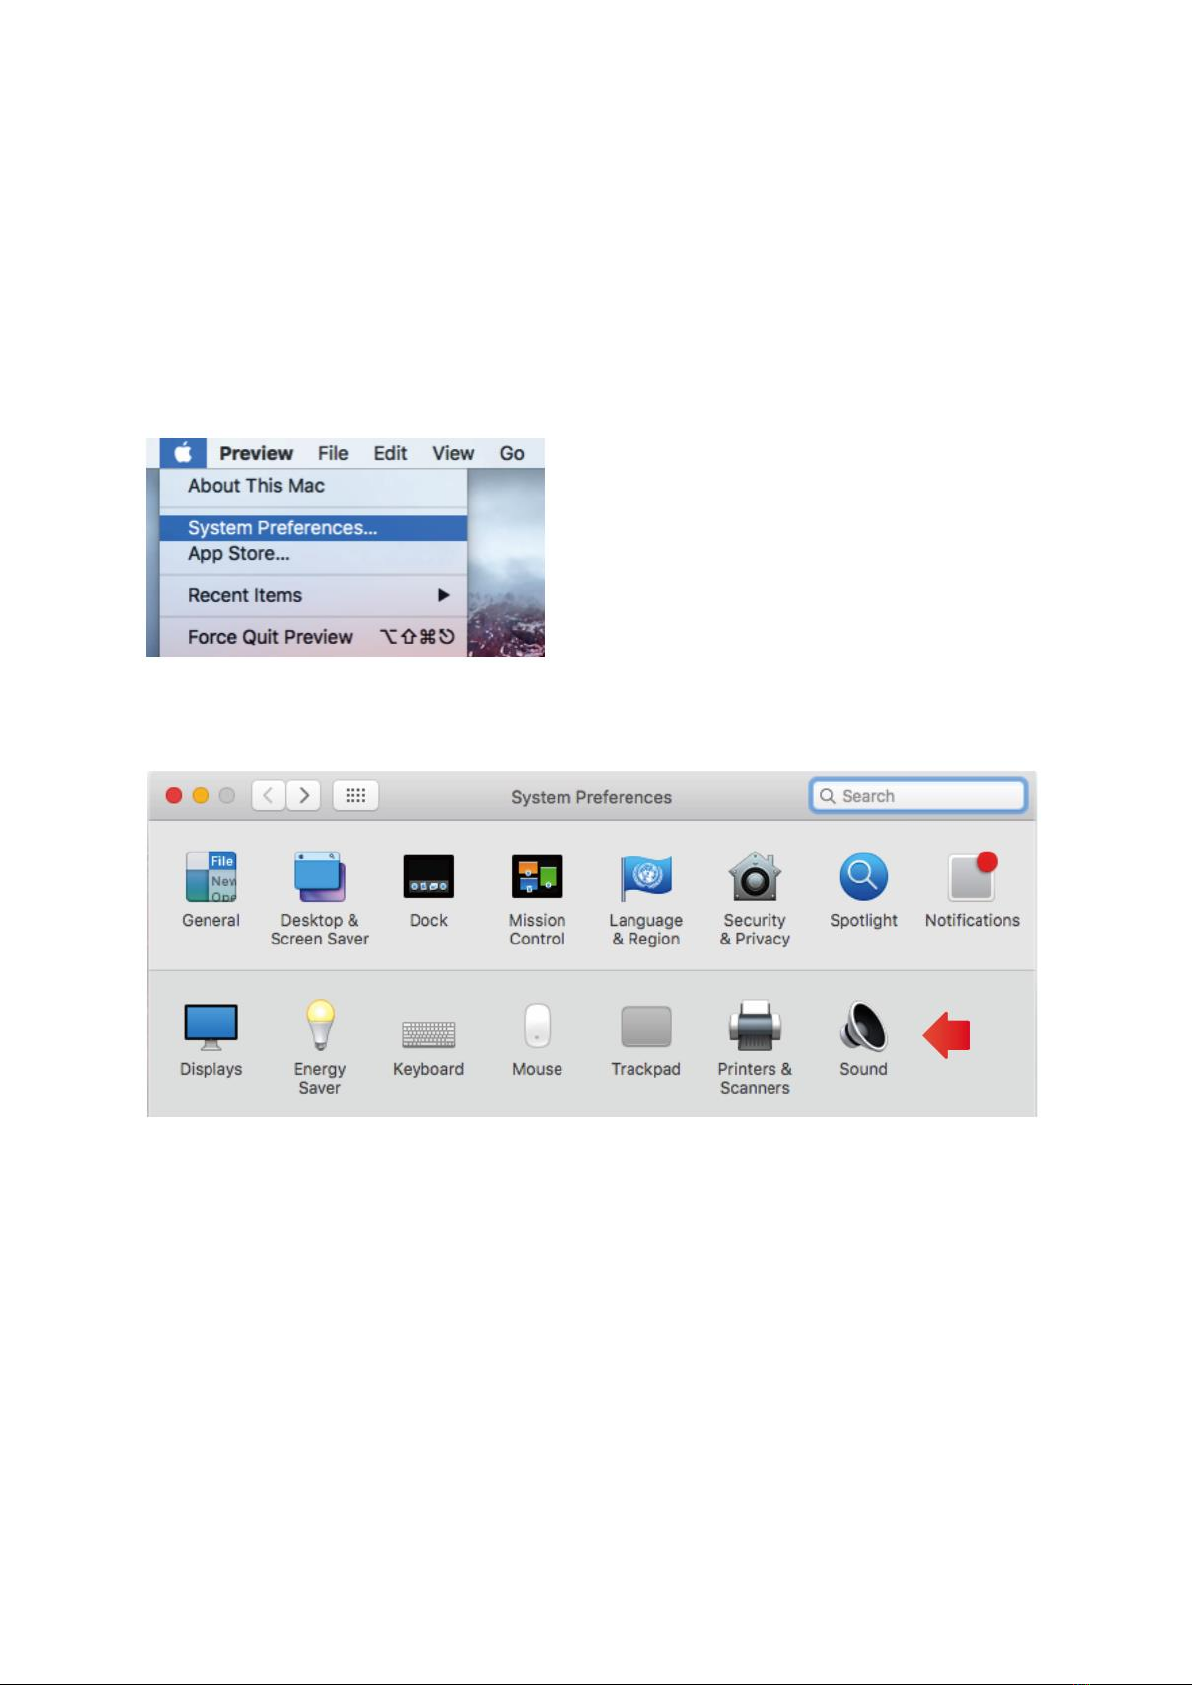
2. On your PC/Laptop, navigate to the System Preferences.
3. Within System Preferences, locate and click on the "Sound" option to open the Sound
preference panel.

15
4. In the Sound preference panel, click on the "Output" tab. Ensure that "fifine Headset"
is selected as the default output device. To adjust the headset volume, you can drag
the progress bar to increase or decrease the volume level according to your
preference. Additionally, you can also use the volume button on the in-line control of
the headset to turn up or down the headset volume.
Microphone Settings
1. On your PC/Laptop, navigate to the System Preferences.
2. Within System Preferences, locate and click on the "Sound" option to open the Sound
preference panel.
16
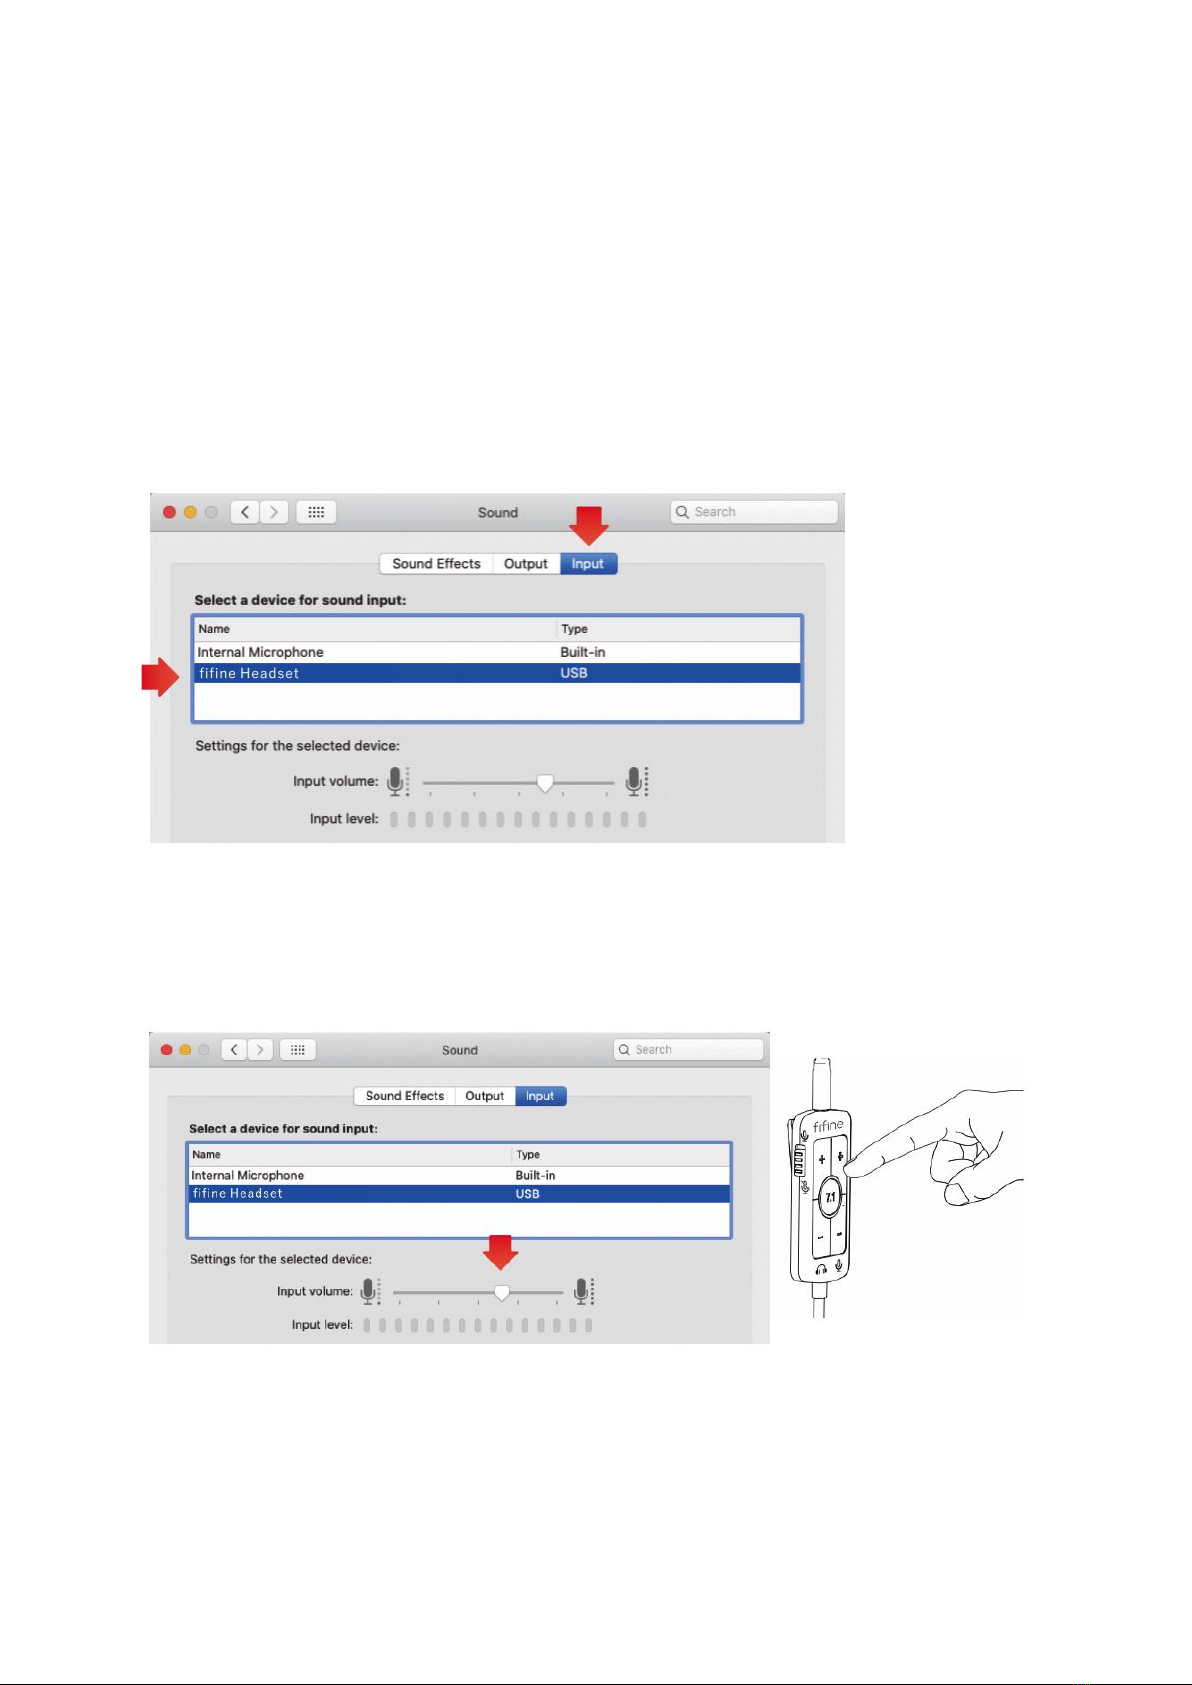
3. To configure the microphone input settings, click the "Input" tab in the Sound
preference panel, and ensure that "fifine Headset" is selected as the default input
device. When speaking into the microphone, monitor the input level meter to verify
that it moves, indicating that the microphone is capturing audio. If the input level
meter remains unchanged, you can troubleshoot the issue by trying the following
steps: a) Reset your computer and replug the headset into different available USB
ports. b) Check if the microphone is fully inserted into the headset. c) Ensure that the
unmute option is switched on using the in-line control of the headset. By following
these steps and troubleshooting options, you can properly configure the
microphone input and address any potential issues.
4. To adjust the microphone volume, you can drag the progress bar in the Sound
preference panel to increase or decrease the volume level according to your
preference. Alternatively, you can also use the volume button on the in-line control
of the headset to turn up or down the microphone volume.
17
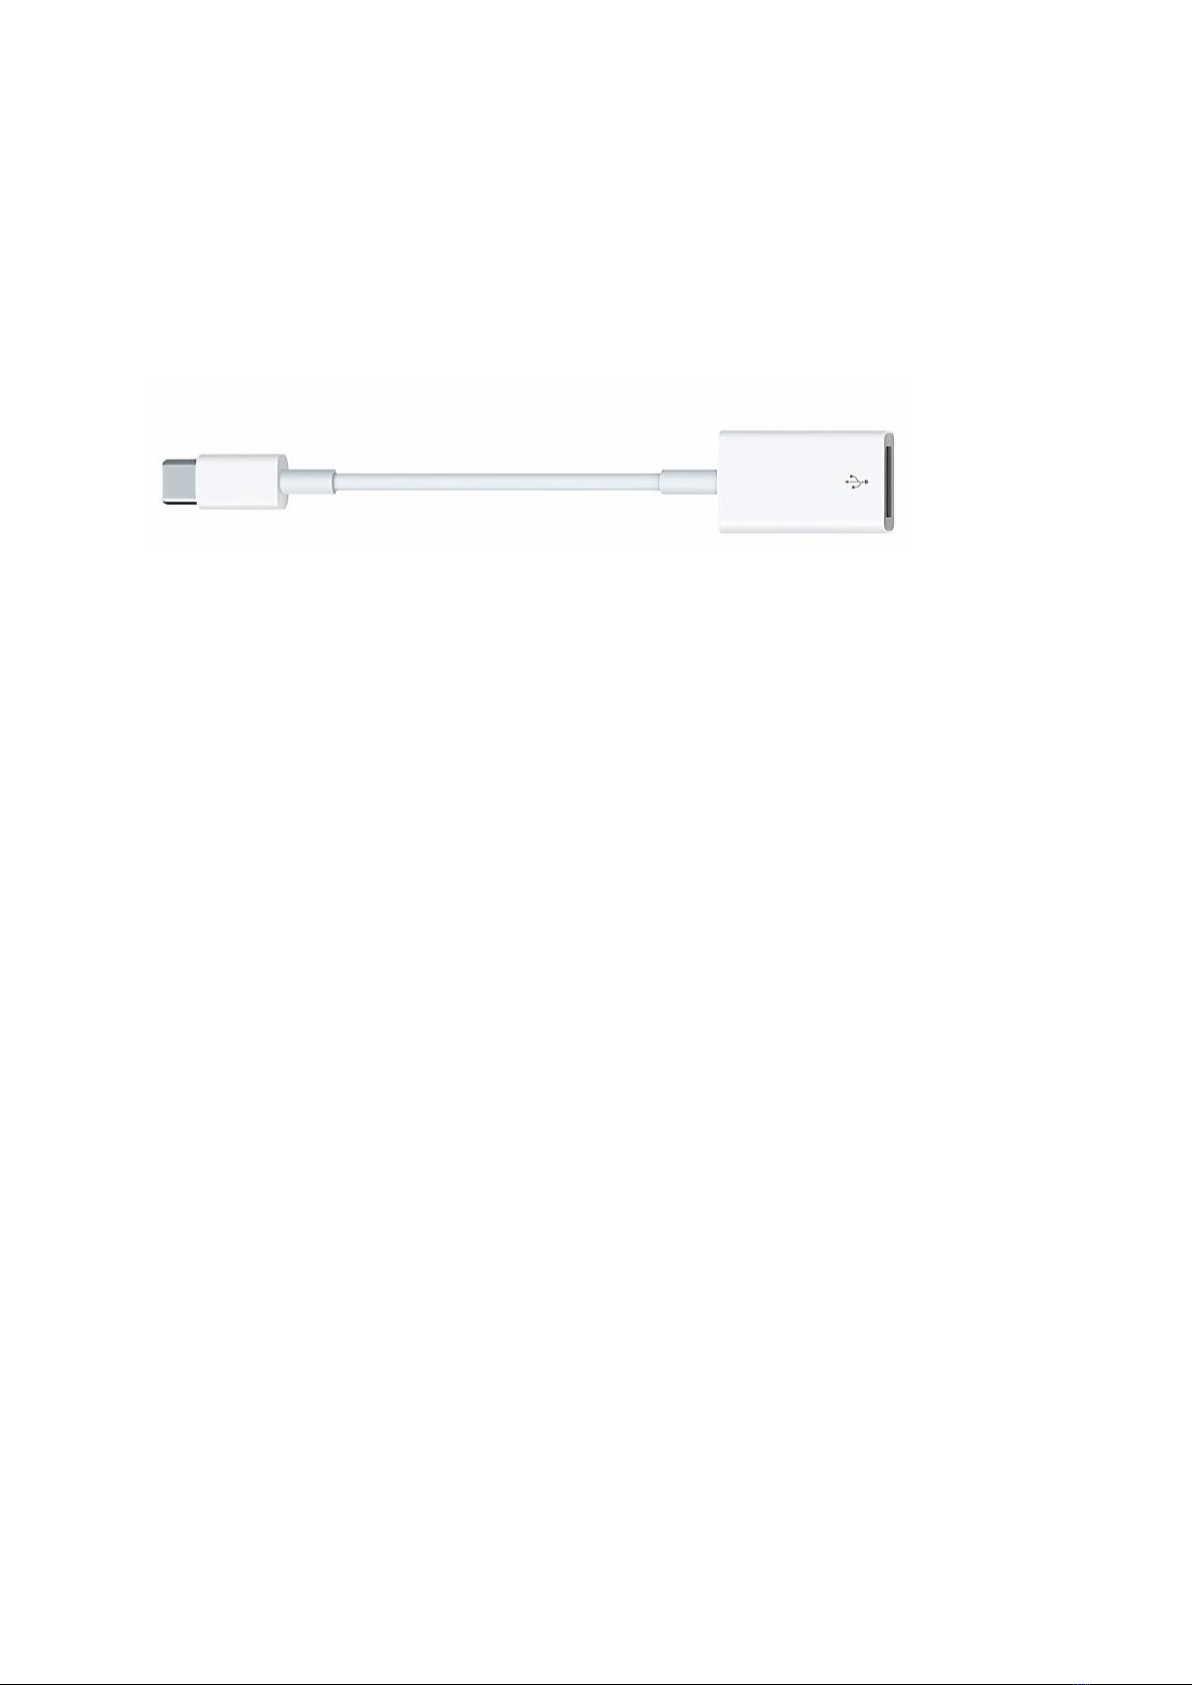
Important Notice
If your Mac only has a USB-C port, you will require a genuine Apple USB-C to USB female
adapter for connecting the microphone. Please ensure that you have the appropriate
adapter. To establish the connection, plug the USB adapter into your Mac first, and then
connect the microphone to the adapter. This will allow you to connect the microphone
to your Mac and ensure compatibility with the USB-C port.
Troubleshoot Tips Both For Mac and Windows Computer
1. If your computer prompts that it's unable to identify USB devices, try restarting your
computer and replugging the headset into a USB port on your computer. This can
help refresh the USB connections and allow proper recognition.
2. If the headset is recognized but no sound is coming out, check if the system sound or
audio volume in the specific applications you're using is turned on. Adjust the
volume settings accordingly to ensure sound output.
3. If the microphone on the headset is recognized but no sound is coming out, and
your PC is running on Windows 10, go to Settings, then click on Privacy. In the Privacy
settings, select Microphone and ensure the "Allow apps to access the microphone"
option is turned on. After making the changes, restart your PC to apply the settings.

18
Important Notice
On Headset Usage
•Prior to starting, turn down the audio volume to avoid potential harm to your ears.
Once adjusted, find the appropriate volume level that suits your needs.
•Wear the headset correctly by identifying the "L" and "R" markings. Place the "L" side
on your left ear and the "R" side on your right ear to ensure proper stereo sound.
•It is important to enjoy music at a moderate volume to prevent any adverse effects
on your hearing.
•Avoid listening for prolonged periods at high volume levels, as this can lead to
hearing damage. Take breaks and allow your ears to rest to protect your hearing
health.
•In noisy environments, there may be a tendency to increase the volume to
compensate. However, for your safety and awareness of your surroundings, it is
recommended to keep the volume at a level where you can still hear sounds from
your environment.
•When the volume is set too high, sound may leak from the headset and potentially
disturb those around you. Please be mindful of this and avoid raising the volume to a
level that may cause discomfort or annoyance to others.
On Safety
•Avoid dropping, hitting, or subjecting the headset to strong shocks as it may cause
damage to the product.
•Do not attempt to disassemble the headset without authorization, as it may affect its
functionality and void any warranty.
•Avoid submerging the headset in liquid or exposing it to water. Water damage can
lead to permanent damage and render the product unusable.
•Refrain from using corrosive cleaners or oils to clean the product. Instead, use a dry
cloth to gently clean the headset.

19
On Placement
You can place the headset flat on a desk or utilize a headset stand specifically designed
for this purpose. Avoid placing the headset in the following locations:
•Areas exposed to direct sunlight, near heaters, or any location with extremely high
temperatures. Heat can damage the components of the headset.
•Dusty environments that can accumulate dust particles and potentially impact the
performance of the headset.
•Unsteady or inclined surfaces that may cause the headset to fall or get damaged.
•Areas exposed to significant vibrations that could affect the internal components of
the headset.
•Locations with high humidity, such as bathrooms, as moisture can damage the
headset.
Specifications
Model Name:
H9
Headset Connector:
USB + 3.5 mm Jack
Power Supply:
5 V ± 0.25 V
Operating Current:
200 mA
Headset Sampling Rate:
48 kHz
Headset Frequency Response:
20 Hz –20 kHz
Microphone Element:
Condenser
Microphone Sensitivity:
-40 ± 3 dB
Microphone Polar Pattern:
Omnidirectional

20
Warranty Conditions
A new product purchased in the Alza.cz sales network is guaranteed for 2 years. If you
need repair or other services during the warranty period, contact the product seller
directly, you must provide the original proof of purchase with the date of purchase.
The following are considered to be a conflict with the warranty conditions, for
which the claimed claim may not be recognized:
•Using the product for any purpose other than that for which the product is intended
or failing to follow the instructions for maintenance, operation, and service of the
product.
•Damage to the product by a natural disaster, the intervention of an unauthorized
person or mechanically through the fault of the buyer (e.g., during transport,
cleaning by inappropriate means, etc.).
•Natural wear and aging of consumables or components during use (such as
batteries, etc.).
•Exposure to adverse external influences, such as sunlight and other radiation or
electromagnetic fields, fluid intrusion, object intrusion, mains overvoltage,
electrostatic discharge voltage (including lightning), faulty supply or input voltage and
inappropriate polarity of this voltage, chemical processes such as used power
supplies, etc.
•If anyone has made modifications, modifications, alterations to the design or
adaptation to change or extend the functions of the product compared to the
purchased design or use of non-original components.
Table of contents
Languages:


