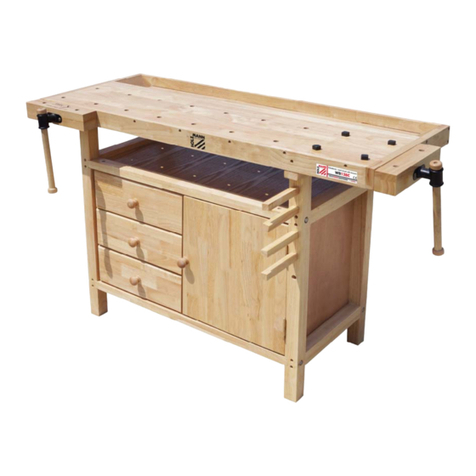
Filex PRO120 User manual

Montagehandleiding / Notice de montage / Assembly Instructions
Model 2062000001
Nr/No
Onderdeel/Element/Part
Omschrijving / Description
1/5
Onderkast met deur
Armoire avec porte
Base cabinet with door
2/5
Werkblad met stalen bekleding 120 cm
Tableau avec couverture en acier 120 cm
Countertop with galvanised steel 120 cm
3/5
Achterpaneel met legbord
Panneau arrière avec étagère
Back panel with shelf
4/5
Poten
Pieds
Legs
5/5
Geperforeerd paneel 120 cm
Panneau perforé 120 cm
Perforated panel 120 cm
4
1
3
5
2

Montagehandleiding / Notice de montage / Assembly Instructions
Model 2062000002
Nr/No
Onderdeel/Element/Part
Omschrijving / Description
1/5
Onderkast met deur en lade
Armoire avec porte et tiroir
Base cabinet with door and drawers
2/5
Werkblad met stalen bekleding 120 cm
Tableau avec couverture en acier 120 cm
Countertop with galvanised steel 120 cm
3/5
Achterpaneel met legbord
Panneau arrière avec étagère
4/5
Potenset
Pieds
Legs
5/5
Geperforeerd paneel 120 cm
Panneau perforé 120 cm
Perforated panel 120 cm
4
1
3
5
2

Nederlands
Montagehandleiding
De cijfers tussen de haakjes verwijzen naar het onderdeelnummer.
1. Bevestig het achterpaneel (3) aan de onderkast (1), gebruik hiervoor twee M5 schroeven (zie figuur
1).
2. Bevestig aan de andere kant het werkblad (2) aan de poten (4), gebruik hiervoor twee M5
schroeven, moeren en ringen (zie figuur 2).
3. Maak vervolgens deze constructie vast aan het legbord (3) en gebruik hiervoor vier M5 schroeven,
moeren en ringen (zie figuur 3 en 4).
4. Plaats het werkblad
Voor model 2062000001, onderkast met deur:
a. Haal de stalen bekleding van het werkblad af.
b. Plaats dan het houten werkblad op de constructie en zorg ervoor dat alle
bevestigingsgaten zich op de correcte plaats bevinden.
c. Maak het werkblad aan de constructie vast, gebruik hiervoor zes M5 schroeven, moeren
en ringen (zie figuur 4).
d. Schuif vanaf de voorkant de metalen bekleding terug over het werkblad (zie figuur 4).
e. Zet de bekleding vast met 4,2x19 zelf tappende schroeven aan de zijkanten vast.
Voor model 2062000002, onderkast met lade en deur:
a. Haal de stalen bekleding van het werkblad af.
b. Trek de lade uit zijn geleider. U doet dit door de lade helemaal uit te trekken en vervolgens
de aanslag (knop) op de linker geleider naar boven te drukken, en vervolgens de aanslag
(knop)op de rechter geleider naar beneden te duwen (zie figuur 5).
c. Plaats dan het houten werkblad op de constructie en zorg ervoor dat alle
bevestigingsgaten zich op de correcte plaats bevinden.
d. Maak het werkblad aan de constructie vast, gebruik hiervoor zes M5 schroeven, moeren en
ringen (zie figuur 4).
e. Schuif vanaf de voorkant de metalen bekleding terug over het werkblad (zie figuur 4).
f. Zet de bekleding vast met 4,2x19 zelf tappende schroeven aan de zijkanten vast.

Français
Notice de montage
Les chiffres mis entre parenthèses réfèrent à la numéro de l’élément.
1. Fixez le panneau arrière (3) à l’armoire (1) en utilisant deux vis M5 (figure 1).
2. A l’autre côté, vissez le tableau (2) aux pieds (4) en utilisant deux vis, écrous et anneaux M5
(figure 2).
3. Ensuite fixez cette construction à l’étagère (3) en utilisant quatre vis, écrous et anneaux M5
(figure 3 et 4).
4. Posez le plateau
Pour modèle 2062000001, armoire avec porte
a. Retirez la couverture en acier du tableau
b. Posez le tableau en bois sur la construction et veillez à ce que tous les trous de
fixations se trouvent à l’endroit correct.
c. Fixez le tableau à la construction en utilisant six vis, écrous et anneaux M5 (figure 4).
d. Remettez la couverture en acier au tableau (figure 4).
e. Fixez la couverture aux deux côtés en utilisant des vis à tôle.
Pour modèle 2062000002, armoire avec porte et tiroir
a. Retirez la couverture en acier du plateau
b. Enlevez le tiroir de ses glissières, en tirez-le aussi loin que possible. Ensuite poussez
l’amortisseur à la glissière gauche vers le haut, et poussez l’amortisseur à la glissière
droite vers le bas (figure 5).
c. Posez le tableau en bois sur la construction et veillez à ce que tous les trous de
fixations se trouvent à l’endroit correct.
d. Fixez le tableau à la construction en utilisant six vis, écrous et anneaux M5 (figure 4).
e. Remettez la couverture en acier au tableau (figure 4).
f. Fixez la couverture aux deux côtés en utilisant des vis à tôle.

English
Assembly instructions
The figures between the brackets refer to the corresponding part number.
1. Attach the back panel (3) to the base cabinet (1) with two M5 screws (figure 1).
2. Attach the legs (4) to the countertop (2) on the other side using two M5 screws, nuts and
washers (figure 2).
3. Attach this construction to the shelf (3) using four M5 screws, nuts and washers (figure 3, 4).
4. Installing the countertop
For model 2062000001, base cabinet with door:
a. Remove the steel panel from the countertop.
b. Put the wooden countertop on the structure and align the fixing holes to the correct
position.
c. Attach the wooden countertop to the construction using six screws, nuts and washers
M8 (figure 4).
d. Slide the steel panel over the wooden countertop from the front (figure 4).
e. Fix the steel panel with M4,2x19 self-tapping screws to the sides.
For model 2062000002, base cabinet with drawer and door:
a. Remove the steel panel from the countertop.
b. Remove the drawer from its guides. This can be done by pulling the drawer completely
out and then pressing the locking tabs on the left guide upwards and on the right guide
downwards (see figure 5).
c. Put the wooden countertop on the construction and align the fixing holes to the
correct position.
d. Fix the wooden countertop to the structure using six screws, nuts and washers M8
(figure 4).
e. Slide the steel panel over the wooden countertop from the front (figure 4).
f. Fix the steel panel with M4,2x19 self-tapping screws to the sides.

This manual suits for next models
2
Table of contents
Languages:
Other Filex Tools Storage manuals

