Fimco HIGH-FLO HFP-12060-111 User manual

Page 1
OWNER’S MANUAL
www.fimcoindustries.com
1000 FIMCO Lane, P.O. Box 1700, North Sioux City, SD 57049
Toll Free Phone: 800-831-0027 : Toll Free Fax: 800-494-0440
[5194678 (01/22)]
12 Volt, 1.2 GPM, 60 PSI
Diaphragm Pump
Model: HFP-12060-111
(5281370/5151086)
Installaon and Service
Informaon
Fimco High-Flo High Performance pumps are designed to pump water and aqueous soluons of common pescides. They are not
designed to pump petroleum products or other ammable materials. They are not designed to pump bleach soluons. Use of this
pump for petroleum products or bleach soluons will void the warranty. When pumping liquids other than water, the pump
should be ushed out with a cleaning soluon, such as Fimco Tank Neutralizer & Cleaner, or clean water mixed with a good grade
dish soap aer each use to prolong pump life.
This High-Flo High Performance pump is equipped with a demand switch that reacts to outlet pressure and shuts the pump motor
o at a factory set pressure limit of 60 PSI. When the pressure drops below this preset limit the switch allows the pump motor to
start again.
High-Flo High Performance pumps are self-priming. Vercal prime will depend on the viscosity of the liquid and sucon line size.
Minimum recommended sucon line size is 3/8 inch. Make sure all hose clamps are ght before tesng or spraying for the rst
me. The installaon of a 50 mesh strainer is recommended to prevent debris or other foreign material from entering the pump
and causing pump failure. The pump should be mounted in a dry and adequately venlated area. The pump can be mounted
horizontally or vercally. If mounted vercally, the pump head should be down and the motor should be up. Your pump has two
male 3/8” hose barb ngs molded into the pump head. Use exible hose or tubing to connect to the inlet and outlet ports on the
pump. This minimizes stress on the pump head. Never use rigid pipe connecons. Do not compress the feet. Overghtening will
reduce the ability to isolate vibraon & noise.
Your pump is rated at 1.2 GPM @ open ow. If the discharge plumbing is very restricve or nozzle ps are undersized, the back
pressure will cause the pump to cycle rapidly. This rapid cycling will increase the operang temperature of the motor and the
amperage draw on the power supply. Extended use with this cycling will cause premature failure of the pump.
Your pump is designed to run o of the baery of your ATV, lawn tractor, or other vehicle with a 12V system. If using a stand alone
baery, use a deep cycle RV or marine baery.
The pump should be winterized before storage, by pumping a soluon of RV anfreeze through it, and the enre plumbing system.
Retain a copy of receipt for your pump.
As it will be required to validate any warranty service.
High-Flo High Performance Pumps are warranted against manufacturer or workmanship defects for Two (2) years from date of
purchase for home owner usage and 90 days for commercial usage.
See Page 6 for Warranty Informaon
WARNING: To reduce the risk of injury, the
user must read and understand the operator’s
manual before using this product.
WARNING: Cancer and Reproducve Harm.
www.P65Warnings.ca.gov

Page 2
~~~~~~~~~~~~~~~~~~~~~~~~~~~~~~~~~IMPORTANT~~~~~~~~~~~~~~~~~~~~~~~~~~~~~~~~
Aer hooking up this pump it is VERY important for you to test your sprayer with plain water before actual spraying is aempted.
This will enable you to check the sprayer for leaks without the possibility of losing any expensive chemicals.
NOTE: Make sure all hose clamps are ght before tesng or spraying for the rst me.
Tesng the system for leaks with water:
1. Fill the tank part way with water.
2. Turn on the pump and check all ngs.
3. If a leak is detected, x the leak and re-test.
~~~~~~~~~~~~~~~~~~~~~~~~~~~~~~~~~WARNING~~~~~~~~~~~~~~~~~~~~~~~~~~~~~~~~
Read and Understand the Owner’s Manual before using this pump. Test and use in accordance to instrucons.
Read and Follow chemical label instrucons and wear protecve gear when lling, using, cleaning and
servicing the sprayer.
Know Emergency Procedures Before Handling Chemicals. Pump leaks, bodily chemical contact, poisoning and spills require imme-
diate response. Follow chemical label instrucons.
Wear Protecve Gear when operang, cleaning and servicing the pump.
Clean pump immediately aer use according to direcons and follow chemical labels for disposing or storing remaining chemicals.
Keep Pump and Spray materials away from other people, children and pets.
Do Not Turn on Power to the pump, unl ready to spray in order to avoid unintenonal spray release.
Keep all parts in good condion and properly installed. Fix damaged or worn parts immediately.
Aer any Repair work has been done, ALWAYS test for leaks with water one nal me before using.
Improper use of this pump or handling of chemicals could result in serious injury or illness, or could cause damage to the
environment.
Use Cauon when connecng and disconnecng to a 12 volt baery. You may use either a stand-alone baery or the baery on
your towing vehicle. Follow these steps when connecng and disconnecng from your baery:
Connecng:
1. Connect to the posive (red) terminal rst.
2. Then connect to the negave (black) terminal.
3. Then connect the end of the lead wire to the end of the pump.
Disconnecng:
1. Disconnect the end of the pump wire from the lead wire.
2. Then disconnect the negave (black) connecon.
3. Finally disconnect from the posive (red) connecon.
NOTE: it is important to disconnect power to the pump when not in use for safety reasons.
Warning: Ensure the wiring harness does not become pinched or damaged in any way. This may damage the pump or cause the
wiring harness to overheat, resulng in a melt down or re.
The Pump will be Damaged and Warranty Voided if used to apply bleach, chlorine or any petroleum based product (gasoline,
diesel, kerosene, oil).
Pump should not be used to transfer any product intended for human consumpon.
Do Not modify pump design.
Before Spraying:
Pump and Sprayer Prep: Always inspect and prepare the pump and sprayer before use.
Keep Pump O unl ready to spray in order to avoid unintenonal spray release.
Wind Speed. Never spray when wind exceeds 4 MPH, in order to minimize spray dri.
Keep Area Clear. Keep people and pets clear of area that is being sprayed.
During Spraying:
Follow Chemical Labels. To avoid over spraying.
Keep Area Clear. Keep people and pets clear of area that is being sprayed.
Wear protecve gear if needed to avoid contact with chemicals.
Always clean up spills immediately per chemical label instrucons.
Always turn o power to pump and relieve pressure in the system before leaving pump unaended.
Aer Spraying:
Clean Pump and Sprayer. Using a tank neutralizer cleaner like Fimco Tank Cleaner and Neutralizer to thoroughly clean system.
Dispose or Store chemicals properly as recommended by the chemical label.

Page 3
Maintenance During/Aer Spraying
Aer use, drain the tank and store or dispose of chemical properly. Fill the sprayer half way with clean water. Start the pump and
allow the water to pump through the enre plumbing system and nozzles. Drain and then rell half full, add the recommended
amount of a good quality tank cleaner, such as FIMCO Tank Neutralizer and Cleaner. Turn pump on and circulate through system
for 15 minutes and then spray out through handgun nozzle. Rell sprayer half way with clean water and repeat. Follow the chemi-
cal manufacturer’s disposal instrucons of all wash or rinsing water.
WARNING: Some chemicals will damage the pump valves if allowed to soak untreated for a length of me! ALWAYS ush the
pump as instructed aer each use. DO NOT allow chemicals to sit in the pump for extended mes of idleness. Follow the chemical
manufacturer’s instrucons on disposal of all waste water from the sprayer.
Winter Storage
Prepare the sprayer for end-of-season storage by running RV anfreeze through the system. This will keep internal parts lubricat-
ed, protect against corrosion and keep the unit from freezing. Note: RV anfreeze is non-toxic and biodegradable and generally
safer for the environment than automove anfreeze.
Before storing your sprayer for winter or long term storage, thoroughly clean and drain it as much as possible. Then pour enough
pink RV anfreeze into the tank so that when the pump is turned on you can pump the anfreeze throughout the enre plumbing
system, including the bypass. Make sure to operate the handgun unl you see pink uid spraying from the nozzle. Leave any re-
maining anfreeze in the tank. Before your next usage, rinse the anfreeze from the sprayer with clean water.
It is nearly impossible to drain all of the water from the sprayer and any trapped water can freeze in cold weather and damage
parts of the sprayer. Pumping the anfreeze through the system will displace the water and help prevent this damage.
Removing from storage: drain the anfreeze. Fill the tank with fresh water and run through the system. Dispose of anfreeze and
ush water properly.
Sprayer and Pump FAQs:
♦ Why does the pump not run all the me?
This is an on-demand pump and only runs when a discharge is open (spray gun, bypass, boom (if applicable) or a leak is in the
system.
♦ Why does the pump surge while using the spray gun?
Low ow/high pressure may cause the pump to surge (or cycle). Typically the spray wand is adjusted at too ne of a mist, to
overcome, adjust the nozzle for a higher ow.
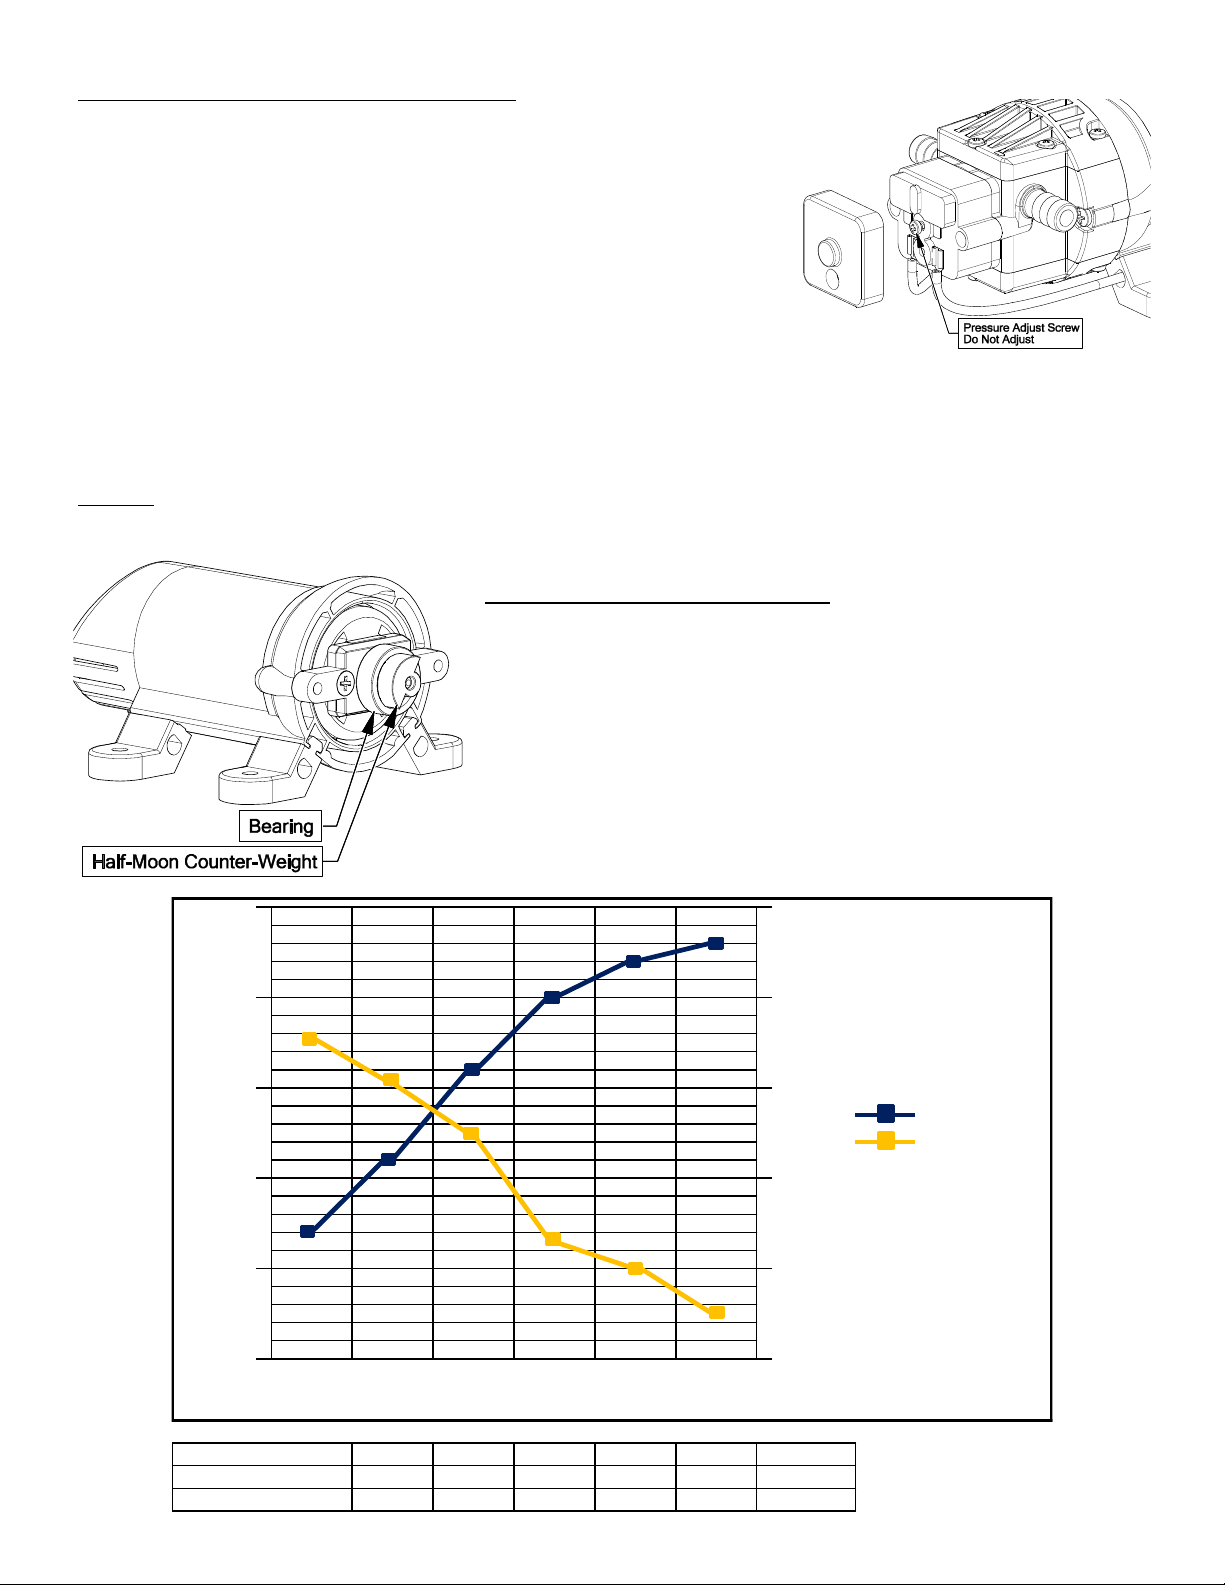
♦ How do I adjust the pressure?
Pressure can only be adjusted by opening the pressure adjust (bypass) valve to allow some of your water or soluon to return
to the tank (if equipped).
♦ Pump quit and will not run, what do I need to do?
Squeeze trigger on spray gun to ensure that the system isn’t just pressurized up with discharges closed.
Check electrical connecons, ensure switch is on. Check fuses. Check for proper voltage. Check pressure switch.
♦ Low ow or no ow at all, what do I need to check for?
Check for a clogged or kinked intake hose and/or clogged intake strainer. Check for proper voltage.
You will need to occasionally check your intake strainer to ensure that it is clean of any debris.
♦ What is causing the fuse to blow each me I turn the pump on?
Check for excessive voltage. Improper adjustment of the pressure switch. Damaged or defecve wire harness or defecve
pressure switch. Half-Moon counterweight and bearing are seized up.
Warning:
Ensure the wiring harness does not become pinched or damaged in any way. This may damage the pump or cause the wiring
harness to overheat, resulng in a melt down or re.
Before Troubleshoong or Aempng to Service the Pump:
♦ Review Troubleshoong Chart: Do Not aempt to repair unl steps below are followed.
♦ Personal Protecve Gear: Wear protecve gear when servicing pump.
♦ Disconnect Power: Disconnect the power to the pump and relieve the pressure from the system.
♦ Empty and Flush the pump system with water, never aempt to service the pump unl it has been emped and ushed.
♦ Perform Repairs: Follow direcons provided in the troubleshoong secon to repair the pump.
♦ Test: Always test the pump for leaks with plain water aer any repairs before using.

Page 4
Pump Model: 5281370
Available
Replacement Parts
Replacement Pump: 5151086
Check the fuse spray pattern
Check for defective pressure switch
12 Volt Power Source
Discharge hose may be too long
Check for clogged strainer/filter
Pressure switch may need to be adjusted
1/4 turn at a time clockwise until surging stops
Check for cracks in the pump housing Check for empty product supply
Check for air leaks in supply line Check for Low Voltage
Check for leaks in the discharge line
Check for defective pressure switch
Try another 12-Volt battery System has leaks
Excessive voltage
Improper adjustment of pressure switch
Damaged or defective wiring harness
Defective pressure switch
Check for restrictions in the discharge line
Fuse blows:
Check for debris in intake
Check for debris in nozzle orifice
Half-moon & Counterweight are sticking
Troubleshooting
Pump
will not run:
Check for loose wiring
Pump surges:
Low flow may cause pump to surge
Make sure the ON/OFF switch is on
Spray Wand is adjusted to small or fine of a
Check for defective pressure switch
Check to see if connected to good
Check for leaks in the discharge line
Check for debris in nozzle orifice
Check for Low Voltage
Pump Does Not
Prime
(No Discharge
w/Motor
Running)
Check for clogged strainer/filter
Check for kinked inlet/outlet hoses
Check for empty product supply
Pump continues
to run:
Low Pressure/
Low Flow:
Check for a clogged strainer
Check for proper voltage
Check for leaks in the discharge line
Air trapped in outlet line or pump head
DO
• Clean and rinse your pump after each use with Fimco Tank
Neutralizer.
• Winterize your pump or sprayer by rinsing, draining and
running RV Antifreeze through it before storing for the winter.
• Use clean water for your spray mixture.
• Store inside a building when not in use.
DON’T
• Use to pump bleach.
• Use to pump petroleum products such as diesel fuel, gaso-
line or kerosene.
• Use to pump chemicals w/petroleum distillates or surfac-
tants.
• Use to store flammable or combustible liquids.
• Leave your pump sit with spray mixture in it for extended
periods.
• Use dirty or unfiltered water for spraying.

Page 5
Motor is NOT Running - Checking the Pressure Switch:
If your motor is not running and you’ve checked the following: for loose wiring connecons, fuse,
the switch on the lead wire was “ON” and made sure you were connected to a fully charged
baery and everything is ne, but the motor won’t run, then it’s me to check to see if the
pressure switch is bad.
• Remove cover o the 1” square box (pressure switch) on the head of the pump,
the cover is held on by one phillips-head screw. This will expose the two red
wires.
• With the pump connected to a good 12 volt power source and everything on.
• Slip the two red wires o the terminals and touch them together.
If the motor runs, it means the pressure switch is bad and needs to be replaced.
If it sll doesn’t run, try bypassing the switch in the lead wire or using another lead wire. Even if a tester shows power to the pres-
sure switch, it sll could be the switch in the wire that is causing the problem.
If sll not responsive, use a voltmeter or electrical tester to make sure you are geng power to the head of the pump, as it could
possibly be something in one of the wires or even the lead wire assembly may need to be replaced.
Warning: It is NOT recommended to run the pump this way, as the pump will connue to run and not shut o.
This could result in blown hoses when all discharges are closed. Also, this could result in premature failure of the pump completely.
Motor Running-BUT Lile to No Pressure:
CHECK:
Both the counterweight and the bearing need to spin freely and both need to
spin INDEPENDENTLY of each other. If these 2 parts are ‘stuck’ together, you will
need to break them free and whether or not they are scking, spray some good
quality lubricant or something similar on them and let it soak in and this should
restore most of your prime.
010 20 30 40 50
010 20 30 40
1.7 2.1 2.6 3.0 3.2
1.22 1.12 0.99 0.77 0.70
2.5
3.5
Pressure
1.2 Current (A)
1.2 Flow (GPM)
2.0
1.5
1.0
3.0
50
3.3
0.61
Current (A)
Flowrate (GPM)
Pressure (PSI)
1.2 Current (A)
1.2 Flow (GPM)
1.50
1.30
1.10
0.90
0.70
0.50

Page 6
LIMITED WARRANTY FOR NEW FIMCO EQUIPMENT
WHO MAY USE THIS LIMITED WARRANTY. This limited warranty (the “Limited Warranty”) is provided by Fimco to the original purchaser (“you”)
of the Equipment (as dened below) from Fimco or one of Fimco’s authorized dealers. This Limited Warranty does not apply to any subsequent
owner or other transferee of the Equipment. THIS LIMITED WARRANTY GIVES YOU SPECIFIC LEGAL RIGHTS, AND YOU MAY ALSO HAVE OTHER
RIGHTS WHICH VARY FROM STATE TO STATE.
WHAT THIS LIMITED WARRANTY COVERS AND FOR HOW LONG. Fimco warrants that any new Equipment will be free from defects in material
and workmanship for a period of two (2) years (homeowner), 90 days (commercial user), aer delivery of the Equipment to you (the “Warranty
Period”). The Warranty Period is not extended if Fimco repairs or replaces the Equipment.
WHAT IS NOT COVERED BY THIS LIMITED WARRANTY. This Limited Warranty does not apply to: (1) used Equipment; (2) any Equipment that has
been altered, changed, repaired or treated since its delivery to you, other than by Fimco or its authorized dealers; (3) damage or depreciaon due
to normal wear and tear; (4) defects or damage due to failure to follow Fimco’s operator’s manual, specicaons or other wrien instrucons, or
improper storage, operaon, maintenance, applicaon or installaon of parts; (5) defects or damage due to misuse, accident or neglect, “acts of
God” or other events beyond Fimco’s reasonable control; (6) accessories, aachments, tools or parts that were not manufactured by Fimco,
whether or not sold or operated with the Equipment; or (7) rubber parts, such as res, hoses and grommets.
HOW TO OBTAIN WARRANTY SERVICE. To obtain warranty service under this Limited Warranty, you must (1) provide wrien noce to Fimco of
the defect during the Warranty Period and within thirty (30) days aer the defect becomes apparent or the repair becomes necessary, at the
following address: Fimco, 1000 FImco Lane, North Sioux City, SD 57049; and (2) make the Equipment available to Fimco or an authorized dealer
within a reasonable period of me. For more informaon about this Limited Warranty, please call: 800-831-0027
WHAT REMEDIES ARE AVAILABLE UNDER THIS LIMITED WARRANTY. If the condions set forth above are fullled and the Equipment or any part
thereof is found to be defecve, Fimco shall, at its own cost, and at its opon, either repair or replace the defecve Equipment or part. Fimco will
pay for shipping and handling fees to return the repaired or replacement Equipment or part to you.
LIMITATION OF IMPLIED WARRANTIES AND OTHER REMEDIES. THE REMEDIES DESCRIBED ABOVE ARE YOUR SOLE AND EXCLUSIVE REMEDIES,
AND FIMCO’S SOLE LIABILITY, FOR ANY BREACH OF THIS LIMITED WARRANTY. TO THE EXTENT APPLICABLE, ANY IMPLIED WARRANTIES, INCLUD-
ING, WITHOUT LIMITATION, THE IMPLIED WARRANTIES OF MERCHANTABILITY AND FITNESS FOR A PARTICULAR PURPOSE, SHALL BE LIMITED IN
DURATION TO THE WARRANTY PERIOD, AND THE REMEDIES AVAILABLE FOR BREACH THEREOF SHALL BE LIMITED TO THE REMEDIES AVAILABLE
UNDER THIS EXPRESS LIMITED WARRANTY. SOME STATES DO NOT ALLOW LIMITATIONS ON HOW LONG AN IMPLIED WARRANTY LASTS, SO THE
ABOVE LIMITATION MAY NOT APPLY TO YOU. IN NO EVENT SHALL FIMCO’S LIABILITY UNDER THIS LIMITED WARRANTY EXCEED THE ACTUAL
AMOUNT PAID BY YOU FOR THE DEFECTIVE EQUIPMENT, NOR SHALL FIMCO BE LIABLE, UNDER ANY CIRCUMSTANCES, FOR ANY CONSEQUENTIAL,
INCIDENTAL, SPECIAL OR PUNITIVE DAMAGES OR LOSSES, WHETHER DIRECT OR INDIRECT. SOME STATES DO NOT ALLOW THE EXCLUSION OR
LIMITATION OF INCIDENTAL OR CONSEQUENTIAL DAMAGES, SO THE ABOVE LIMITATION OR EXCLUSION MAY NOT APPLY TO YOU.
Warranty
This manual suits for next models
2
Table of contents
Other Fimco Water Pump manuals
Popular Water Pump manuals by other brands

Ingersoll-Rand
Ingersoll-Rand ARO PP20A Series Operator's manual

Sagola
Sagola ATLANTA 800G Instruction manual / spare parts list

Goulds Pumps
Goulds Pumps J5S Installation, operation and troubleshooting manual

ABS
ABS AFP 0831S Installation and operating instructions

Zoeller
Zoeller 1261-0001 manual

Kompernass
Kompernass KH 4232 operating instructions

ASP
ASP SSPC Installation, operation & maintenance instructions

HydroAir
HydroAir HA 350 Series Directions for use

Oase
Oase AquaMax Eco Premium 5000 Commissioning

Crane
Crane Barnes PS Omni Grind Plus OGP2022CO Series installation manual

vacuubrand
vacuubrand PC 3002 VARIO select Instructions for use

Simer
Simer 5965 owner's manual