Fino Edge FE-PSS01 User manual

PRECISION KNIFE SHARPENING SYSTEM
USER MANUAL
* Knife not included

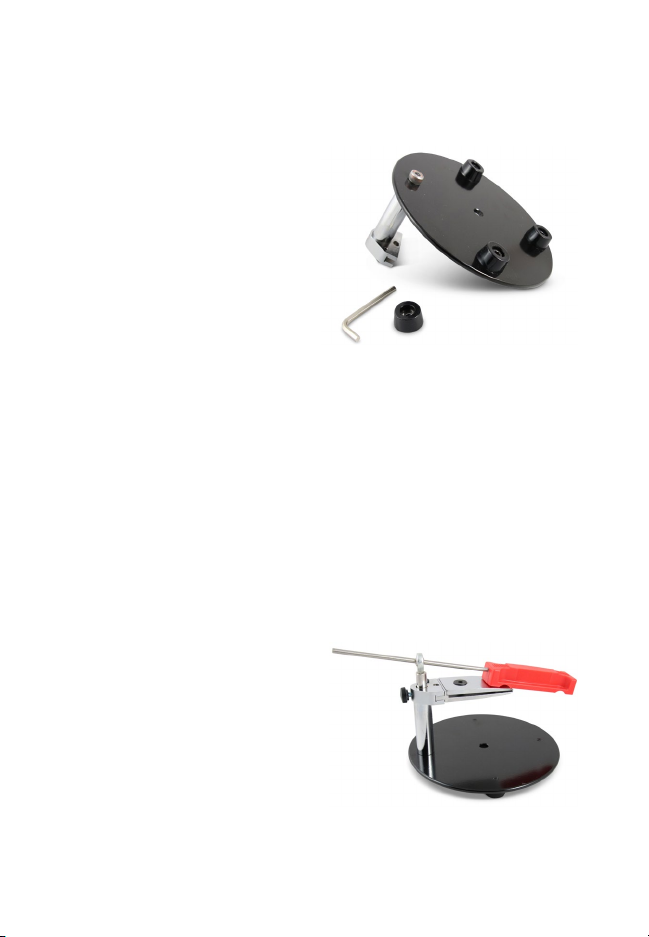
մBox Contents
A Heavy-Duty Base Plate with 3 Rubber Feet
Preinstalled
B Clamping Post with “T” Slot
C Clamping Post Rubber Foot and Bolt
D Adjustable Guide Rod Post with Angle Marking
E Guide Support Locking Bolt
F Large and Small Hex Key Wrenches
G Diamond Hone Block Holder with Guide Rod
H Guide Rod Locking Collar
I Non-Marring Knife Clamp
J 400 Grit Coarse (Yellow), 800 Grit Medium (Red
or Orange) & 1,400 Grit Fine (Black) Diamond
Hone Blocks
ank you for purchasing
FINO EDGE Precision Knife Sharpening System!
A
B
D
F
E
C
GH
I
J
2
Assembly Instruction
Step1:Attach the
clamping post to the base
with bolt using the large
hex key wrench as shown.
e slotted side of the
clamping post should
be facing inward and
attached to the top side of
the base plate.
Step 2:Place the clamping post rubber foot over the
clamping post bolt and press rmly.
Step 3:Place the base plate on a at surface and insert
the guide support locking bolt into the clamping
post. Make sure only to start the threads.
Step 4:Insert the
adjustable guide rod
post into the clamping
post. Flat side with angle
adjustment markings
should be aligned to the
back and snug the guide
supporting the locking bolt.
3

Step 5:Slide the non-marring knife clamp into the
“T” slot on the clamping post.
Step 6: Loosen the guide rod locking collar using the
small hex key. Remove the collar from the guide rod
making sure not to remove the bolt completely.
Step 7:Slide the guide rod through adjustable guide
rod post and reattach the guide rod locking collar on
the guide rod.
Step 8:Position the Diamond hone
block holder with the open side
facing up. Attach your desired hone
block by snapping it rmly into the
holder in place.
Step 9: Place the large and small hex keys into the
holes provided on the clamping post to hold the
knife clamp in place and have them easily available
for future use.
You are now ready to sharpen your knife!
մClamping Blade
Always clamp your blade in the same orientation.
4

We recommend to clamp your blade with the
handle to the le when the head of the locking bolt
on the clamp is visible.
Before clamping, ensure that the blade is clean and
no foreign materials (dirt or debris) are present.
Presence of such particles can interfere with the
proper holding of the blade.
Loosen the locking bolt on the non-marring clamp
and align you knife in the clamp jaws.
e edge of the clamp should be positioned in such
a way that it sits on a straight line between the tip
and heel of the blade as shown below.
Tip : For proper clamp alignment stick a masking
tape from tip to heel in such a way that the longer
edge makes a straight line from tip to heel!
* Knife not included
5

Tighten the clamp on the blade using the large hex
key to make sure that the clamp is tightly secured to
the blade.
For blades up to 8 inches, clamp should be in the
middle of the blade. For blades above 8 inches, you
will have to divide the blade into working sections.
Clamping should be in the middle of each section
starting at a point and working your way back to
the heal. Make sure to sharpen both sides of the
blade before moving the clamp!
Once the blade is secured in the clamp, slide the
clamp into the “T” slot on the clamping post and
place the large hex key in its storage position to
hold everything in place while sharpening.
մDiamond Hone Block Selection
When your
diamond hone
blocks are new
there is a break in
period in which the
hone blocks will be
aggressive.
6

is will slow over time as you use the hones and
the overall abrasive prole will improve. is break
in period is normal and expected with all diamond
hones and is not a sign of wear or damage when
cutting is not as aggressive as when new.
•400 Grit Coarse Yellow Hone: e coarse hone
block is used when then knife’s cutting edge
is extremely dull or has s damage that requires
aggressive work to return to full sharpness.
•800 Grit Medium Orange or Red Hone: is
medium hone block is used for general purpose
sharpening and is the starting hone block for most
knives that are regularly serviced.
•1,400 Grit Fine Black Hone: is hone is used for
nishing your knife’s edge to razor sharpness.
e diamond hone blocks will snap securely into
place on the diamond hone block holder while still
being easily being removed by hand.
Lubricant: e diamond hone blocks can be
used dry however we recommend using water or
any non-petroleum based honing solution while
sharpening. Never use a petroleum based oil as a
sharpening lubricant!
7

Cleaning: e diamond hone block should be dried
aer each use and before storage. From time to
time the hone block should be cleaned with soapy
water and a so brush to ensure best performance.
մSharpening Angle Selection
e Adjustable Guide Rod Post has
reference angle markings for setting the
precise angle for your sharpening. is is
only a reference and care should be taken
while setting the angle prior to sharpening.
We recommend using an angle gauge or the built-in
angle nder on your smart phone to set the angle.
e guide rod post can be adjusted by loosening the
guide rod post locking bolt, making the adjustment
and then tightening the guide rod post locking bolt
in place.
If the blade angle is unknown, use the existing
angle on the blade to set the guide rod post height
by looking at how the diamond hone block lines are
aligned up to the existing angle on the knife blade.
While setting the angle of your knife blade keep in
mind that the angle is made on both sides. If you
8

set your angle to 15 degrees, you will be putting a
30-degree angle on the blade while sharpening
both sides. If you want to achieve a 34 degree angle
on your knife you can set the sharpening angle to
17 degrees.
Most blades will be sharpened anywhere from 17 to
22 degrees creating a 34 to 44 degree blade angle.
is provides the best balance in sharpness while
still having a durable edge.
If a more durable edge is required such as one seen
on a pocket knife then changing the sharpening
angle from 22 to 30 degrees is recommended,
thereby creating a 44 to 60 degree blade angle. is
may not be razor sharp but will provide a durable
edge on the knife’s blade.
մ Guide Rod Locking Collar Adjustment
Before sharpening your
knife, adjust the guide rod
locking collar so that the
diamond hone block sits on
the knife edge when fully
extended as shown.
9

Use the small hex key to loosen the guide rod
locking collar and position the hone block so that
the back edge is on the part of the blade farthest
from the holder. Tighten the collar snuggly on the
guide rod close to the adjustable guide rod post to
prevent the diamond hone from slipping of the edge
of the knife while sharpening.
Aer adjusting the locking color, make sure that the
bearing in the Adjustable Guide Rod Post is
aligned with the Clamping post and is not over
tightened. You should be able to fully move the
hone block from one side to another and out of the
way easily. If the bearing is overtightened, simply
back it o by 1/2 turns to allow the required reach
and movement with the guide rod.
մSharpening Your Knife
Please refer to clamping section before sharpening
to ensure best results for your blade edge.
While sharpening always keep your hand on the
plastic grip of the hone block holder, away from the
knife’s edge.
Always let the diamond hone do the work. Only a
10

very light consistent pressure is needed while using a
diamond hone block to ensure a consistent contact
is being made across the entire knife edge.
Use the entire length of the diamond hone while
making full strokes across the entire blade edge or
section with each pass.
Aer each pass, li the
diamond hone from the knife
edge and bring it back to the
starting position and repeat
as needed. For best results use
the same number of strokes
on each side of your knife.
While sharpening the
opposite side of the blade,
keep the knife secured in
the clamp. Remove the large
hex key and the clamp from
the “T” slot. Flip the clamp
over, reinsert it into the “T”
slot and secure in place by
inserting the large hex key
back in its storage position.
* Knife not included
11

FINO EDGE
Henderson NV 89011 USA
Toll Free: 888-395-FINO (3466)
702-795-FINO (3466)
Email: info@noedge.com
www.FinoEdge.com
Proceed to sharpen the other side of the knife’s
blade edge.
Important: Before moving to the next diamond
hone or changing the clamp position on longer
blades make sure that both the sides have been
sharpened!
Finish your knife’s edge using the Fine Grit Black
Diamond Hone.
For an extra razor-sharp edge, you can nish the
blade on a leather strap.
WARNING!
Use a practice knife prior moving on to more
expensive knives to get a feel of proper use of the
sharpening system!
12


