Firelands Helion Conquest 10ST XB User manual

QUICK-START GUIDE
Full manual available to download from: www.Helion-RC.comFull manual available to download from: www.Helion-RC.com
Quick-Start
Guide
Product specications are subject to change without notice.
Due to ongoing development, the actual product may vary from
images shown.
This product contains chemicals known to the State of California
to cause cancer, birth defects and other reproductive harm.
This product is not a toy! (14+) Recommended for ages 14 and
up. Adult supervision required for ages under 18 years old.
Contains small parts, keep out of reach of children 3 years of
age and younger.
To download the full Owner’s Manual & Technical
Information Guide, please visit:
www.Helion-RC.com
or scan the QR code with your smart phone.
Distributed in the
UK by:
J Perkins Distribution Ltd,
Lenham,
Kent, UK
ME17 2DL.
www.jperkins.com
Distributed in Australia by:
Model Engines (Aust.) Pty. Ltd.,
P.O. BOX 828
NOBLE PARK 3174
Australia
www.modelengines.com.au
Ph (03) 8793 5555
Distributed in the US by:
Firelands Customer Service/Product Support
1133 Libra Drive, Lincoln, NE 68512
www.relandsgroup.com
1-800-205-6773
customerservice@relandsgroup.com
HLNA0762 Conquest 10ST XB (US)
HLNA0772 Conquest 10ST XB (UK-EU)
HLNA0782 Conquest 10ST XB (AU)
MADE IN CHINA
QUICK-START GUIDE
Full manual available to download from: www.Helion-RC.comFull manual available to download from: www.Helion-RC.com
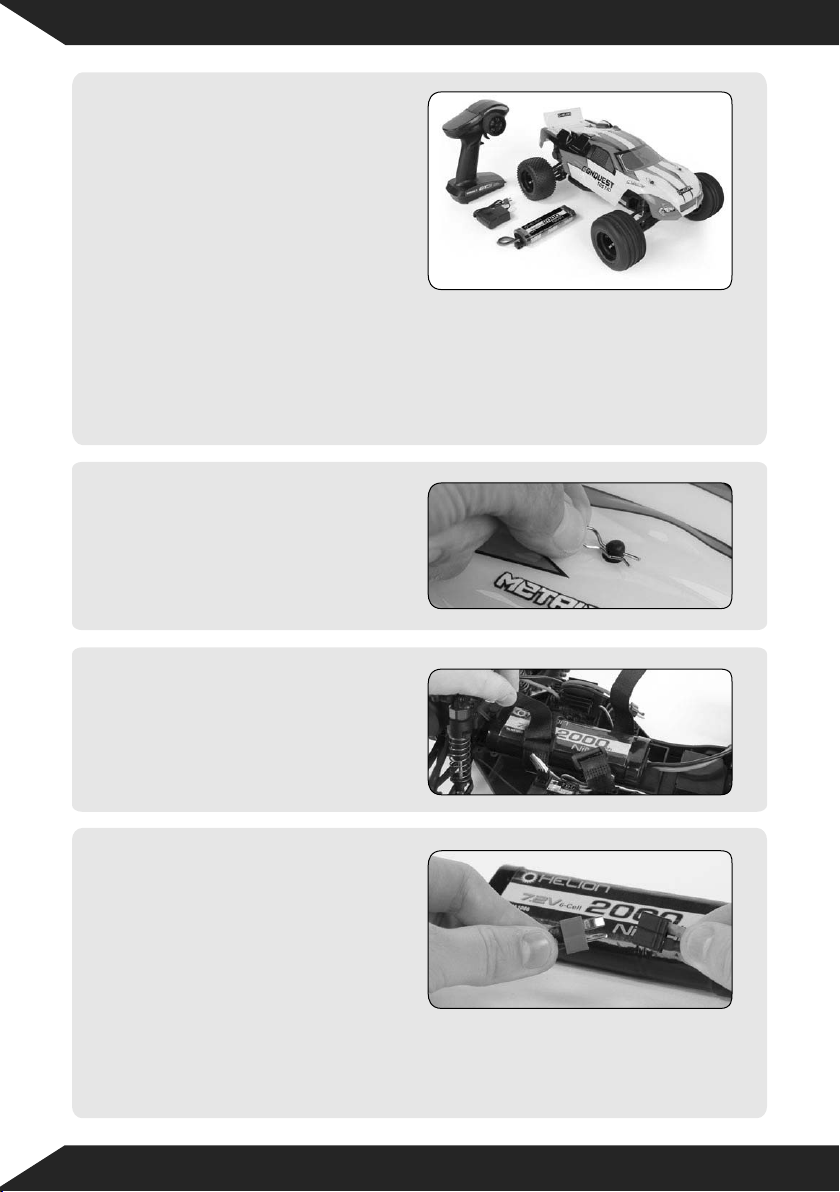
1Remove the components from
the box and ensure the contents
are correct:
• 1 x Conquest 2WD Stadium
Truck
• 1 x 2000mAh 6-cell NiMH
battery pack
• 1 x IKONNIK ET3 2.4GHz
3-channel transmitter
• 1 x 6-cell wall charger
• 1 x Quick-Start Guide.
2Remove the four body clips from
the car and lift the body clear.
3Locate the battery cradle in the
centre of the car, release the hook
and loop tape and withdraw the
battery pack.
4Plug the charger into a wall
socket, connect the battery to the
charger and place the battery on
a non-ammable surface. Switch
the wall socket ON noting that a
fully discharged battery will be
topped up in approximately 3
hours. Periodically monitor the
temperature of the battery when
charging and disconnect if it
exceeds 120°F (49°C). Unplug
the battery when charged.
QUICK-START GUIDE
Full manual available to download from: www.Helion-RC.comFull manual available to download from: www.Helion-RC.com
5Re-insert the fully charged battery
pack into the cradle and tightly
secure it with the hook and loop
straps.
6Remove the battery cover from the
underside of the ET3 transmitter
and insert four AA alkaline cells.
7Ensure the radio switch is in the
OFF position, then connect the
battery to the ESC.
8Replace the body and secure it
with the four body clips.
9Switch ON your IKONNIK ET3
transmitter and ensure the LED
is lit solid red and that no alarms
are audible. LED
CH2 EPA D/R
CH1 &
CH 2
Trim

QUICK-START GUIDE
Full manual available to download from: www.Helion-RC.comFull manual available to download from: www.Helion-RC.com
11 Check the operation of the throttle
and steering. Pulling the throttle
trigger back will drive the car
forward, pushing the trigger forward
once will apply the brakes while
pushing the trigger forward twice
will drive the car in reverse. Turning
the wheel to the right will cause the
car to turn right and vice versa.
12 Use the throttle and steering trim
dials to ne-tune the controls of
your car. In doing so, ensure that
your Conquest tracks in a straight
line. Also that it doesn’t creep
forwards or backwards at zero
throttle.
Locate the switch and turn ON
your Conquest. In the unlikely
event that the car does not
operate, see the PAIRING /
BINDING instructions at the back
of this guide
10

QUICK-START GUIDE
Full manual available to download from: www.Helion-RC.comFull manual available to download from: www.Helion-RC.com
1Remove the body and locate the
ET3 Krypton receiver.
2Place your Conquest and ET3
transmitter in close proximity but
not less than 12” (300mm) apart.
Having followed steps 1 to 10, in the unlikely event that your car does not operate please
follow the 5 stage pairing process detailed here.
Pairing / Binding The Transmitter
3Press and hold the PAIR / BIND
button on the receiver then switch
the receiver on. The receiver’s
LED will ash to indicate that it is
in PAIR / BIND mode.
5When the LED on the receiver
lights solid red your ET3
transmitter and Conquest will
be bound. You will now have full
control of throttle and steering.
Return to Step 11 of this guide to
complete the set-up of your car.
4Press and hold the PAIR / BIND
button on the transmitter then
switch the transmitter on. Release
the PAIR / BIND button only when
the transmitter’s LED begins
ashing.
300mm

REPLACEMENT PARTS
Full manual available to download from: www.Helion-RC.comFull manual available to download from: www.Helion-RC.com
Replacement Parts
HLNA0970 .........Rear Chassis Plate, B, ST, MT
HLNA0971 ......... R-Clip, B, ST, MT
HLNA0972 .........Nuts(M4)
HLNA0973 .........M3*8 Column Head Hex Screw
HLNA0974..........Wheel Hex
HLNA0975 .........Nuts(M3)
HLNA0976 ......... Radio Tray Mount
HLNA0978 .........Back Shock
HLNA0979 .........Shock Ball Head C
HLNA0980 .........Pin 2*10
HLNA0981 .........Diff Planetary Gear
HLNA0982 .........Diff Shaft
HLNA0983 .........Differential Outdrive
HLNA0984 .........Diff O-Ring
HLNA0985 .........Flat Head Hex Machine Screw M3*14
HLNA0986 .........Flat Head Hex Machine Screw M3*12
HLNA0987 .........Flat Head Hex Machine Screw 3*8
HLNA0988 .........Flat Head Hex Machine Screw 2*10
HLNA0990 .........Sus. Arm E-Clips 0.6mm
HLNA0991 .........Flat Head Hex Mechnical Screw 3*10
HLNA0992 .........Cap Head Hex. Mechnical Screw (3*10)
HLNA0993 .........Cap Head Hex. Mechnical Screw (3*12)
HLNA0994 .........Cap Head Hex. Mechnical Screw (3*5)
HLNA0995 .........Front Bumper, B, ST
HLNA0999 .........Motor Guard With Wheelie Wheel, ST, MT
HLNA1003 .........Battery Strap
HLNA1004 .........Chassis, B, ST, MT
HLNA1005 .........Front Lower Suspension Arm B, ST, MT
HLNA1006 .........Rear Lower Suspension Arm B, ST, MT
HLNA1007 ......... Front Chassis Plate B, ST, MT
HLNA1008 .........Front Shock Tower B, ST, MT
HLNA1009 .........Rear Shock Tower B, ST, MT
HLNA1010 ......... Steering Hub Carrier (L/R)
HLNA1011 ......... Front Hub Carrier (L/R)
HLNA1012 .........Rear Upright
HLNA1013 .........Front Bulk Head Brace

REPLACEMENT PARTS
Full manual available to download from: www.Helion-RC.comFull manual available to download from: www.Helion-RC.com
HLNA1014 ......... Front Shock Mount
HLNA1015 ......... Front Upper Link 58.5mm
HLNA1016 ......... Steering Link 55mm
HLNA1017 ......... Rear Upper Link 73mm
HLNA1018 .........Servo Link 30.5mm
HLNA1019 ......... Gear Box
HLNA1020 .........Motor Guard, B, ST
HLNA1021 .........Main Gear Cover
HLNA1022 .........Differential Case(48P)
HLNA1023 .........Gear (34T-48P)
HLNA1024 .........Gear (81T-48P)
HLNA1025 .........Wing Mount, B
HLNA1026 .........Front Shock Absorbe
HLNA1027 .........Rear Arm Bulkhead
HLNA1028 .........Front Arm Bulkhead
HLNA1031 .........Steering Sway Arm Assembly
HLNA1032 .........Gear (20T-48P)
HLNA1033 .........Slipper Shaft
HLNA1034 .........Slipper Pad
HLNA1035 .........Slipper Hub
HLNA1036 .........Slipper Tensioner Spring
HLNA1037 ......... Motor Mount
HLNA1039 .........Rear Wheel Axle
HLNA1040 .........Dogbone
HLNA1041 ......... Front/Rear Suspension Pin
HLNA1042 .........Servo Saver Assembly
HLNA1043 .........Ball Head Scews 5.8mm
HLNA1044 ......... Front Wheel Axle
HLNA1045 .........Steering Shaft Bush
HLNA1053 .........Gear (23T)48P
HLNA1054 .........Front Lower Suspension Arm Screws 3*25mm
HLNA1055 .........Rear Lower Suspension Arm Screws 3*29mm
HLNA1056 .........Pin 3*26
HLNA1057 .........Pin 5*18
HLNA1059 .........Powder Steel Gear(20T-48P)
HLNA1061 .........Rear Shock Absorber
HLNA1062 .........Body Post, ST, MT

REPLACEMENT PARTS
Full manual available to download from: www.Helion-RC.comFull manual available to download from: www.Helion-RC.com
NOTE: If you experience any problems,
please consult online troubleshooting guide.
HLNA1063 .........Post Mount, ST, MT
HLNA1064 .........Wheel, ST
HLNA1065 .........Front Tire, ST
HLNA1066 .........Rear Tire, ST
HLNA1067 .........Front Wheel Complete, ST
HLNA1068 .........Rear Wheel Complete, ST
HLNA1070 ......... Cap Head Hex. Mechnical Screw 3*14
HLNA1071 ..........Cap Head Hex. Mechnical Screw 3*16
HLNA1072 ......... M3*3 Grub Hex Screws
HLNA1079B .......Replacement Body, ST Blue
HLNA1079R .......Replacement Body, ST Red
HLNA1079Y ....... Replacement Body, ST Yellow
HLNA1079G ....... Replacement Body, ST Green
HLNA1080 .........Clear Body, ST
HLNA1086 .........Conquest Battery 2000 mAh
HLNA1088 .........Front Steering Turnbuckle (55mm)
HLNA1089 .........Front Arm Turnbuckle
HLNA1090 .........Front Steering Turnbuckle (74mm)
HLNA1091 .........Machine Serrated Axle Nuts
HLNA1092 .........Aluminum Axle Drive Hexes
HLNA1093 .........Front Aluminum Pivot
HLNA1094 .........Rear Aluminum Pivot Block
HLNA1095 .........Front Aluminum Chassis Brace
HLNA1096 .........Front Aluminum Pivot Plate
HLNA1097 ......... Rear Aluminum Pivot Plate
HLNA1098 .........Front and Rear Shock
RDNA0086 ........ Metric 12 550 HT Brushed Motor
HLNA0059 .........ESC, Brushed, 30-15 WP with Reverse
KNNS0024 ........ET3 3-Channel 2.4GHz (Krypton) - Transmitter and All Weather Receiver
KNNS0025 ........ ET3 3-Channel 2.4GHz (Krypton) - Transmitter Only
This manual suits for next models
3
Table of contents
Popular Motorized Toy Car manuals by other brands

Kyosho
Kyosho INFERNO MP7.5 Sports2 readyset instruction manual

Reely
Reely Deathwatcher EVO BL 2.0 operating instructions

Awesomatix
Awesomatix A700 Evo II instruction manual

REVELL
REVELL Ferrari 458 Italia Assembly manual

Silverline
Silverline MCLAREN M28C MONACO G. P. 1979 J. Watson - P.... manual

Eduard
Eduard Boxer MRAV quick start guide

MDTechShop
MDTechShop 2017-9006-06 Assembly instruction

Himoto
Himoto Buggy E18XB user guide

Avigo
Avigo 5F5EAD4 Mercedes-Benz GL Class Operator's manual

Serpent
Serpent Cobra Te Instruction manual & reference guide

Electus Distribution
Electus Distribution 1:10 SCALE HIGH SPEED R/C TRUGGY manual

REVELL
REVELL Acura Integra R Assembly instructions

 LS-628 instruction manual")


