First Choice WaveTruck User manual
www.FirstChoicePool.com
INSTALLATION MANUAL

•Programmed movement for better cleaning
•Ecient, quiet operation
•Engineered for enhanced durability
•Simple installation, no additional tools required
•Easy grip roll bar handle
FULL KIT INCLUDES CLEANER, NINE CONNECTOR HOSES, ONE
LEADER HOSE, FLOW GAUGE, REGULATOR VALVE,SKIMMER
CONE,AND OWNER’S MANUAL.
THE WAVETRUCK AUTOMATIC SUCTION SIDE POOL CLEANER FEATURES:
See pages 15-17 for a complete list of replacement parts and kits
REMEMBER THESE IMPORTANT FACTS!
Before installing the WaveTruck automatic pool cleaner:
• Manuallyclean/vacuumthepoolandcleanallskimmer,pumpanddebrisbaskets.
• Cleanorbackwashthelter.
• Checkthatthewaterisatitsproperlevel.
• Checkwaterchemistry.Makesurethepoolisfreefromexcessalgaetoensureproper
operation of the WaveTruck automatic pool cleaner.
NeverusetheWaveTruckautomaticpoolcleanertoremoveplaster/pebbledebrisin
new or remodeled pools.
Always remove the WaveTruck automatic pool cleaner before backwashing or
chemically shocking the pool.

1
Thank you for purchasing the WaveTruck automatic pool cleaner.
The WaveTruck automatic pool cleaner works from the suction side ofyourpoollter
system and is subject to the GPM (gallons per minute) of the suction line. It is designed
to operate and install simply with most swimming pools. Occasionally, additional hoses
and/orpartsareneededtocompleteyourspecialsituation.Fortechnicalassistance
and parts availability, call your local First Choice dealer.
Keepthisinstallationmanualonle–withyourreceipt,purchasedateandserialnumber.
Always remove the WaveTruck automatic pool cleaner and hoses before swimmers
enter the pool. It is not a toy and is not intended for children to play with.
When removed from the pool, keep the WaveTruck automatic pool cleaner
disconnectedandstoredinashadedsafeplace–awayfromallchewing
animals!
The hoses must be stored straight. DO NOT COIL!
Carry the WaveTruck automatic pool cleaner by the handle only.
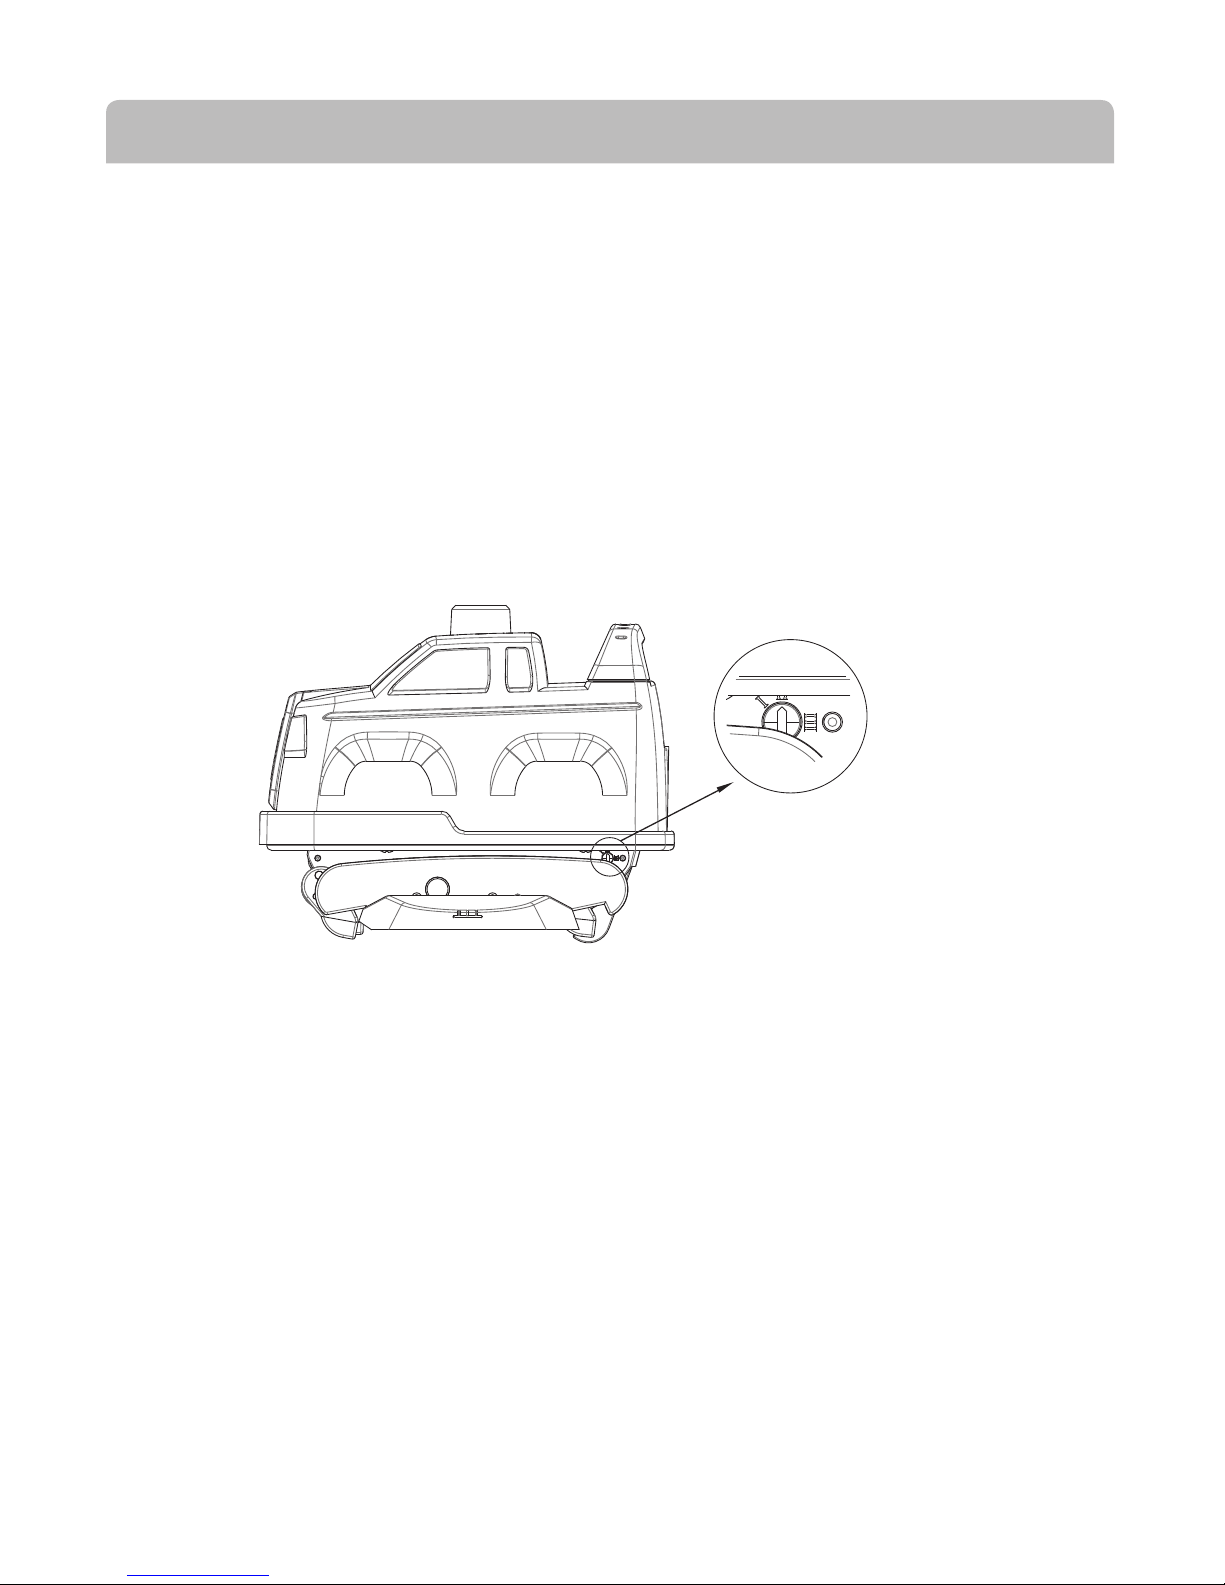
Always install a USPC-approved safety vacuum lock with sidewall connections. When
the WaveTruck automatic pool cleaner is removed, make sure the safety vacuum lock
wallttingcapissecurelycoveringthesidewallsuctionportandsnappedshut.SAFETY
FIRST!
THE WAVETRUCK AUTOMATIC POOL CLEANER
2
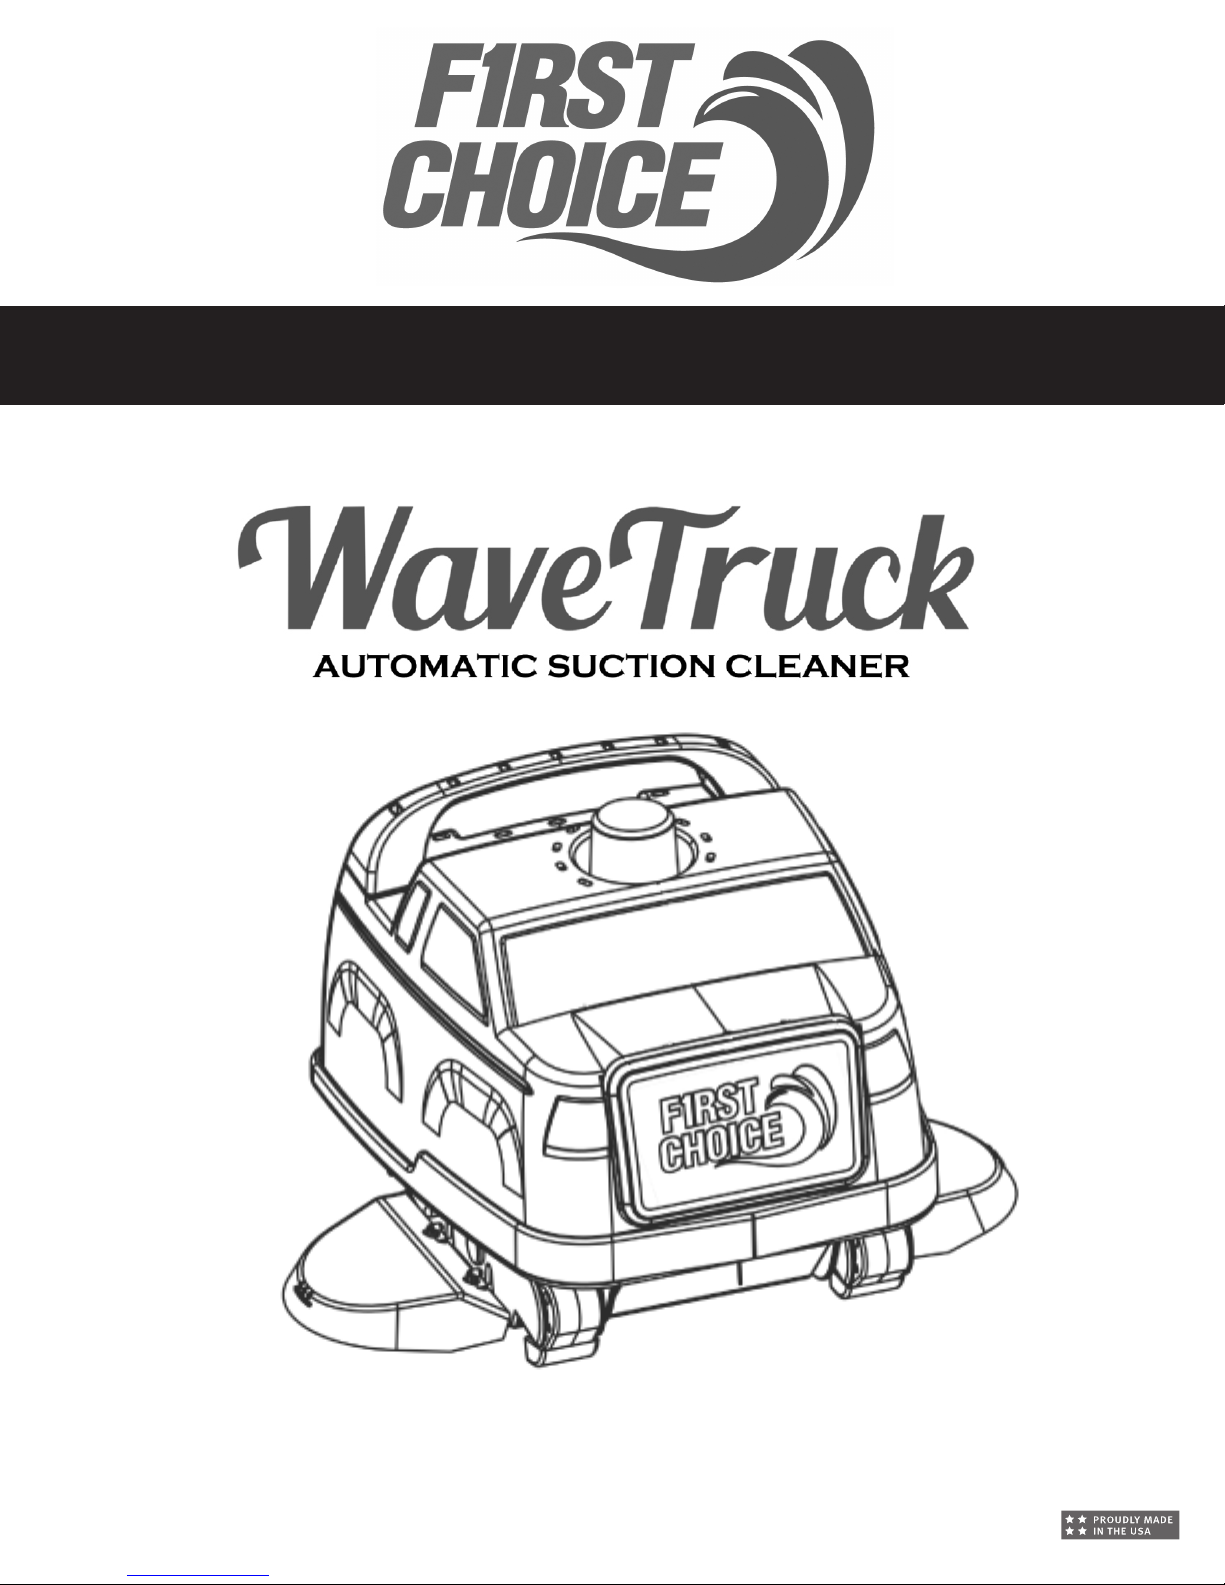
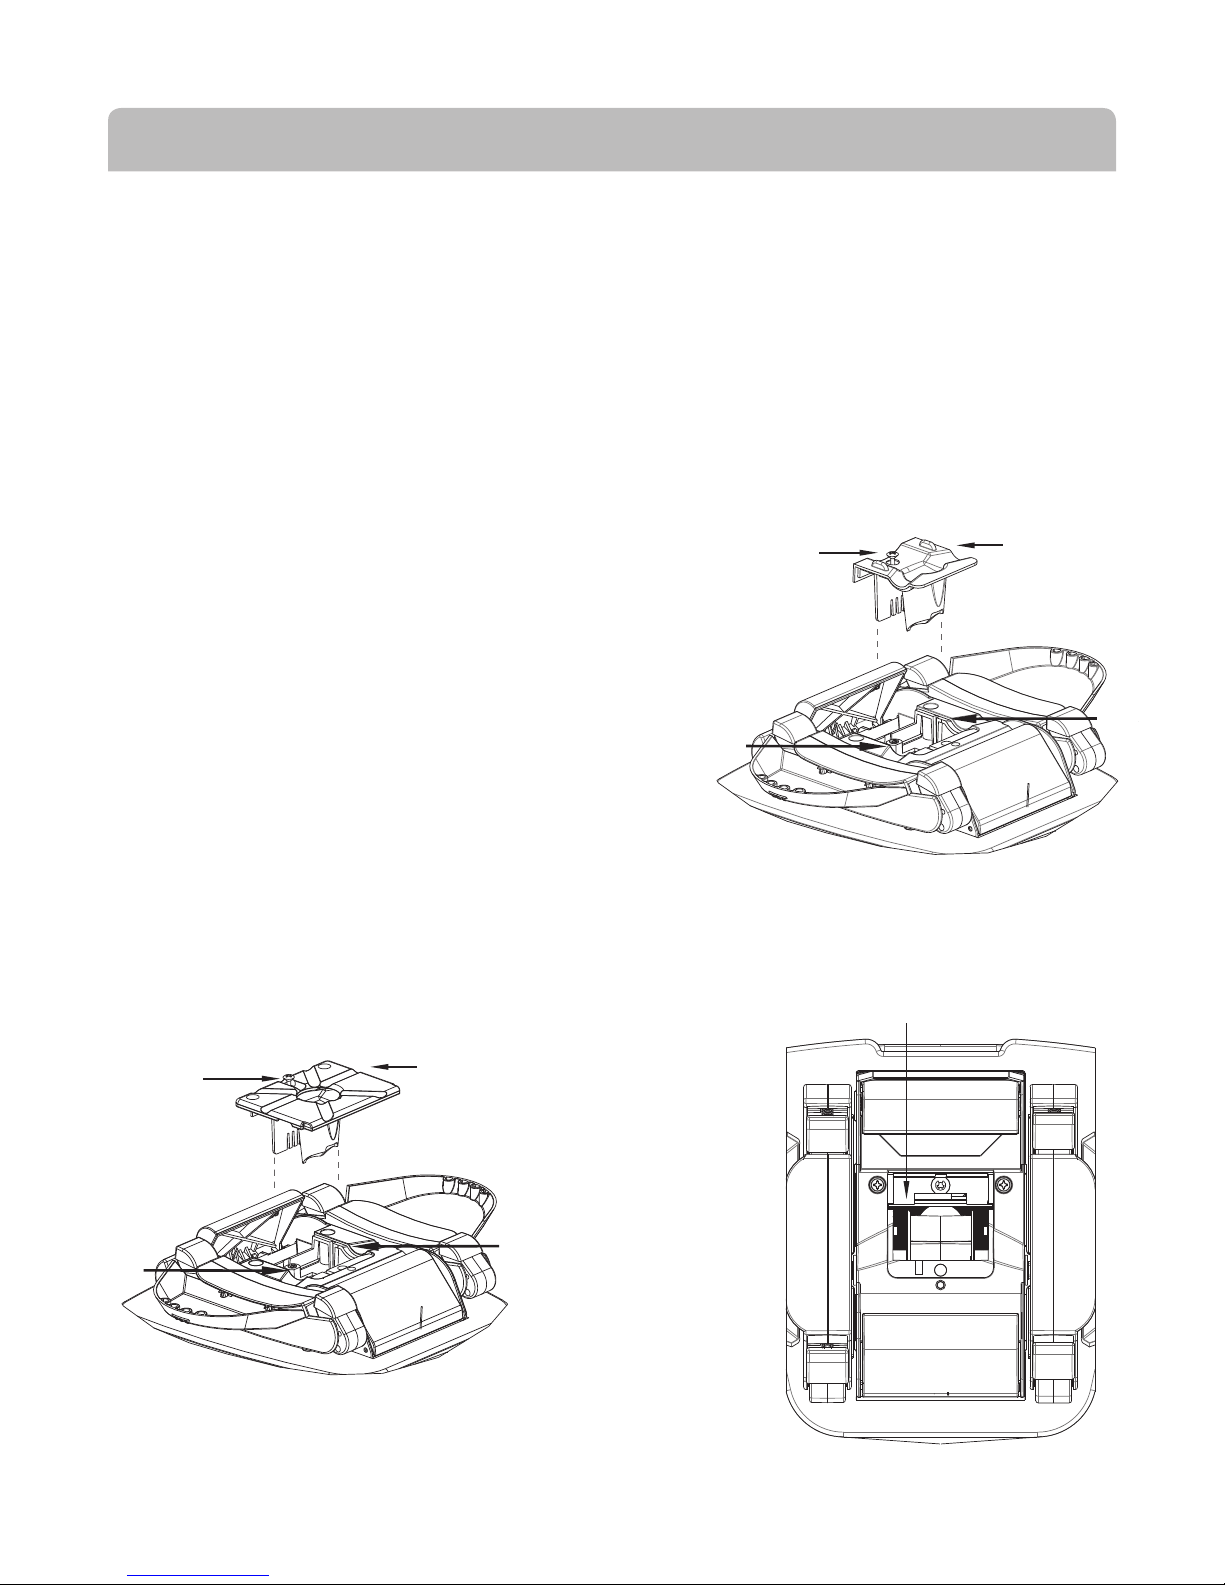
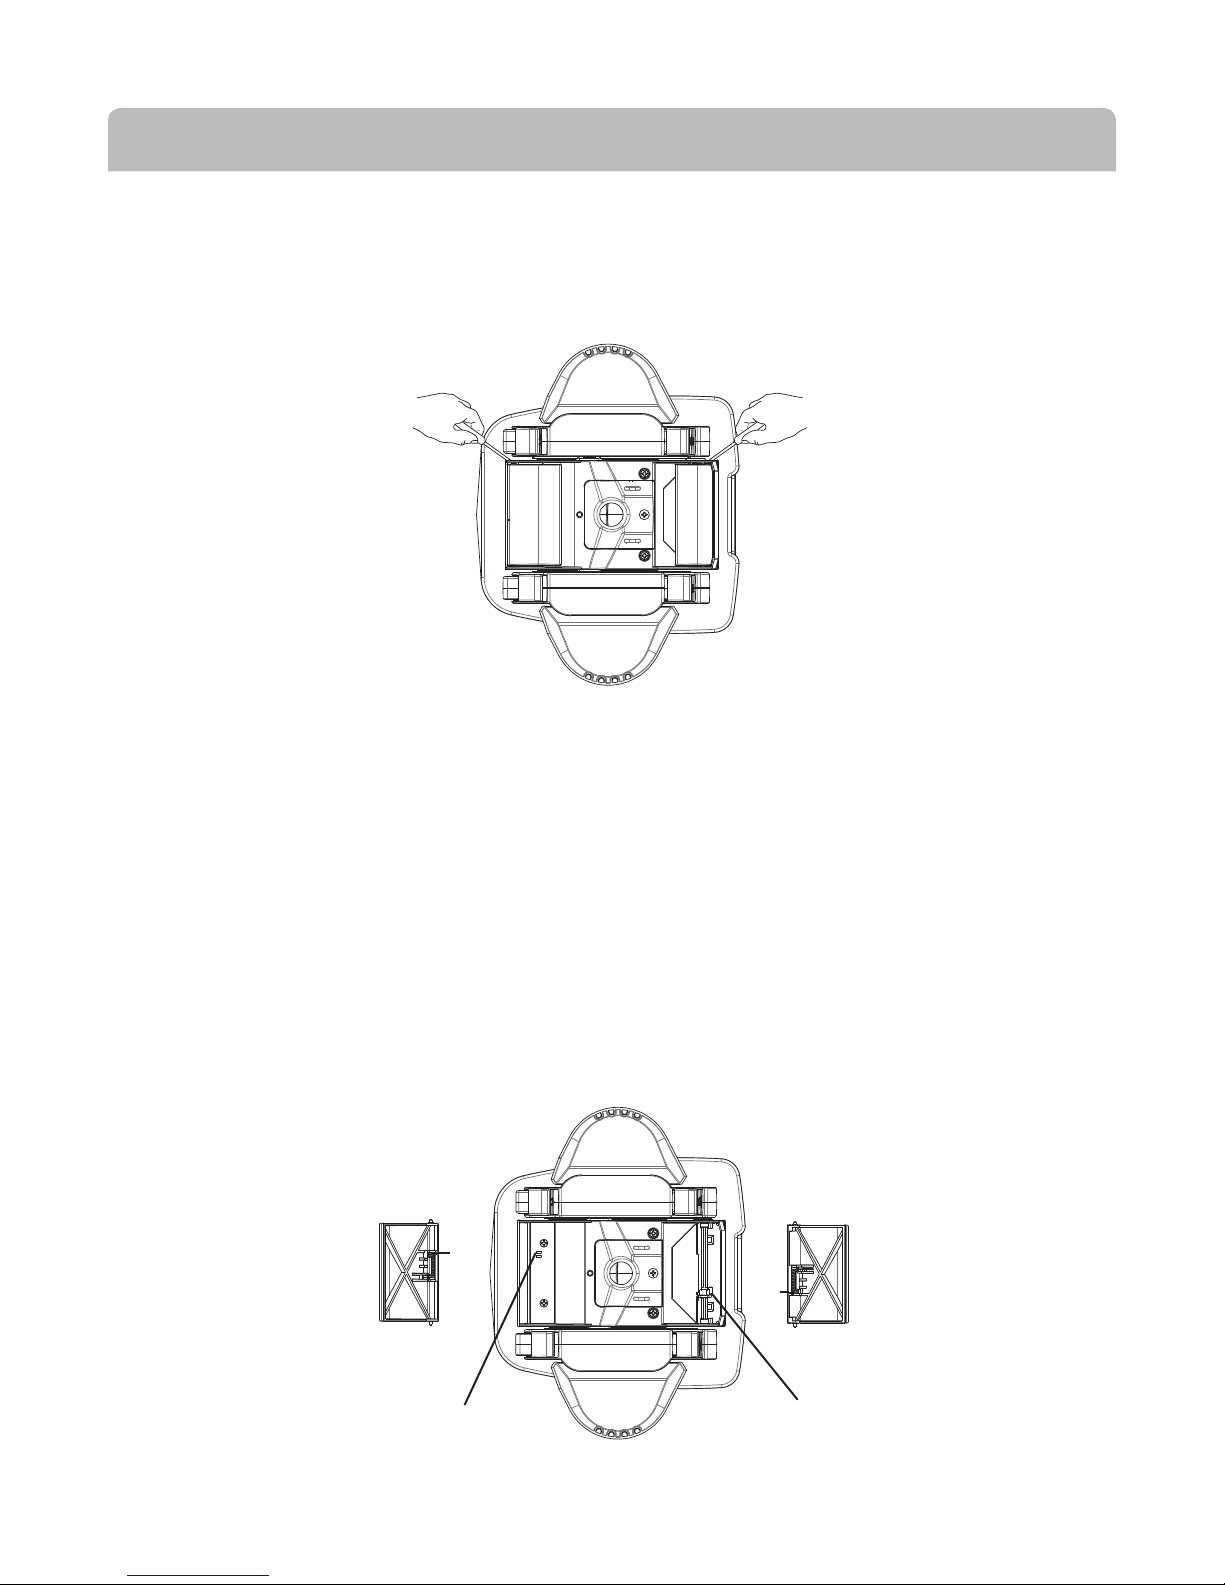
STEP 1: CONNECTING AND SUBMERGING THE HOSES AND CLEANER
Fig. 2
Fig. 1
There are nine connector hoses and one leader hose with a gray hose cu. The hose cu connects
to the top of the WaveTruck automatic pool cleaner (see Fig. 1).
Connect the WaveTruck automatic pool cleaner hose sections together by pushing and twisting
thetaperedmaleconnectorendofeachhosermlyintotheopenfemaleendoftheadjacenthose
section (see Fig. 2). Depending on the size and shape of your pool, all hose sections might not be
used.Thehoseshouldreachfromtheskimmerorsafetyvacuumlockwallttingtothefurthest
pointinthepoolplusoneextrahosesection.Ifthehoseisnotlongenough,itwillbenecessaryto
purchase additional hose sections from your pool dealer. After the correct hose length has been
assembled,llthehosecompletelywithwaterbyloweringtheattachedWaveTruckautomaticpool
cleaner and then vertically pushing the hose down, allowing all the air to escape. If optional leaf
canisterispurchased,installbetweenrstandsecondhosesections(seeFig.3).
Fig. 4
To StarzTruck Skimmer
First hose section
Second hose section
(showing leaf canister)
Fig. 7
VLK15Txxx safety
vacuum lock wall fitting
Pool deck / coping
First hose section
To skimmer or vac-lock
Leader hose
Flow Gauge
HWN163
Flow indicator
(desired position)
Fig. 3
3
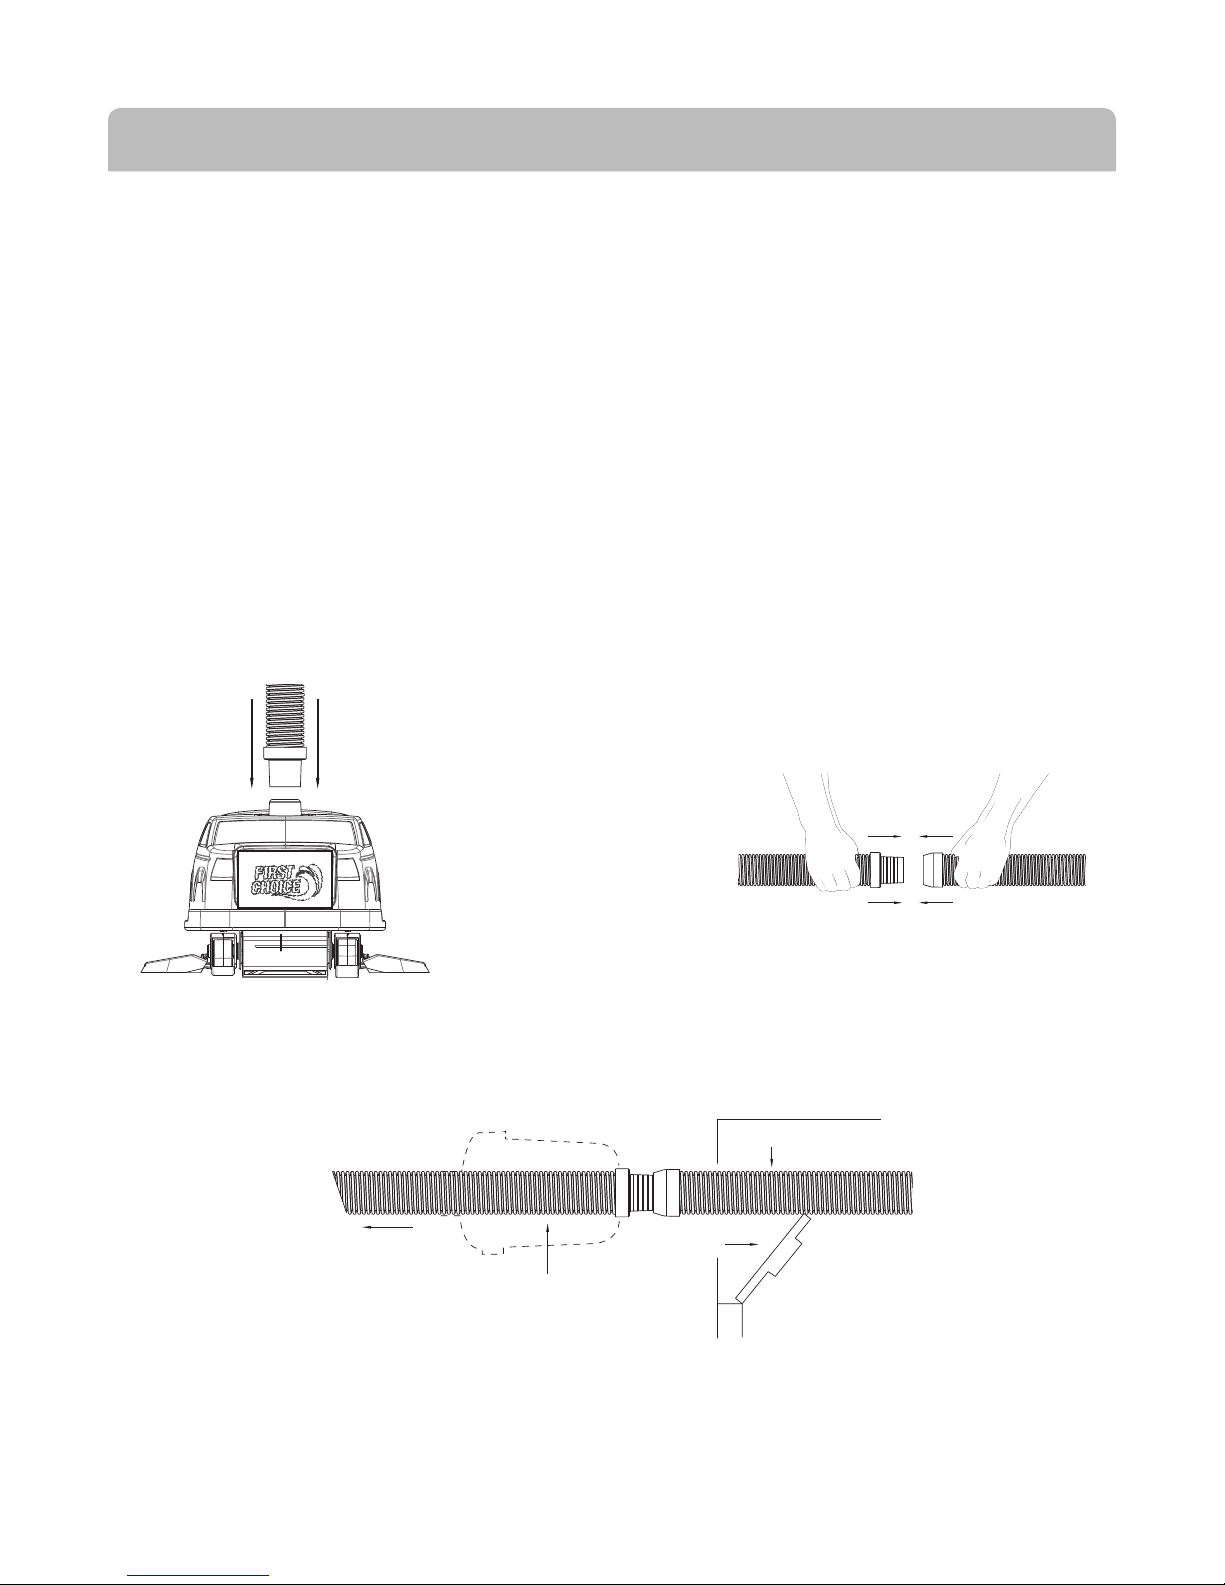
STEP 2: CONNECTING TO SUCTION
Fig. 5
HWN161 regulator valve
HWN152cone adapter
To pump
To StarzTruck
Hose
To main drain (if applicable)
Skimmer
Fig. 6
VLK15Txxx safety
vacuum lock wall fitting
Fig. 7
VLK15Txxx safety
vacuum lock wall fitting
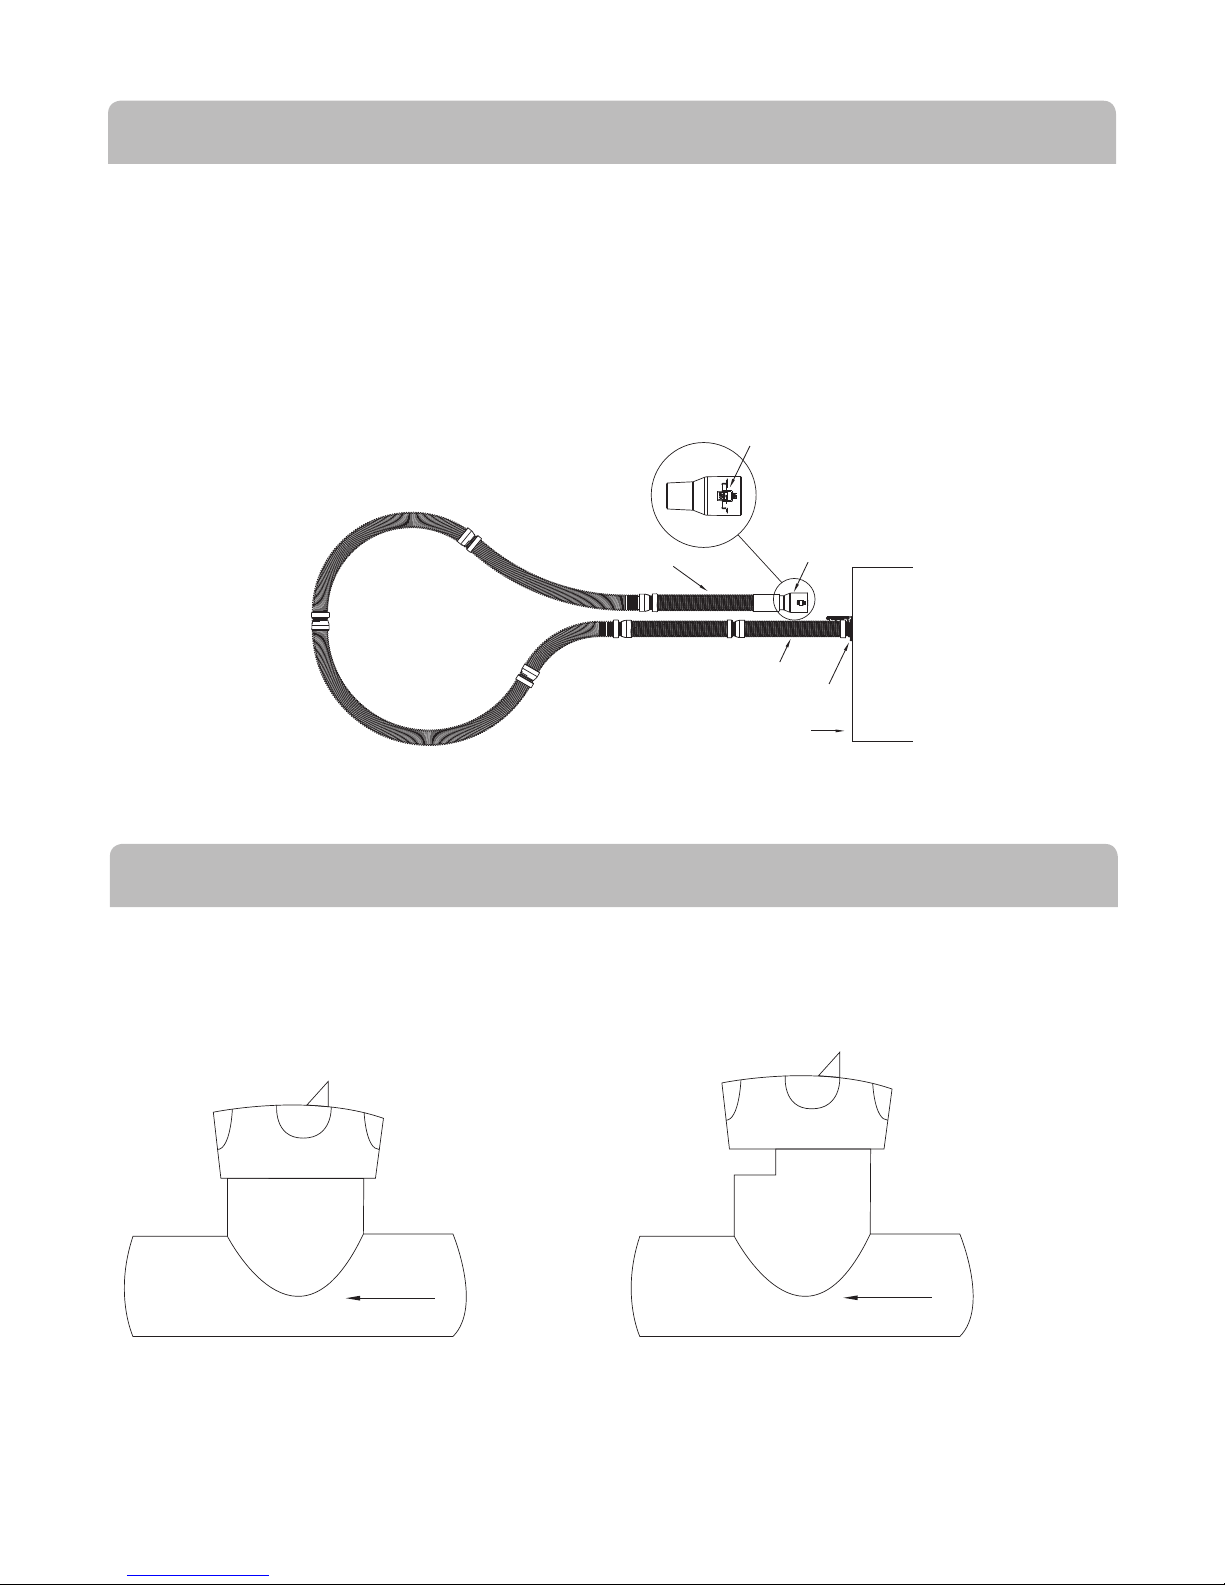
Connect the skimmer cone adapter to the regulator valve and then insert the skimmer cone into:
A. The suction port of the skimmer (see Fig. 4) or
B. The wall port safety vacuum lock without a three-way or ball valve (see Fig. 5)
Without the skimmer cone and regulator valve, insert the male end of the hose directly into the
safetyvacuumlockwallttingportwithathree-wayorballvalve(seeFig.6)
Fig. 6
VLK15Txxx safety
vacuum lock wall fitting
Fig. 7
VLK15Txxx safety
vacuum lock wall fitting
Fig. 4
To StarzTruck Skimmer
First hose section
Second hose section
(showing leaf canister)
Fig. 5
HWN161 regulator valve
HWN152cone adapter
To pump
To StarzTruck
Hose
To main drain (if applicable)
Skimmer
Fig. 6
VLK15Txxx safety
vacuum lock wall fitting
4
Pool deck / coping
First hose section
To skimmer or vac-lock
Leader hose
Flow Gauge
HWN163
Flow indicator
(desired position)
Fig. 3
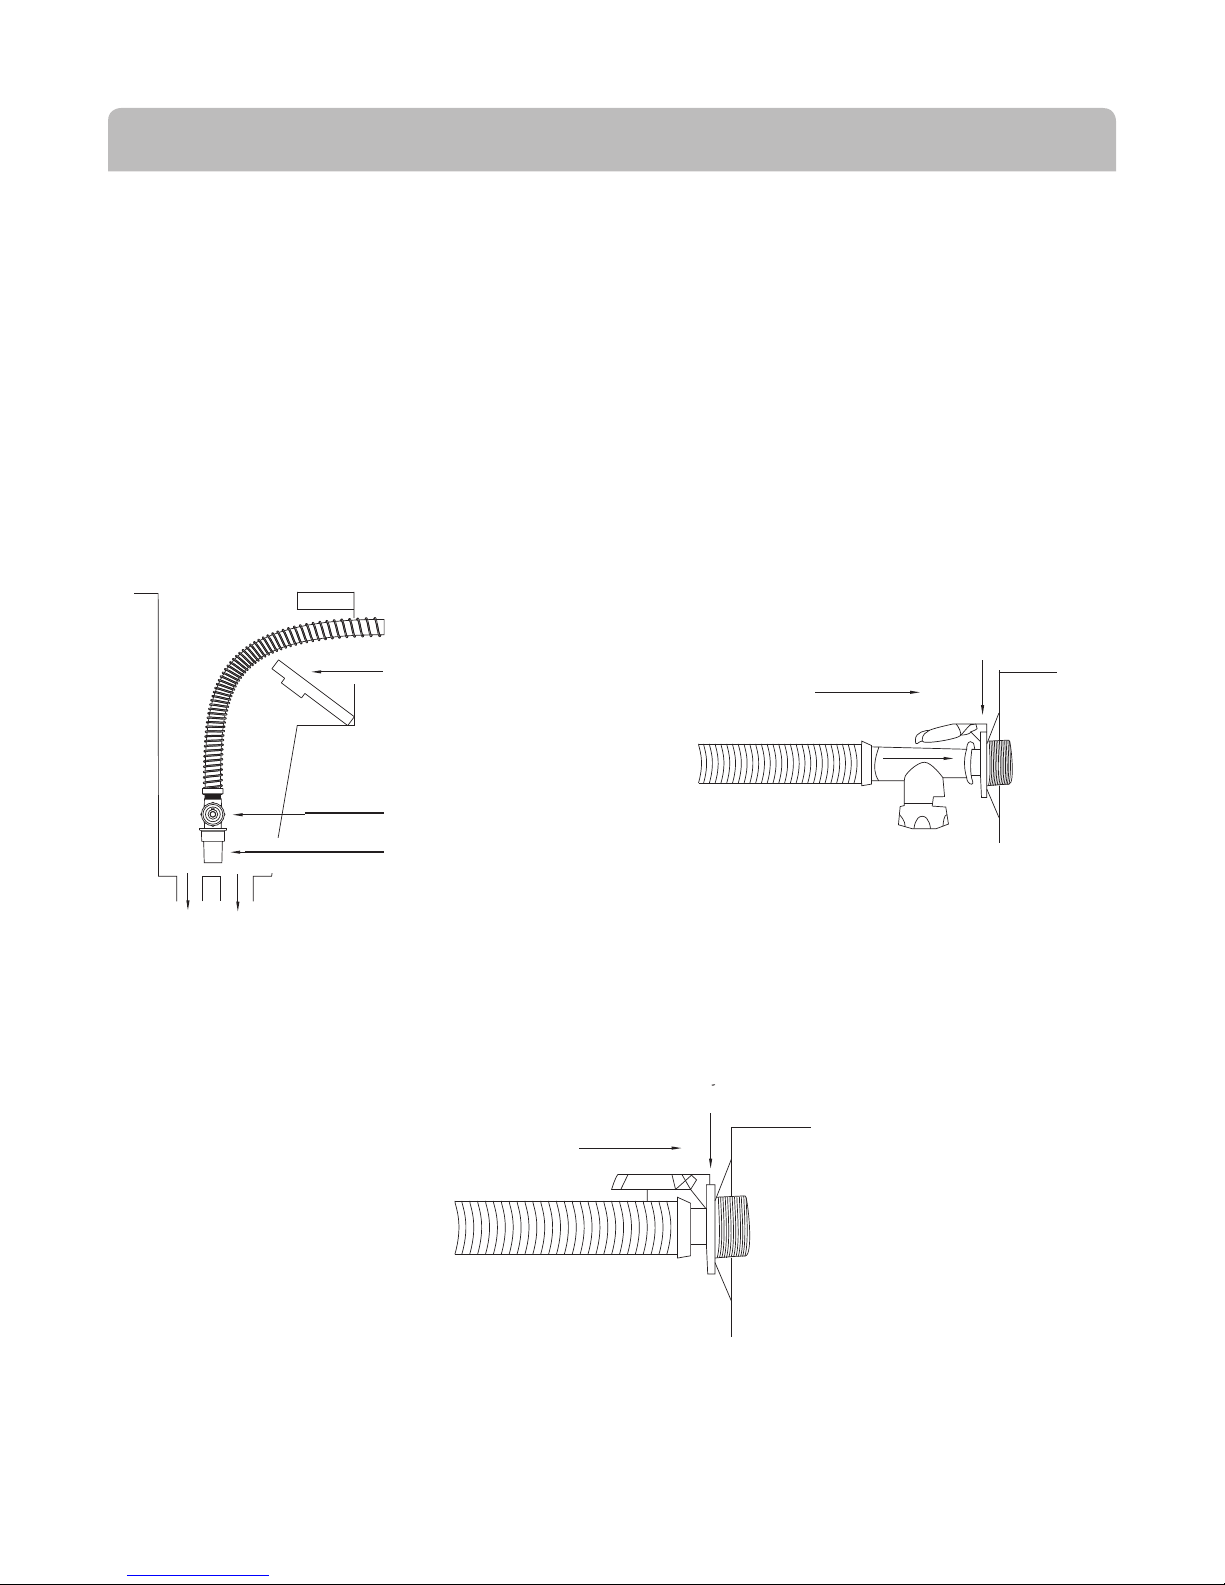
STEP 3: TESTING THE FLOW
Ensure that the hose is full of water and that your pump is running. Remove the WaveTruck auto-
matic pool cleaner from the hose, then insert the ow gauge into the leader hose. Make sure the ow
gauge is underwater (see Fig. 7), and with the opposite end of the hose attached to a dedicated suc-
tion or skimmer port observe the ow gauge. The optimal level is inbetween the MAX and MIN lines
of the ow gauge. If the setting is higher than the MAX marking, it will be necessary to reduce the
ow using the regulator valve described in Step 4.
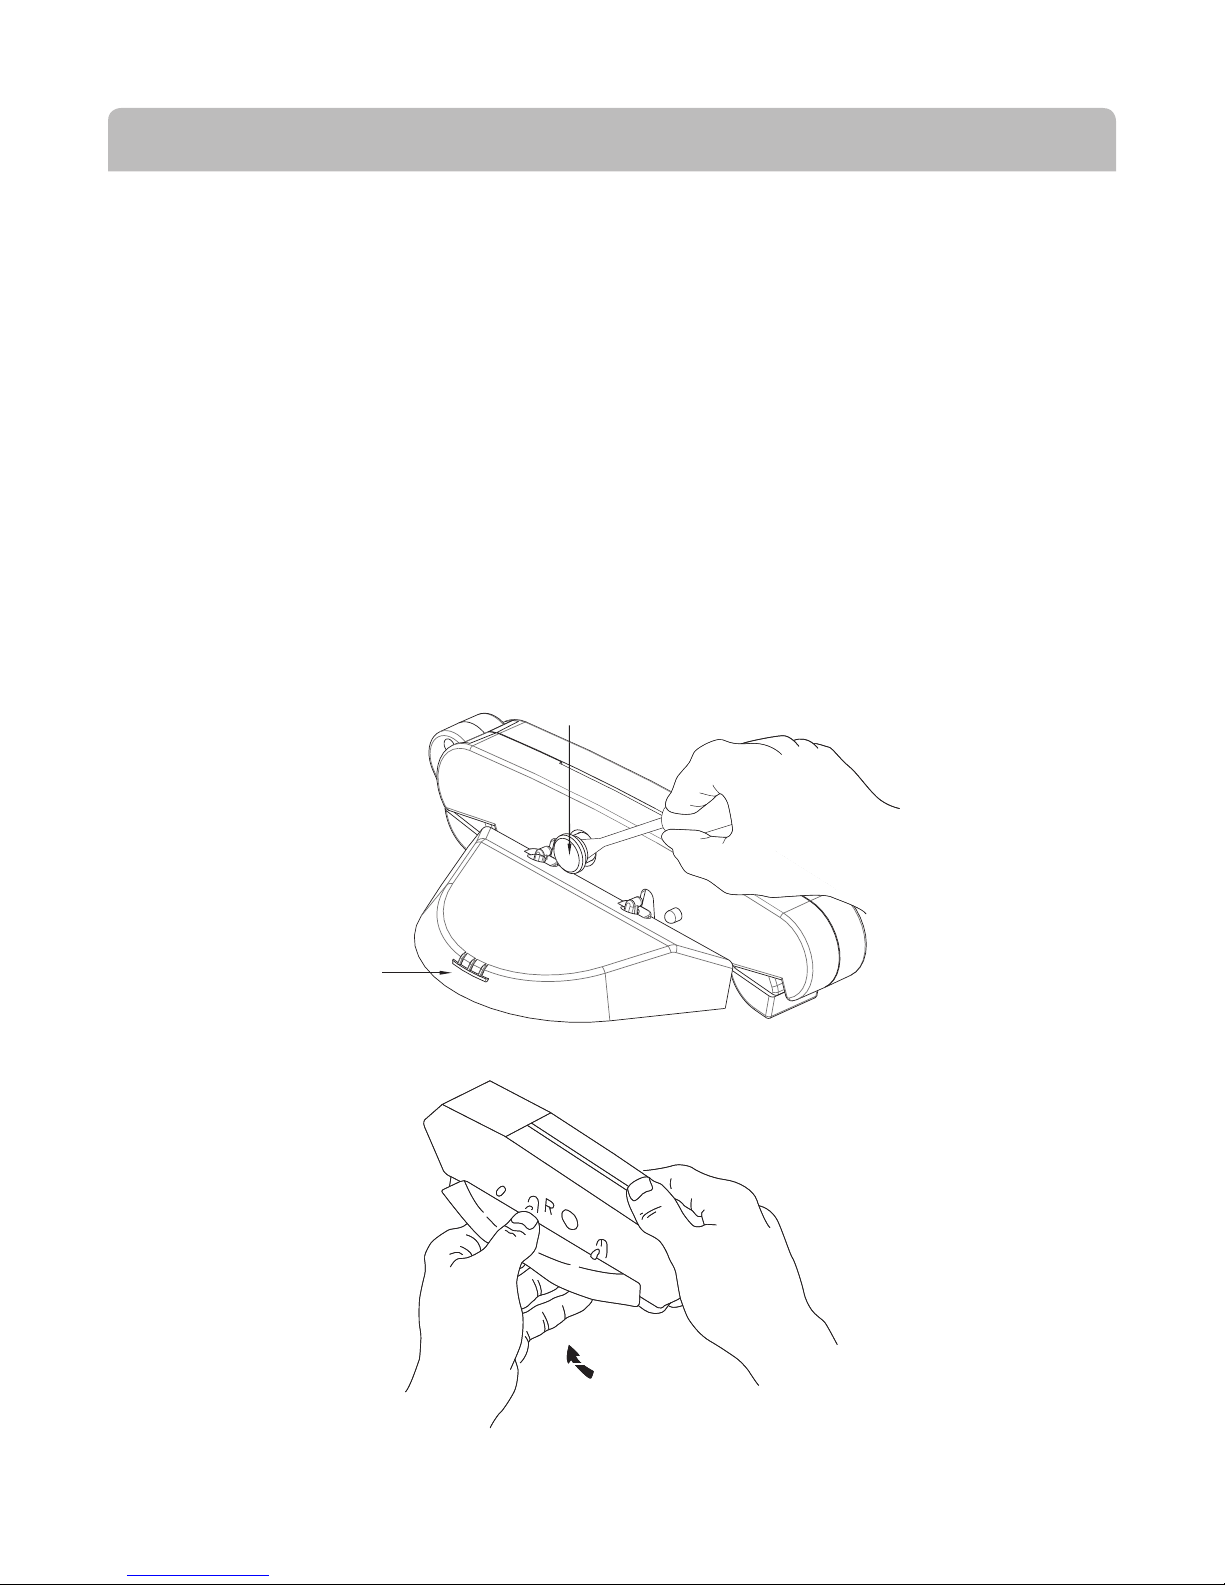
STEP 4: ADJUSTING WATER FLOW
Observe your WaveTruck automatic pool cleaner in operation at higher speed with dual or variable speed
pumps. Adjust the regulator, three-way or ball valve to speed up or slow down the cleaner (see Fig. 8).
Fig. 9
Screw top in.
Bypass less water.
Speed cleaner up.
Unscrew top.
Bypassmore water.
Slow cleaner down.
MaxMax
Min
To slow cleaner down
screwtop outward.
(Bypass more water)
To speed cleaner up
screwtop inward.
(Bypass less water)
Fig. 7
VLK15Txxx safety
vacuum lock wall fitting
Fig. 8
5
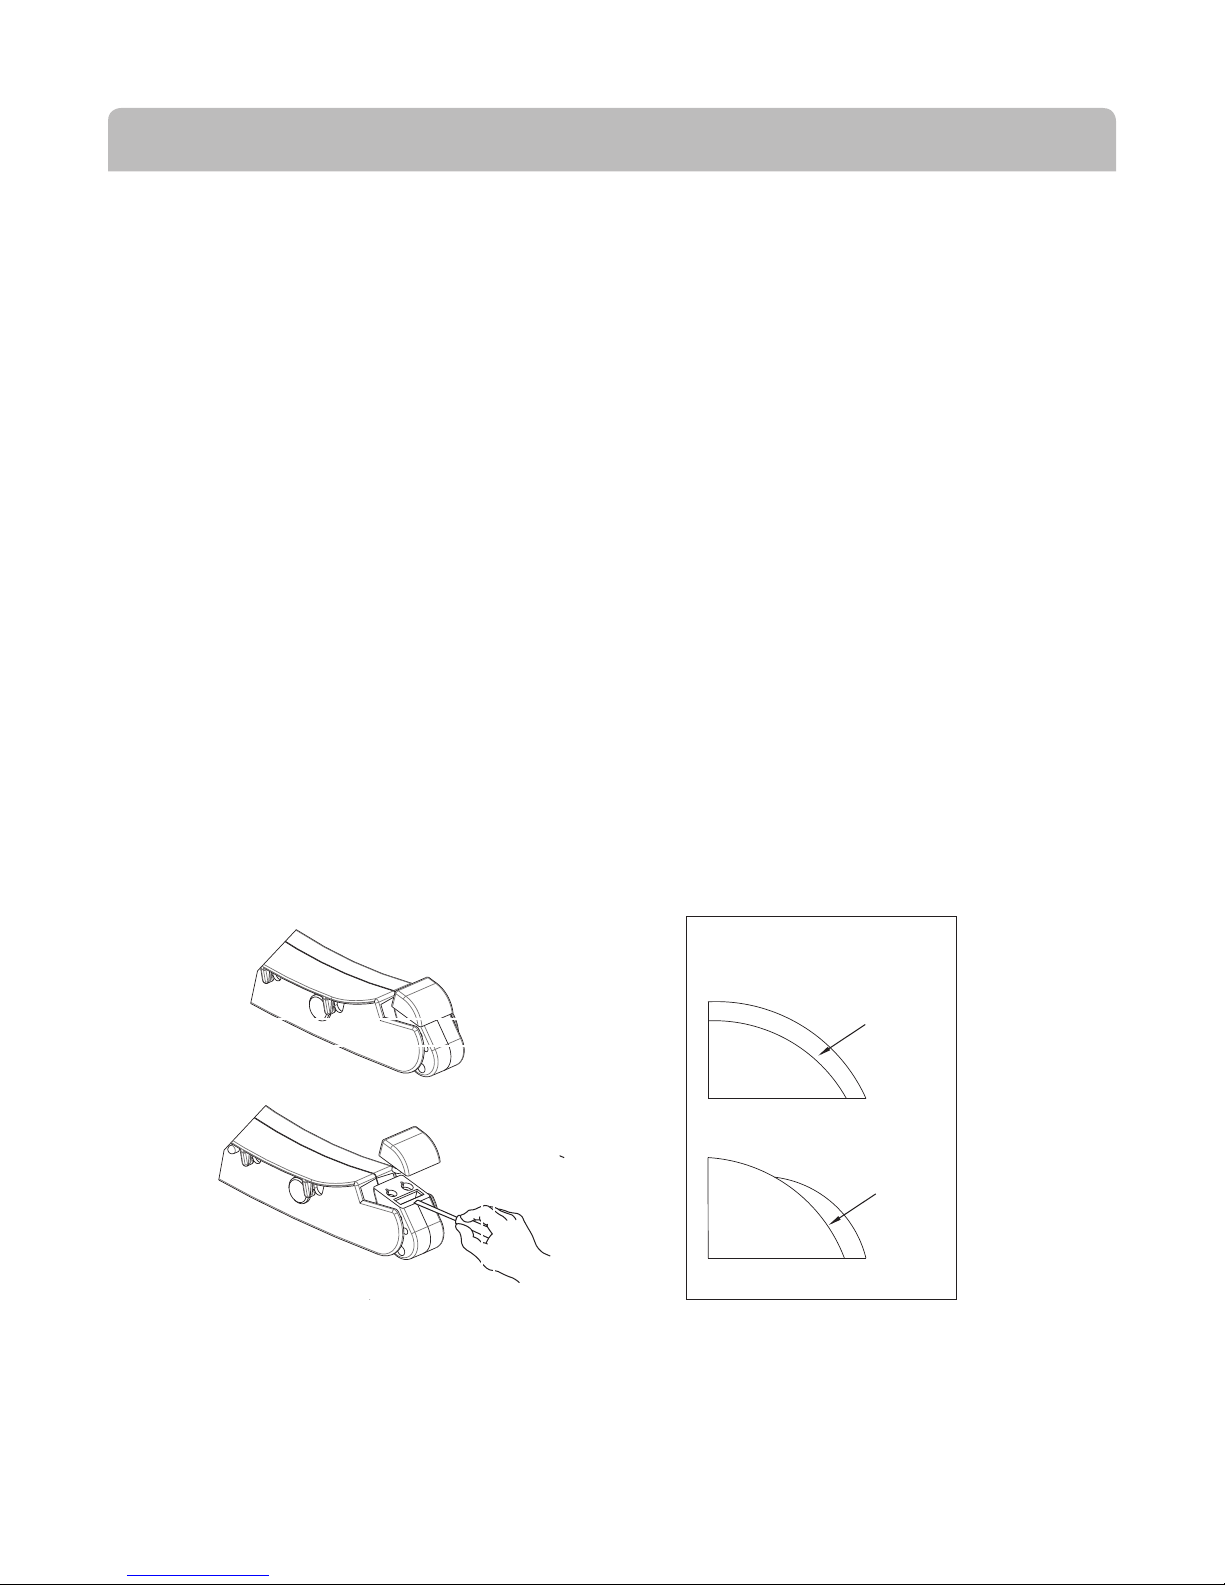
The rear ap tension adjuster is preset to II. When the WaveTruck automatic pool cleaner seems to be spending
too much time against steps, vertical walls and other obstructions, turn the rear ap tension adjuster to position
I (see Fig. 9). Sometimes adjusting your ow valve up or down will also help. Custom pools with interior bar
stools, fountains, planters, etc., will require someone to physically free the cleaner in the case that its becomes
trapped.TheWaveTruckautomaticpoolcleanerwillclimbverticalwallsinconcreteandberglasspools(not
vinyl) if there is at least a 12-inch radius where the oor meets the walls. The cleaner will not climb or go all
thewayupthewalleverytimeduetotheprogrammedgearbox.IftheWaveTruckautomaticpoolcleaneris
not sticking to the wall, set the rear ap tension adjuster to position III (see Fig. 9)and/oradjustyourregulator
valve(s). If the cleaner climbs above the waterline and sucks in air, set the rear ap tension adjuster to position I
(see Fig. 9)and/oradjustyourregulatorvalve(s).
STEP 5: ADJUSTING YOUR WAVETRUCK AUTOMATIC POOL CLEANER
Fig. 10
Rear flap tension adjuster
Fig. 9
Screw top in.
Bypass less water.
Speed cleaner up.
Unscrew top.
Bypassmore water.
Slow cleaner down.
MaxMax
Min
6
WAVETRUCK AUTOMATIC POOL CLEANER SERVICE TIPS
Bottom of cleaner (concrete)
Fig. 17
Slots
Captive
screwFixed access
cover
Bottomof cleaner (vinyl)
Fig. 18
Captive
screwFixed access
cover
Slots
Turbine/vacuum chamber
Fig. 19
BOTTOM OPENING REMOVAL AND CLEANING INSTRUCTIONS
REMOVING THE BOTTOM OPENING
Should the WaveTruck automatic pool cleaner stop moving or become sluggish due to debris trapped in the
throatorinsidetheunit,theturbine/vacuumchamberisaccessiblefollowingtheseinstructions.
1. Turn o pump.
2. Remove WaveTruck automatic pool cleaner from pool.
3.DisconnectWaveTruckautomaticpoolcleanerfromleaderhose.
4. Turn WaveTruck automatic pool cleaner upside down.
5. Locate and loosen the captive screw behind the
throat in the center of the bottom (see Figs. 10 & 11).
6.Liftxedaccesscover(seeFigs.10&11).
7.Cleanturbine/vacuumchamber(seeFig.12).
8. Check turbine for free movement.
9.Reinstallthexedaccesscoverbyliningitupwiththe
two slots as shown in Figs. 10 & 11.
Slide the cover in place and tighten the captive screw.
10. Reinstall WaveTruck automatic pool cleaner in pool per
installation instructions.
Bottom of cleaner (concrete)
Fig. 17
Slots
Captive
screwFixed access
cover
Fig. 10
Rear flap tension adjuster
Worn
Shoe
Good shoe
Wear
Mark
Fig. 11
Wear mark
Fig. 12
Pod plug
7
CHECK THE CONDITION OF THE SHOES, WINGS AND FLAPS PERIODICALLY
The pod shoes and wings have wear indicators on their sides and should be checked occasionally to determine
if replacement is needed. The shoe wear indicator is a line on the side of the pod shoe that appears as a
dierenceintexture.Whenthistexturedierenceisnolongervisibleatthebottomoftheshoewhenviewed
from either side, the shoes must be changed (see Fig. 13). The wing wear indicator is located on the side and
is a horizontal line which has three vertical lines above it. When you can no longer see the horizontal line, the
wings must be replaced (see Fig. 14 on page 8 ).
POD SHOE REPLACEMENT
A. Turn unit upside down.
B. Insert screwdriver between foot and shoe on one of the pods (see Fig. 13).
C. Using a lifting motion, remove the shoe from the foot.
D. Dip a new shoe in water and attach the shoe to the foot, making sure to put the small post into the small hole
and the large post into the large hole. These posts and holes are dierent sizes to prevent the shoes from being
improperly installed.
E. Repeat steps b, c and d for each shoe.
WAVETRUCK AUTOMATIC POOL CLEANER SERVICE TIPS
Worn
Shoe
Good shoe
Wear
Mark
Fig. 11
Worn
Shoe
Good shoe
Wear
Mark
Fig. 11
Worn
Shoe
Good shoe
Wear
Mark
Fig. 11
Fig. 13
8
WAVETRUCK AUTOMATIC POOL CLEANER SERVICE TIPS
Wear mark
Fig. 12
Pod plug
Fig. 13
WING REPLACEMENT
A. Using a screwdriver, remove the plugs from both pods (see Fig. 14).
B. Remove the old wings by bending the wings up toward the sides of the cleaner, and lift them o their hooks
(see Fig. 12). If any of the wing hooks are broken, take the WaveTruck automatic pool cleaner to your dealer
for pod replacement as the cleaner will not function properly if the wings are not properly attached.
C. Attach new wings, making sure that you match the “L”(left) and “R” (right) wings to the corresponding pods.
D. Replace the pod plugs and tap them into place
Bottom of cleaner
Fig.14
REARFRONT
Bottom of cleaner
Fig.15
POD REPLACEMENT
A. Using a screwdriver, remove the plugs from the pod (see Fig. 14).
B.Unscrewandremovethehexboltthatwascoveredbytheplug.
C. Remove pod by placing equal pressure on both ends of the pod until it releases from the cleaner body.
D.Installnewpodandreplaceandtightenhexbolt.Ensurethatthepodmoveseasilyandfreely.
9
Bottom of cleaner
Fig.14
WAVETRUCK AUTOMATIC POOL CLEANER SERVICE TIPS
REARFRONT
Bottom of cleaner
Fig.15
FLAP REPLACEMENT
A. Remove the front and rear aps from your WaveTruck automatic pool cleaner by inserting a small screwdriver
between the ap and the lower body near the pivot point of the aps (see Fig. 13).
. You will notice that your replacement aps look similar but are marked “Front” and “Rear” on the ap. It is absolutely
necessary to install the proper ap in the front and rear of the unit because the springs in the aps are dierent.
Failure to do so will result in unsatisfactory performance of the WaveTruck automatic pool cleaner.
Wheninstallingthefrontap,besurethattheextendedlegofthespringisinsertedintothenotchonthefront
ofthelowerbody.Securetheapbyrstplacingoneofthecornertabsintoitscorespondingholeandthen
carefullypushingtheotheredgeintosecurethenaltabinplace.Youwillfeelandhearasnapwhentheap
falls in place. Fold the ap in toward the bottom of the WaveTruck automatic pool cleaner. You will feel some
resistance at this point (that is normal). As the ap snaps into its normal position, you will feel the spring action and
notice that the front ap is now in its normal operating position.
Wheninstallingtherearap,theextendedlegofthespringmusttagainstoneoftheatsurfacesofthecam(see
CamNotch
Bottom of cleaner (concrete)
Fig. 17
Slots
Captive
screwFixed access
cover
Bumper
Front flap
Lower body assembly
Captive screw
“B” screws
“C” screws
“A” screws
Fig. 16

10
WAVETRUCK AUTOMATIC POOL CLEANER SERVICE TIPS
Bumper
Front flap
Lower body assembly
Captive screw
“B” screws
“C” screws
“A” screws
Fig. 16
WAVETRUCK AUTOMATIC POOL CLEANER BUMPER REPLACEMENT
Replacement of the WaveTruck automatic pool cleaner bumper is not recommended as a“do it yourself” repair,
because there is a slight possibility that the replacement might cause a problem in the propulsion system. We
strongly suggest that you consult your dealer for this repair.
A #2 phillips screwdriver is necessary for this repair.
1. TurnWaveTruckautomaticpoolcleanerupsidedownandplaceitinapositionthatissteady/rm.
2. Locateandloosenthecaptivescrewbehindthethroatinthecenterofthebottom(Figs.10,11,12,onPg6).
3. Liftthexedaccesscover(seeFigs.11&12,Pg6).
4. Remove four “A” screws (see Fig. 10,Pg6).
5. Lift the lower body assembly o the WaveTruck automatic pool cleaner (see Fig. 10,Pg6).
6. Remove four“B”screws (see Fig. 18).
7. Remove bumper carefully, do not tamper with any other cleaner parts.
9. Replace with new bumper, do not tamper with any other cleaner parts
10. Reinstallscrewsandparts,followingstepsinreverse–6,5,4,3,2.
11. Reinstall WaveTruck automatic pool cleaner in pool per installation instructions.
Bottomof cleaner (vinyl)
Fig. 18
Captive
screwFixed access
cover
Slots

11
PROBLEM:SLOW/NOFORWARDMOVEMENT
CAUSES SOLUTIONS
Lackof/improperwaterowthroughcleaner Check and adjust water ow, Pg 4
Partial blockage of WaveTruck throat Clearblockage,Pg6
Worn shoes Replace shoes, Pg 7
Worn wings Replace wings, Pg 8
PROBLEM:CLEANERFAILSTOCLIMBVERTICALWALLSGUNITE/CONCRETEPOOL
CAUSES SOLUTIONS
Improper shoes for application Contact your local First Choice dealer
Lackof/improperwaterowthroughcleaner Adjust water ow, Pg 4
Partial blockage of WaveTruck throat Clearblockage,Pg6
Worn shoes Replace shoes, Pg 7
Worn wings Replace wings, Pg 8
Hose too short Install additional hose sections, Pg 2
Improper tension on rear ap Turn rear ap adjuster to III, Pg 5
WAVETRUCK AUTOMATIC POOL CLEANER TROUBLESHOOTING GUIDE

12
PROBLEM: CLEANER CLIMBS TO SURFACE AND SUCKS AIR
CAUSES SOLUTIONS
Toomuch/improperwaterowthroughcleaner Adjust water ow, Pg 4
Improper tension on rear ap Turn rear ap adjuster to I
If still climbing too much, reduce water ow
until proper operation is achieved, Pg 4, 5
Steering failure 1. Check and clean rear screen
2. Check to see that cone gear is free and
rotates smoothly in both directions
3.Checkmediumturbineandspindlegear
assemblies for malfunction. This will require the unit
be disassembled, if you are not comfortable with the
cleaner’s assembly please seek professional help.
PROBLEM: CLEANER HEAD FLOATS
CAUSES SOLUTIONS
Cleaner head or return line has air in it Remove all air from cleaner head
Stop all air from entering the pool through
the return lines
Ifcleanerheadandhosearecoveredwithne
bubbles, give the hose a good tug. This will release
the air bubbles and allow the cleaner head to settle
to the bottom of the pool until the hose is covered
with bubbles again
The cleaner head is being pulled or lifted o
the bottom of the pool by the cleaner hose
orreturnlineow–eitheratthesurfaceorat
thebottomofthepool–orboth
Readjust return lines to prevent water ow from
interferingwithcleanerheadand/orhose
WAVETRUCK AUTOMATIC POOL CLEANER TROUBLESHOOTING GUIDE

13
A. Pool plaster is aected by age, water chemistry, etc.
B. Pool plaster can deteriorate over a period of time.
C. The integrity of “good” pool plaster is such that a pool
vacuumcleaner–automaticormanual–cannotremove
that plaster.
D. The integrity of “good” pool plaster is such that the plaster
will cause wear on the WaveTruck automatic pool cleaner
–notviceversa.
E. Vinylandberglassareaectedbyage,sunlightand
water chemistry.
F. Vinyl can become brittle and weak.
G. Vinyl can also be aected by the installation and the pool’s
surroundings.
H. When installing the WaveTruck automatic pool cleaner,
you assume all responsibility for the condition of the pool
and the pool’s surroundings.
To better serve you, please have the following information
available if you contact your local First Choice dealer.
1. The purchase date and purchase location of your
WaveTruck automatic pool cleaner.
2. The serial number of your WaveTruck automatic pool
cleaner.
3. Thenumberofhosesectionsused.
WAVETRUCK AUTOMATIC POOL CLEANER TROUBLESHOOTING GUIDE
WAVETRUCK AUTOMATIC POOL CLEANER DISCLAIMER
PROBLEM: CLEANER STICKS AT STEPS, CORNERS, ETC.
CAUSES SOLUTIONS
Improper water ow Check and adjust water ow, Pg 4
Worn shoes Replace shoes, Pg 7
Worn wings Replace wings, Pg 8
Hose too short Install additional hose, Pg 2
Steering failure 1. Check and clean rear screen
2. Check to see that cone gear is free and rotates
smoothly in both directions
3.Checksteeringprogramandtroubleshoot–then:
A.Clean,repairorreplacegearbox
B. Checkpod/A-frameconnectionandreplace
ifnecessary–donotattempttoretighten
loose pods
C. Check medium turbine and spindle gear
assemblies- This will require the unit be
disassembled, if you are not comfortable with the
cleaner’s assembly please seek professional help.

14
Thislimitedwarrantyisextendedtotheoriginalpurchaser
(consumer) from the manufacturer of the WaveTruck Automatic
Pool Cleaner.
First Choice warrants this cleaner to be free from defects in
materials and workmanship for a period of one year from the
original date of purchase subject to all the following conditions
andexclusions.
1. Should the cleaner fail to be in good working order in
accordance with the above schedule, First Choice will at its
option repair or replace the cleaner or any defective parts
atnoadditionalchargeexceptassetforthbelow.Repair
parts and replacement products will be furnished on an
exchangebasisandwillbeneworfunctionallyequivalent.
All parts removed as a result of replacement shall become
the property of First Choice. Liability of First Choice and
the sole remedy of the purchaser whether in contract
under any warranty, in tort (including negligence), in
strict liability or otherwise, shall be limited to the repair
or replacement of defective parts only and shall in no
eventexceedreturnoftheamountofthepurchaseprice
paid by the purchaser.
2. This limited warranty is for the replacement of alleged
defective parts during the term of the warranty. First
Choice, upon determination and at our option, will repair
and return to the owner all defective parts that are covered
by this warranty. Any parts not covered by this limited
warranty will be returned to owner freight collect.
3. Thislimitedwarrantyisonlyextendedtotheoriginal
purchaser (consumer) and only during the time in which
the original purchaser occupies the premises where the
cleaner was originally installed. It does not apply to any
subsequent purchasers or recipients of the cleaner.
4. This limited liability warranty includes thereplacement
of parts due to normal wear but does not include cosmetic
situations including but not limited to: discoloration or
fading due to sunlight or chemicals, scratches, scus, etc.
5. This limited warranty does not cover any loss, damage,
injury, or malfunction of the equipment due to the failure
to properly maintain and or operate the cleaner, or
alteration of the equipment, tampering, and act of God,
abuse, misuse, negligence, omissions.
6. Thiscleanerisintendedforaproperlydesignedand
maintained swimming pool. This limited warranty
does not cover pools that have a defective design, are
improperly maintained, and are inappropriate for the
WaveTruck automatic pool cleaner’s operation.
7. This limited warranty does not cover damage or injury
from improper installation, pump running dry, damage
due to loss of prime or plugged pipes.
8. This limited warranty does not cover any change in
appearance, damage, malfunction due to chemical
reactions, etc.
9. First Choice is not responsible for any loss of time,
inconvenienceoranyconsequentialexpensessuchas
telephone calls, labor, etc., unless required by law.
10. Deterioration, discoloration or brittleness of pool plaster
and vinyl liners can be caused over time separately by
or in combination with, age and an imbalance in pool
water chemistry, improper installation and other factors.
First Choice hereby disclaims any and all claims, and
purchaser releases First Choice from any and all claims for
damages to any pool plaster or vinyl liner in purchaser’s
poolbyreasonoftheuseand/oroperationofthecleaner.
11. This limited warranty is only valid in the USA and Canada.
12. This limited warranty is in lieu of any other warranties
expressorimplied,includingthewarrantiesof
merchantabilityortness.Anysuchimpliedwarranty
imposed by state consumer law is limited in duration
to one year from date of purchase.
No distributor, dealer or representative has any authority to
makeanywarrantiesexpressorimpliedconcerningWaveTruck
automaticpoolcleanerexceptascontainedherein.Unless
warranty card has been received by First Choice, First Choice
reserves the right to refuse repair service or to honor warranty.
STARZTRUCK AUTOMATIC POOL CLEANER LIMITED WARRANTY
www.FirstChoicePool.com

15
Discover the quality, price and
selection of these dependable
First Choice replacement parts. Each
one is made to last in the USA, and
engineeredforaperfectt.
www.FirstChoicePool.com
1.
TopShellFCH420036
2.
Cone Gear FCH420041
3. IntermediateFCH420043
4. Intermediate Gear Shaft FCH420045
5. Spindle Gear Screw FCH420047
6. SpindleGearFCH420049
7. SpindleGearBushingFCH420053
8. ConeGearBushingFCH420053
9. Upper Middle Body FCH420055
10. UpperBodyScrewKit(6Pack)
FCH420057
11. Medium Turbine Drive Gear
FCH420059
12. MediumTurbineFCH420061
13. MediumTurbineCasewithAxle
FCH420063
14. GearBoxAssemblyFCH420065
15. RearScreen(White)FCH420067
16. FloatKit(2Pack)FCH420073
17. Lower Middle Body FCH420075
18. Bumper (White) FCH420077
19. MiddleBodyScrew(6Pack)
FCH420083
20. Lower Body Screw (4 Pack)
FCH420085
21. Flap Adjuster FCH420087
22. Lower Body (White) FCH420089
23. FlapKitFCH420095
24. Pod Screw Kit FCH420001
25. PodPlugs(6Pack)FCH420003
26. WingKit:LeftandRightWings
FCH420021
27a. Pod Shoes (4 Pack) for Vinyl
FCH420009
27b. Pod Shoes (4 Pack) for Concrete
FCH420011
28. CaptiveScrew/RetainingClip
FCH420101
29a. FixedAccessCoverAssembly
forConcreteModels(White)FCH420103
29b. FixedAccessCoverAssembly
for Vinyl Models FCH420109
30. PodKit(White)FCH420013
31. TurbineBearingsFCH420005
32. SkimmerConeFCH420111
33. MediumTurbine/SpindleGearKit
FCH420115 (not shown)
34. UniversalA-FrameKitFCH420029
35. TurbineKitFCH420007
36. A-FrameandTurbineKitFCH420029
(not shown)
37. A-Frame/Bushing/SaddleKit
FCH420033(notshown)
38. LeafCanister(SeeLocalDealer)
39. RegulatorValveFCH420125
40. Safety Vacuum Lock Wall Fitting
(See Local Dealer)
41. Propulsion/ConversionKit
(White)FCH320119(notshown)
42. FlowGaugeFCH320113
43. HoseConnectorFCH420117
32
33 37 38
FIRST CHOICEALLAMERICAN REPLACEMENT PARTS
FOR THE WAVETRUCK™AUTOMATIC POOL CLEANER
3938 40 41 42
43
4
3
2
9
6
5
15
16
19
17
20
11
12
14
13
18
8
35
31
34
30
21
25
24
37
23
22
7
1
29
10
28
27
26

16
HWN119 -A-FRAME& TURBINE KIT
(REPLACES AXV621DAT)
HWN118 -UNIVERSAL A-FRAME KIT
(REPLACES AXV621D)
HWN11601 -POD KIT (WHITE)
(REPLACES AXV417WHP)
37
35
30a
30b HWN11602 -POD KIT (BLACK)
(REPLACES AXV417BKP)
HWN112 -TURBINE BEARINGS: (2 PACK)
(REPLACES AXV055P)
31 HWN113 -TURBINE KIT
(REPLACES AXV602P / AXV112P)
36
HWN120 - A-FRAME/BUSHING/SADDLE KIT
(REPLACES AXV621D)
41
HWN160 - PROPULSION/CONVERSION KIT
(REPLACES AXV622DPK)
40
HWN154 - MED. TURBINE/SPINDLE GEAR KIT
(REPLACES AXV079VP)
34
MediumTurbine/SpindleGearKit
FCH420115
Turbine Kit: Turbine and
Two Turbine Bearings
FCH420007
A-Frame/Bushing/SaddleKit
FCH420033
Universal A-Frame Kit
FCH420029
FIRST CHOICE REPLACEMENT KITS
We’ve made your pool equipment service and repair a lot easier with these convenient replacement kits. Each one is a
complete grouping that contains everything you need for that particular repair. For more information or to stock up on
individual replacement parts, visit FirstChoicePool.com.

17
HWN119 -A-FRAME& TURBINE KIT
(REPLACES AXV621DAT)
HWN118 -UNIVERSAL A-FRAME KIT
(REPLACES AXV621D)
HWN11601 -POD KIT (WHITE)
(REPLACES AXV417WHP)
37
35
30a
30b HWN11602 -POD KIT (BLACK)
(REPLACES AXV417BKP)
HWN112 -TURBINE BEARINGS: (2 PACK)
(REPLACES AXV055P)
31 HWN113 -TURBINE KIT
(REPLACES AXV602P / AXV112P)
36
HWN120 - A-FRAME/BUSHING/SADDLE KIT
(REPLACES AXV621D)
41
A-Frame and Turbine Kit
FCH420031
Propulsion/ConversionKit
FCH420119
HWN160 - PROPULSION/CONVERSION KIT
(REPLACES AXV622DPK)
40
HWN154 - MED. TURBINE/SPINDLE GEAR KIT
(REPLACES AXV079VP)
34
FIRST CHOICE REPLACEMENT KITS
Rev01/17
P/NFCTM
www.FirstChoicePool.com
Table of contents


