logo
Brands
  1. Home
  2. •
  3. Brands
  4. •
  5. Fishman
  6. •
  7. Amplifier
  8. •
  9. Fishman PREFIX PREMIUM User manual

Fishman PREFIX PREMIUM User manual

Other manuals for PREFIX PREMIUM

1

Other Fishman Amplifier manuals

Fishman SA Sub User manual

Fishman

Fishman SA Sub User manual

Fishman ELLIPSE AURA - User manual

Fishman

Fishman ELLIPSE AURA - User manual

Fishman Loudbox Mini User manual

Fishman

Fishman Loudbox Mini User manual

Fishman LOUDBOX ARTIST User manual

Fishman

Fishman LOUDBOX ARTIST User manual

Fishman PREFIX PRO SERIES PREAMP User manual

Fishman

Fishman PREFIX PRO SERIES PREAMP User manual

Fishman PRESYS BLEND ONBOARD PREAMP User manual

Fishman

Fishman PRESYS BLEND ONBOARD PREAMP User manual

Fishman Fluence Stephen Carpenter Signature User manual

Fishman

Fishman Fluence Stephen Carpenter Signature User manual

Fishman POWERMIX User manual

Fishman

Fishman POWERMIX User manual

Fishman PREFIX PREMIUM BLEND User manual

Fishman

Fishman PREFIX PREMIUM BLEND User manual

Fishman Loudbox Performer User manual

Fishman

Fishman Loudbox Performer User manual

Fishman PREFIX STEREO BLENDER User manual

Fishman

Fishman PREFIX STEREO BLENDER User manual

Fishman Onboard aura User manual

Fishman

Fishman Onboard aura User manual

Fishman AG-125 - User manual

Fishman

Fishman AG-125 - User manual

Fishman Ellipse Aura PRO-AUR User manual

Fishman

Fishman Ellipse Aura PRO-AUR User manual

Fishman CLÁSICA M User manual

Fishman

Fishman CLÁSICA M User manual

Fishman AGP-2 User manual

Fishman

Fishman AGP-2 User manual

Fishman MATRIX INFINITY MIC BLEND User manual

Fishman

Fishman MATRIX INFINITY MIC BLEND User manual

Fishman INK 3 User manual

Fishman

Fishman INK 3 User manual

Fishman Loudbox Mini Charge User manual

Fishman

Fishman Loudbox Mini Charge User manual

Fishman B II User manual

Fishman

Fishman B II User manual

Fishman LOUDBOX PRO User manual

Fishman

Fishman LOUDBOX PRO User manual

Fishman INK User manual

Fishman

Fishman INK User manual

Fishman SA220 Setup guide

Fishman

Fishman SA220 Setup guide

Fishman ACOUSTIC MATRIX NATURAL I User manual

Fishman

Fishman ACOUSTIC MATRIX NATURAL I User manual

Popular Amplifier manuals by other brands

ASTRO HVO V40 P operating manual

ASTRO

ASTRO HVO V40 P operating manual

Marantz SUPERSCOPE BLA-545 Service data

Marantz

Marantz SUPERSCOPE BLA-545 Service data

NAD CI980 Quick setup guide

NAD

NAD CI980 Quick setup guide

Technics SE-CH770 Service manual

Technics

Technics SE-CH770 Service manual

Harman Kardon HK6300 instruction manual

Harman Kardon

Harman Kardon HK6300 instruction manual

NAD T975 owner's manual

NAD

NAD T975 owner's manual

McIntosh MA6850 Brochure & specs

McIntosh

McIntosh MA6850 Brochure & specs

Electro-Harmonix ENGLISH MUFF’N manual

Electro-Harmonix

Electro-Harmonix ENGLISH MUFF’N manual

Viatron Autrix Technical manual

Viatron

Viatron Autrix Technical manual

GME GA9800 instruction manual

GME

GME GA9800 instruction manual

Atlas CP700 Specification sheet

Atlas

Atlas CP700 Specification sheet

Roland KC-1000 owner's manual

Roland

Roland KC-1000 owner's manual

Pyle PFMRA350BW user manual

Pyle

Pyle PFMRA350BW user manual

Advantage S-250 manual

Advantage

Advantage S-250 manual

IRT Electronics DVA-3007 manual

IRT Electronics

IRT Electronics DVA-3007 manual

Dimavery BA-100 Series user manual

Dimavery

Dimavery BA-100 Series user manual

Sony XM-S400D operating instructions

Sony

Sony XM-S400D operating instructions

Schertler ROY X quick guide

Schertler

Schertler ROY X quick guide

https://manuals.online logo
https://manuals.online logoBrands
  • About & Mission
  • Contact us
  • Privacy Policy
  • Terms and Conditions

Copyright 2025 Manuals.Online. All Rights Reserved.

WARNING
INSTALLATION BY A QUALIFIED PROFESSIONAL REPAIRMAN IS STRONGLY
RECOMMENDED. FISHMAN TRANSDUCERS WILL NOT BE RESPONSIBLE FOR
INSTRUMENTS DAMAGED DUE TO IMPROPER INSTALLATION.
PARTS
• (4) ½ " self-tapping screws • (2) 3/8" self-tapping screws
• Two plastic backing plates • Plastic latch insert
• Plastic logo insert • Endpin jack with hardware
• Preamp cutout template • Prefix preamp
• Acoustic Matrix Pickup (may be pre-tinned)
• Adhesive backed wire guide clips
TOOLS
• Detail sander with attached 2.5" (63.mm) diameter saw blade, or flex shaft
tool with 1" (25.4 mm) diameter cutting wheel, or router with 3/16" (4.76 mm)
cutter
• #43 (.089", 2.25mm) drill • #32 (.116", 2.95mm) drill
• Soldering iron (30 watt max) • Rosin core solder
• Wire strippers • #1 Phillips screwdriver
• 1/2" open end wrench • 3/32" or 2 mm Allen wrench
• 2.4mm (3/32") slot head screwdriver • 15/32" (11.9 mm) reamer or:
• Variable speed drill • Center punch
• 1/8" twist drill • 15/32" (11.9 mm) spade bit drill
• X-Acto miniature saw
PREPARE THE INSTRUMENT
I - Widen The Endpin Hole to Accept The Endpin Jack
There are two methods to widen the endpin hole:
1. Slow and Safe
If you have the time, this is the preferred method. Remove the endpin and
widen the hole to size with a 15/32" (11.9mm) reamer (available in the US &
Canada through Stewart Macdonald, 800-848-2273 part #4323).
OR
2. Quick and Clean
The objective of this method is to quickly drill out the endpin jack hole, with
the endpin or other suitable plug in place. If the endpin is loose, remove and
refasten it in the endblock with cyanoacrylate glue before starting the
procedure.
NOTE: We do not recommend this method for instruments with brittle
ornamental veneers (for example: Abalone) around the endpin hole.
1. Apply masking tape around the endblock area to protect the instrument.
2. Locate an X-Acto saw 1/16" away from the body and saw off the endpin,
nearly flush to the instrument.
3. Centerpunch a guide hole in the trimmed endpin.
4. Drill a 1/8" pilot hole through the endpin and endblock.
5. Line up 15/32" Spade bit in the pilot hole and begin drilling. Maintain a
perpendicular plunge in relation to the instrument. Use steady (but not
heavy) pressure, especially as the drill exits inside the guitar.
6. To avoid damage to the instrument, let the drill come to a complete stop
before removing it from the hole.
II - Cut Out the Preamp Cavity
PRELIMINARY WARNING: The Prefix
Premium preamp will only fit in
guitars with a clearance of at least 2
1/4" (57.15 mm) between the top and
back braces, at the point where the
preamp chassis swings inside the
instrument.
PLEASE NOTE: For instruments with solid wood sides (especially maple),
we strongly recommend that you glue 2.5"(63.5mm) x .5"(12.7mm)
plywood patches in the areas inside the guitar where the screw holes will
be drilled. Doing so will prevent the area around the mounting holes
from cracking or splintering and will strengthen the side of the
instrument at the cutout.
1. Choose the flattest possible location for the preamp on the side of the
instrument. The flattest and most comfortable location for the player is
often at the upper bout, just above the instrument's waist and well below
the shoulder. Note that the bezel will bend just enough to conform to the
curved sides of most standard sized instruments.
CAUTION! When mounting the Prefix Premium on solid wood instruments
with highly curved sides (such as small bodied acoustic-electrics),
exercise extreme caution when choosing the preamp location. A highly
curved mounting surface may cause the preamp to bind against the
mounting bezel or in worst cases, may cause the wood to crack around
the preamp mounting holes.
2. Attach the enclosed cutout template at the desired location. and cut out
the cavity for the preamp. We have found that a Fein Pneumatic Detailing
Sander (part# MOx6-25), with a 2 ½" diameter saw blade (part# 6-35-02-
096-02-3) to be an excellent choice for cutting out the preamp cavity.
3. Drill the four outside preamp mounting holes with a #43 drill (.089",
2.25mm) drill . Drill the smaller holes on either side of the latch with a
#32 (.116", 2.95mm) drill.
OUTPUT CABLE/ENDPIN JACK WIRING
IMPORTANT NOTE: To ensure full pivot action for the preamp, remember
to leave an extra 3" (76.2mm) of slack when you decide the output cable's
final length..
1. Determine the proper length for the cable, then if necessary, strip and tin
the output wires.
2. To gain better access to the terminals on the
endpin jack, gently bend back the Strain
Relief/Sleeve tab, before you begin to solder.
Jack Connections
• Red wire to Tip (short
terminal)
• White wire to Ring
(middle terminal)
• Black wire to Switch
(longest terminal)
• Shield wire to Sleeve
(strain relief)
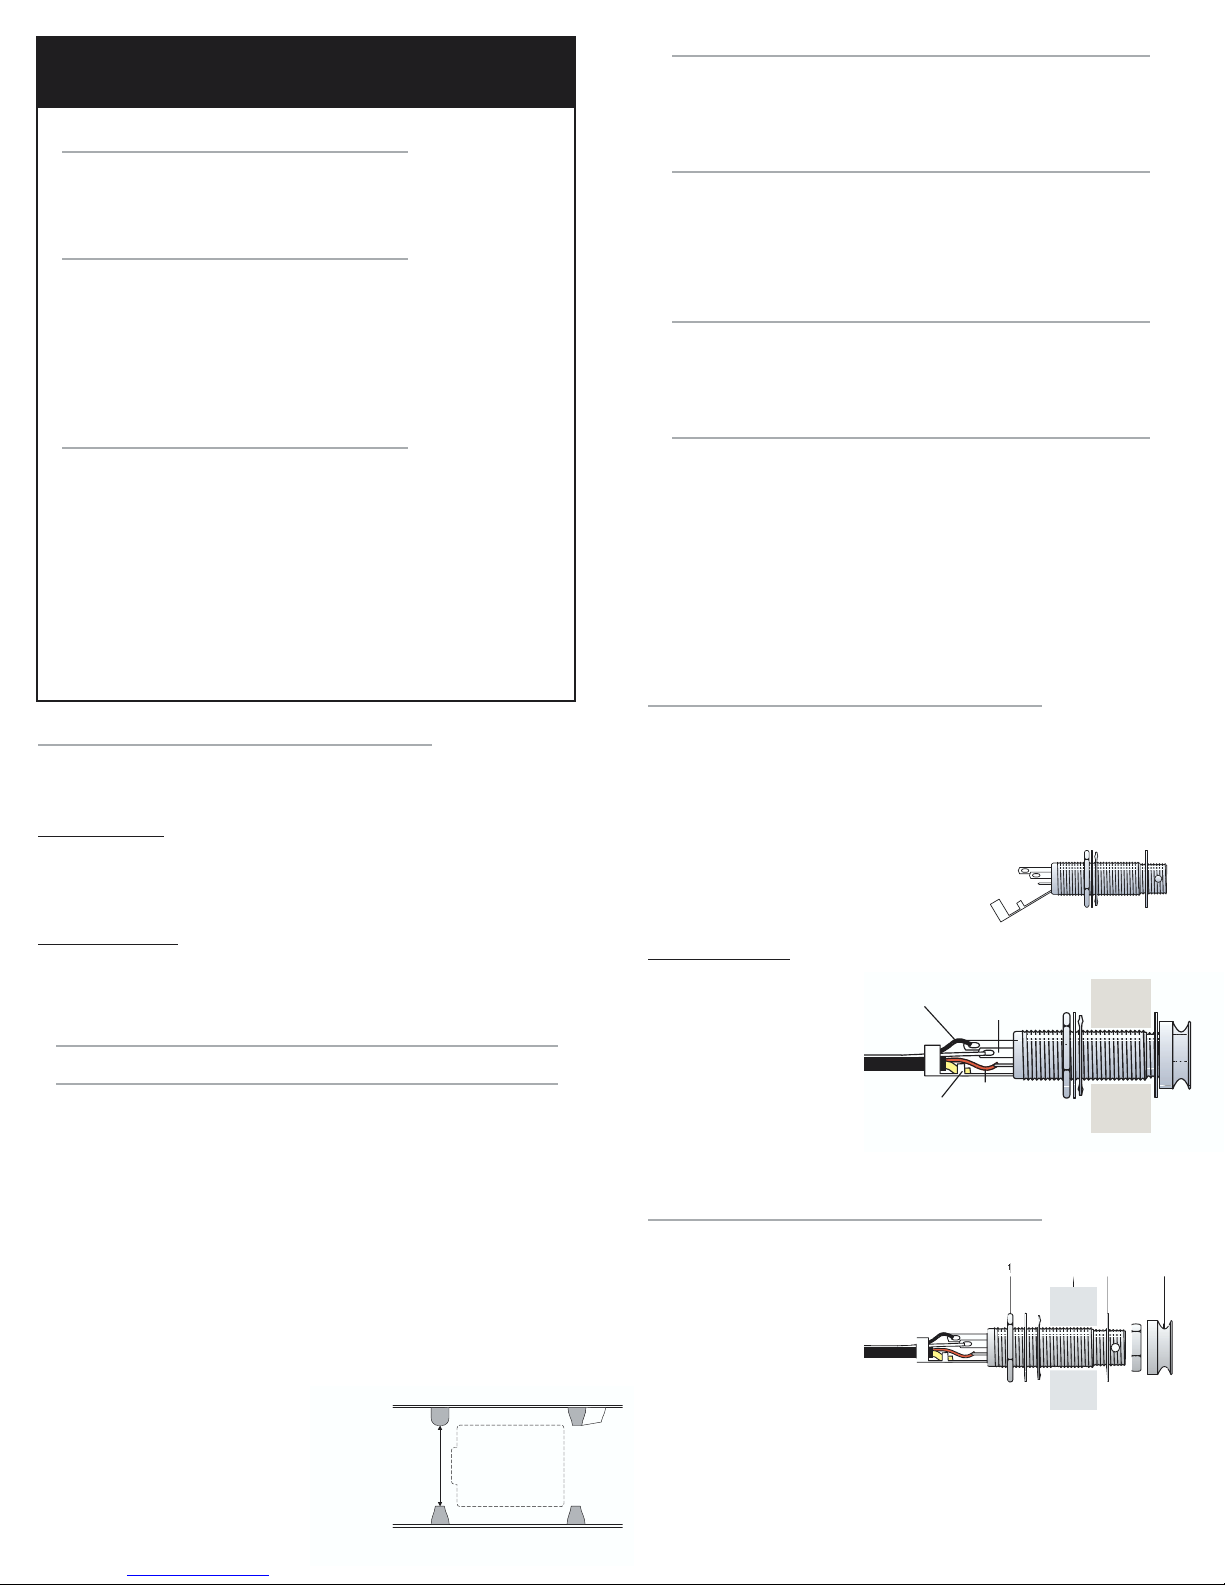
ENDPIN JACK INSTALLATION
Follow this sequence when installing the endpin jack:
1. Large hex nut
2. Large dress washer
3. Star washer
4. Guitar end block
5. Small dress washer
6. Small dress nut
7. Strap button
Once you put the jack through the endblock, fit it so that the larger diameter
threads sit just below outside surface of the guitar. After fitting the small
dress washer and the dress nut over the end of the jack, insert a 3/32" (or 2
mm) Allen wrench (or suitably sized screwdriver or rod) through the cross
drilled hole on the end of the jack. Tighten the dress nut with a 1/2" open
FISHMAN PREFIX™ PREMIUM
PREAMP INSTALLATION
Minimum 2.250"
(57.15 mm)
Clearance between
Top and
Back Braces
Soundboard
Back
Shield to
Sleeve
Red Wire
to Tip
Black Wire
to Switch White Wire
to Ring
23 4 5 6 71
end wrench while holding the jack in place with the allen wrench. Thread and
hand tighten the strap button.
NOTE: With the strap button in place, the end of the
jack should protrude slightly, so that when a plug is
inserted, it can snap securely in place.
PREAMP INSTALLATION
There is a second outer bezel included with your Prefix Premium preamp.
The Prefix Premium will need to fit properly on many different shapes and
sizes of guitars. It is for this reason we have included 2 choices of outer
bezels. Choose the correct bezel to fit your instrument. If you have a very
curved section between the waist and shoulder on your guitar, choose the
pre-curved bezel. If you have a fairly straight surface to mount your preamp,
choose the flat bezel. Choosing the correct bezel will ensure a proper fit
when the preamp is installed.
Instructions to change bezel:
1. Remove the 2 pivot screws located on each side of the preamp bezel.
2. Remove outer bezel from preamp.
3. Insert correct bezel onto preamp.
4. Re-attach 2 pivot screws.
PICKUP INSTALLATION
1. Insert the pickup in the saddle slot (follow specific installation
instructions as outlined for the Acoustic Matrix pickup).
2. Carefully pull back the foil "trap door" on the preamp (located next to the
output cable) to expose the terminal block.
3. Punch through the perforated slot in the trap door with the pickup wire
and thread it through the foil.
4. Insert the hot pickup wire (inner conductor) in the left side of the terminal
block, marked "IN".
5. Insert the pickup ground wire (shield) in the right side of the terminal
block, marked "GND".
6. Tighten down the screws on the top of the terminal block with a 2.4mm
(3/32") slot head screwdriver.
7. Replace the foil trap door by gently tucking it back into the preamp, just
below the battery clip.
8. Microphone Placement - Use a rag and some denatured alcohol to clean the
underside of the soundboard where the base of the microphone will attach inside
the guitar. Remove the plastic release film from the microphone base and adhere
it to the soundboard.
9. Angle the preamp 90° from the bezel and insert it in the cut-out.
10. Put the four 1/2" screws in the outside corners of the preamp and fasten
them to the plastic backing brackets. The larger of the two brackets
goes under the preamp latch. Do not over tighten.
11. Snap in the the plastic inserts over the screws. The insert with the
Fishman logo fits on the bottom of the preamp.
To keep the wires inside the guitar from rattling, secure them with the
included adhesive backed clips. Attach the wire guide clips to the sides or
the kerfed lining of the instrument.
SETUP
Battery Compartment
Pull the small tab at the top of the
Prefix Premium Blend toward you. The
body of the preamp will swing out,
revealing the battery compartment.
Observe the polarity marks on the
battery clip and install a fresh 9V
alkaline battery accordingly.
Stereo Blender Setup
Microphone Trim Control - A small
circular potentiometer is located on
the underside of the preamp just
below the battery compartment. This
is a "set it and forget it" control. Use it
to initially calibrate the microphone
balance in relation to the pickup. Set
the Blend slider to the center position
and with a small slotted screwdriver,
adjust the Trim Control until both the
microphone and pickup levels are
balanced to your taste.
Mono/Stereo Switch
A small slide switch, located on the underside of the preamp (across from
the Notch control pot), lets you choose between mono and stereo operation.
Leave the switch in the Mono position when you use a standard instrument
cable.
If you wish to split the pickup and microphone signals for separate external
processing (such as with a Fishman Blender), move the switch to the Stereo
position and use a stereo cable or a stereo "Y" cable to carry the two signals
to separate destinations. In the stereo mode, the pickup goes to the tip
output and the microphone sits on the ring output.
FISHMAN PREFIX™ PREMIUM
PREAMP INSTALLATION - CONTINUED
Microphone Position
Upper Bout Microphone Position
Lower Bout
Preamp
Control Panel Preamp
Control Panel
Foil Sheilding
Trap Door
Pulled Back
Trap
Door
Terminal
Block
Slot
Preamp
Battery Case
9 Volt Battery
STEREO / MONO
Stereo / Mon
Switch
Microphone
Trim Control
MONO CABLE
Microphone & Pickup
Signals
STEREO "Y" CABLE
Tip
Pickup
Ring
Microphone
MONO STEREO
Fishman Transducers
340-D Fordham Road Wilmington MA 01887 USA
Phone 978-988-9199 • Fax 978-988-0770
www.fishman.com
514-000-001 • 8-13-03