Fisso Photo Set Strato S-20 User manual

Garantie
Der Hersteller übernimmt während zwei Jahren ab Kaufdatum, Garantie für Funktionsfähigkeit und
Material- oder Herstellungsfehler des Produktes. Nicht unter Garantie fallen normale Abnützung
und Folgen unsachgemässer Behandlung oder Beschädigung durch den Anwender. Andere oder
weitergehende Ansprüche, insbesondere Schadenersatzansprüche jeder Art, sind ausge-
schlossen. Im Garantiefall wird das Produkt repariert oder ersetzt. Die Garantieverpflichtung gilt
unter dem ausdrücklichen Vorbehalt, dass ausschliesslich der FISSO-Reparaturservice benützt
wurde.
Warranty
The manufacturer guarantees that the product is capable of performing its function and is free from
material or manufacturing faults for two years from the date of purchase. Normal wear and tear and
the consequences of improper handling or damage by the user are not covered bythe warranty. All
other or further claims, especially compensation claims of any kind, are excluded. The product will
be repaired or replaced in the event that the warranty is invoked. This warranty obligation applies
under the express condition that the FISSO repair service is used exclusively.
Garantie
Le fabricant assure pendant deux ans à partir de la date de l’achat, la garantie du bon
fonctionnement, de la qualité des matériaux et l’absence d’erreur de montage du produit. Cette
garantie ne s’applique pas à l’usure normale et au conséquences d’une manipulation inadéquate
ou tout autre dommage causé par l’utilisateur. Toute autre prétention à dédommagement ou à
indemnisation de toute nature sont exclues. En cas de garantie, le produit sera réparé ou échangé.
L’obligation de garantie n’est effective qu’à condition expresse que seul le service de réparation de
FISSO ait été mis à contribution
Photo Set Strato S-20
Gebrauchsanweisung
Instructions for use
Mode d’emploi
GT510 / V1 / 18.07.2013 d/e/f
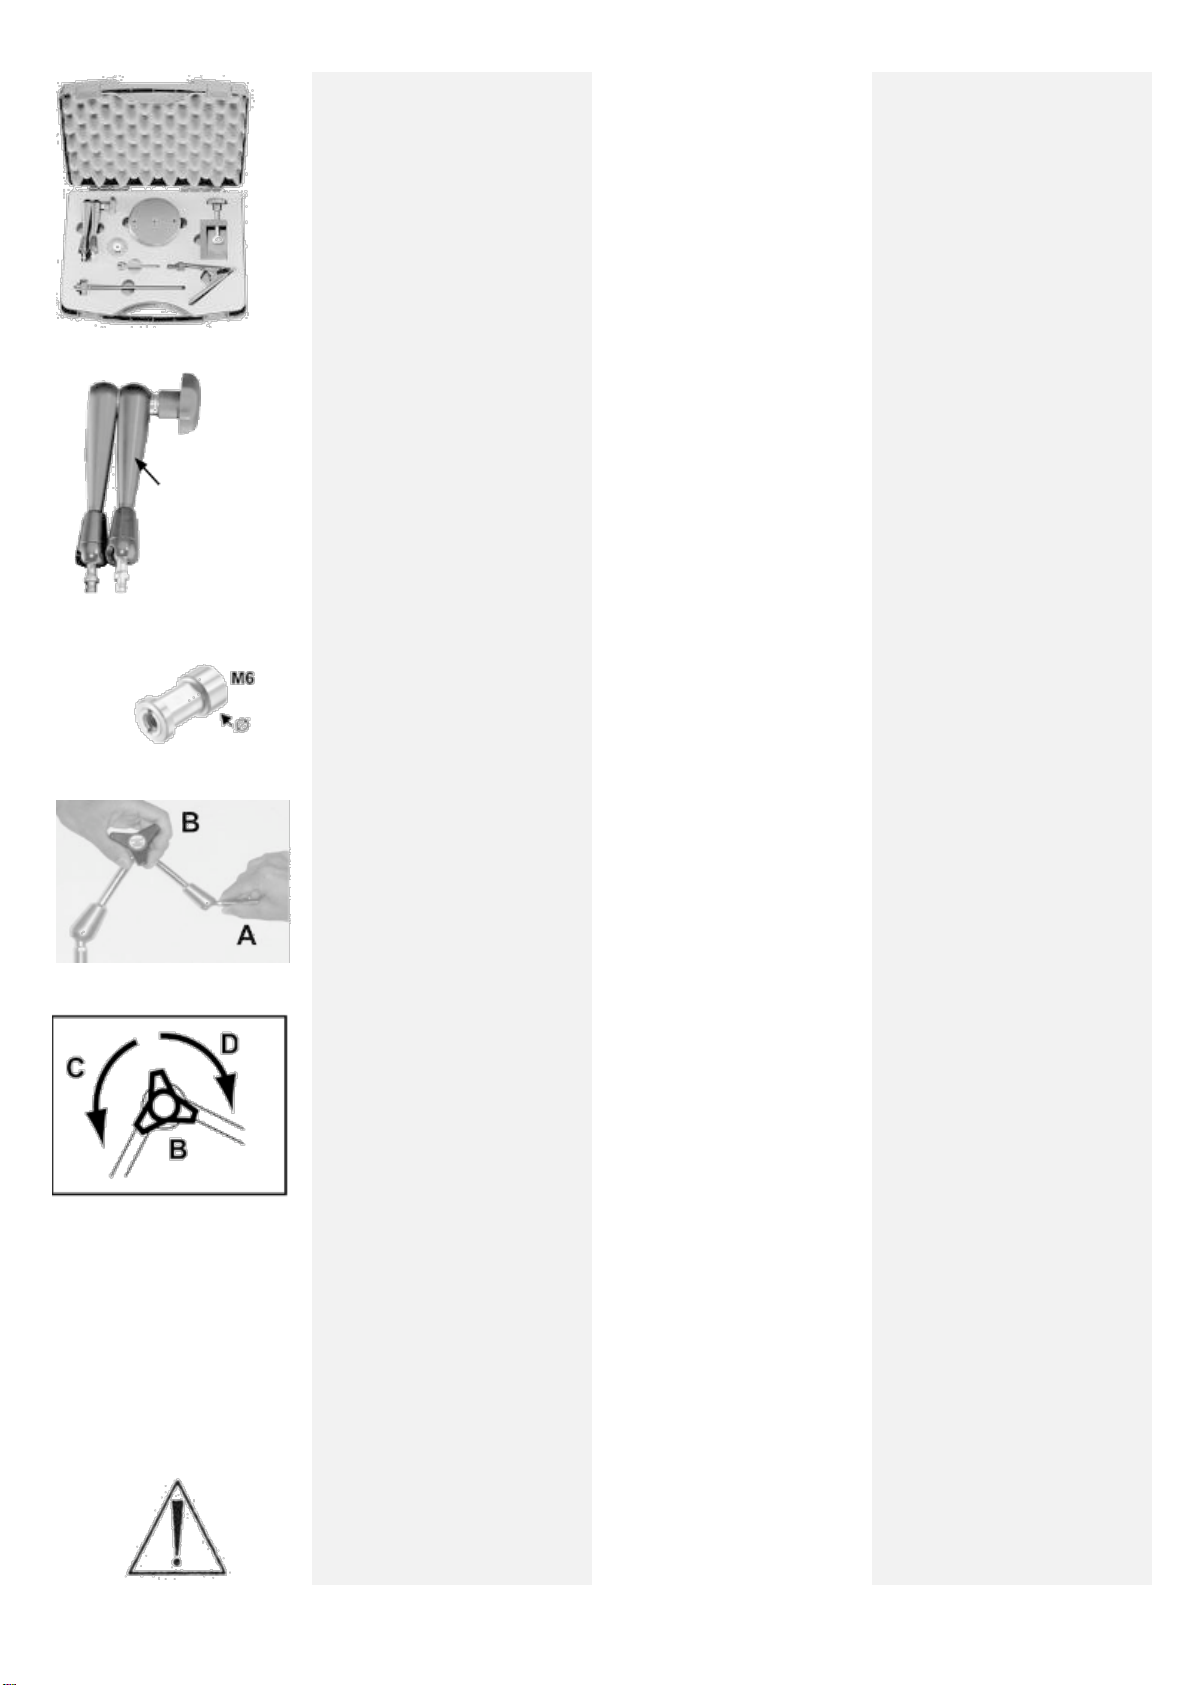
Fig. 1
Gebrauchsanweisung
Photo Set Strato S-20.00
Set (Fig. 1) bestehend aus:
1xStratoS-20Gelenkstativ
Länge 200 mm
1x Stahlsockel mit 3 Bohrungen
1xKlemmsockelmit2Bohrungen
1xKlemmzwinge
1xVerlängerung200mm
1x Adapter M6 / 3/8“ Ww mit Über-
gewinde 3/8“ Ww -¼“ Ww
2x Gabelschlüssel # 7
Montage
Der Unterarm beim Spanngriff (Fig. 2)
wird in den Stahl –oder Klemmsockel
geschraubt. Die Klemmzwinge wird
auf dem Oberarm befestigt. Die
Gewinde können mit dem Gabel-
schlüssel festgezogen werden. Die
Verlängerung kann zwischen Unter-
arm und Sockel oder Oberarm und
Klemmzwinge geschraubt werden.
Achtung: Befestigung der Verlänge-
rung auf dem Oberarm halbiert die
Tragkraft des Gelenkstativs! Der
Adapter (Fig. 3) kann mit dem M6
Gewinde auf das Gelenkstativ oder
auf die Verlängerung geschraubt
werden. Das Übergewinde auf der
gegenüberliegenden Seite mit ¼“
Ww Innen- und 3/8“ Ww Aussen-
gewinde kann herausgeschraubt
werden. Damit ist das Fisso Halte-
system mit Photozubehör anderer
Anbieterkompatibel.
Bedienung
Halten –Lösen –Positionieren
–Fixieren –Kontrolle
Fig. 4: Halten Sie mit einer Hand
das Gelenkstativ im vorderen Bereich
fest(A) und bedienen mit der anderen
den Spanngriff (B)
Fig. 5
1. Zum Lösen drehen Sie am Zent-
ralspanngriff (B) im Gegenuhr-
zeigersinn (C)
2. Bringen Sie nun das Gerät in die
gewünschte Position
3. Zum Fixieren drehen Sie am Zent-
ralspanngriff (B) im Uhrzeiger-
sinn (D)
4. Kontrolle: Gelenkstativ auf
Funktionprüfen
Maximale Belastbarkeit bei
maximaler Länge (ohne
Verlängerung): 1 kg
Das Gelenkstativ lässt sich mit
geringem Kraftaufwand bedienen. Die
Fixierung basiert auf dem Prinzip der
Reibung. Positionswechsel ohne
Lösen des Spannmechanismus
können Schäden verursachen und
verringerndieFunktionsdauer.
Achtung: Wird das Gelenkstativ
nicht richtig festgezogen oder
überlastet, kann sich dieses ungewollt
verschieben oder lösen, was zur
Beschädigung der gehaltenen
Objekteführen kann.
Instructions for use –
Photo Set Strato S-20.00
Set (Fig. 1) comprising:
1xStratoS-20articulatedarm,
length 200 mm
1x steel base with3 holes
1x clamping base with 2 holes
1xquickclamp
1xextension200mm
1x adapter M6 / 3/8” Ww with con-
version bushing 3/8”Ww - ¼»Ww
2xopen-end wrench # 7
Assembly
The lower arm with the tightening
knob is screwed to the steel –or
clamping base (Fig. 2). The quick
clamp is fixed on the upper arm. The
threaded connections can be
tightened with the open-end wrench.
The extensioncan be screw-mounted
between the lower arm and base or
the upper arm and the quick clamp.
Attention: Mounting the extension to
the upper arm halves the carrying
capacity of the articulated arm! The
adapter (Fig. 3) can be screw-
mounted to the articulated arm or the
extension by the M6 thread. The
conversion bushing on the opposite
side with 1/4“ Ww inside and 3/8“
Ww outside thread can be
unscrewed. This adapter renders the
Fisso holding system compatible with
photo accessories from other
suppliers.
Operating
Holding –releasing –positioning
–fixing –checking
Fig. 4: Hold the front part of the arti-
culated arm (A) firmly with one hand
and manipulate the tightening knob
(B) with the other.
Fig. 5
1. To release, turnthe central
tightening knob (B) counter-
clockwise (C).
2. Now bring the device into the
desired position.
3. To ix, turn the central tightening
knob (B) clockwise (D).
4. Check the function of the
articulatedarm.
Maximum carrying capacity
at maximum length (without
extension): 1 kg
Manipulating the articulated arm
requires little force. The articulated
arm is fixed in position by friction.
Changing the position without relea-
sing the tightening mechanism can
cause damage and will shorten the
servicelife.
Attention: If the articulated arm is
not correctly tightened or is
overloaded, it can inadvertently shift
or release, which can damage the
objects being held.
Mode d’emploi du
set photo Strato S-20.00
Set (Fig. 1) composé de:
1x bras articuléStrato S-20,
long. 200mm
1x socleen acier avec 3 trous
1x soclede serrage avec 2trous
1xpince deserrageàressort
1xprolongation 200 mm
1x adaptateur M6 /3/8 “ Ww avec
adaptateur 3/8“ Ww - 1/4» Ww
2xclé à fourche # 7
Montage
Le brasinférieuravec poignéede
serrage(Fig. 2) estvissédansle
socle enacier ou le socle deserrage.
La pincede serrage àressort est
montéesurlebras supérieur.Les
filetages sont serrés avec la clé à
fourche. La prolongation peut être
vissée soit entre le bras inférieur et le
socle,soit entrele bras supérieur etla
pince. Attention: si la prolongation est
montéesur lebras supérieur,la
capacitédechargedu brassupérieur
est diminuée de moitié! L’adaptateur
(Fig. 3) peut être vissésur le bras
articuléou sur la prolongation au
moyen du filetage M6. L’adaptateur
3/8“ Ww - 1/4» Ww au côté opposé
peut êtredévissé. Ainsi le système de
support Fisso estcompatible avec les
accessoires photo d’autres fabricants.
Utilisation
Tenir –libérer –positionner
–fixer –contrôle
Fig. 4 : Tenez d’une main le bras
articuléfermementàsonextrémité (A)
et tournezlapoignée deserragede
l’autre (B)
Fig. 5
1. Pour libérer, tournez la poignée
deserrage (B) dans le sens
inversedes aiguilles d’une
montre(C)
2. Amenez ensuite l’appareil dans la
positionvoulue
3. Pour le fixer, tournez la poignée
de serrage (B) dans le sens des
aiguilles d’une montre (D)
4. Contrôle du fonctionnement du
brasarticulé.
Charge maximale à longueur
maximale (sans prolongation):
1 kg
Le bras articulé se commande faci-
lement. Lafixation du bras articulése
fait par frottement et serrage. Un
changement de position sans libérer
le mécanisme de serrage peut en-
dommager les produits et diminuer la
durée de vie de l’articulation.
Attention: Si le bras articulé n’est
pas correctement serré ou s’il est
surchargé, il peut se déplacer
involontairement ou se libérer, ce qui
peut endommager les objets fixés.
Fig. 2
Fig. 3
Fig. 4
Fig. 5
Unterarm
Lowerarm
Brasinférieur
5/8“
3/8“ Ww
1/4“ Ww
Popular Measuring Instrument manuals by other brands


senva
senva AQD Duct Series installation instructions

Stahlwille
Stahlwille SmartCheck Angle operating instructions

NuFlo
NuFlo EZ-IN Series installation manual

TSI Instruments
TSI Instruments DustTrak 8520 Operation and service manual

Danfoss
Danfoss AK-LM 350 Design guide

Hanna Instruments
Hanna Instruments HI 96700 instruction manual


