FitNord Seal One User manual

Seal One
Seal Two
IMPORTANT
WICHTIG
MPORTANT
IMPORTANTE!
¡IMPORTANTE!
READ THIS MANUAL FIRST BEFORE USE THE PRODUCT.
LESEN SIE DIE ANWEISUNGEN SORGFÄLTIG DURCH, BEVOR SIE DAS GERÄT VERWENDEN.
LISEZ CE MANUEL AVANT DE L’UTILISER.
LEGGERE QUESTO MANUALE PRIMA DELL’USO.
LEA ESTE MANUAL ANTES DE UTILIZARLO.
EN USER MANUAL
DE GEBRAUCHSANWEISUNG
FR GUIDE DE L’UTILISATEUR
IT MANUALE D’ISTRUZIONI
ES MANUAL DEL USUARIO

REGARDS FROM THE FITNORD TEAM
CONGRATULATIONS ON
PURCHASING A FITNORD
KAYAK!

Thank you for purchasing a FitNord
kayak! For your safety, please
carefully read this user manual before
using the kayak. This user manual
applies to the Seal One and Seal Two
models.
DISCLAIMER
© 2022 Nordic Sports Brands Oy
All rights reserved.
The product and operating instructions are subject to
change. The manual may contain translation errors.
Specifications are subject to change without notice.
Nordic Sports Brands Oy is not liable for damages resul-
ting from use in violation of the operating instructions.
Importer
Nordic Sports Brands Oy
Kohmankaari 3
33310 Tampere
Finland

EN

CONTENT
1. Kayak set contents...................................................................................................................7
2. Safety instructions....................................................................................................................8
3. General information.................................................................................................................9
4. Inflating and setting up......................................................................................................10
5. Deflating and packing..........................................................................................................13
6. Storage......................................................................................................................................................14
7. Repairing.................................................................................................................................................15
8. Technique Tips..............................................................................................................................16
9. Warranty..................................................................................................................................................17

EN
ABOUT THE MANUAL
Please note ”warnings”and ”tips” in this manual particularly.
Warnings: Improper operation may result in personal injury.
Tips: Helpful advice & clues for the usage of kayak.
Should you have any inquiries, please contact the supplier immediately
(Nordic Sports Brands Oy / Suomen Kuntokauppa).
WARNING!
Improper use of the kayak and/or failure to read this user manual may lead
to serious bodily injury.
Seller will take no responsibility for any injuries caused by improper use
without following the manual.
6

EN
1 KAYAK SET CONTENTS
ABungee system for storing goods
B Carrying handle
C Foot rest
D D-ring
EDetachable seat
FAir valve
GFin attachment
HSlide-in fin
IPaddle
JPump
KGear bag
A
A
B
B
BB
C
C
C
D
D
D D
F
F
F
G
H
I
E
E
E
J
K
7

ENEN
8
2 SAFETY INSTRUCTIONS
Always follow these rules when using the kayak:
• Wear a personal flotation device every time
• Always check the condition of the kayak before paddling
• Do not go paddling in stormy weather or thunderstorms
• Check the water temperature - falling into cold water is a risk
• Wear sun protection and sunglasses
• Children or those without swimming skills should not use the kayak without
supervision
• Watch out for boats, ships, swimmers and other traic
• For longer trips have a bottle of water, spare clothes and a mobile phone in a
waterproof bag with you
• Beware of underwater rocks and other obstacles
• Care for the environment and do not leave rubbish in nature!
• Max users: Seal One - one person, Seal Two - two persons
WARNING!
Kayak paddling is a water sport, and there are risks involved.

ENEN
9
3 GENERAL INFORMATION
• Be careful with sharp objects near the kayak. Check that there are no sharp
rocks, etc. on
• the ground before inflating or deflating. Never drag the kayak along the ground!
• Dog nails do not break the material, but they can leave marks.
• If you want to anchor the kayak in place, you can take a bottle filled with sand as
an anchor.
• Tie it tightly to the D-ring with a long and durable cord that reaches all the way
to the bottom.
ENEN
10
4 INFLATING AND SETTING UP
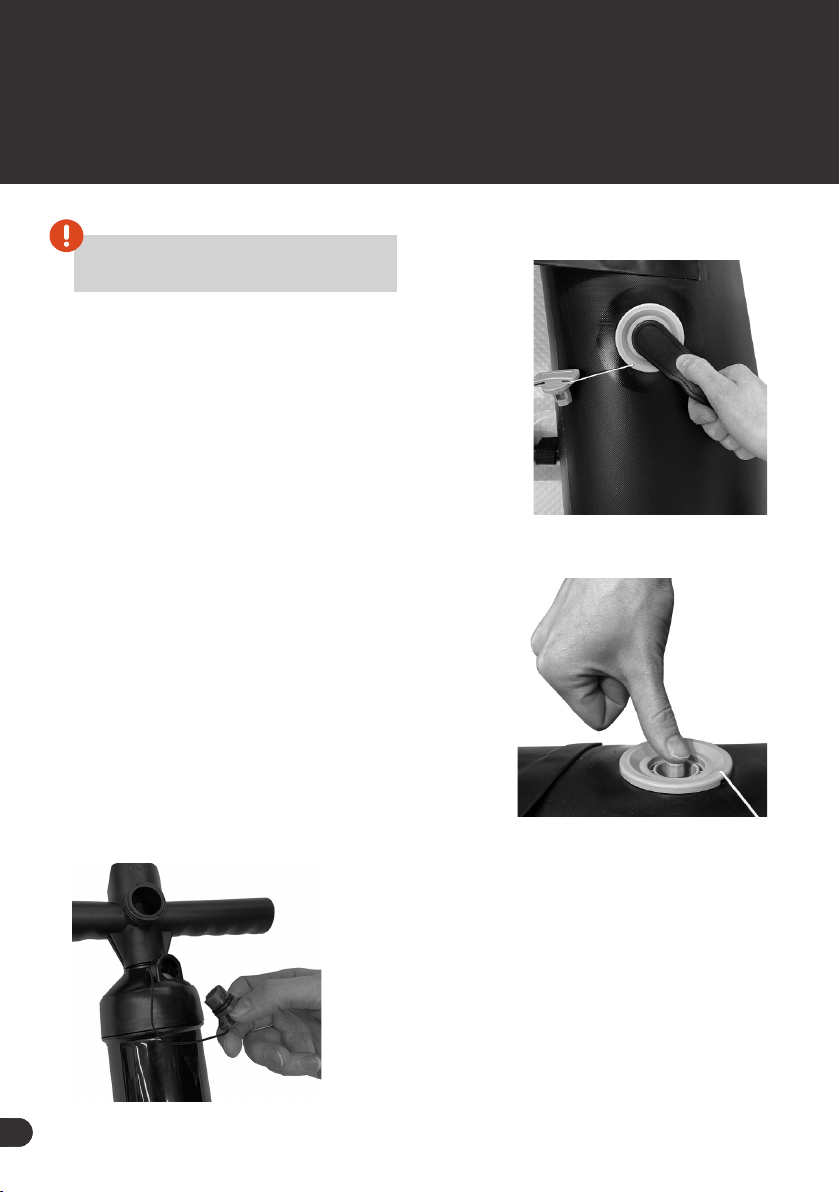
NOTE!
Tighten the valves before inflating!
Valve and pump operation
1. The valves must be closed when inflating: the
button in the middle is in up position. By pressing
the button you can open/close the valve. Button
down = valve open, button up = valve closed.
2. The FitNord pump is a Double Action Pump.
Initially, you can keep the plug closed allowing the
pump to push air into the board during both the
pulling and pushing phases. When the pressure
rises and the pumping becomes heavier, open
the plug which makes the pumping easier (single
action mode).
All three valves must be tightened before the first
inflation. If the valve is loose, air will leak from the
outer edges of the valve and the kayak will deflate.
Tighten the valve with the wrench tool included in
the repair kit. Note that the kayak must be empty
when tightening. Insert the wrench into the slots
around the valve, press all the way down and
tighten firmly clockwise.
ENEN
11
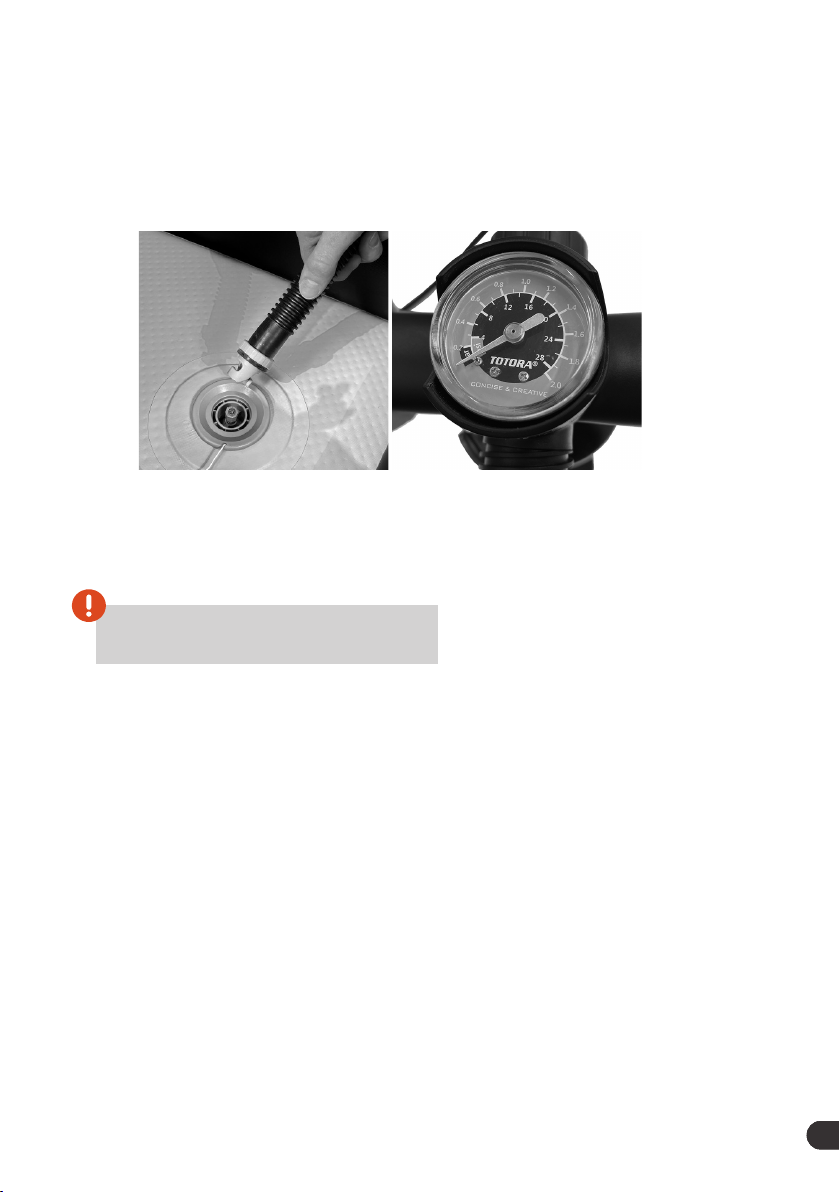
3. Begin inflating by attaching the pump hose into the valve. Press gently and turn
clockwise. For best results, partially inflate both the bottom and sides, leaving them a
bit soft. When the kayak starts taking shape, fully inflate the bottom first and then the
sides.
4. Max pressure for the bottom is 1 bar (15 PSI), but often only 8-10 PSI is needed for
desired stiness. Max pressure for the sides is 0,2 bar (3 PSI).
The pressure gauge located on top of the pump will tell the pressure. Inflating the
kayak takes about 5-15 minutes. It is advisable to use the whole body to avoid getting
your hands tired.
NOTE!
Don’t exceed the maximum pressure!
ENEN
12
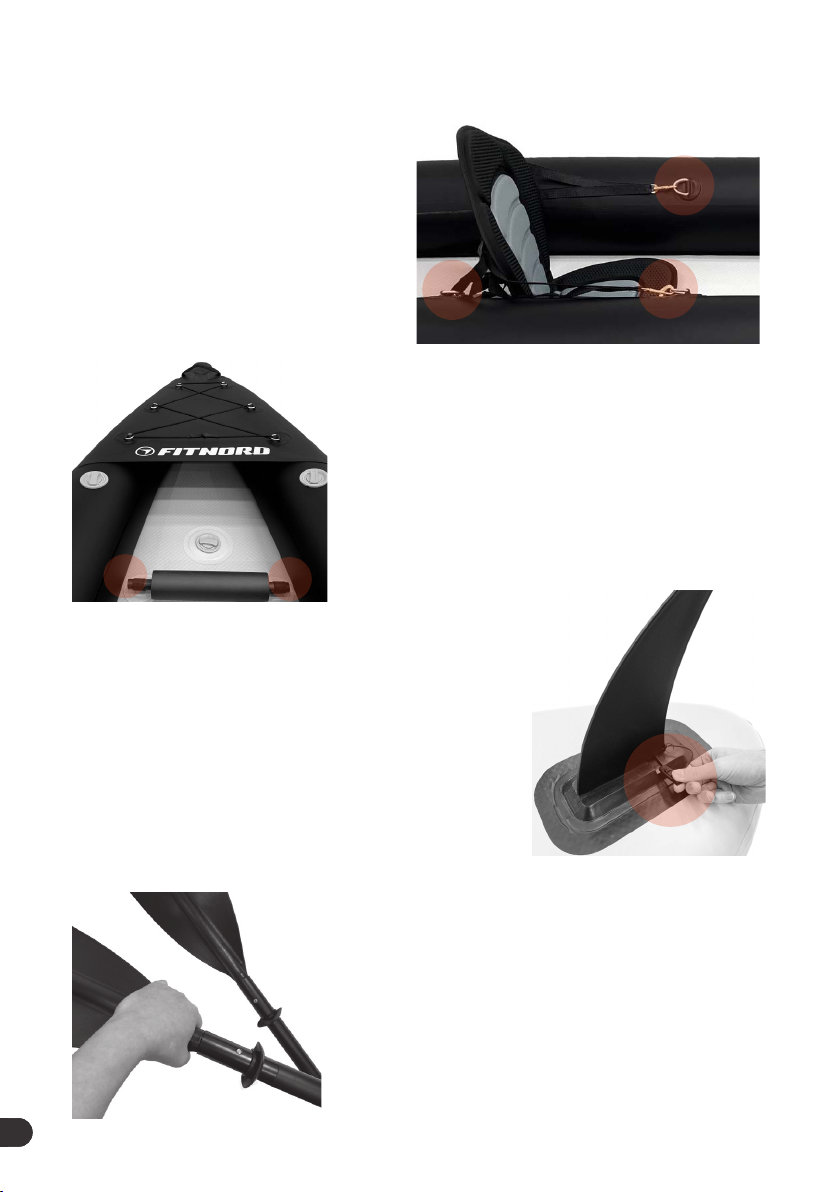
1. Attach seat straps into the D-rings on
the back of the kayak and foot rest into
the D-rings in front of the seat.
2. Attach the footrests to the D-rings in front
of the seat. Adjust the straps so that you get a
comfortable sitting posture.
3. Slide the fin into the slot in the bottom of the kayak
and secure it with the clip. The fin increases
directional stability of the kayak. To avoid getting
stuck or breaking the fin, don’t use use the fin in
shallow water or rocky shores.
4. Connect the three parts of the paddle. You can
adjust the blade angle from the blade part lock. When
standing, the correct length is about the same as the
paddler height with her/his hand raised.
Seat, fin and foot rest attachment + paddle assembly

ENEN
13
After use let the kayak dry, also wipe o dirt and debris. Remove the fin and open the
valves by pushing and twisting them counterclockwise.
When the kayak has deflated enough on itself, you can connect the pump hose on
the other side of the pump (deflate mode) and pump the remaining air out.
Start folding the kayak from the opposite end from the valves, watch out for the fin
box.
5 DEFLATING AND PACKING
NOTE!
There will be a loud burst of air initially.

ENEN
14
6 STORAGE
If possible, store the kayak indoors spread on a flat surface with the valve open. To
save space you can also roll it in its bag. If it is not possible to store the kayak inside,
you can also store it outside in a warehouse, but it must be protected from the weat-
her conditions such as rain, snow, and sun exposure.
Do not move or fold the kayak in the cold, as frozen material is brittle. Make sure the
kayak is completely dry and clean before storing. The kayak must not be stored in the
sun, as UV radiation can damage the material. Leaving it in the sun or in a hot place
can also raise the pressure above max limit, which will void warranty, shortens the
kayak’s lifespan, and may even break it.
The same instructions apply to short-term storage. However, if you plan to use the
kayak again the same or the next day, there is no need to deflate it; just do not leave it
in the sun.

ENEN
15
If your kayak leaks, always tighten the valve first. A loose valve leaks air between the
outer edge of the valve and the surface material of the kayak. If tightening does not
help and you cannot find the exact leak spot, spread water-detergent solution all over
the seams. The leaking area will bubble where air escapes. Mark the area, deflate the
kayak and clean the area well. Perform repairing outdoors or in a well-ventilated area.
1. Cut a patch from the spare PVC material included in the repair kit so that the patch
extends at least 3 cm in all directions around the leak. You can roughen the area
around the leak a little with sandpaper if you like. You can get the glue by contacting
customer service, or when retrieving your board from the store.
2. Apply the glue generously to both the patch and the kayak so that the glue comple-
tely covers the patch and the leaking area. Allow the glue to dry for 3-6 minutes and
place the patch carefully over the leak.
3. Press it evenly and make sure no air bubbles are trapped between the kayak and the
patch. After pressing firmly for couple of minutes, wipe o any adhesive that might have
leaked over the edges and allow the patch to dry for 24 hours in a dry and warm place.
Before going out on the water, check the kayak again.
Glue precautions
• The adhesive is highly flammable, do not handle the adhesive near fire or sparks.
Smoking is strictly forbidden.
• Gluing must be done in well-ventilated area. The glue fumes are harmful to health
and can cause nausea.
• Keep the adhesive out of the reach of children and pets.
• Protect your hands and be careful not to get glue in your eyes, mouth, or skin.
• In case of contact with eyes, rinse immediately with plenty of water and seek
medical advice.
• Before completely dry, the adhesive is very harmful to the environment.
7 REPAIRING

ENEN
16
8 TECHNIQUE TIPS
Paddling is fun, eective and can be practiced on many dierent levels. You can padd-
le longer trips, go fishing around the reeds or simply enjoy the nature. Inflatable kayak
is much more stable than a solid kayak – still get used to the kayak’s movement in
shallow water before paddling into deeper water.
Take a bit wider grip than your shoulders on the paddle. Reach as far forward as
possible, immerse the blade completely in the water and lift it up when it reaches your
side. If you drag the blade behind you, the kayak will start turning. In a two-person
kayak, the stronger paddler should be in front as the “engine”, and the rear paddler will
focus on steering. If you are paddling alone in a two-person kayak, it is a good idea to
secure the seat between the two benches to keep center of gravity in the middle of
the kayak.
We hope you have a lot of fun with the FitNord kayak and spend memorable
moments enjoying nature!

ENEN
17
9 WARRANTY
FitNord Seal kayaks and accessories have a 12-month warranty for private use, from
the date of purchase. The warranty does not cover commercial use or rental use. The
warranty covers manufacturing defects in the product and materials. The warranty
does not cover defects due to improper use, such as leaks due to excessive pressure
or storage against the instructions, breakages caused by sharp objects or dragging
the kayak, or normal wear and tear of parts. In case of problems, please contact your
dealer.
Following the instructions your kayak will provide joyful adventures for years to come.

DAS FITNORD TEAM
WIR GRATULIEREN
SIE FÜR DEN EINKAUF
UNSERES KAJAKS!

Danke das Sie sich für ein FitNord
Kajak entschieden haben! Zu Ihrer
Sicherheit, Bitte lesen Sie diese
Anweisungen gut vor dem Gebrauch.
Diese Gebrauchsanweisung gilt für:
Seal One und Seal Two Modelle.
VERZICHTSERKLÄRUNG
© 2022 Nordic Sports Brands Oy
Alle Rechte sind vorbehalten. Das Produkt und die
Gebrauchsanweisung können sich verändern.
Die Gebrauchsanweisung kann Übersetzungsfehler ent-
halten. Technische Informationen können ohne vorherige
Ankündigung geändert werden. Nordic Sports Brands Oy
ist nicht verantwortlich für die Verwendung entgegen der
Gebrauchsanweisung verursachte Schäden.
Importeur:
Nordic Sports Brands Oy
Kohmankaari 3
33310 Tampere
Finnland

DE
This manual suits for next models
1
Table of contents
Languages:


