Catalina Yachts 34' Catalina MK II 1999 User manual

1
Revision Date: 4/7/12
Libertas
34’ Catalina MK II 1999
OPERATION MANUAL
Welcome aboard! We are happy you have chosen Libertas for your sailing vacation. Libertas is a 34’
Catalina MK II -- built in 1999. The Catalina 34 is a classic, and one of the most popular family sailboats

2
Revision Date: 4/7/12
made in the mid 30 foot range. It has lots of room both above and below and has a thoroughly comfortable
layout. It handles very well in big winds and can be sailed shorthanded very easily.
The Catalina 34 was designed by Frank Butler and was first introduced in 1996. Over 1700 of these vessels
have been built over the years and improved each year with input from Catalina skippers. The Catalina 34
is an ideal cruiser. Its performance is very responsive and its interior is accommodating. The Catalina 34 is
a sleek yacht with crisp clean lines and sturdy construction. A one piece fiberglass hull and engineered sub
sole structural system with stainless steel tie rods, a molded structural hull liner, and a stainless steel truss at
the mast step provides reassuring strength at sea. A structural aluminum chain plate reinforcement system
tie all mast loads to the hull. On board the deck has molded-in non-skid surfaces. The cockpit seats are
comfortable and large to sleep or sun bathe on.
The experience of Catalina 34 skippers is demonstrated in the practicality of the masthead rig with fore and
aft lowers, forestay and backstay. The inboard shroud base leaves room for secure footing on the non-skid
deck and provides for narrow sheeting angles and the ability to carry large genoas. The rigid boom-vang and
double ended mainsheet system make sail handling easier and more secure. The wide aft cabin has a large
berth, upholstered seat and bureau. It's a very "forgiving" vessel with a lot of room and comfortable
surroundings. The distinctive cabin house and diamond-shaped sail emblem help identify a Catalina
anywhere.
Catalina 34 MKII's Floor Plan
The information summarized in this manual is intended to assist all skippers, crew and guests in feeling
more comfortable with the basic systems and how they work. If something isn't familiar to you, please
check these notes. If the information is unclear, incomplete, confusing, or otherwise less than helpful,
please help us to add, change, or restate the information so that it conveys the desired results. Please feel
free to add your suggestions for other information or clarifications at the end of this manual, or simply add a
comment or two in the margin as appropriate. Your suggestions will be incorporated into future revisions.
In addition to the information contained in this manual; you will find a blue colored Catalina Manual at the
navigation station. This manual contains information from manufacturers on various systems and equipment
aboard Libertas. A companion binder contains information on the various operating systems aboard the
vessel. Feel free to consult these manuals if the need arises. Please note that throughout this manual items
denoted in bold text should be given special attention. Items denoted in bold red text are highlighted
because of personal injury concerns or situations that could cause major maintenance problems.
You will see this is posted as a no smoking and no pet’s vessel. We ask that you restrict smoking to the

3
Revision Date: 4/7/12
cockpit or decks and/or dockside in order to maintain a pleasant sailing environment for all guests. Your co-
operation is appreciated.
There is a logbook stored by the navigation station. Please feel free to use the logbook to document your
adventures if you wish. You may also use this logbook to make any comments and/or suggestions about
improving Libertas for future charters. Please feel free to email us if you would like to make any other
comments or suggestions as well. We are interested in ensuring Libertas is not only well maintained, but
also improved over time. We look forward to hearing from you.
A final note regarding your safety and your care for this vessel: The Libertas draws 5’7’’ and is
therefore susceptible to “grounding” in the San Juan Islands and other inland waters. Please consult
with AYC staff regarding hazardous passages and anchorages. Your attention to your onboard charts
and the GPS chart plotter are essential. If you have questions regarding the operation of the GPS, AYC
staff can demonstrate the simple functions before you leave the dock. Experienced yachtsmen, familiar
with these Northwest waters, will confirm for you just how hazardous they can be without prudent
precautions.
We are sure you will enjoy sailing the beautiful islands of the Pacific Northwest aboard Libertas. If you
have questions about the vessel or about places to visit, please do not hesitate to ask the AYC staff. Have a
great sailing adventure, and again thanks for choosing the Libertas!

4
Revision Date: 4/7/12
TABLE OF CONTENTS
I. VESSEL DESCRIPTION/SPECIFICATIONS…………..........................................................................
II. VESSEL OPERATON................................................................................................................................ 5
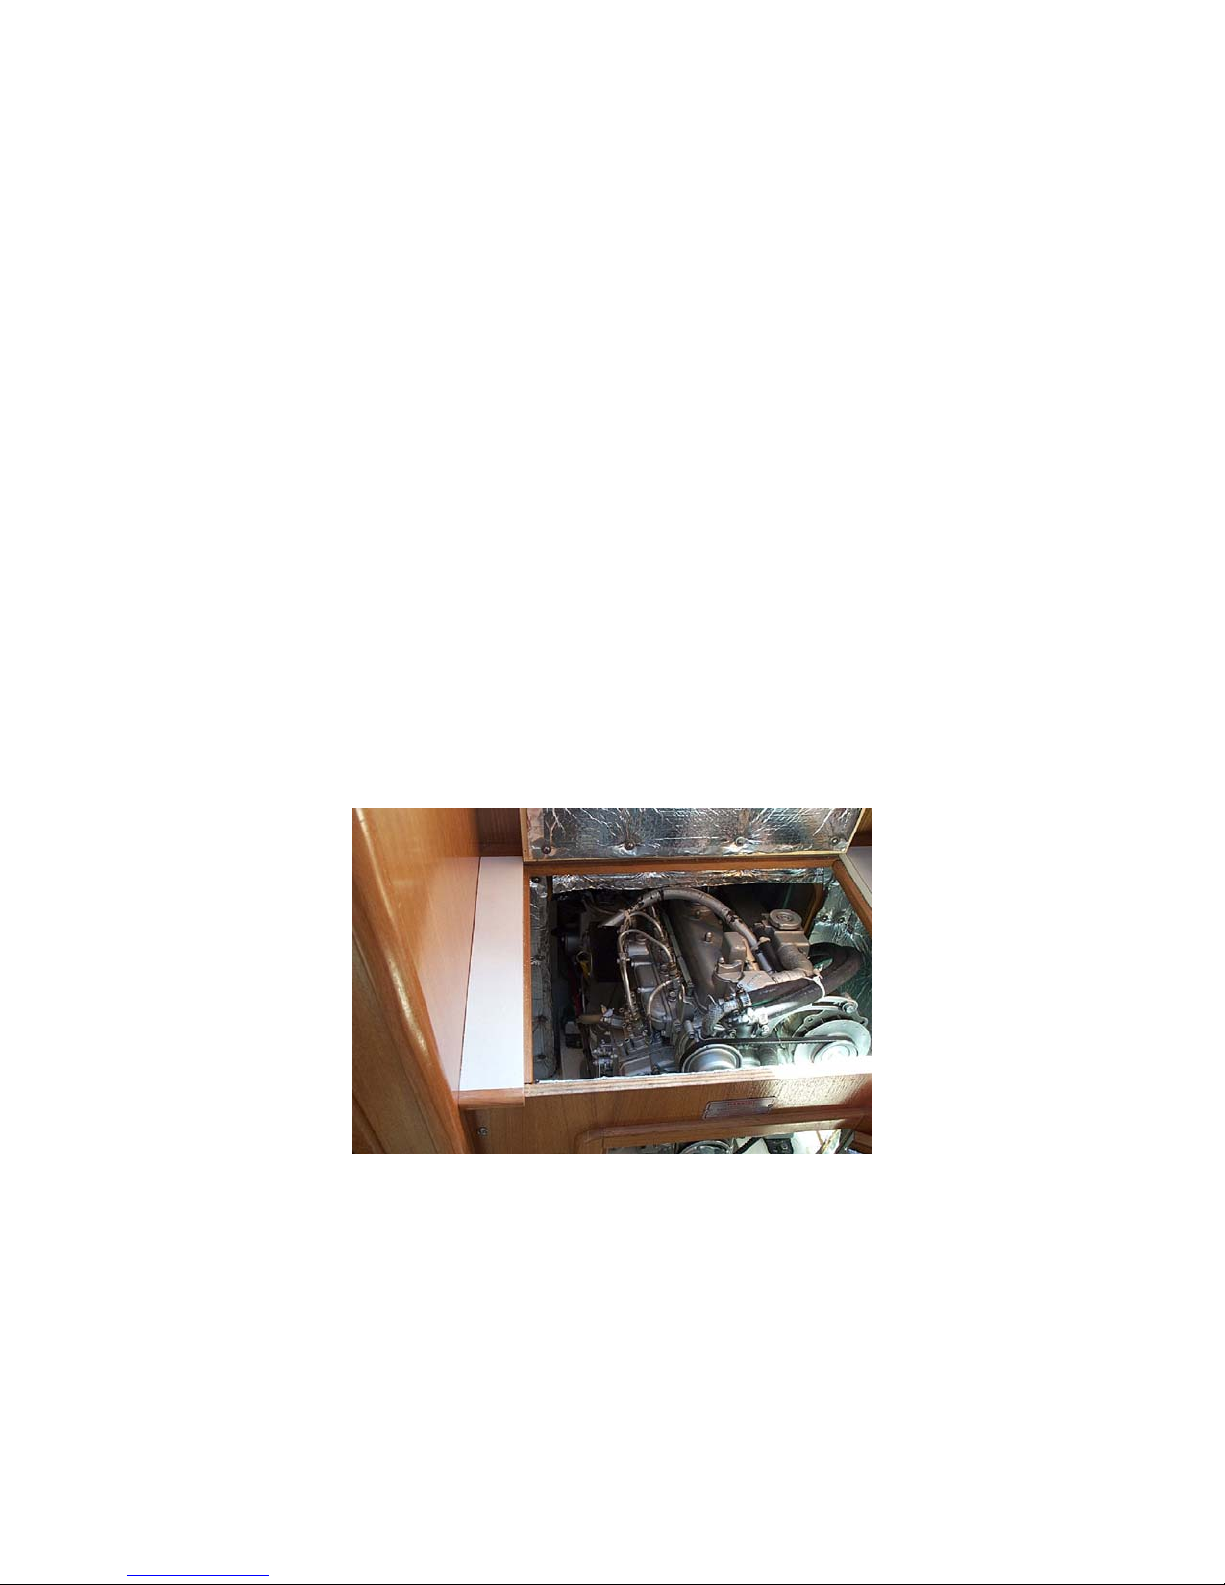
A. ENGINE................................................................................................................................................ 5
Engine Inspection.................................................................................................................................. 5
Startup................................................................................................................................................... 6
Shifting.................................................................................................................................................. 7
Shutdown .............................................................................................................................................. 7
Fueling Up ............................................................................................................................................ 7
Trouble Shooting Engine Problems...................................................................................................... 7
B. GETTING UNDERWAY ..................................................................................................................... 8
C. DINGHY ............................................................................................................................................... 9
D. DOCKING ............................................................................................................................................ 9
E. MOORING CANS (BUOYS) ............................................................................................................. 10
F. ANCHORING ..................................................................................................................................... 10
III. VESSEL SYSTEMS................................................................................................................................ 10
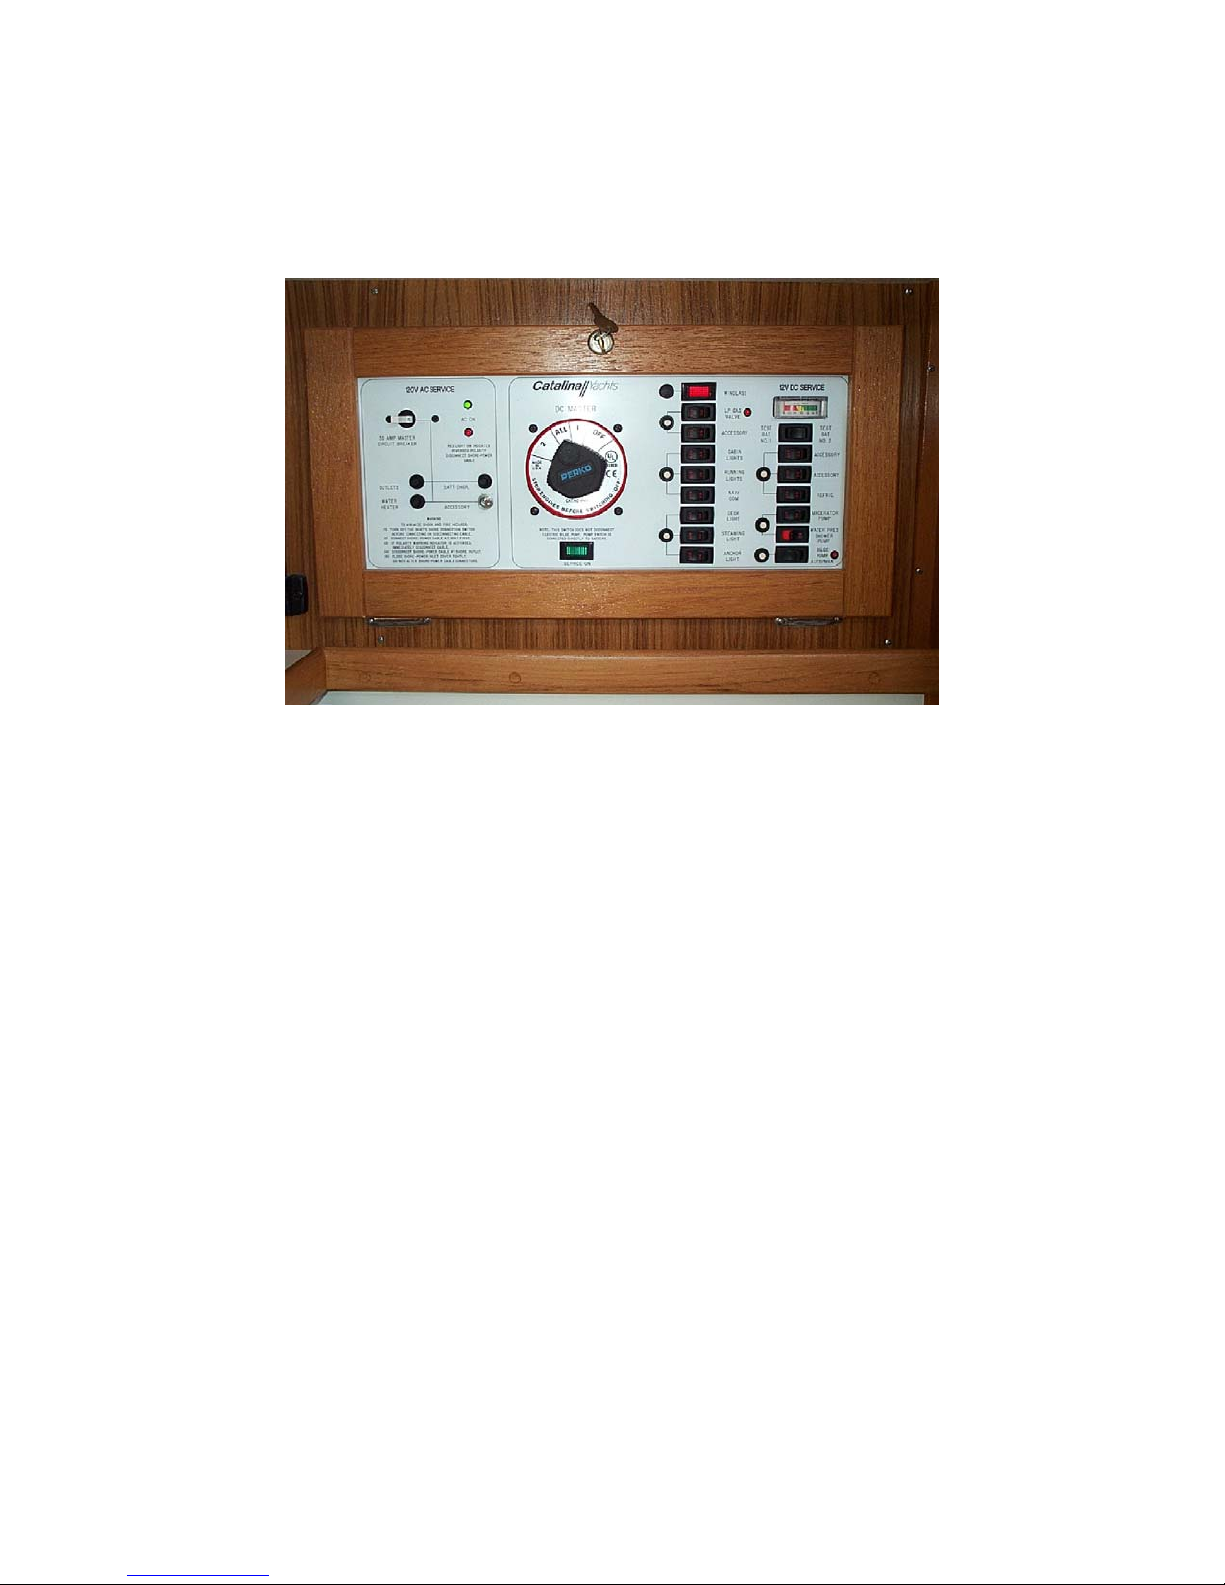
A. ELECTRICAL SYSTEMS ................................................................................................................. 10
110-Volt AC System........................................................................................................................... 10
12 Volt DC System ............................................................................................................................. 11
Troubleshooting Electrical Systems ................................................................................................... 12
B. SANITATION SYSTEM.................................................................................................................... 12
Marine Head (toilet)............................................................................................................................ 12
Holding Tank ...................................................................................................................................... 12
C. WATER SYSTEM.............................................................................................................................. 13
Fresh Water Tank................................................................................................................................ 13
Fresh Water Pump............................................................................................................................... 13
Water Heater ....................................................................................................................................... 13
Shower ................................................................................................................................................ 14
D. GALLEY SYSTEMS.......................................................................................................................... 14
Propane Stove/Oven............................................................................................................................ 14
Refrigeration ....................................................................................................................................... 15
Barbeque ............................................................................................................................................. 15
E. HEATING SYSTEMS........................................................................................................................ 15
Forced Air Diesel Furnace.................................................................................................................. 15
Space Heater (110 Volt AC) ............................................................................................................... 15
F. ELECTRONICS SYSTEMS ............................................................................................................... 15
VHF Radio .......................................................................................................................................... 16
Depth Sounder/Knot Meter/Wind Speed............................................................................................ 16
Global Positioning System (GPS)....................................................................................................... 16
Autopilot ............................................................................................................................................. 16
AM/FM Stereo Radio – CD Player..................................................................................................... 16
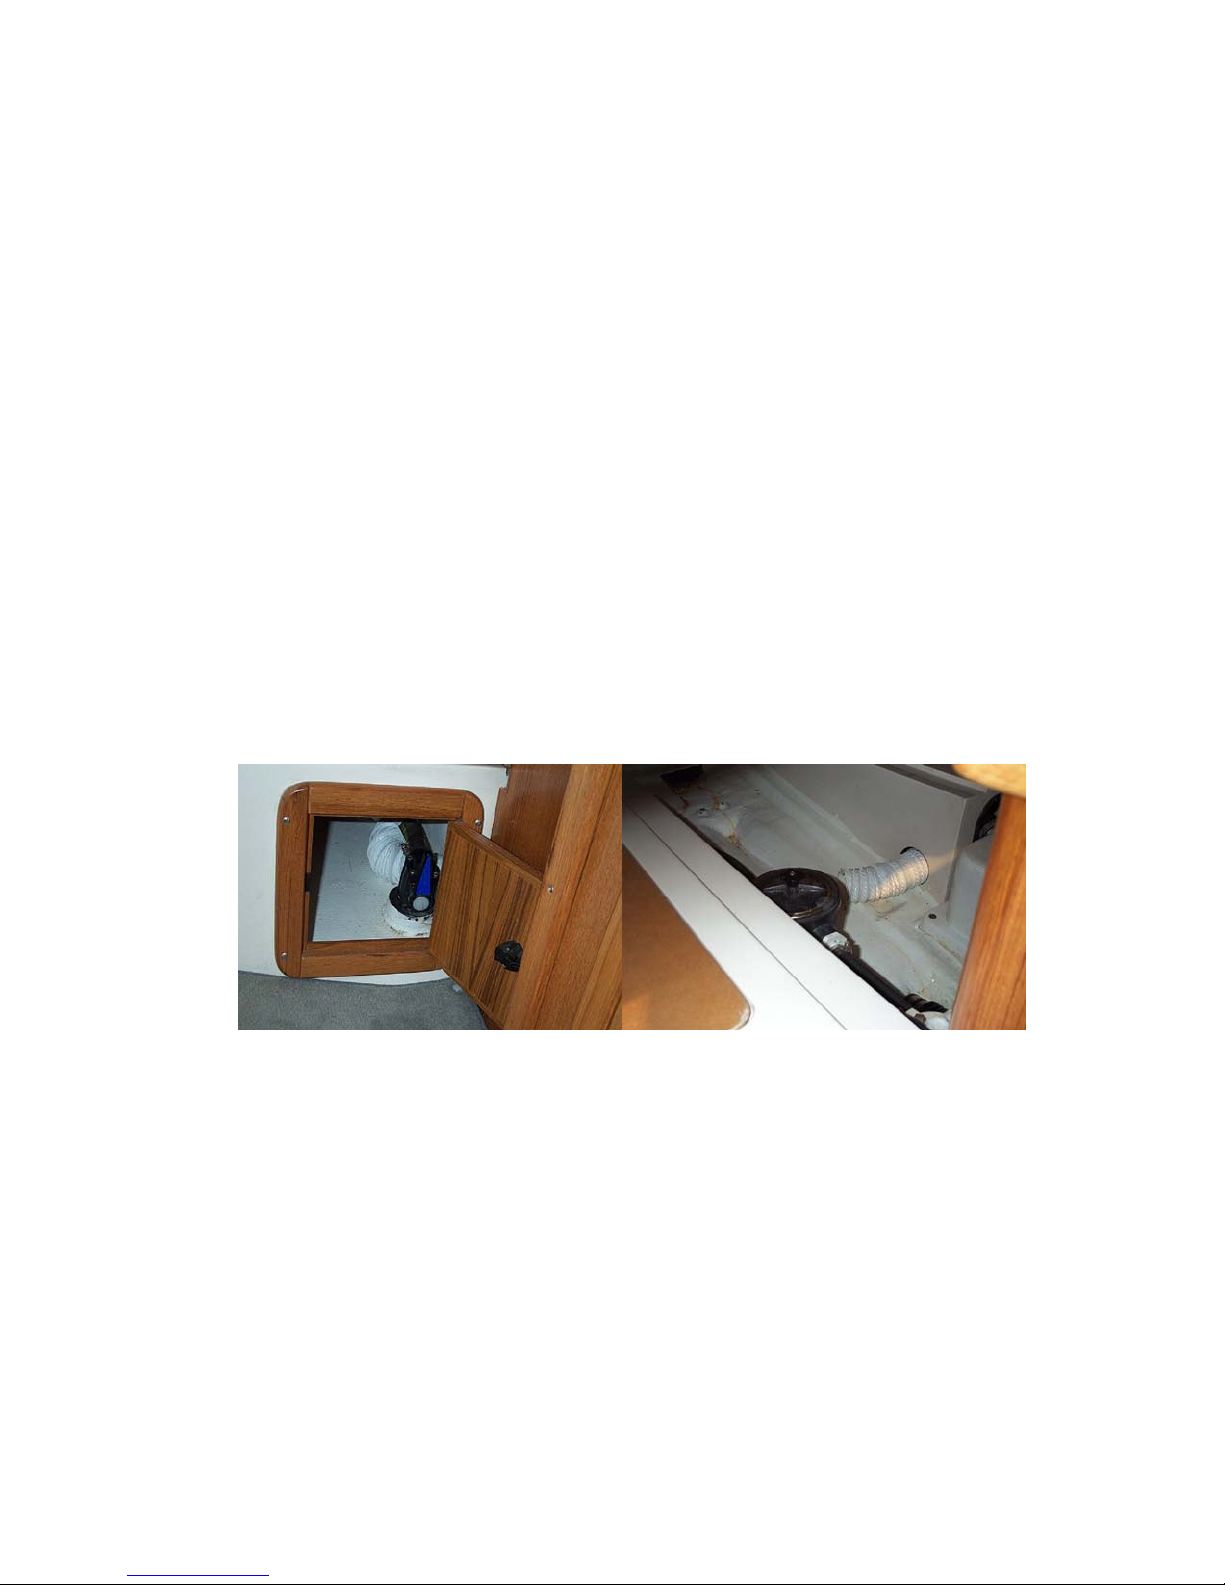
G. BILGE PUMPS................................................................................................................................... 17

5
Revision Date: 4/7/12
H. THRU-HULL SEA COCKS............................................................................................................... 17
I. DODGER AND BIMINI...................................................................................................................... 17
G. SAFETY EQUIPMENT ..................................................................................................................... 17
First Aid Kit ........................................................................................................................................ 17
Fire Extinguishers ............................................................................................................................... 17
Signaling Flares .................................................................................................................................. 18
Life Jackets ......................................................................................................................................... 18
Steering Gear Failure .......................................................................................................................... 18
Engine Spares/Tools ........................................................................................................................... 18

6
Revision Date: 4/7/12
I. VESSEL DESCRIPTION/SPECIFICATIONS
Specifications Electronics Galley Other Features
LOA: 34’6” GPS (chart plotter plus
handheld)
Propane Stove/Oven Electric Windlass
LWL: 29’10” Autopilot Pressure H/C Water Forced Air Diesel Heater
Beam: 11’9” VHF Radio Refrigeration Stereo/CD
Draft: 5’7” Depth sounder Dodger
Displacement: 1,950 lbs. Knot meter Custom Cockpit Table
Ballast: 5,000 lbs. Propane BBQ
Engine: Universal 35 HP Sails Etc. Accommodations Walk on Transom w/
H&C Freshwater Shower
Cruising Speed: 6.5 kts
@3/4gph
135% Genoa Roller
Furling
Head with shower Inflatable Dinghy
Headroom: 6’2” Sail Area: 554 sq. ft. Sleeps 7 in: Collapsible Crab Pot
Fuel Capacity: 25 gal. Dutchman Flaking V-Berth
Water Capacity: 55 gal. ST Winches Queen Aft Strm
Holding Tank Capacity:
18 gal.
Tall Rig Double Dinette
Mast Height Above
Water: 55’
Single Settee
"The wonder is always new that any sane man can be a sailor." - Ralph Waldo Emerson

7
Revision Date: 4/7/12

8
Revision Date: 4/7/12
II. VESSEL OPERATON
A. ENGINE
Libertas is powered by a 35 HP Universal engine. There are separate control levers at the helm that operate
the throttle (right) and transmission (left). On the engine control panel there are gages for RPM, fuel,
ammeter, oil pressure, engine hour counter and water temperature.
A sound alarm is provided to indicate high fresh water temperature and low oil pressure. The engine will
propel Libertas at its cruising speed of 6.5 knots in calm water at 2500 RPM. We ask that you maintain
engine RPM between 2000 and 2500 for cruising. Higher throttle settings will only minimally increase
speed, but will greatly increase fuel consumption and wear on the engine. Please limit higher throttle
settings for emergency situations.
Libertas has noticeable prop-walk to port in reverse. When in reverse, be careful to keep a firm grip on the
wheel and use only low RPMs.
Manufacture instructions are located in the Catalina Owner’s Manual, which is stored at the navigation
table. Also you will find a blue engine manual with an extra key attached.
Engine Inspection
Engine Compartment
Step 1: Check engine oil level daily. The dipstick is located on the starboard side of the engine, near the air
filter. The engine should not be operated with oil levels above the “high” mark or below the
“low” mark. If the oil level is below the “low” mark, add more engine oil. Extra oil is stored in the
port lazarette. The engine oil fill is located on the top of the engine just behind the fan belt and the
cap simply reads “oil.”
Please wipe away any oil that may have spilled while filling.
Important: Please make note of any oil that you find on the engine and call it to the attention of AYC

9
Revision Date: 4/7/12
staff upon returning from your charter.
Step 2: Check the coolant level by removing the coolant cap (with the engine cool). The coolant cap is
located on the port side of the engine on the top. To open, push down and turn counterclockwise.
The coolant should be visible or felt within 1-2 inches below the top. Additional coolant is stored in
the port lazarette. Do not overfill, as there needs to be room to allow the coolant to expand as the
engines warm up to operating temperature.
Step 3: Check the tension on “fan belt” for the alternator and water pump. The belts should give slightly
under moderate tension from a finger. Loose belts should be tightened before starting engine.
Step 4: Check bilges for excess water. The manual setting for the bilge pump should be used to remove any
excess water. Be sure to return the bilge pump switch back to automatic.
Step 5: Inspect the raw water intake strainers and raw water intake thru hull, located under the berth in the
aft cabin. The thru hull should be open and the strainer clear of debris. If the strainer needs
cleaning, close the thru hull before opening the strainer. Unscrew the plastic bulb holding the
strainer. Be careful not to lose the rubber O-ring. Rinse the strainer and plastic bulb and replace them
with the O-ring in place. Do not fully tighten initially because the air needs to be removed. Slowly
open the thru-hull valve and allow the air in the plastic bulb to escape. When the air has escaped,
tighten the plastic bulb by hand and observe for leaks. The continued supply of seawater is critical to
the operation of the engine.
Raw water intake thru hull (aft, starboard compartment) Intake strainer (behind engine)
Important: After cleaning, confirm the thru hull is open, as shown in the above, left photo.
Step 6: If necessary, disconnect the shore power connections by first turning off the 110 AC master
breakers, then turning off the breaker at the dock box, and finally disconnecting the actual cords.

10
Revision Date: 4/7/12
Starting Engine
Step 1: Switch off AC and turn the battery selector to ALL.
Step 2: Double check that the gearshift is in neutral.
Step 3: Move the throttle slightly ahead.
Step 4: Insert the key into the ignition, turn and hold down in clockwise direction. Hold for a few seconds
to heat glow plugs. Then push the starter button and release key. A warning buzzer will sound until
the engine starts.
Step 5: Reduce throttle to idle, adjusting as necessary until engine is warm.
Important: Confirm water from the exhaust muffler discharges from the outboard, aft port outlet.
This will indicate that intake water is reaching the engine for cooling.
Step 6: Check oil pressure. If an alarm sounds, it should stop within 15 seconds. If not, immediately shut-
off engine by pulling up on the shut-off lever. Check level of engine oil before restarting.
After Starting Engine
Step 1: Check for fuel. After turning the engine key, check the level on the fuel gauge. Fill as necessary.
The capacity of the fuel tank is 23 gallons. (See fueling note below.)
Step 2: While the engine is warming up, check around the boat, dock, and surrounding water to make sure
there are no loose lines or floating objects and that it is safe to get underway.
Step 3: Turn on the appropriate DC breakers necessary for running the electronics, running lights, radio, etc.

11
Revision Date: 4/7/12
Step 4: Ensure that the wheel centers the rudder before moving. Use black electrical tape on wheel as a
guide.
Running the Engine
Under normal conditions, engine exhaust temperature should not exceed 180 F. An alarm will sound if the
water temperature exceeds 212 F. If this occurs, stop the engine immediately and determine the cause.
Important: The engine room should be periodically inspected for fluid leaks or other significant
changes to the engine environment.
RPM’s while cruising should not exceed 2000. If there is significant weight to aft, the water exhaust
muffler becomes submerged. Idle up occasionally to ensure that exhaust and water are being discharged at
the aft port exhaust outlet.
Shutdown
Step 1: After cruising, allow the engine to cool down for a few minutes at idle speed before shut down. This
will usually occur during maneuvering to the moorage.
Step 2: Shut Down - Pull up and hold the red engine shut off lever until the engine stops.
Step 3: Push back the shut off lever, in order to start engine next time.
Step 4: Turn off key.
Sail with gear shifted into reverse. Do this before the boat gains speed. However, then make sure that
the gear shift is in neutral before restarting engine.
Fueling Up
You will need to fuel up before returning to the slip at the end of your charter. The fuel tank holds 25
gallons of diesel fuel. Before refueling, have an “oil/fuel sorbs” handy to soak up spilled fuel. You should
have a rough idea of the number of gallons you will need by the fuel gauge and by the hour meter. Libertas
uses approximately ¾ gallons per hour when cruising at 6.5 knots. The fuel filler cap is located on the port
deck aft. CHECK THAT YOU HAVE THE CORRECT DECK OPENING! Do not add water or pump-out
at the same time you are fueling. Use only DIESEL FUEL! Place the diesel fuel nozzle into the tank
opening, pump slowly and evenly, and note the sound of the fuel flow. Pumping too fast may not allow
enough time for air to escape, which may result in spouting from the tank opening. As the tank fills, the
sound will rise in pitch or gurgle. Pay attention to the tank overflow vent. The sound may indicate that the
tank is nearly full. Top off carefully, and be prepared to catch spilled fuel. Spillage may result in a fine
from law enforcement. Replace deck cap. Caution – Clean up splatter and spillage immediately for
environmental and health reasons. Wash hands with soap and water thoroughly.

12
Revision Date: 4/7/12
Trouble Shooting Engine Problems
Engine Overheating:
1. Immediately shut engine down. The most likely cause is clogging of the sea water strainer. This
condition may be preceded by black smoke from the exhaust. Follow procedure above to clear the strainer.
Check to be sure water is exiting with the exhaust. If water is not exiting with the exhaust, then check the
sea strainer. If it is full of sea weed or eel grass, close the raw water intake then open the sea strainer and
clean out, replace cover and open the raw water intake valve.
2. If seawater is getting to the engine, the next likely cause is low coolant level. Check the coolant level by
observing the expansion tank. If coolant level is low, add coolant from the pre-mixed jug. Never open the
radiator cap when the engine is hot, as this could cause severe burns.
Low Oil Pressure:
1. Immediately shut engine down.
2. Check oil level. Add oil if necessary. Use care not to overfill oil.
3. If the engine oil level is not low, DO NOT RESTART. Contact AYC or other personnel listed on the
emergency contact list in the gray manual.
Alternator Failure:
You may keep running the engine, but be aware the batteries are not being charged. Conserve on engine and
battery use. Contact AYC immediately.
Engine Dies And Won’t Restart:
Contact AYC immediately.
B. GETTING UNDERWAY
Close the portholes, windows, and hatches. Disconnect shore power and store cord. Assign one crew
member to be in charge of securing ports and assign one crew member to be in charge of the dinghy, if
towing. Shorten the line on all close quartering maneuvers. Once outside the marina, idle the engine while
the crew brings in fenders and lines.
C. DINGHY
The Libertas is equipped with a light weight inflatable Zodiac dinghy. Though stowed on the foredeck, the
dinghy can be towed with the towing bridle found in the port cockpit lazarette -- which also contains oars,
foot pump, etc. A patch kit is located in the salon’s forward port cabinet.
When towing the dinghy, pull the painter up tight to the boat when maneuvering in the marina to avoid
getting the line wrapped around the propeller. The line may be lengthened when underway. Consider
assigning one of your crew “dinghy duty” to monitor the status of the dinghy. In rough weather, lift the
dinghy with a halyard onto the foredeck and tie down upside down or deflate and store in the port lazarette.

13
Revision Date: 4/7/12
Be sure when towing your dinghy, that someone is always keeping an eye on the painter when slowing
down or stopping. When rowing your dinghy to shore, use EXTREME CAUTION. Choose an area free of
any large rocks that might cause harm in beaching. Lift up on and carry the dinghy to bring it up to higher
ground. Please never drag it. Secure it when leaving as the tides come up quickly. The foot pump for the
dinghy is stored in the port cockpit lazarette. There is a patch kit onboard if the dinghy is ruptured.
D. DOCKING
Have your crew make ready the lines and fenders, and give clear instructions on how you will be docking.
Have bow, stern, and spring lines ready. Often times it is best to lead dock lines to the mid-section of the
boat where your crew member can easily step off and secure either line. As you are coming in to dock, have
your best communicator mid-ships to give you distances from the dock. It is often hard to judge how close
the dock is. Calling out distances (i.e. 20 feet, 10 feet, 4 feet, etc.) will only add to a successful docking.
If you find you are too far off the dock, BACK OFF and re-approach. It is better to re-approach than to lose
crew over the side…
E. MOORING CANS (BUOYS)
The Washington State Parks sticker on Libertas allows you to use the mooring cans in the marine parks for
free. You only need to register at the kiosk, usually located at the head of the docks. Mooring cans have a
metal triangle at the top, upon which is a metal ring. The metal ring is attached to the chain which secures
your boat. IT IS VERY HEAVY. The strongest member of your crew should be chosen for this job. Come
up to the mooring can into the wind as you would for anchoring. Have crew members on the bow, one with
a boat hook and one with a mooring line secured like a bow line. As you are coming slowly up to the can,
have the crew holding the boat hook point at the can with the hook so the skipper always knows where it is.
Hook the can and bring the ring up to the boat to allow the second crew member to thread the ring with the
line. Release the boat hook. If your mooring line is led out the starboard cleat, bring the end of the line back
to the port side cleat. You will essentially create a bridle with about 10 feet of slack from the cleats to the
can.
F. ANCHORING
Libertas carries a plow type anchor on the bow attached to 50 feet of chain and 200 feet of 5/8-inch rode.
There is a windlass which is foot operated and located in the forward chain locker. Prior to use, the

14
Revision Date: 4/7/12
breaker for the windlass, located just forward of the navigation table, must be pushed in. A red light
will illuminate when the breaker is in all the way. The windless is only intended for use with the rode. The
chain must be pulled by hand.
Setting the anchor:
Let out sufficient anchor rode (chain and line) before setting the anchor. Color markers are placed every 30
feet on the chain and nylon rode. If the anchorage is crowded, put down at least a 3 to 1 scope (60 feet of
rode for 20 feet of water at highest tide). Back the anchor in with a short burst in reverse from the engine.
Then let out additional scope dependent upon conditions. If the anchorage is less crowded, more scope is
always a better option. The holding power of the anchor increases greatly as more scope is added. There is
a second anchor stowed in the forward chain locker.
Raising the anchor:
Coordinate the maneuver with the helmsperson to remain steady above the anchor as it is raised. As the
anchor rises, be careful not to allow it to swing against the hull.

15
Revision Date: 4/7/12
III. VESSEL SYSTEMS
A. ELECTRICAL SYSTEMS
Libertas has two electrical systems, 110 volts AC and 12 volts DC. It is important to understand these two
systems are completely separate and isolated from one another. There is no inverter. Both AC and DC
systems are controlled at the electrical panel at the navigation station. There are separate breakers for 110 volt AC
and 12 volt DC.
Important: Refer to these photos for positioning of switches when leaving the vessel at the dock after
a cruise.
Battery Switch
Start engine and charge with switch turned to ALL. Dedicate #1 for starting and #2 for house use when
anchored or when batteries have not recently received a charge. Otherwise, leave selector switched to ALL,
including when plugged into shore power.
Important: Never turn OFF the engine battery switch while the engines are running. DAMAGE
WILL OCCUR. It is a good practice to avoid changing the battery selector while the engine is
running.
110-Volt AC System
Libertas is equipped with the capacity to plug into dockside shore power (110 volt AC) using the heavy

16
Revision Date: 4/7/12
white shore power cord. This system powers everything on the AC circuit breaker panel:
y110 volt AC wall outlets
yBattery charger
yWater heater
Connecting to shore power:
Check the power rating/plug size of the nearest dock receptacle (that is 30 amps, 20 amps, or 15 amps). If
necessary, add a shore power cord adapter located in the compartment forward of the navigation station. The
procedure to hook up to shore power is as follows:
1. Make sure the “AC Main” circuit breaker is off.
2. Turn off the circuit breaker located at the shore side outlet on the dock.
3. Plug the boat side of the cord in first on the transom and then plug the cord to the shore side outlet. Give
the plug a small twist clockwise to lock.
4. Turn on the circuit breaker at the dock.
5. Turn on the “AC Main” circuit breaker and any of the circuit breakers for the 110 volt AC systems
desired.
Immediately check the polarity indicator on the 110 AC panel to ensure proper polarity. If the
reverse polarity indicator is illuminated, disconnect the power, find another power source, and inform
the dock master.
Note: in addition to the “AC Main circuit breaker there is a “shore power breaker” located in the aft, port
lazarette.
TransomPlug ShorePowerBreaker
The shore power cords coming off the bow can be wrapped loosely around the bowline.
On shore power, the electrical outlets will be functional under the 110 volt AC system. They will not work
under the 12-volt DC system.
12 Volt DC System
This system is powered by the marine batteries aboard Libertas and powers everything onboard not powered
by the 110 volt AC system.

17
Revision Date: 4/7/12
Batteries/Charger
Black device below galley sinks and to the left is the battery charger. It will make a humming
sound when charging.
Troubleshooting Electrical Systems
1. Battery running low. Signs of this are lights dimming, stereo not working. Immediately start engine and
run for a period of time at 1600 RPM with the battery switch turned to “BOTH” batteries.
2. Unable to start the engine due to low battery. Place the battery master switch on “BOTH” and retry. If
engine starts, recharge as above. If it does not work, see engine troubleshooting or contact AYC for
instructions.

18
Revision Date: 4/7/12
B. SANITATION SYSTEM
Marine Head (Toilet)
The head contains a vanity with sink, a showerhead, and a marine toilet with hand operated pump for
flushing. Heads are easily plugged by 2-ply tissue, Kleenex, hair, tampons, or paper towels. The only things
that go into the head are body waste and a small amount of special marine toilet paper. It is the skipper’s
responsibility to advise all crew and guests of the policy. A small plunger is found under the head sink.
The person who plugs a head is responsible for unplugging it. Always pump the head for children, so you
can make sure nothing foreign is being flushed. Use only the special dissolving marine toilet tissue
provided by AYC.
To operate the head:
1. Move the lever to the “wet” position and pump to wet the bowl.
2. Use the head – minimal or no toilet paper (marine only).
3. Pump the bowl again in the “wet” position until the bowl is clear. After the bowl is clear pump several
more times to clear the lines.
4. Move the lever to “dry” and pump the bowl empty.
5. IMPORTANT: Always leave the lever on “dry” when not in use to prevent water from flooding back
into the boat.
Should the toilet pump handle squeak or stick, it needs to be lubricated. Put a couple of squirts of ‘head
lube’ into the toilet. Pump the toilet dry slowly, to draw the lube into the handle unit.
Holding Tank
Head contents go to the holding tank. Unfortunately, the holding tank needs to be emptied frequently. It has
a capacity of only 13 gallons. Figure about 1 gallon per use. With an overfilled tank, it is possible to break a
hose, clog a vent, or burst the tank. The result will be indescribable catastrophe and an expensive fix. Empty
the tank every other day to avoid this problem.

19
Revision Date: 4/7/12
The toilet can be emptied in two ways: overboard or into the holding tank. There is a Y-Valve for the
waste system that controls the direction of the flow. This valve will almost always be plumbed to the
holding tank. Overboard discharge is permitted only 3 miles from land. The valve for discharging directly
overboard should not be used. The Y-Valve is located in the hanging locker next to the chart table. The
macerator can also be used to empty the holding tank when away from shore. Prior to using the macerator,
close the thru hull under the head sink and open the thru hull located next to the holding tank. Hold the
panel switch down to activate the macerator. A change is pitch will occur when the holding tank is empty.
Be sure to close the holding tank thru hull when finished running the macerator.
The holding tank needs to be emptied after every trip. The pump out is accomplished by using the
Pump Out system at the fuel dock and removing the waste through the deck waste plate located at
port amidships. Ensure that the thru hull below the head sink is closed.
After emptying the holding tank, refill it with a hose at the same deck plate and empty again. Do not use the
same hose for this that you would use to fill the water tanks. Most holding tank facilities provide a “rinse”
hose. Finish the operation by pouring deodorant chemicals in the toilet and flushing them into the tank.
The blue holding tank chemicals seem to stain everything they touch except the toilet bowl. Please be
careful not to get the chemical on anything else (i.e., the toilet seat). A bottle of chemicals in found in the
lazarette.
Overboard Discharge:
The holding tank is above the water line and may also be emptied overboard when NOT in U.S. Waters. By
law, NO overboard pumpout into sea water is allowed within U.S. Waters. To empty the holding tank open
the thru-hull valve located in the lazarrette. It is important that every member of the crew be informed on
the proper use of the marine toilet. The valves, openings, and pumps are small and may clog easily. If the
toilet clogs, it is YOUR RESPONSIBILITY!
Pumping out:
1. Locate the nearest pumpout station and consult the directions there.
2. The holding tank cap is located on the port deck.
3. Apply tight seal with the pump nozzle and remove effluent.
4. Rinse the tank with hose water and repeat the pumpout.

20
Revision Date: 4/7/12
5. Flush the pumpout hose with sea water and replace.
6. Place ½ cup of holding tank deodorant in the toilet bowl and flush through.
7. Tighten the holding tank cap on the boat.
DO NOT CONFUSE THE HOLDING TANK CAP AND THE DIESEL FUEL TANK FILLER CAP.
BOTH ARE LABELLED. READ BEFORE USING EVERY TIME.
This manual suits for next models
2
Table of contents
Other Catalina Yachts Boat manuals